Информацию по функционалу модерации товаров можно получить на этой странице, а также из видеоролика:
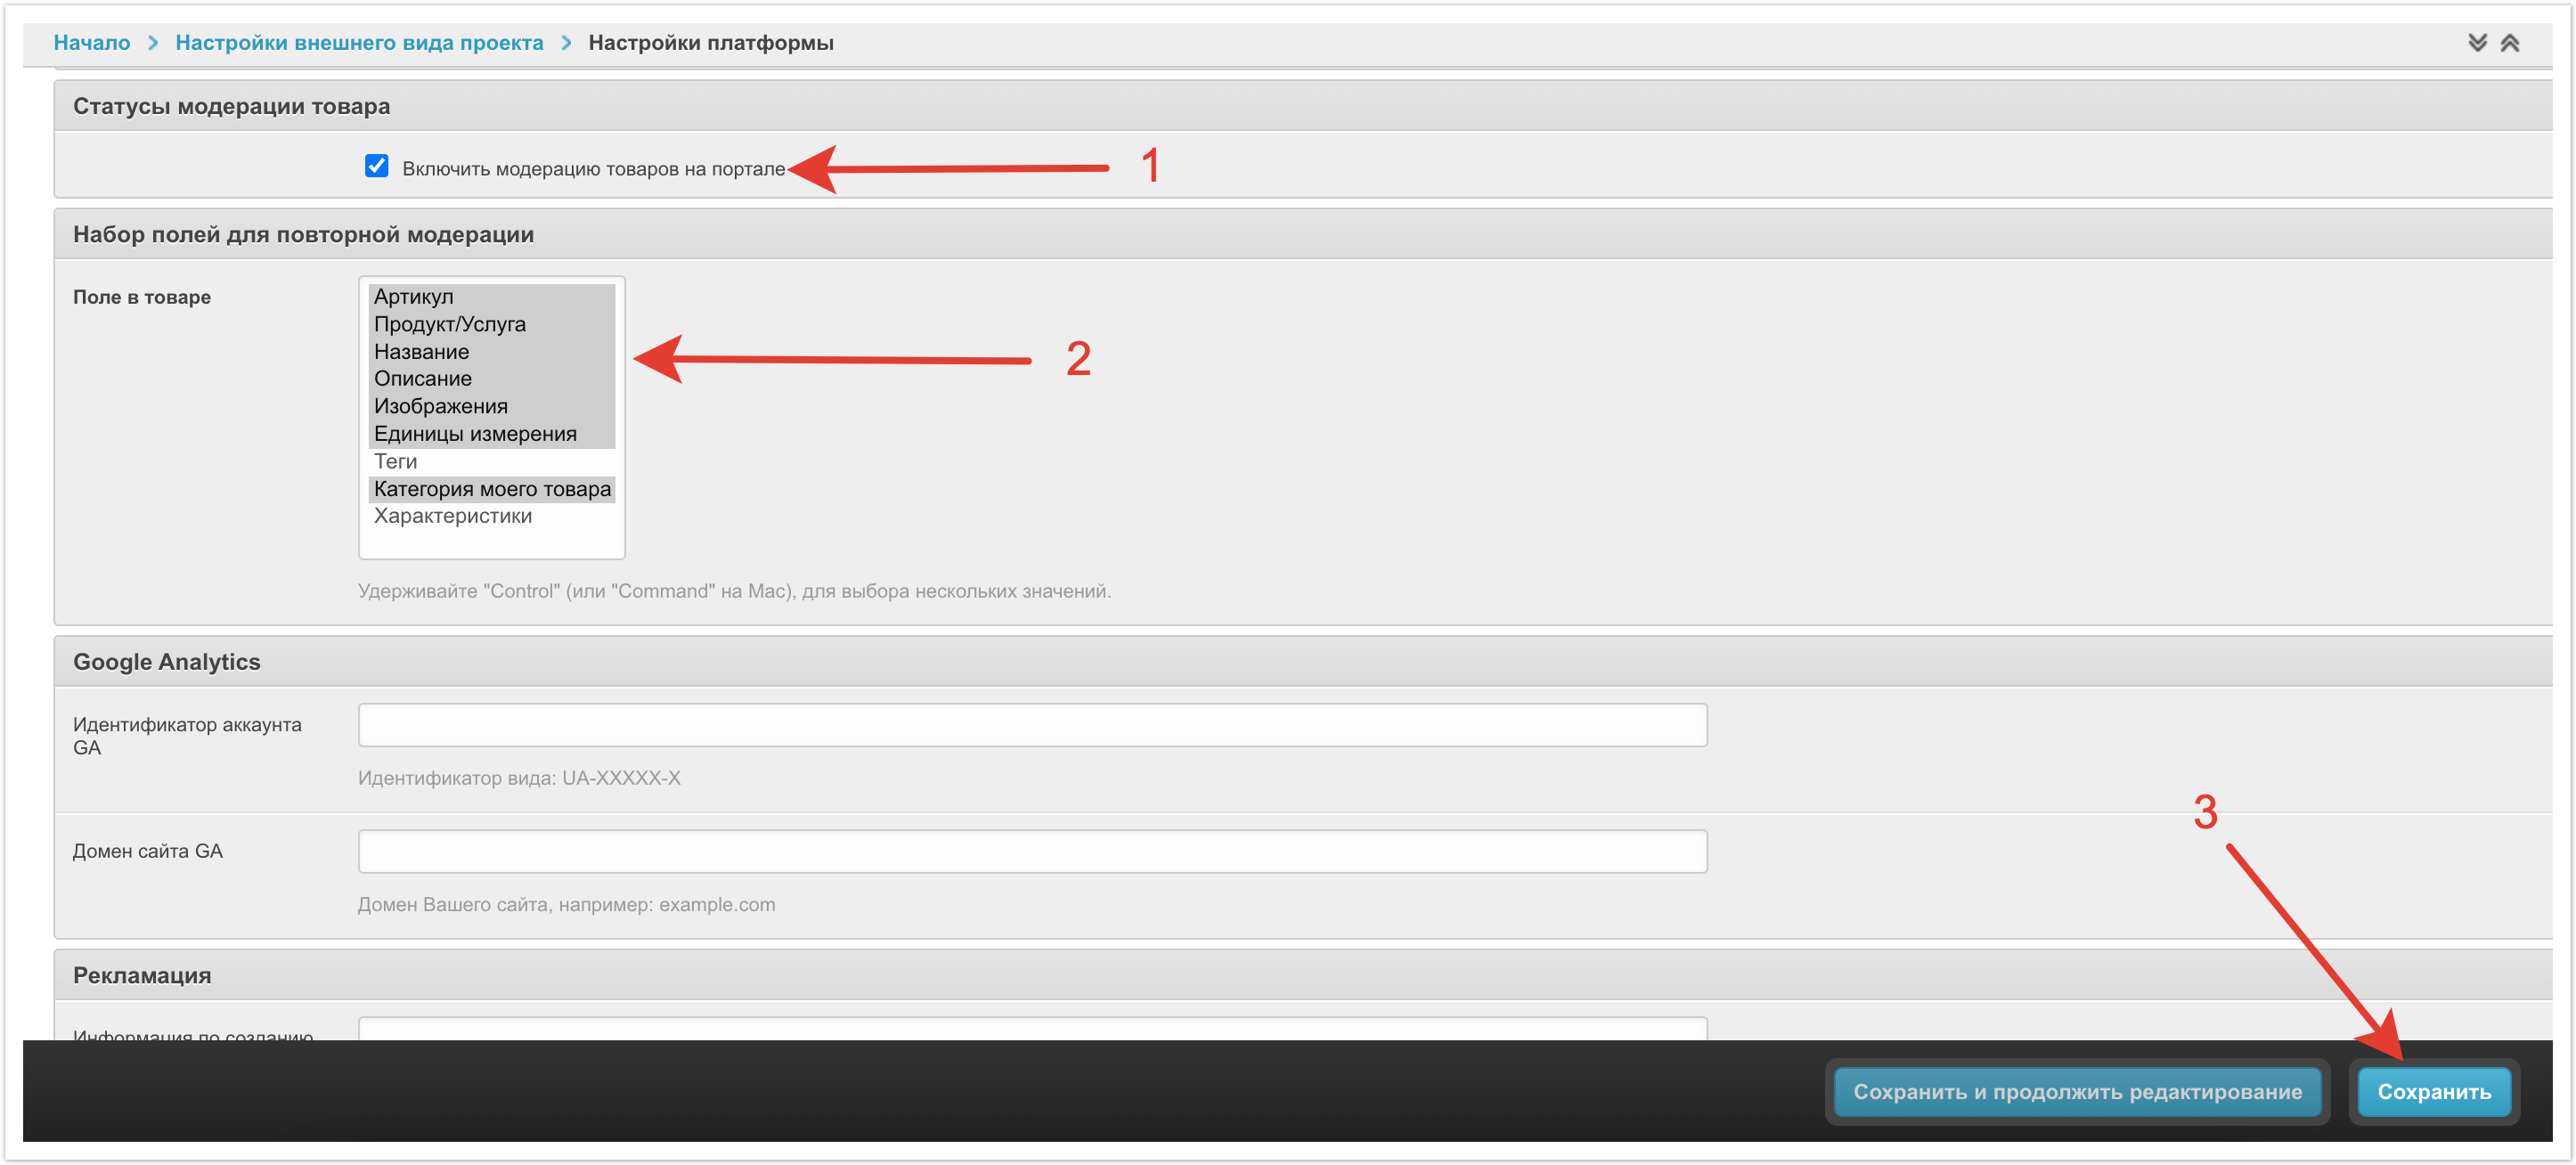
Функционал модерации товаров включается через Настройки платформы в панели администратора.
Нужно найти настройку Включить модерацию товаров на портале и активировать ее.
Далее в настройке Поле в товаре нужно выбрать поля, при изменении которых товар будет отправляться на повторную модерацию. Для выбора нескольких полей удерживайте клавишу CTRL (или Command на Mac). Повторная модерация - это повторная проверка ранее опубликованного в каталоге товара при изменении важных данных по нему.
Сохраните изменения для вступления настроек в силу.
Ролевая модель пользователей, участвующих в модерации товаров
На платформе есть несколько ролей пользователей, которые задействованы в PIM системе. Рассмотрим особенности каждой из ролей, и какие задачи они решают.
Администратор платформы - это пользователь client_amin, который имеет доступ к административной панели платформы. Этот пользователь может администрировать статусную модель модерации товаров, регулировать доступные варианты сортировки каталога, задавать вес товарных полей, а также изменять любые другие настройки, которые задаются через панель администратора.
Ответственный менеджер (Маркетолог) - это пользователь для руководителя отдела контента. Он обладает следующими правами:
- Настройка импорта товаров.
- Возможность управления мастер-данными номенклатуры в рамках импорта товаров.
- Возможность просмотра данных по опубликованным для покупателей товарам.
- Возможность просмотра данных по всем загруженным товарам.
- Полные права на редактирование карточек товаров.
- Полные права на редактирование статусов товаров (модерация).
- Права на массовую догрузку данных о товарах с помощью XLS-файла.
- Формирование отчета о качестве работы бренд-менедеров (подчиненных) в виде экспорта XLS-файла с отчетом.
- Формирование XLS-файла экспорта товаров из публичной части.
- Пользователю доступно три вида отображения каталога, один из которых может быть настроен им под свои потребности.
Бренд-менеджер - это роль для сотрудника контентного отдела, который выполняет непосредственную проверку и обогащение карточки товара необходимыми данными для публикации в каталоге покупателей. Пользователь с этой ролью обладает следующими правами:
- Редактирование контента и параметров карточек товаров в зоне своей ответственности за исключением мастер-данных по товарам. Зона ответственности для каждого бренд-менеджера настраивается администратором платформы.
- Массовая догрузка данных о товарах с помощью импорта из XLS-файла. Доступна догрузка данных по товарам в зоне ответственности бренд-менеджера и не являющихся мастер-данными товаров.
- Ручное редактирование параметров карточки товара за исключением мастер-данных, выбранных руководителем.
- Возможность изменения статуса публикации товара.
- Возможность формирования XLS-файла экспорта из открытой части каталога.
- Просмотр списка опубликованных товаров.
- Просмотр информации о качестве заполнения карточки товара.
- Пользователю доступно три вида отображения каталога, один из которых может быть настроен конечным пользователем самостоятельно.
Заведение и настройка новых пользователей системы
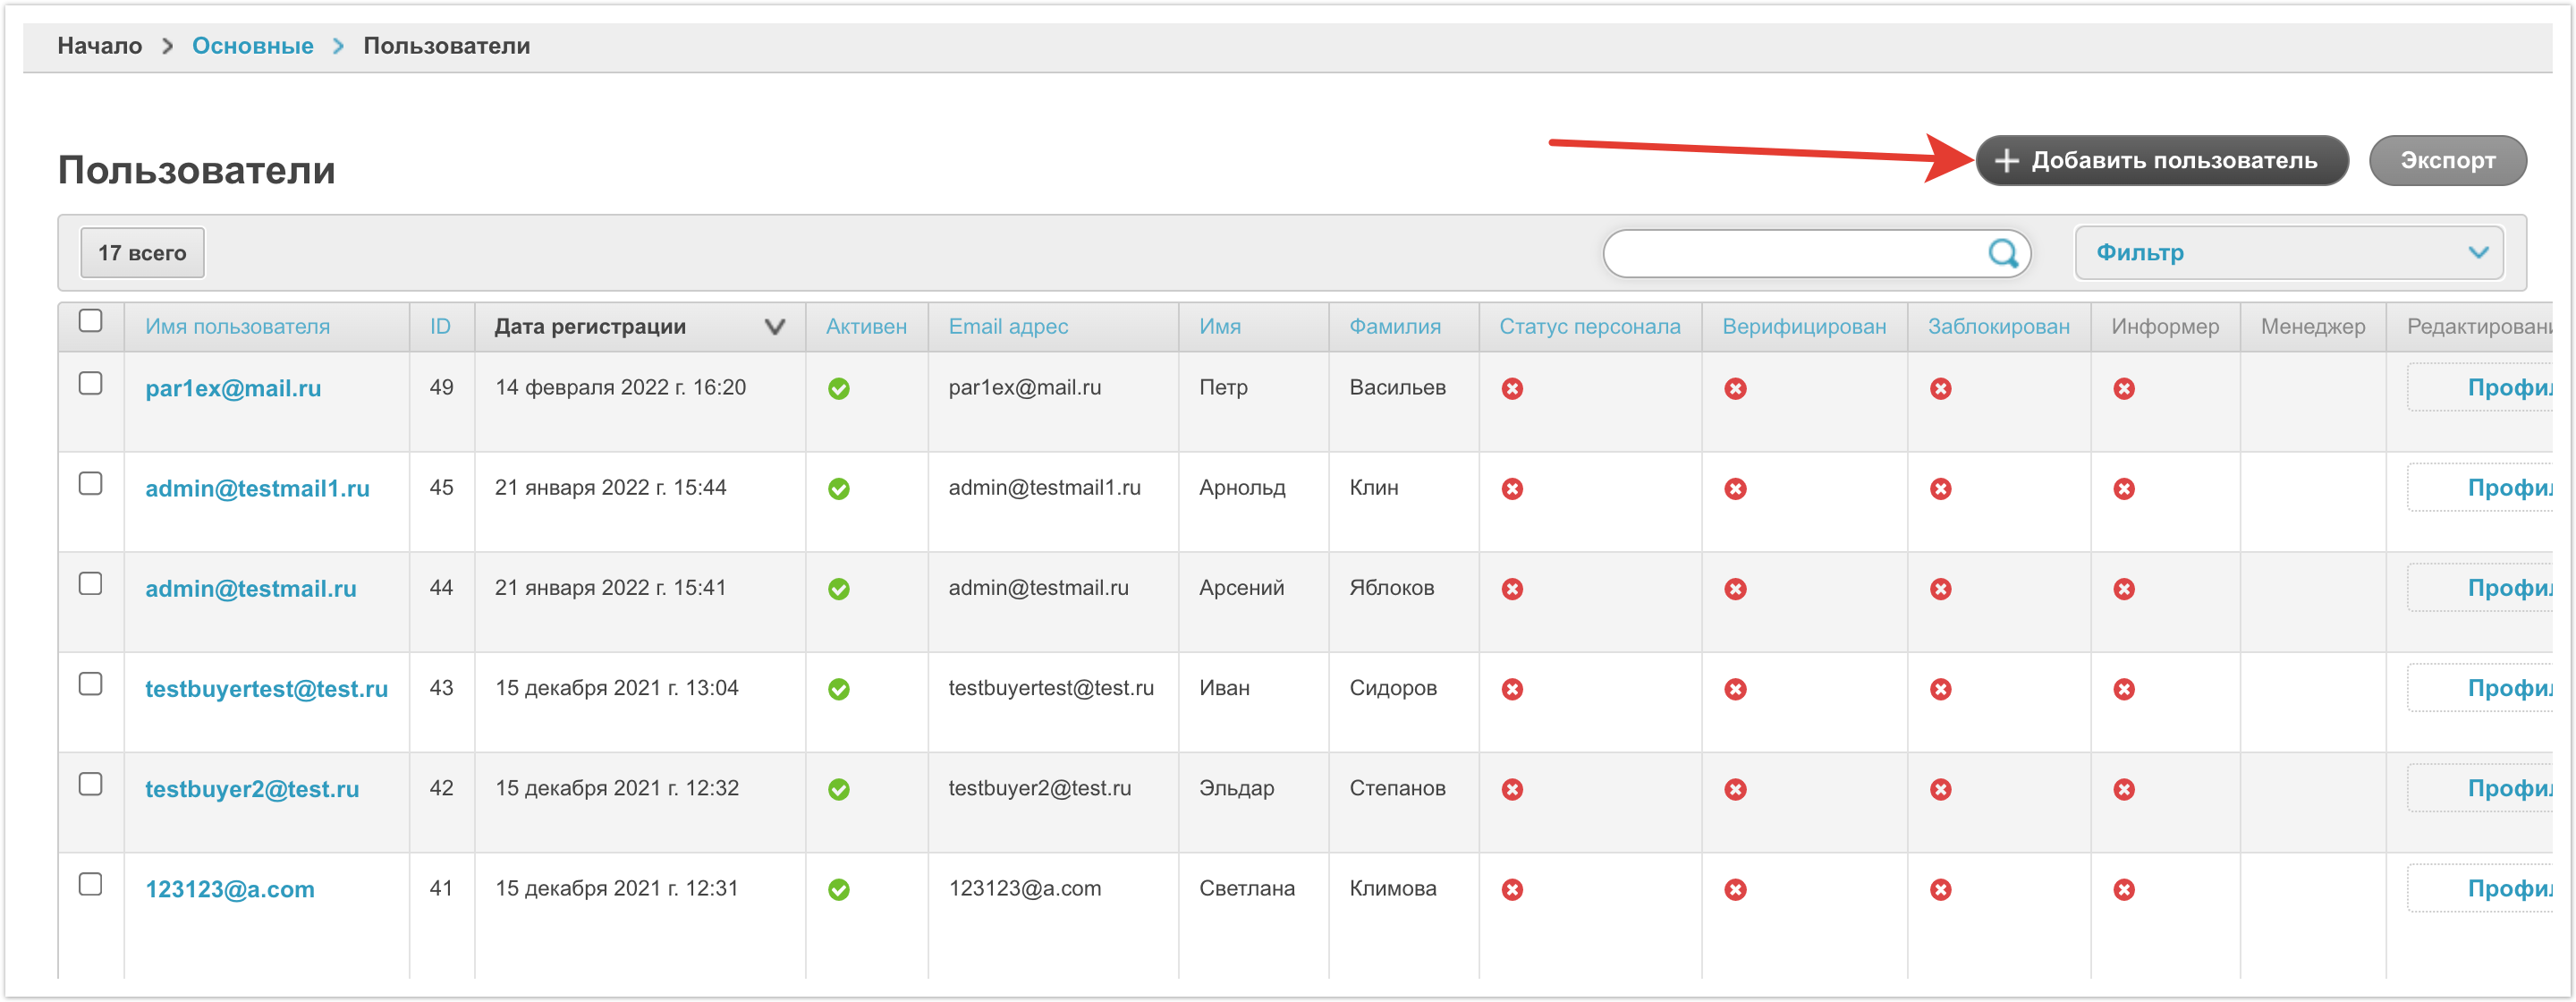
Роли, описанные выше создаются на платформе автоматически. Но для работы с ними необходимо создать пользователя. Для этого в административной панели кликните по кнопке Добавить в разделе Пользователи.
Или перейдите раздел Пользователи, а затем кликните по кнопке Добавить пользователя.
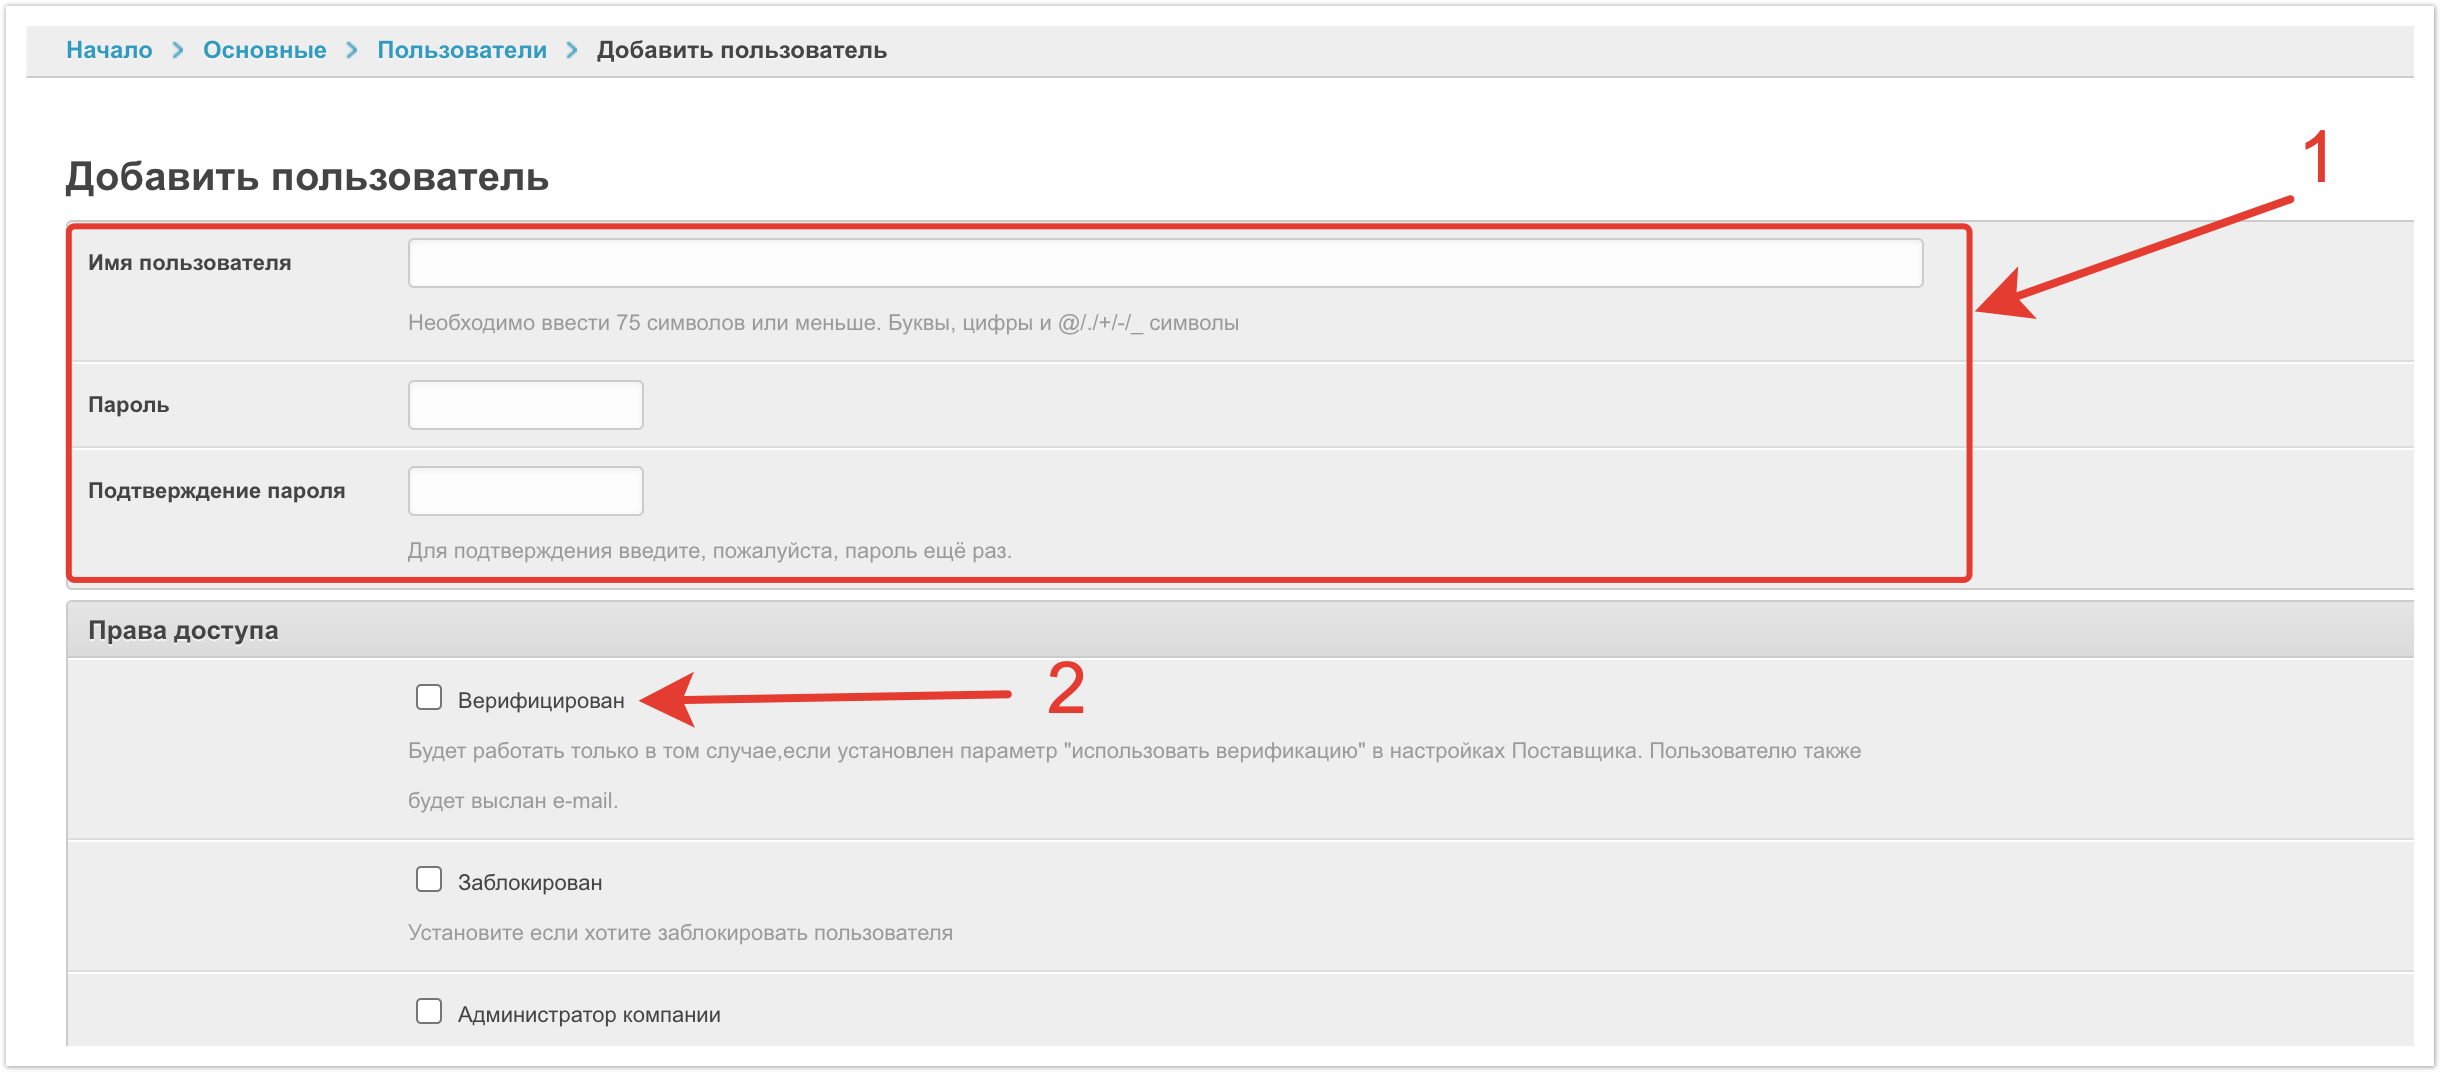
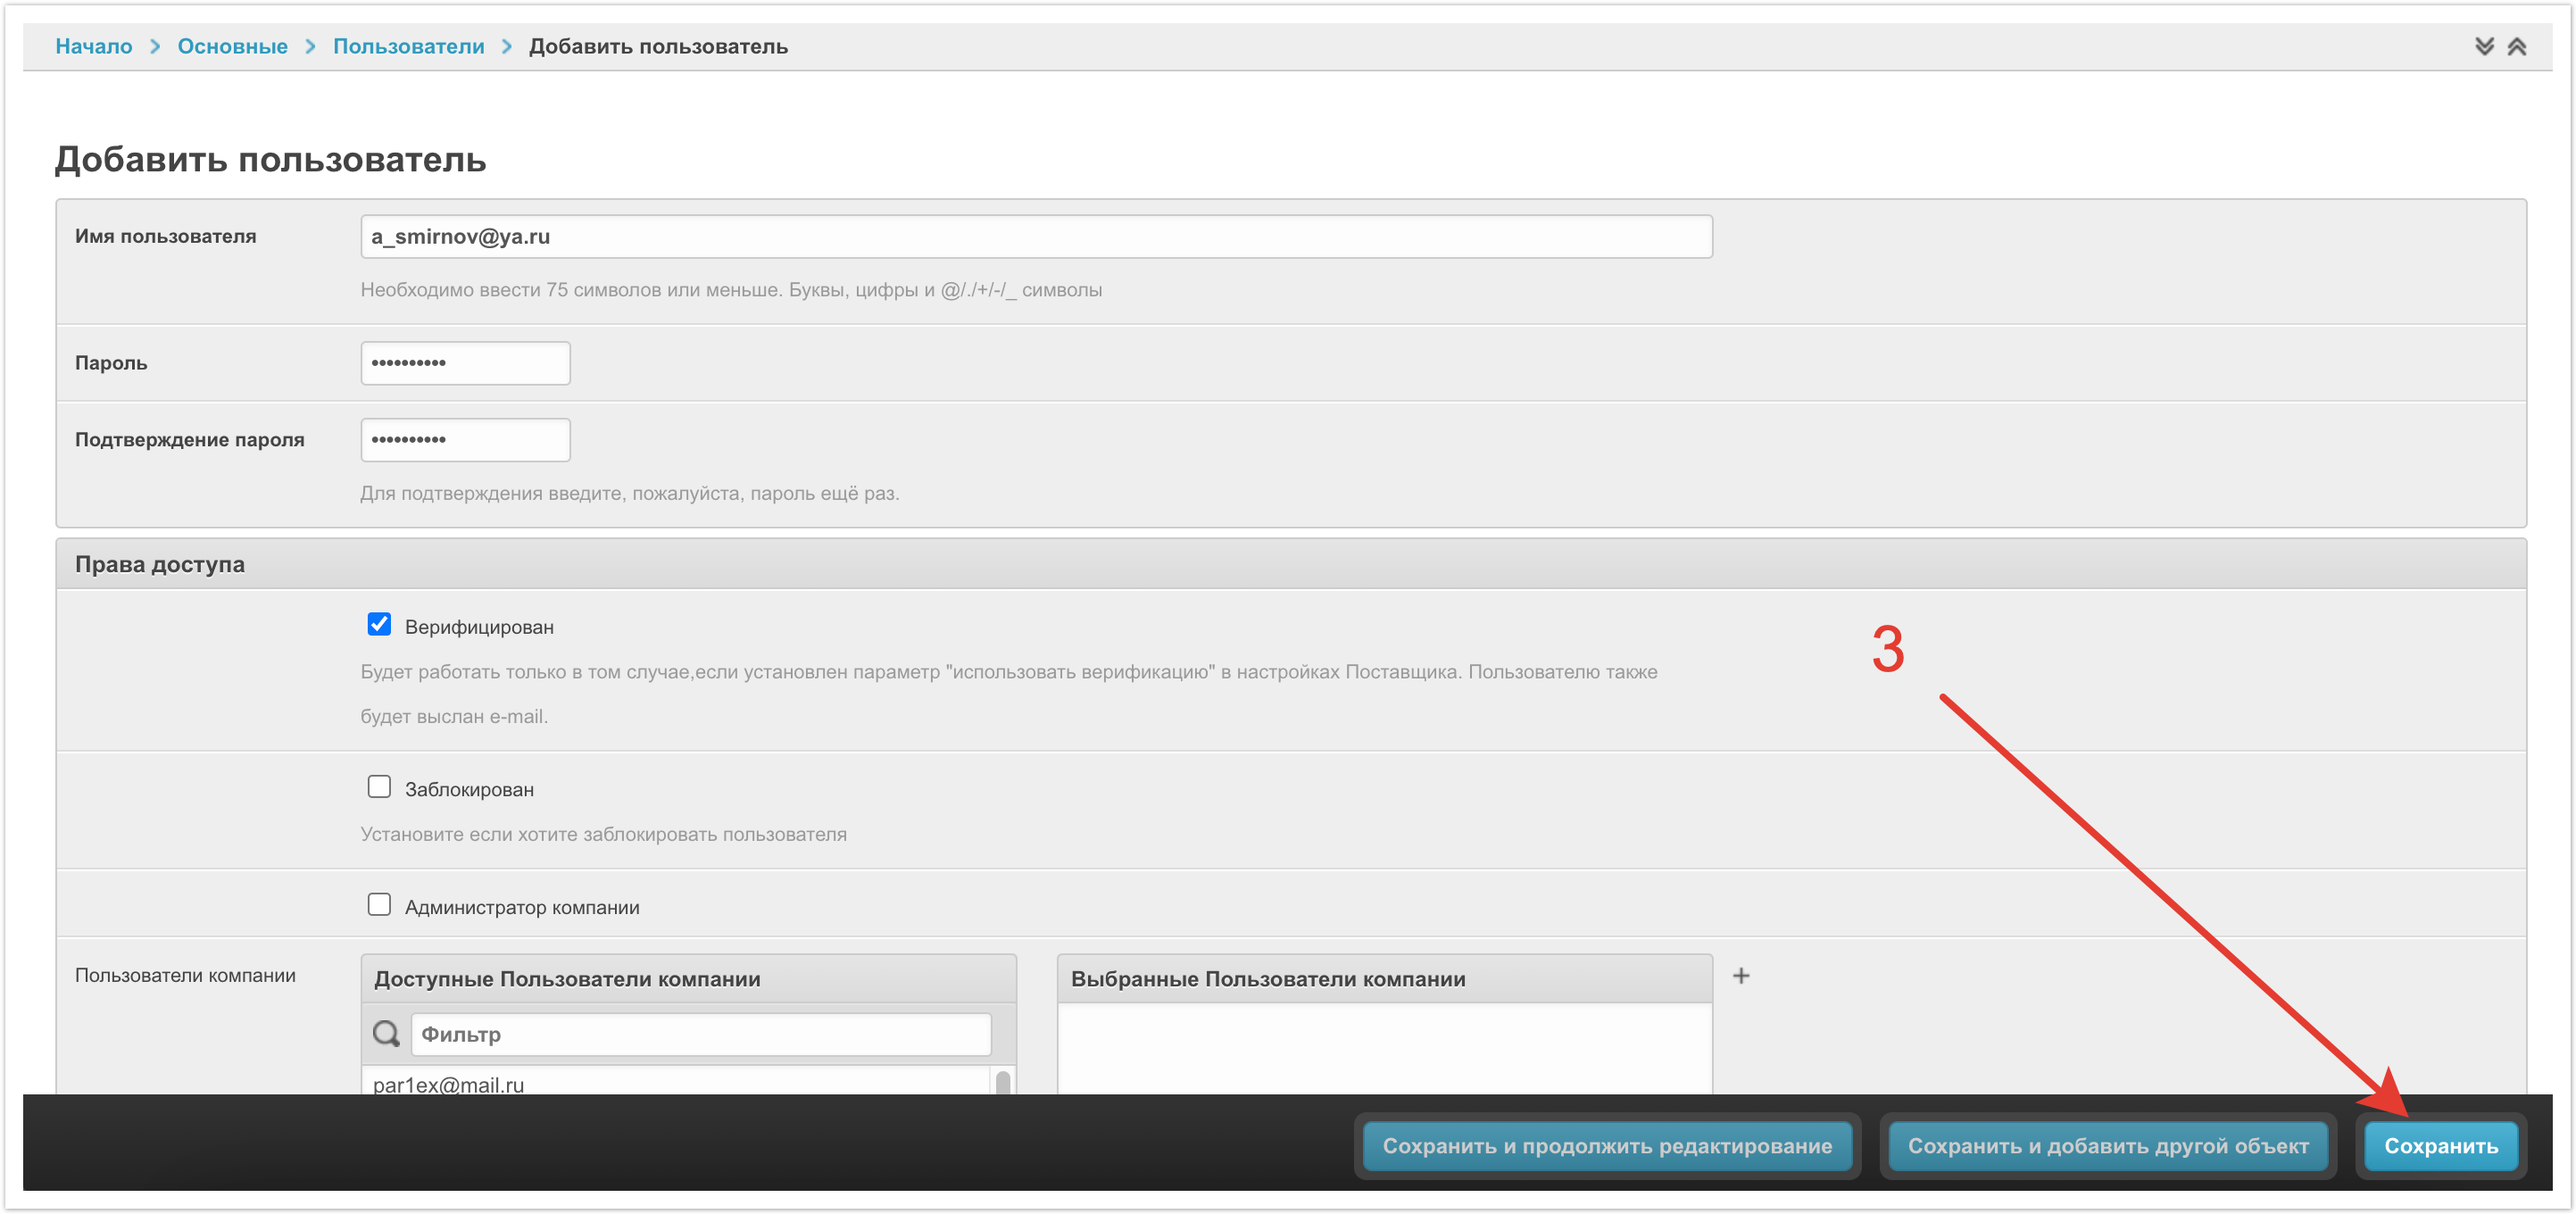
Откроется страница, где нужно заполнить необходимые поля. Для регистрации достаточно задать имя пользователя и пароль, а также поставить чек-бокс верификации, если она используется на проекте. В качестве имени пользователя лучше всего использовать адрес электронной почты.
Завершите регистрацию с помощью кнопки Сохранить.
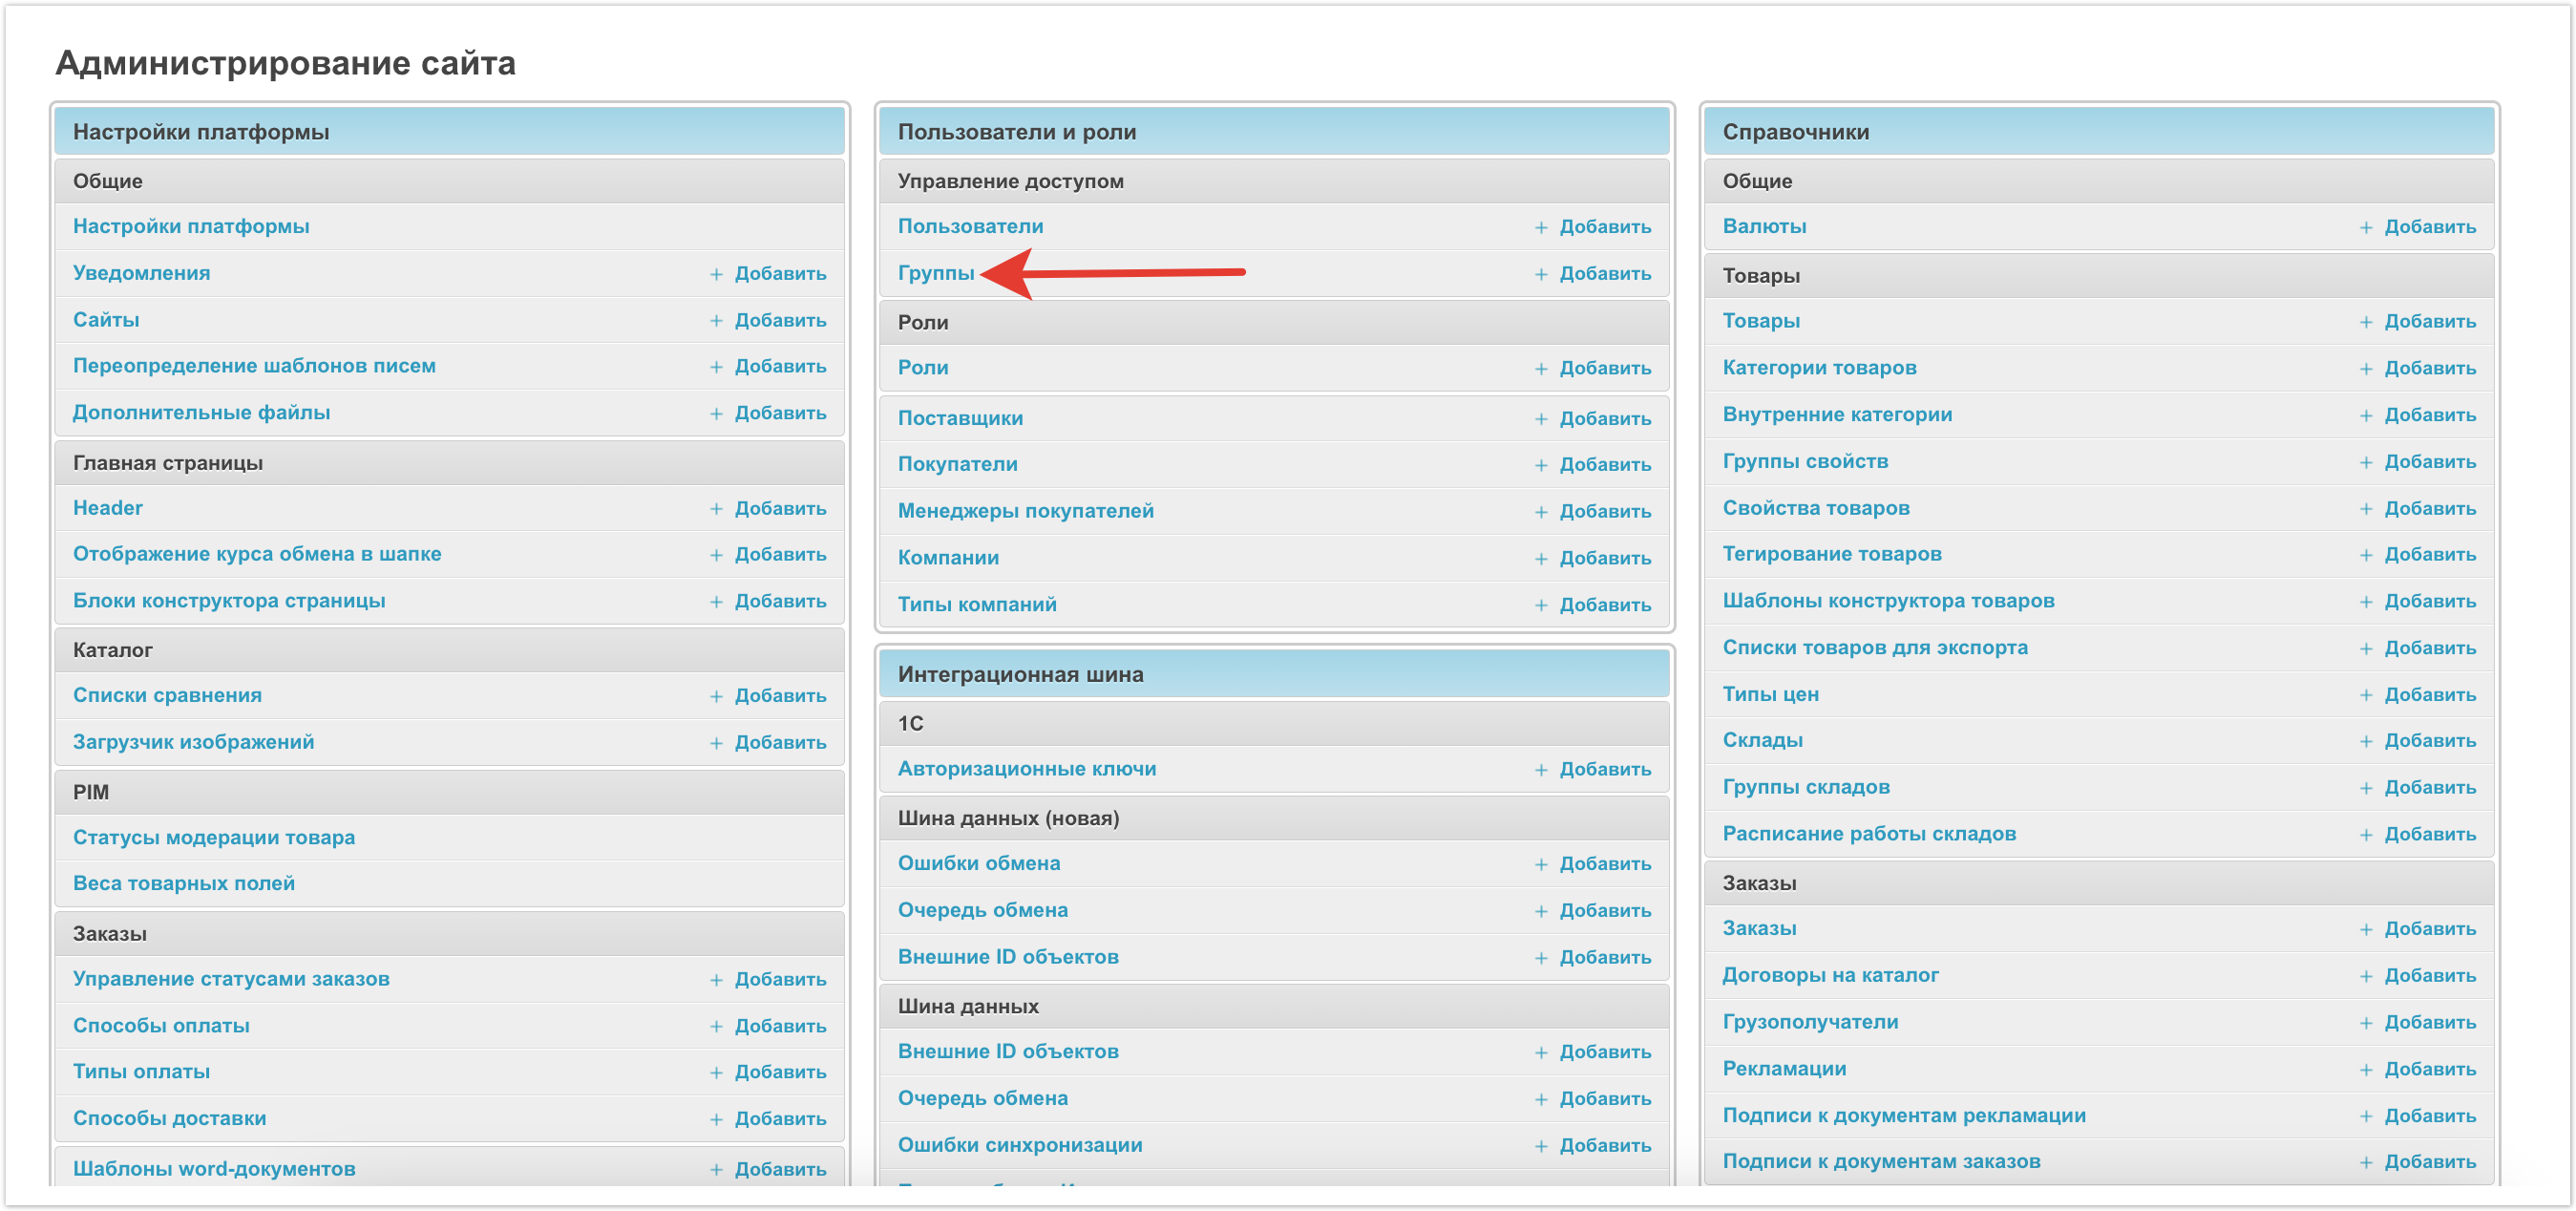
Далее нужно выдать пользователю набор прав для его роли. Чтобы сделать это, перейдите в раздел Группы.
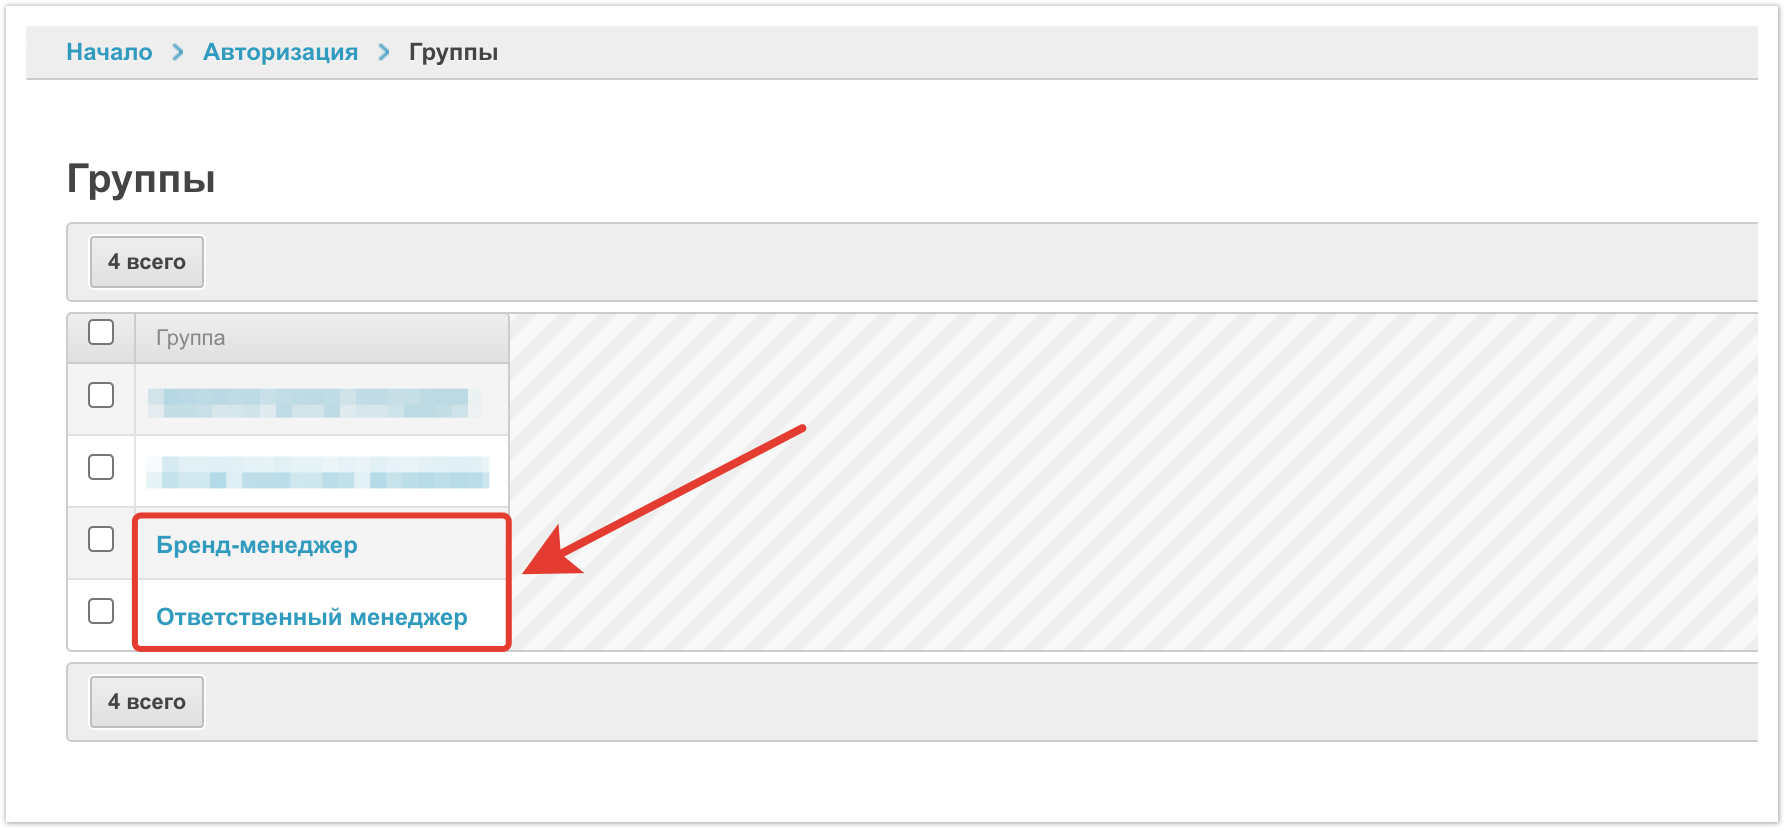
Затем выберите нужную группу. Рассмотрим на примере Ответственного менеджера. Для Бренд-менеджера, алгоритм действий будет аналогичным.
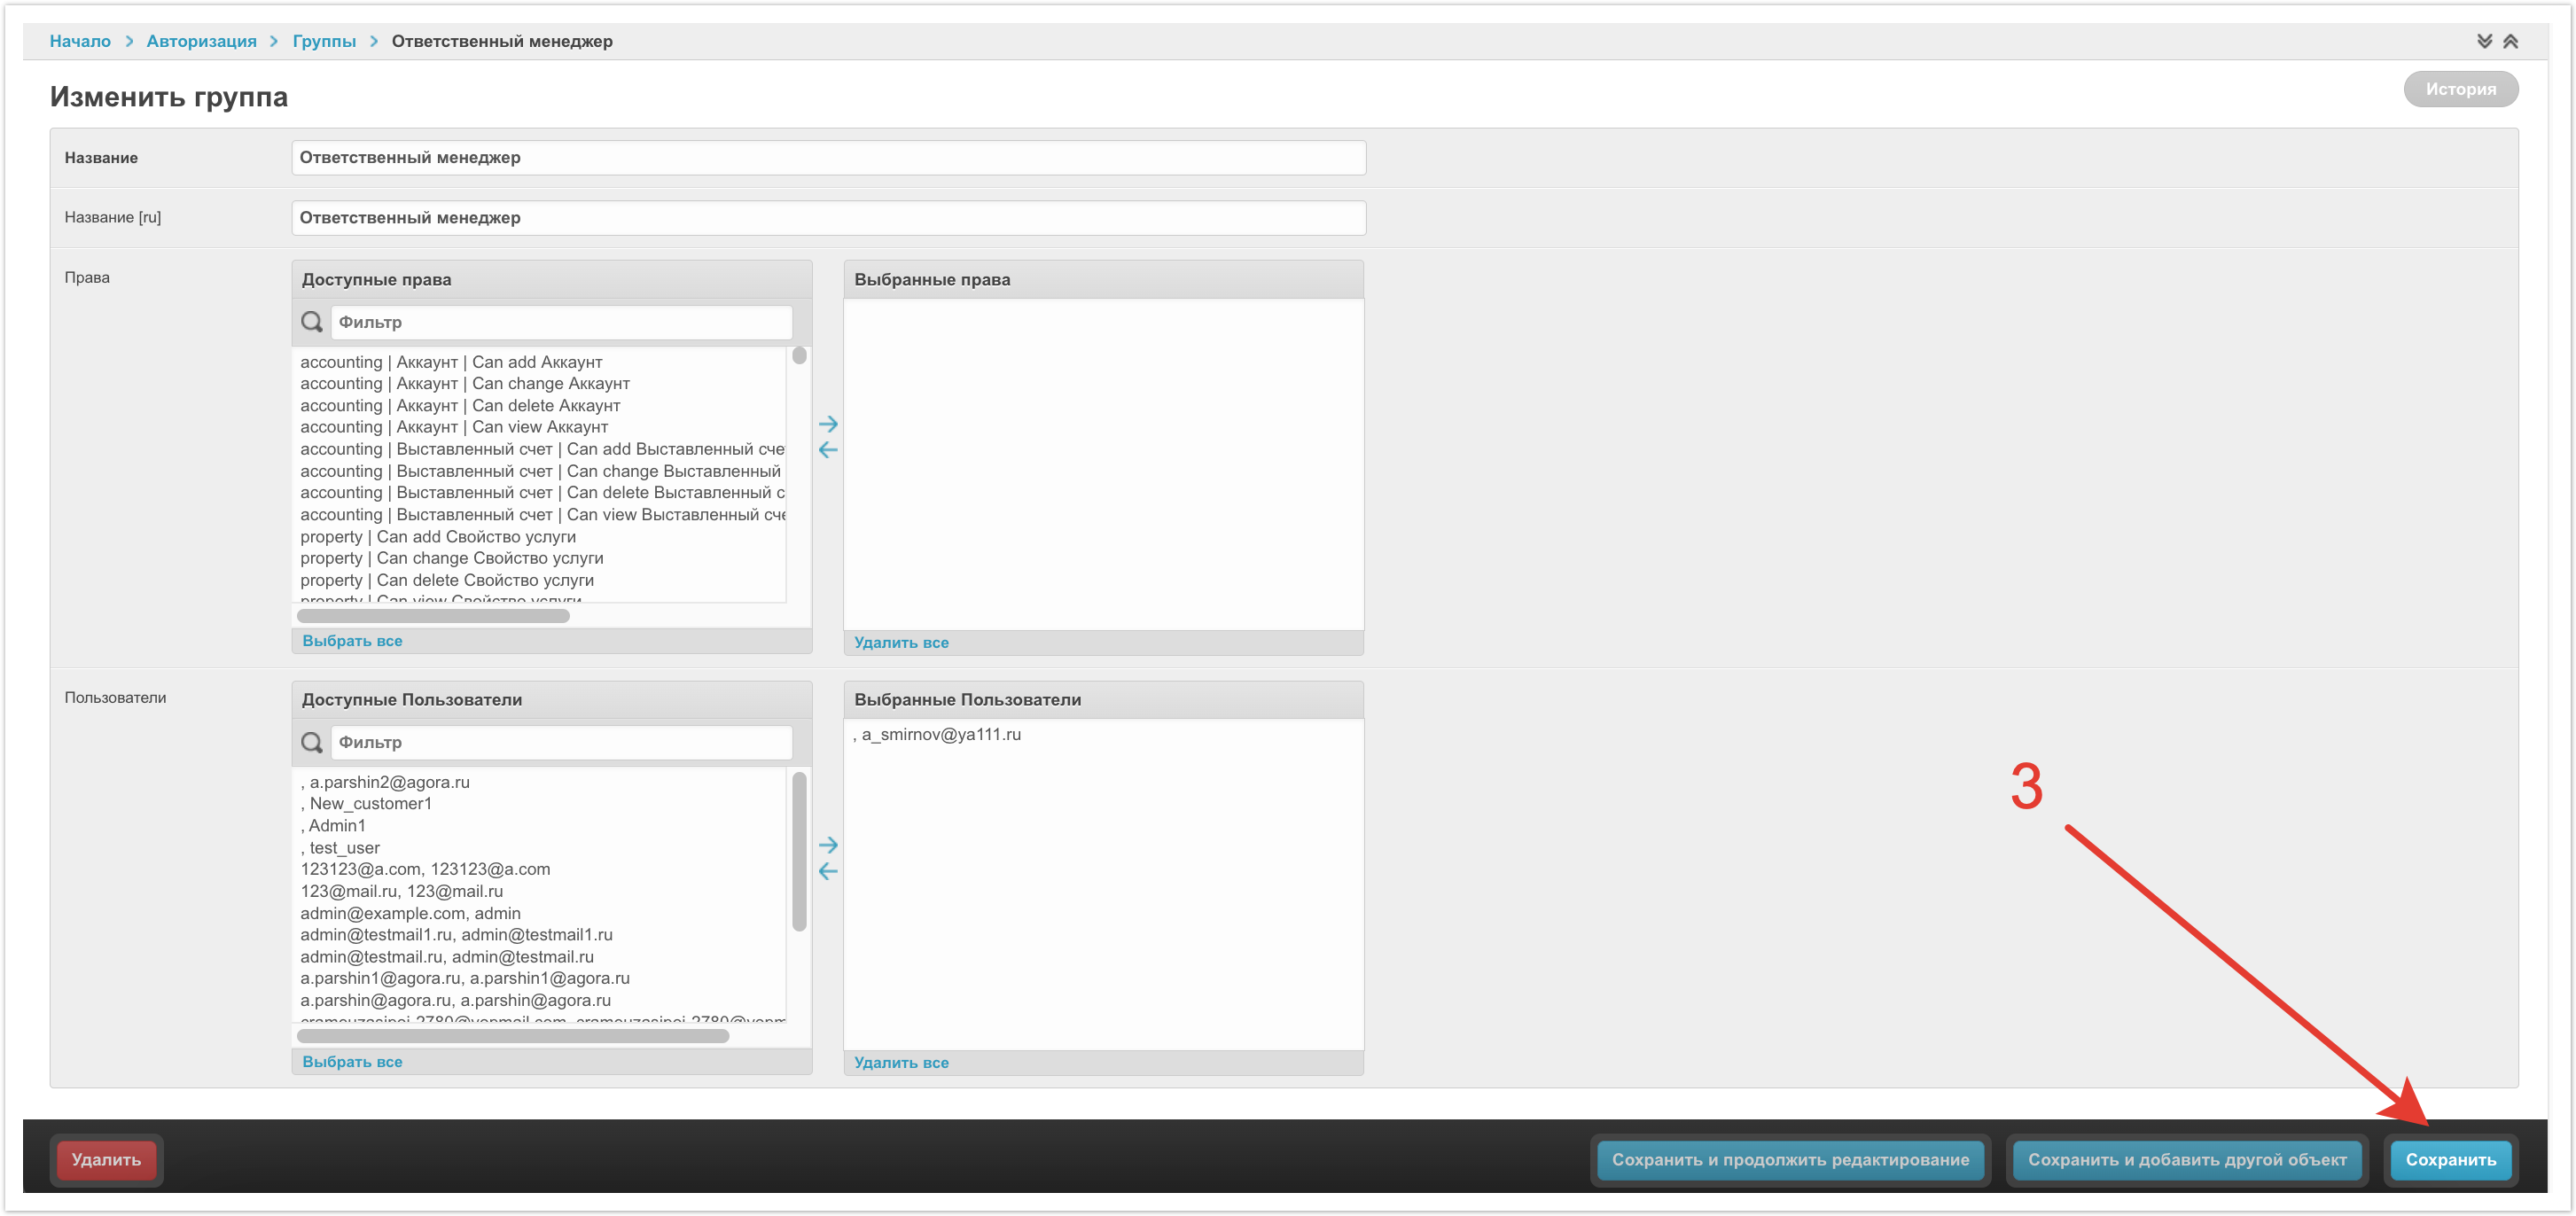
На открывшейся странице в поле Пользователи нужно найти созданного ранее пользователя, который должен получить эту роль. С помощью стрелки вправо переместить его в столбец выбранных пользователей.
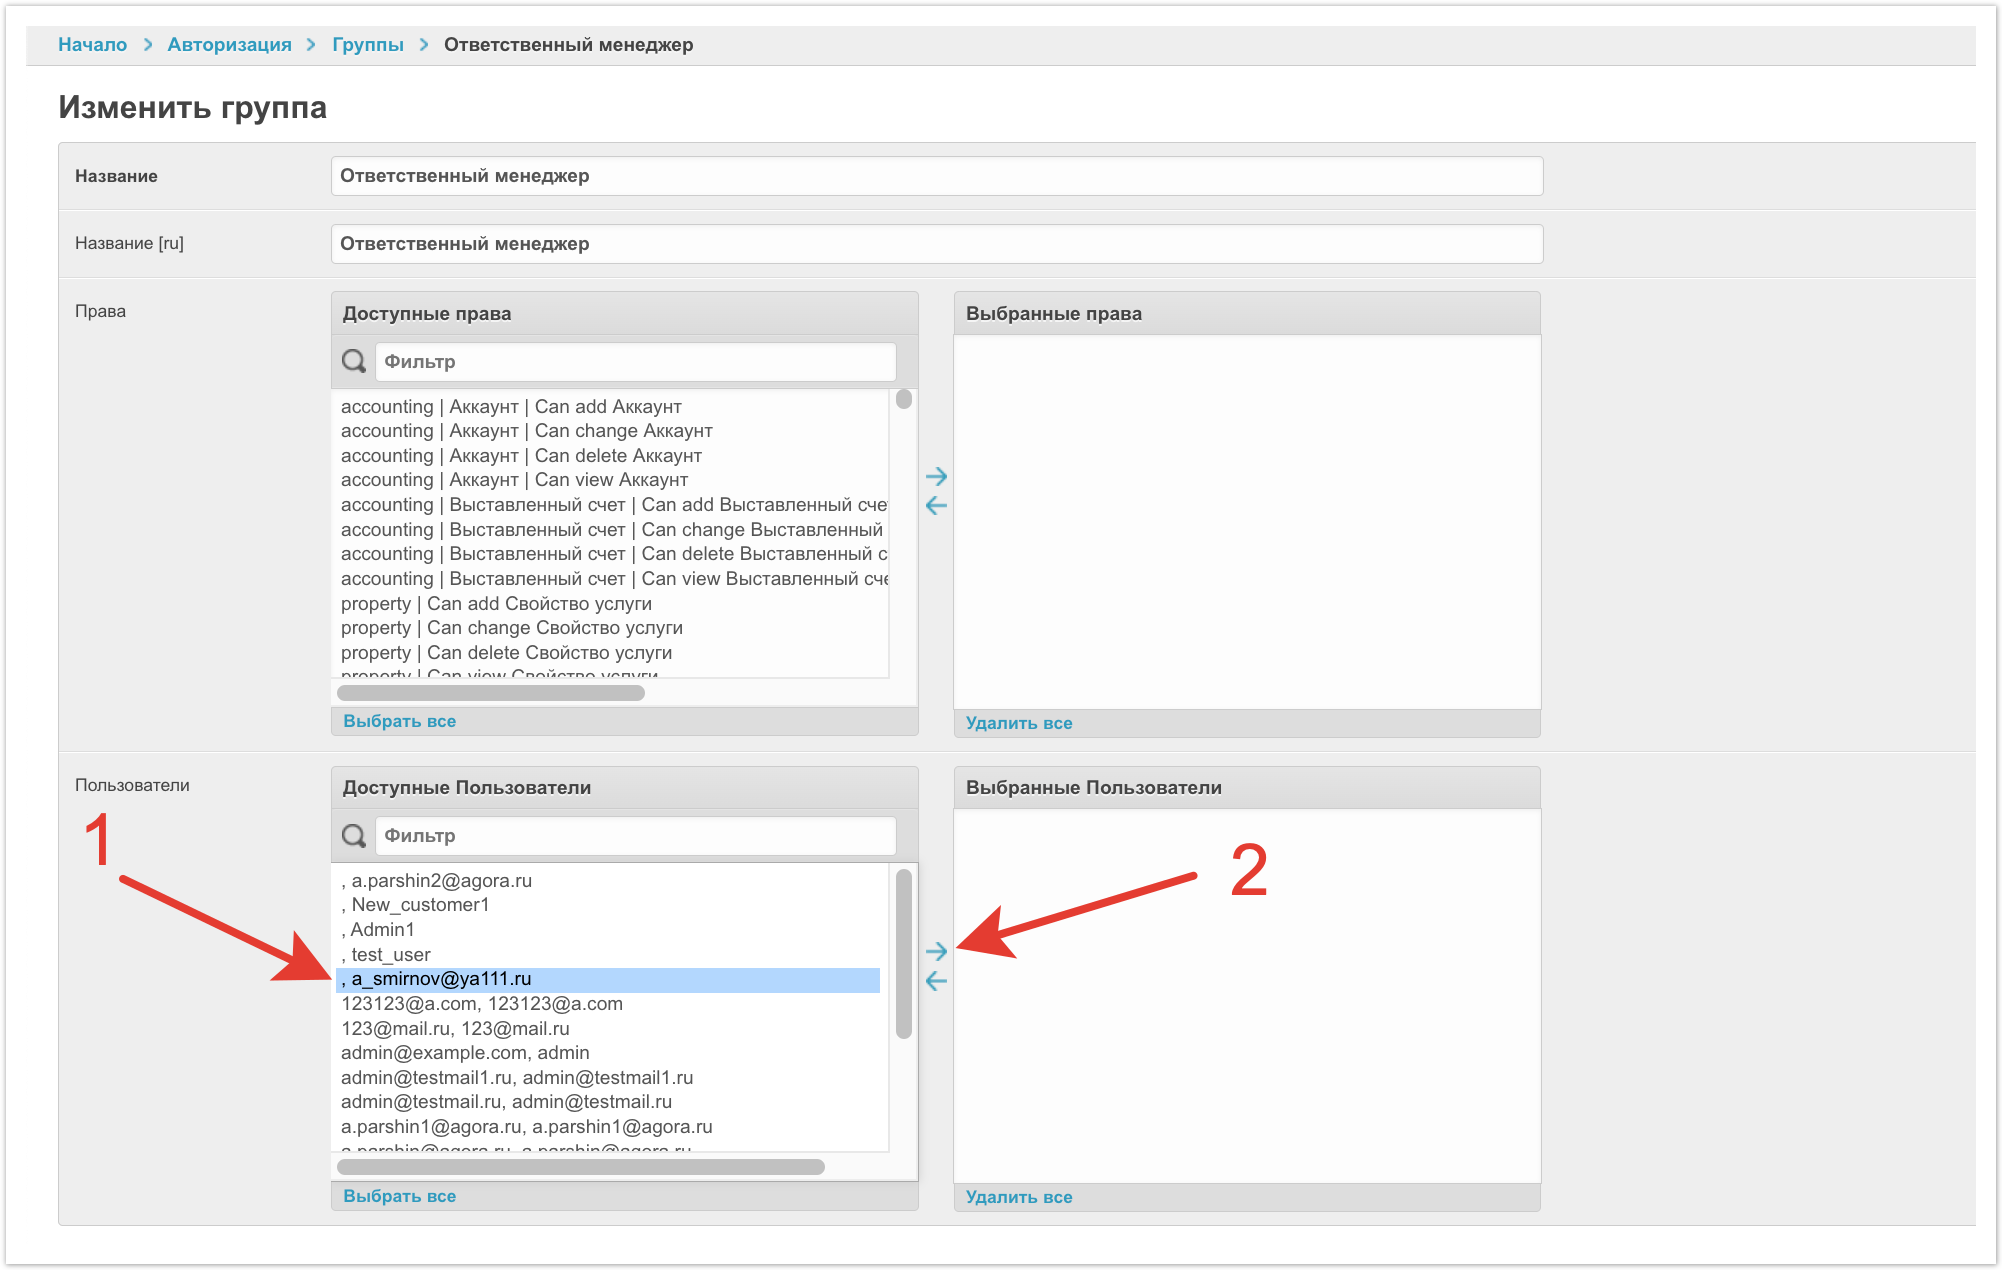
Далее необходимо Сохранить изменения.
После этого нужно связать менеджера с поставщиком. Для этого нужно перейти в раздел Пользователи. Далее нажать на логин пользователя, которого мы настраиваем.
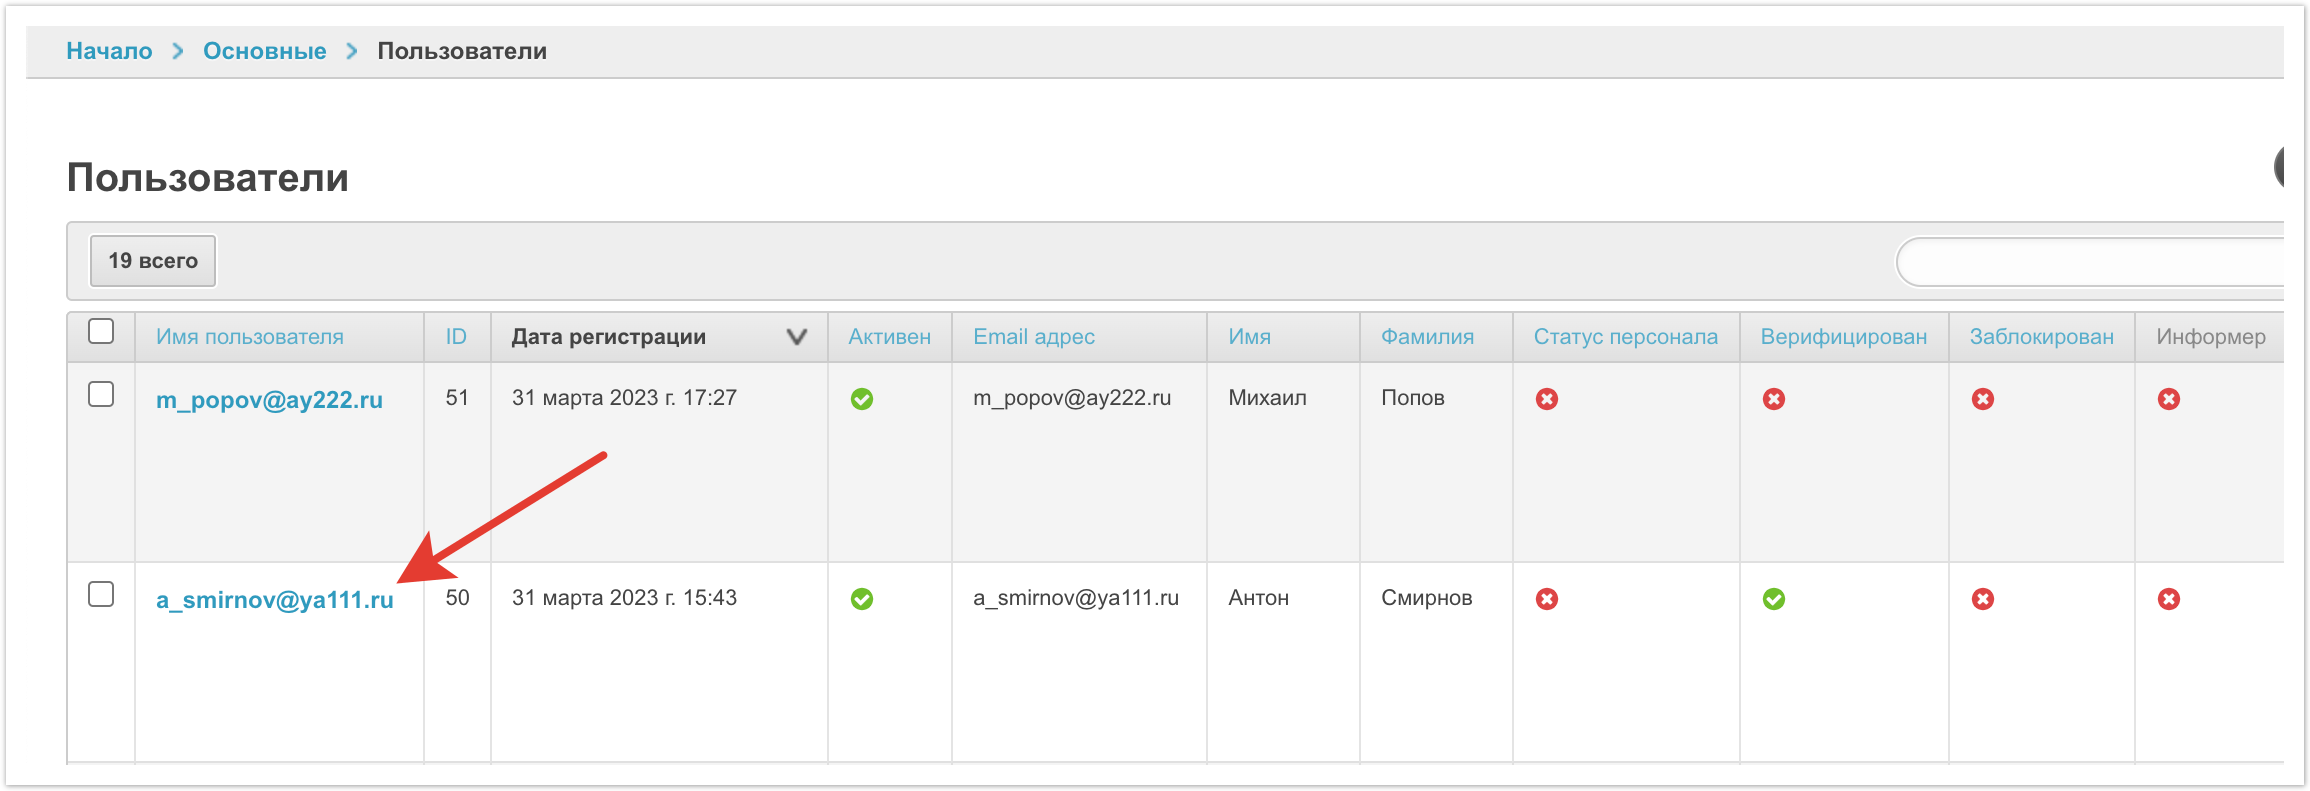
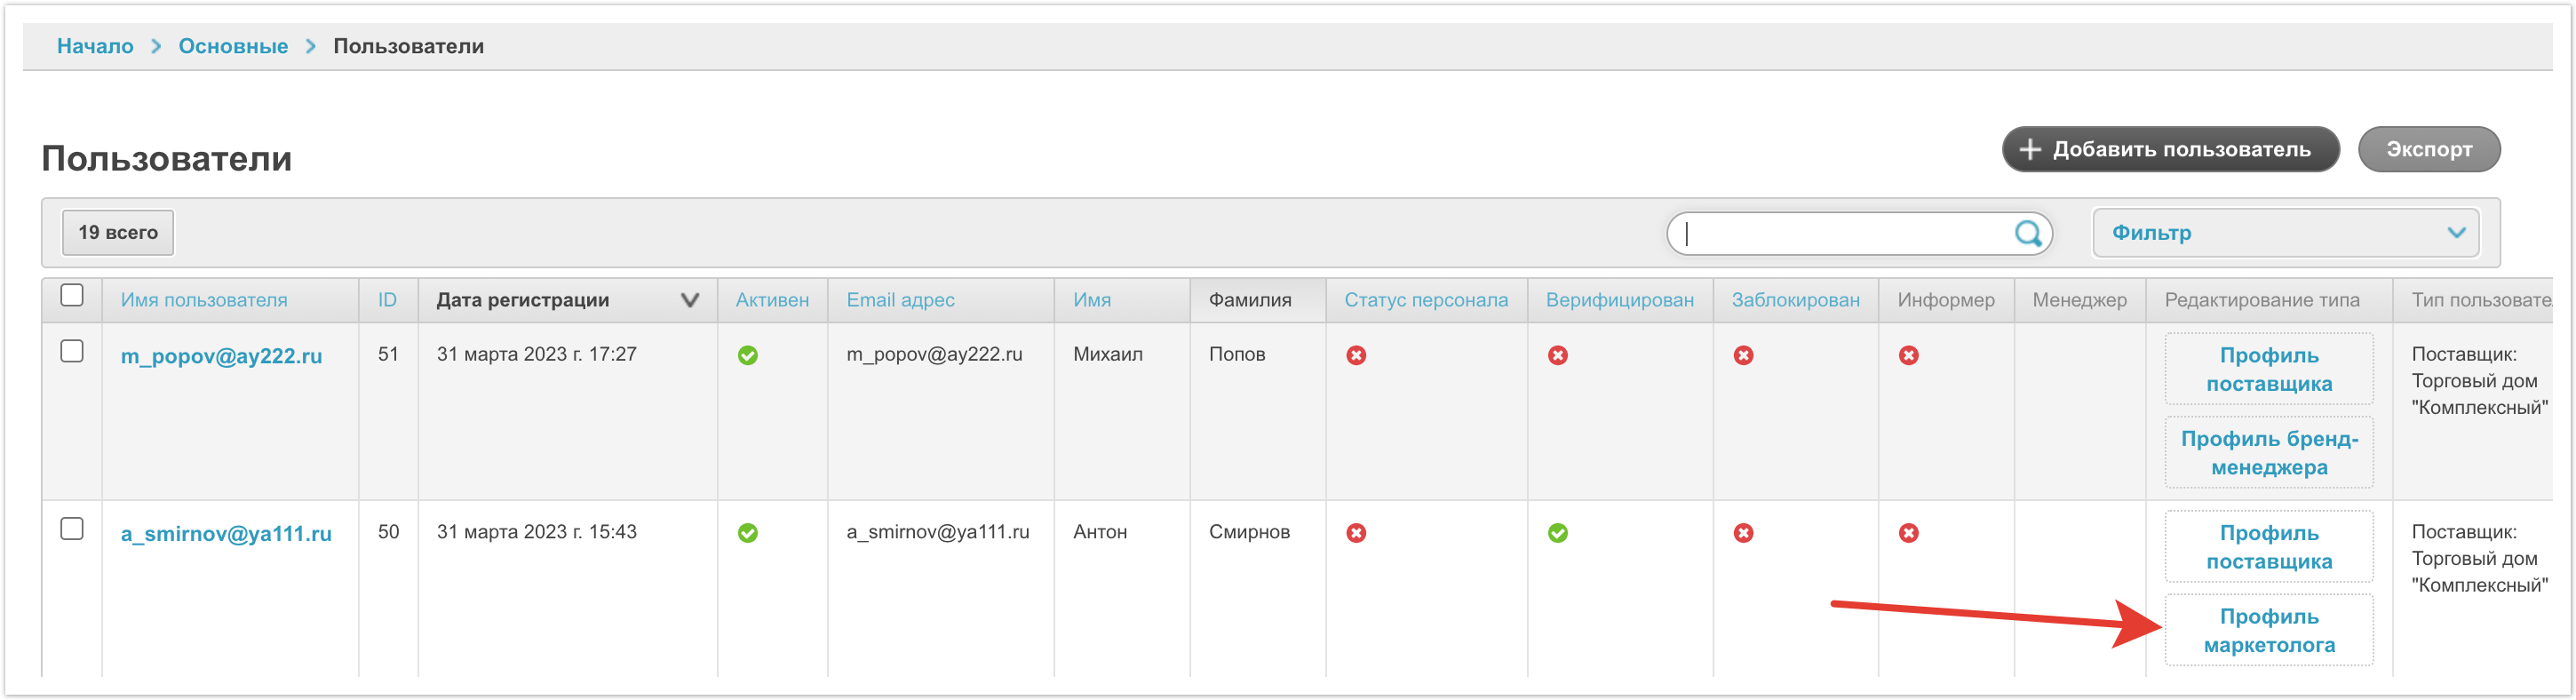
На открывшейся странице в поле Поставщик нужно задать Поставщика платформы и затем Сохранить изменения.

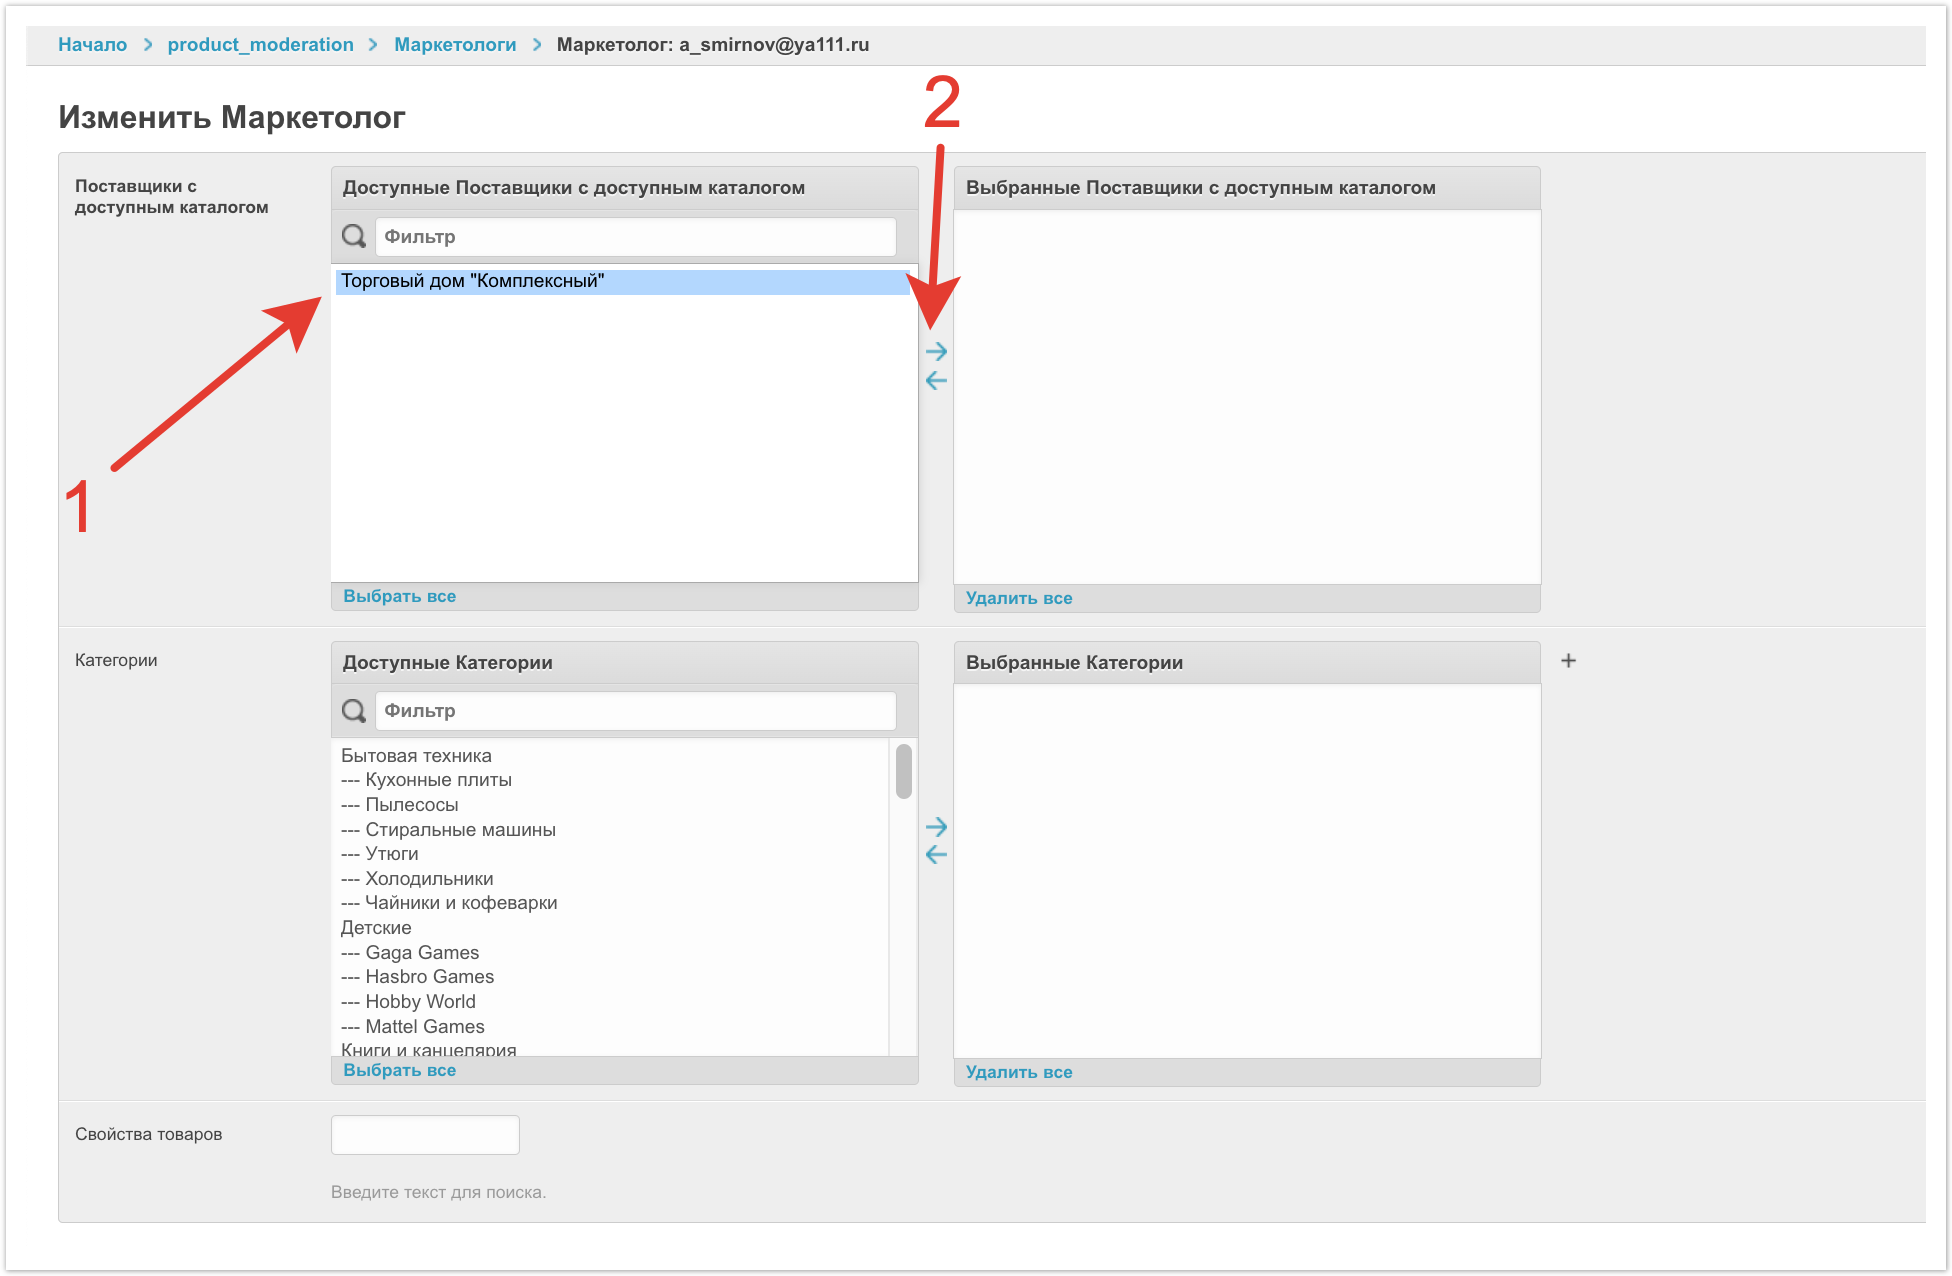
После этого у пользователя появятся кнопки для перехода в профиль поставщика и в профиль маркетолога или бренд-менеджера. Нажимаем на кнопку Профиль маркетолога.
Далее в поле Поставщики с доступным каталогом переносим поставщика в правый столбец с помощью стрелки вправо. Настройка Ответственного менеджера на этом заканчивается. После сохранения изменений он может начинать работу на платформе.
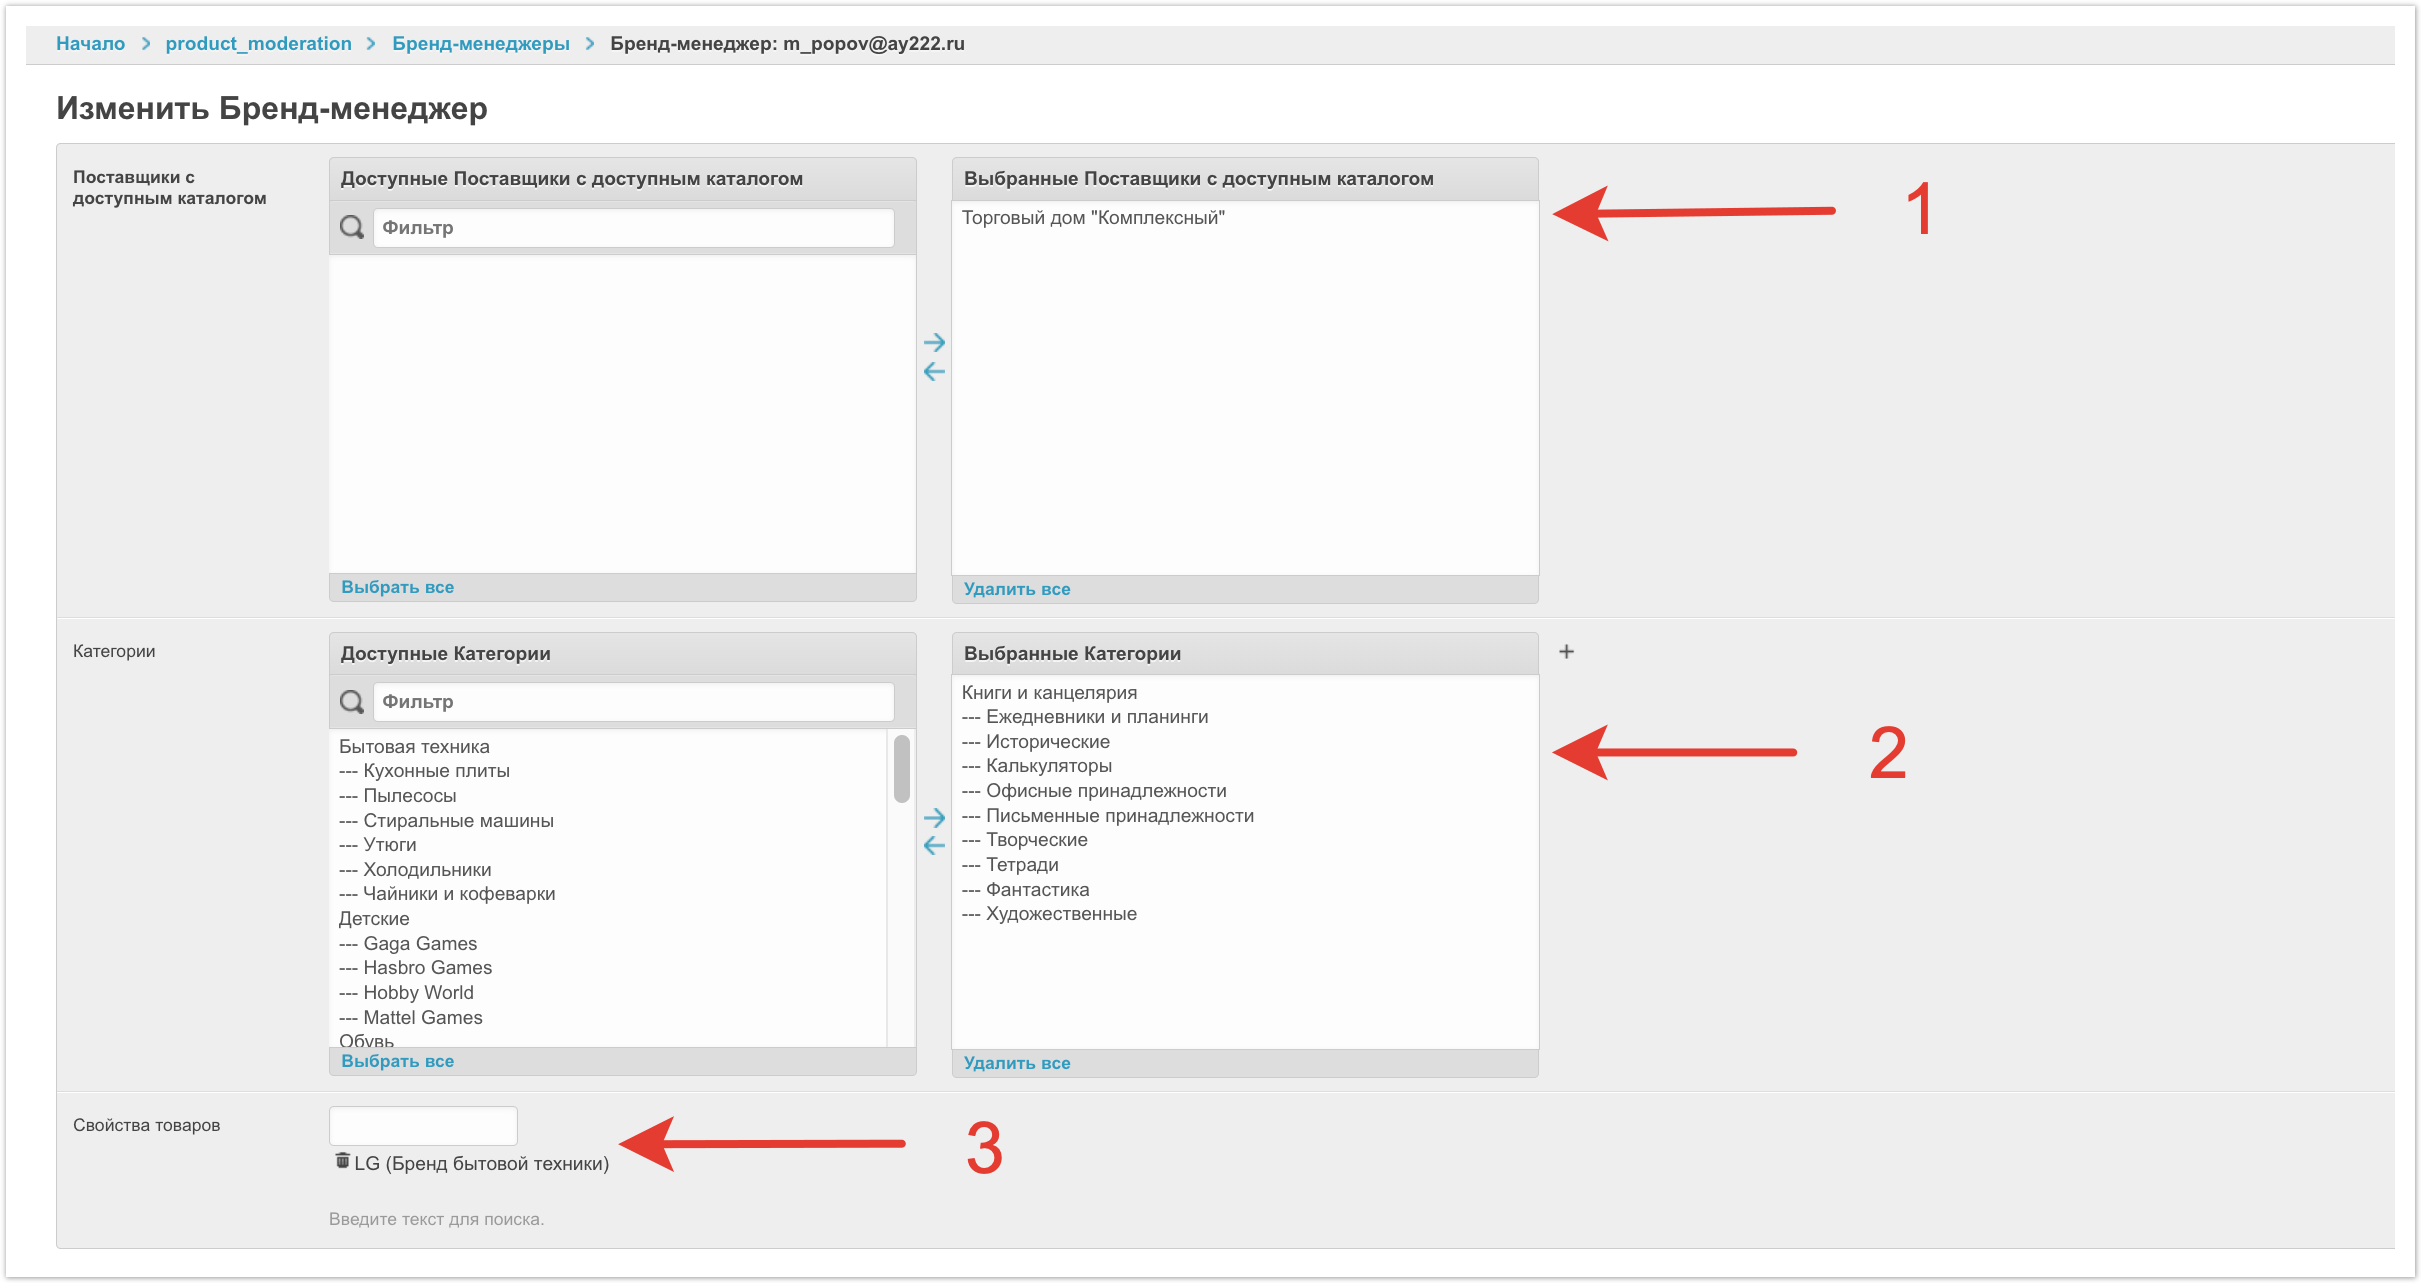
Для бренд-менеджера на этом шаге также настраиваем зону его ответственности. Для этого помимо поставщика заполняем также Категории и Свойства товара. В поле Категории выбираем те категории, за которые отвечает бренд-менеджер. А в поле Свойства товаров выбираем конкретные свойства, по которым будут фильтроваться доступные менеджеру товары. Например, можно задать в качестве свойства конкретный бренд, за который отвечает сотрудник. При выборе нескольких разных свойств будут выбираться товары, которые попадают в обе выборки одновременно. Например, если указать в качестве свойства бренд - Casio и цвет - черный, то менеджер будет видеть только товары бренда Casio черного цвета.
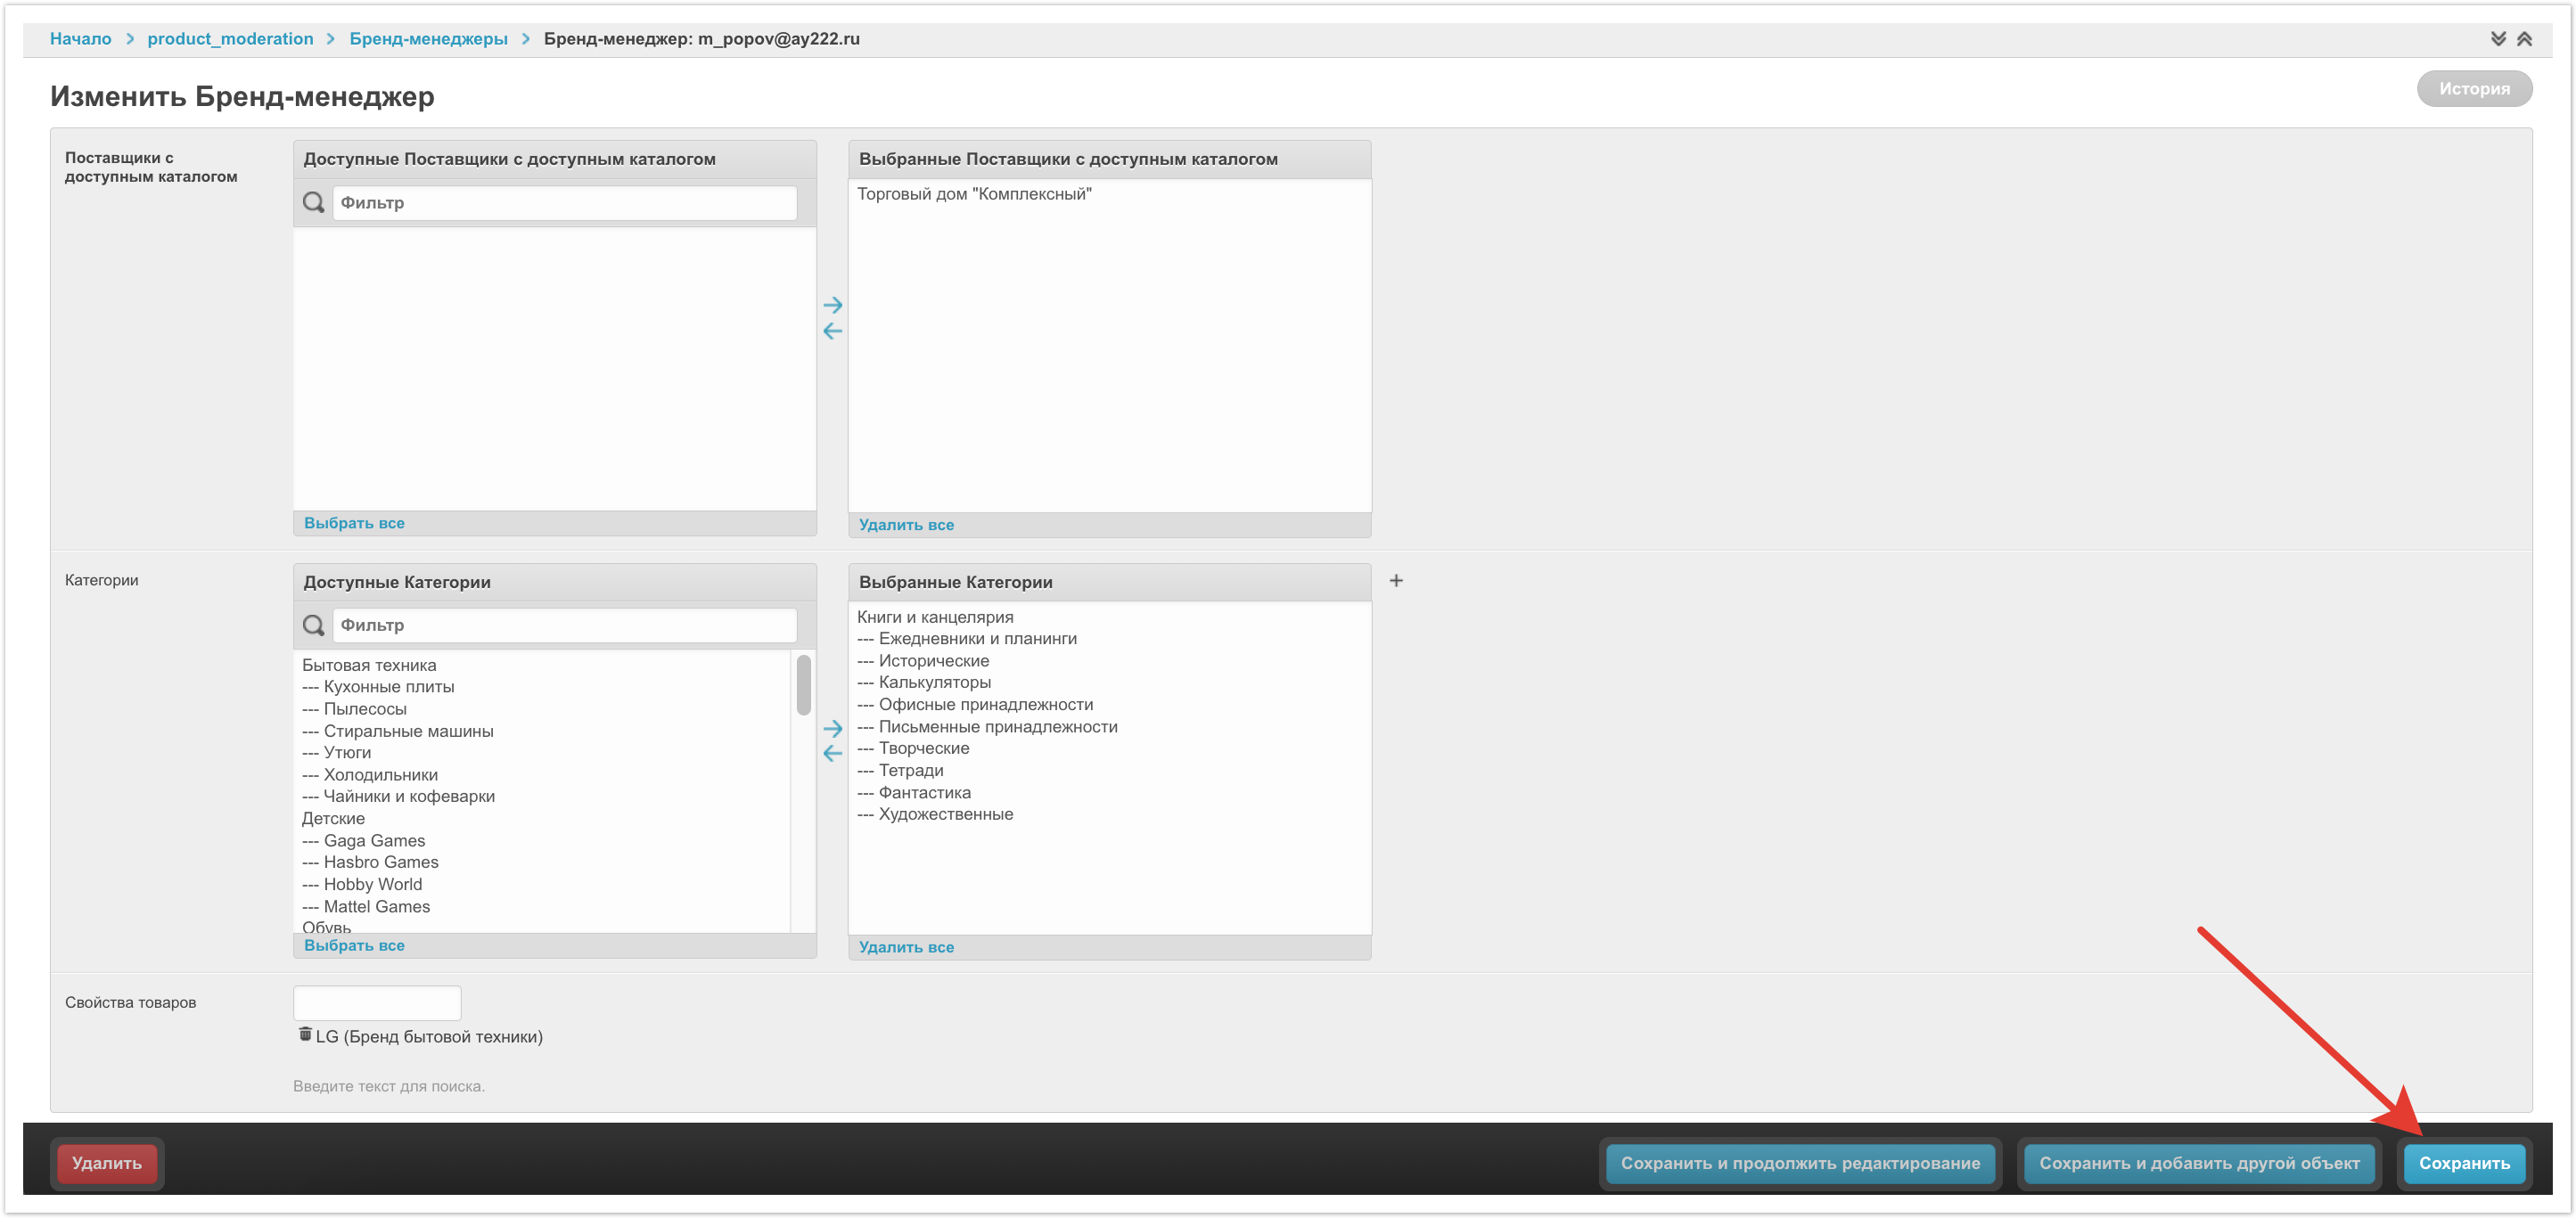
После заполнения нажимаем кнопку Сохранить.
Теперь администратор платформы может предоставить сотруднику данные его учетной записи и пользователь сможет работать на платформе. Из соображений безопасности менеджер может задать собственный пароль от своей учетной записи, для этого можно воспользоваться формой для восстановления пароля.
Импорт товаров на платформу
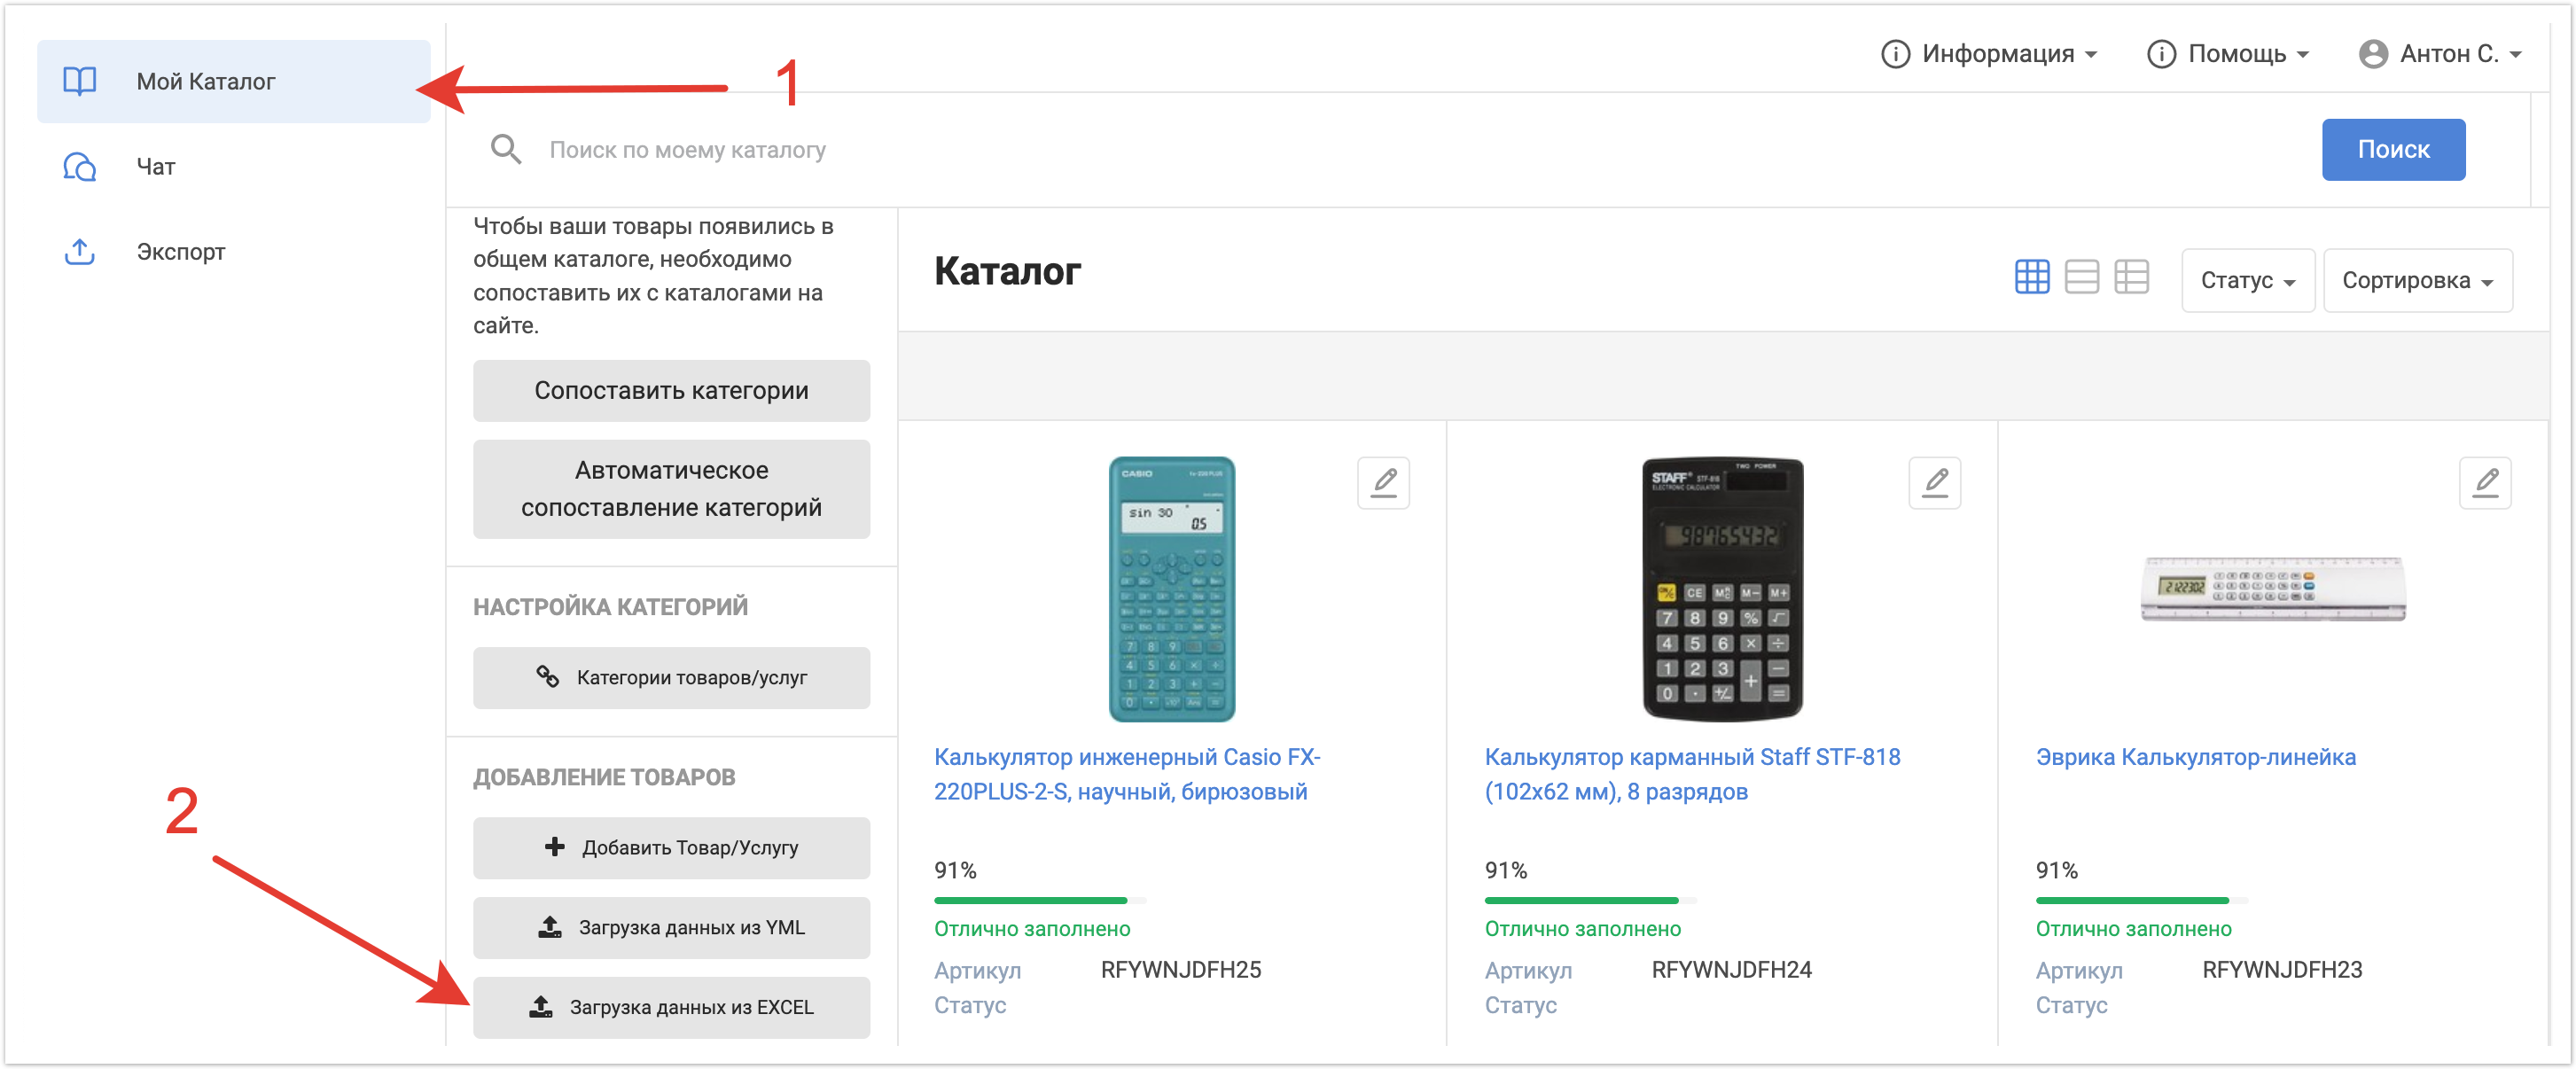
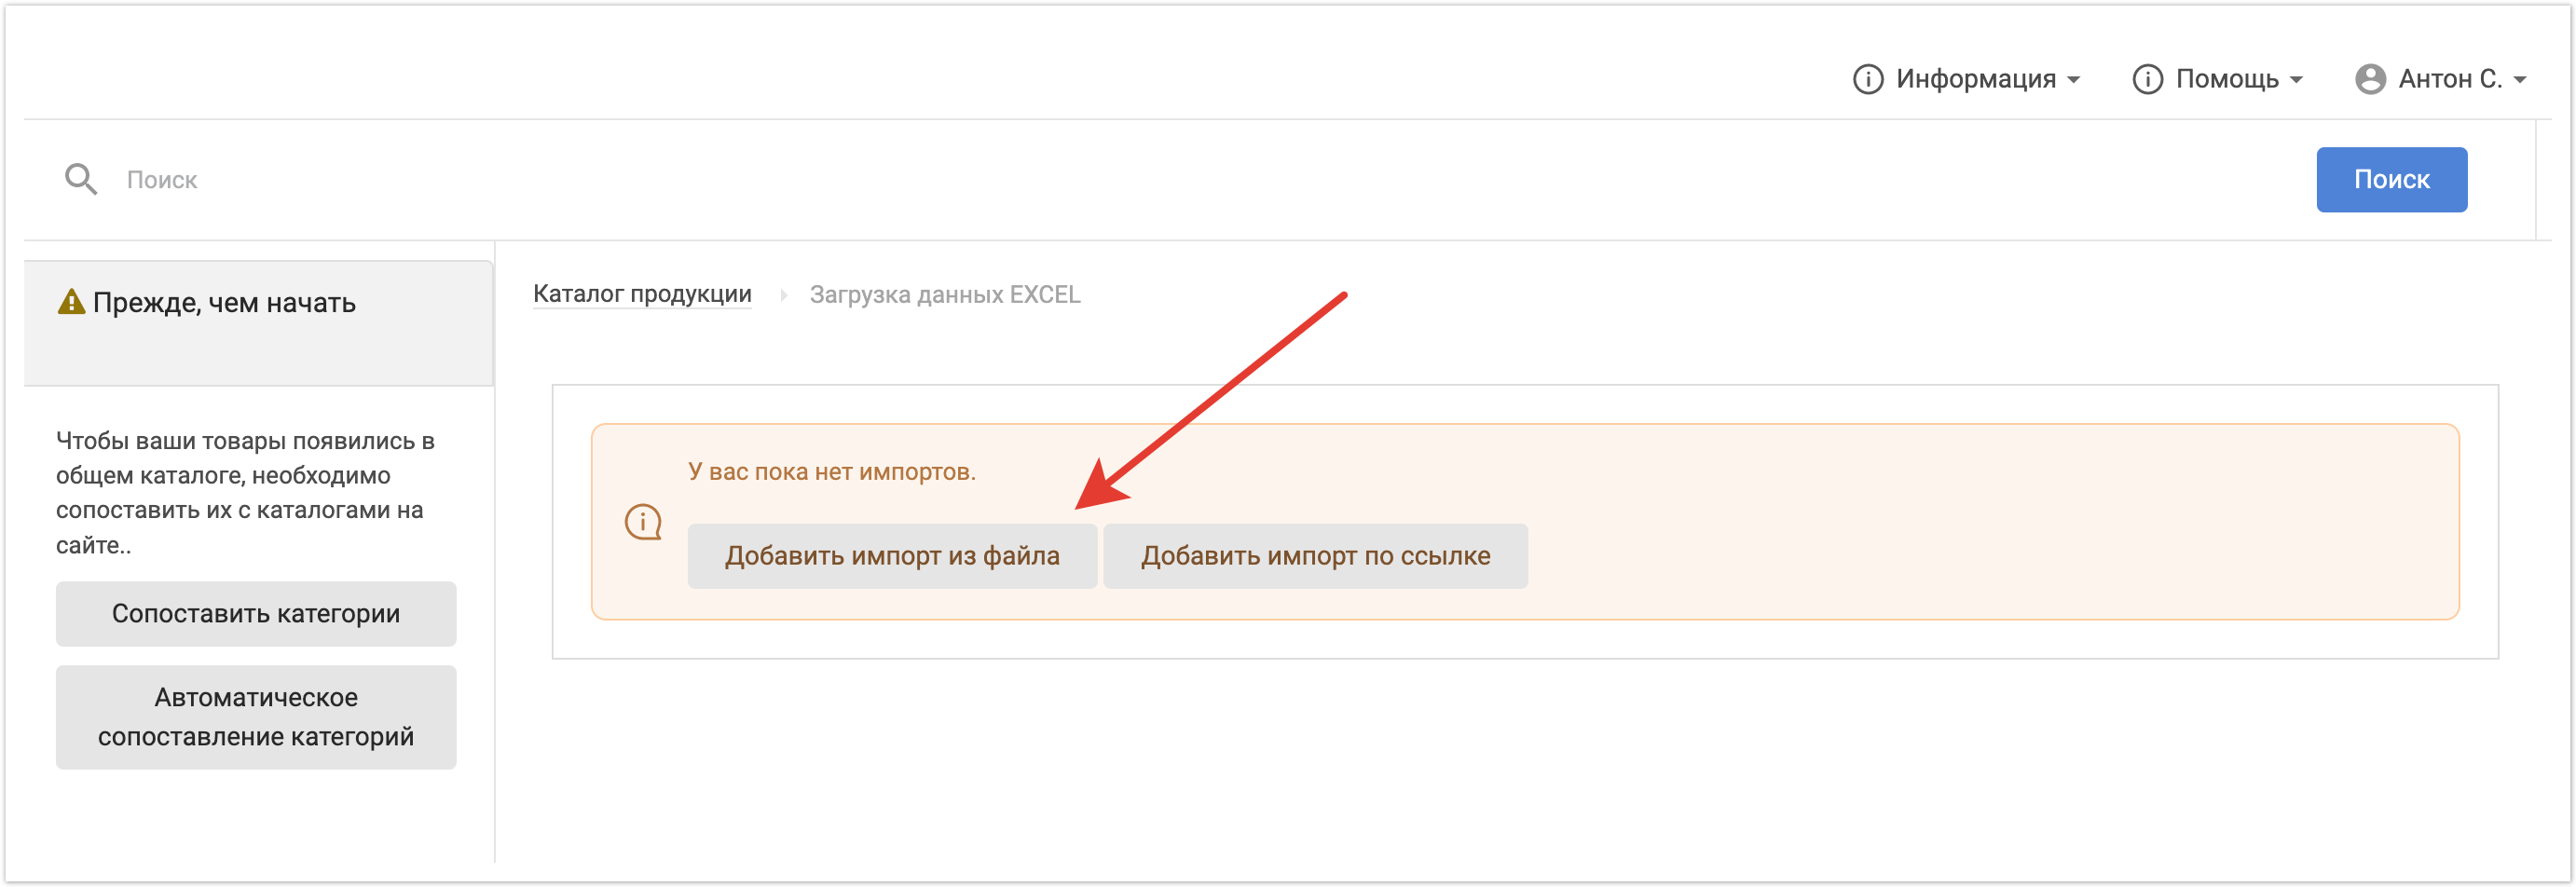
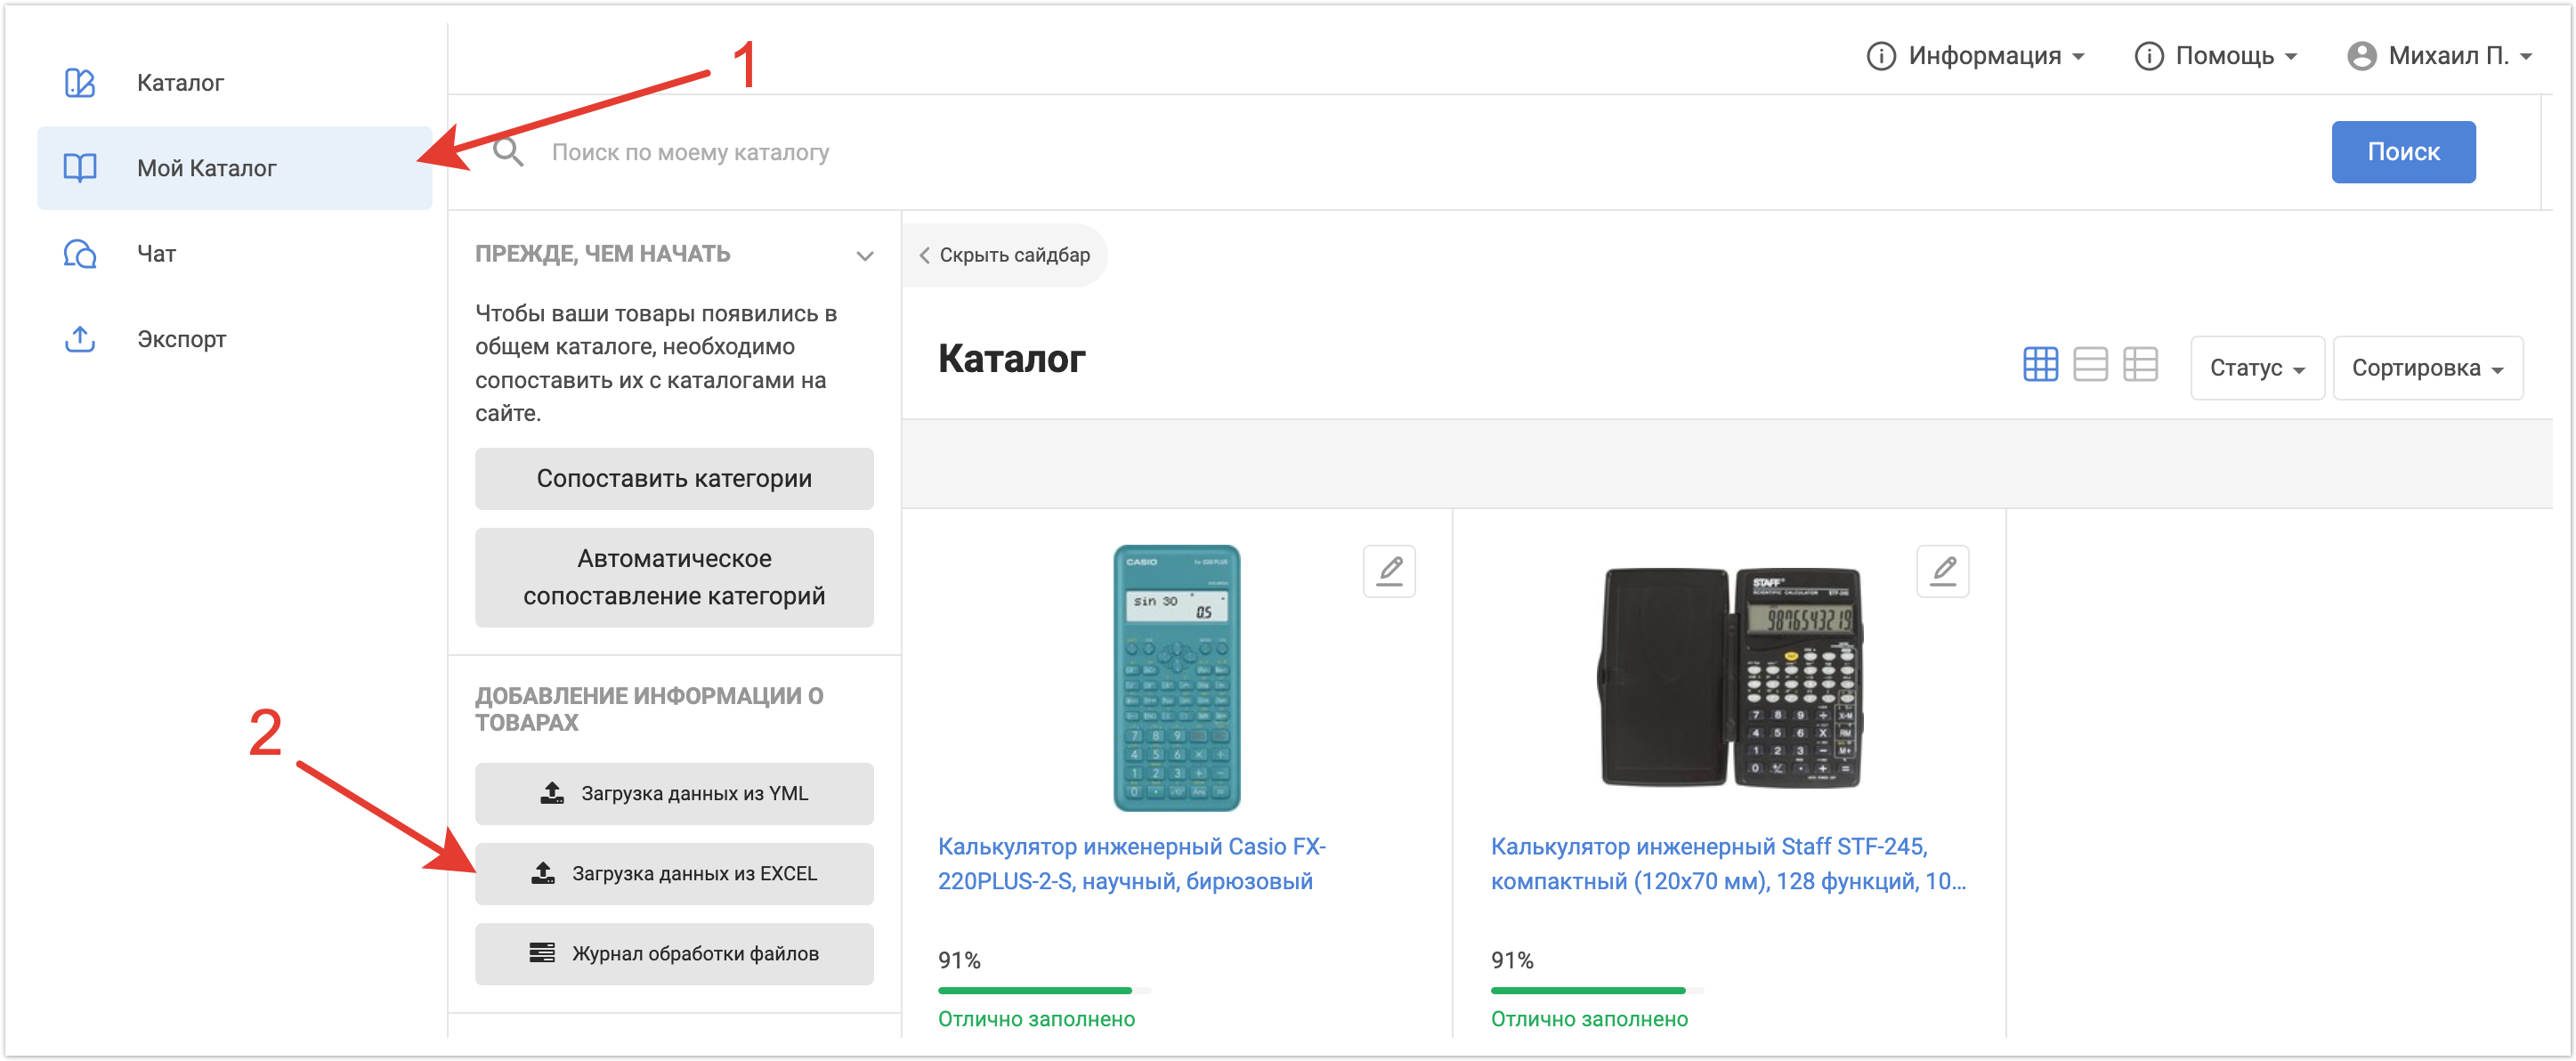
Импорт товаров на платформу может выполнить пользователь с ролью Ответственный менеджер, то есть руководитель отдела контента. Для этого ему нужно авторизоваться в своем личном кабинете, перейти в раздел Мой каталог и нажать на кнопку Загрузка данных из EXCEL. Загрузка каталога доступна также в формате YML или из ERP-системы. Кроме того, доступна загрузка товаров вручную.
Далее по кнопке Добавить импорт из файла появится окно, где можно будет выбрать файл из локального хранилища устройства.
Затем нужно будет настроить поля для импорта товаров. Подробнее про загрузку файла описано на странице. Для корректного импорта обязательно должен быть указан уникальный идентификатор, например артикул, а также должны быть указаны Категория поставщика, Название, Цены и Остатки. Название типа цены и склада берется из первой строки файла, в которой предполагаются заголовки столбцов. Помимо стандартных настроек ответственный менеджер также может указать, в каких столбцах будут указаны Мастер данные. Мастер данные - это те данные, которые будут недоступны для редактирования бренд-менеджерам. Например, в качестве мастер-данных можно выбрать артикул.
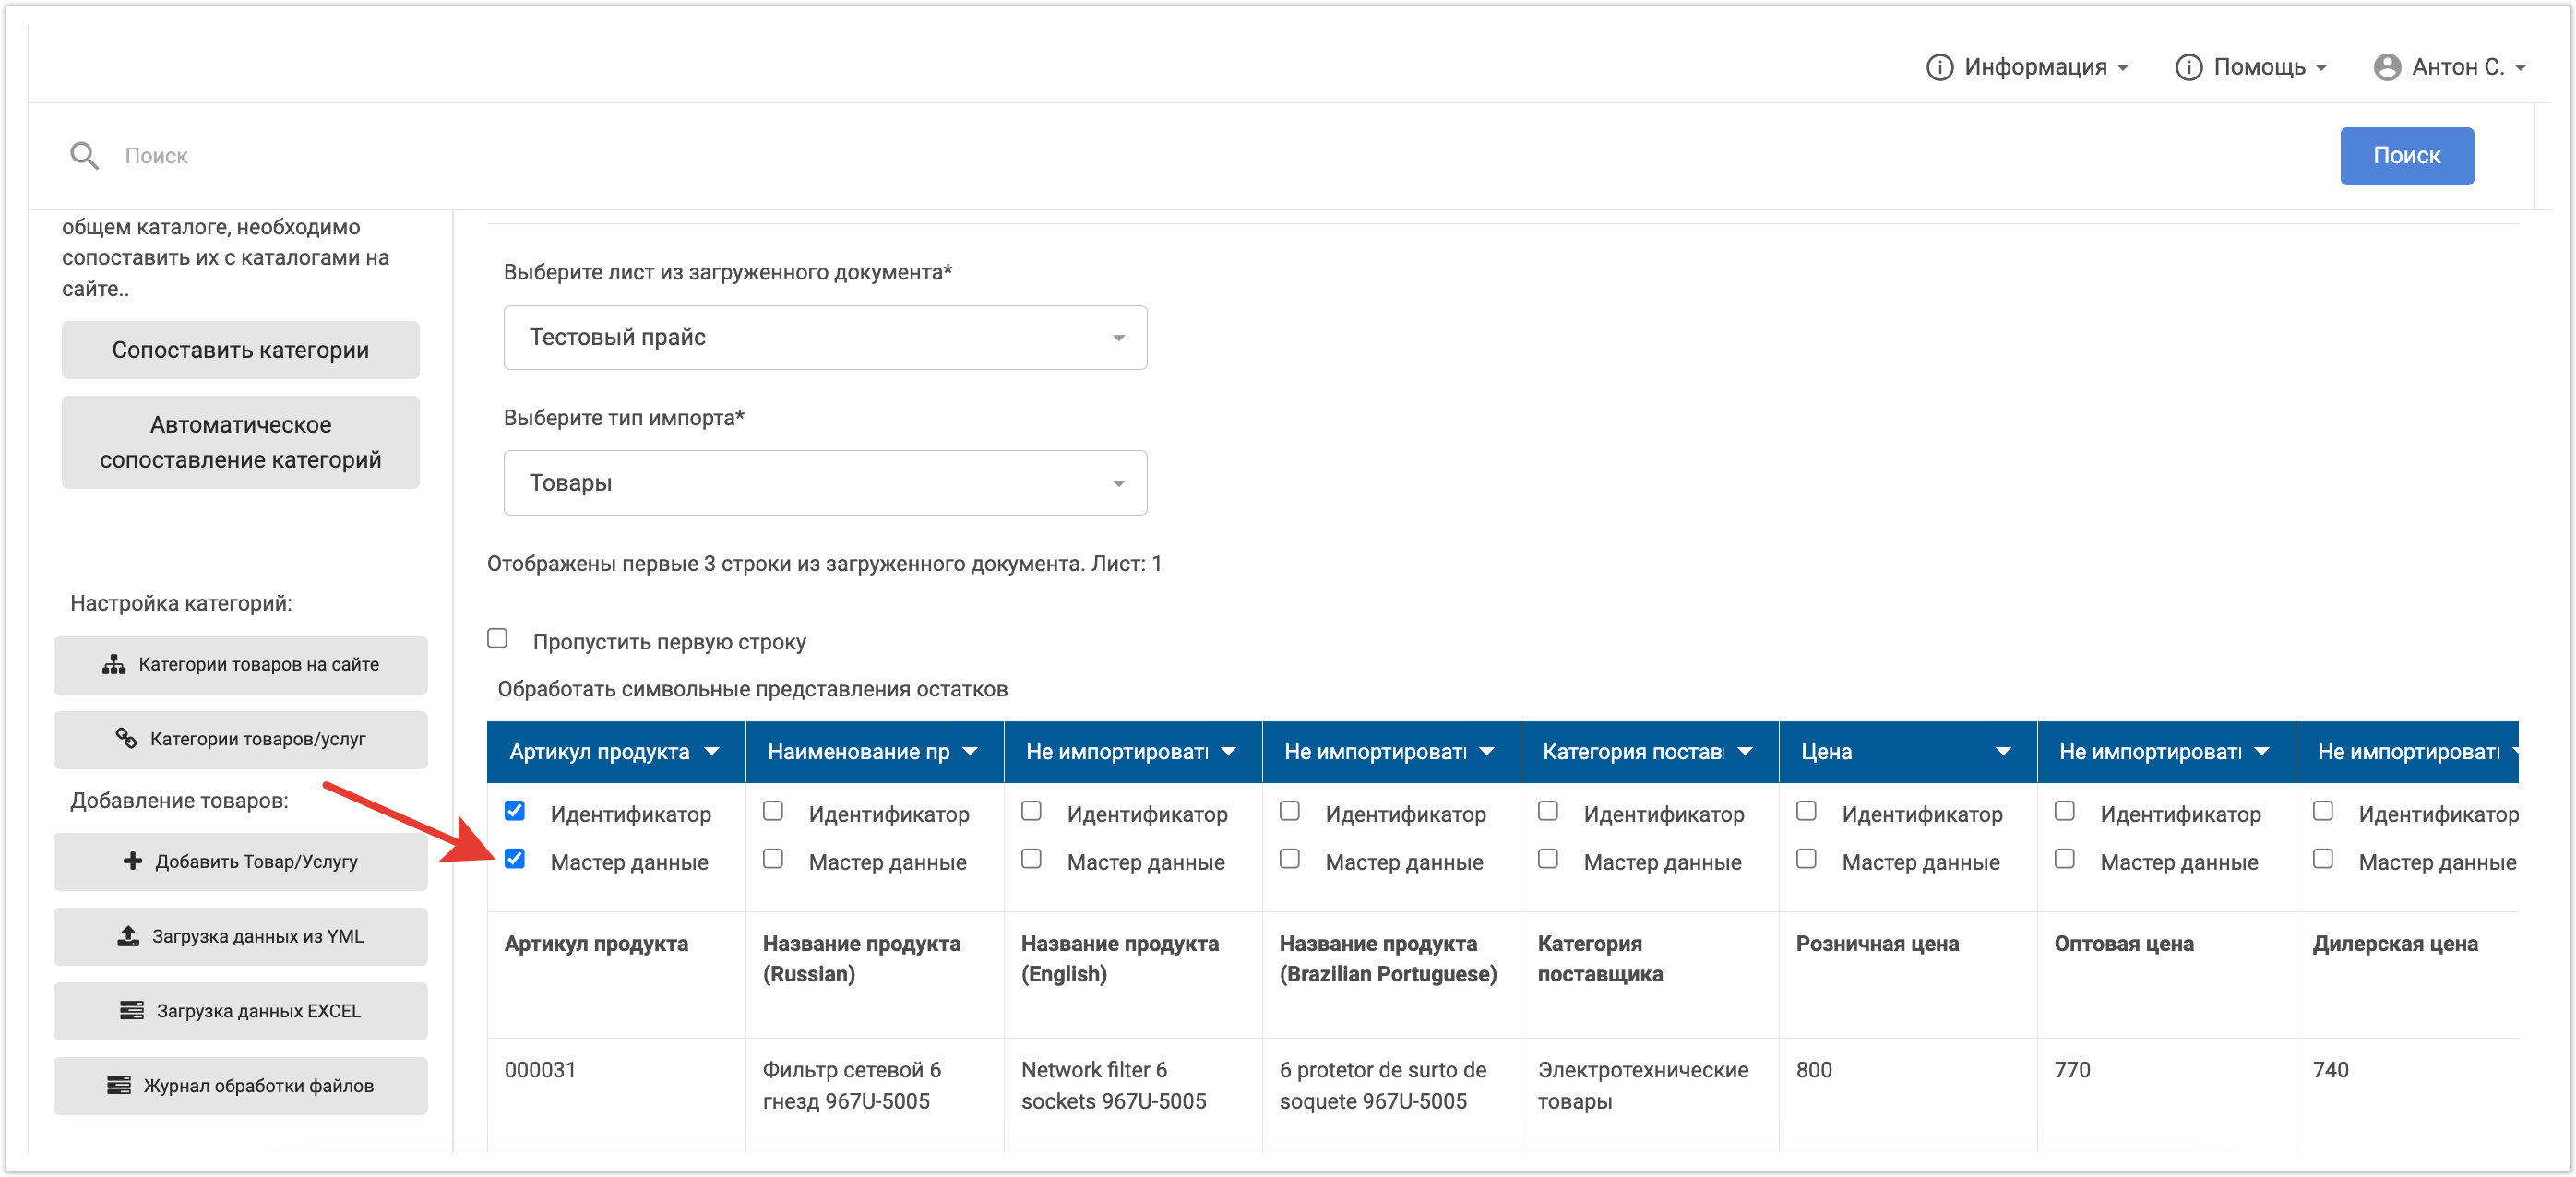
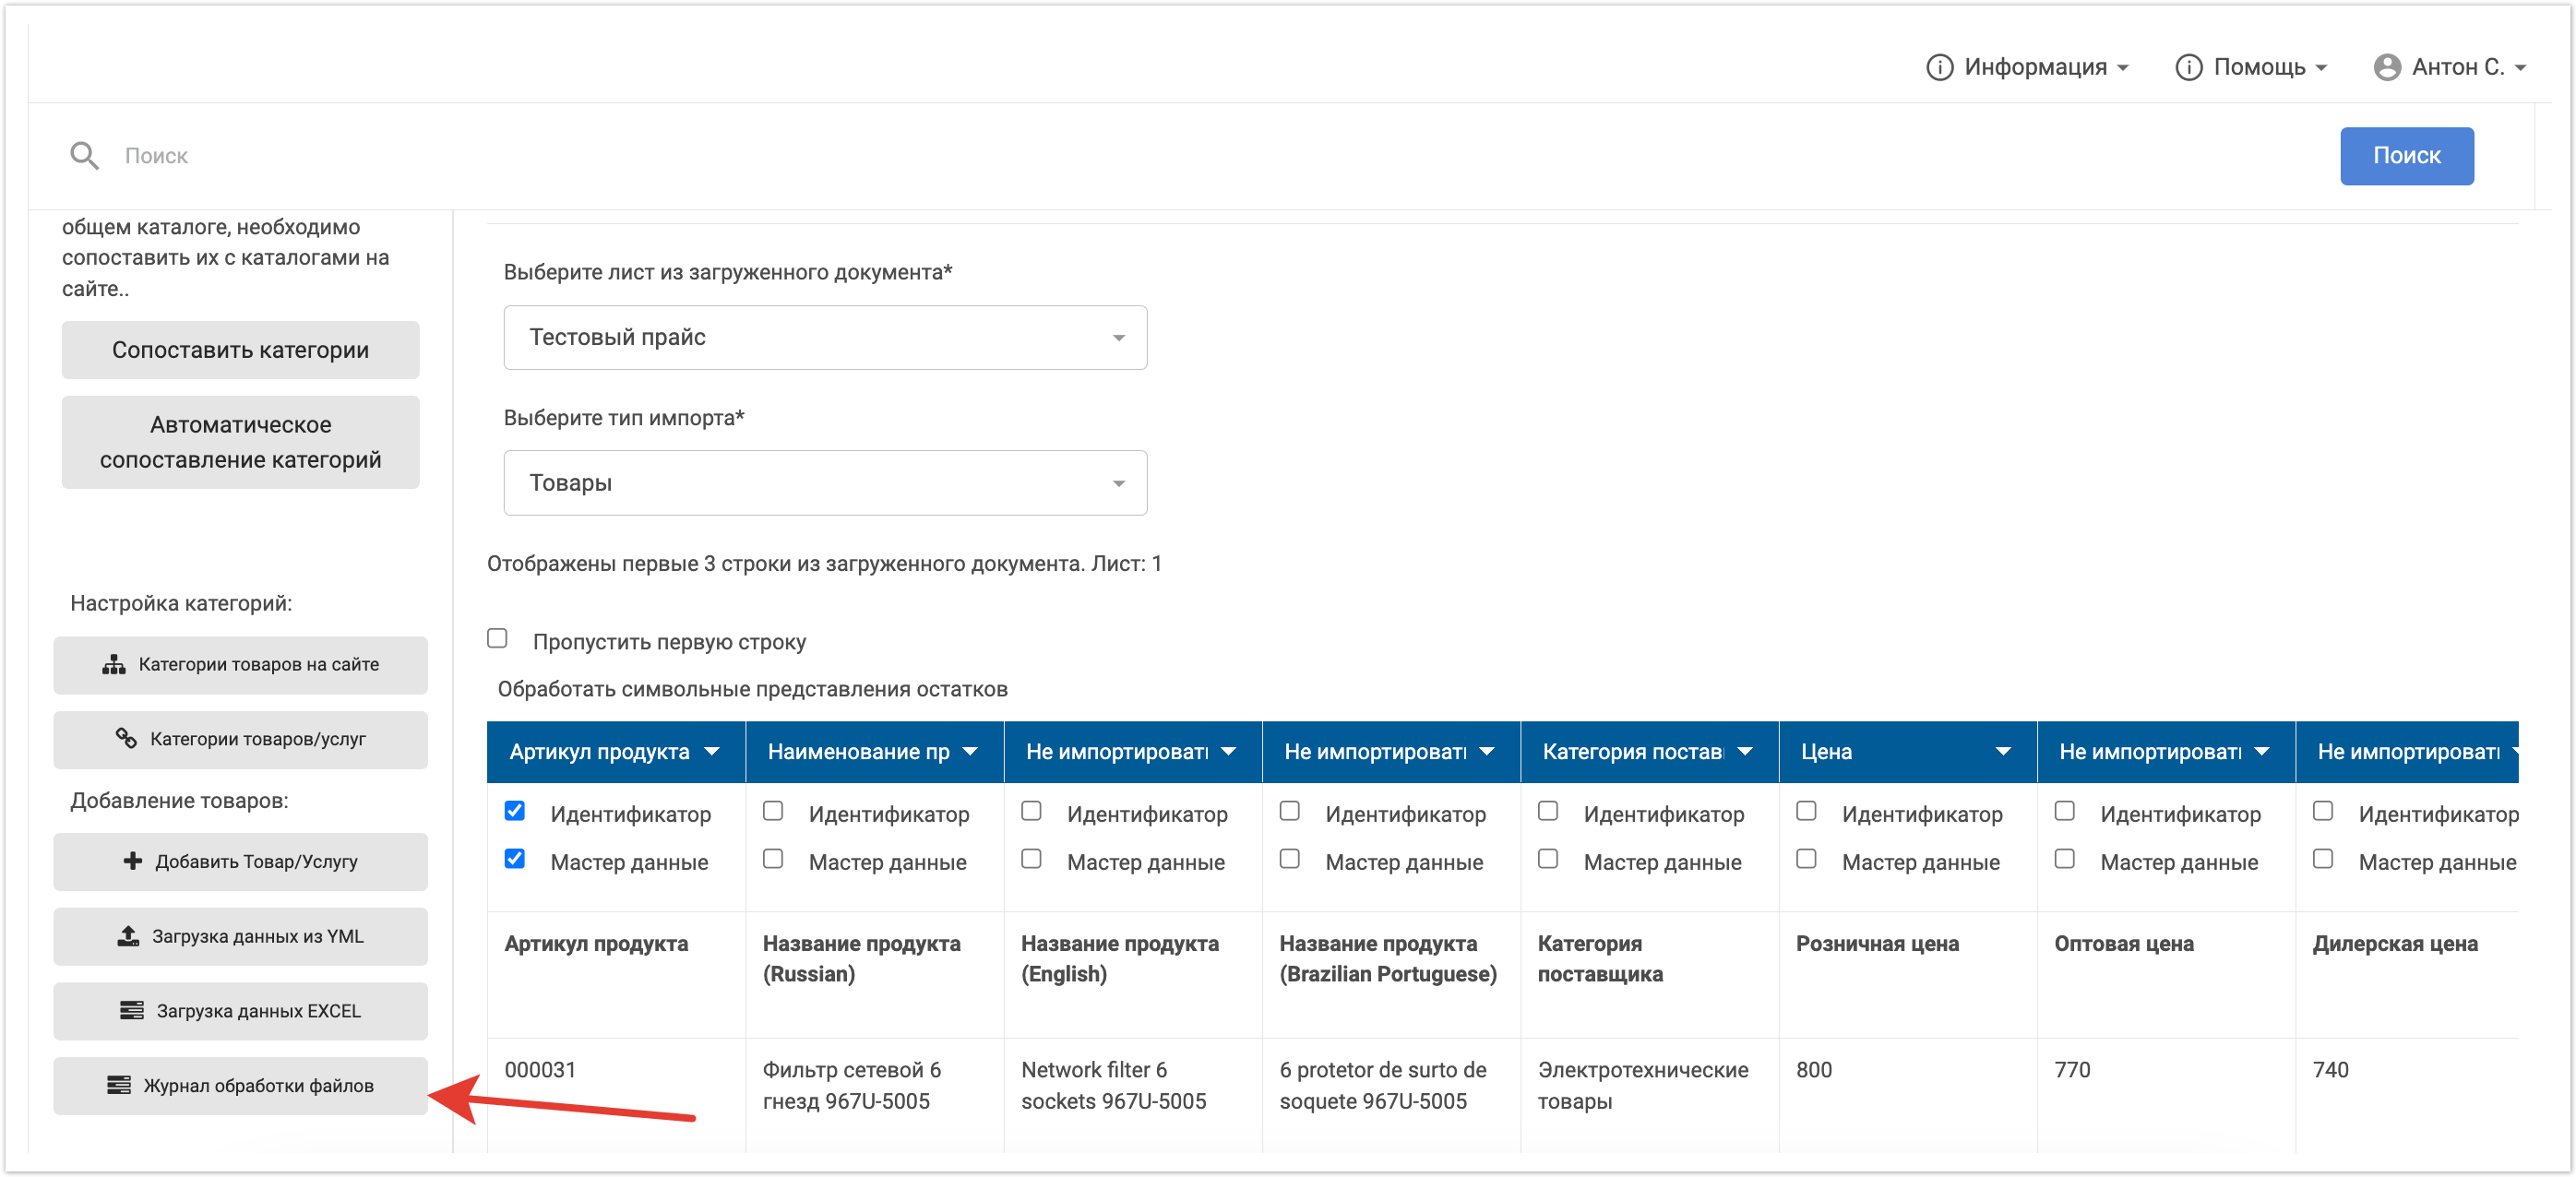
После заполнения всех параметров импорта нужно установить чек-бокс Пропустить первую строку, чтобы строка с заголовками столбцов не обрабатывалась. Далее можно запустить процесс обработки файла. Статус обработки файла можно увидеть в разделе Журнал обработки файлов. Если файл был успешно обработан, то данные по товарам запишутся на платформе. После этого они станут доступны бренд-менеджерам для редактирования и модерации.
Модерация товаров
Настройка статусов модерации
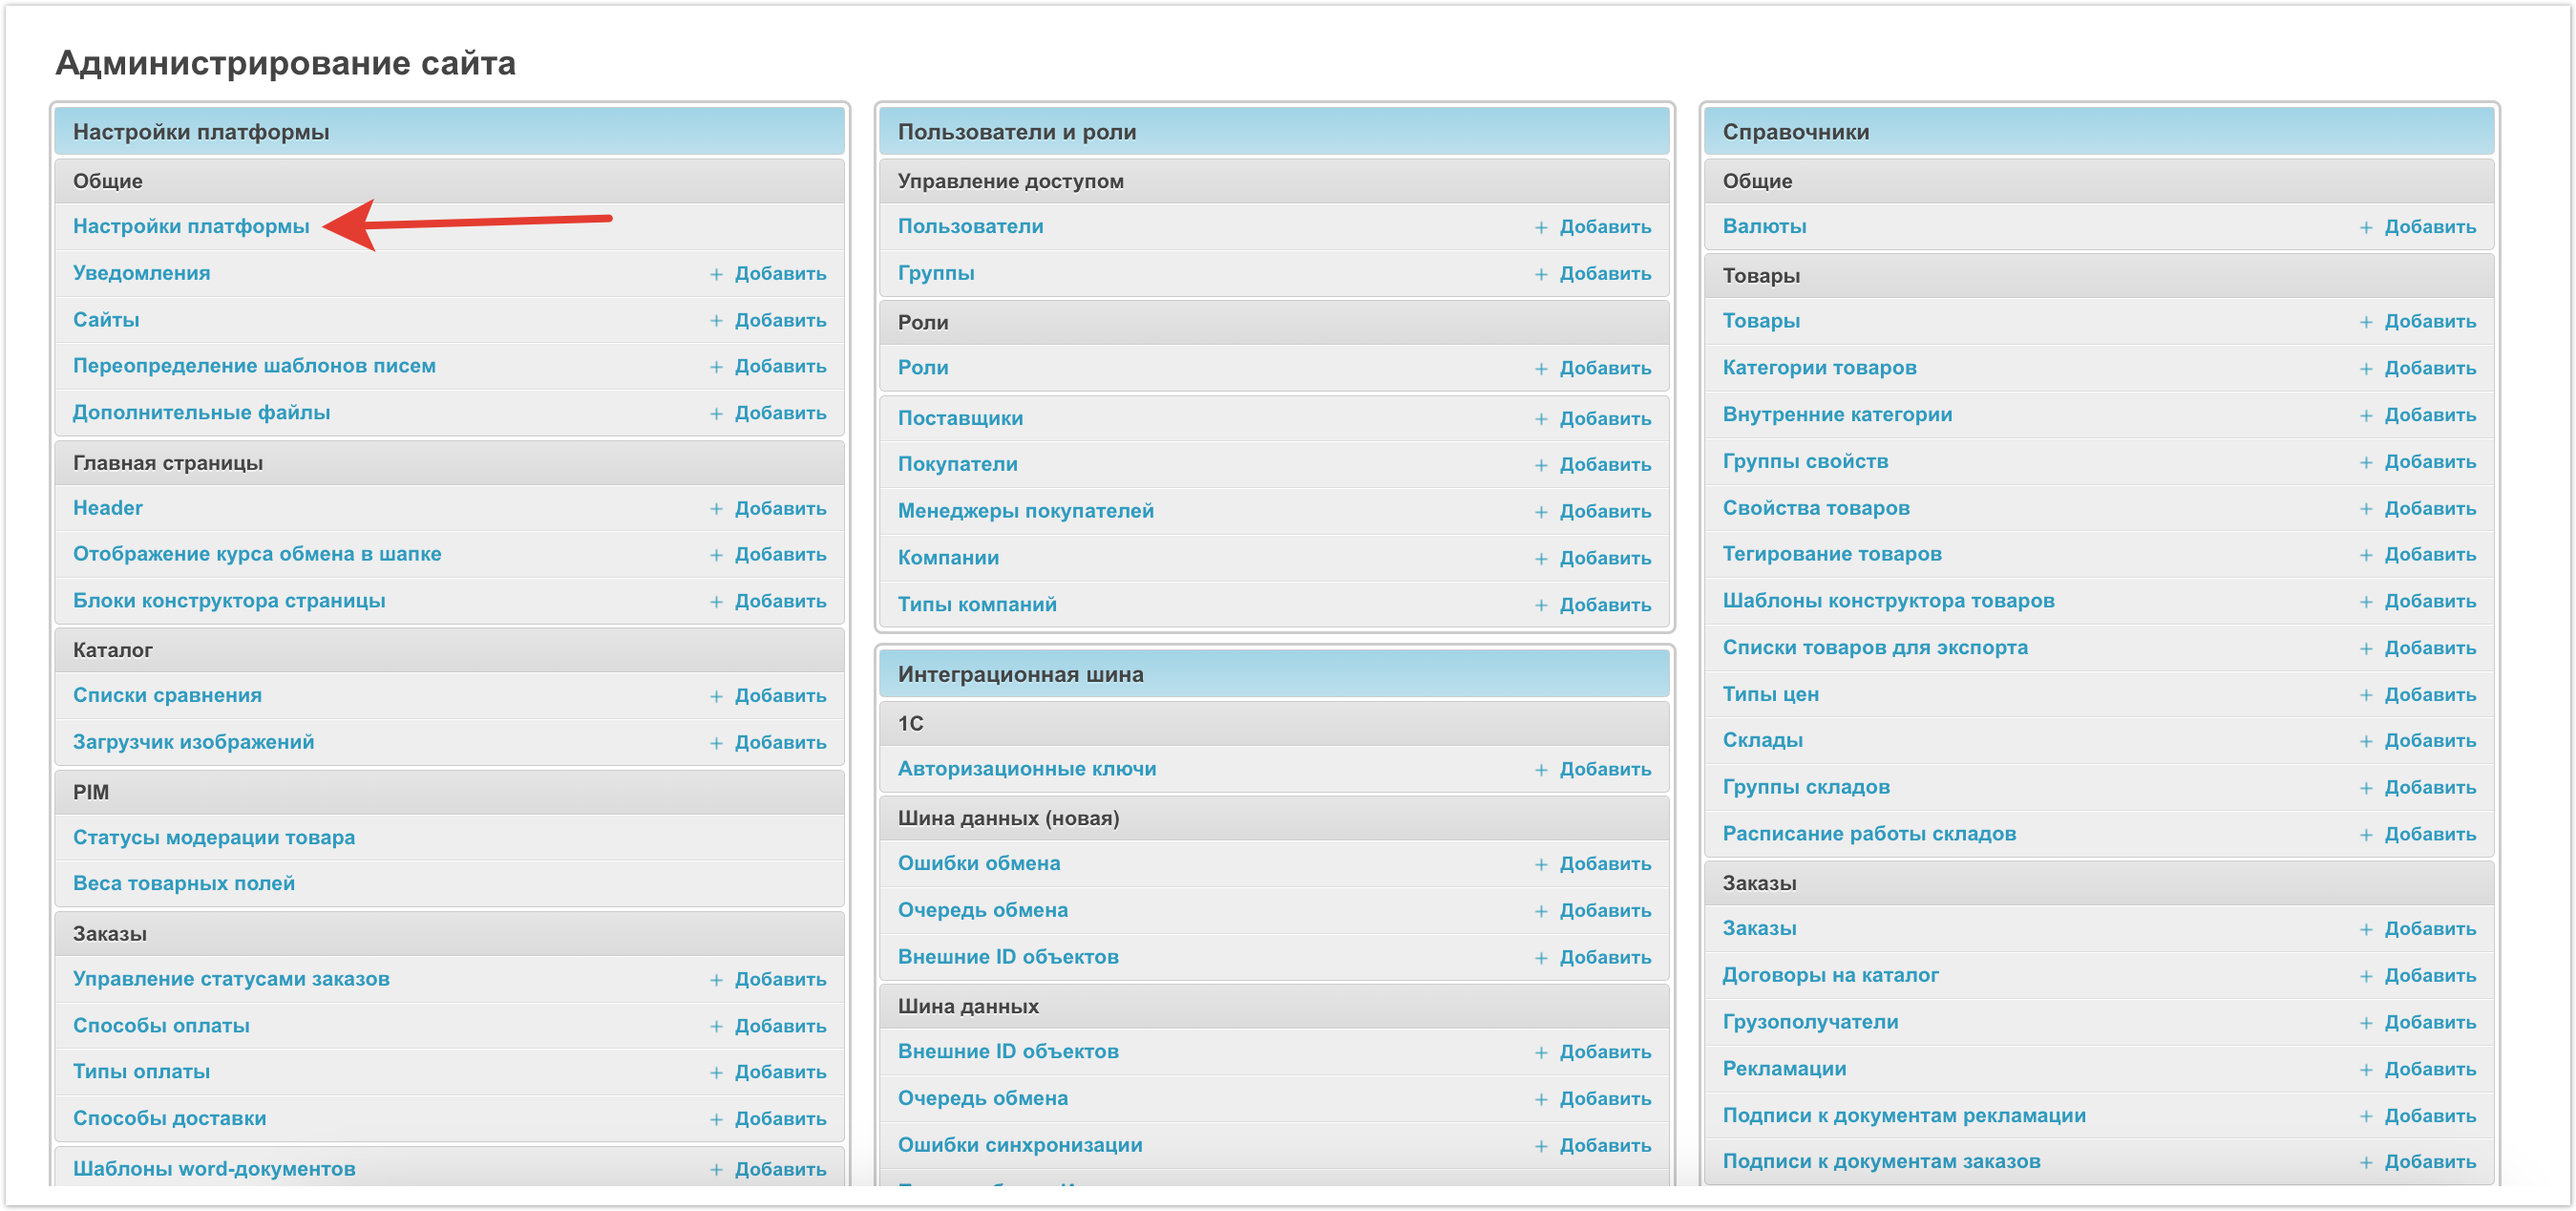
В продукте PIM разработана статусная модель для проведения процесса модерации и публикации товаров конечному пользователю платформы. Настройка статусов модерации товаров производится в разделе административной панели Статусы модерации товара.
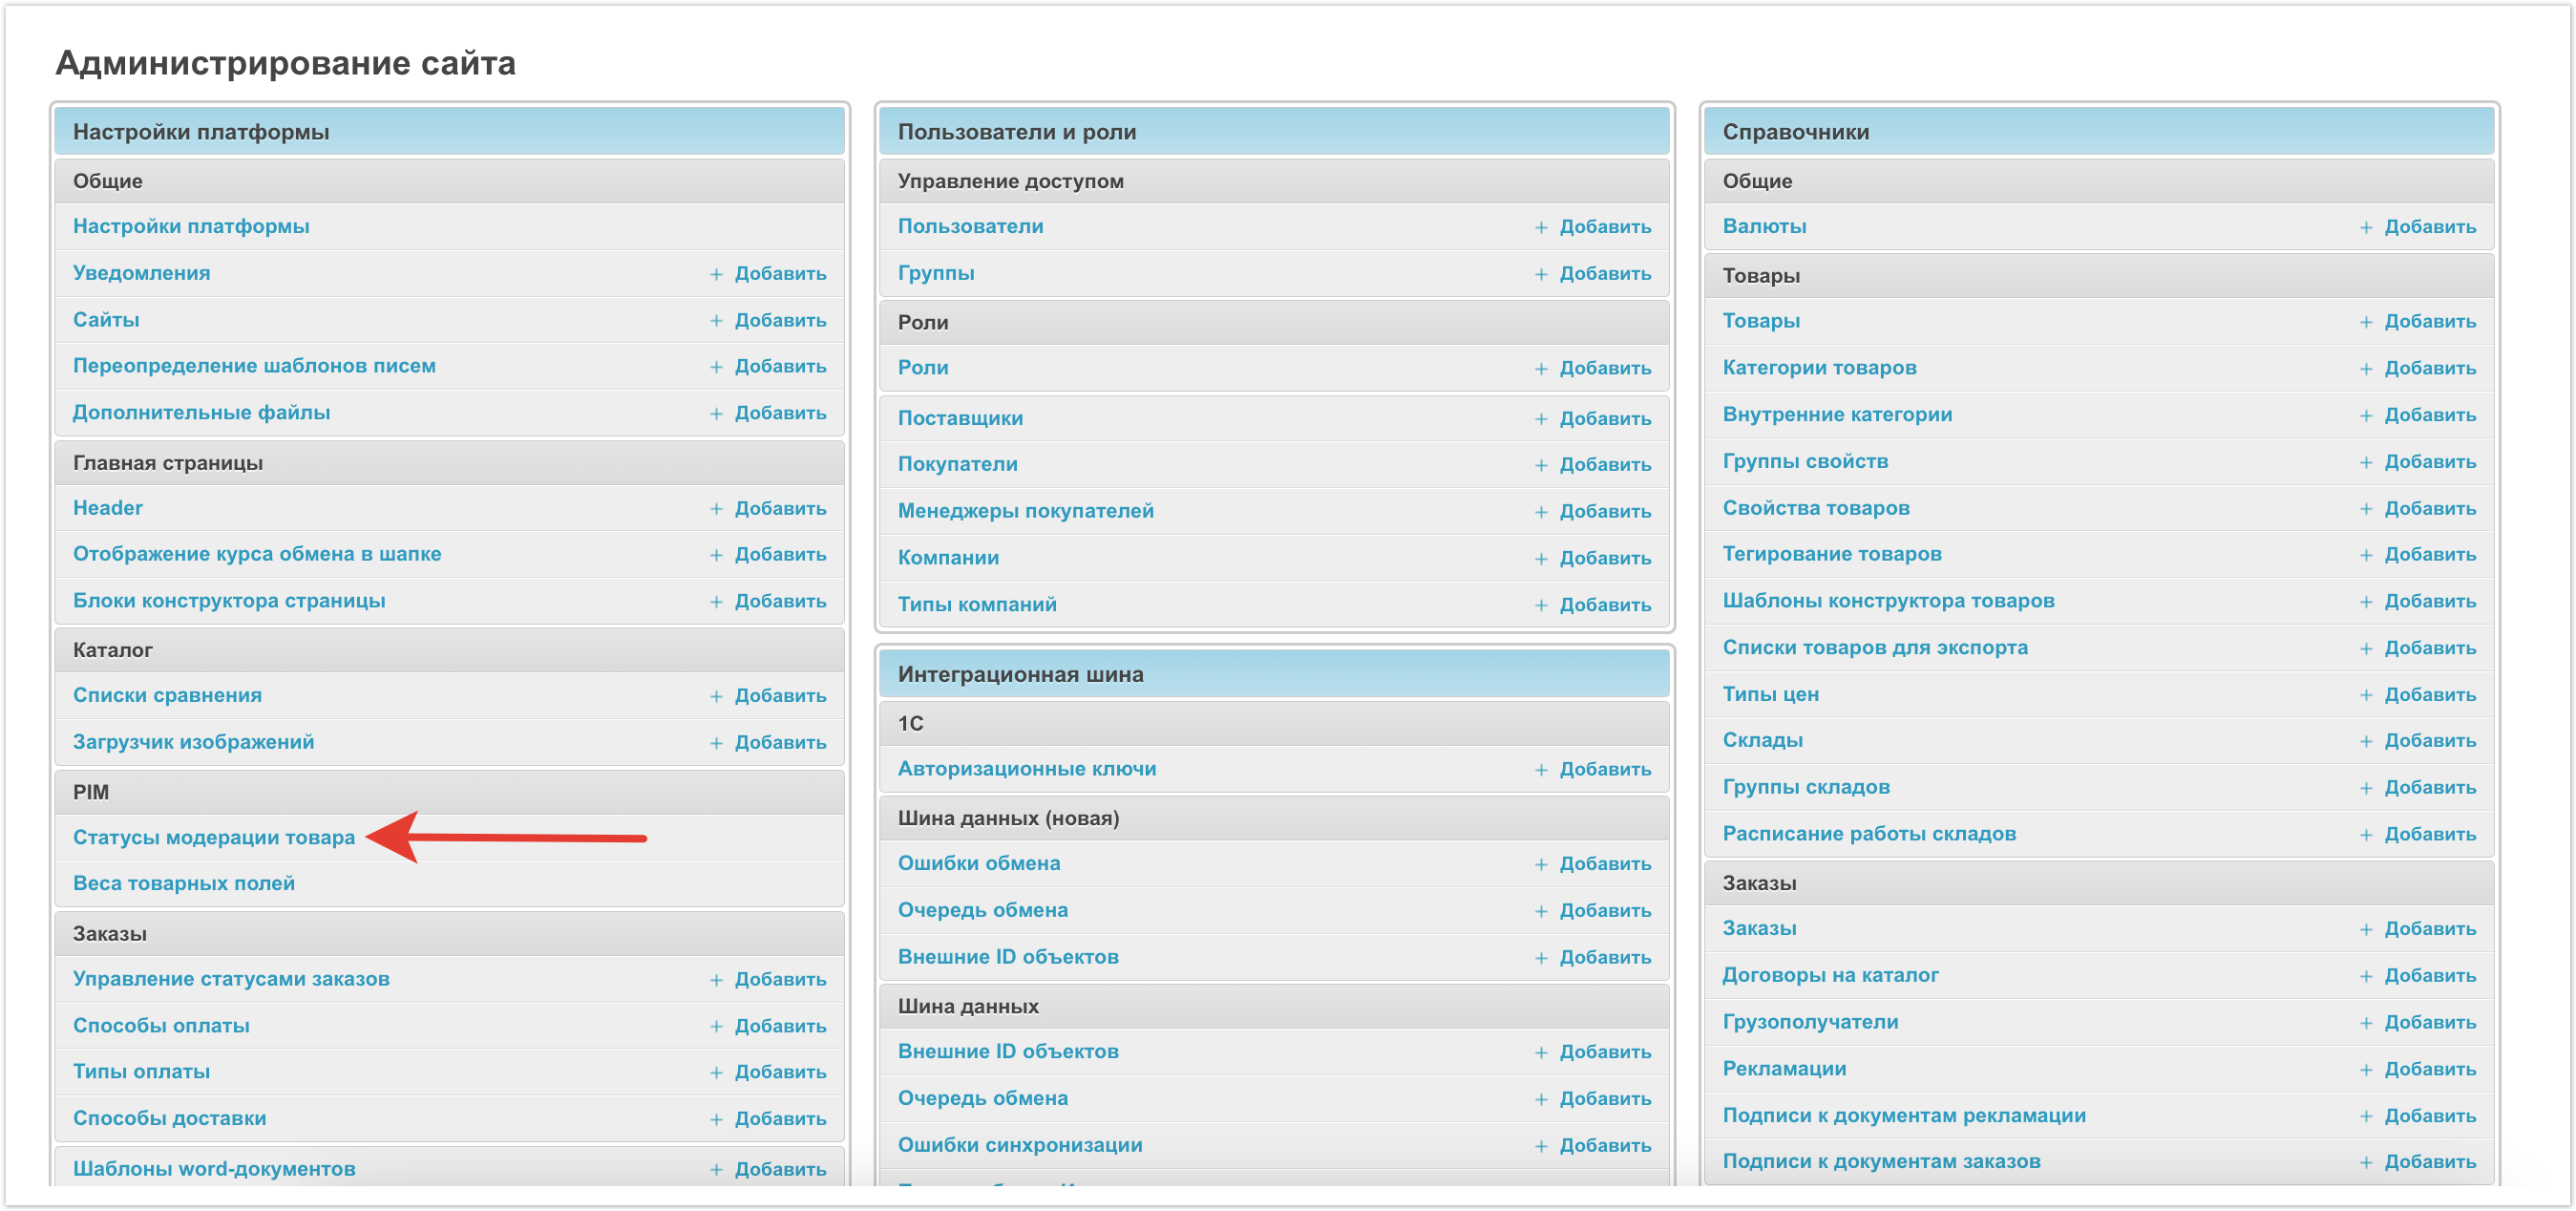
В разделе находятся все статусы модерации товаров, настройками которых администратор платформы может управлять.
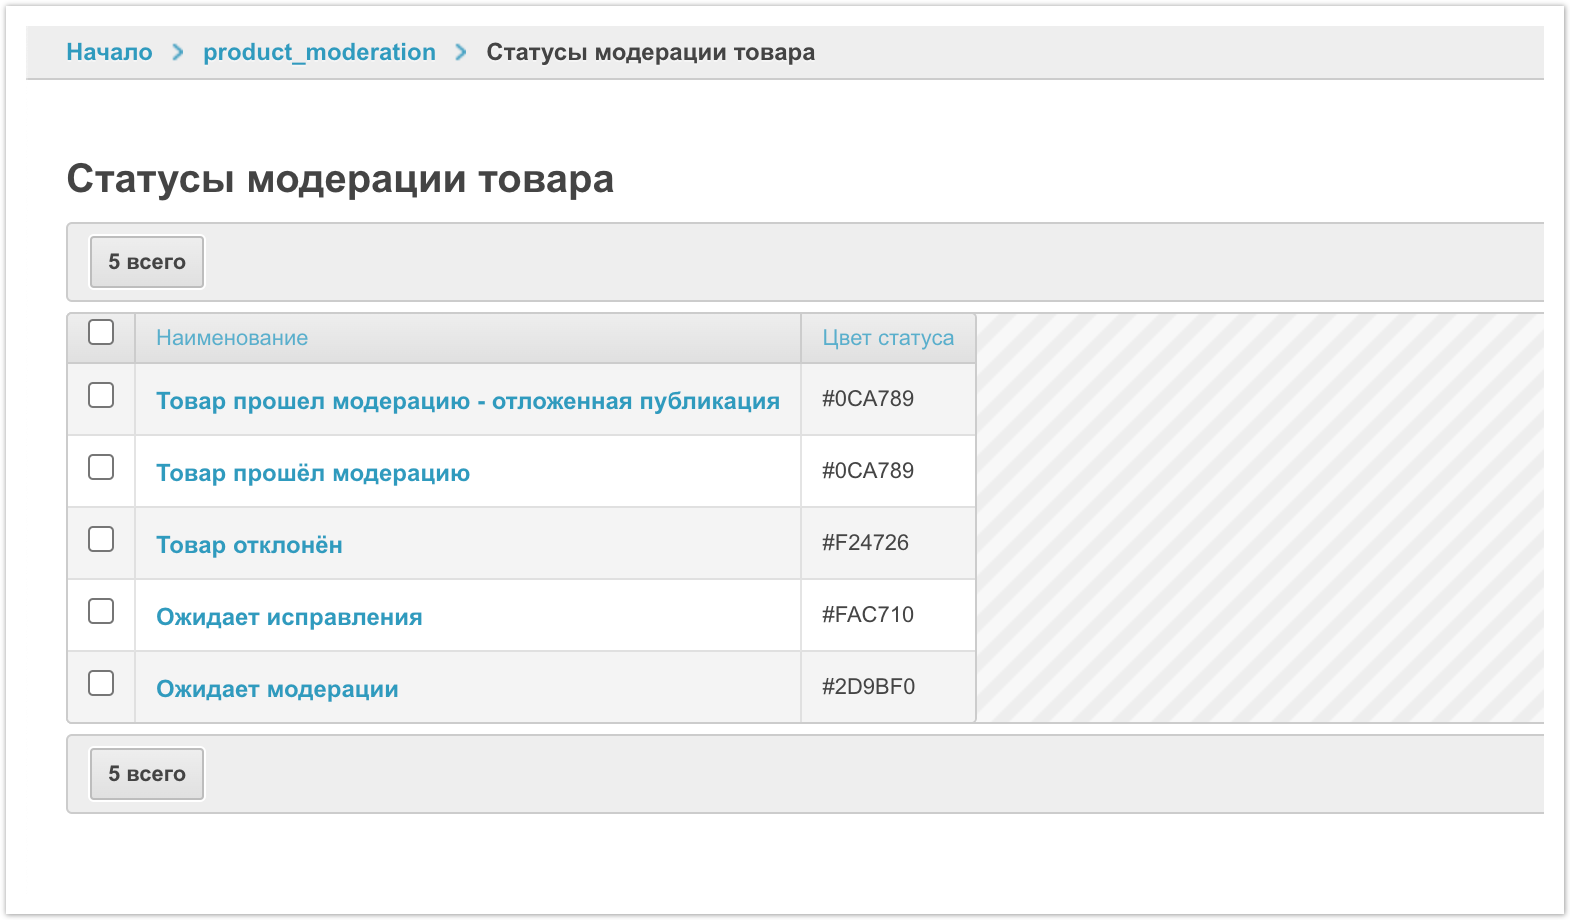
Ожидает модерации - товар загружен на площадку и попал в зону ответственности менеджера. Данный товар не отображается покупателям, поскольку еще не прошел проверку.
Ожидает исправления - этот статус присваивается товару в случае, если бренд-менеджер взял его в работу, но для публикации не достаточно данных. Например, бренд-менеджеру не достаточно изображений, и он запрашивает их у другого сотрудника компании, либо уточняет какие-либо детали о значениях характеристик или детали описания. В этом статусе товар не опубликован в открытом каталоге и не доступен покупателям.
Товар отклонен - товар был загружен на платформу, но ни при каких условиях он не может быть проверен и опубликован в открытом каталоге. Например, это какой-либо товар не подходящий под тематику площадки, или ошибочно загруженный товар. В этом случае, ему можно присвоить данный статус. Товар будет сохранен в базе, но он не будет доступен в каталоге покупателей.
Товар прошёл модерацию - данный статус присваивается товару, когда ответственный сотрудник провел проверку и редактирование карточки товара и убедился в том, что все параметры номенклатуры и контент соответствуют требованиям компании. В этом случае товару выставляется данный статус и он становится доступным для покупателей. Покупатель может найти товар в каталоге с помощью инструментов поиска, просмотреть карточку товара, сравнить его, добавить в избранное, купить и добавить его к файлу экспорта для выгрузки контента.
Товар прошел модерацию - отложенная публикация - данный статус используется в случае, если требуется отложить публикацию товара на определенный день и время. Например, компания выводит на рынок новый продукт. В этом случае, товар может быть импортирован на площадку и проверен заранее. Для товара выбирается дата и время, когда он должен быть опубликован в каталоге покупателей и товар публикуется автоматически в заданные дату и время.
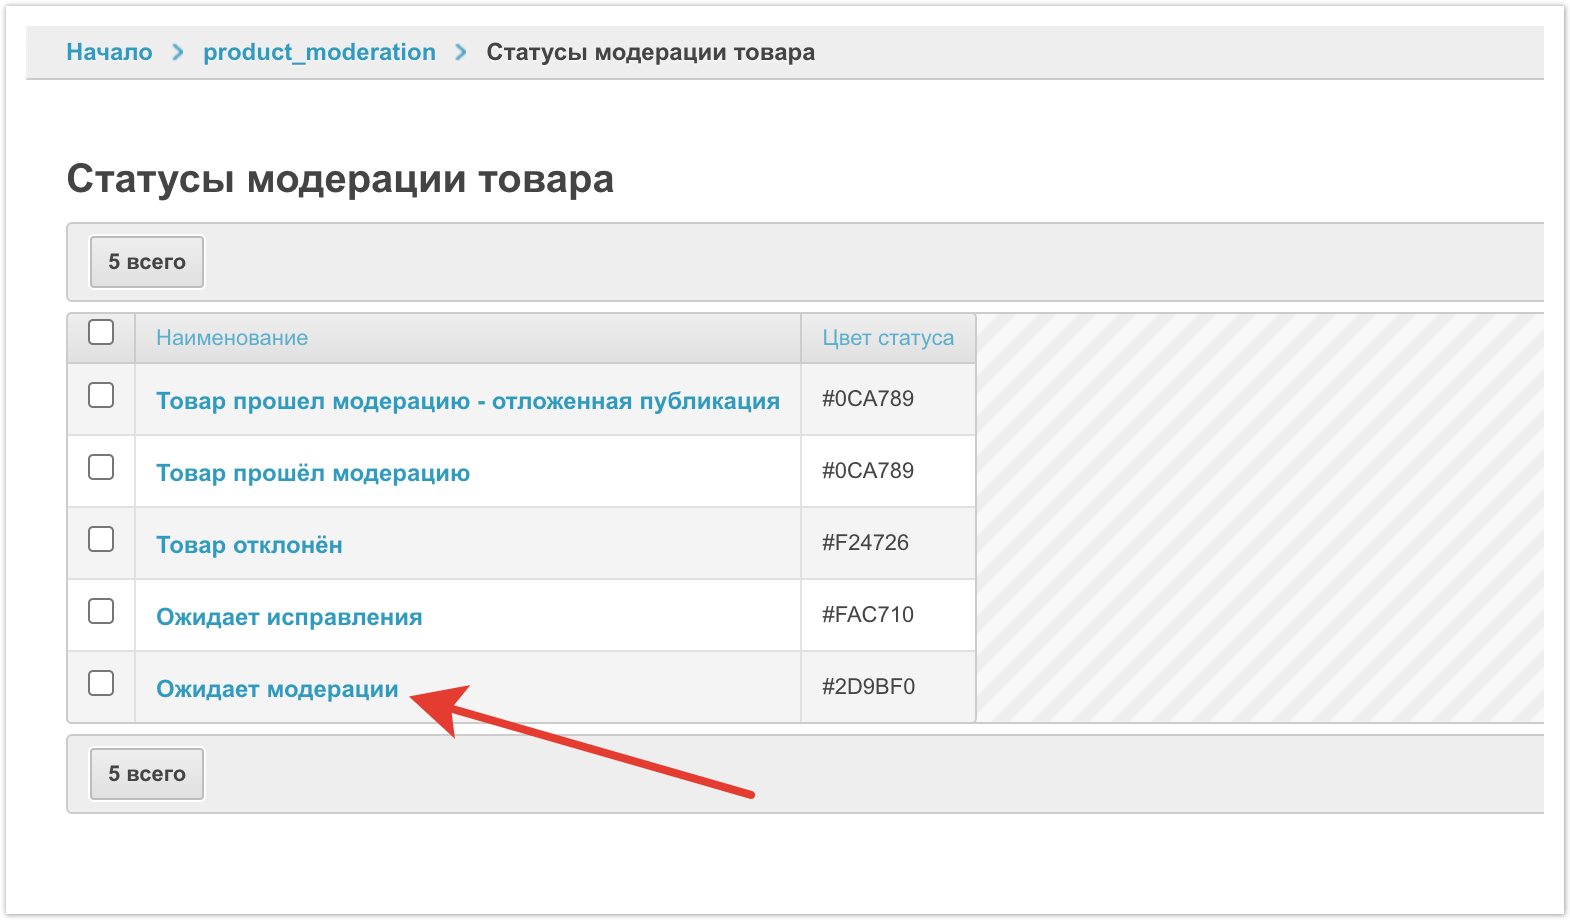
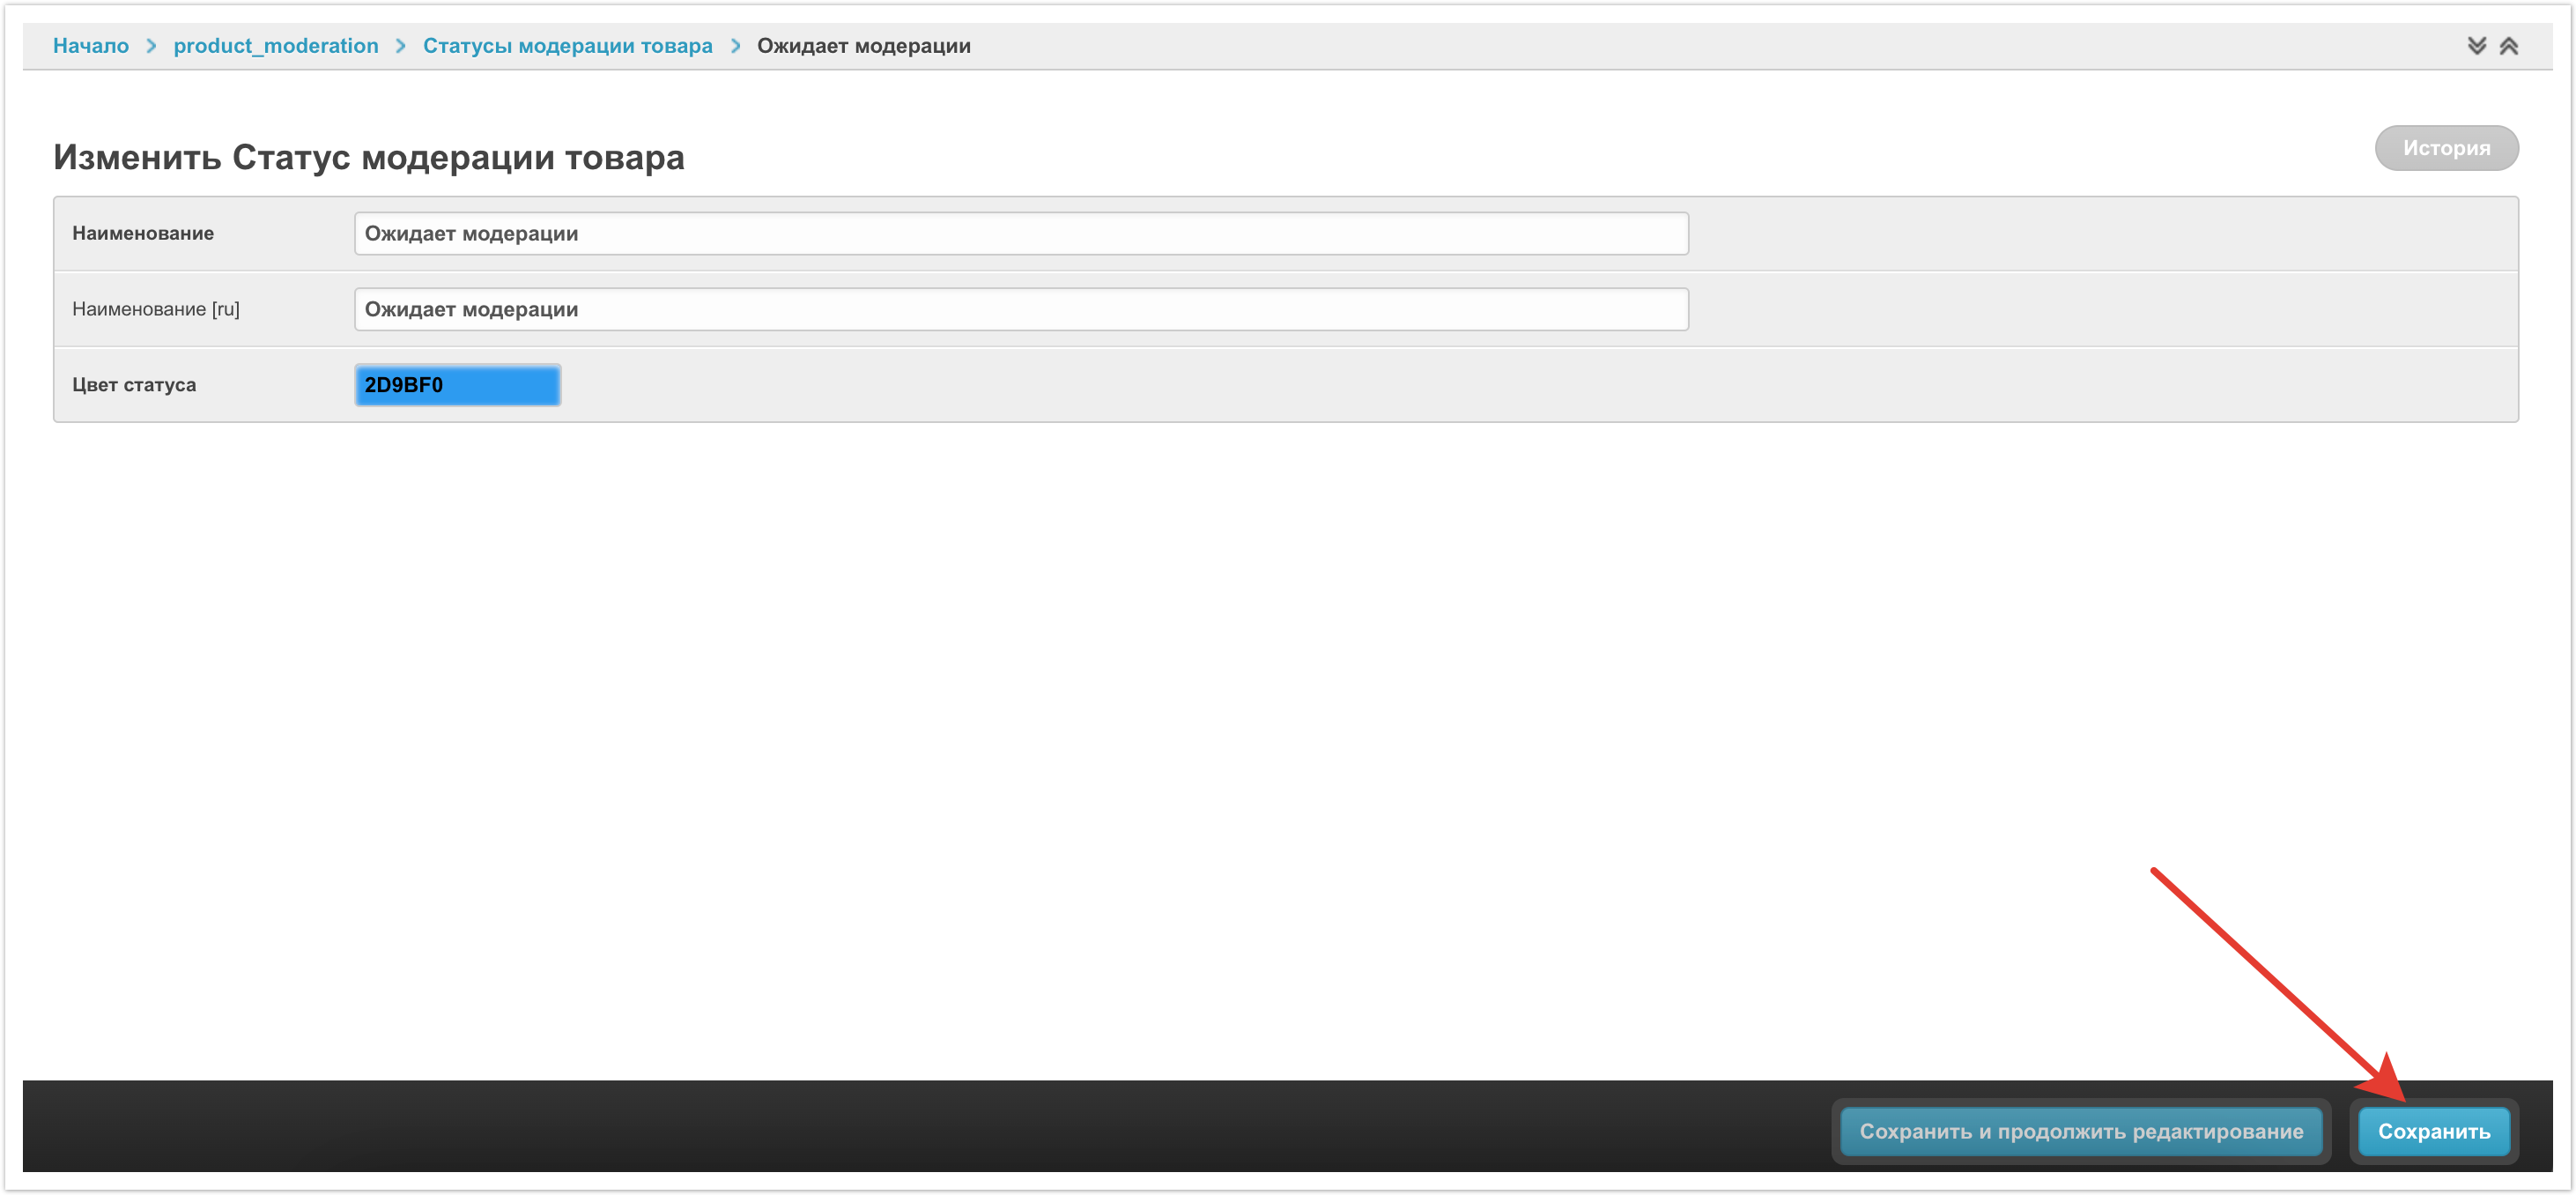
Чтобы изменить настройки статуса, кликните по его названию.
На открывшейся странице будут указаны текущие настройки.
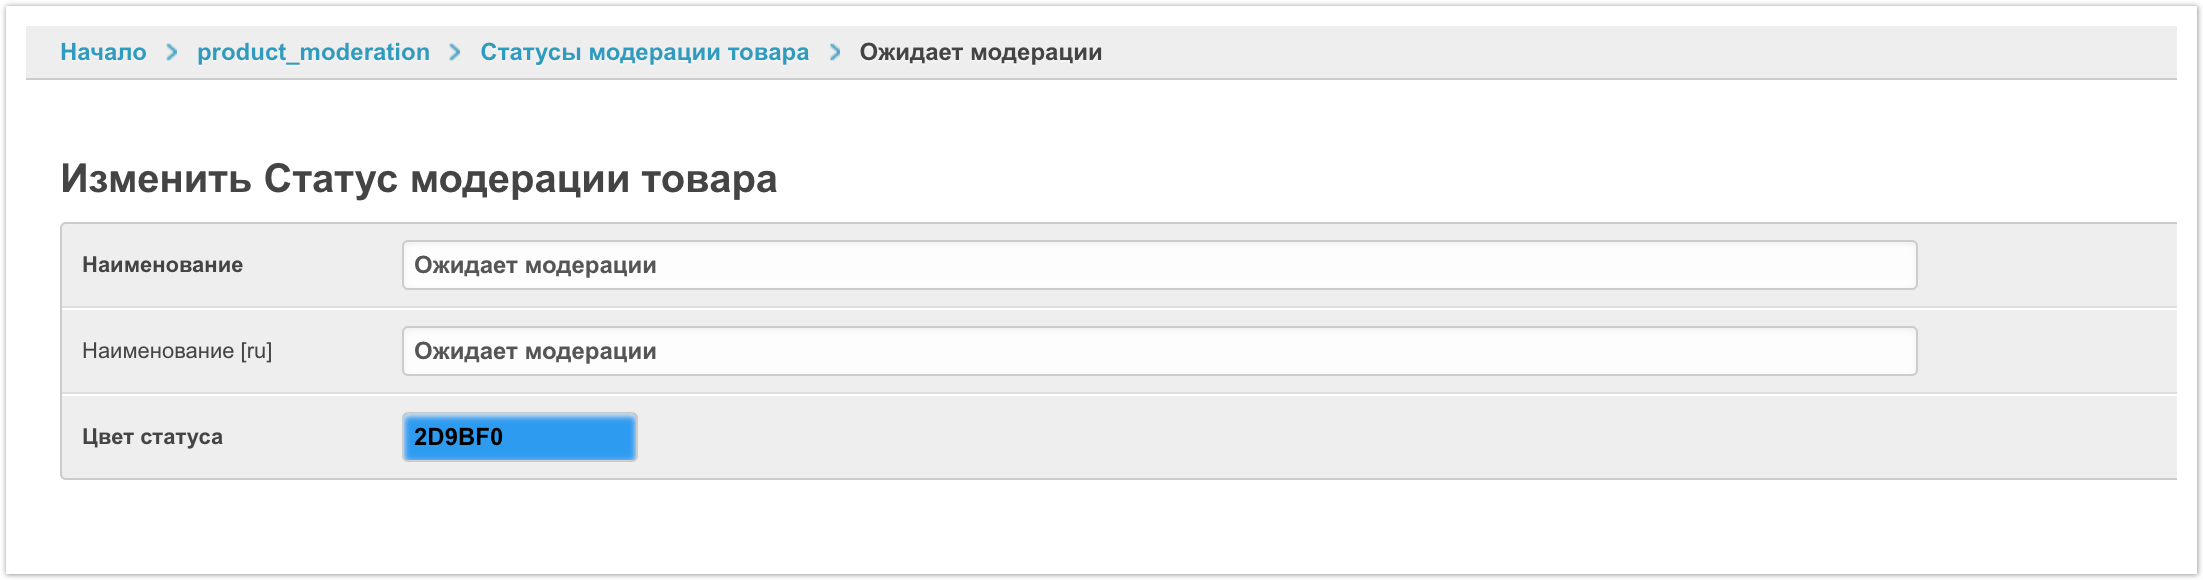
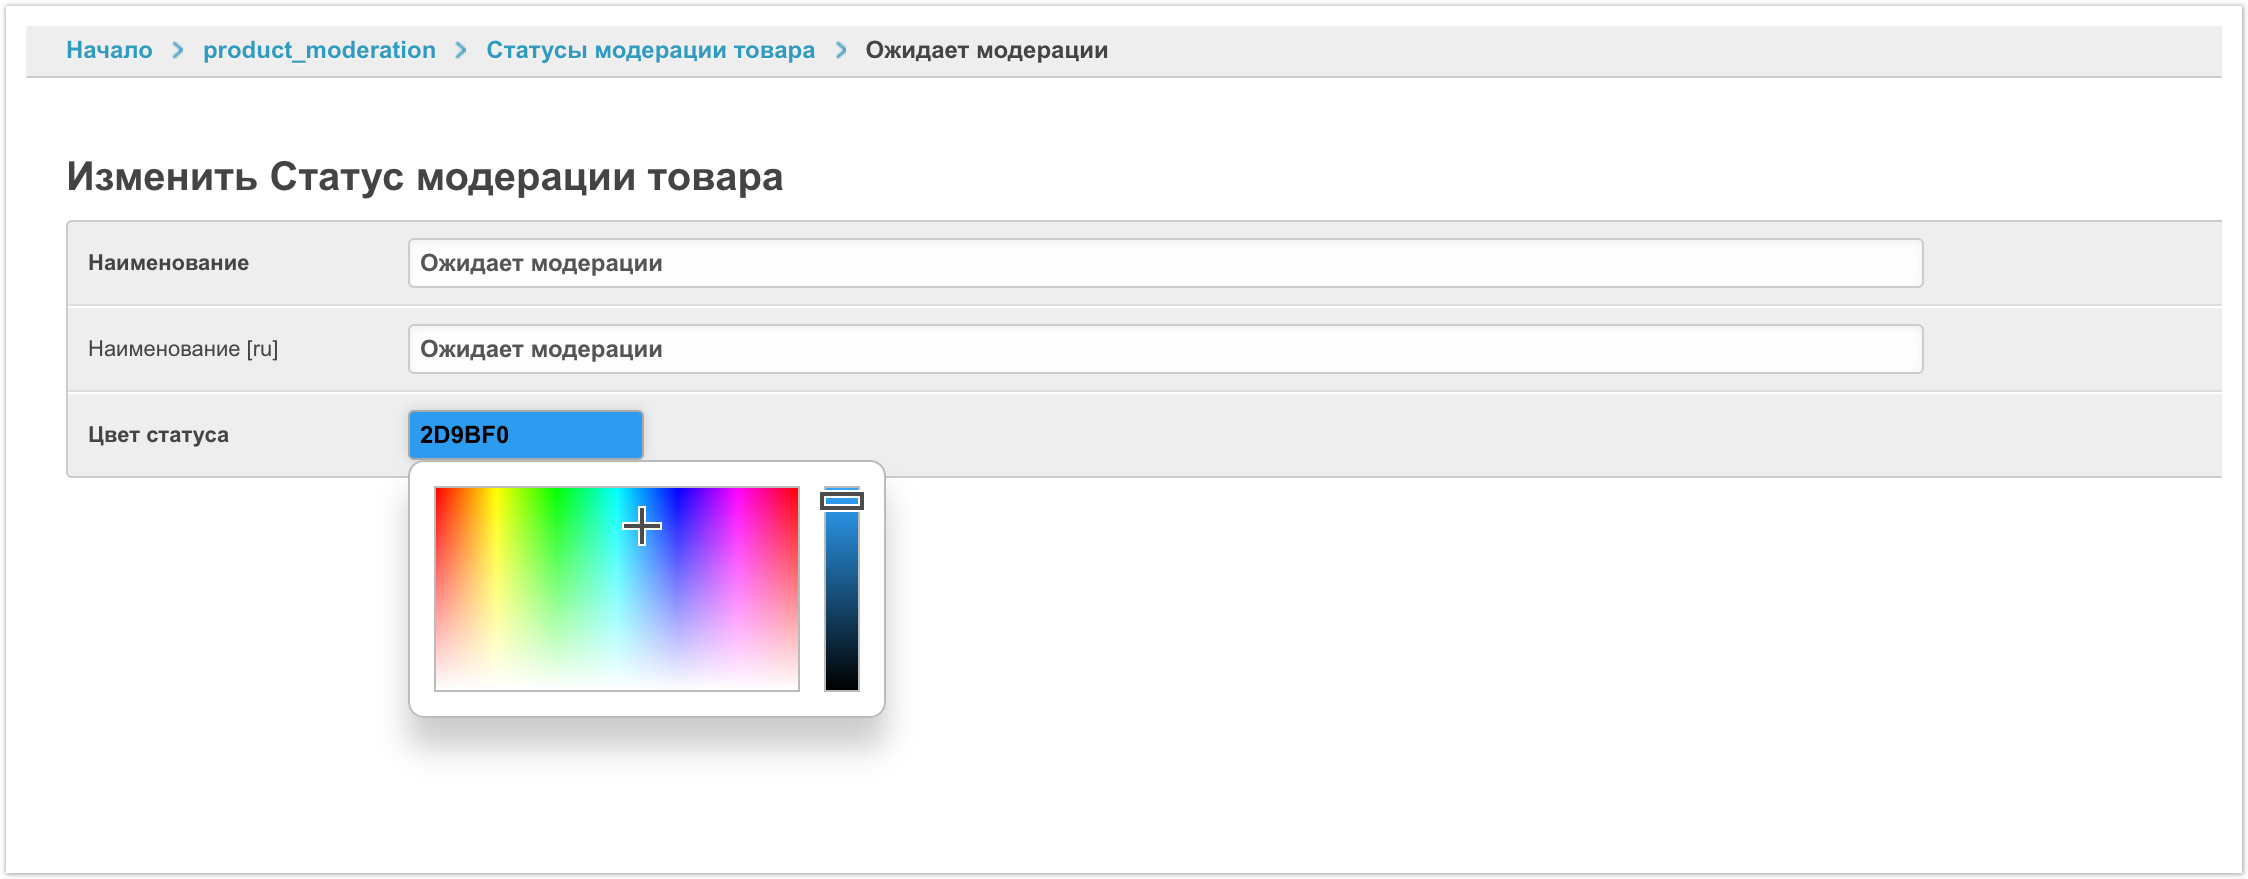
Вы можете изменить название на русском и других языках, если они подключены. А также можно изменить цвет статуса с помощью палитры или указав шестизначный код цвета.
Чтобы изменения вступили в силу, Сохраните изменения.
Если необходимо вернуть исходные настройки статусов модерации товаров, нужно в панели массовых операций выбрать Вернуть наименование статусов по умолчанию. Выделять отдельные статусы чек-боксами при этом не нужно.

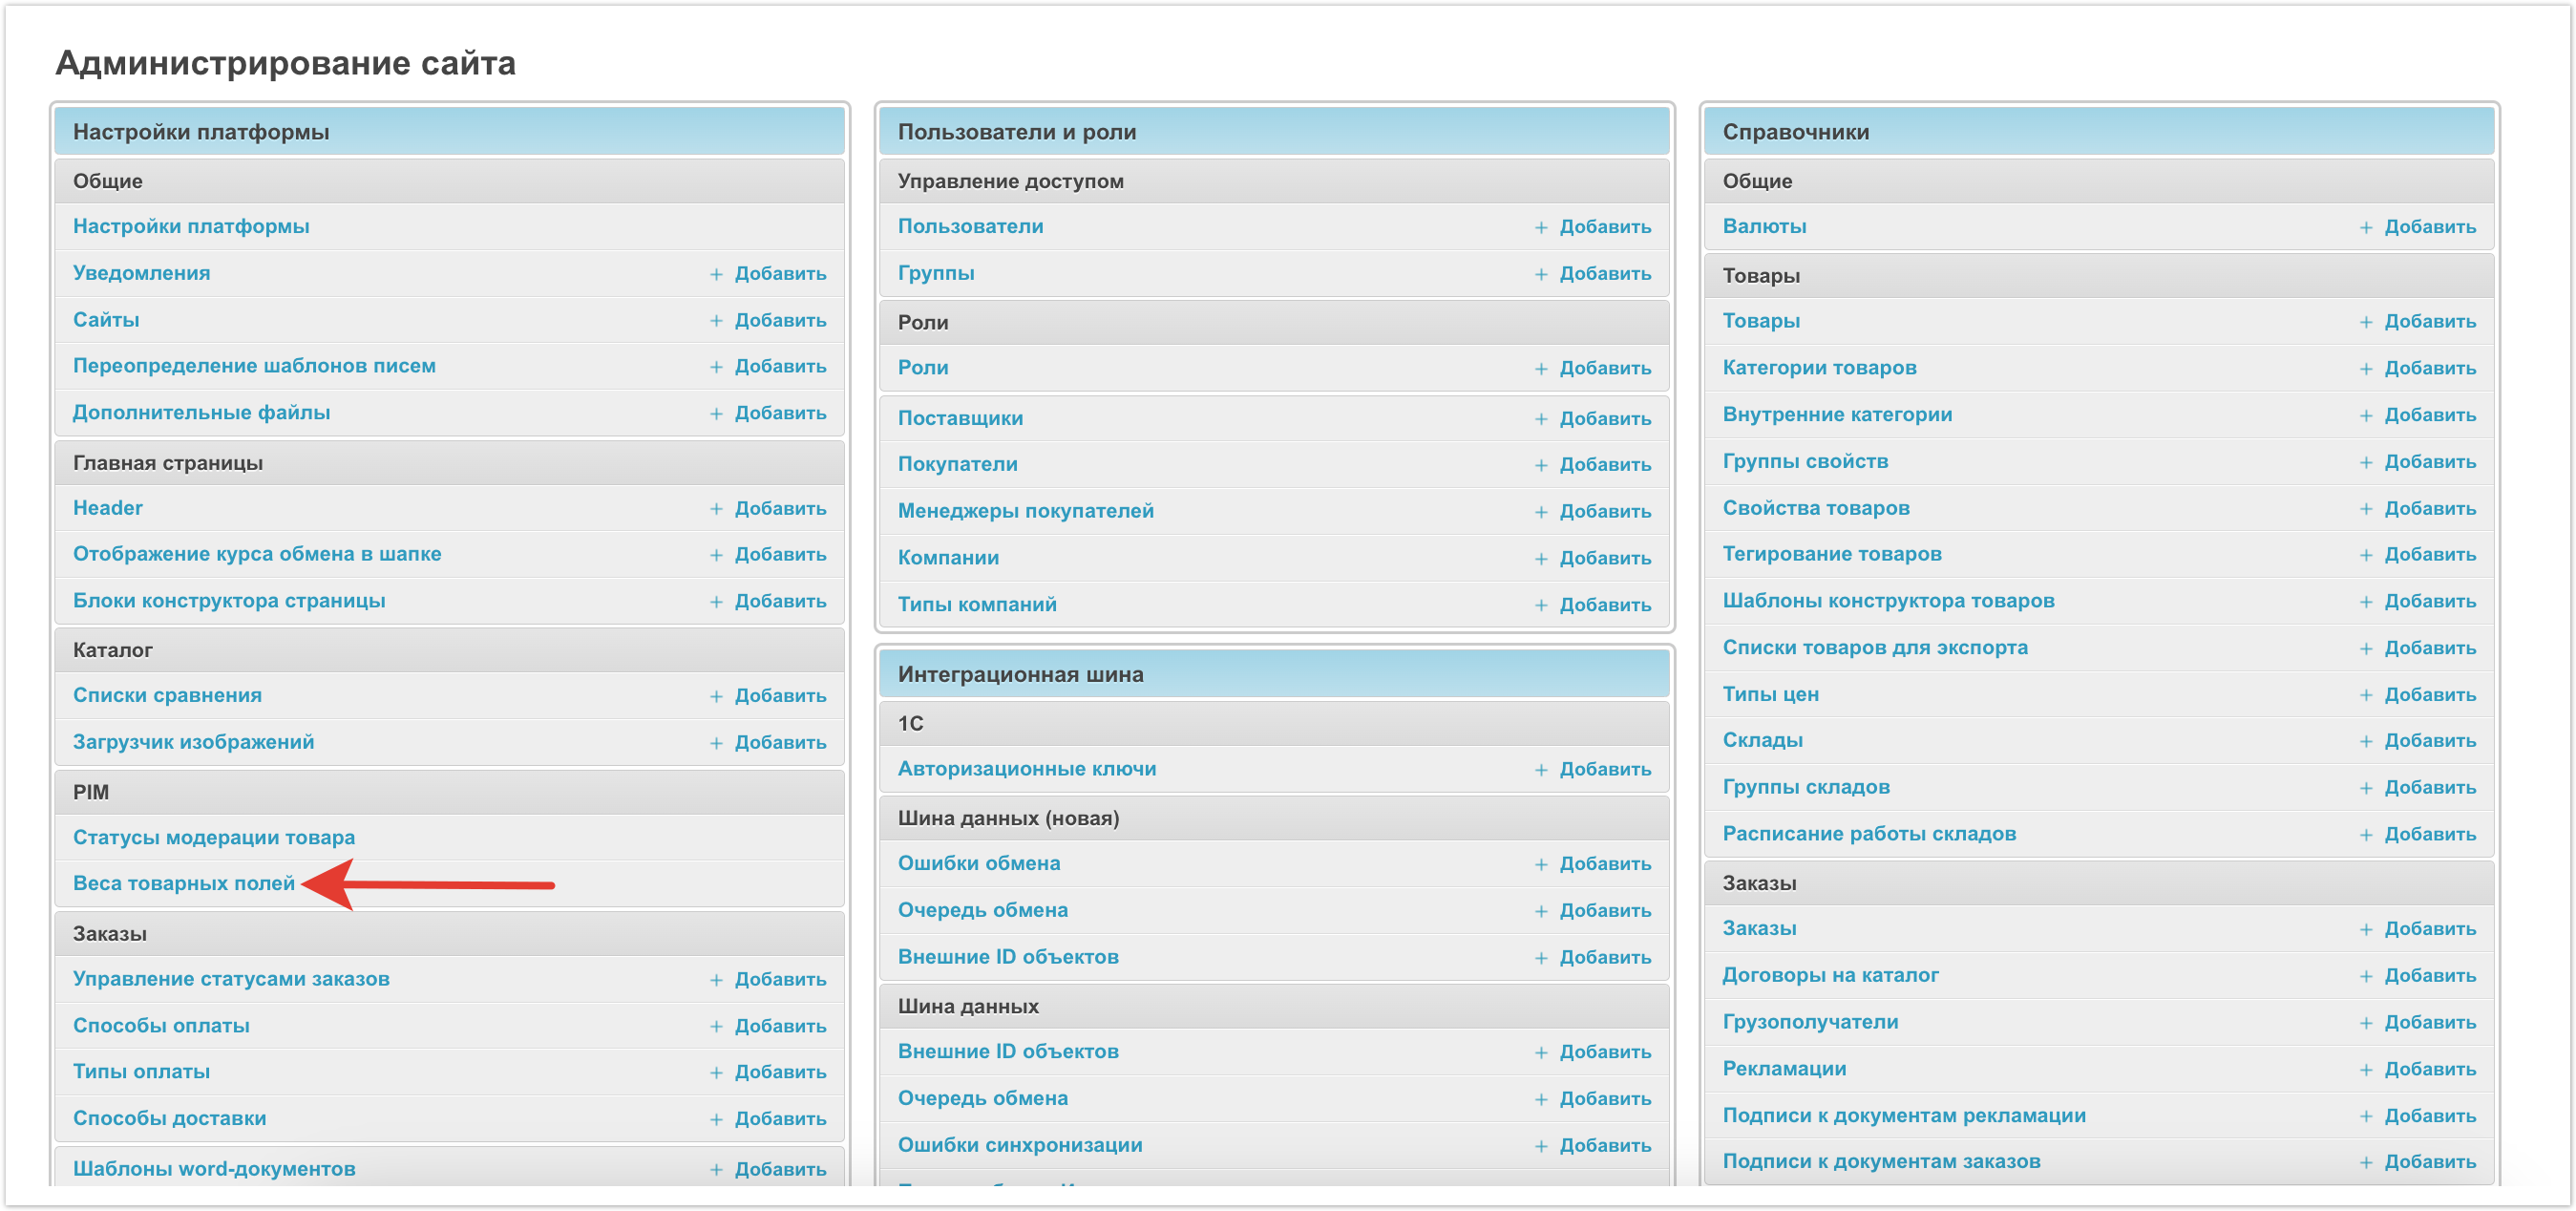
Настройка весов товарных полей
Чтобы наглядно видеть процент заполнения карточки товара нужно настроить Веса товарных полей. Настройка выполняется в одноименном разделе панели администратора.
На открывшейся странице будет список полей товара, для которых можно задать и вес при расчете процента заполнения карточки товара.
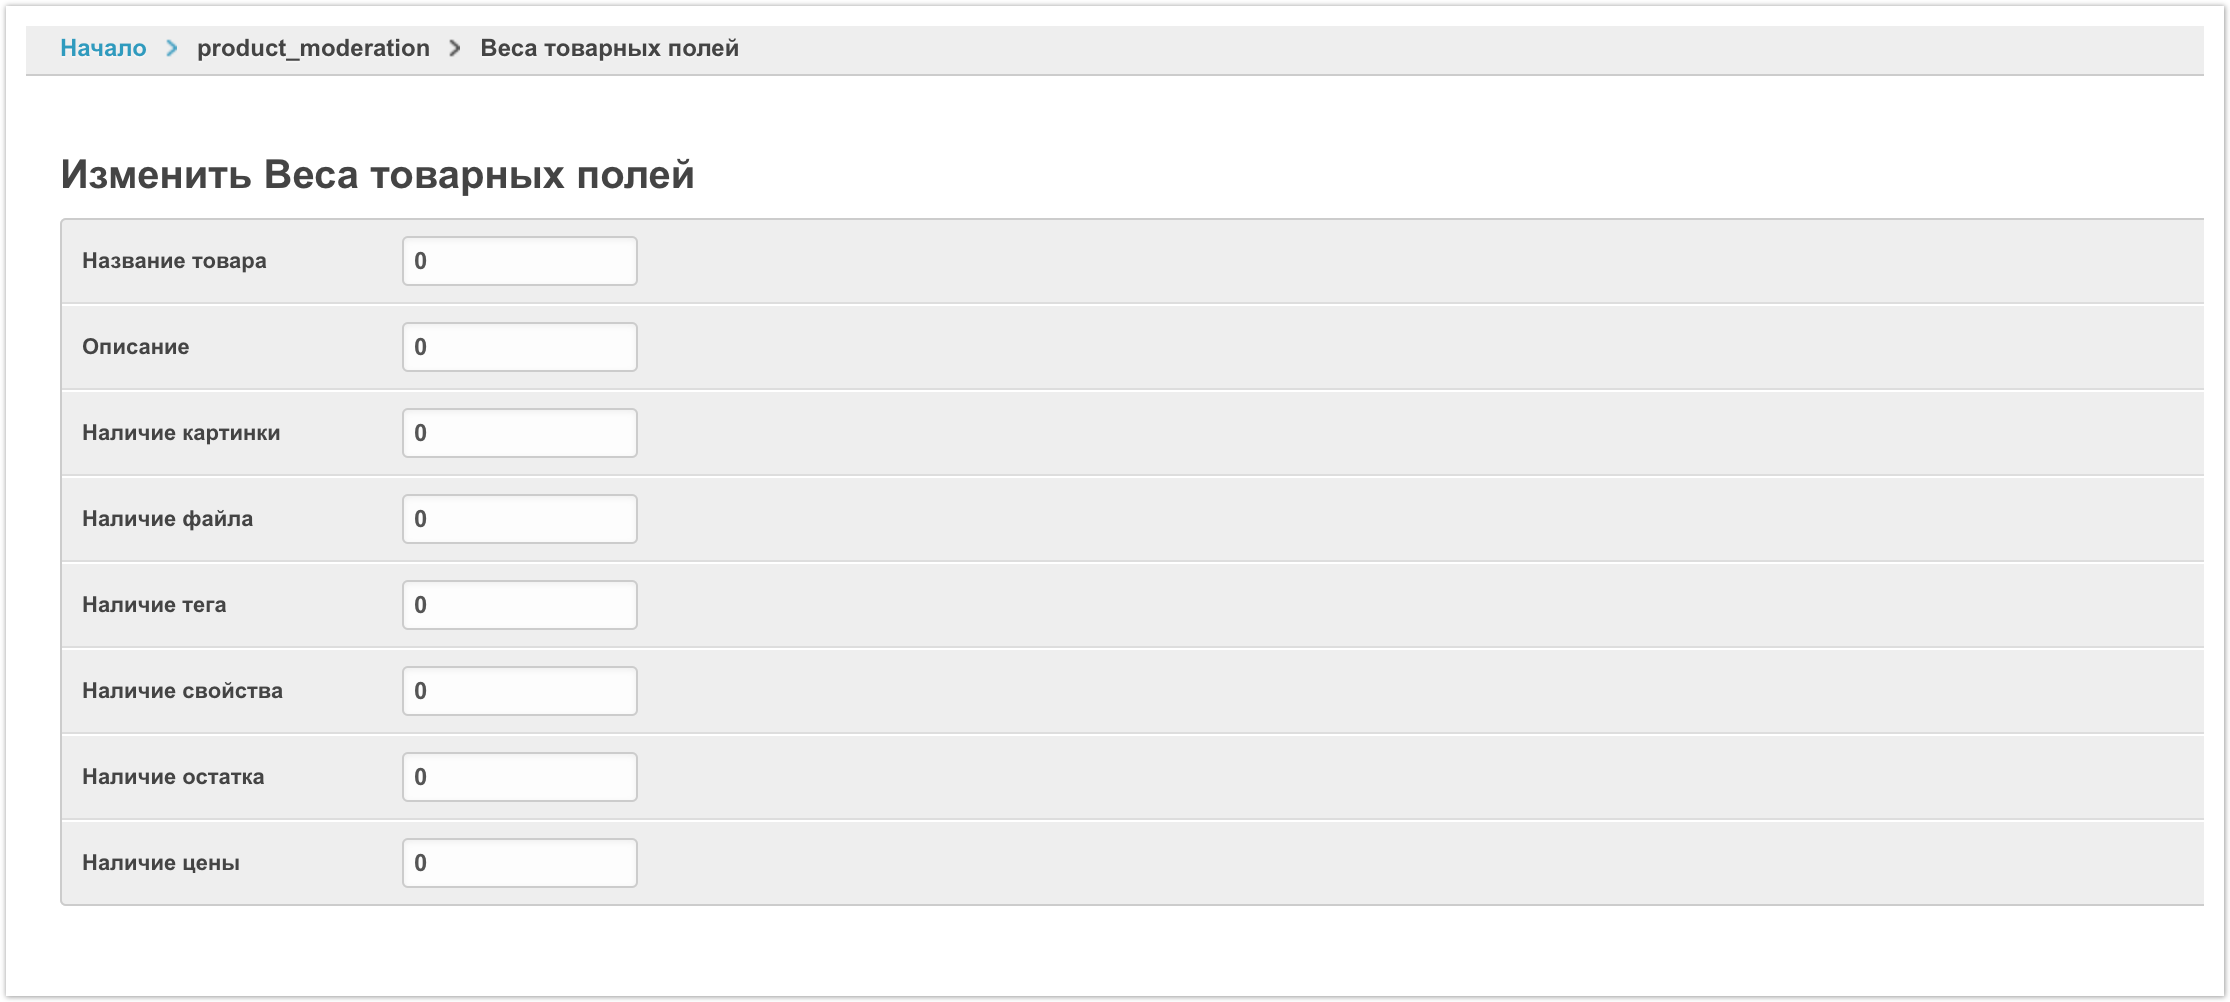
Название товара - коэффициент веса названия товара в расчете процента заполненности.
Описание - коэффициент веса наличия заполненного описания товара в расчете процента заполненности.
Наличие картинки - коэффициент веса наличия изображения товара при расчете процента заполненности.
Наличие файла - коэффициент веса наличия файла (блок Файлы) при расчете процента заполненности.
Наличие тега - коэффициент веса наличия тега у товара при расчете процента заполненности.
Наличие свойства - коэффициент веса наличия свойства (характеристики) товара при расчете процента заполненности.
Наличие остатка - коэффициент веса наличия остатков по товару при расчете процента заполненности.
Наличие цены - коэффициент веса наличия цен по товару при расчете процента заполненности.
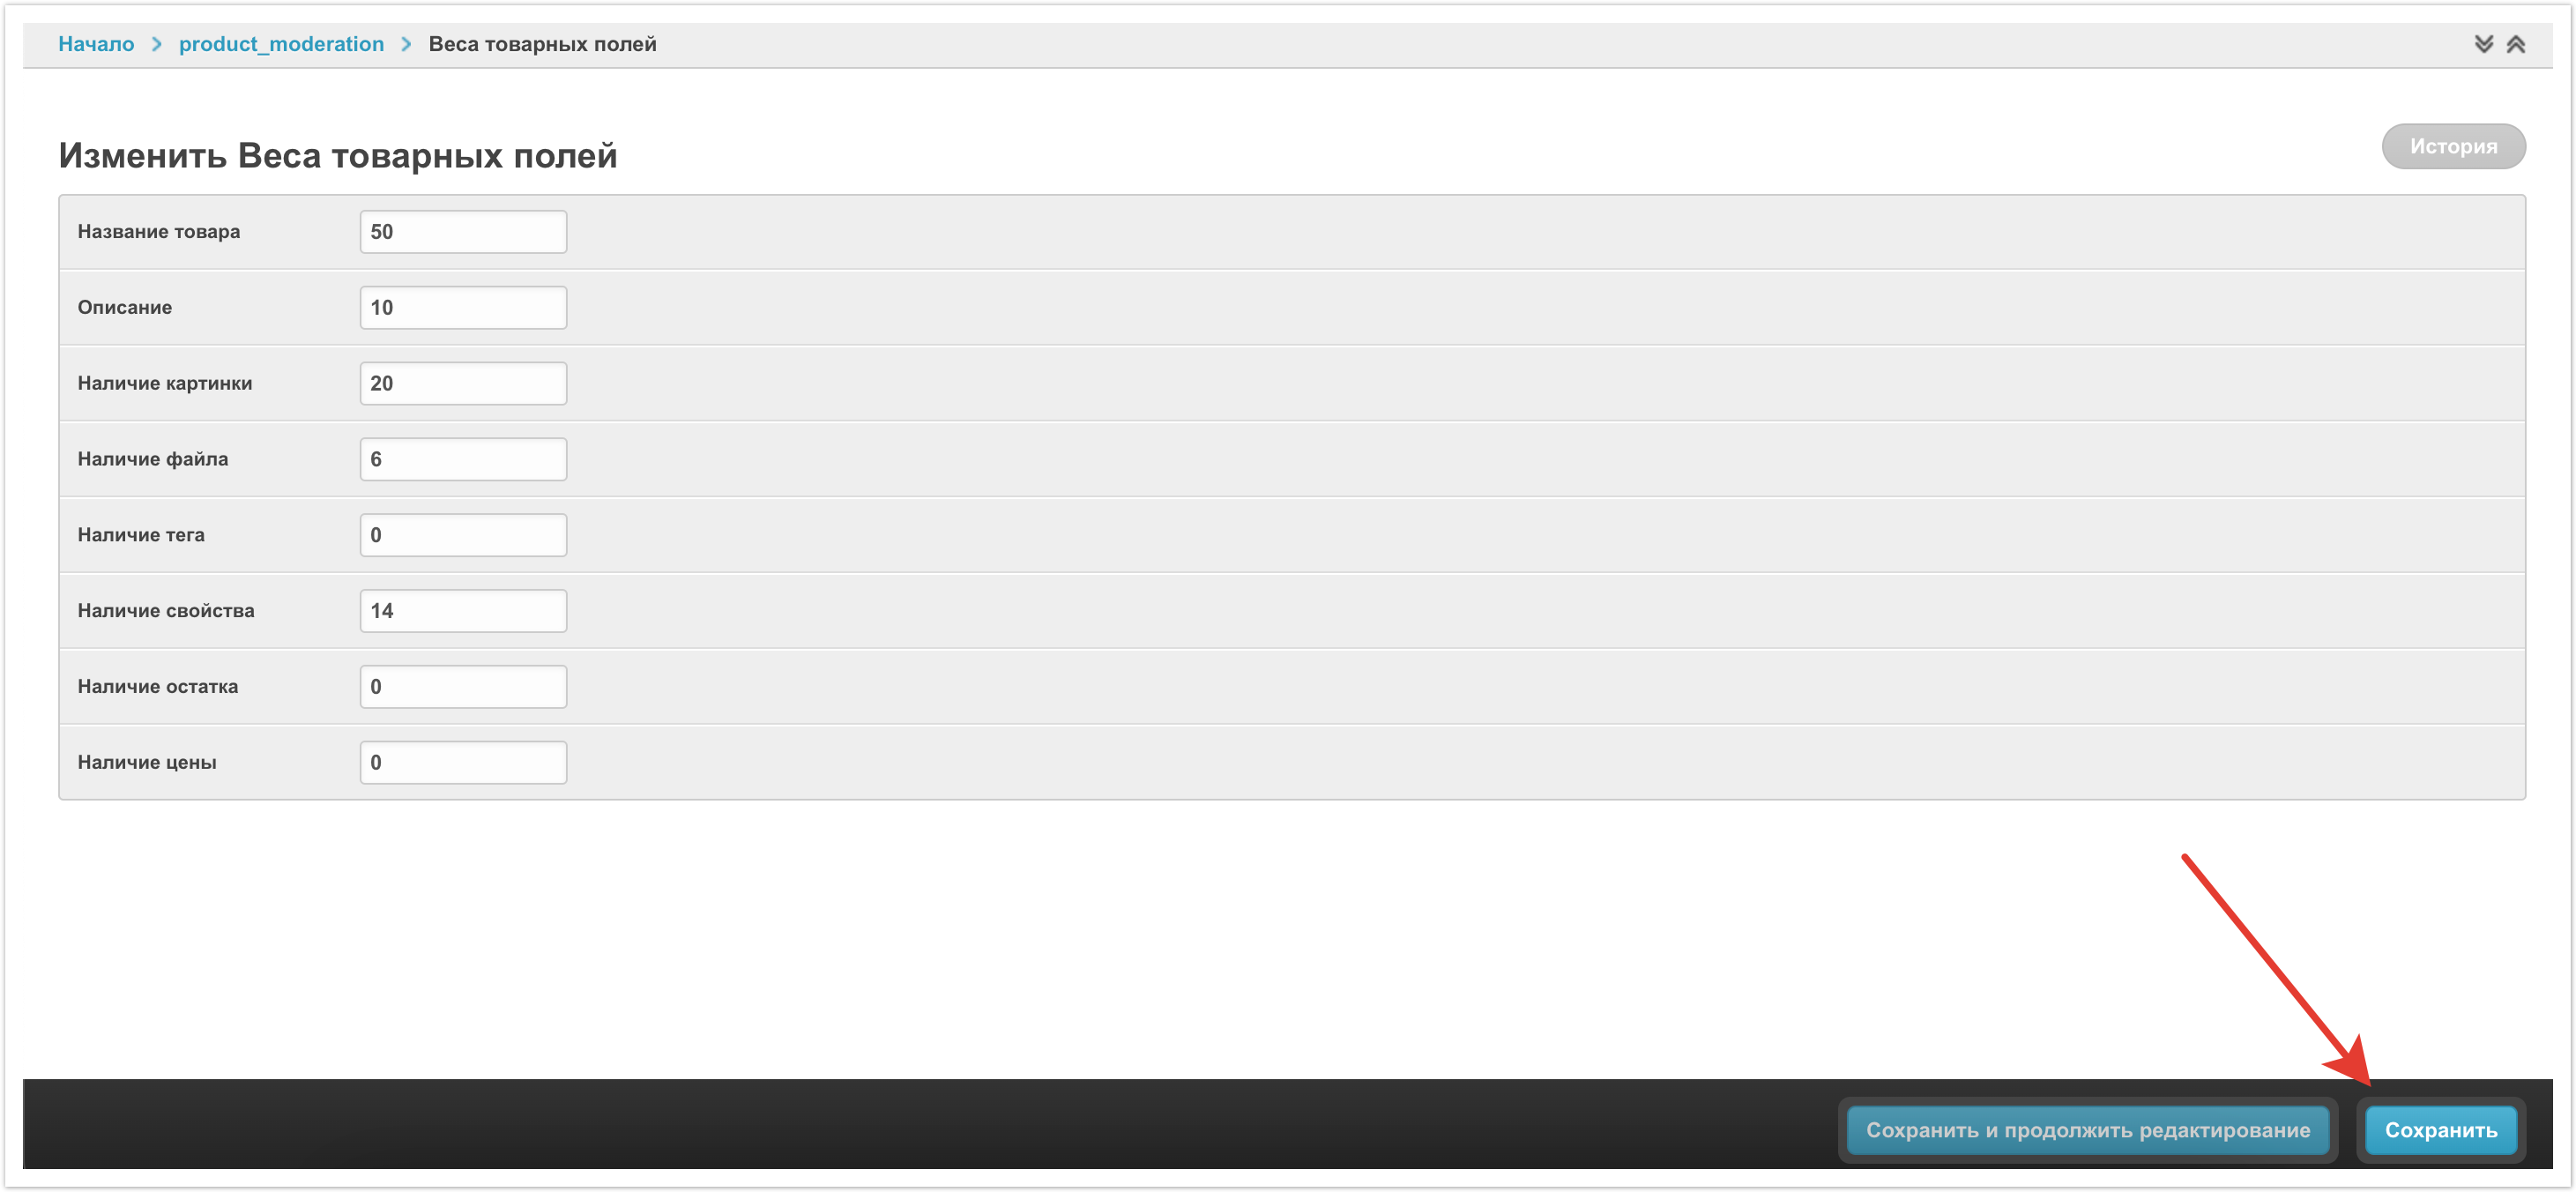
После того как все расчеты проведены и данные по весам заполнены для всех полей, то нужно Сохранить изменения.
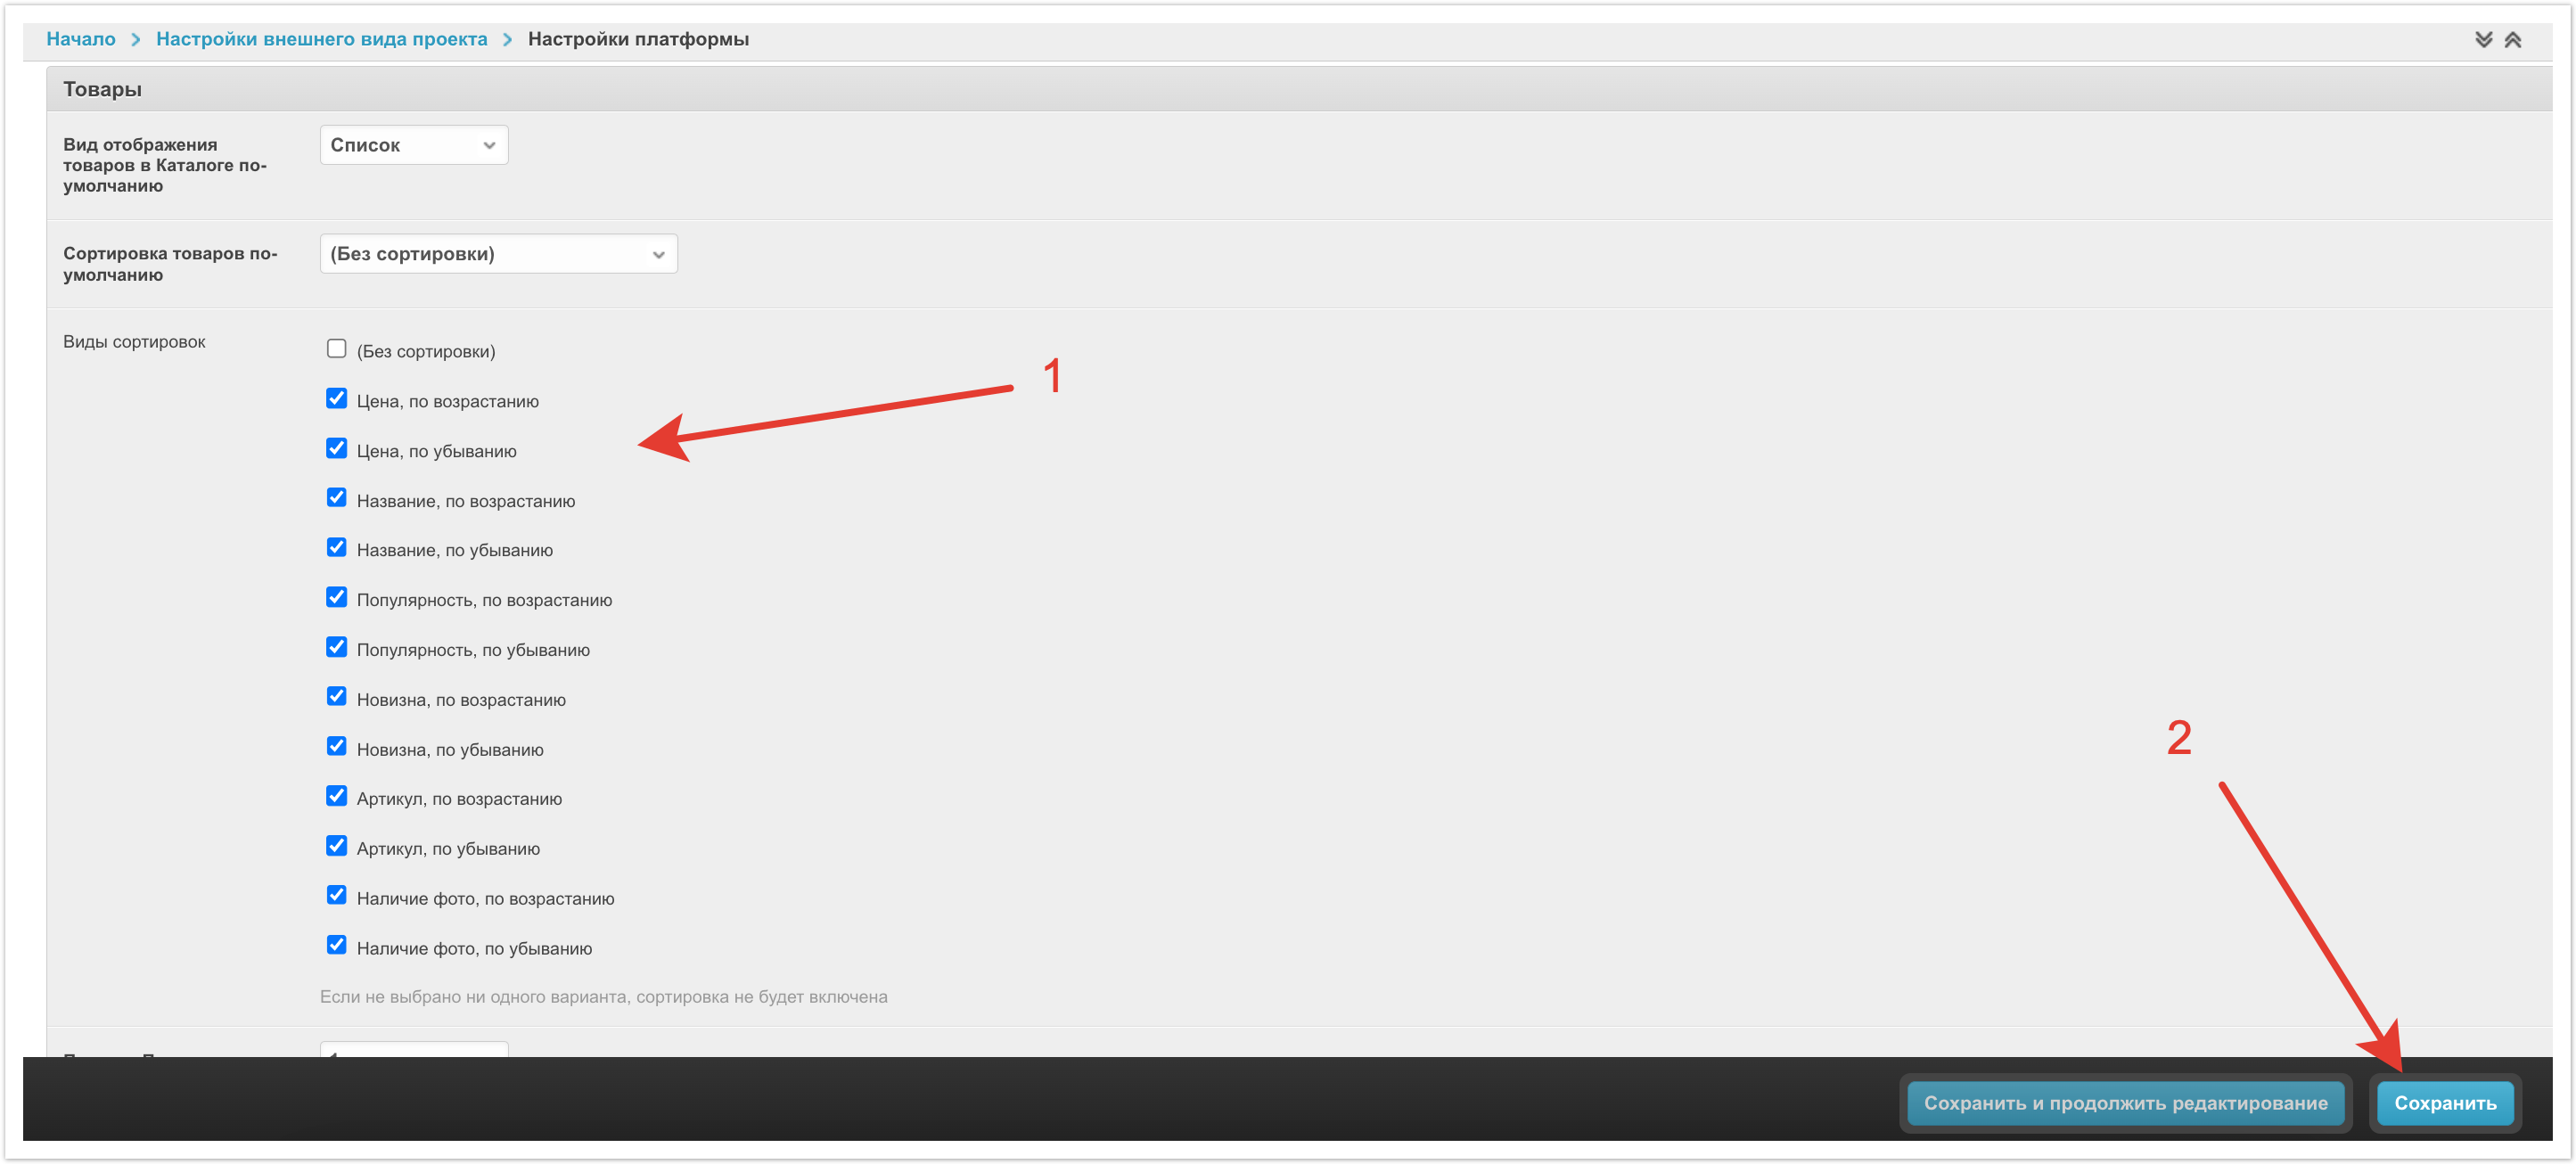
Настройка доступных сортировок в каталоге
Администратор платформы может также настроить виды сортировок, которые будут доступны пользователям в их каталоге.
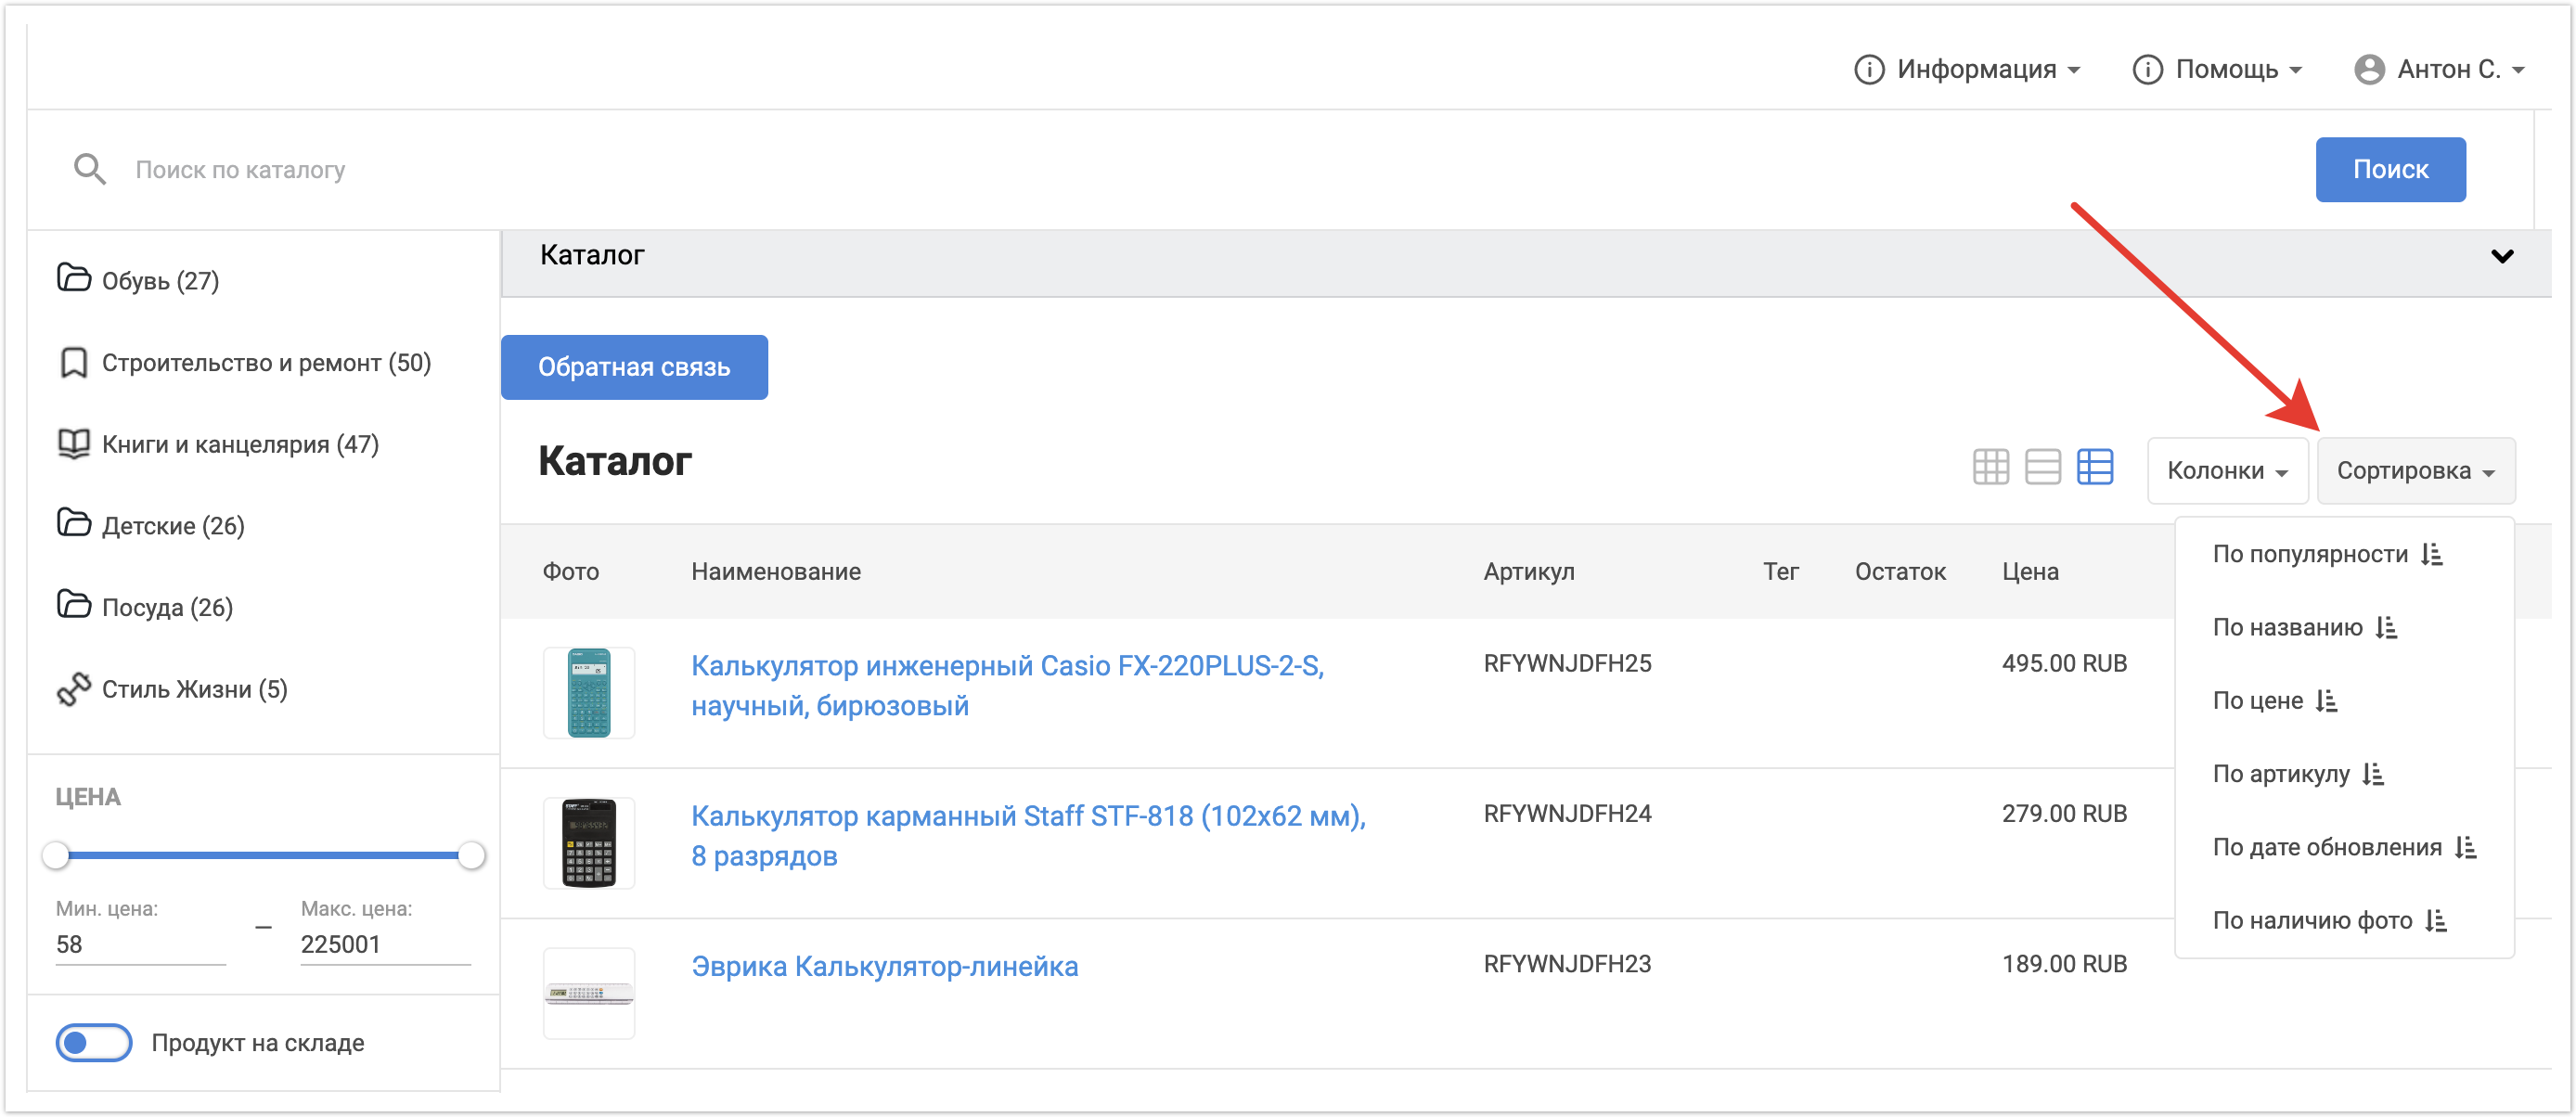
Для этого нужно перейти в раздел Настройки платформы.
Пролистать страницу до блока Товары. В поле Виды сортировок с помощью чек-боксов выбрать те, которые должны быть доступны для пользователей платформы. После внесения изменений нужно их Сохранить.
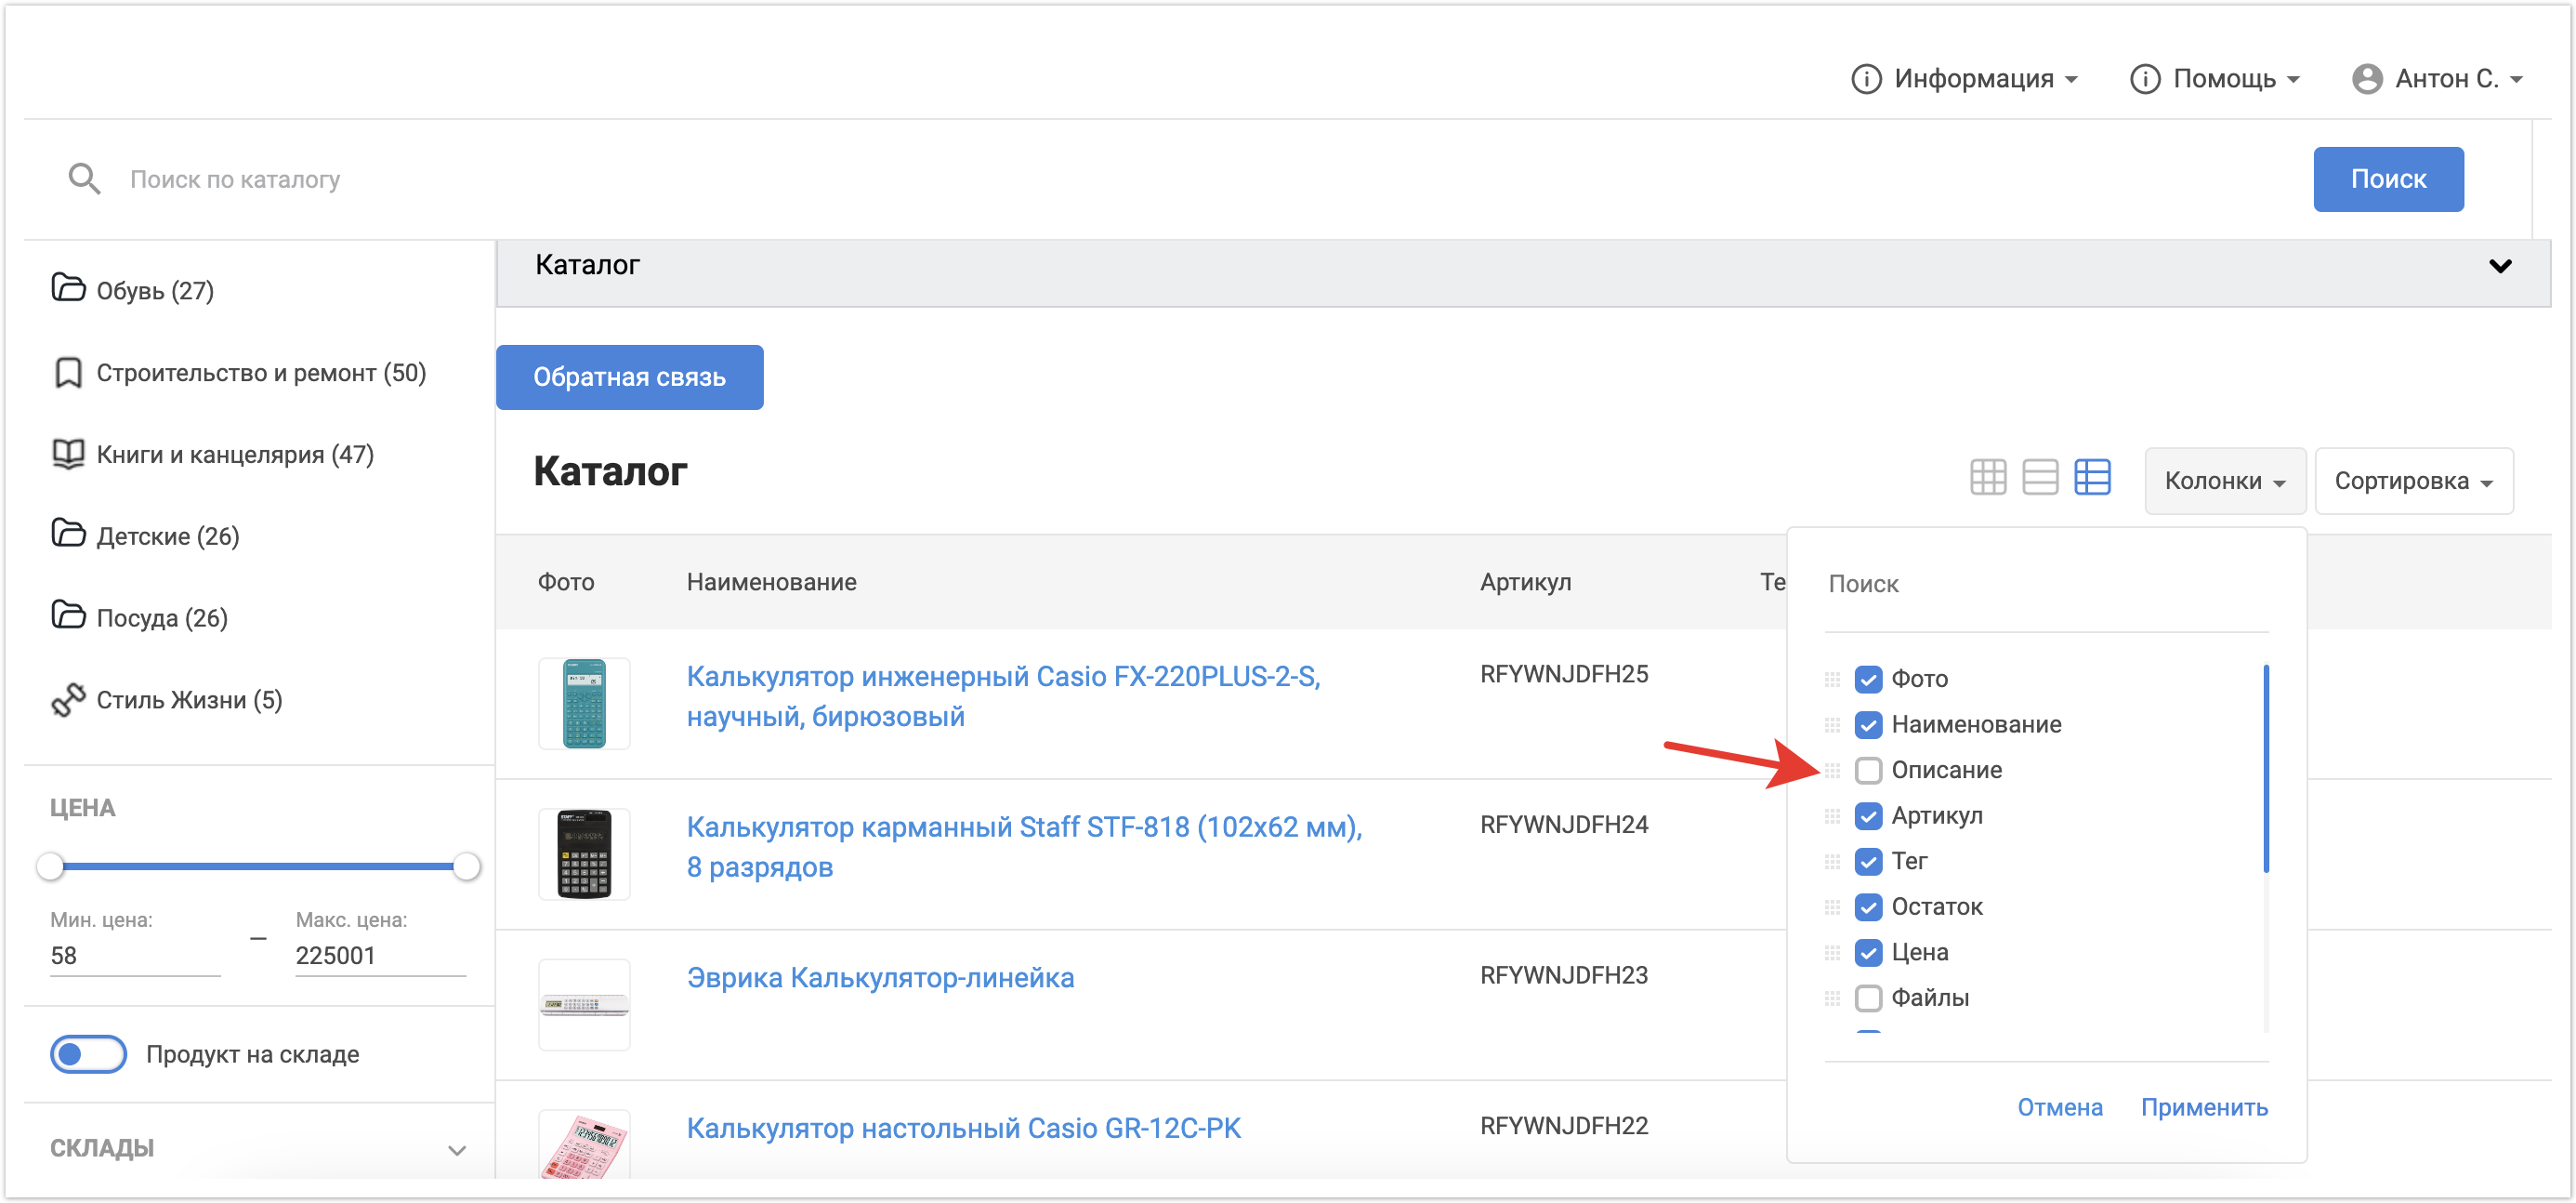
Настройка доступных столбцов в каталоге
Пользователи платформы могут персонально настроить колонки, которые будут выводится в их каталоге.
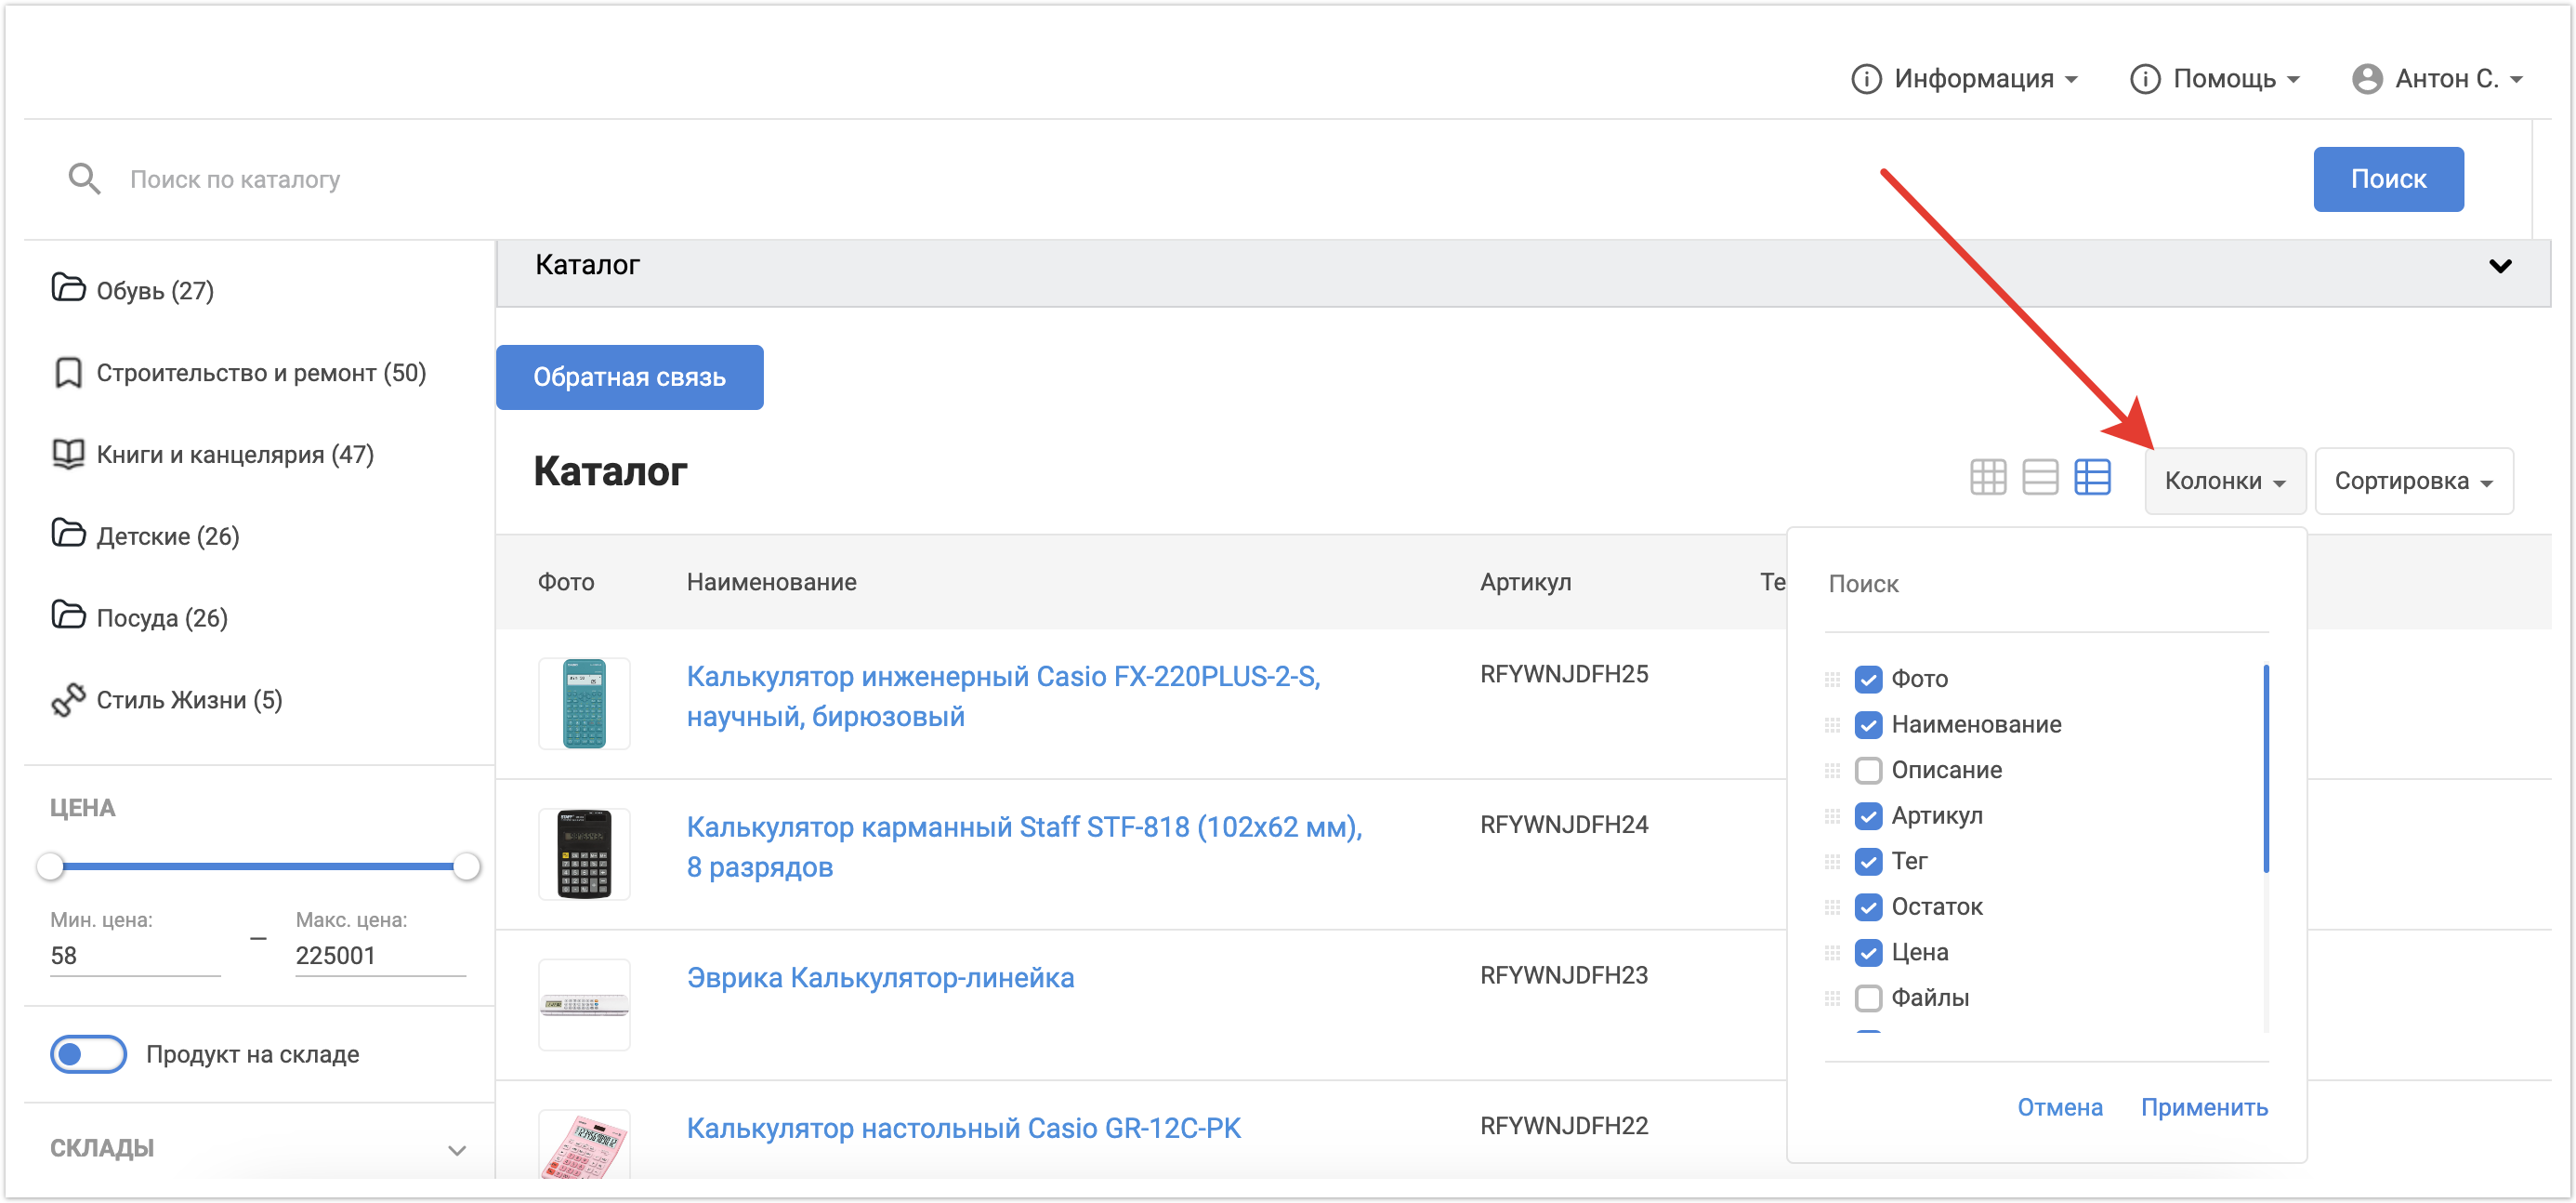
С помощью чек-боксов они могут включать и отключать вывод определенных столбцов в каталоге.

Кроме того, с помощью функционала drag-and-drop можно менять порядок выводимых столбцов. Для этого нужно навести на квадратный символ с точками и перетащить столбец на нужное место.
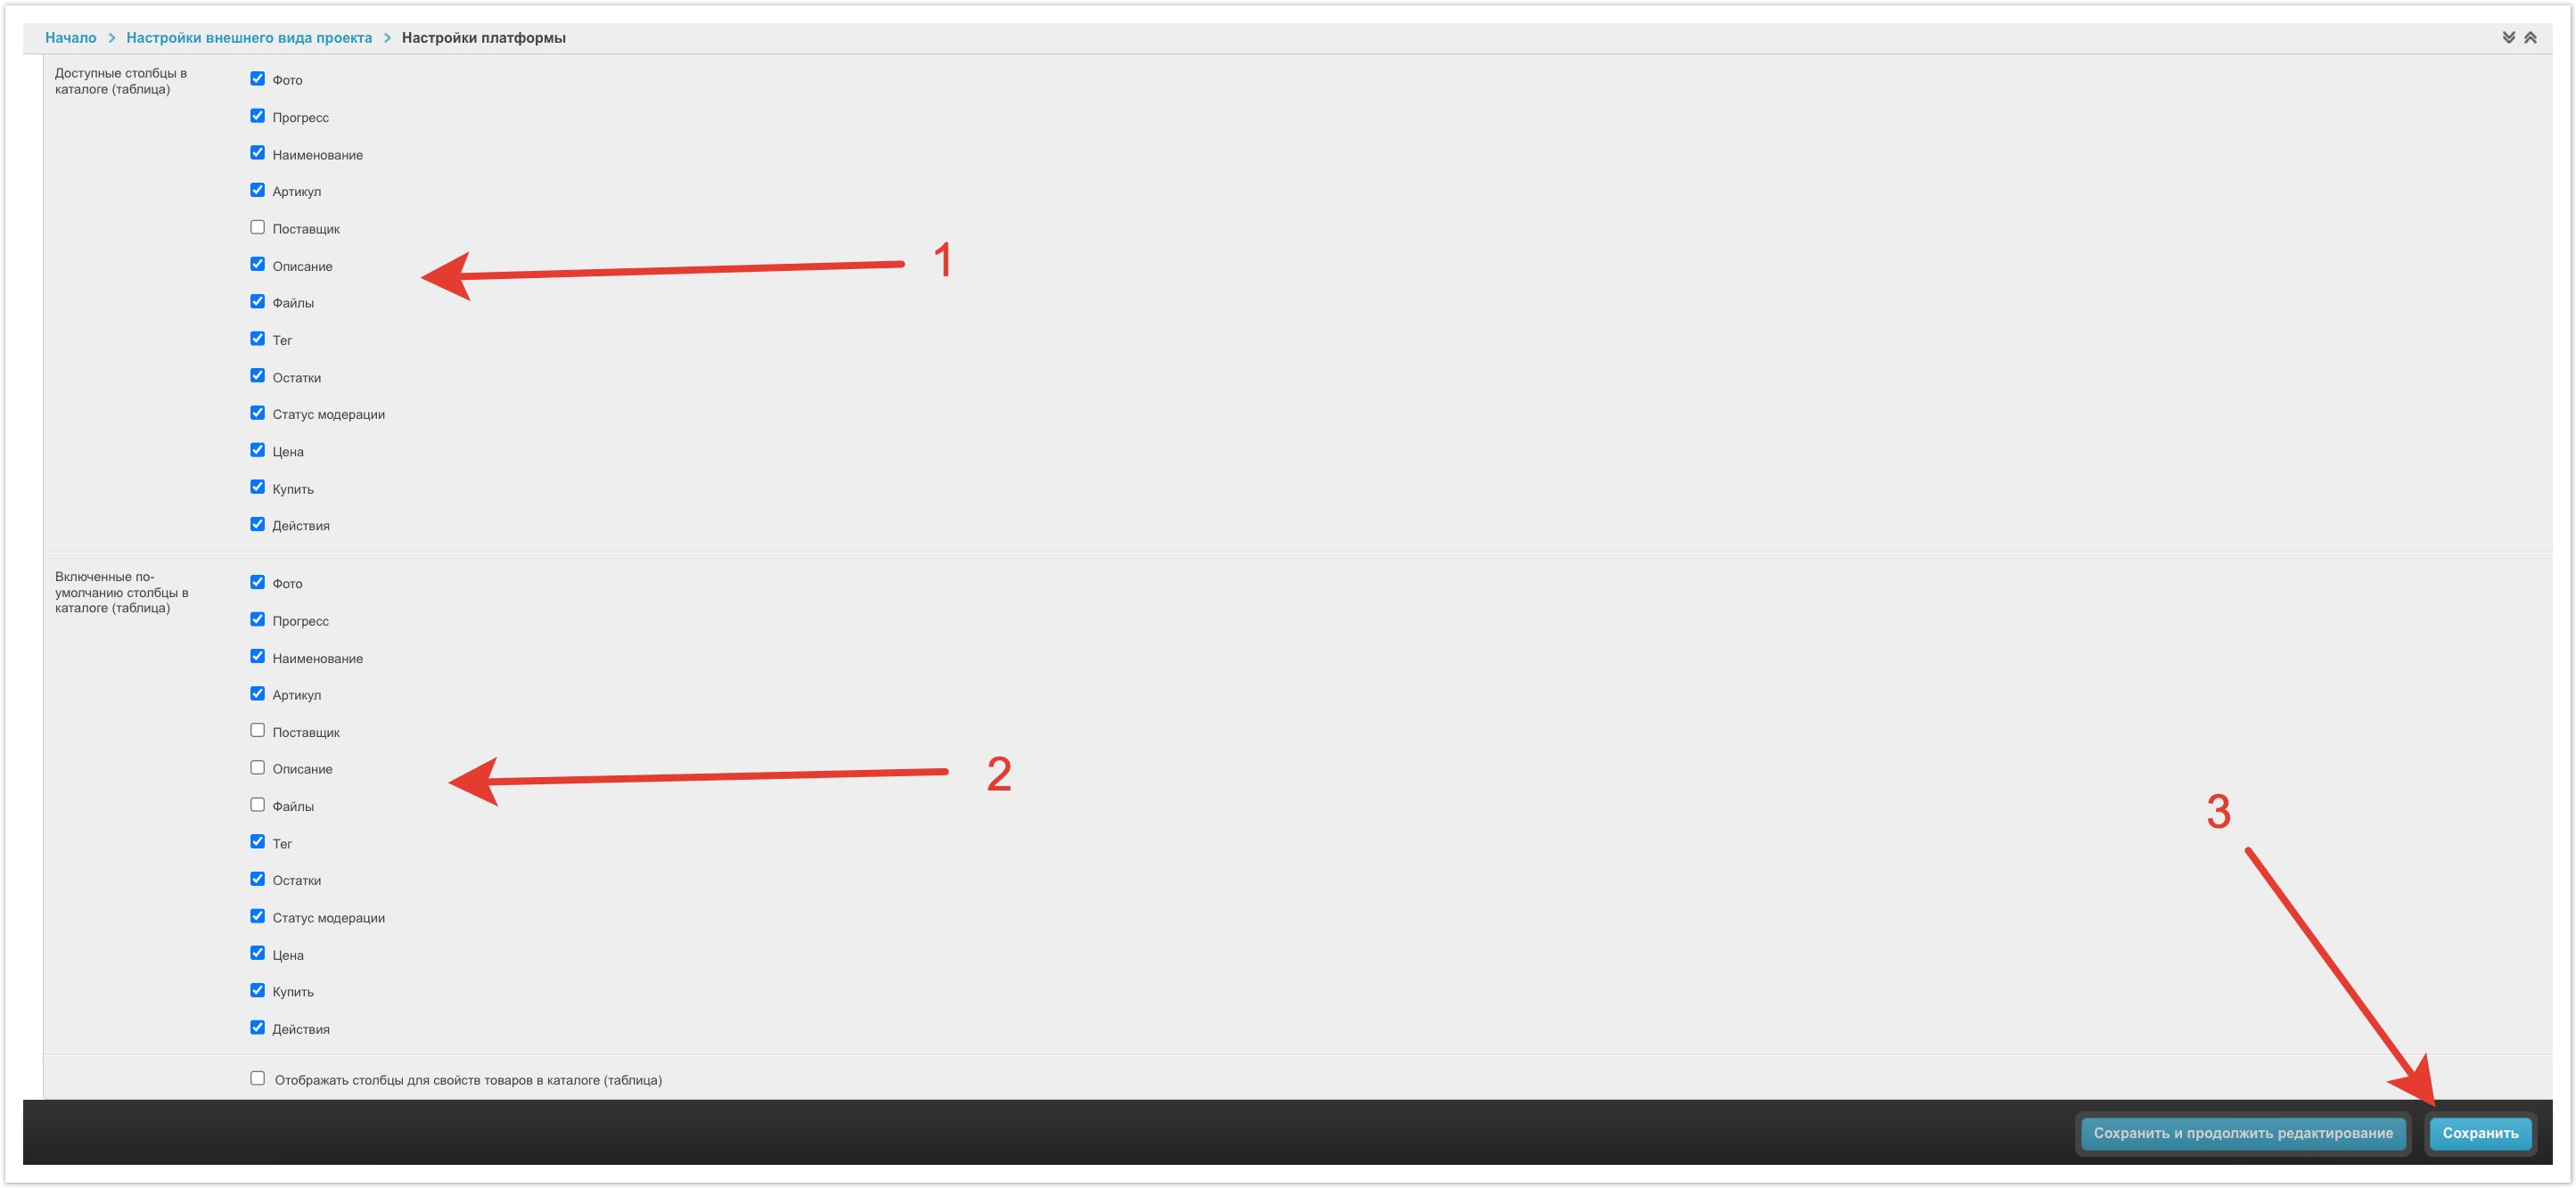
Со стороны администратора платформы можно настроить какие колонки будут доступны для выбора пользователям платформы. Чтобы их настроить нужно перейти в панели администратора в раздел Настройки платформы.
Далее пролистать страницу до блока Каталог. В поле Доступные столбцы в каталоге(таблица) можно выбрать какие колонки будут доступны для выбора пользователю при режиме просмотра каталога Таблица. В поле Включенные по-умолчанию столбцы в каталоге(таблица) можно выбрать какие колонки будут по умолчанию выводится пользователю при режиме отображения каталога Таблица. После внесения изменений нужно их Сохранить.
Модерация товаров бренд-менеджером
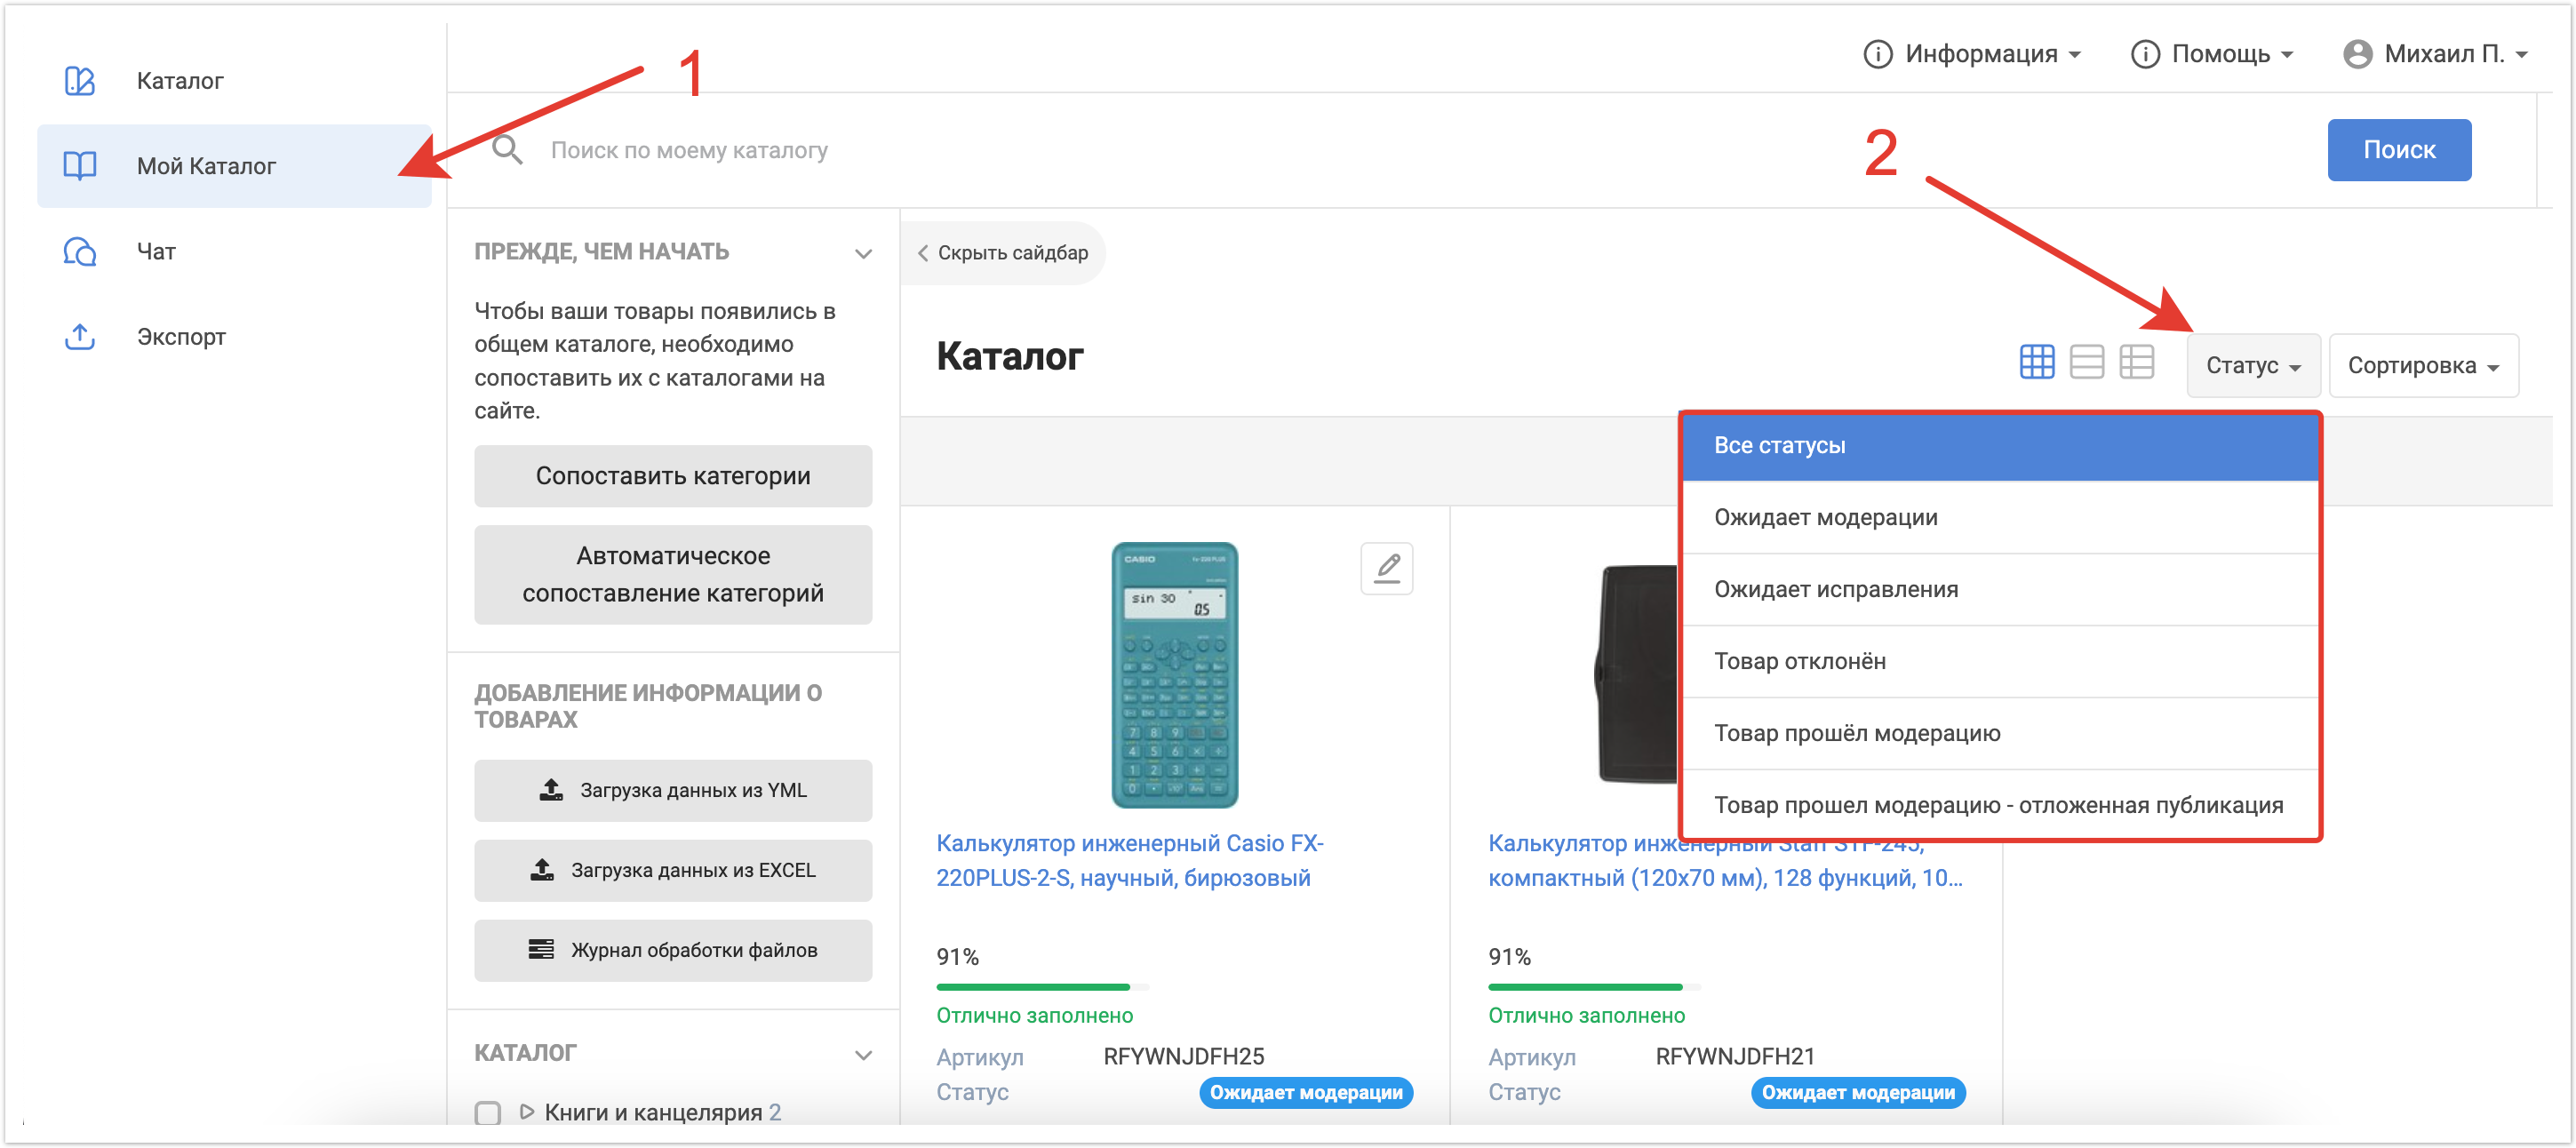
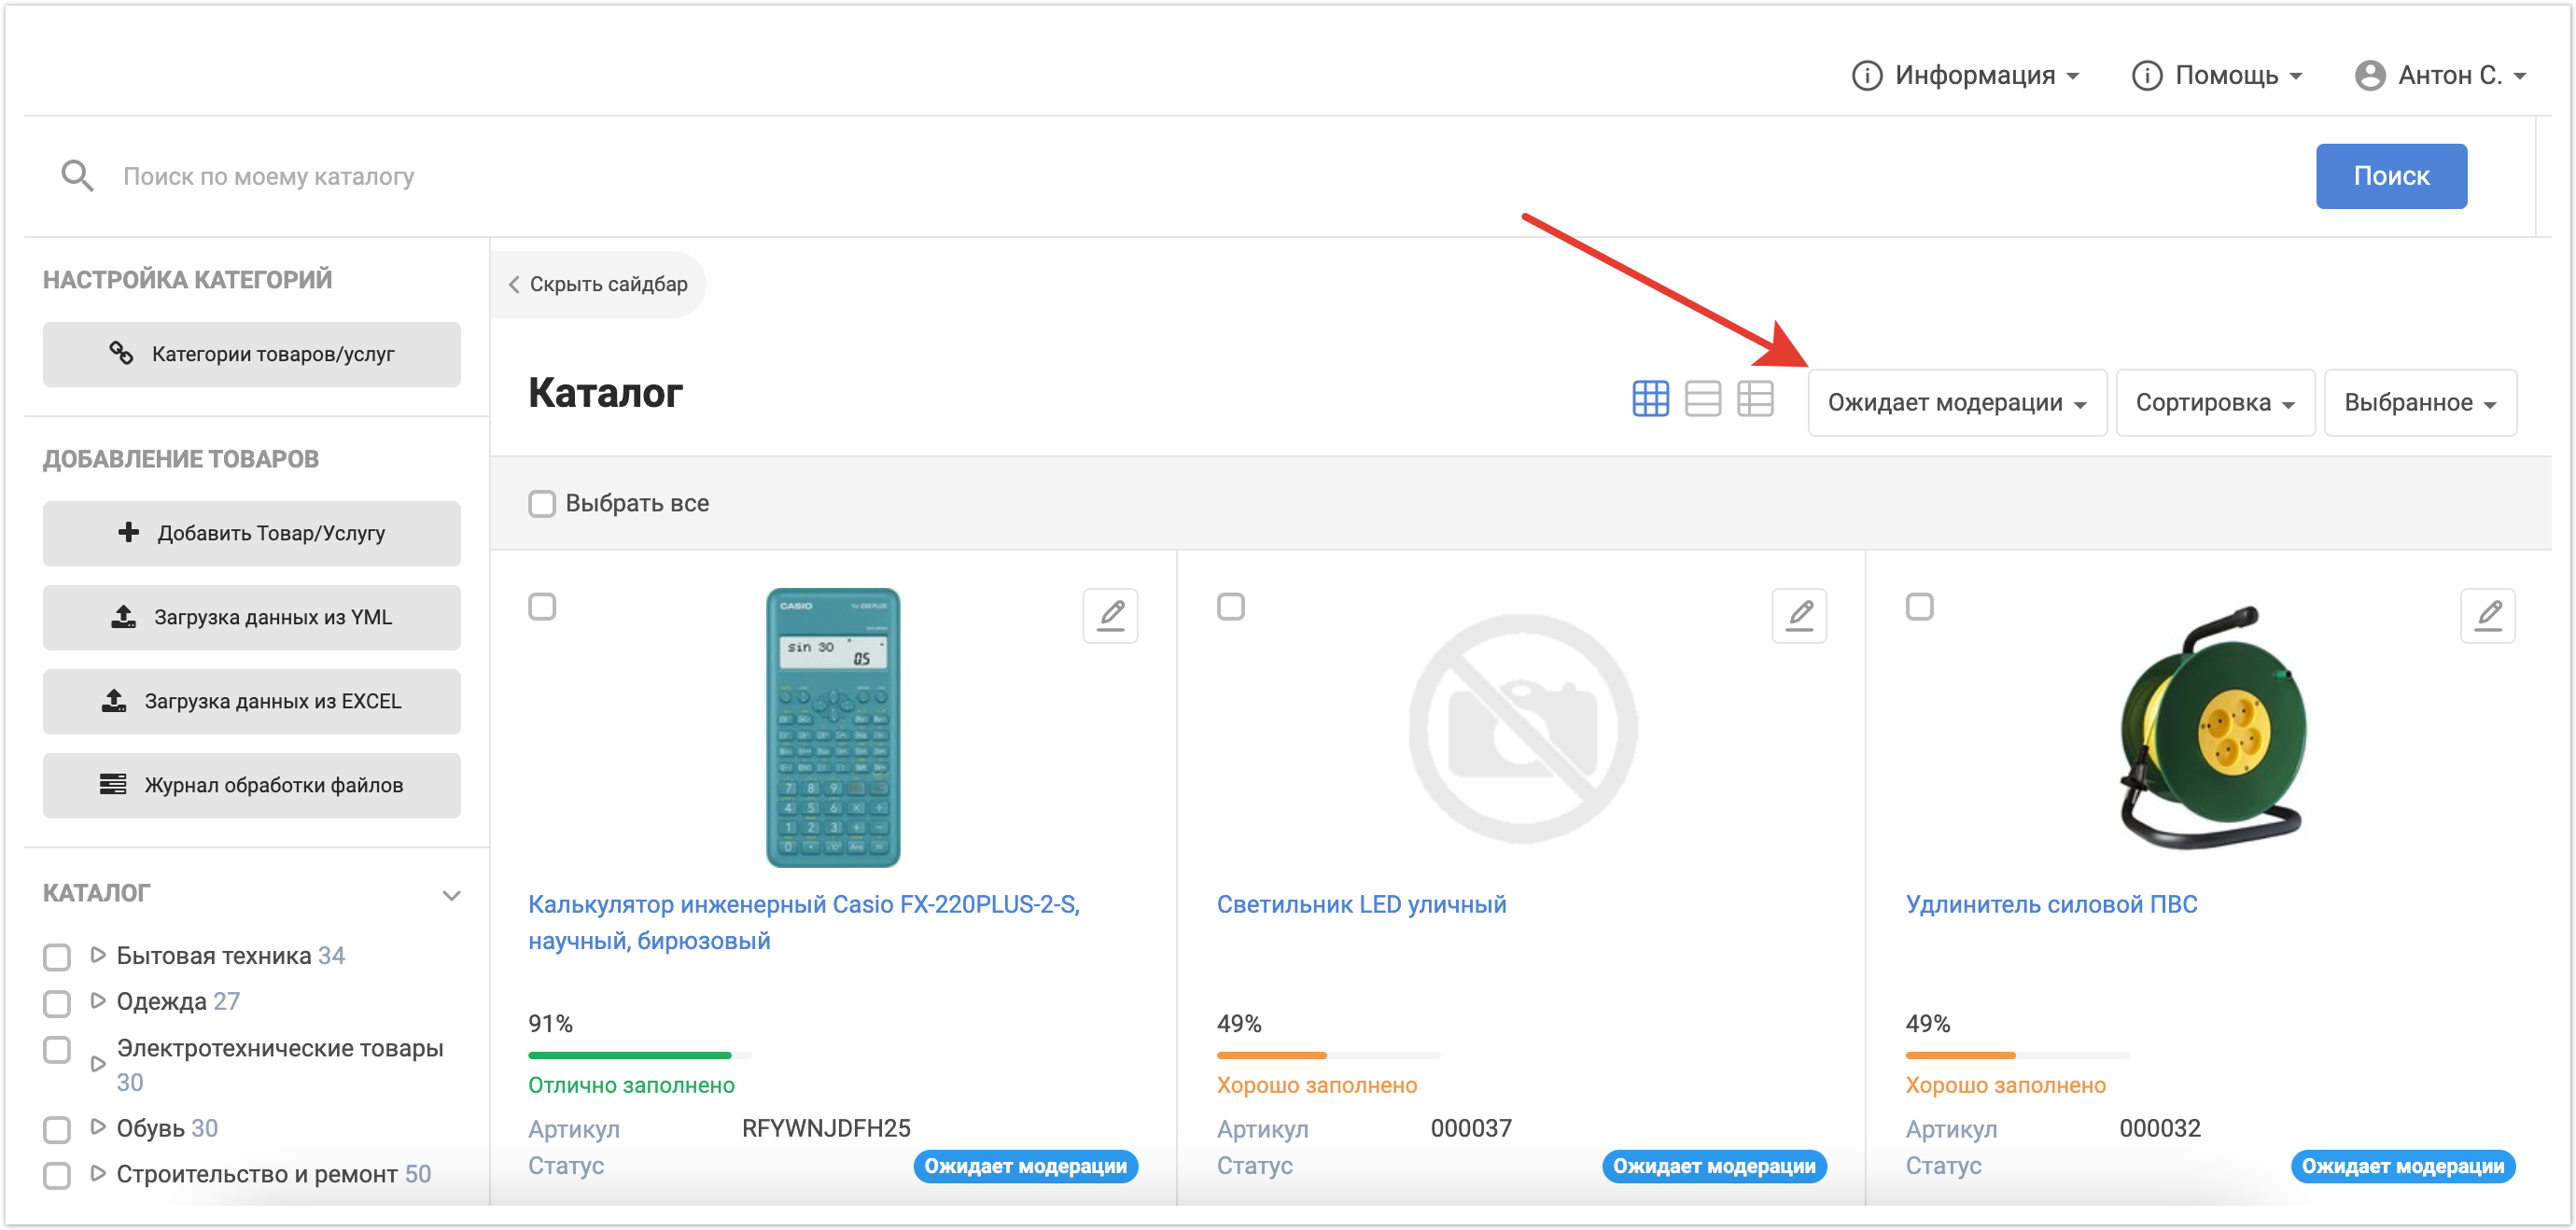
После того, как Ответственный менеджер импортировал товары на платформу, Бренд-менеджер может приступать к их модерации. Он авторизуется в своем личном кабинете и переходит во вкладку Мой каталог. Бренд-менеджер видит только тот список товаров, который ему был присвоен на этапе настройки пользователя. Загруженным товарам автоматически присваивается статус Ожидает модерации. Можно выставить фильтрацию по этому статусу и таким образом увидеть список загруженных недавно товаров, которые ожидают проверки. При необходимости можно найти нужный товар через поиск по каталогу или фильтрацию по свойствам.
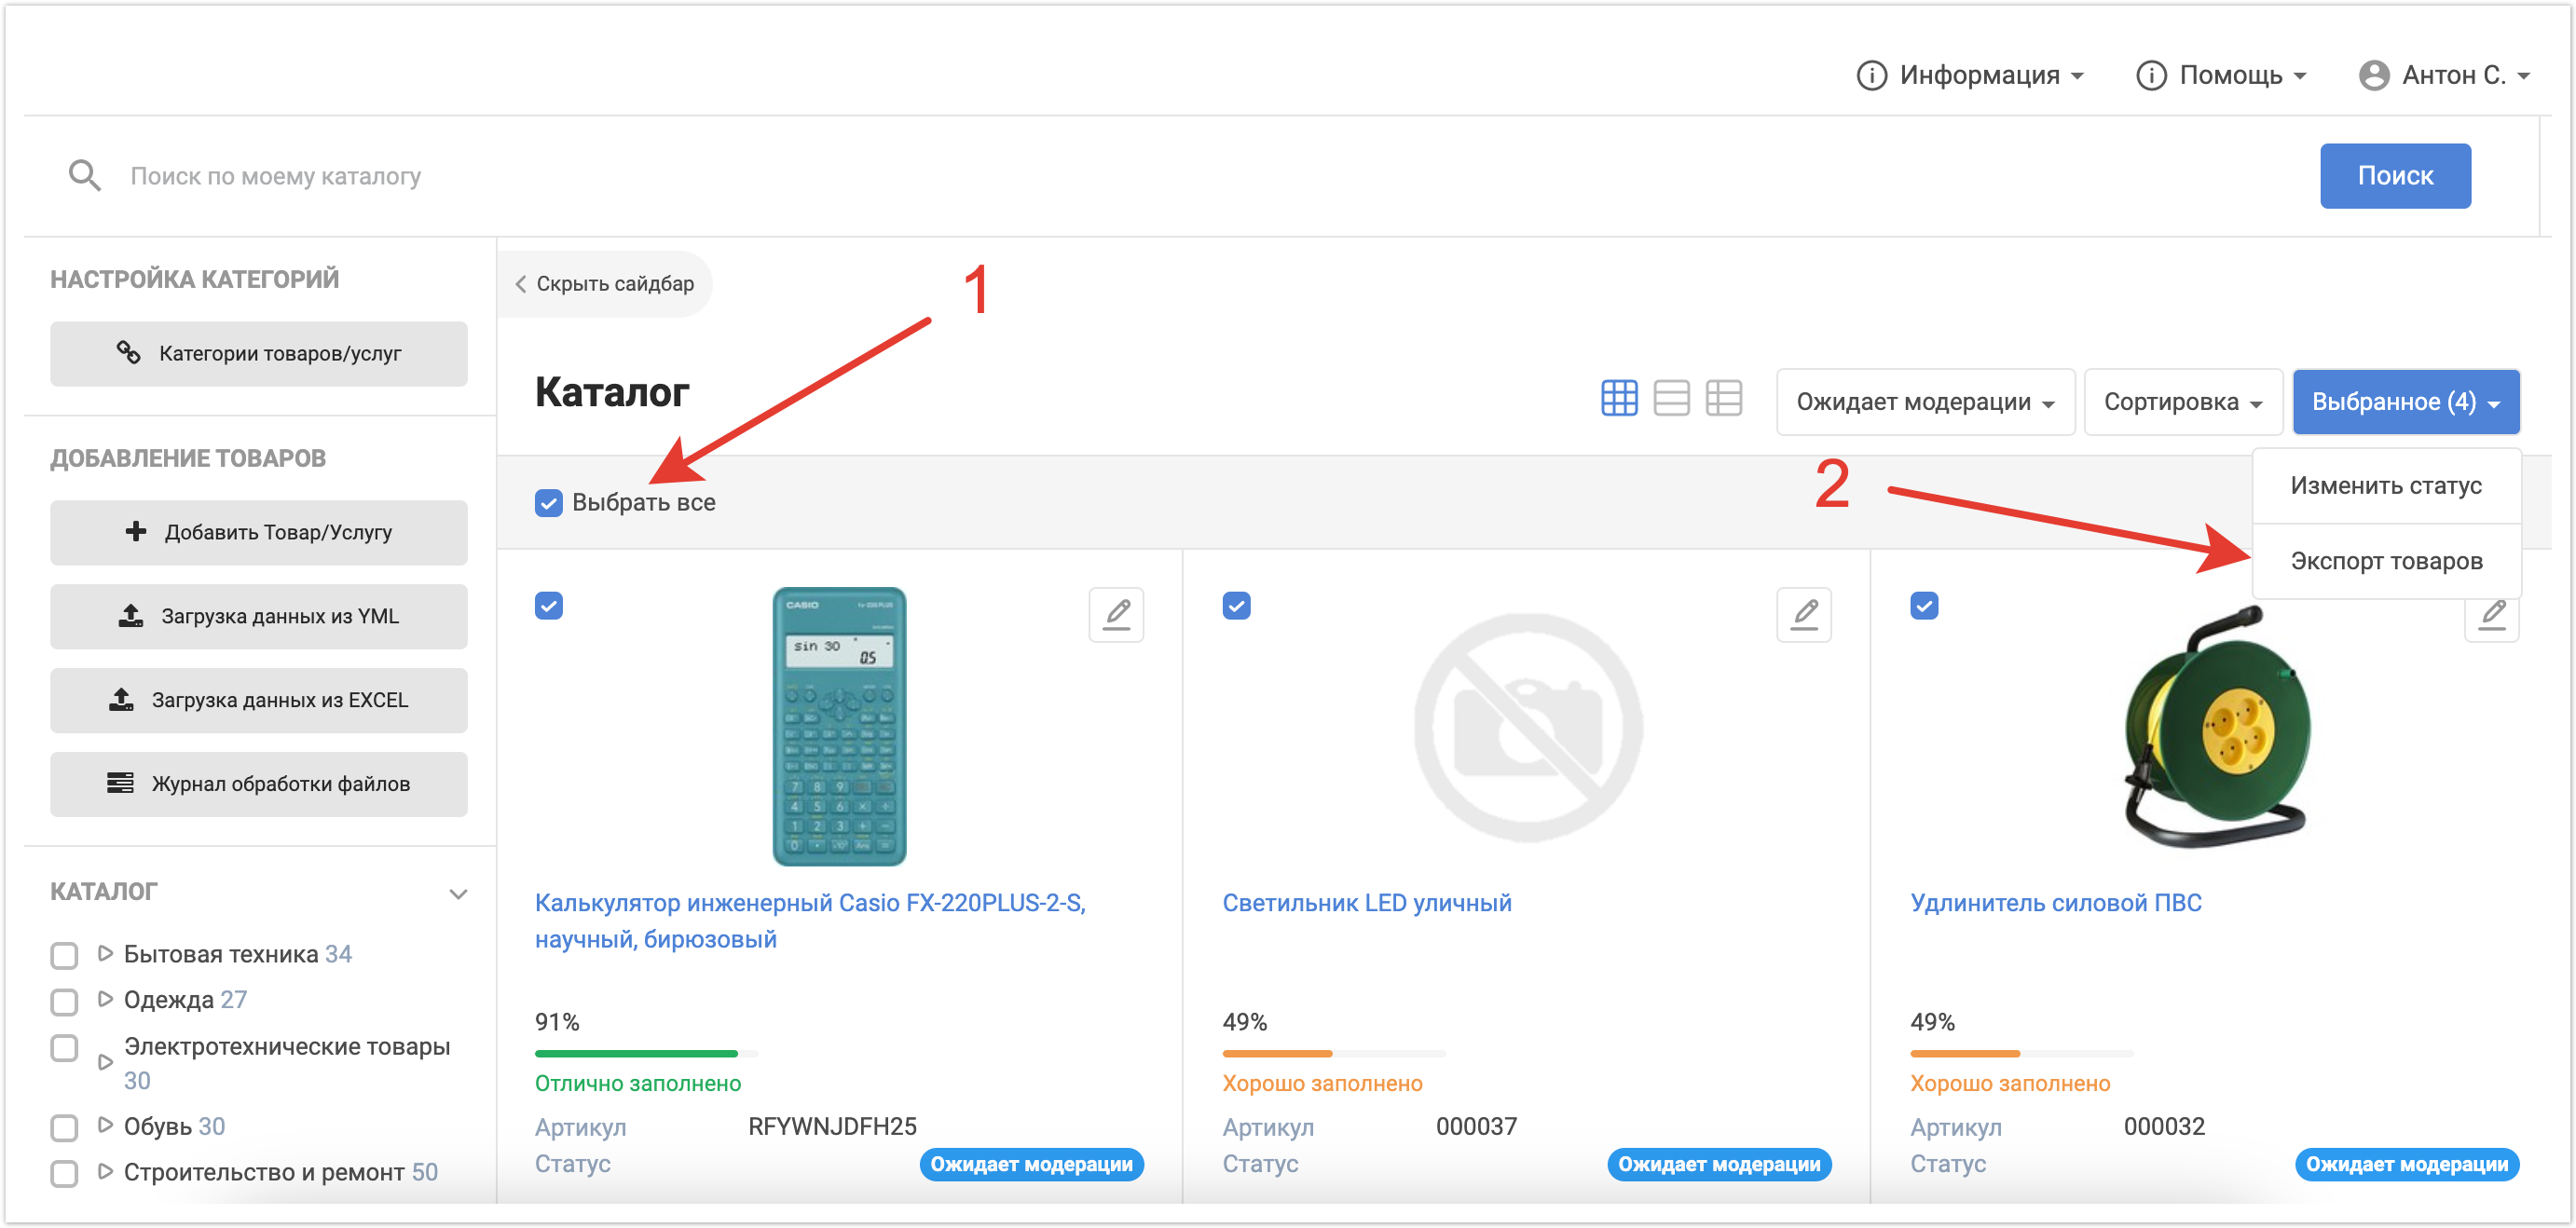
Провести модерацию товара и изменить его статус можно с помощью массовых действий или вручную для каждого товара. Чтобы выполнить это через массовые действия нужно выбрать товары с помощью чек-боксов, а далее в выпадающем списке выбрать Изменить статус.
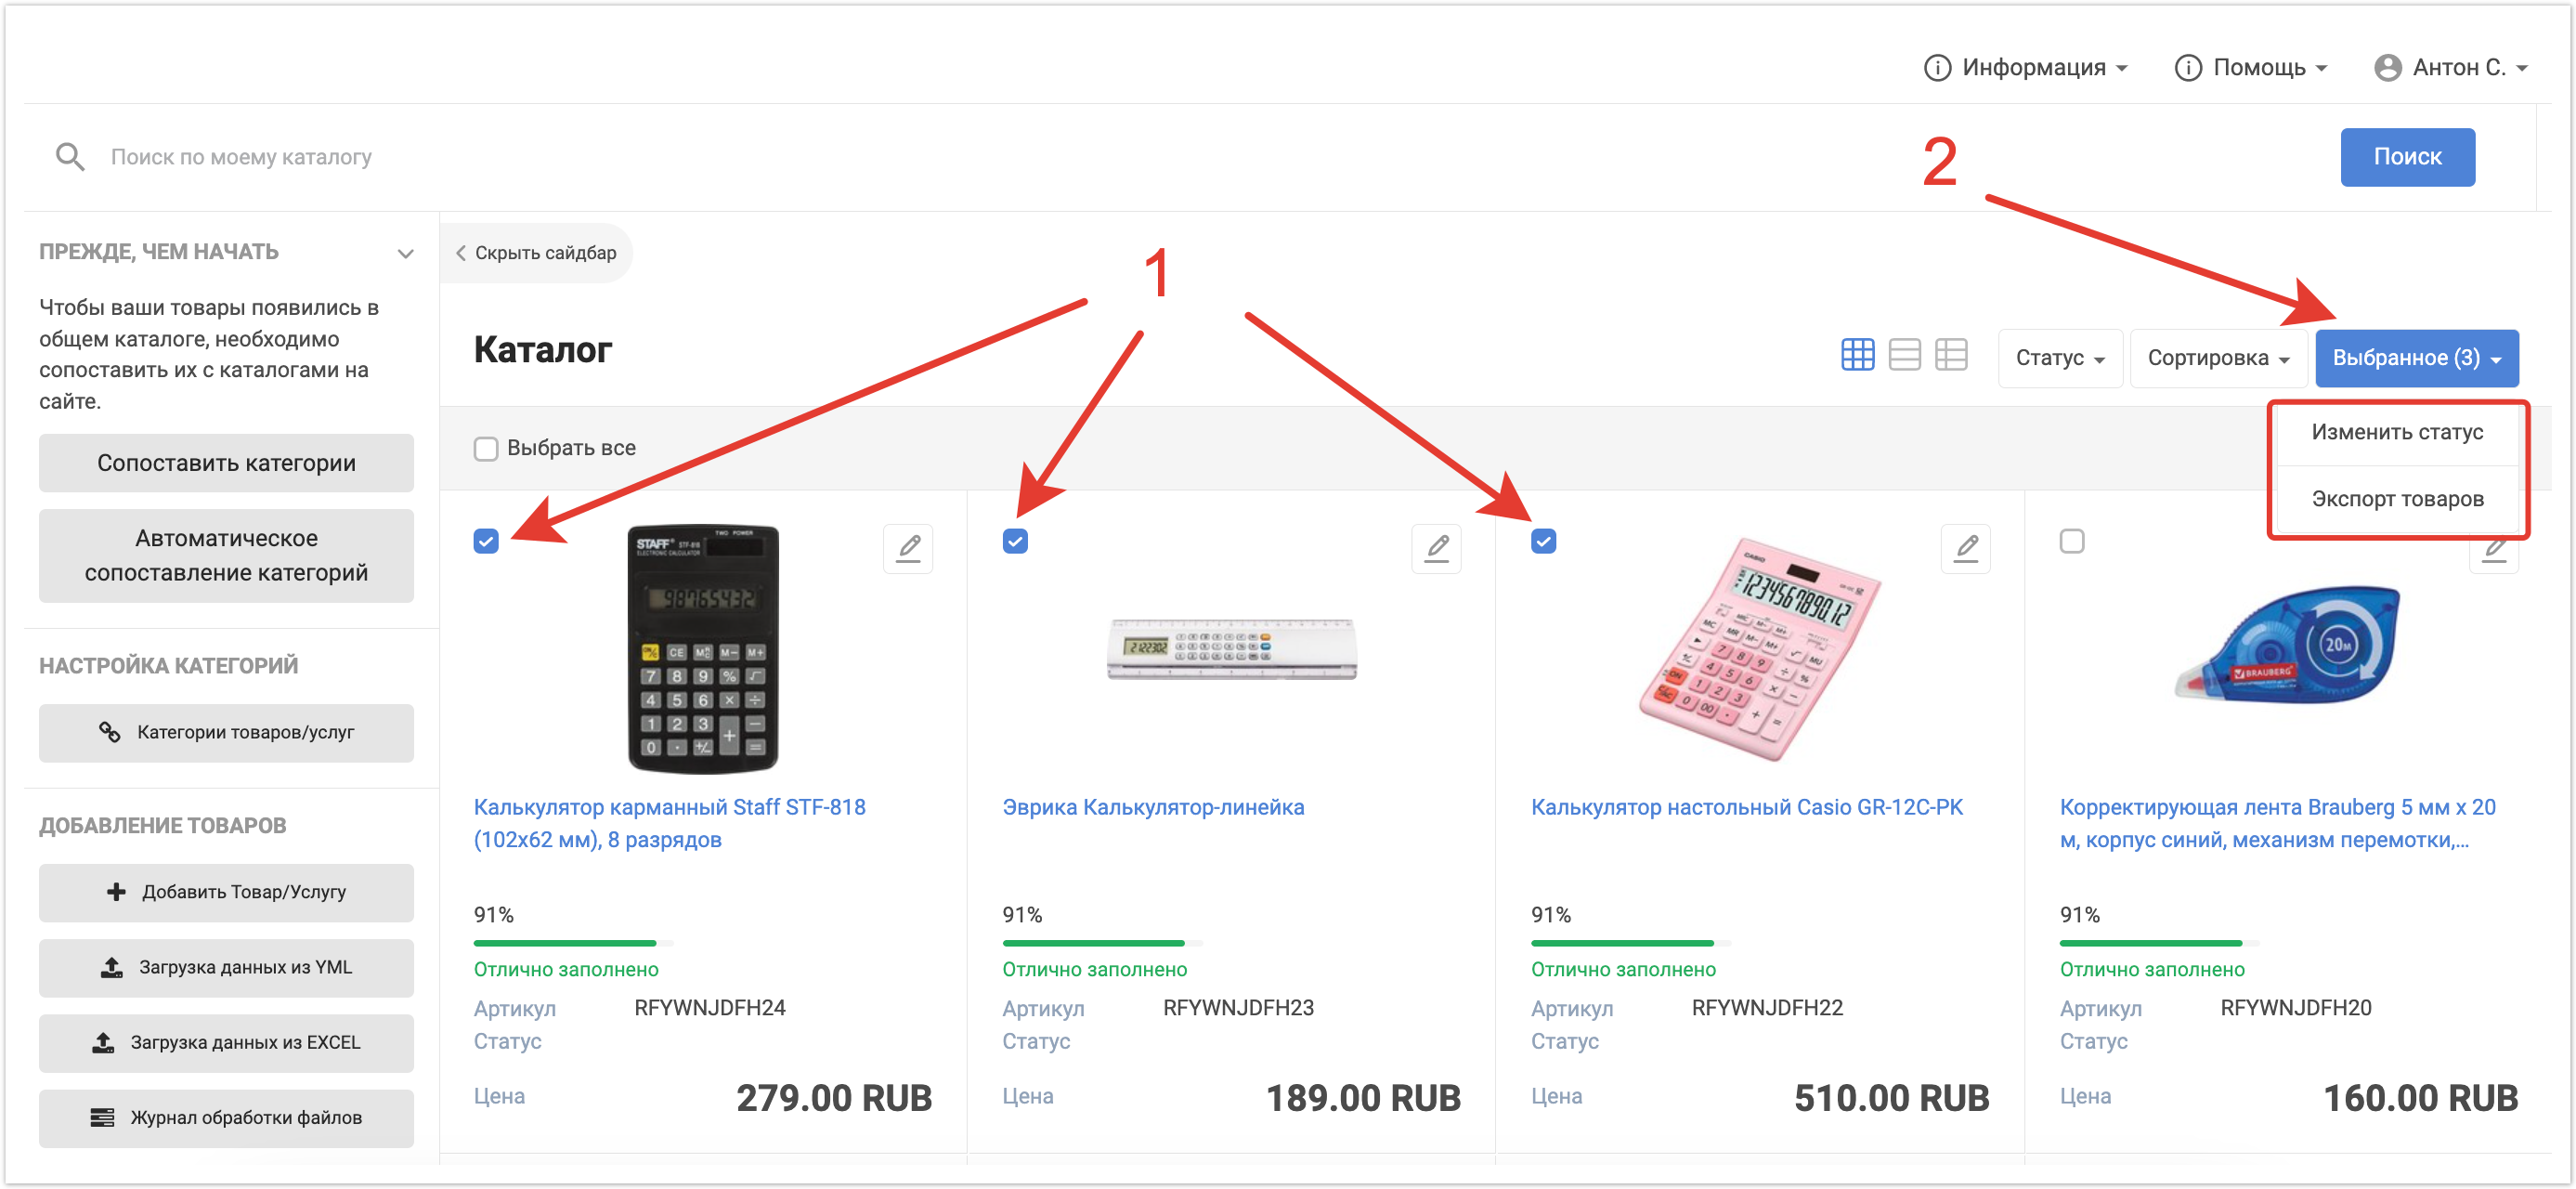
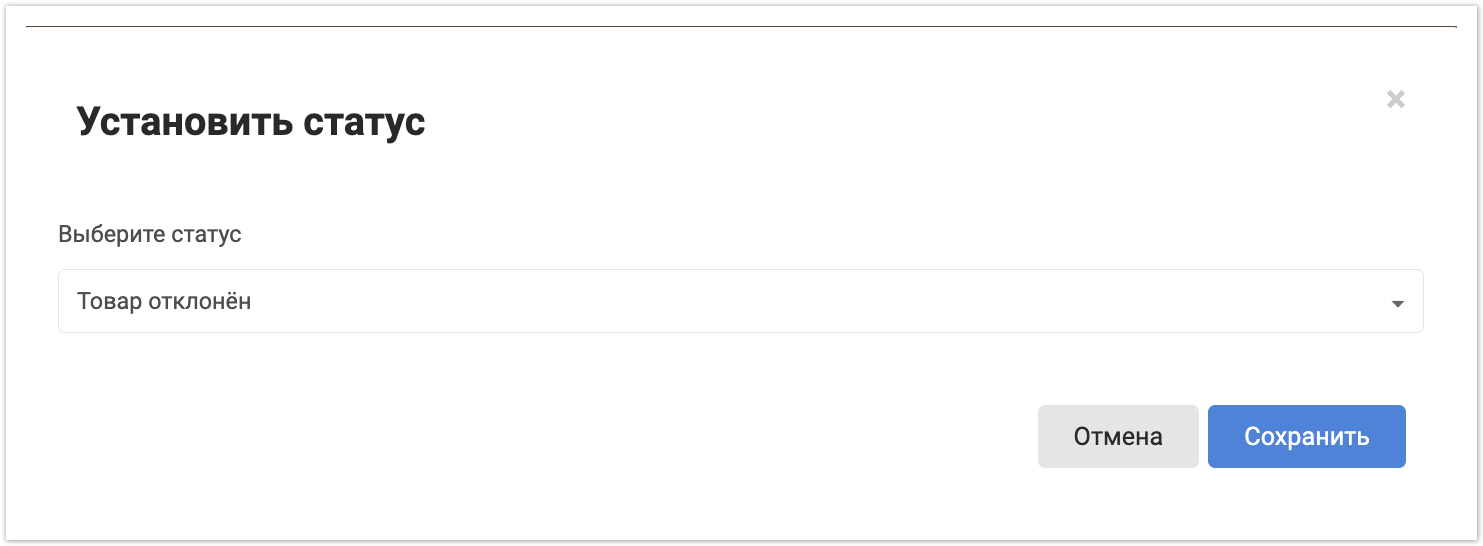
Откроется окно, где нужно будет выбрать статус для выделенных товаров. Например, таким образом можно массово отклонить товары, если они были загружены ошибочно.
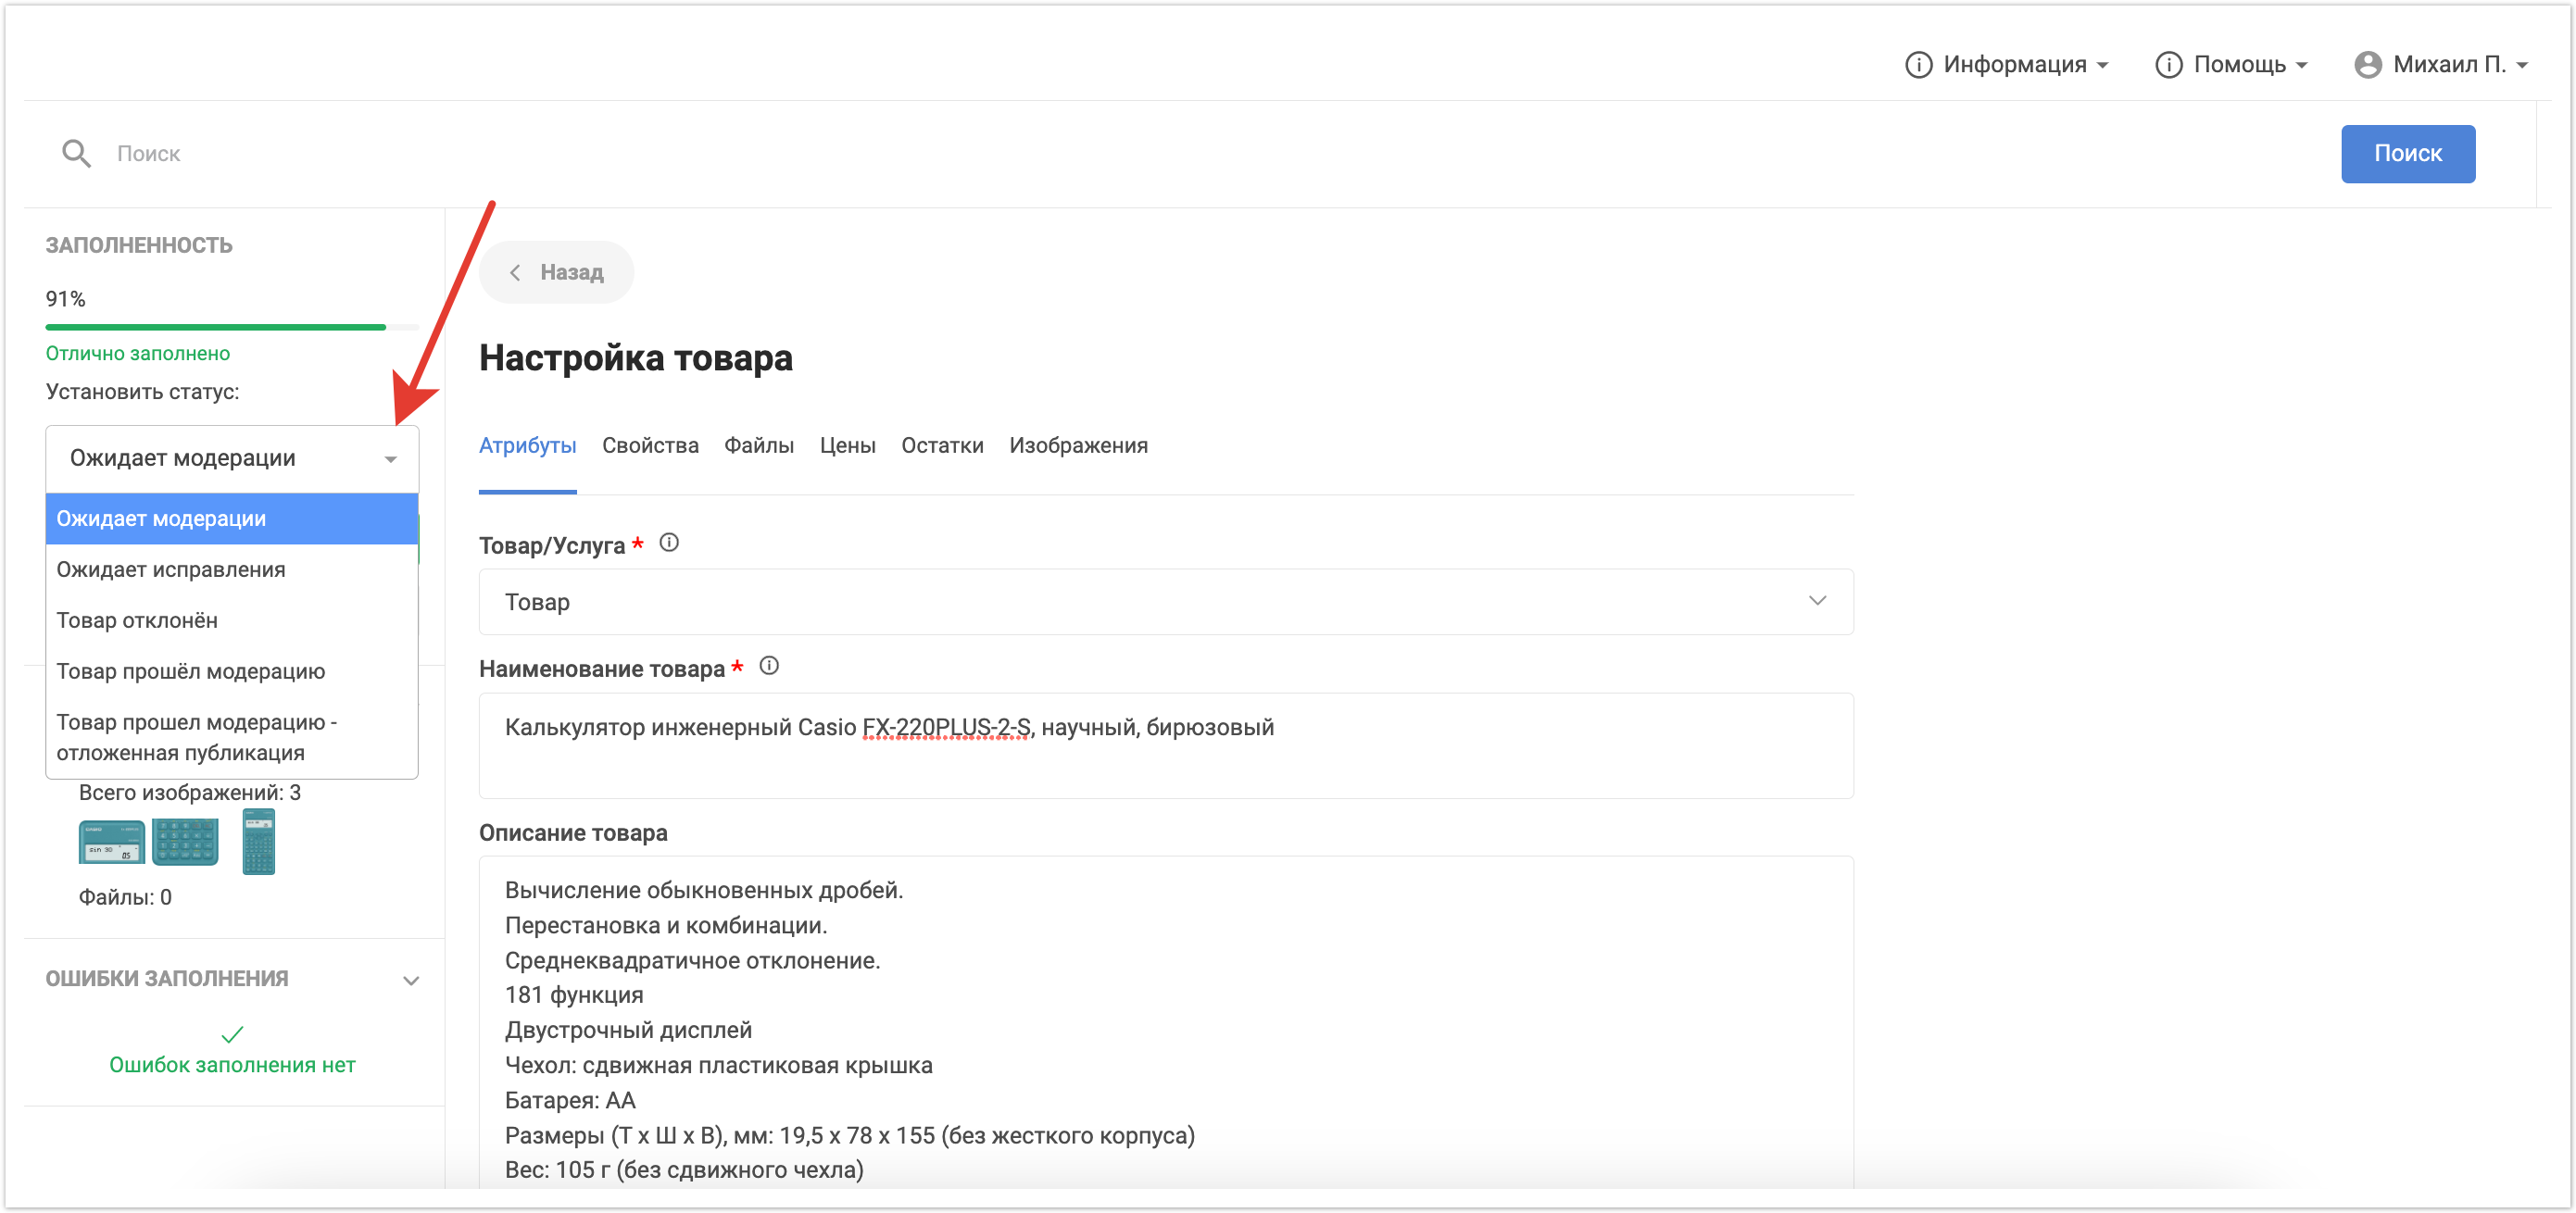
Для того, чтобы изменить статус для товара вручную, необходимо перейти в режим редактирования.
Редактирование товара
Ручное редактирование товара
Режим редактирования товара позволяет бренд-менеджеру внести исправления по товару, если они необходимы, а также изменить статус модерации. Для этого нужно нажать на кнопку для редактирования.
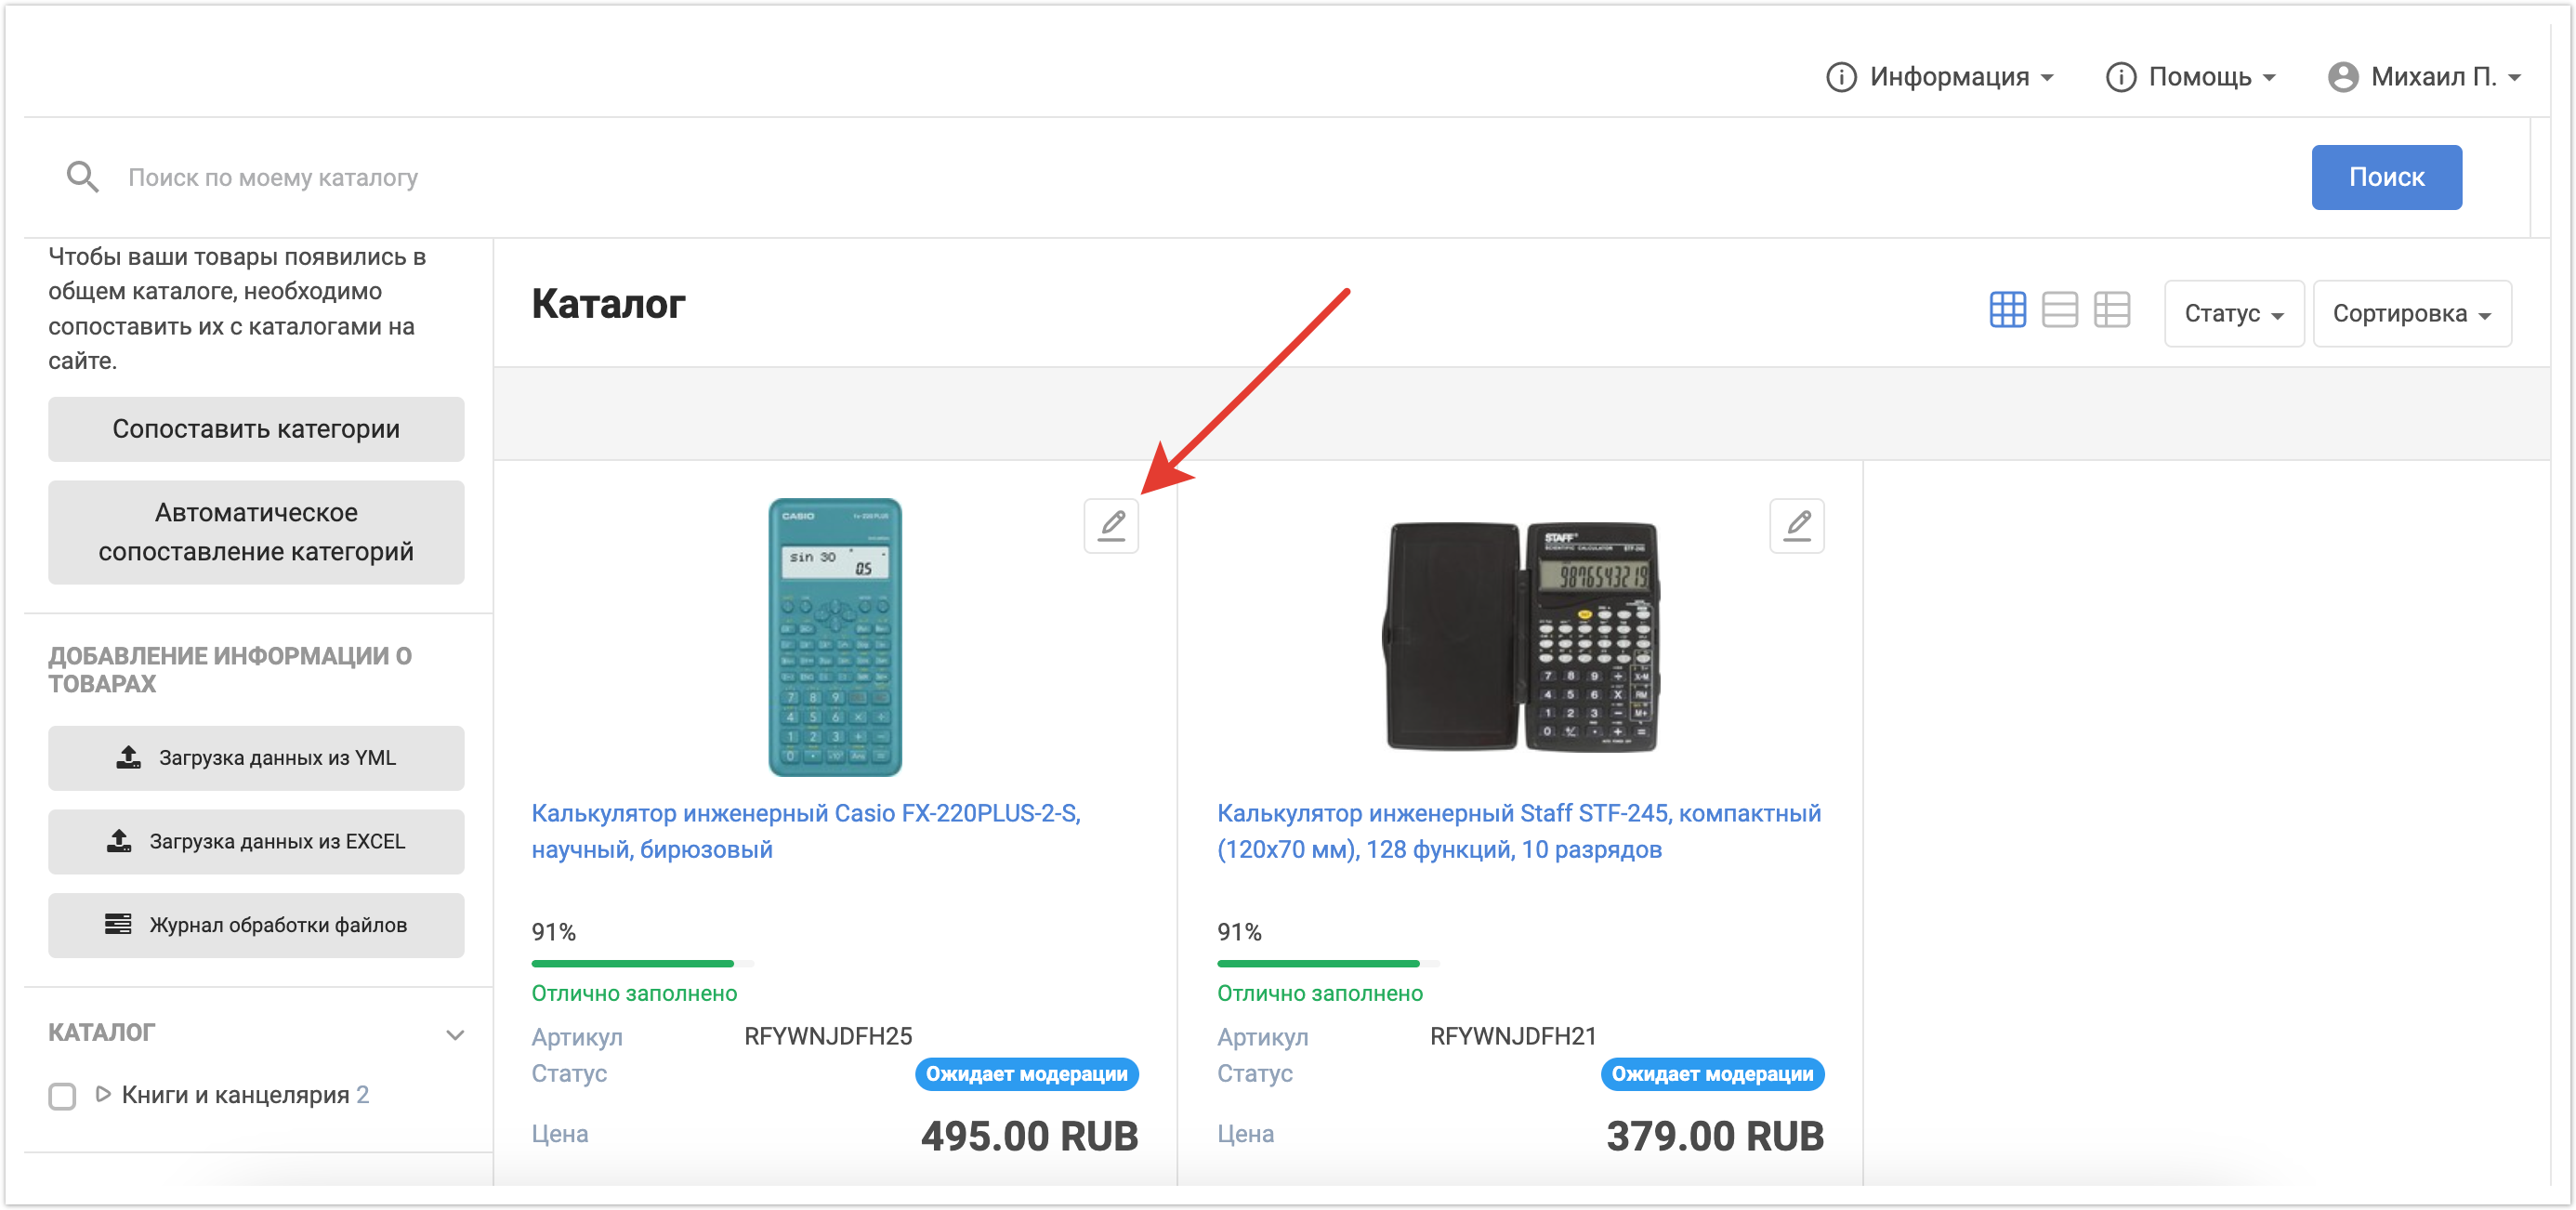
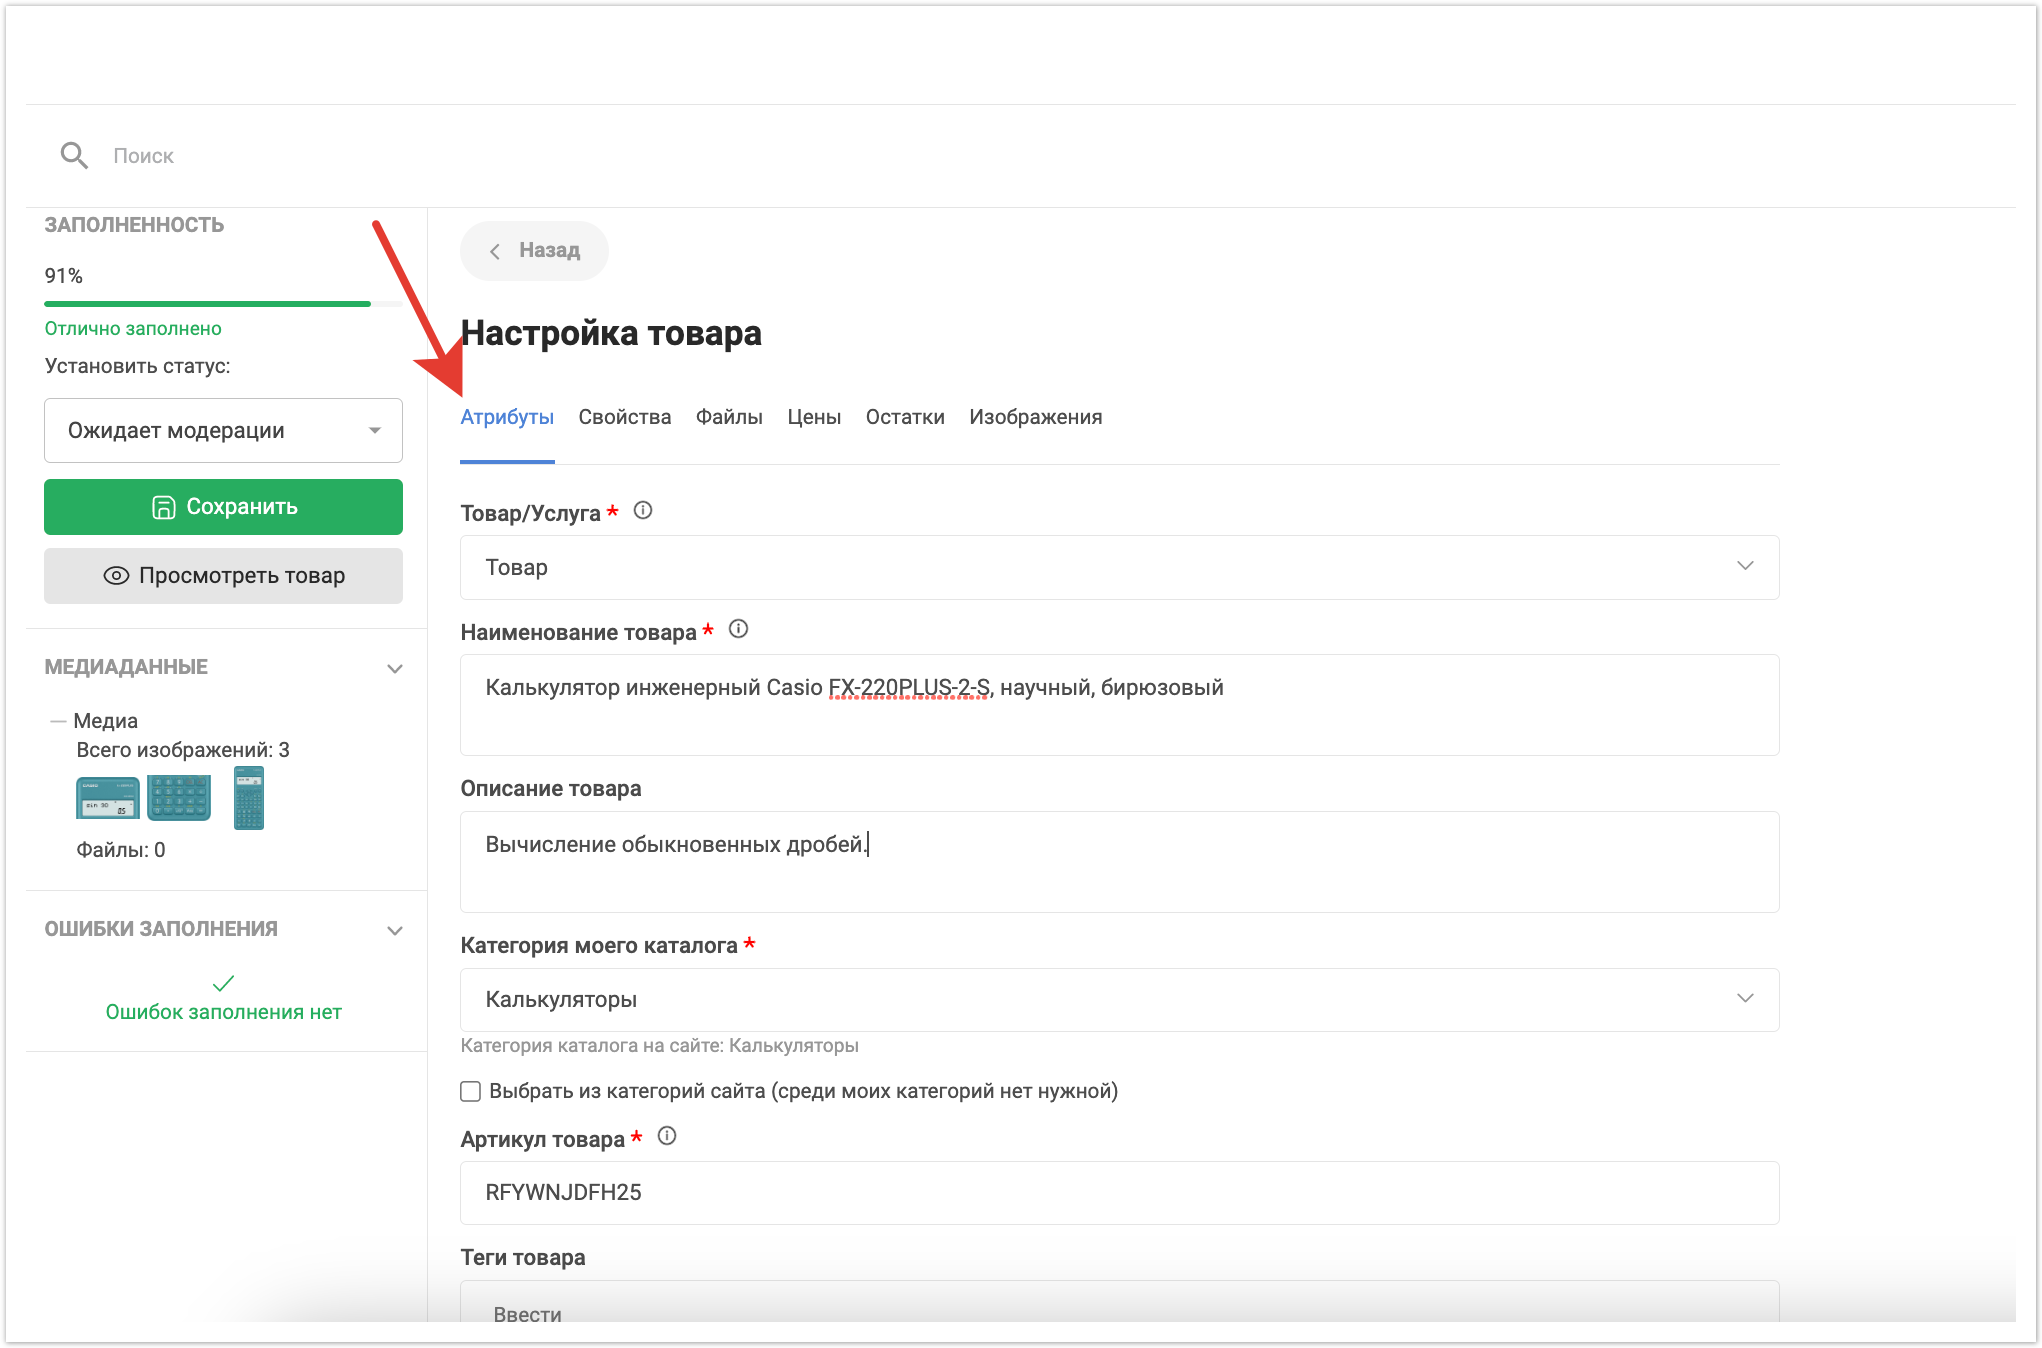
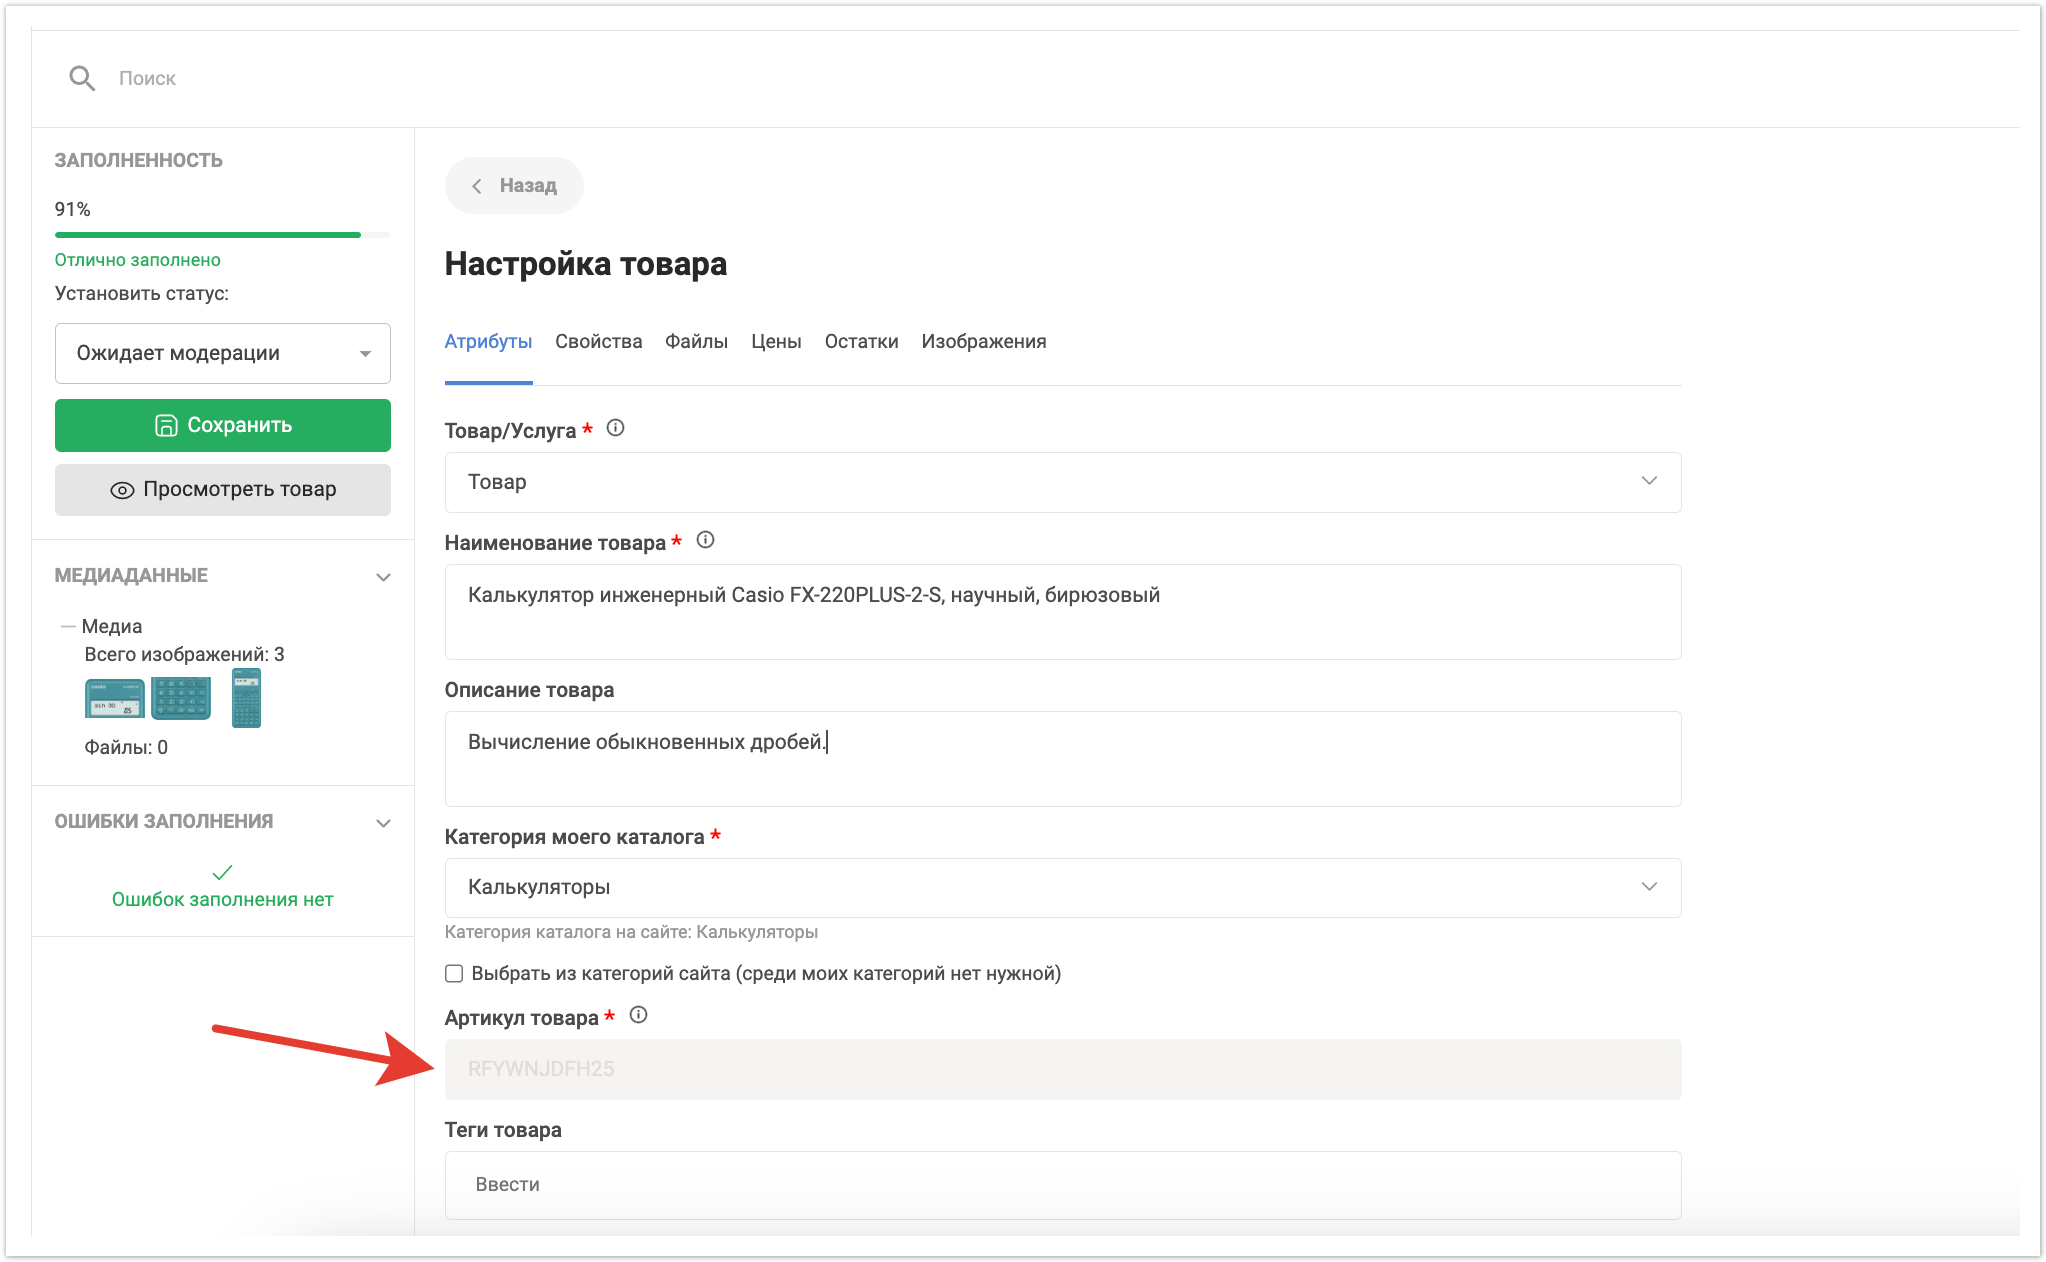
Откроется карточка товара, где будет виден процент заполненности и можно будет скорректировать необходимые данные. Данные находятся на нескольких вкладках: Атрибуты, Свойства, Файлы, Цены, Остатки, Изображения.
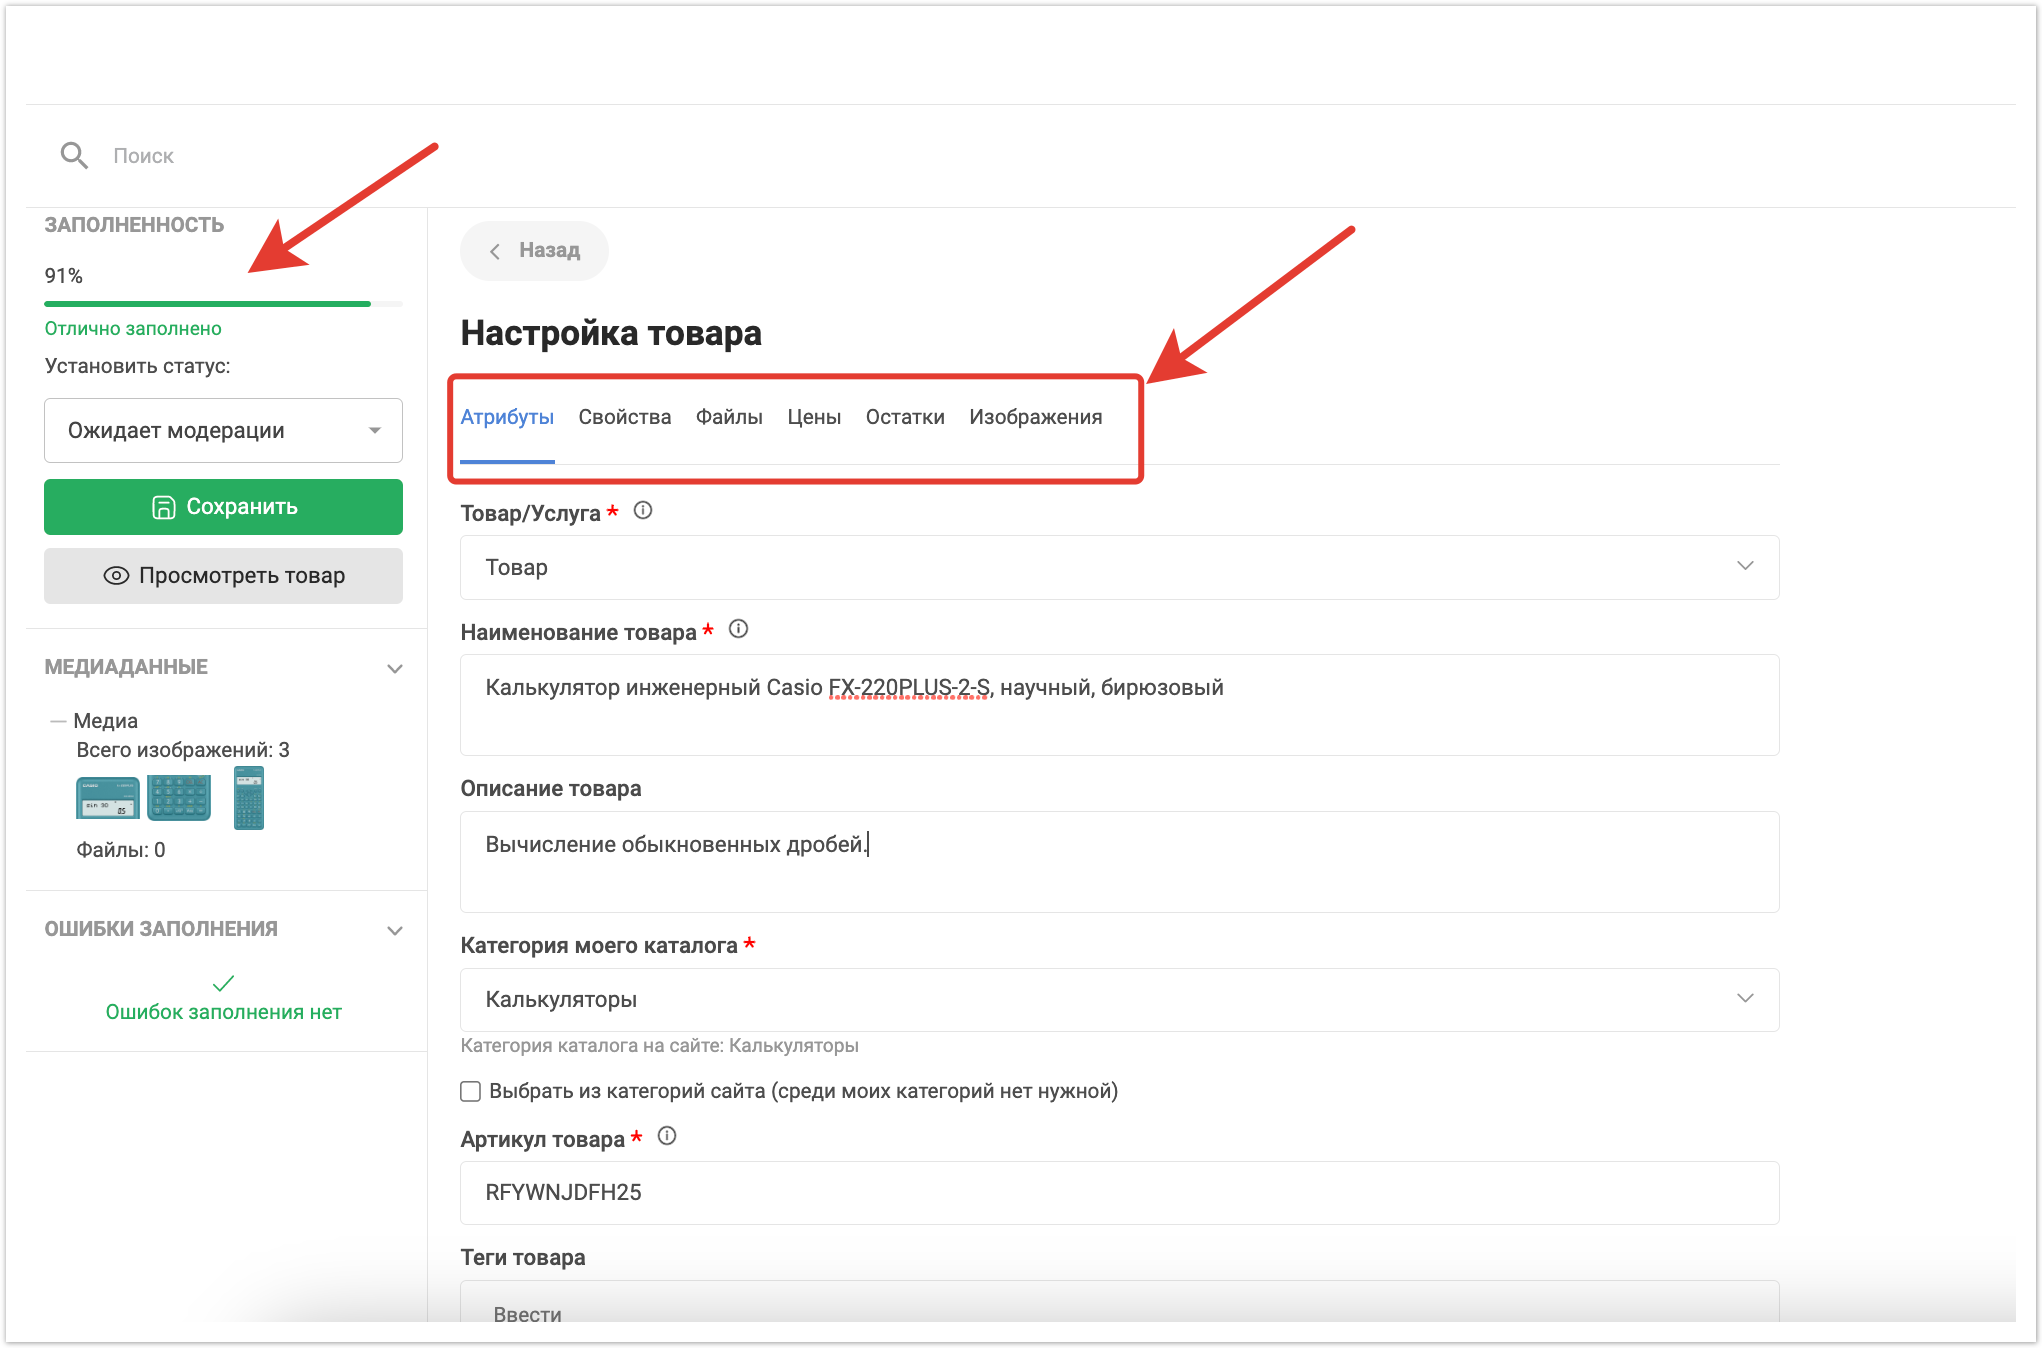
Вкладка Атрибуты содержит следующие данные:
- Вид номенклатуры - товар или услуга
- Название товара
- Описание товара - текстовое описание товара
- Категория моего каталога - категория товара, импортированная при загрузке файла Ответственным менеджером
- Артикул товара
- Теги товара - дополнительные теги товара, которые можно использовать для пометки товаров в каталоге для покупателей.
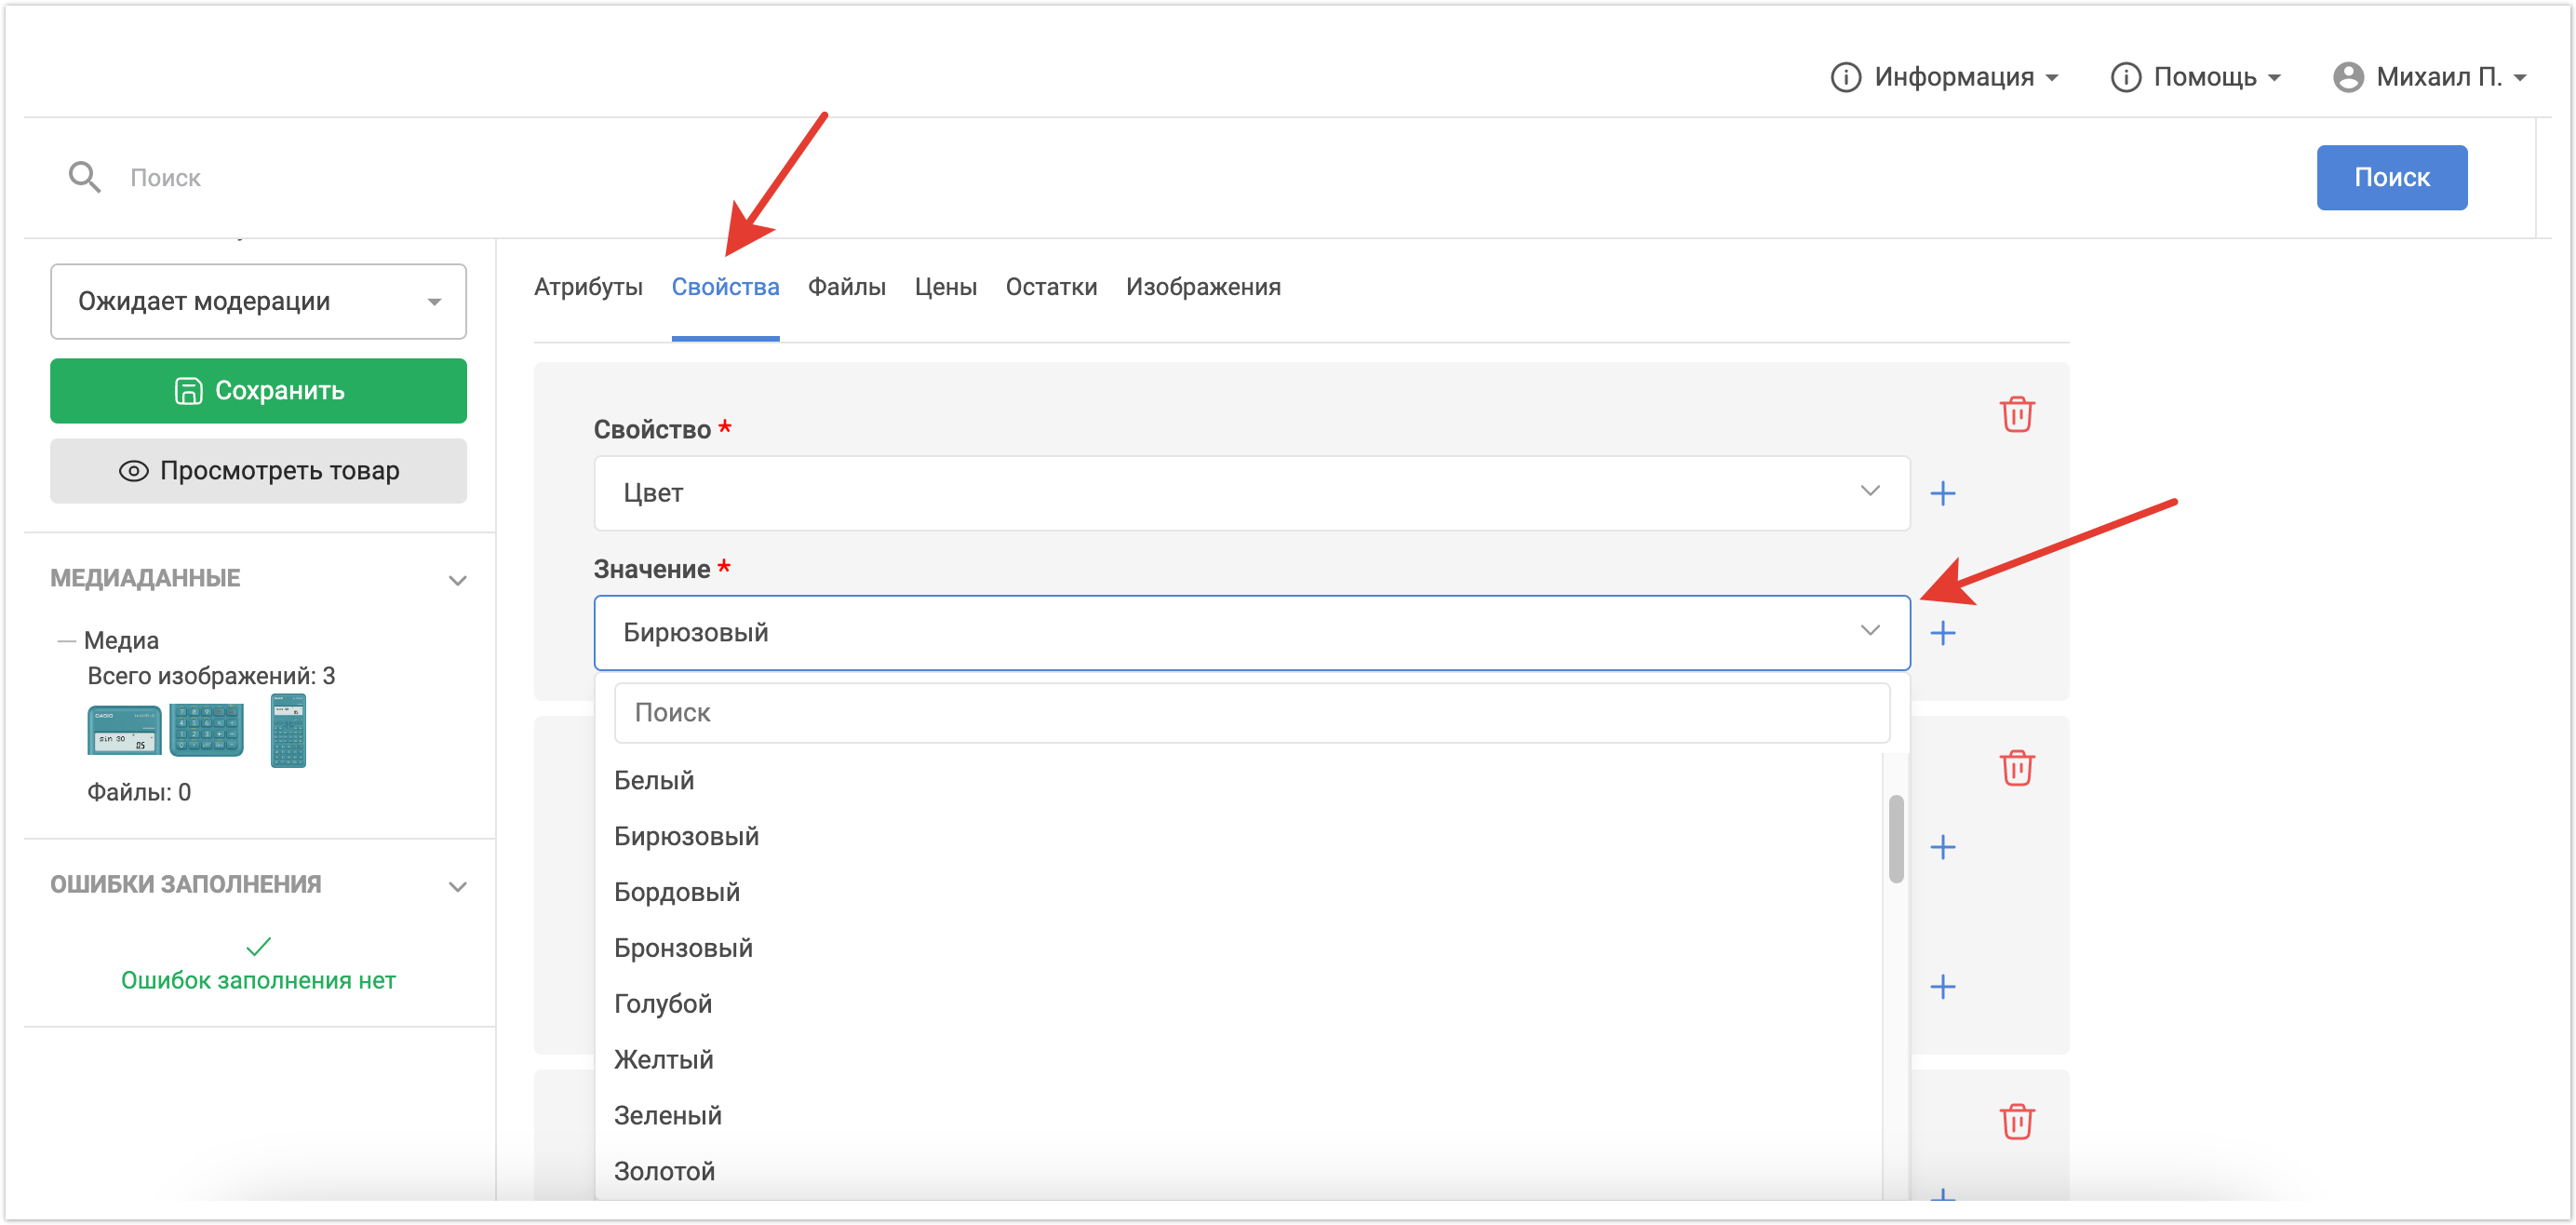
Вкладка Свойства содержит в себе все импортированные свойства для товара, а так же их значения. В этом разделе Бренд-менеджер может изменить свойство продукта или его значение, воспользовавшись выпадающим списком. Он также может удалить лишние свойства при необходимости или добавить новое свойство по кнопке Добавить свойство.
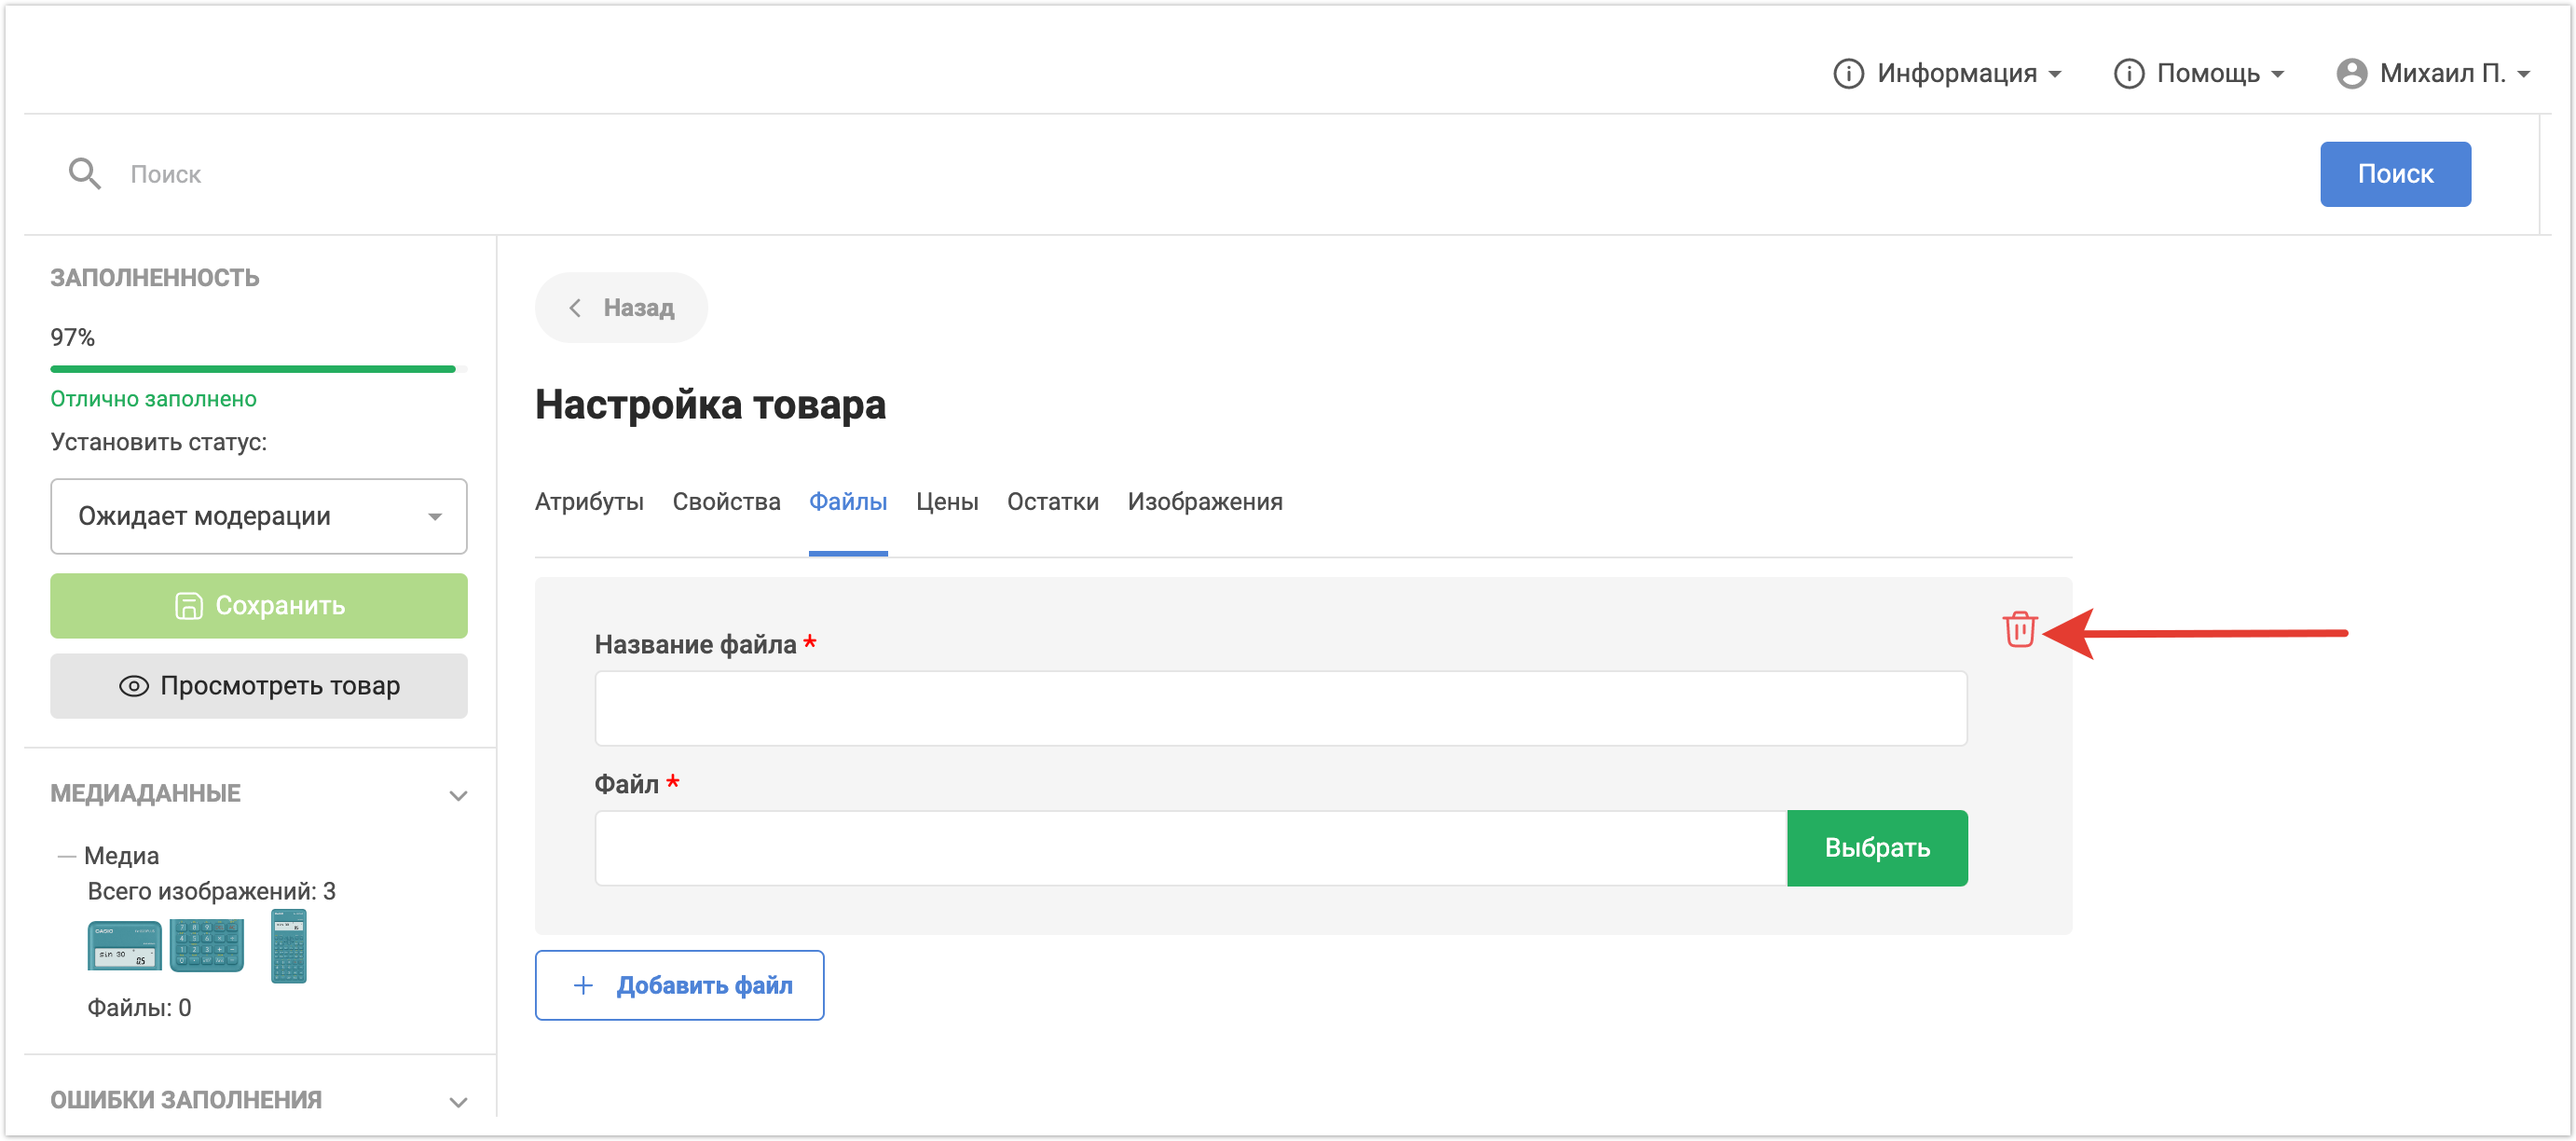
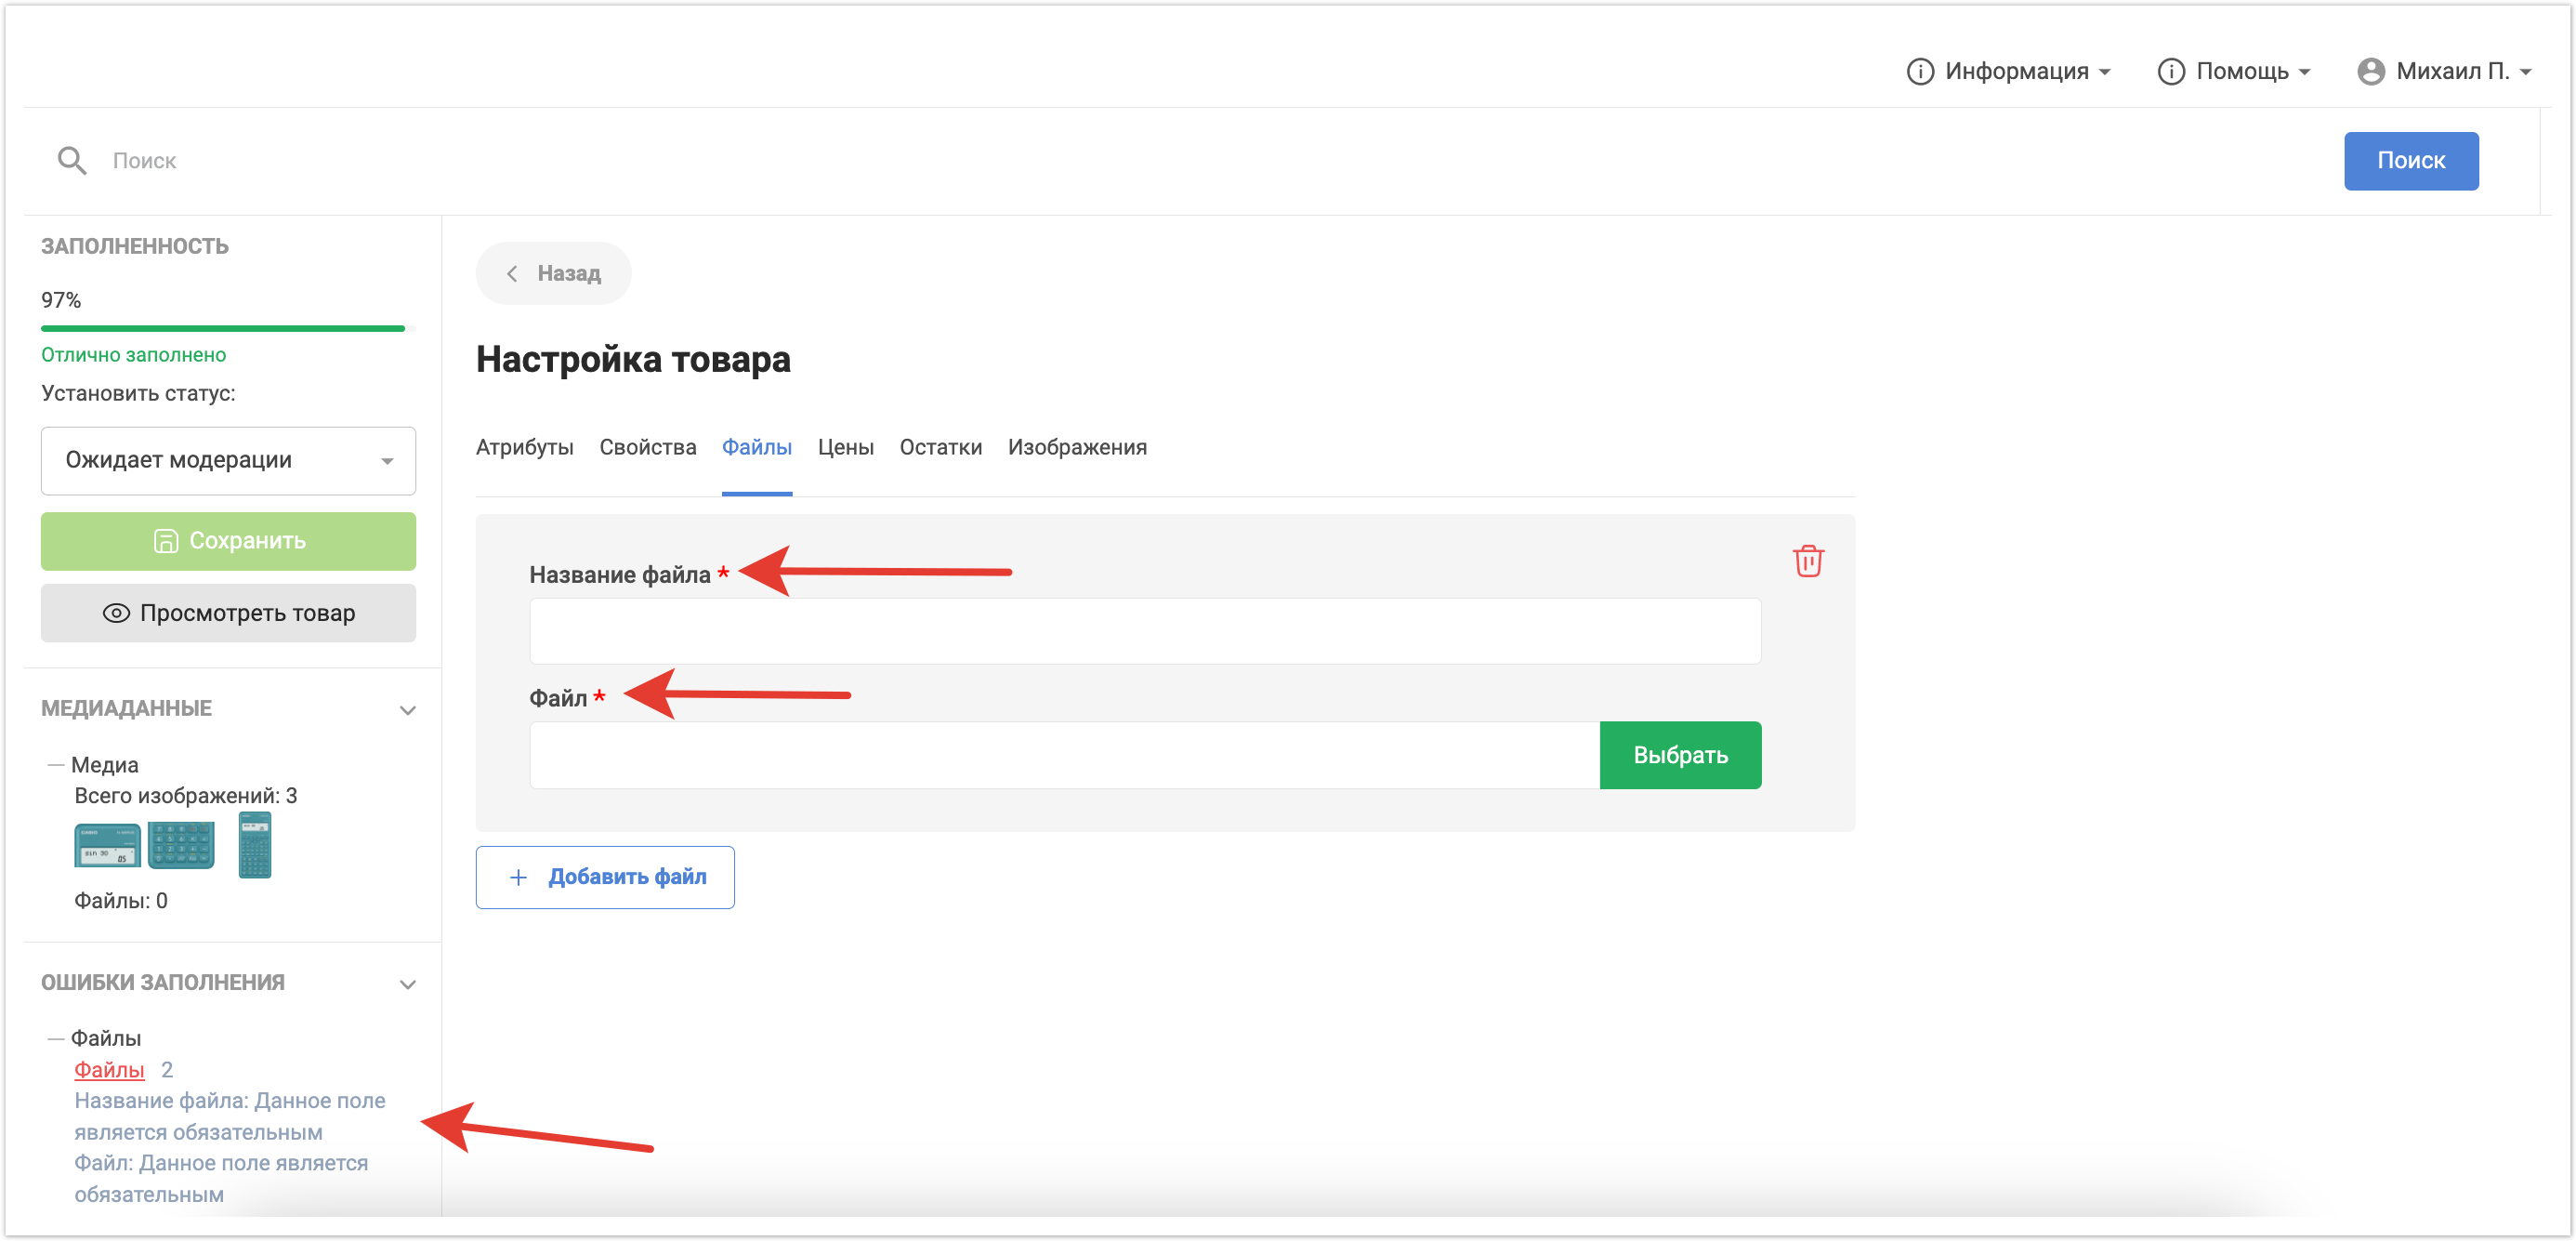
На вкладке Файлы существует возможность добавить дополнительные файлы, такие как Сертификаты, Спецификации, Инструкции и любые другие файлы, которые должны быть отображены конечному пользователю в продуктовой карточке. Для добавления файла нужно нажать на кнопку Добавить файл, а далее выбрать его на локальном компьютере.
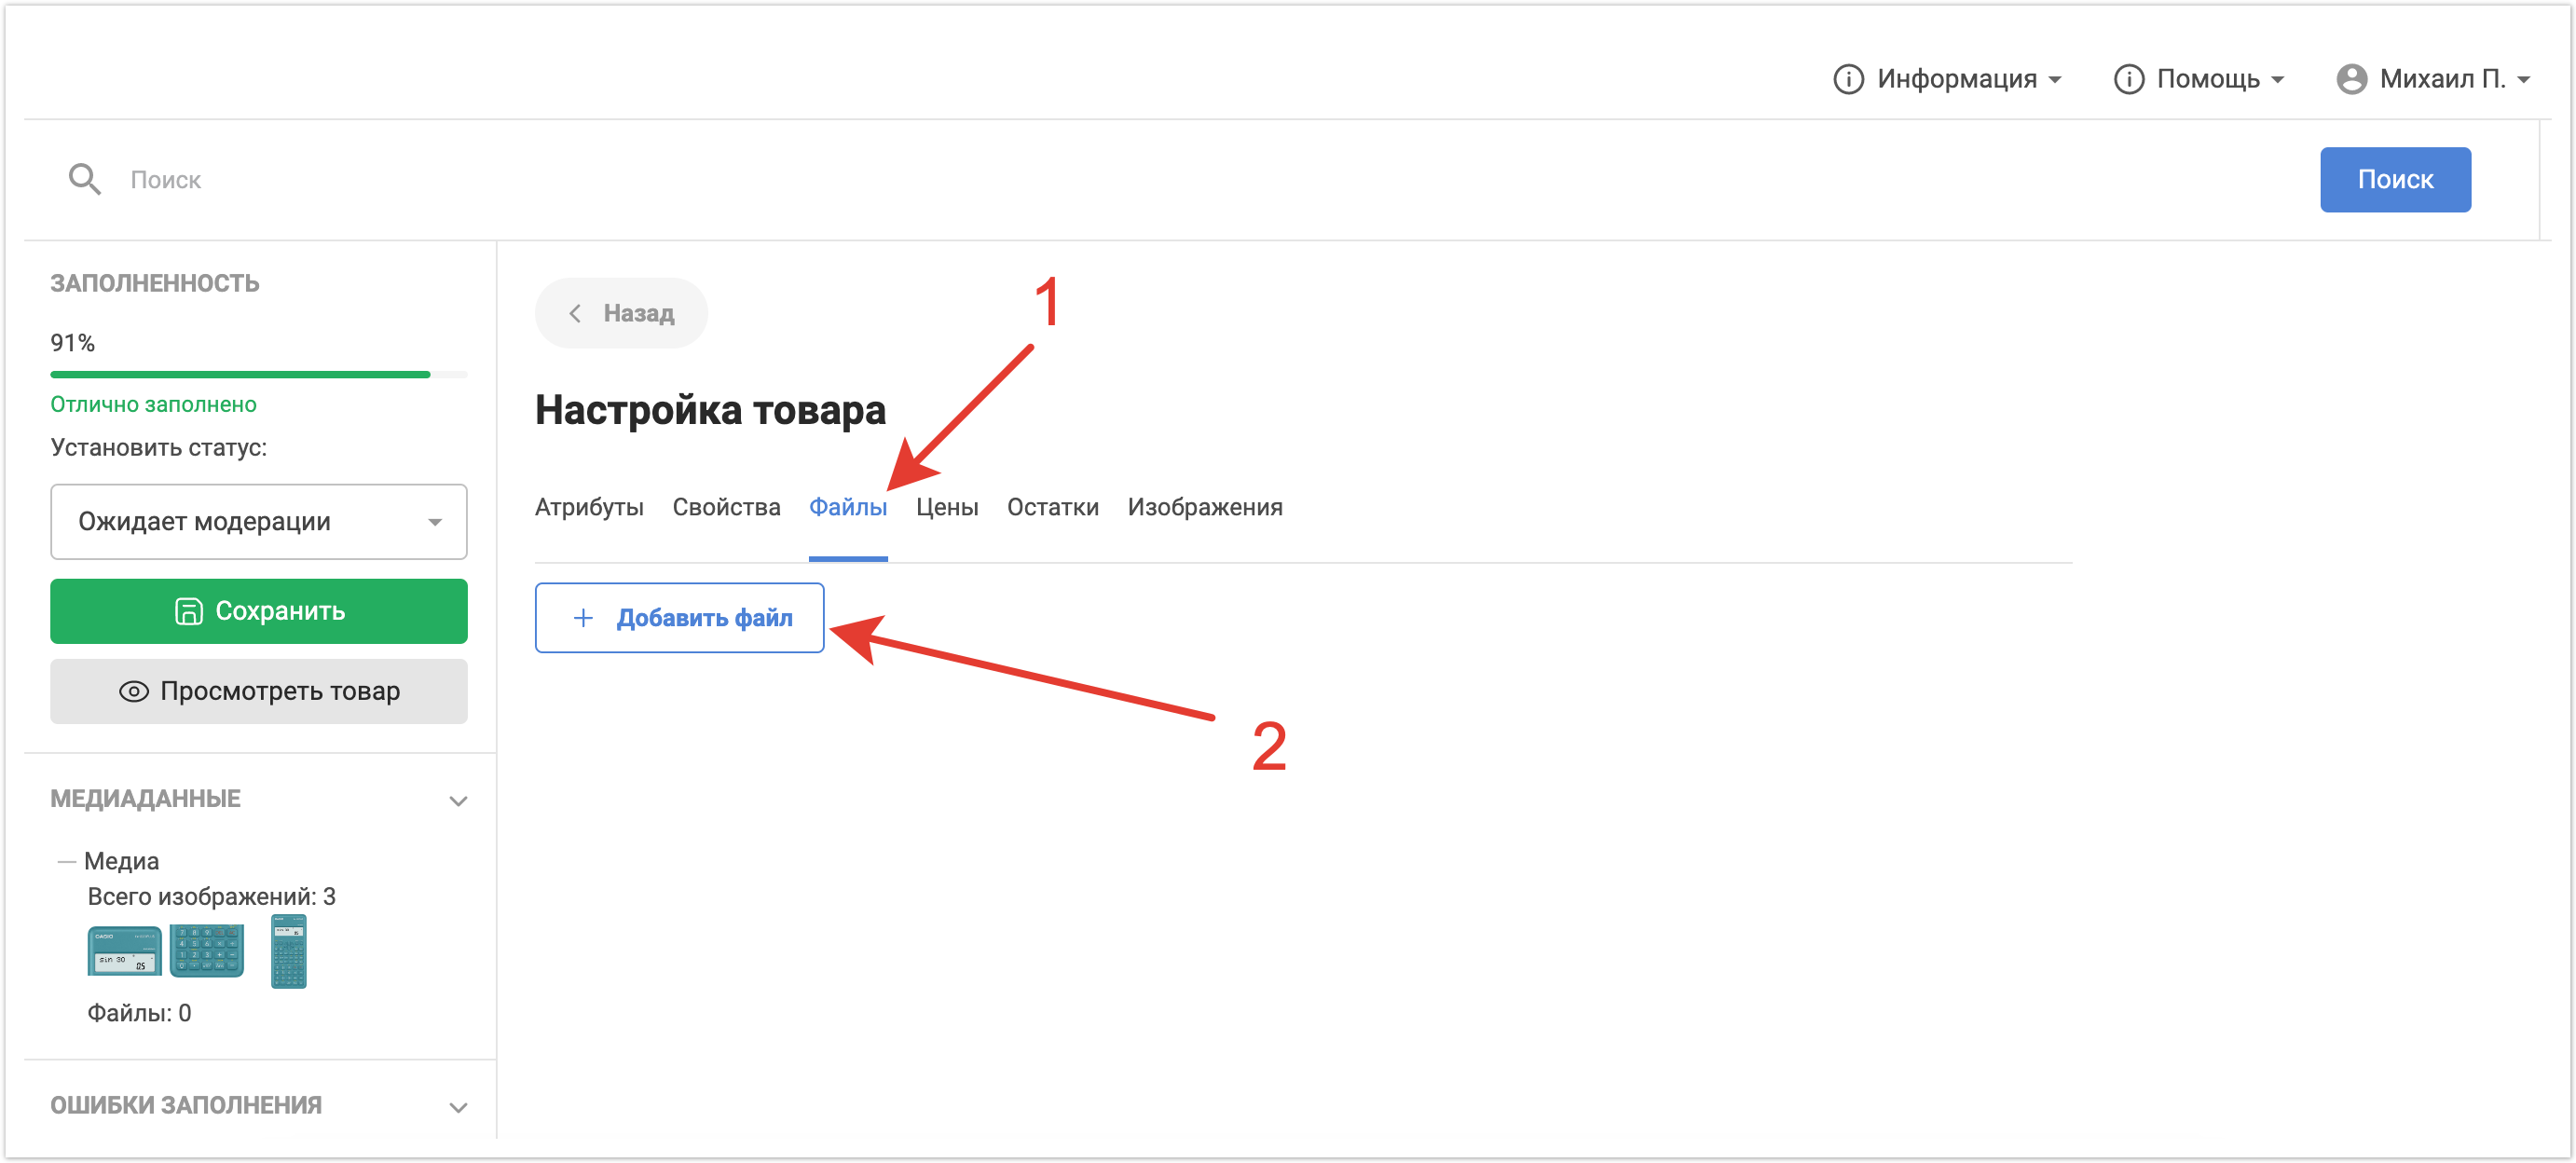
Можно также удалить ранее загруженный файл, если он более не актуален.
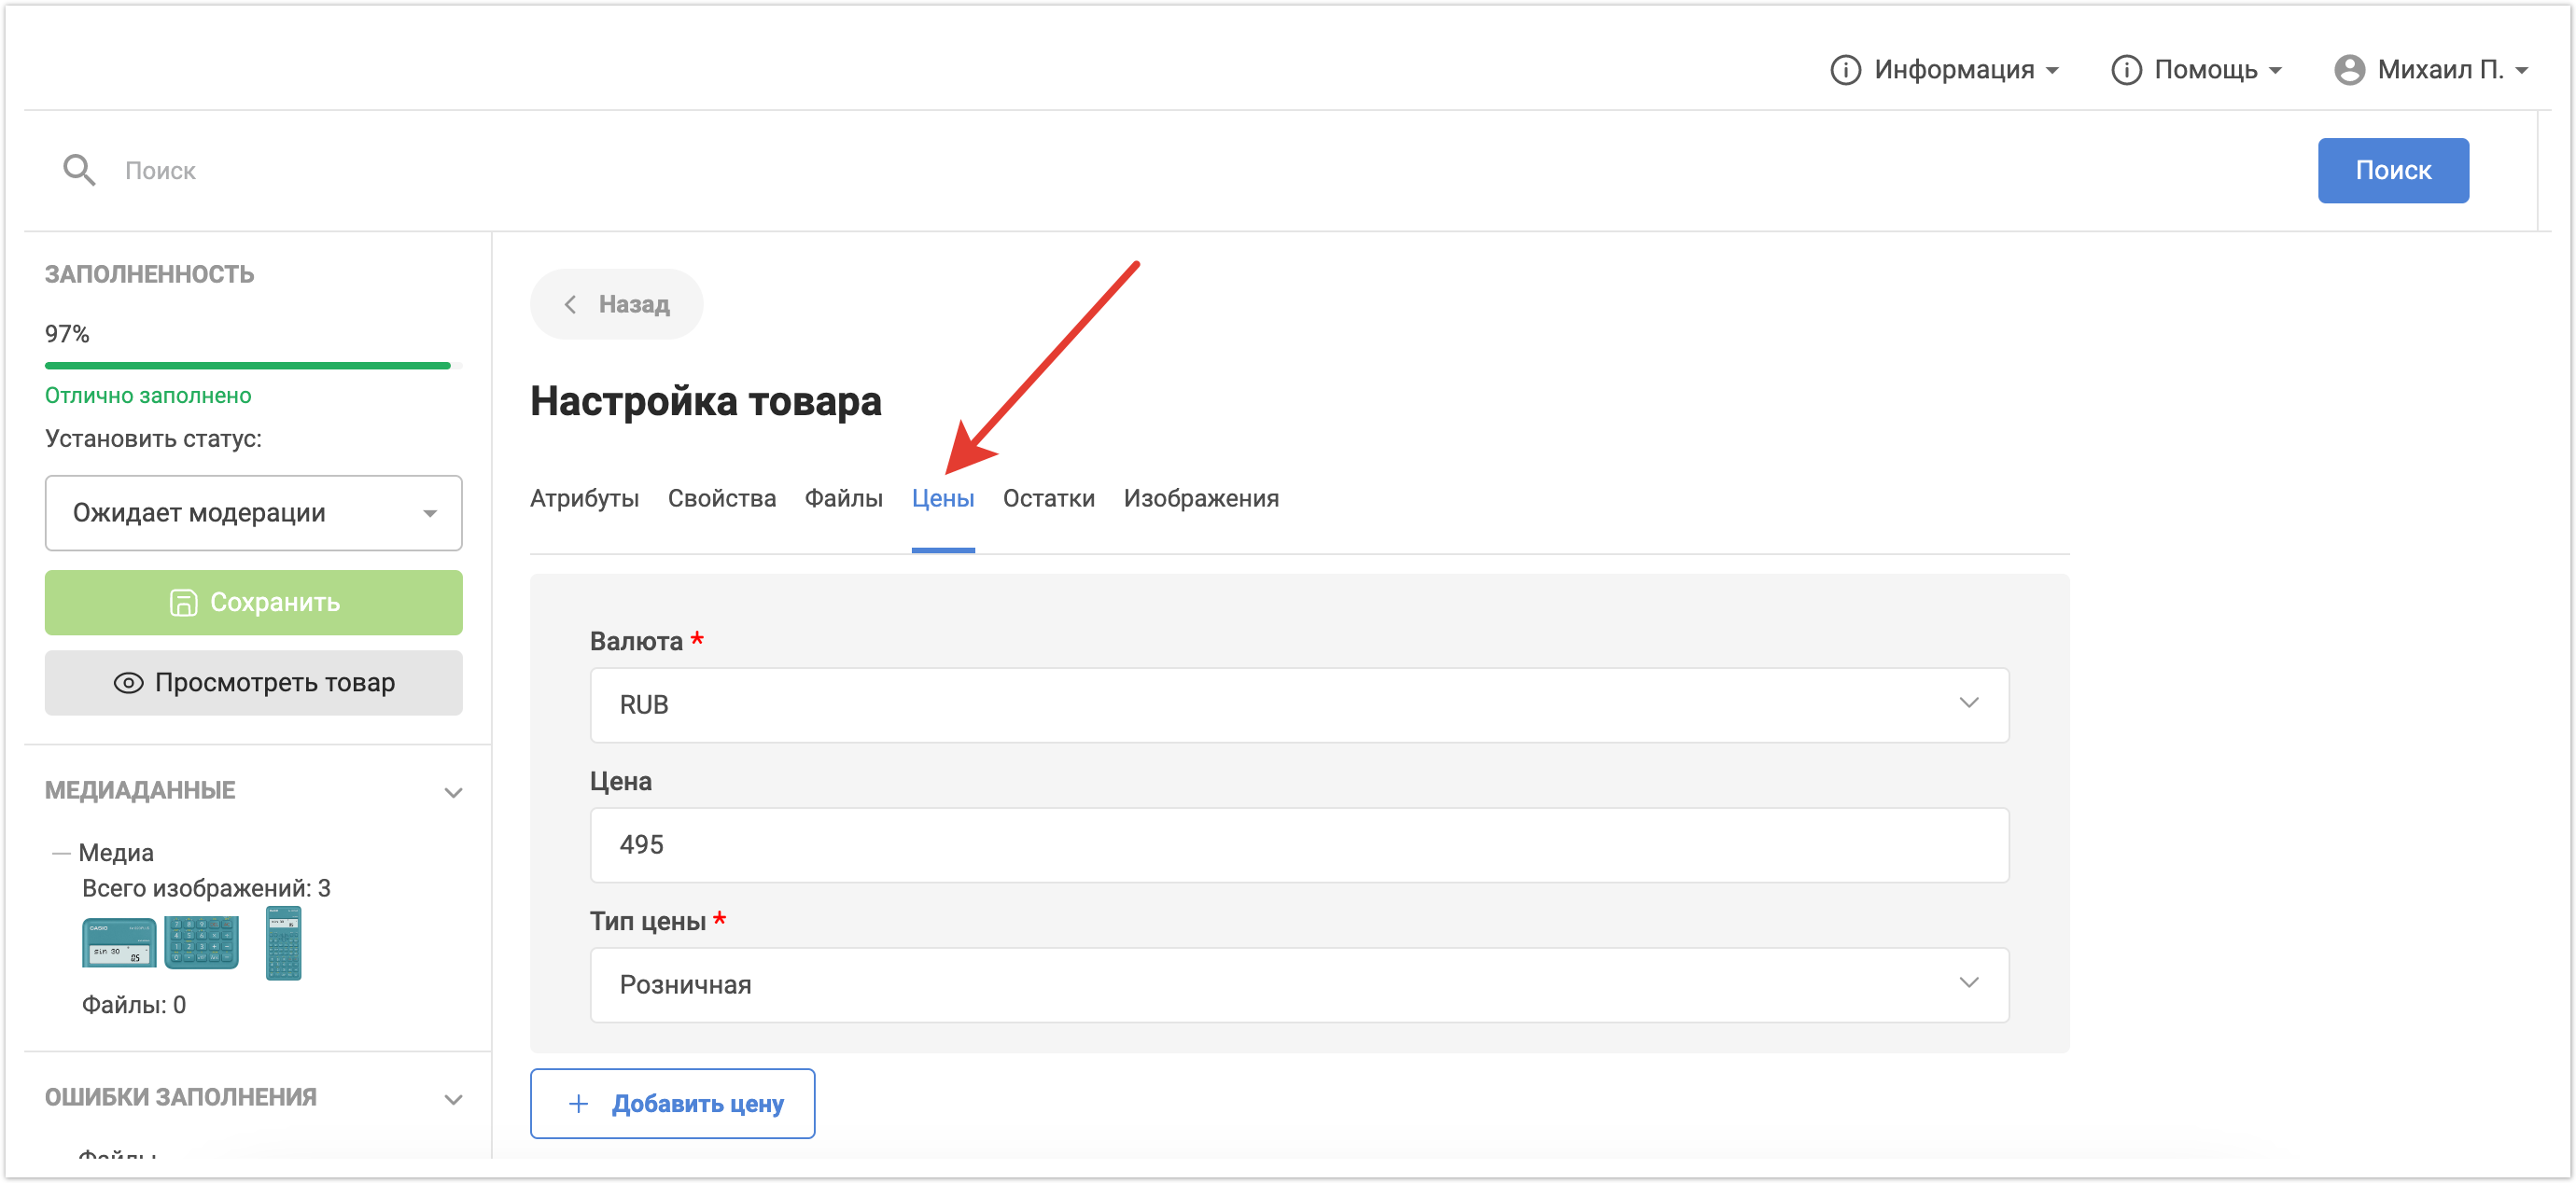
На вкладке Цены можно изменить значение цены для товара. Также можно добавить еще один тип цены и его значение по кнопке Добавить цену.
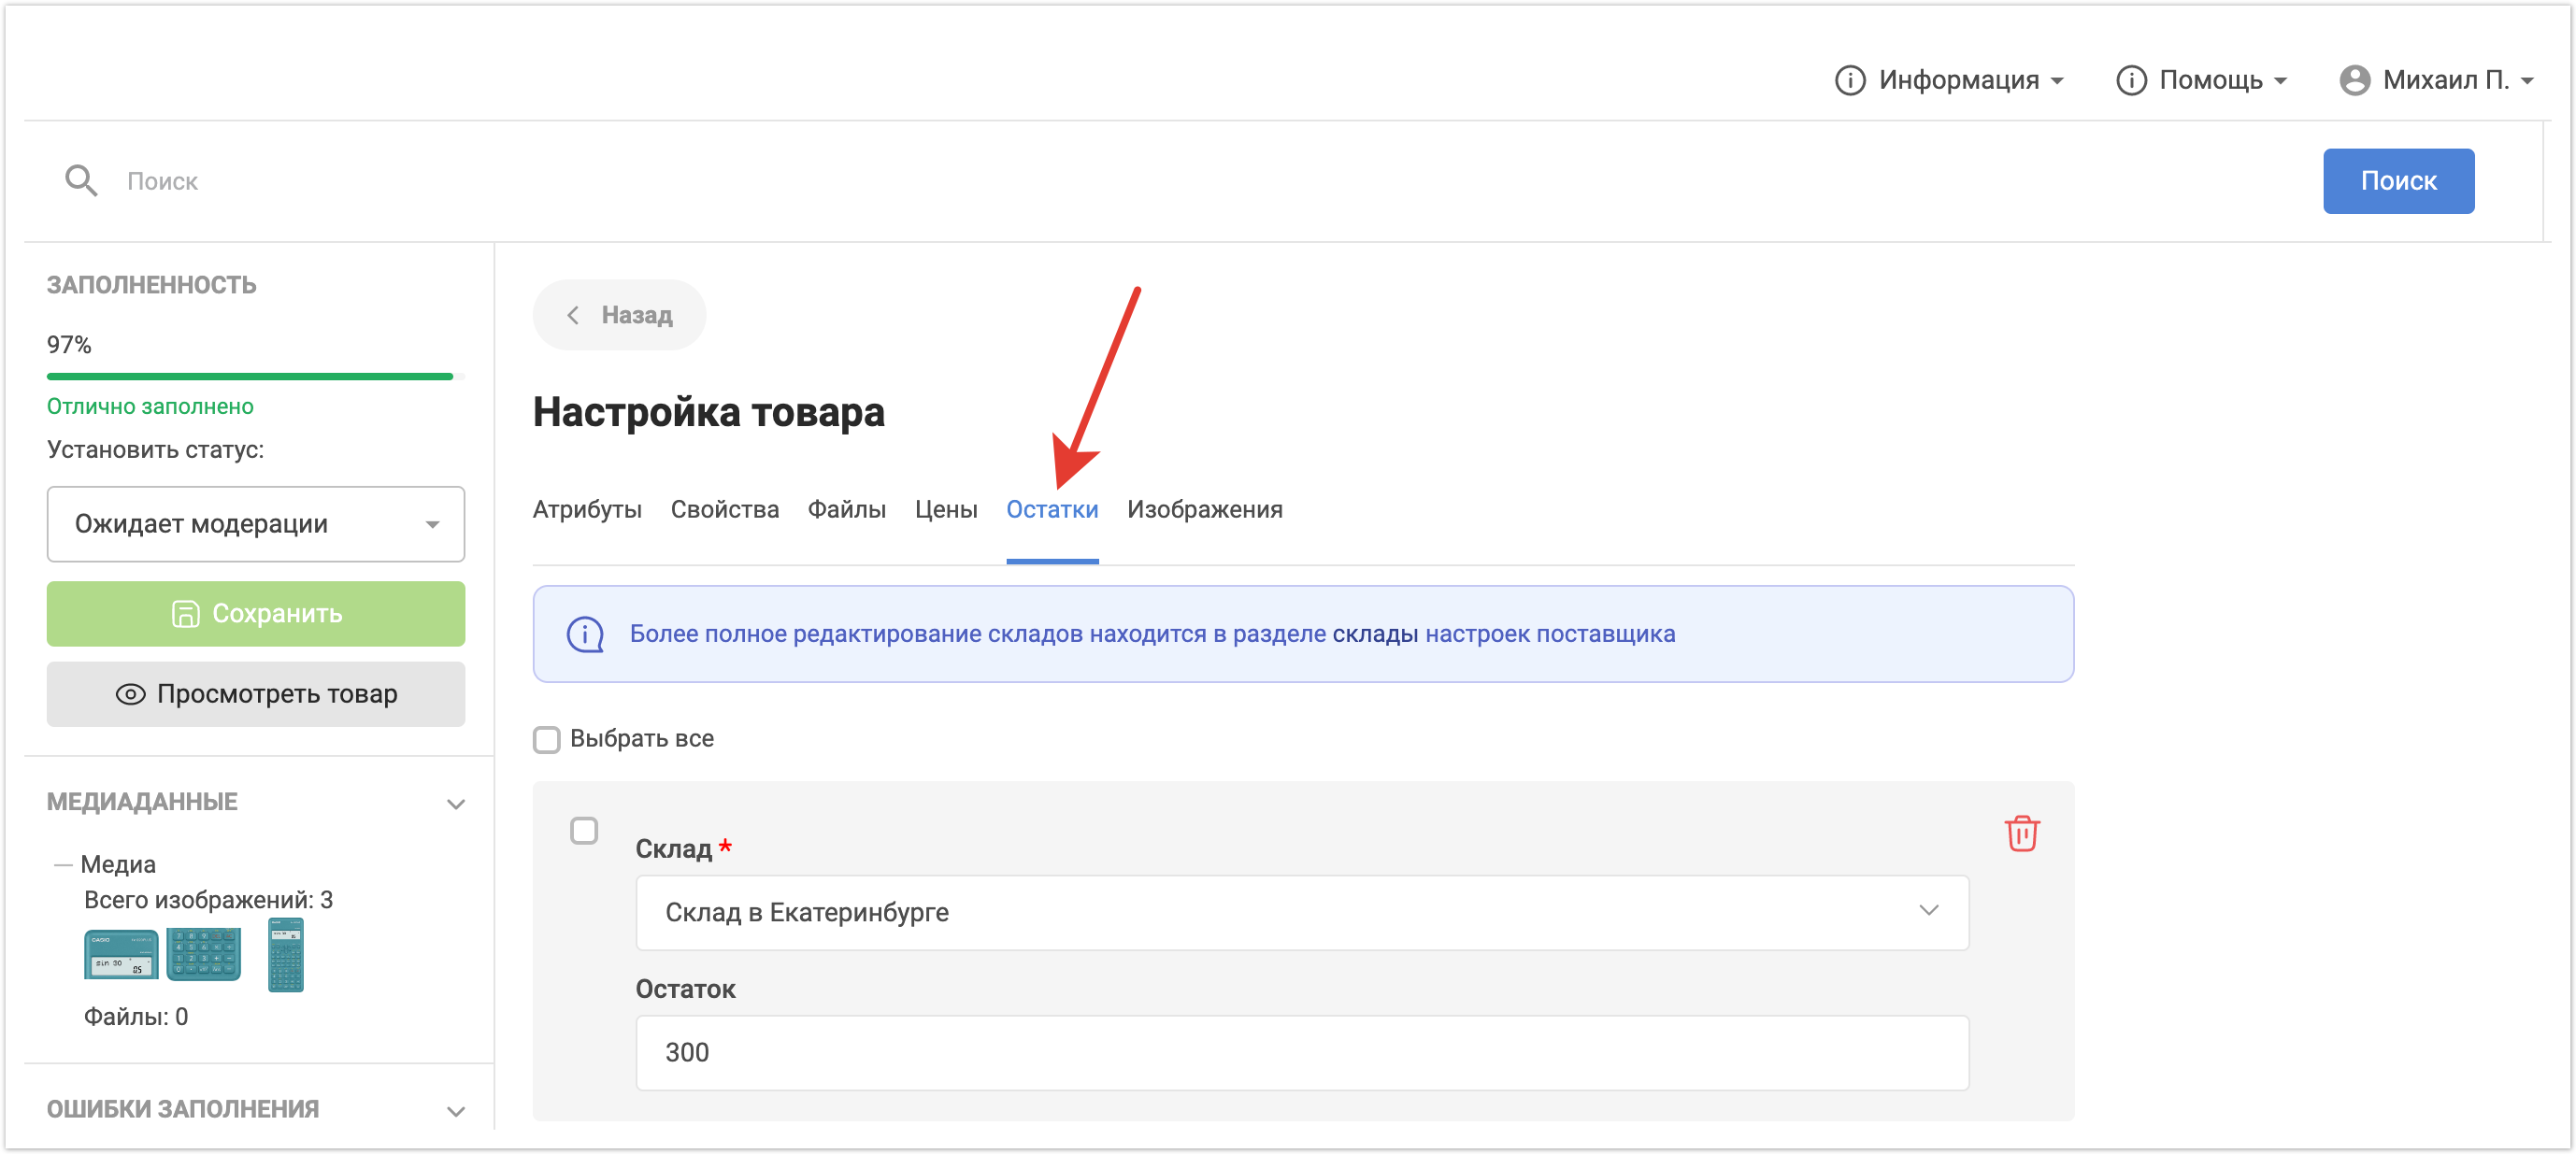
На вкладке Остатки можно отредактировать остатки товара на конкретном складе или удалить их полностью. Внизу страницы также есть кнопка Добавить остаток, по которой можно добавить остаток на новом складе.
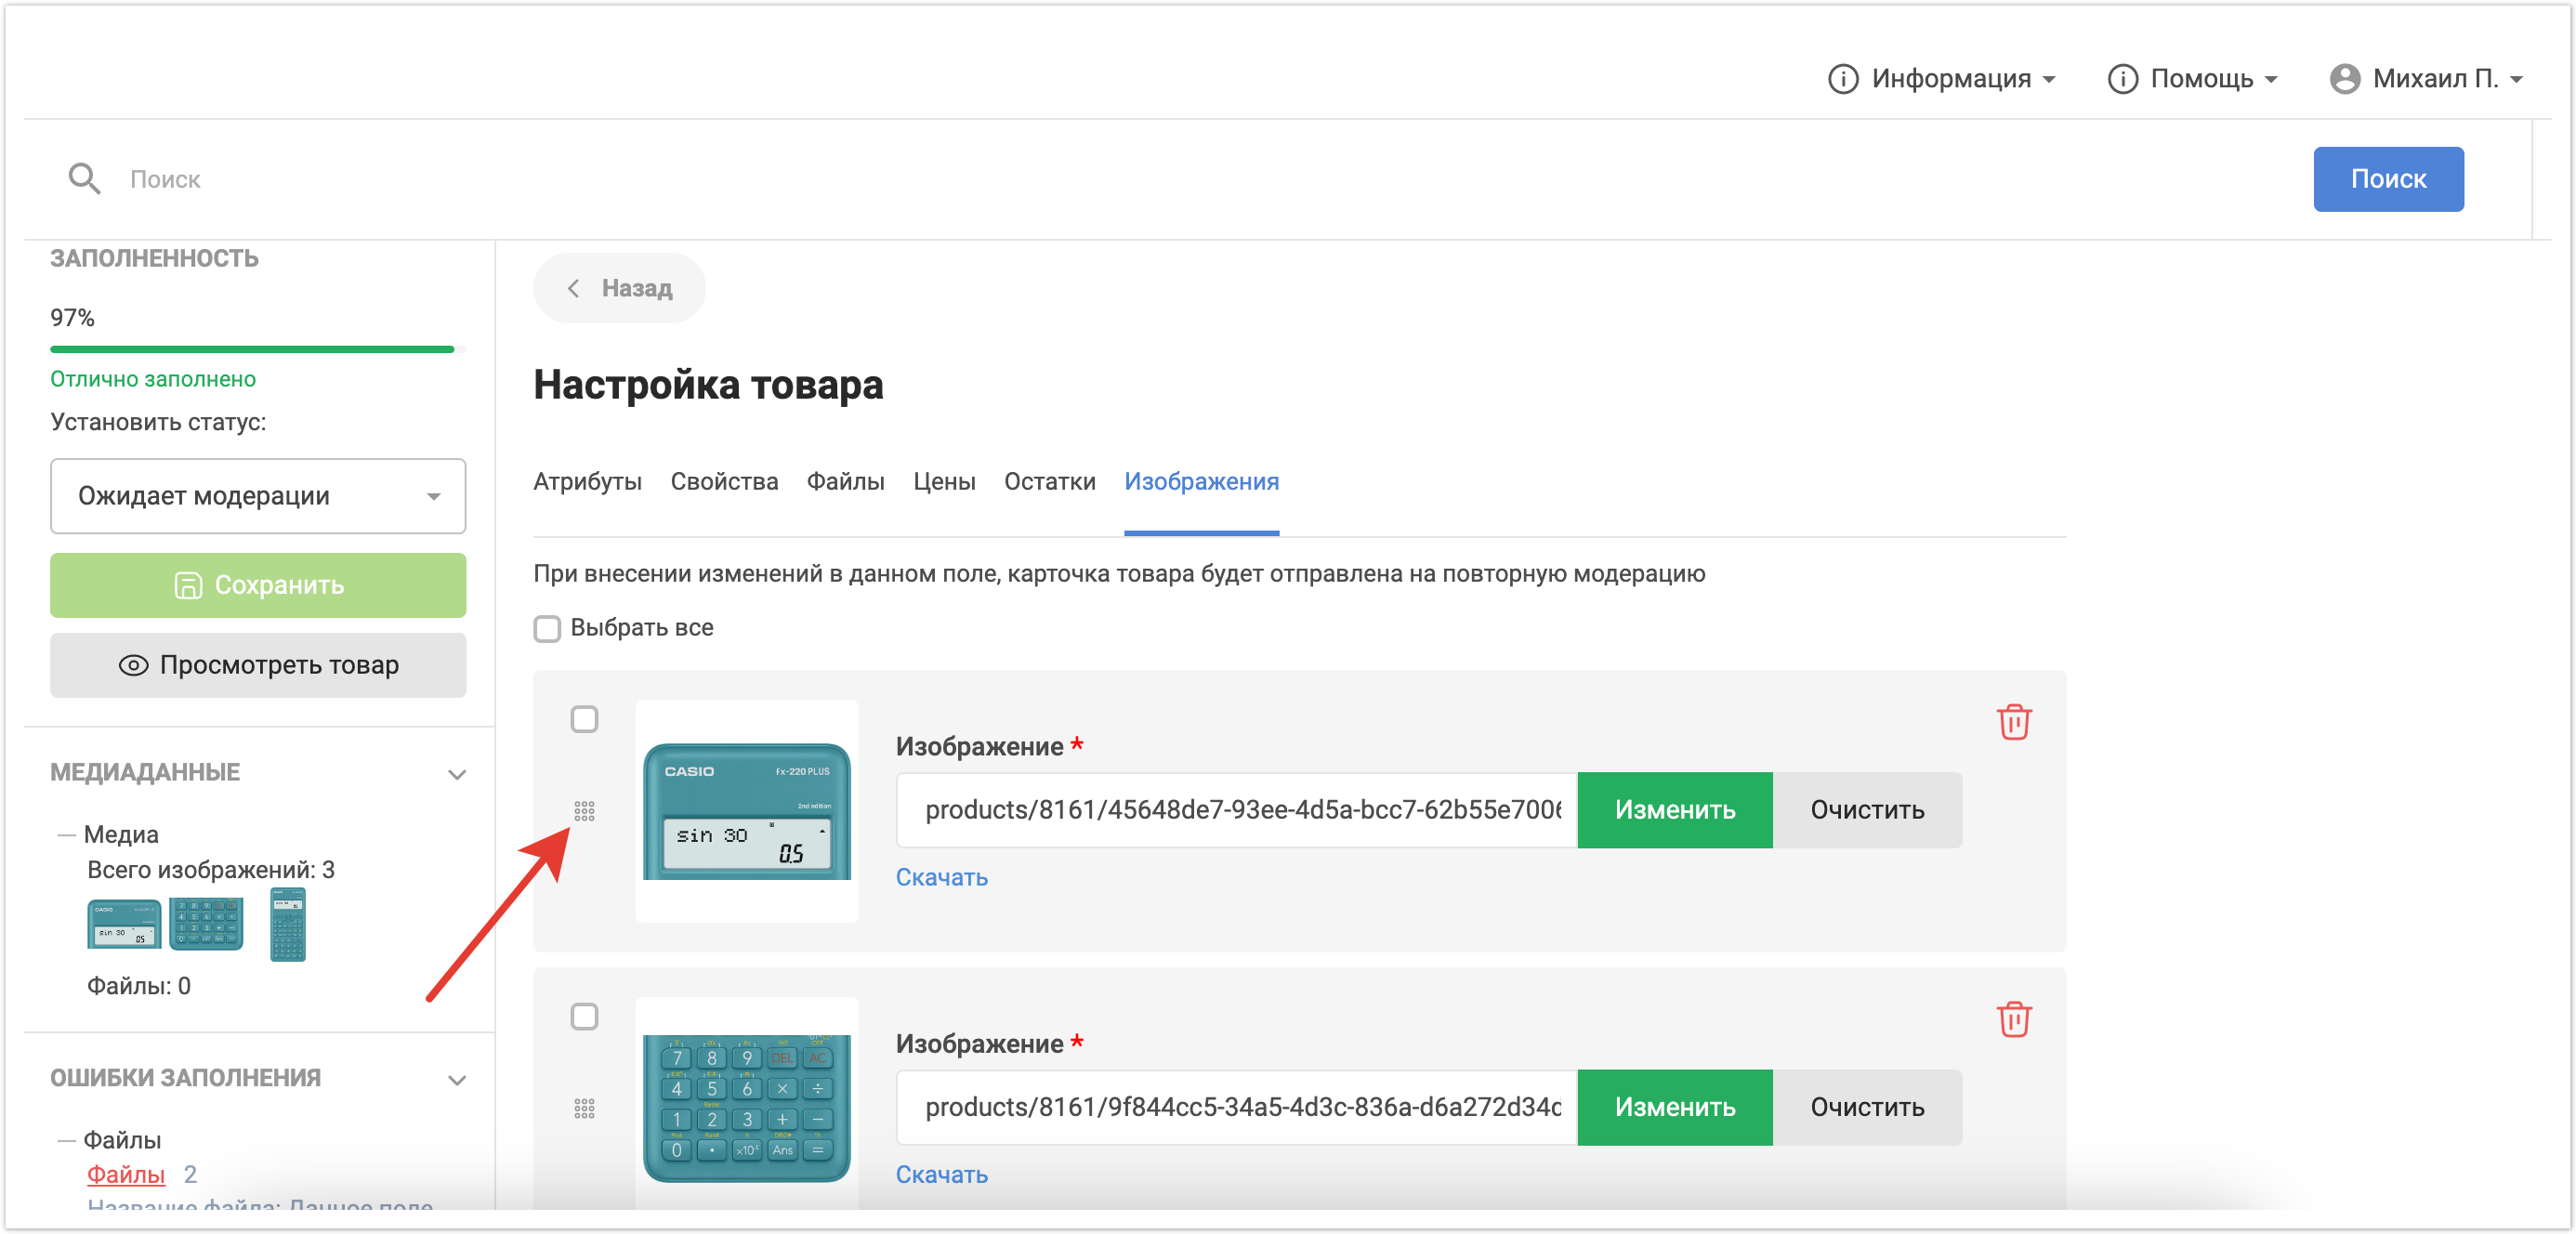
Вкладка Изображения содержит в себе список импортированных изображений для товара, а также предоставляет возможность догрузить изображения или удалить не актуальные.
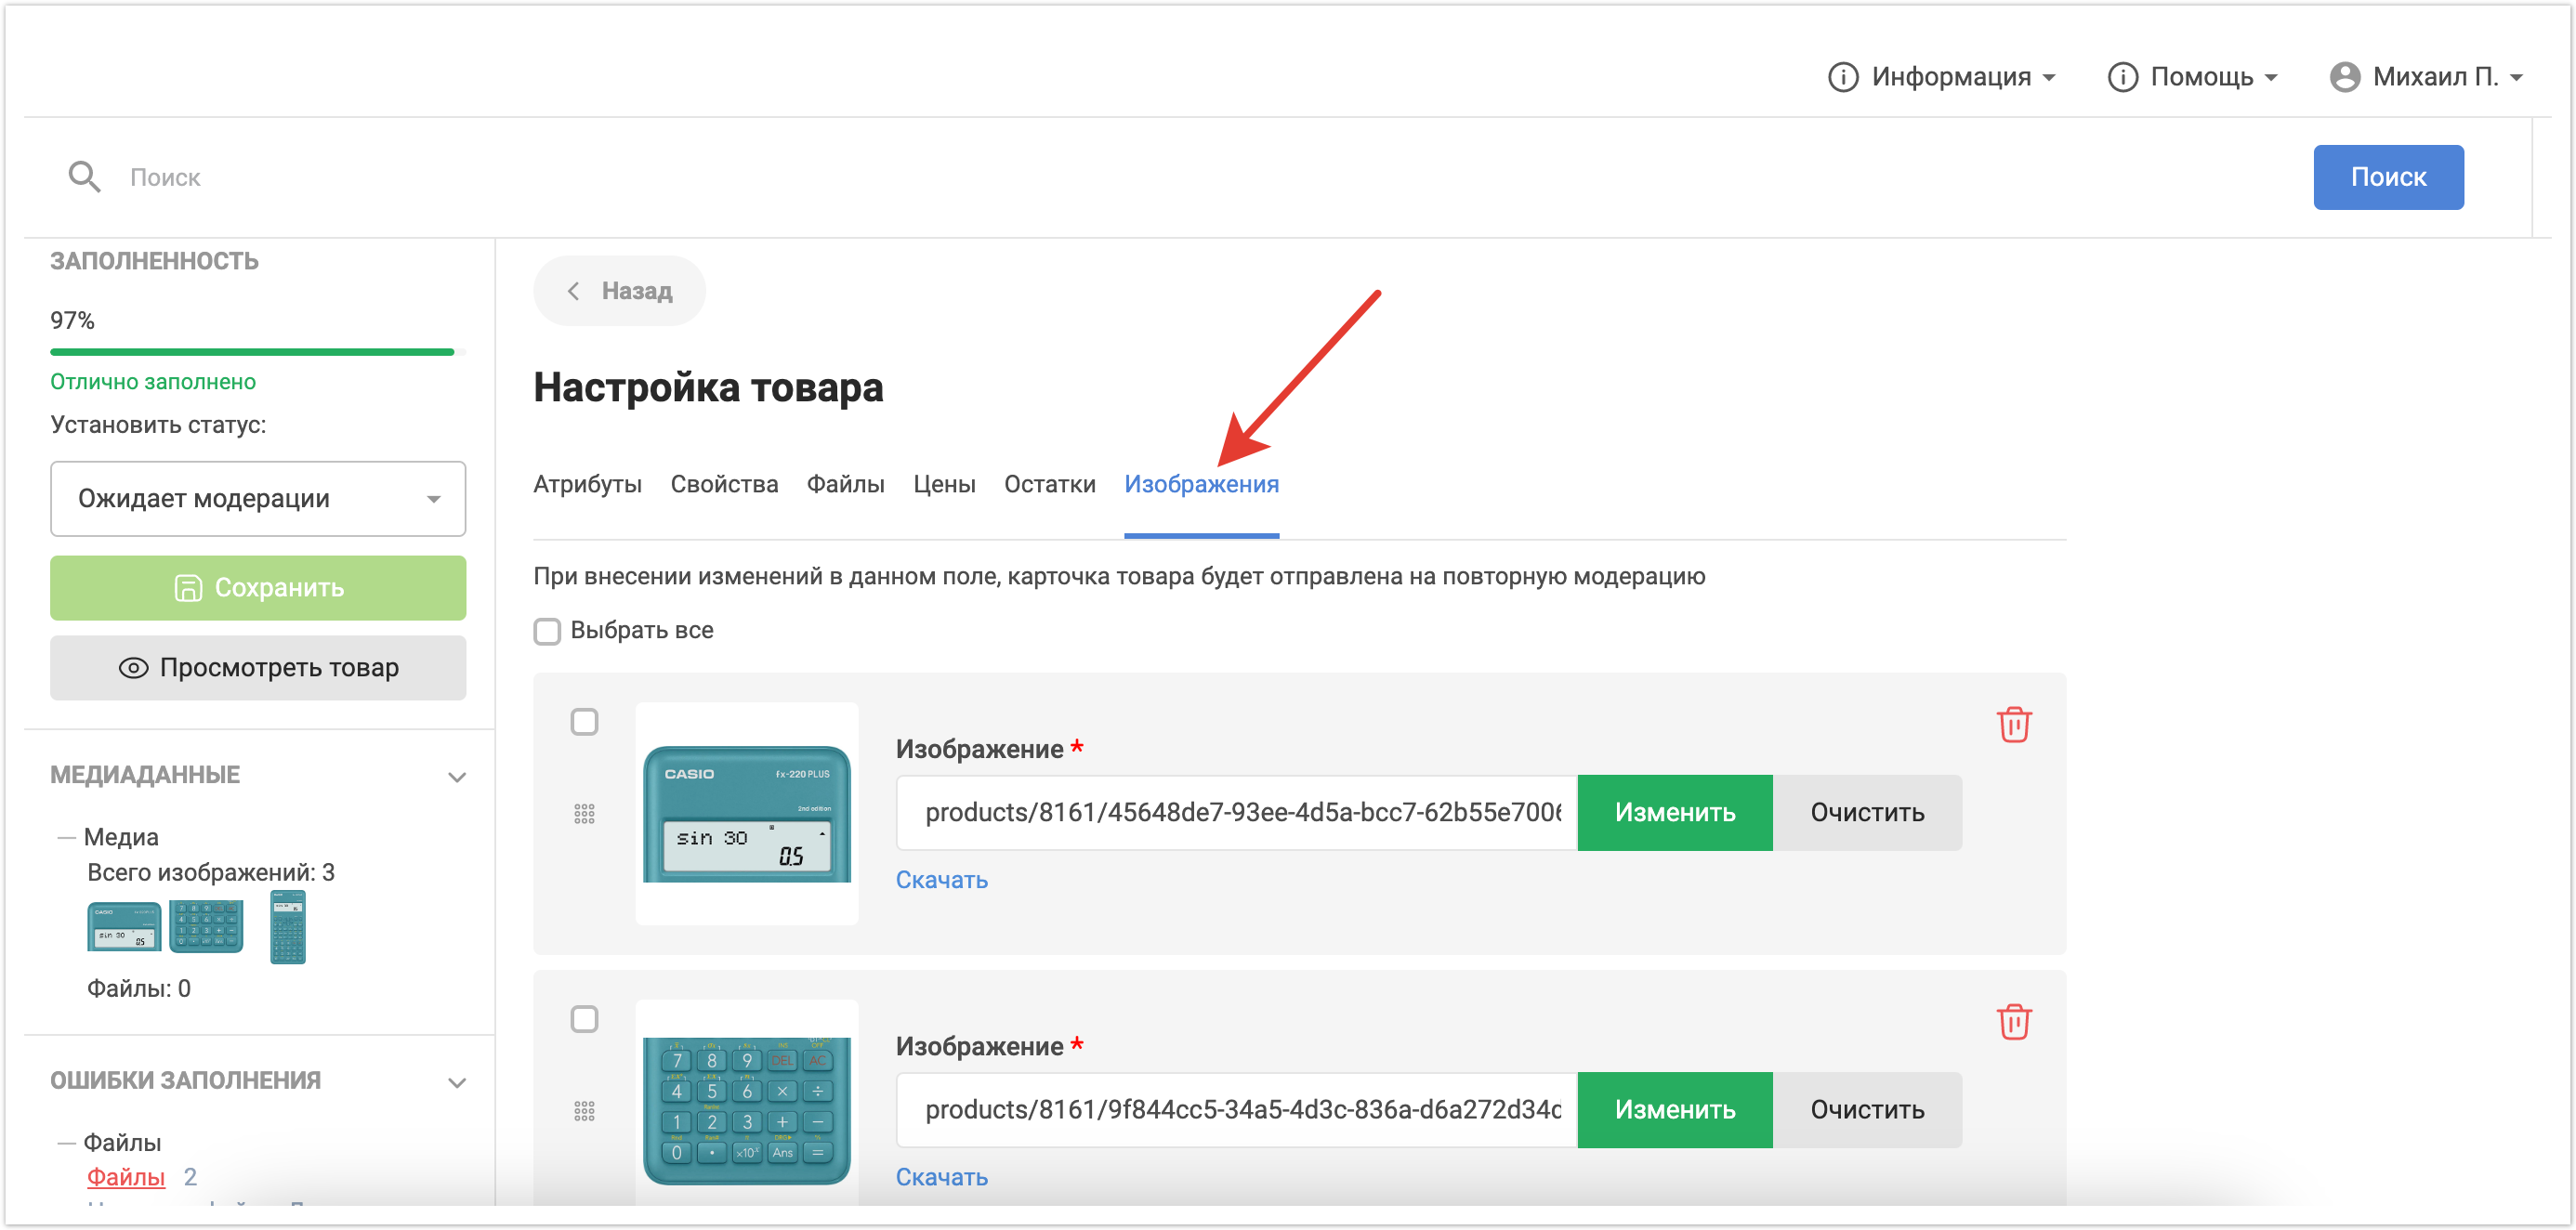
В случае, если изображений у товара несколько, то будет присутствовать возможность установить порядок отображения изображений в карточке продукта с помощью функционала drag-n-drop.
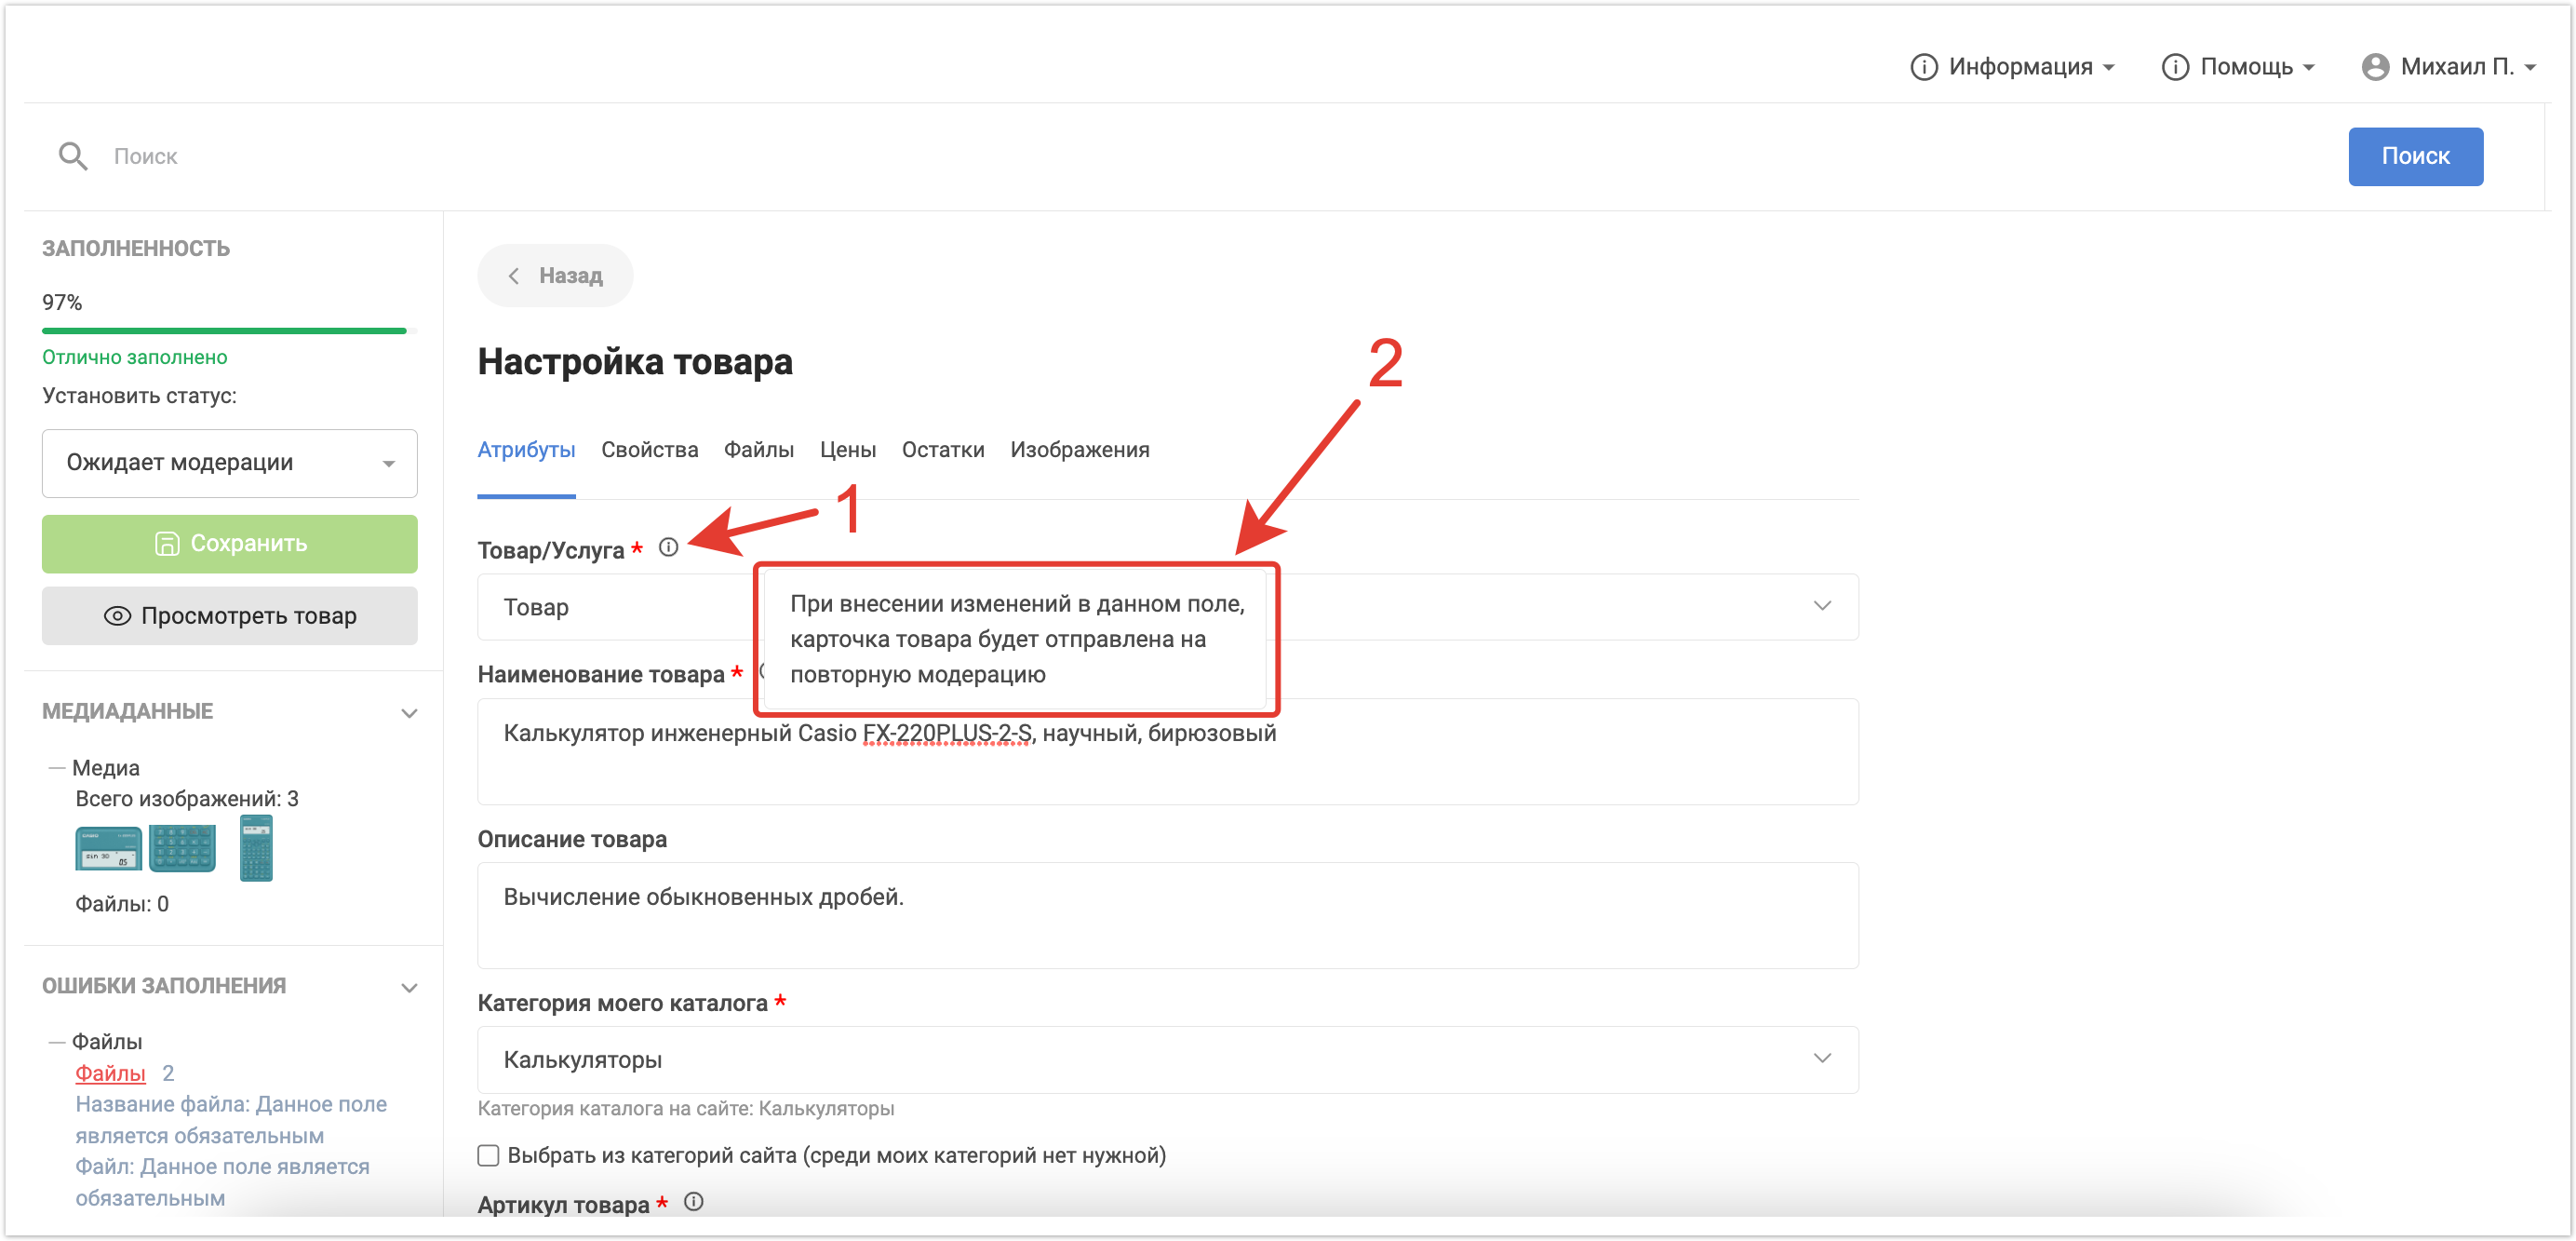
Обязательные для заполнения поля отмечены красной звездочкой. Если не указать по ним данные, то сохранить изменения не удастся и в области Ошибки заполнения будет указана ошибка.
Если параметр товара участвует в логике Повторной модерации, то в данном поле будет отображен информер. Эта информация актуальна для случая, когда вносятся правки по товару, который ранее уже прошел модерацию и был опубликован в каталоге покупателя.
Мастер-данные, которые Ответственный менеджер отметил при импорте товаров, нельзя будет редактировать.
После внесения изменений можно сразу указать товару нужный статус, например если достаточно данных для публикации, то можно установить сразу статус Товар прошел модерацию и он будет опубликован в каталоге покупателей после сохранения изменений.
Перед сохранением изменений убедитесь, что по товару нет ошибок заполнения. После этого можно нажать на кнопку Сохранить.

Редактирование товара через импорт xls-файла
В случае, если у ряда товаров произошли массовые изменения, например добавилась новая характеристика или обновились изображения, можно загрузить XLS-файл, который содержит идентификатор товара и колонки с обновленными значениями. Таким образом пользователю не нужно редактировать каждый товар вручную, а изменения можно внести массово. Для импорта XLS-файла с изменениями, необходимо перейти в раздел Мой каталог и кликнуть по кнопке Загрузка данных из EXCEL. Подробнее про загрузку файла описано на странице.
Ответственный менеджер также может проводить модерацию и редактировать товары, например если какой-то из его сотрудников в отпуске.
Экспорт данных
Функционал экспорта товаров и медиаконтента позволяет пользователям выгружать файл с товарами, которые выводятся им на платформе. Экспорт доступен пользователям со следующими ролями:
- Ответственный менеджер
- Бренд-менеджер
- Покупатель
Каждый пользователь может решить свои задачи с помощью экспорта. Ответственный менеджер(руководитель) получает отчет по работе своих сотрудников(бренд-менеджеров). Бренд-менеджер получает информацию по товарам и может получить файлы и изображения по каждому из товаров для проверки. Покупатель получает возможность выгрузить файл с товарами для последующей загрузки его на торговые площадки, например если он закупает у поставщика на платформе, а далее продает в розницу.
Выгрузка текстовой информации по товарам производится в виде XLS-файла. Файл представляет из себя таблицу со всеми данными, которые содержит в себе карточка товара.
Выгрузка медиа-контента осуществляется в виде архива, который содержит в себе вложенные архивы с медиа (изображения, файлы) по товарам. Каждый архив с медиа-контеном товара имеет название, совпадающее с артикулом, таким образом можно удобно найти данные по конкретному товару.
Экспорт товаров для бренд-менеджера
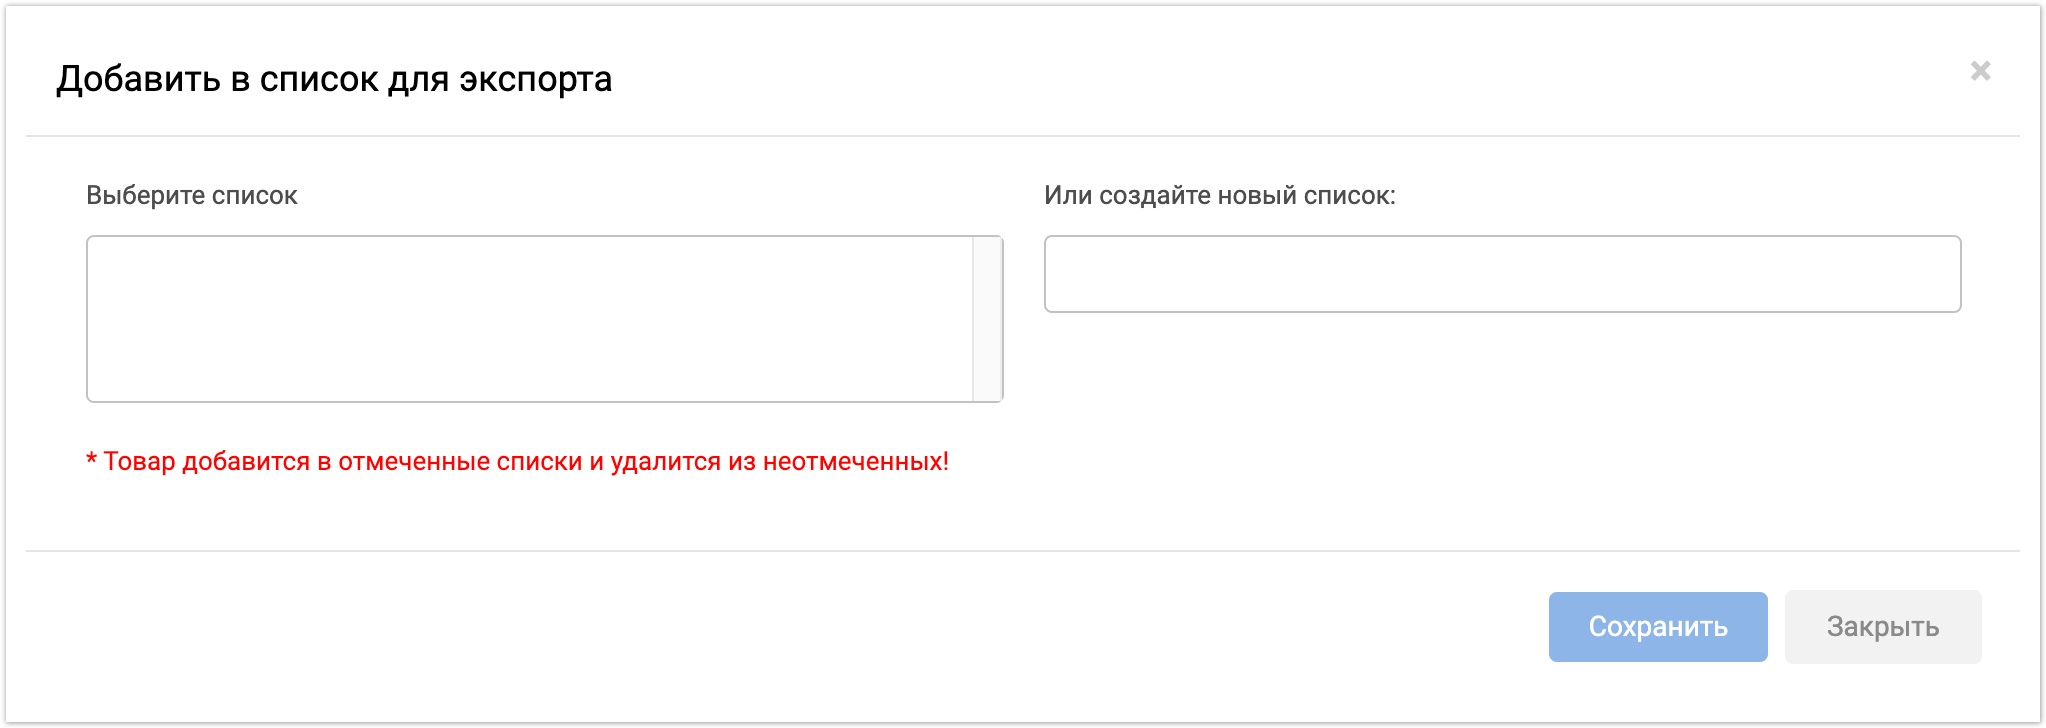
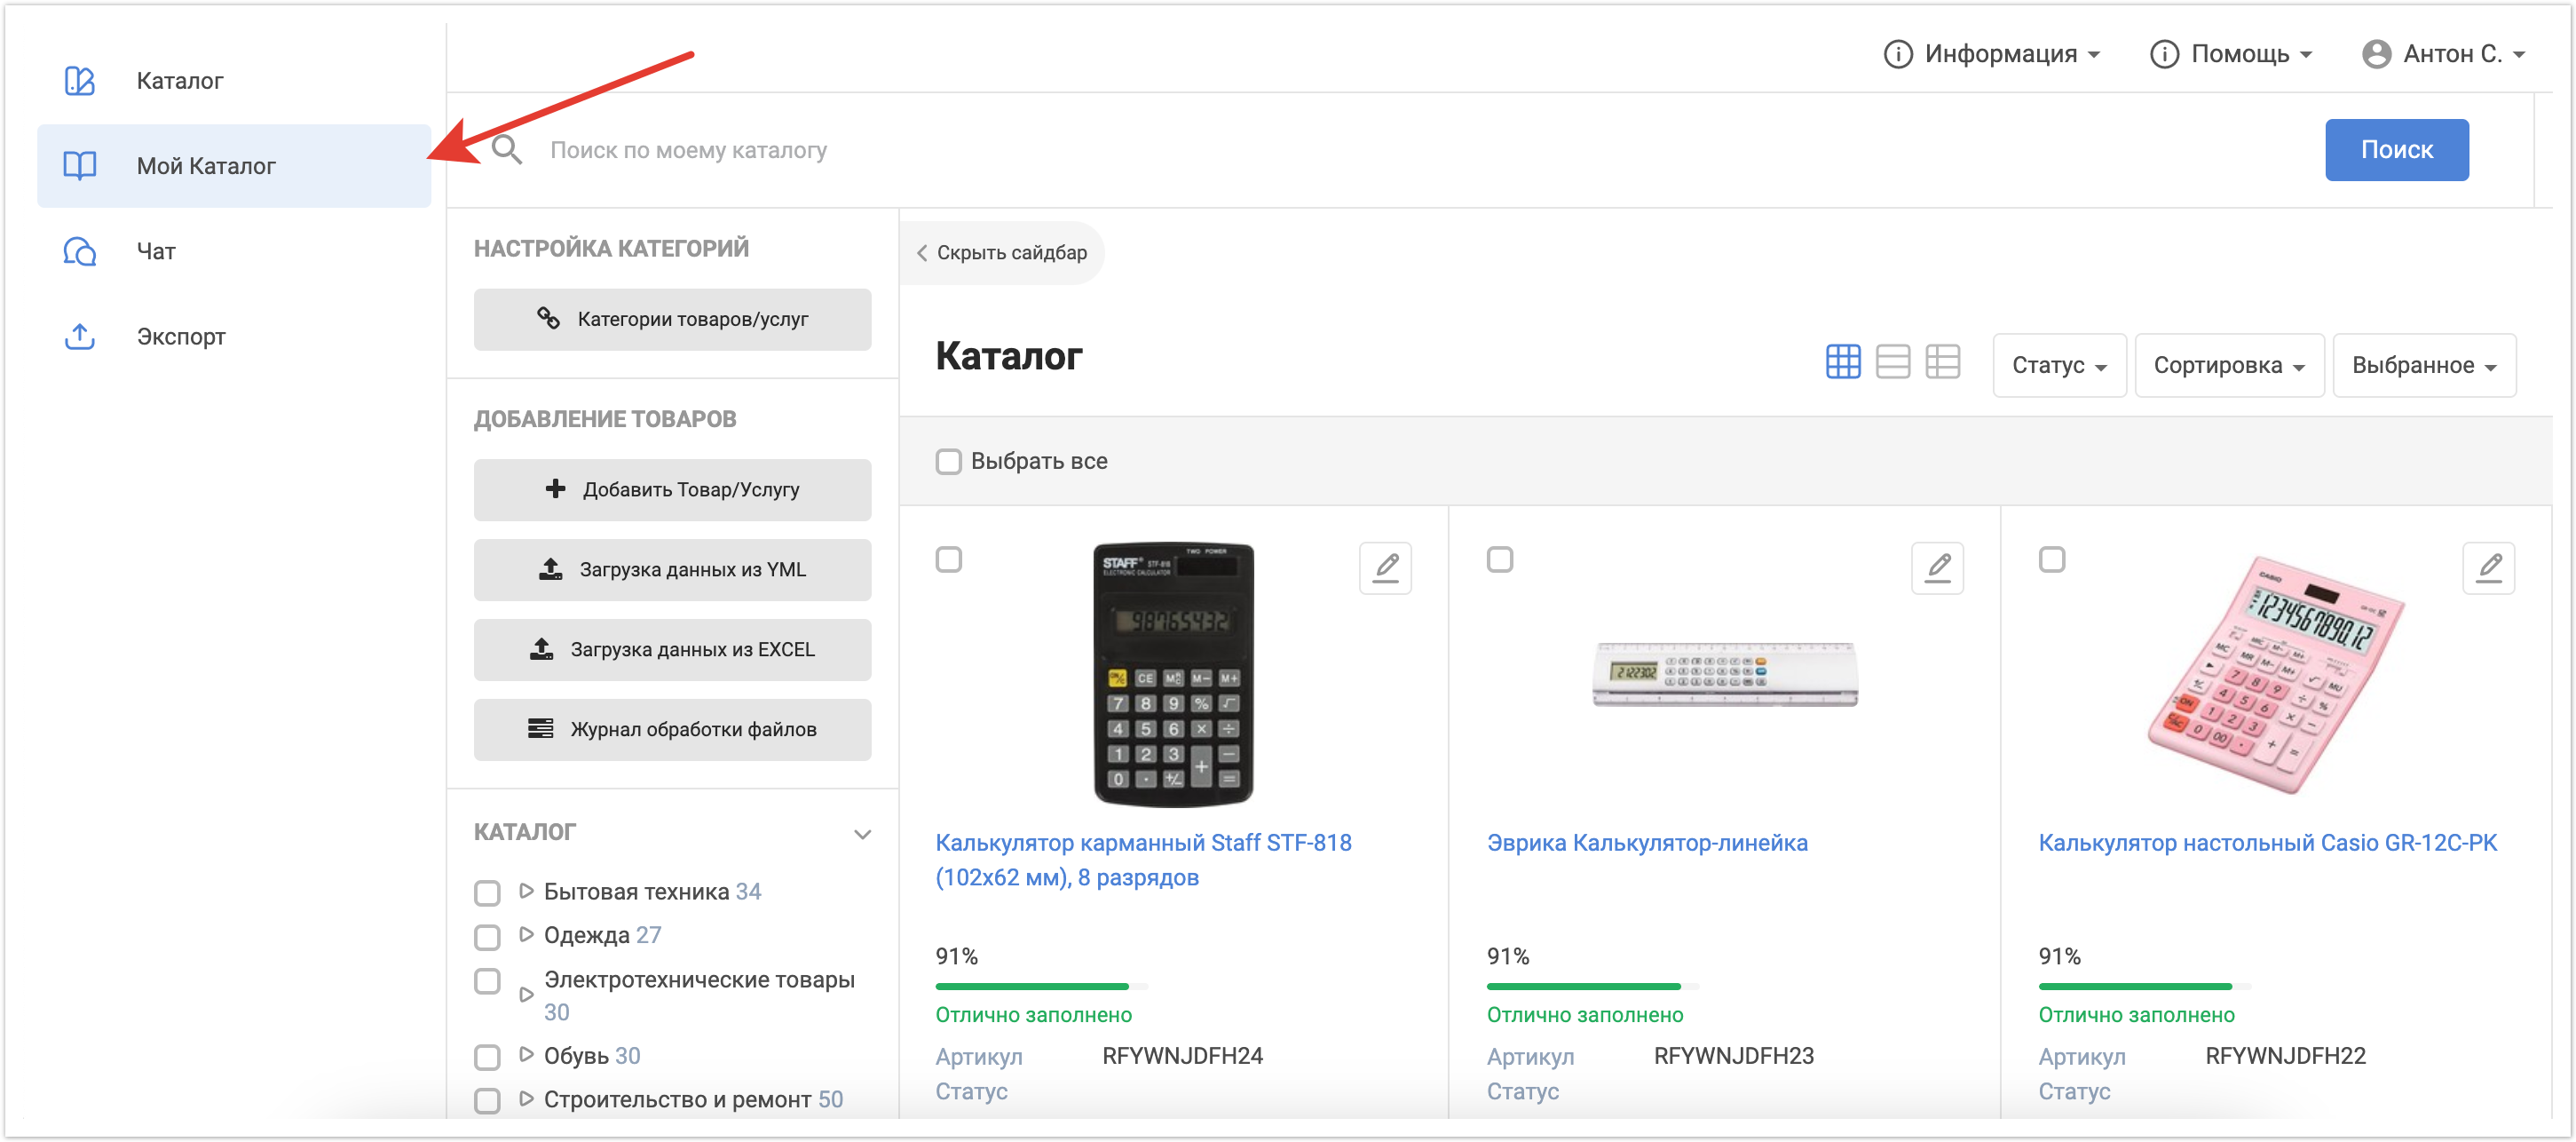
Для экспорта файла по товарам пользователю нужно перейти в раздел Мой каталог. Далее выбрать нужные товары, отметив их чек-боксами, и в выпадающем списке выбрать Экспорт товаров.
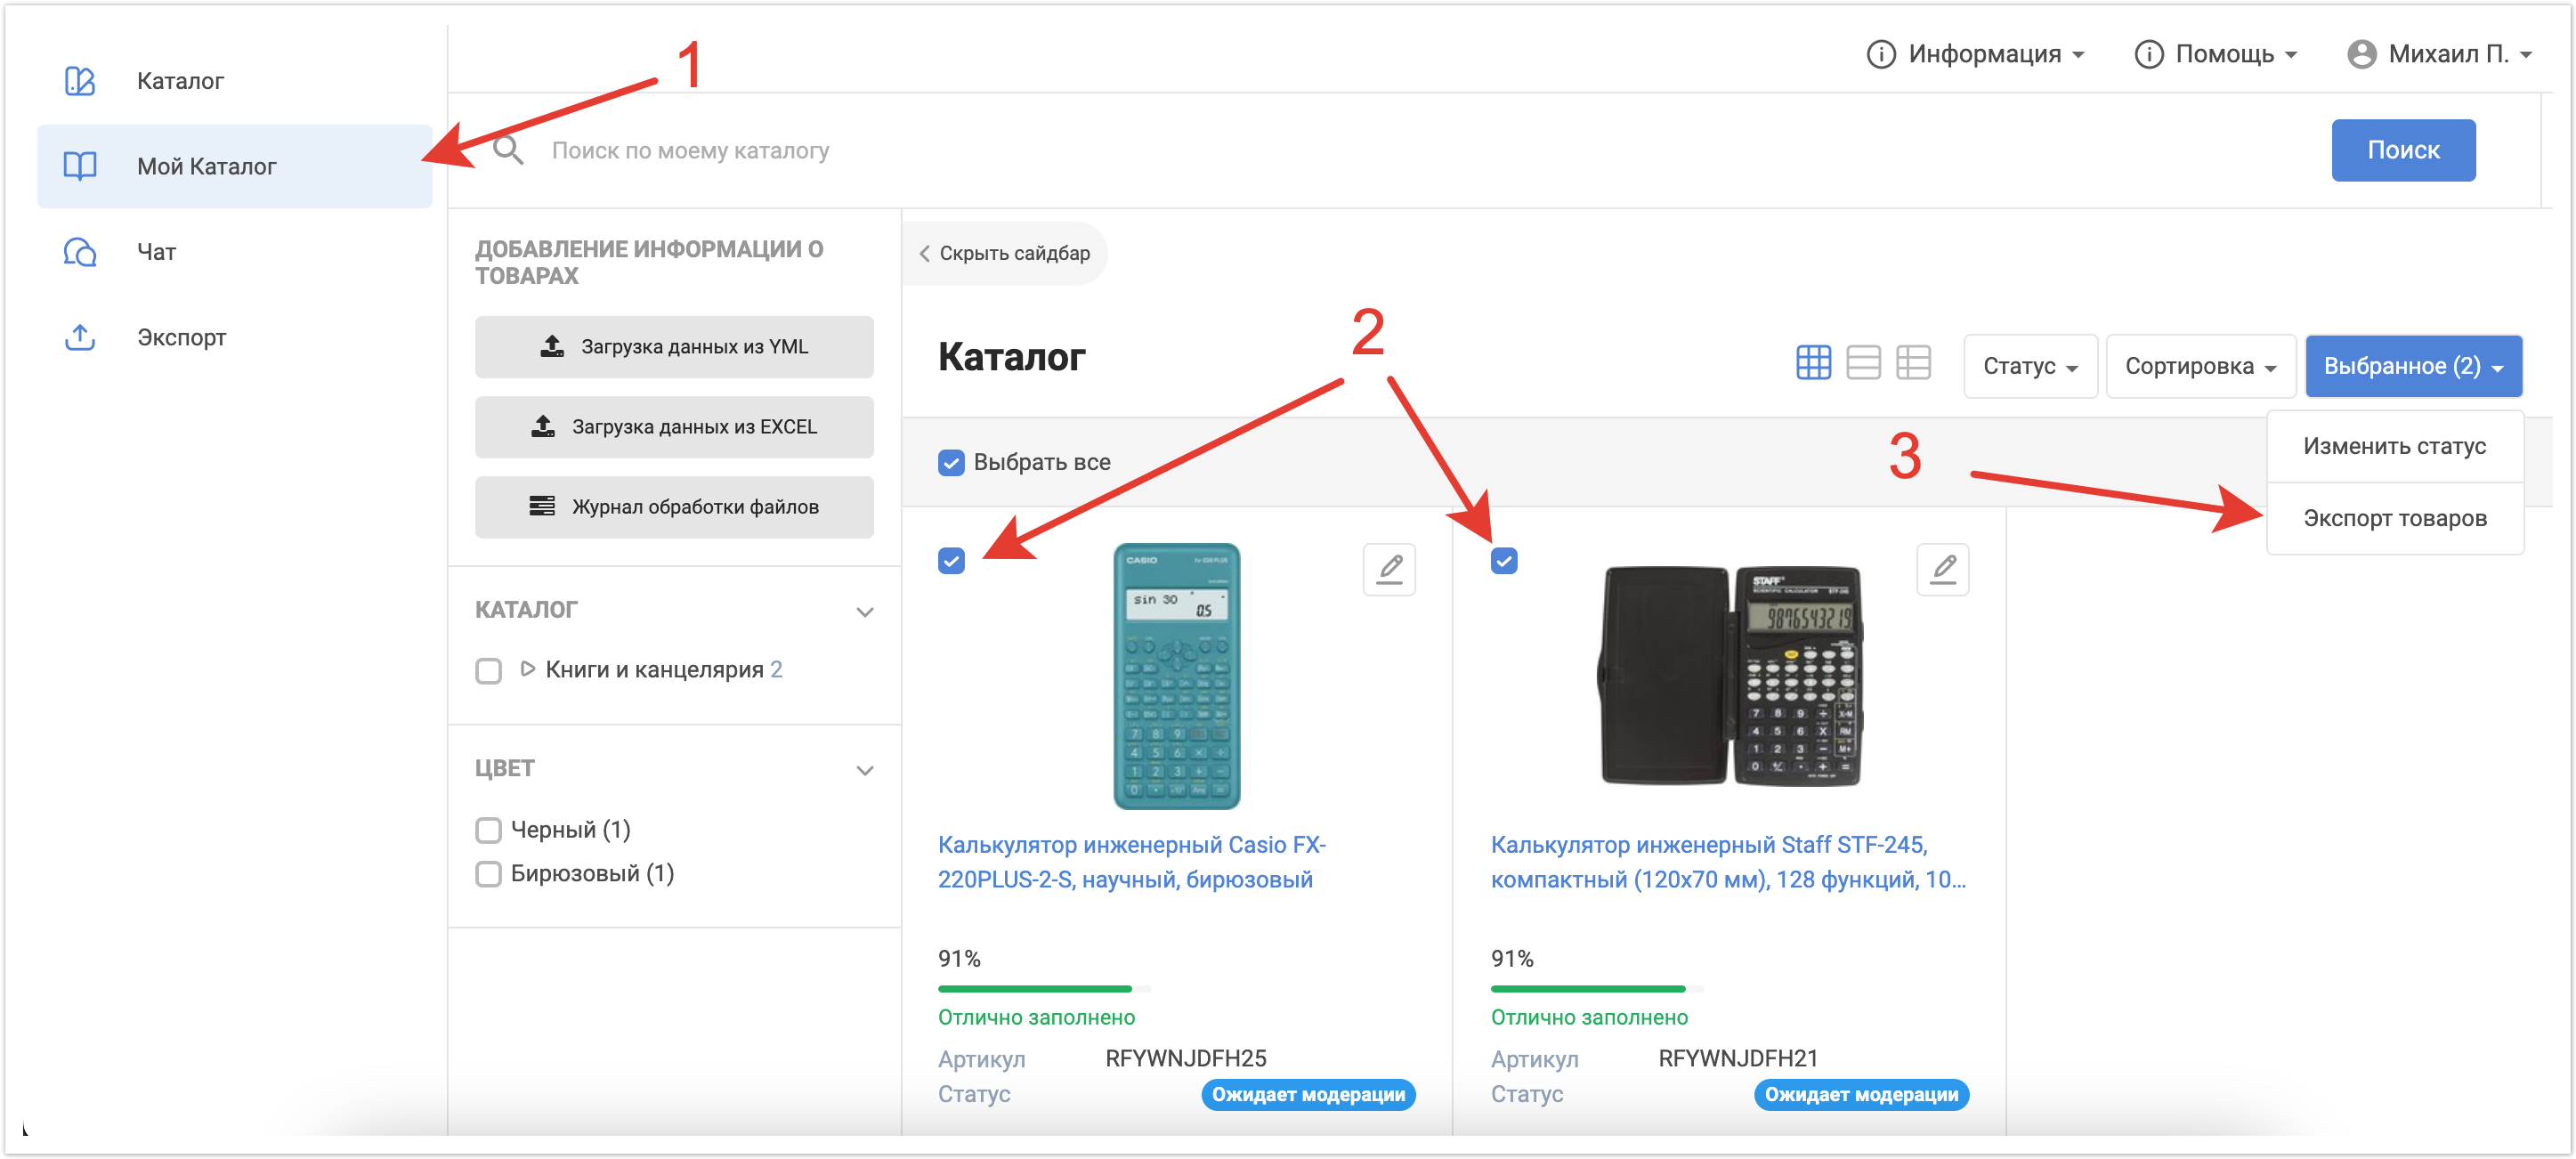
Будет предложено добавить товары к существующему списку экспорта, если он ранее создавался, или создать новый список. Выберите тот вариант, который вам подходит.
После сохранения нужно перейти в раздел Экспорт и выбрать нужный список товаров.
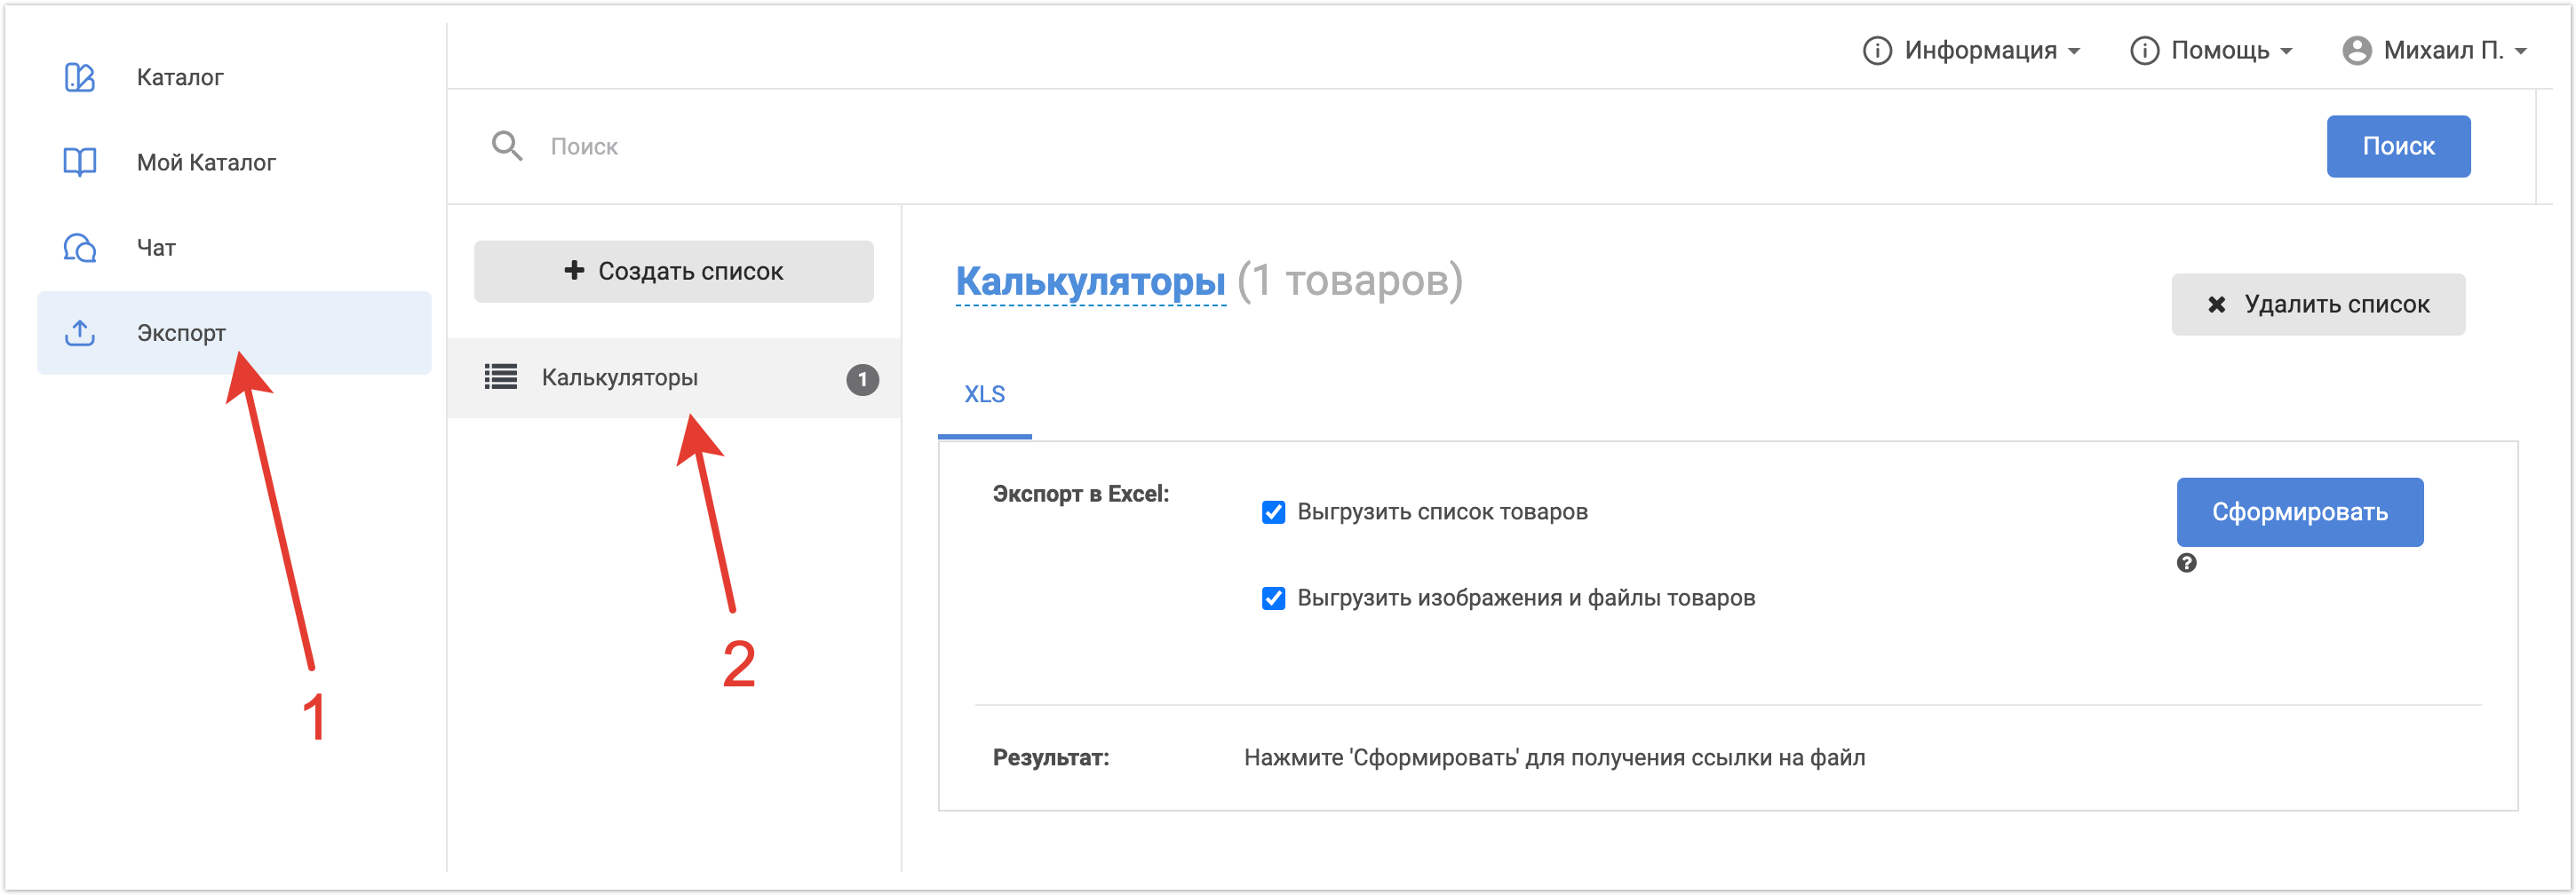
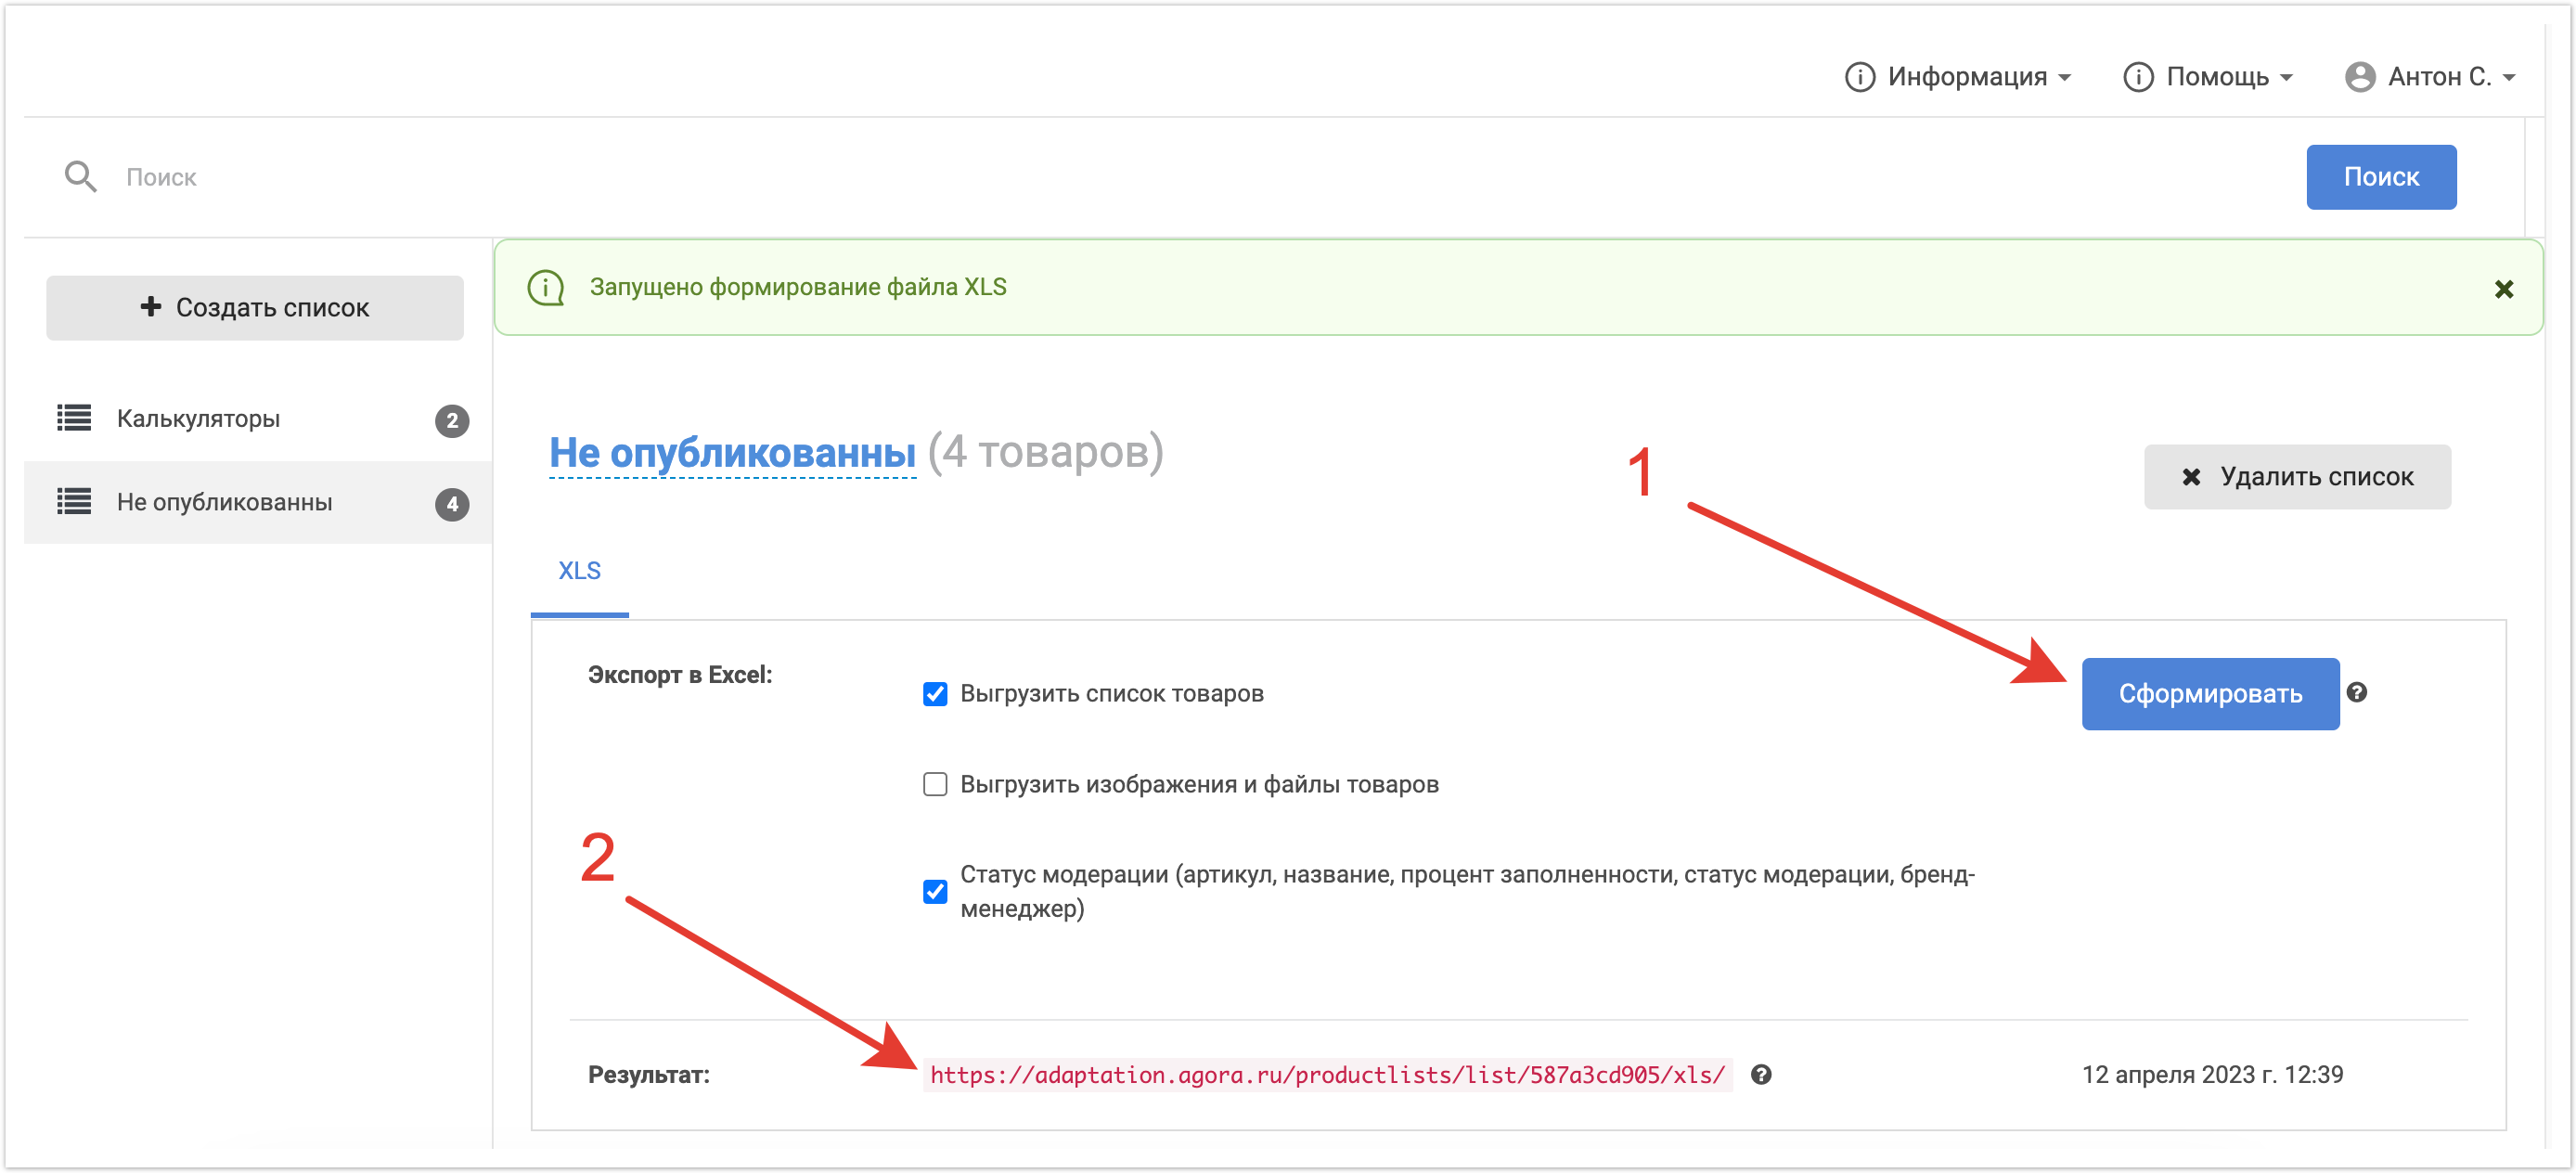
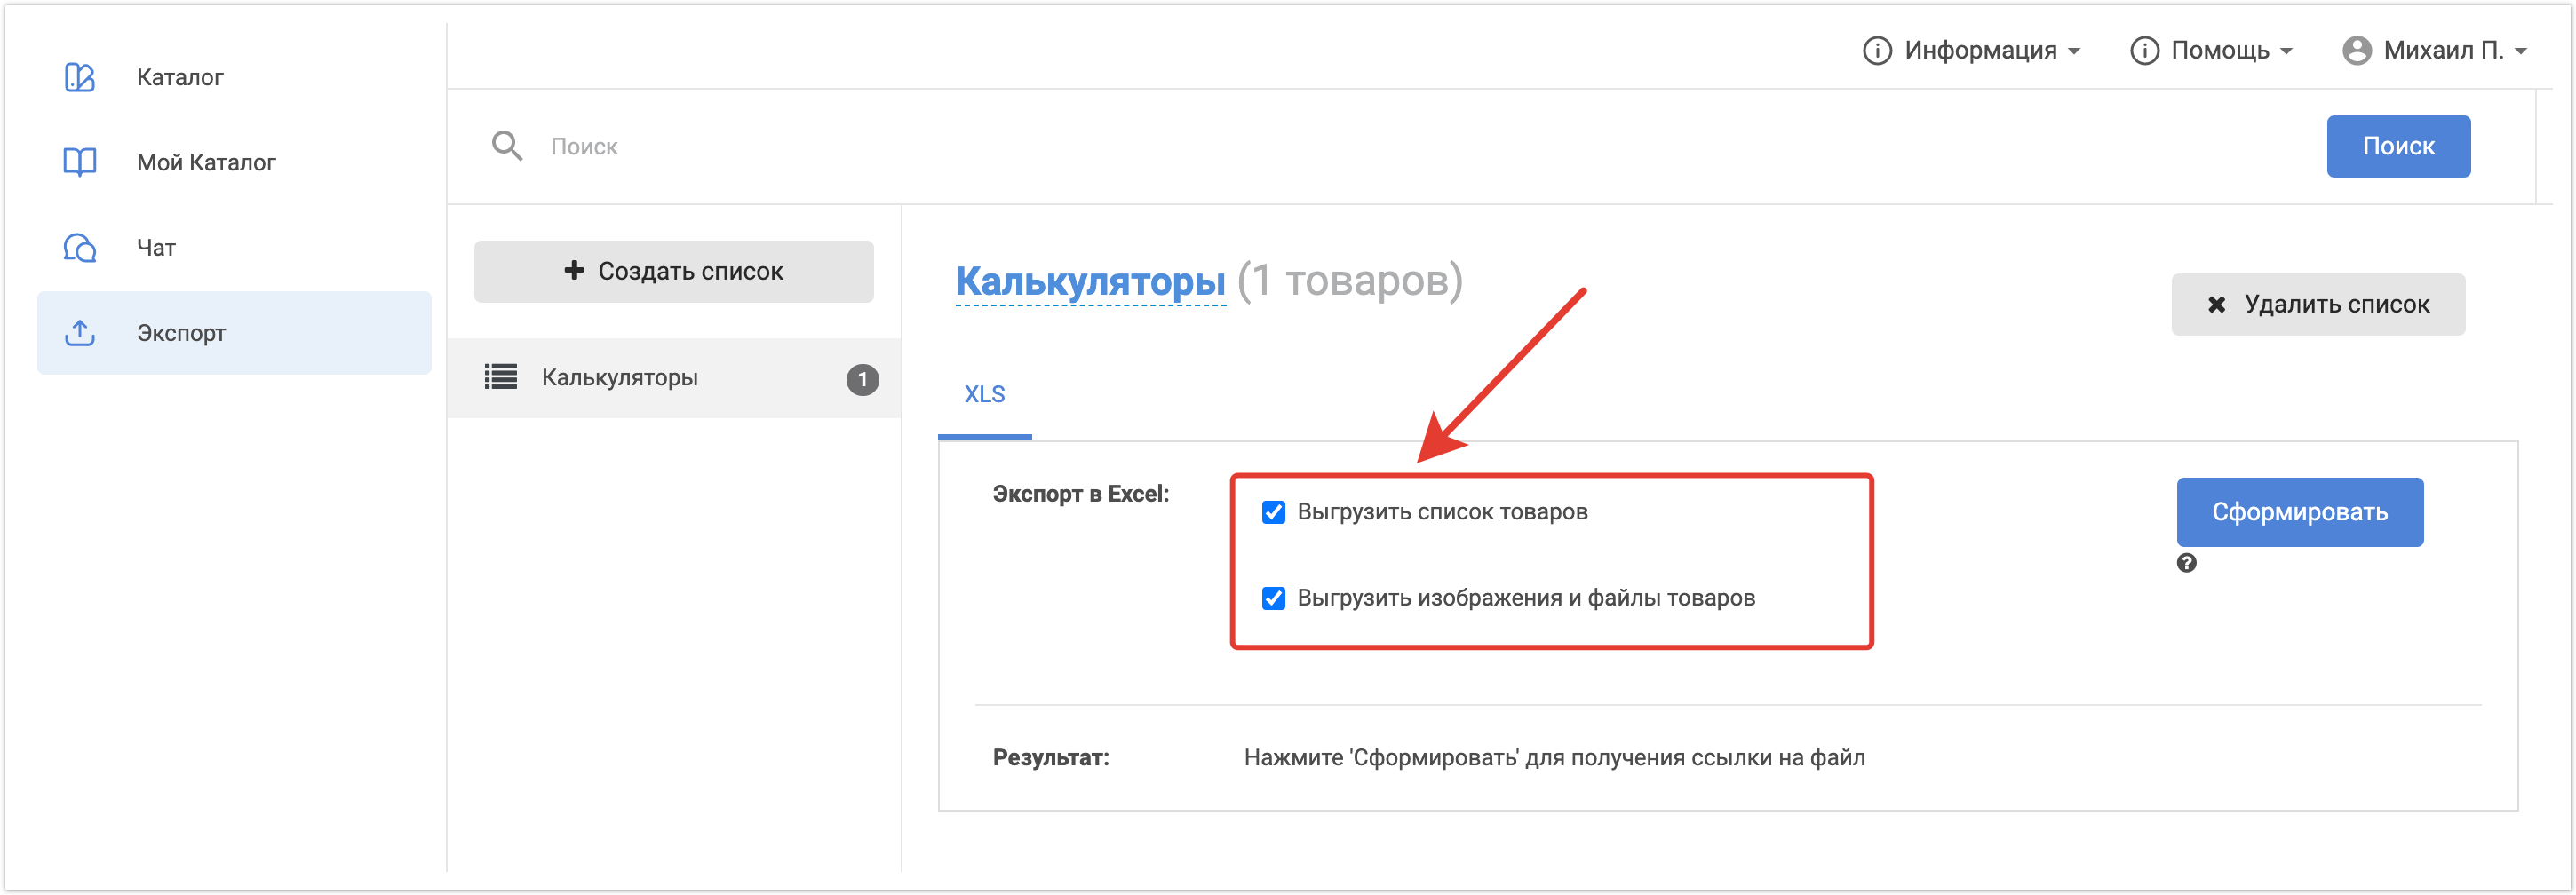
Далее нужно выбрать что требуется выгрузить: Выгрузить список товаров или Выгрузить изображения и файлы товаров. В первом случае будет сформирована только таблица с товарами, а если выбрать вторую настройку тоже, то будут также добавлены архивы с медиаконтентом.
После выбора нужных настроек необходимо нажать на кнопку Сформировать и будет запущено формирование файла.
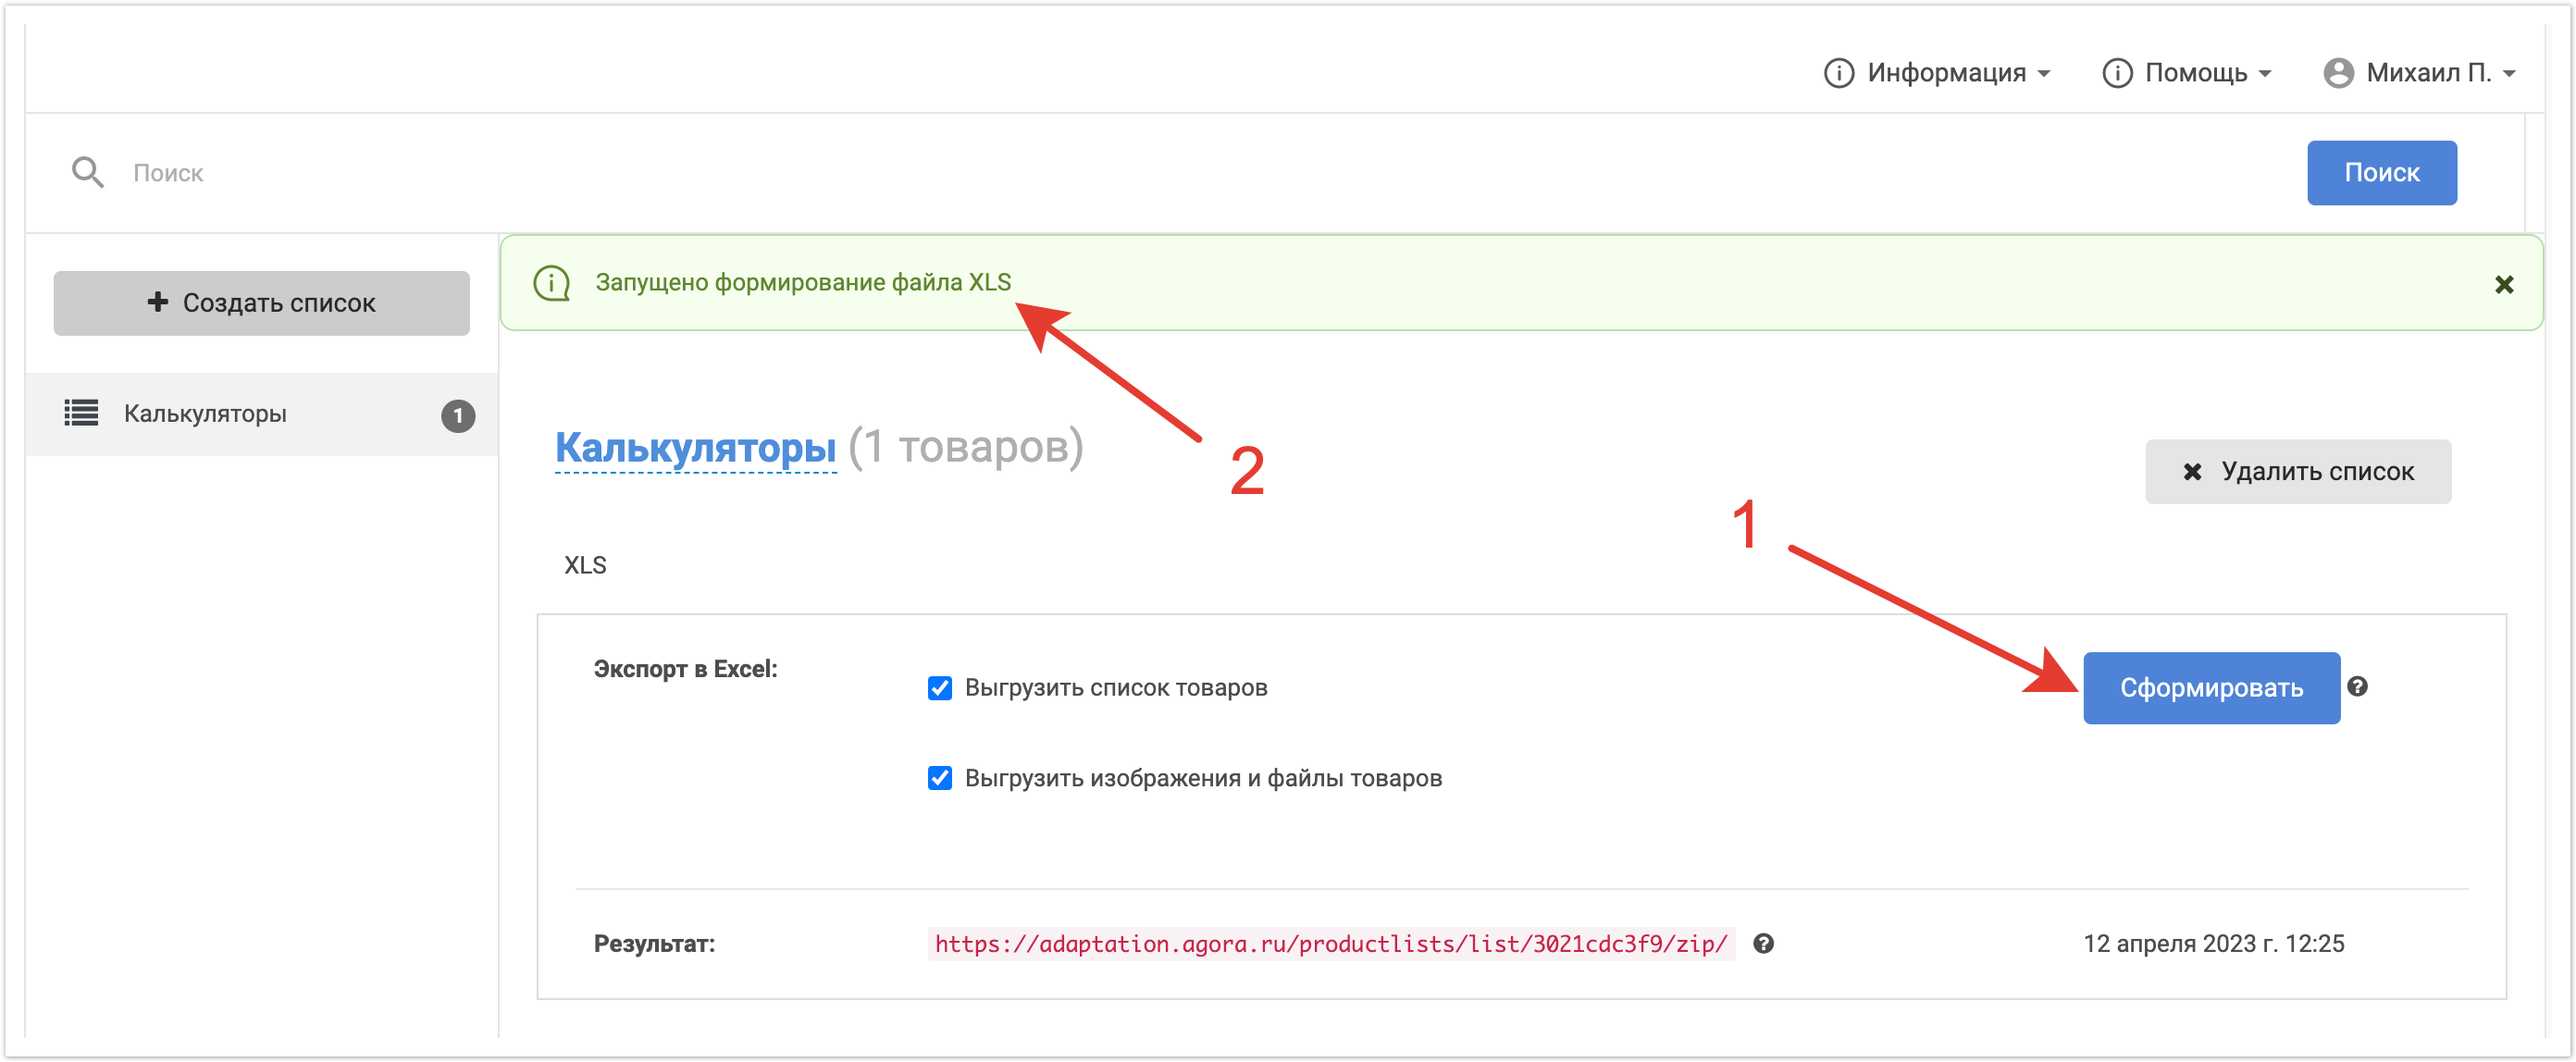
После завершения процесса формирования файла появится ссылка, по которой его можно будет скачать.
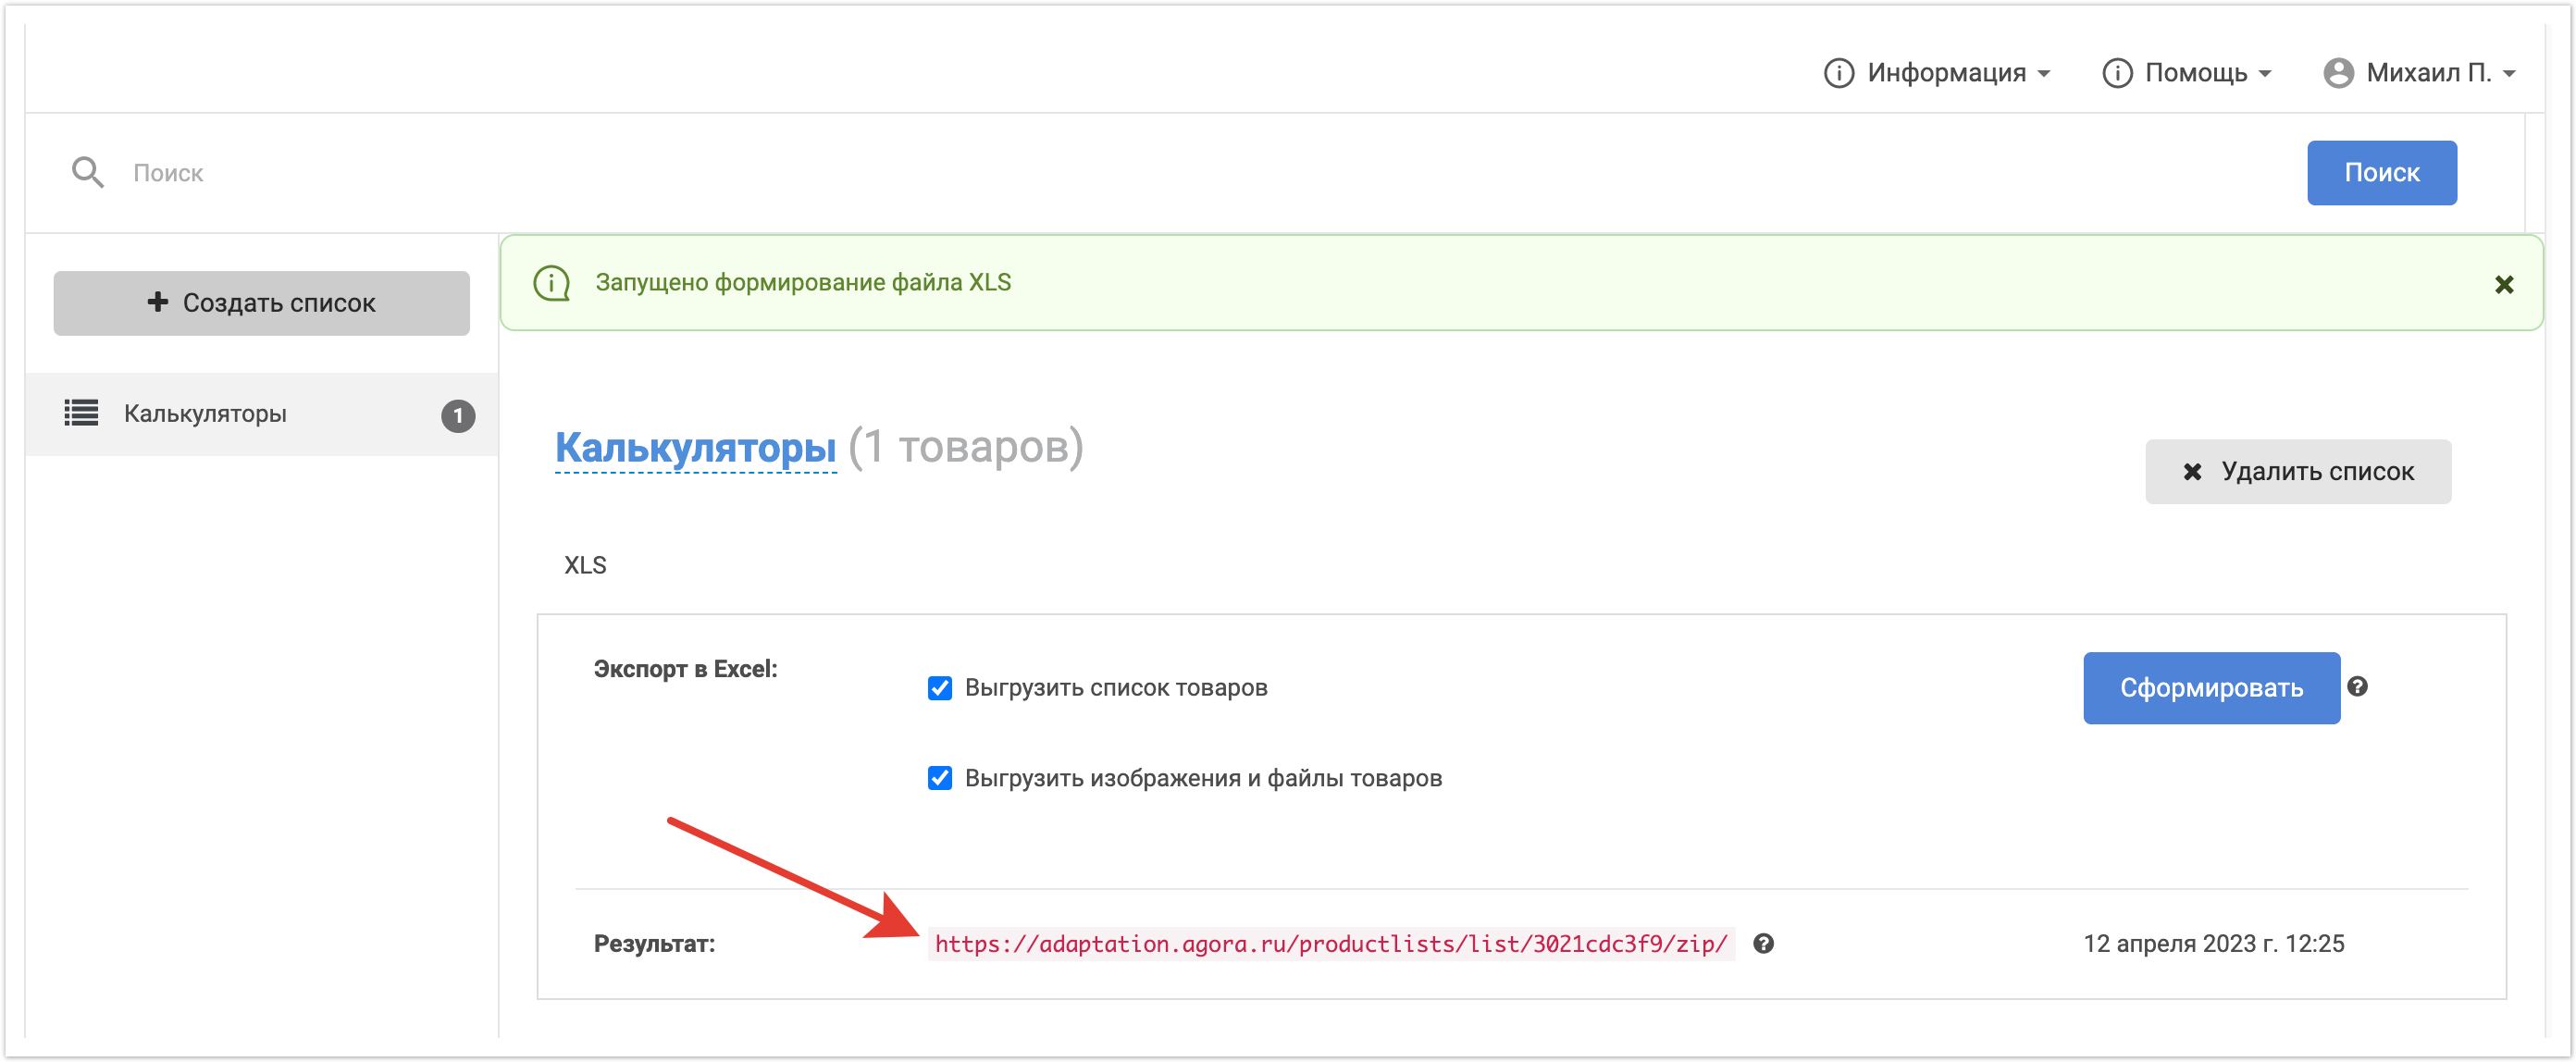
При клике на ссылку, архив будет сохранен на локальную машину. Распаковав файл пользователь получит:
- XLS-файл со всеми параметрами продукта
- Архив с медиаконтеном по продуктам из сформированного списка экспорта
Экспорт отчета о качестве работы бренд-менеджера
Ответственный менеджер имеет возможность выгрузить отчет о качестве работы своих подчиненных (Бренд-менеджеров). Для выгрузки отчета Ответственный менеджер может авторизоваться в личном кабинете на платформе и перейти в раздел Мой Каталог.
Далее, воспользовавшись инструментами поиска, он может сформировать список товаров, по которым он хочет посмотреть отчет. Например, можно отфильтровать товары по статусу Ожидает модерации.
C помощью чек-бокса Выбрать все и массового действия Экспорт товаров можно добавить товары к существующему списку экспорта, если он ранее создавался, или создать новый список.
Далее необходимо перейти в раздел Экспорт и выбрать нужный список.
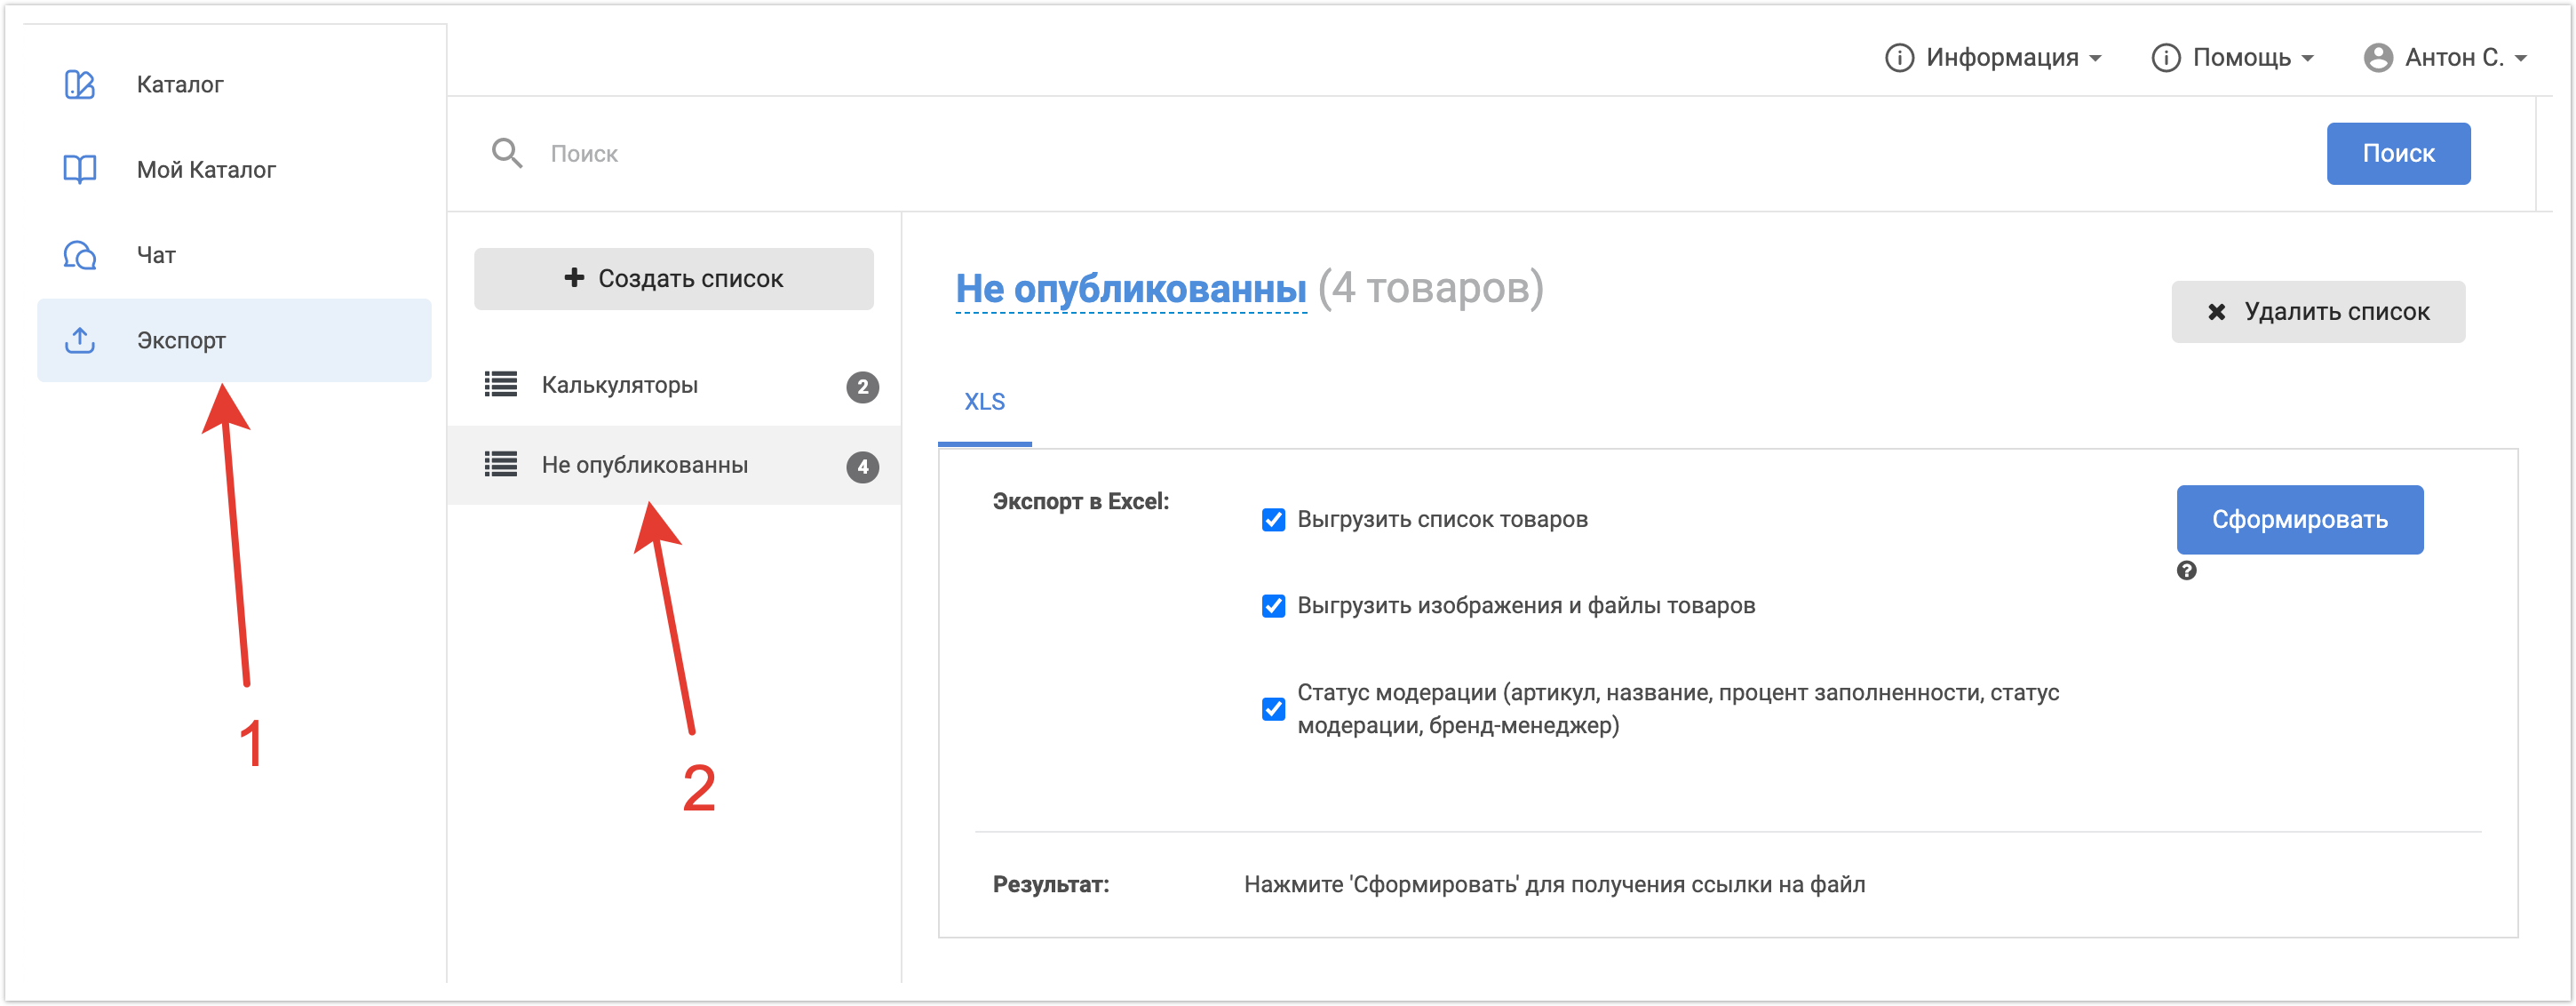
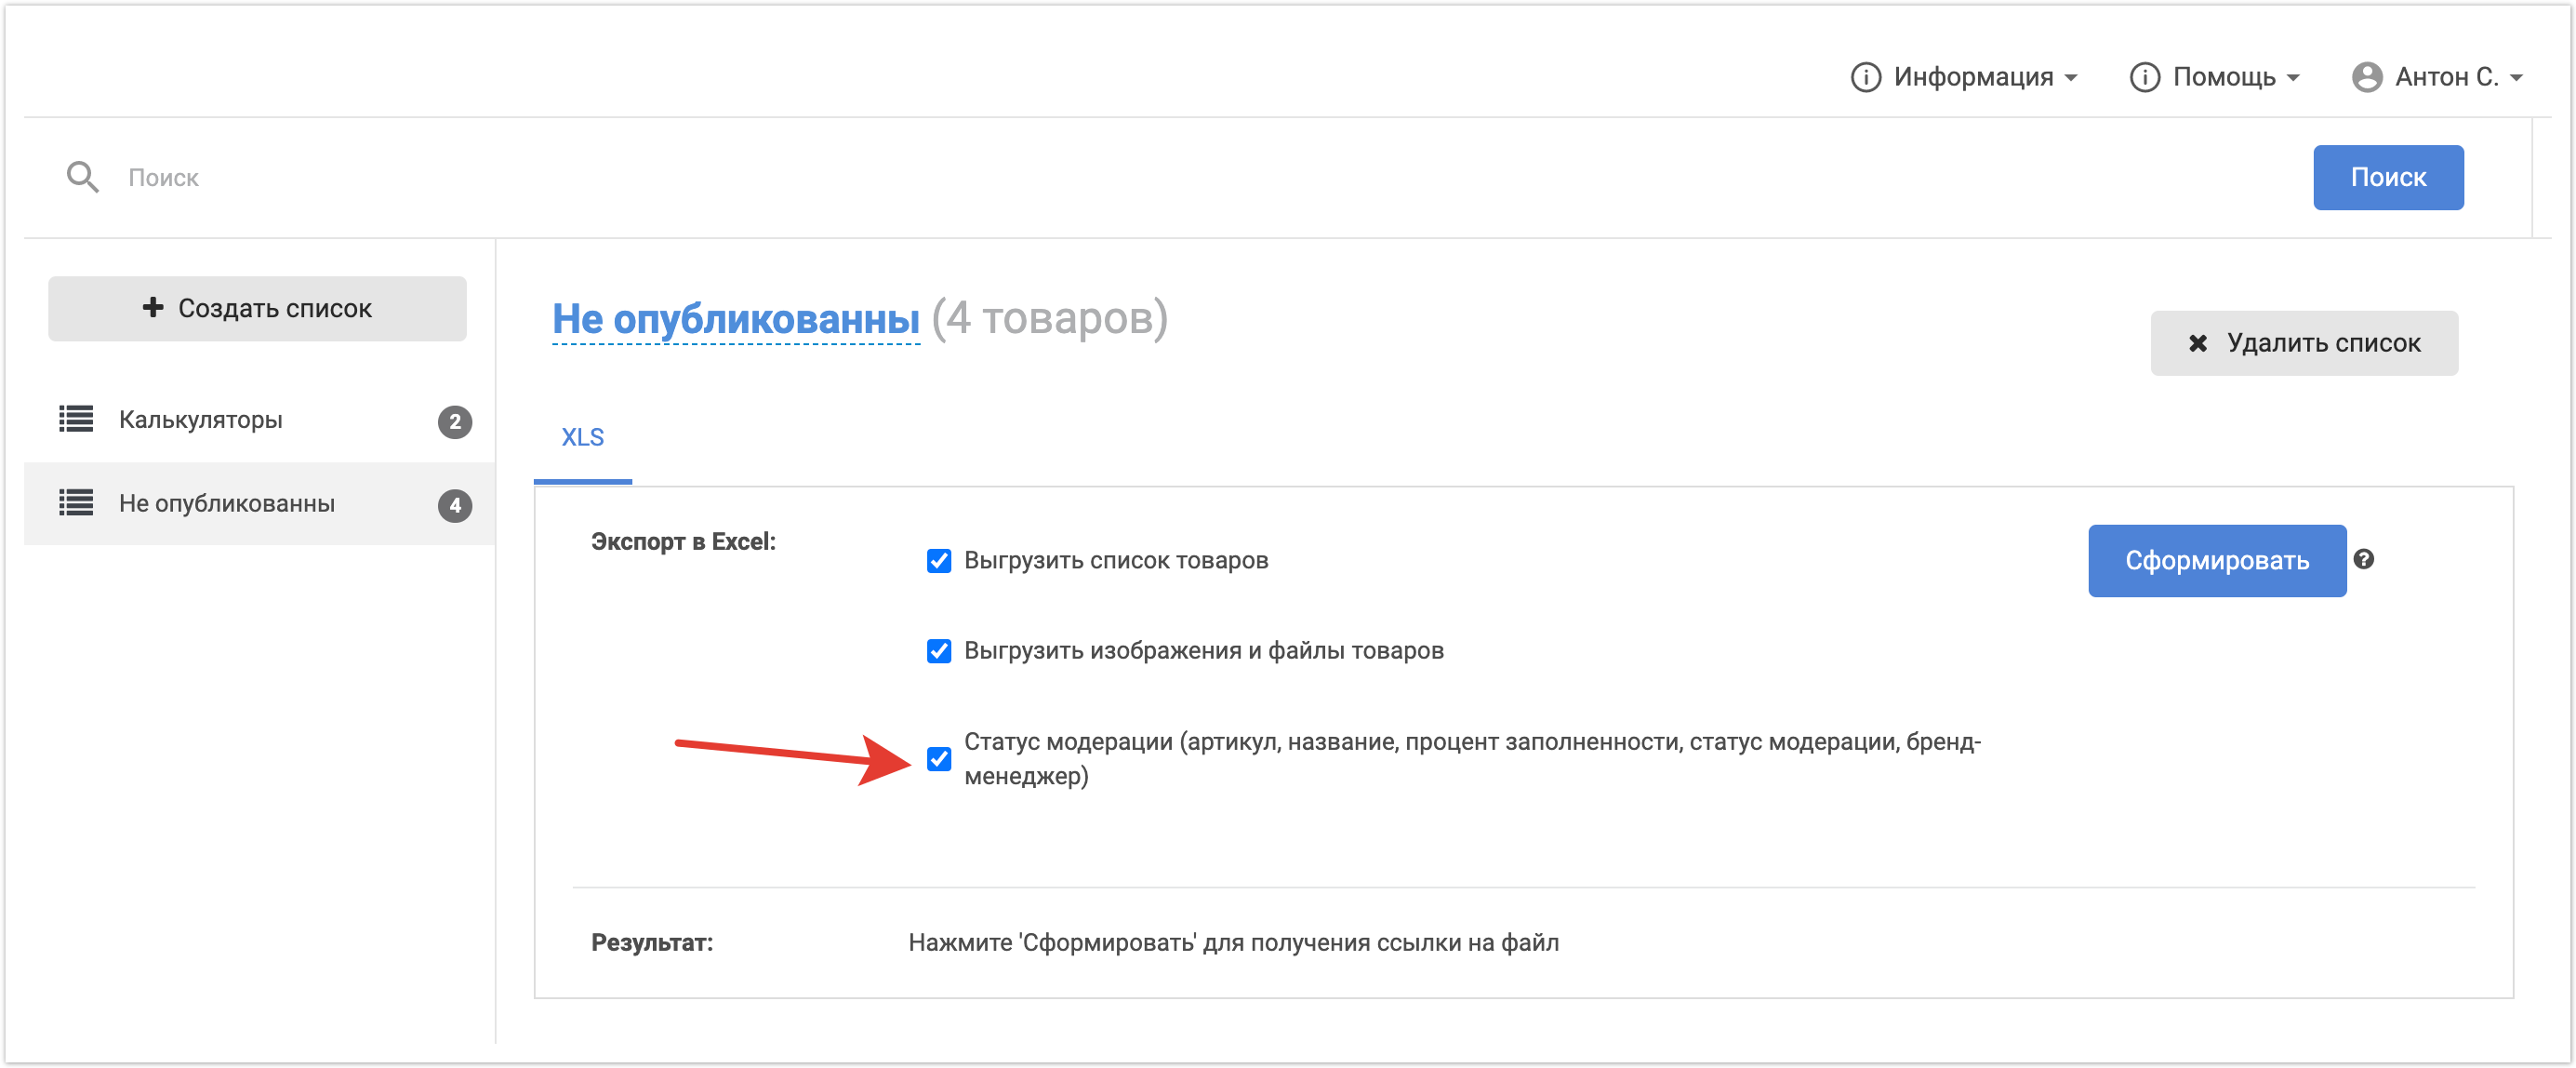
На открывшейся странице будет доступна дополнительная настройка Статус модерации. При ее включении руководитель получит в файле информацию об артикуле, наименовании, проценте заполненности, статусе модерации товара и бренд-менеджере, ответственном за этот товар.
Для формирования файла экспорта, необходимо кликнуть по кнопке Сформировать. Далее система запустит формирование файла, и после завершения его формирования, будет доступна ссылка для скачивания архива с данными. Таким образом, Ответственный менеджер может в любое удобное время проверить качество работы своих подчиненных, сформировав отчет в своем личном кабинете.