
| Sv translation | |||||||||||||||||||||||||||||||||||
|---|---|---|---|---|---|---|---|---|---|---|---|---|---|---|---|---|---|---|---|---|---|---|---|---|---|---|---|---|---|---|---|---|---|---|---|
| |||||||||||||||||||||||||||||||||||
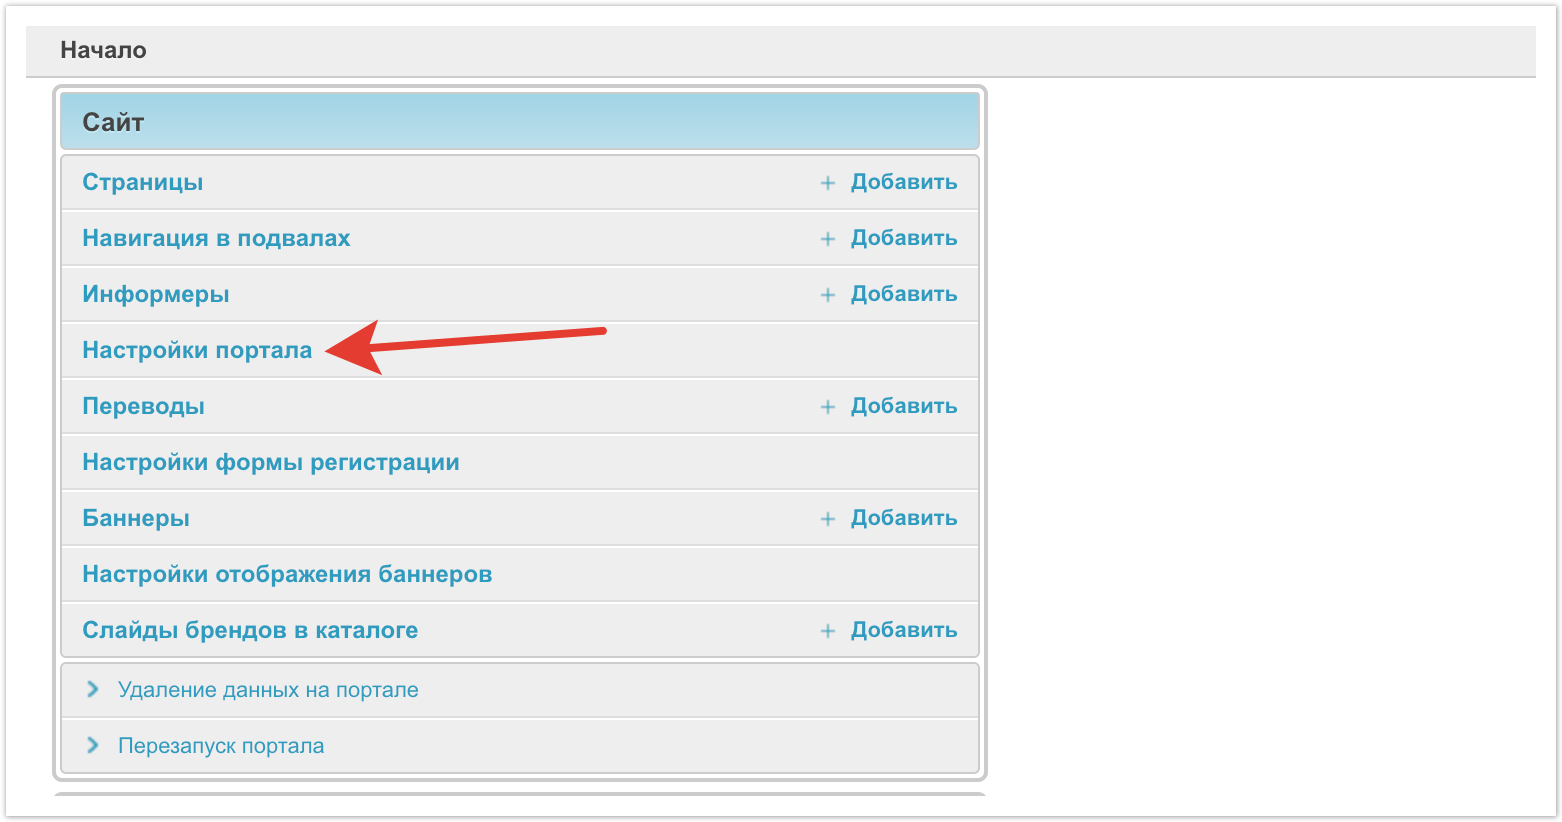
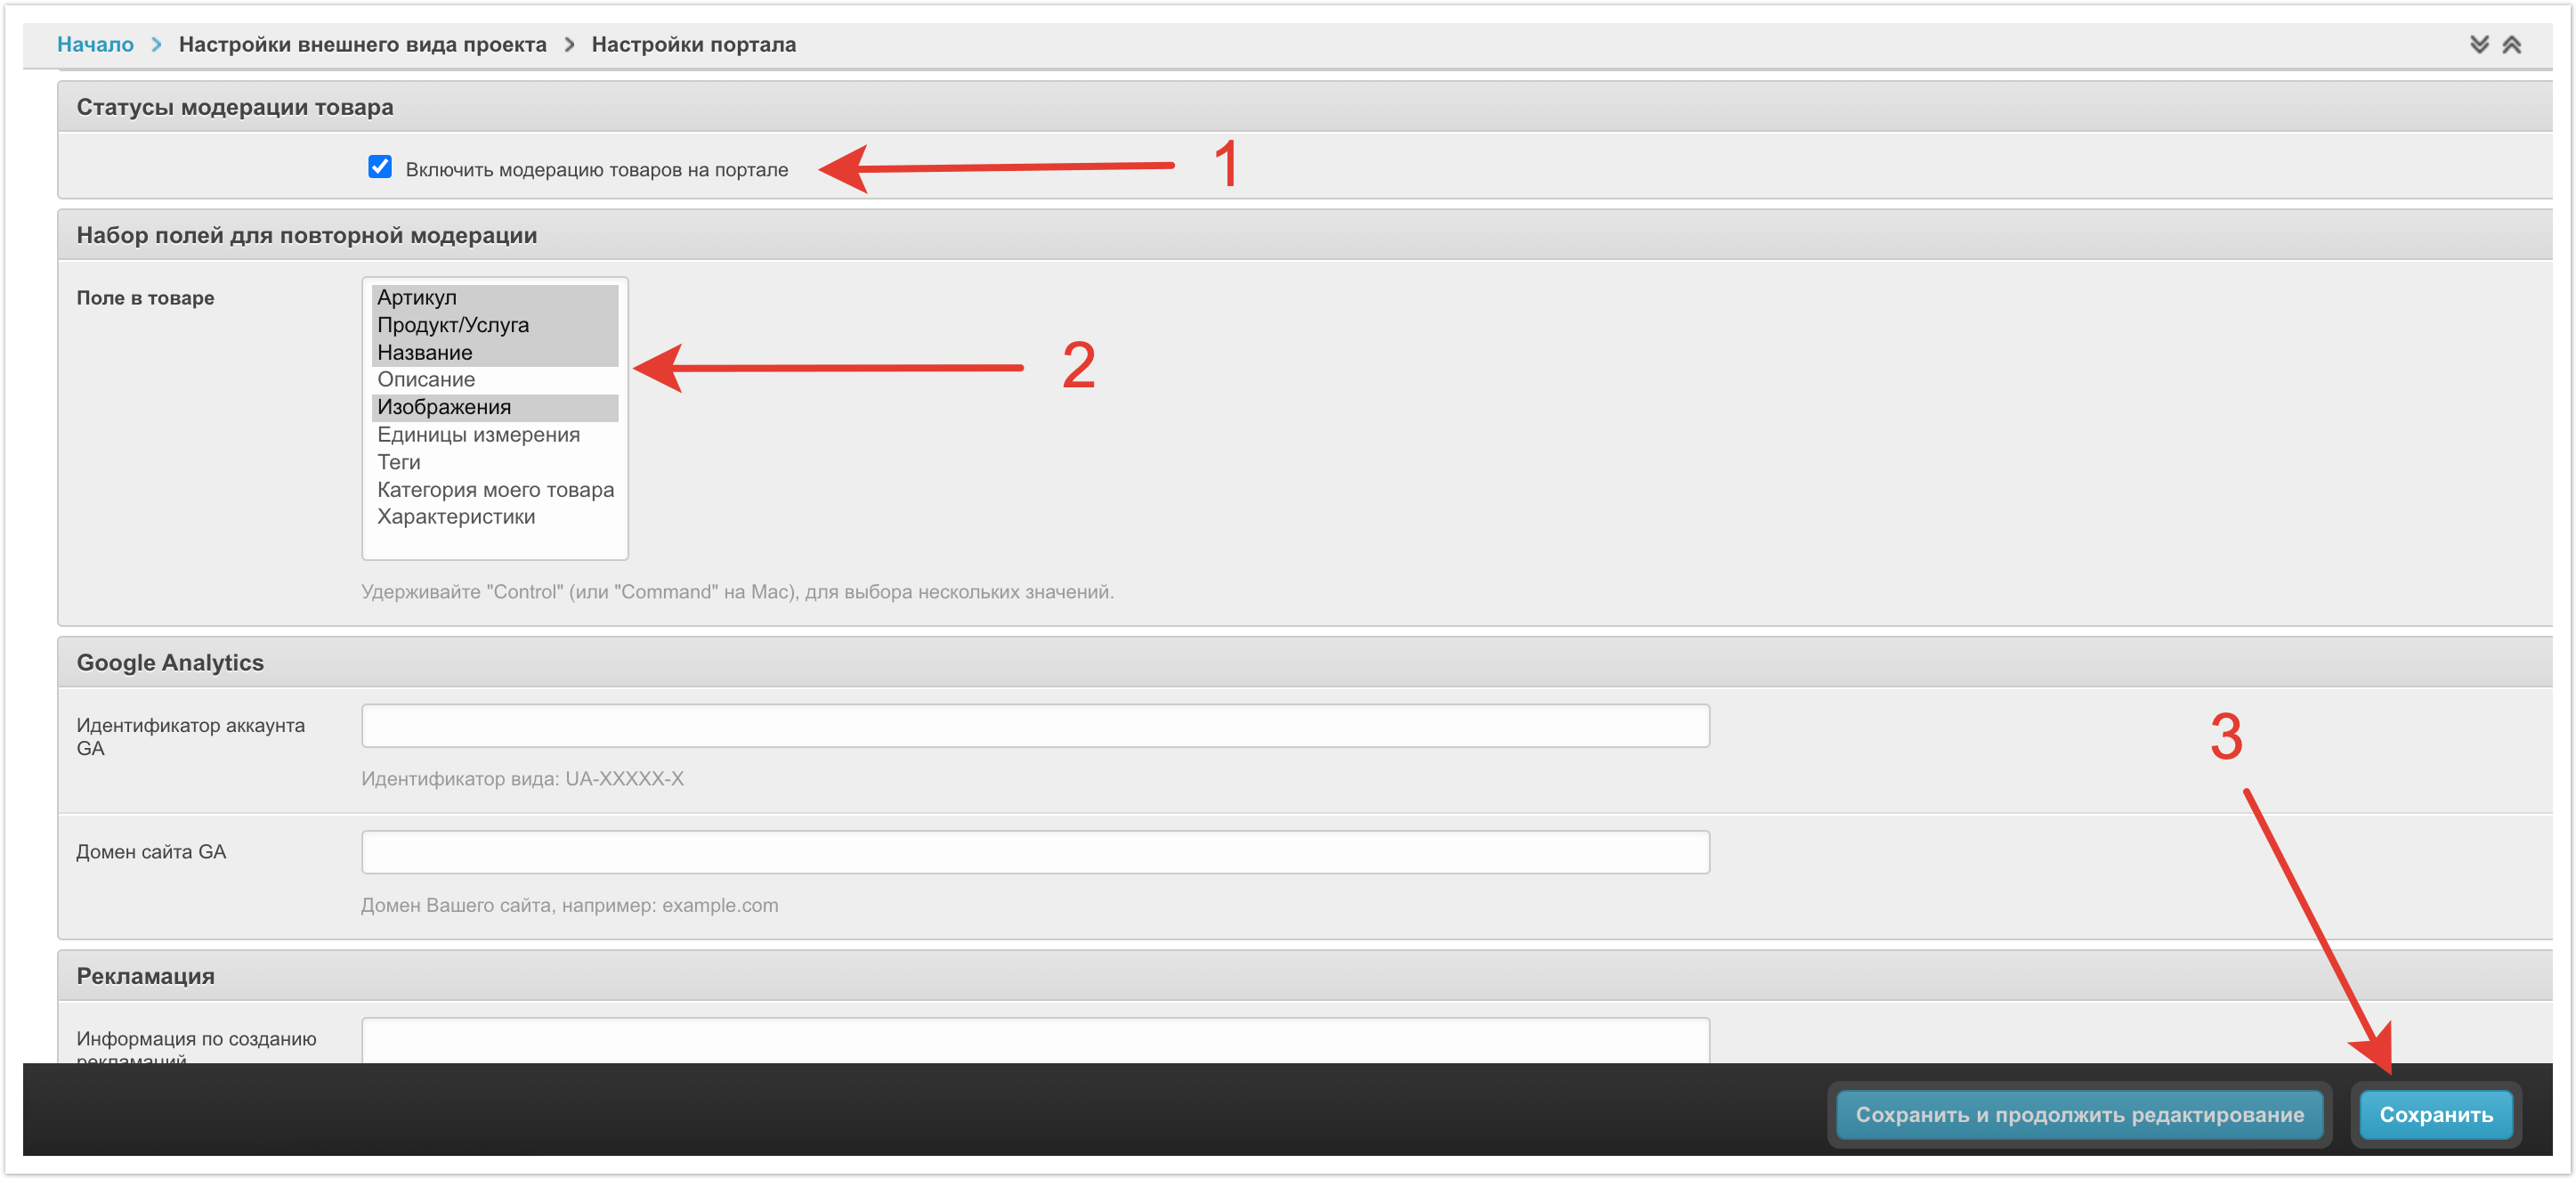
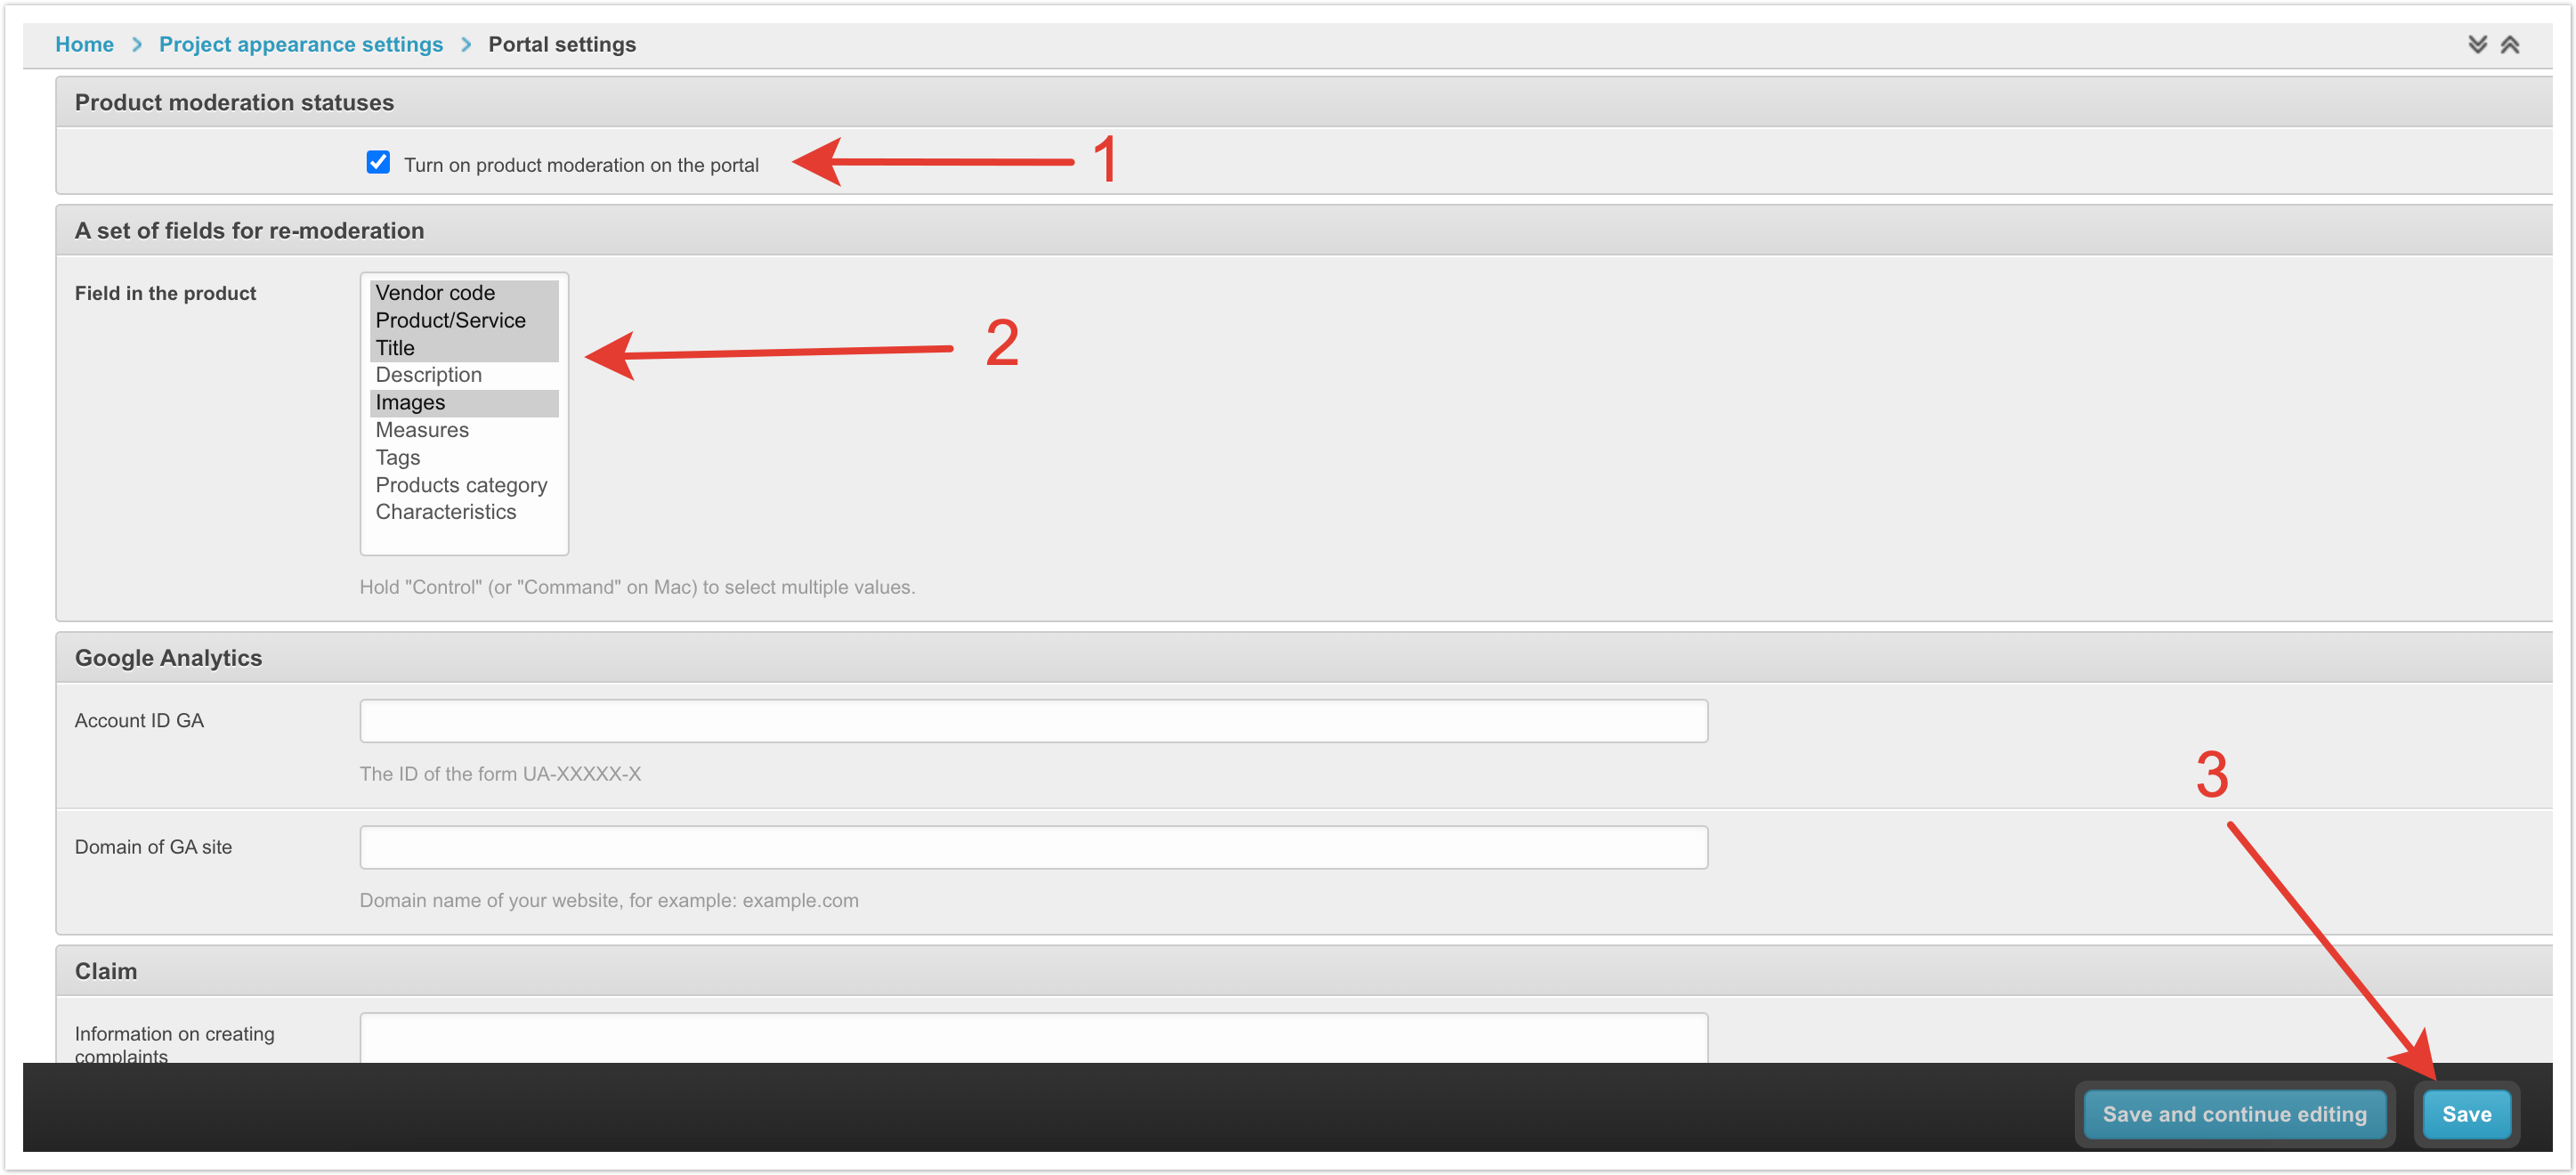
Функционал модерации товаров включается через Настройки портала в панели администратора.
Нужно найти настройку Включить модерацию товаров на портале и активировать ее. Далее в настройке Поле в товаре нужно выбрать поля, при изменении которых товар будет отправляться на повторную модерацию. Для выбора нескольких полей удерживайте клавишу CTRL (или Command на Mac). Повторная модерация - это повторная проверка ранее опубликованного в каталоге товара при изменении важных данных по нему. Сохраните изменения для вступления настроек в силу.
Ролевая модель пользователей, участвующих в модерации товаровНа платформе есть несколько ролей пользователей, которые задействованы в PIM системе. Рассмотрим особенности каждой из ролей, и какие задачи они решают. Администратор платформы - это пользователь client_amin, который имеет доступ к административной панели платформы. Этот пользователь может администрировать статусную модель модерации товаров, регулировать доступные варианты сортировки каталога, задавать вес товарных полей, а также изменять любые другие настройки, которые задаются через панель администратора. Ответственный менеджер (Маркетолог) - это пользователь для руководителя отдела контента. Он обладает следующими правами:
Бренд-менеджер - это роль для сотрудника контентного отдела, который выполняет непосредственную проверку и обогащение карточки товара необходимыми данными для публикации в каталоге покупателей. Пользователь с этой ролью обладает следующими правами:
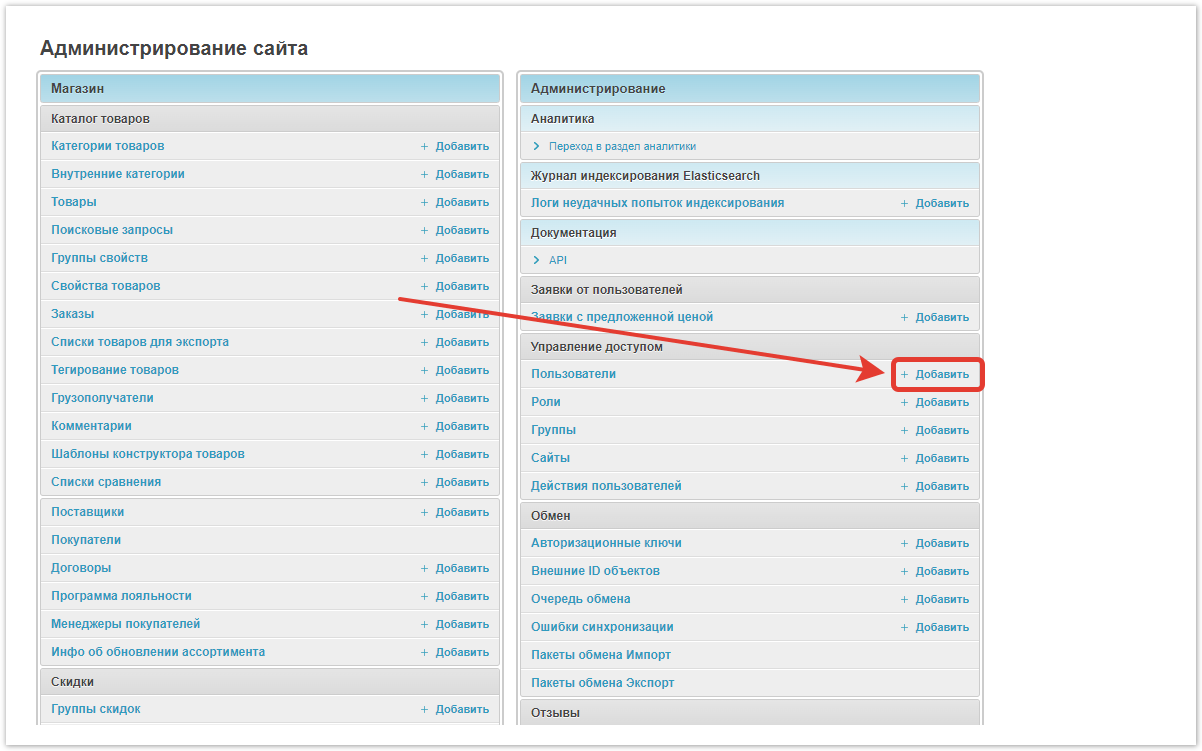
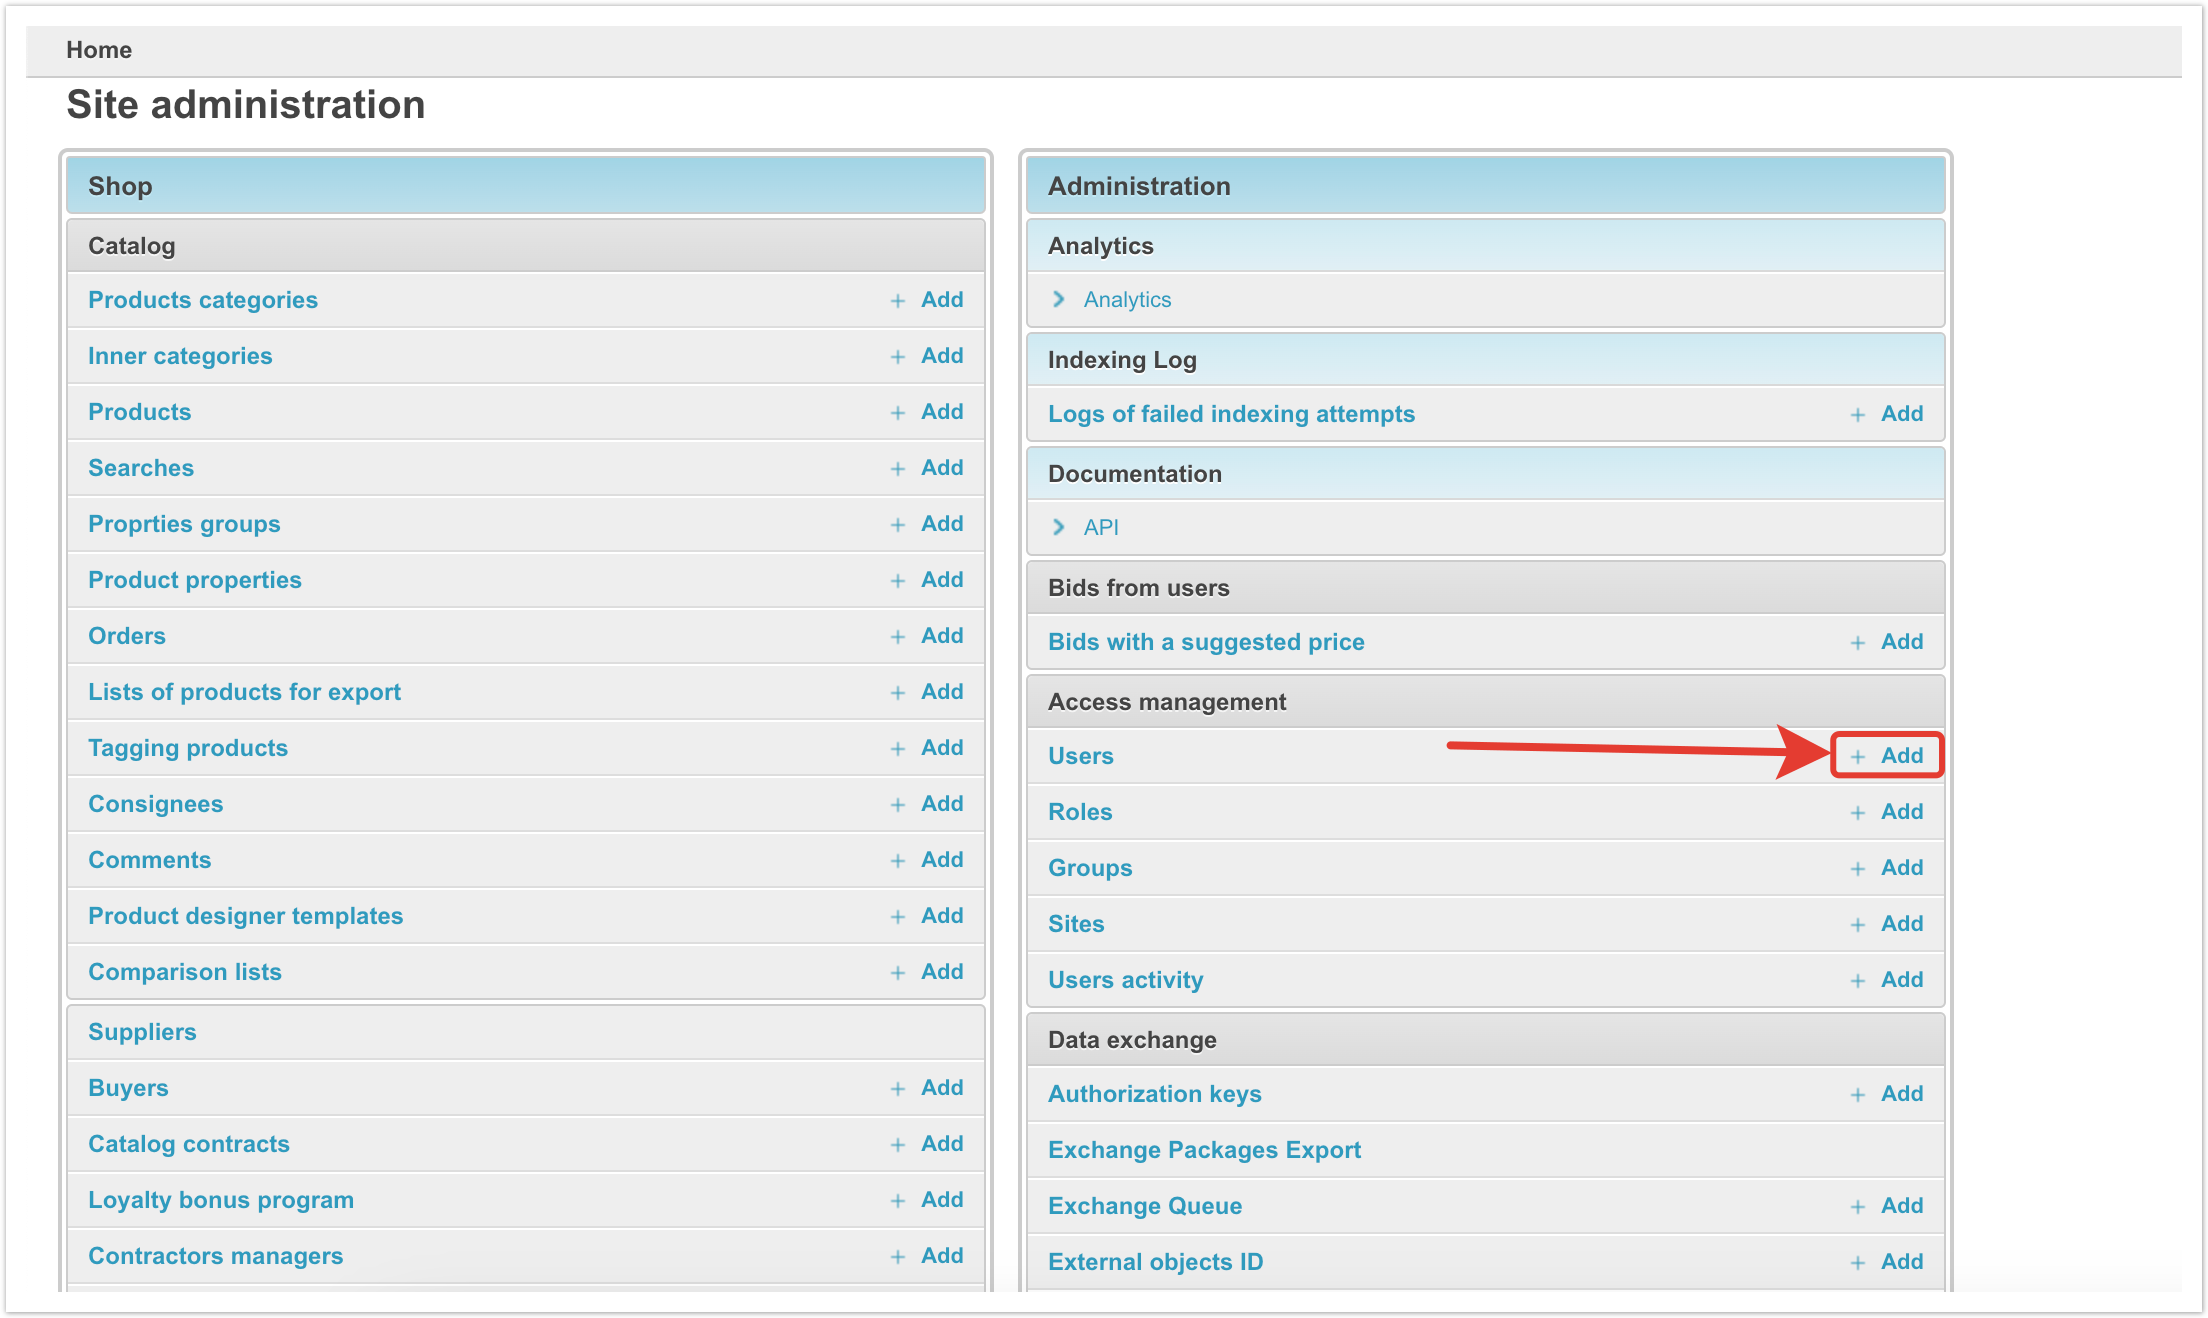
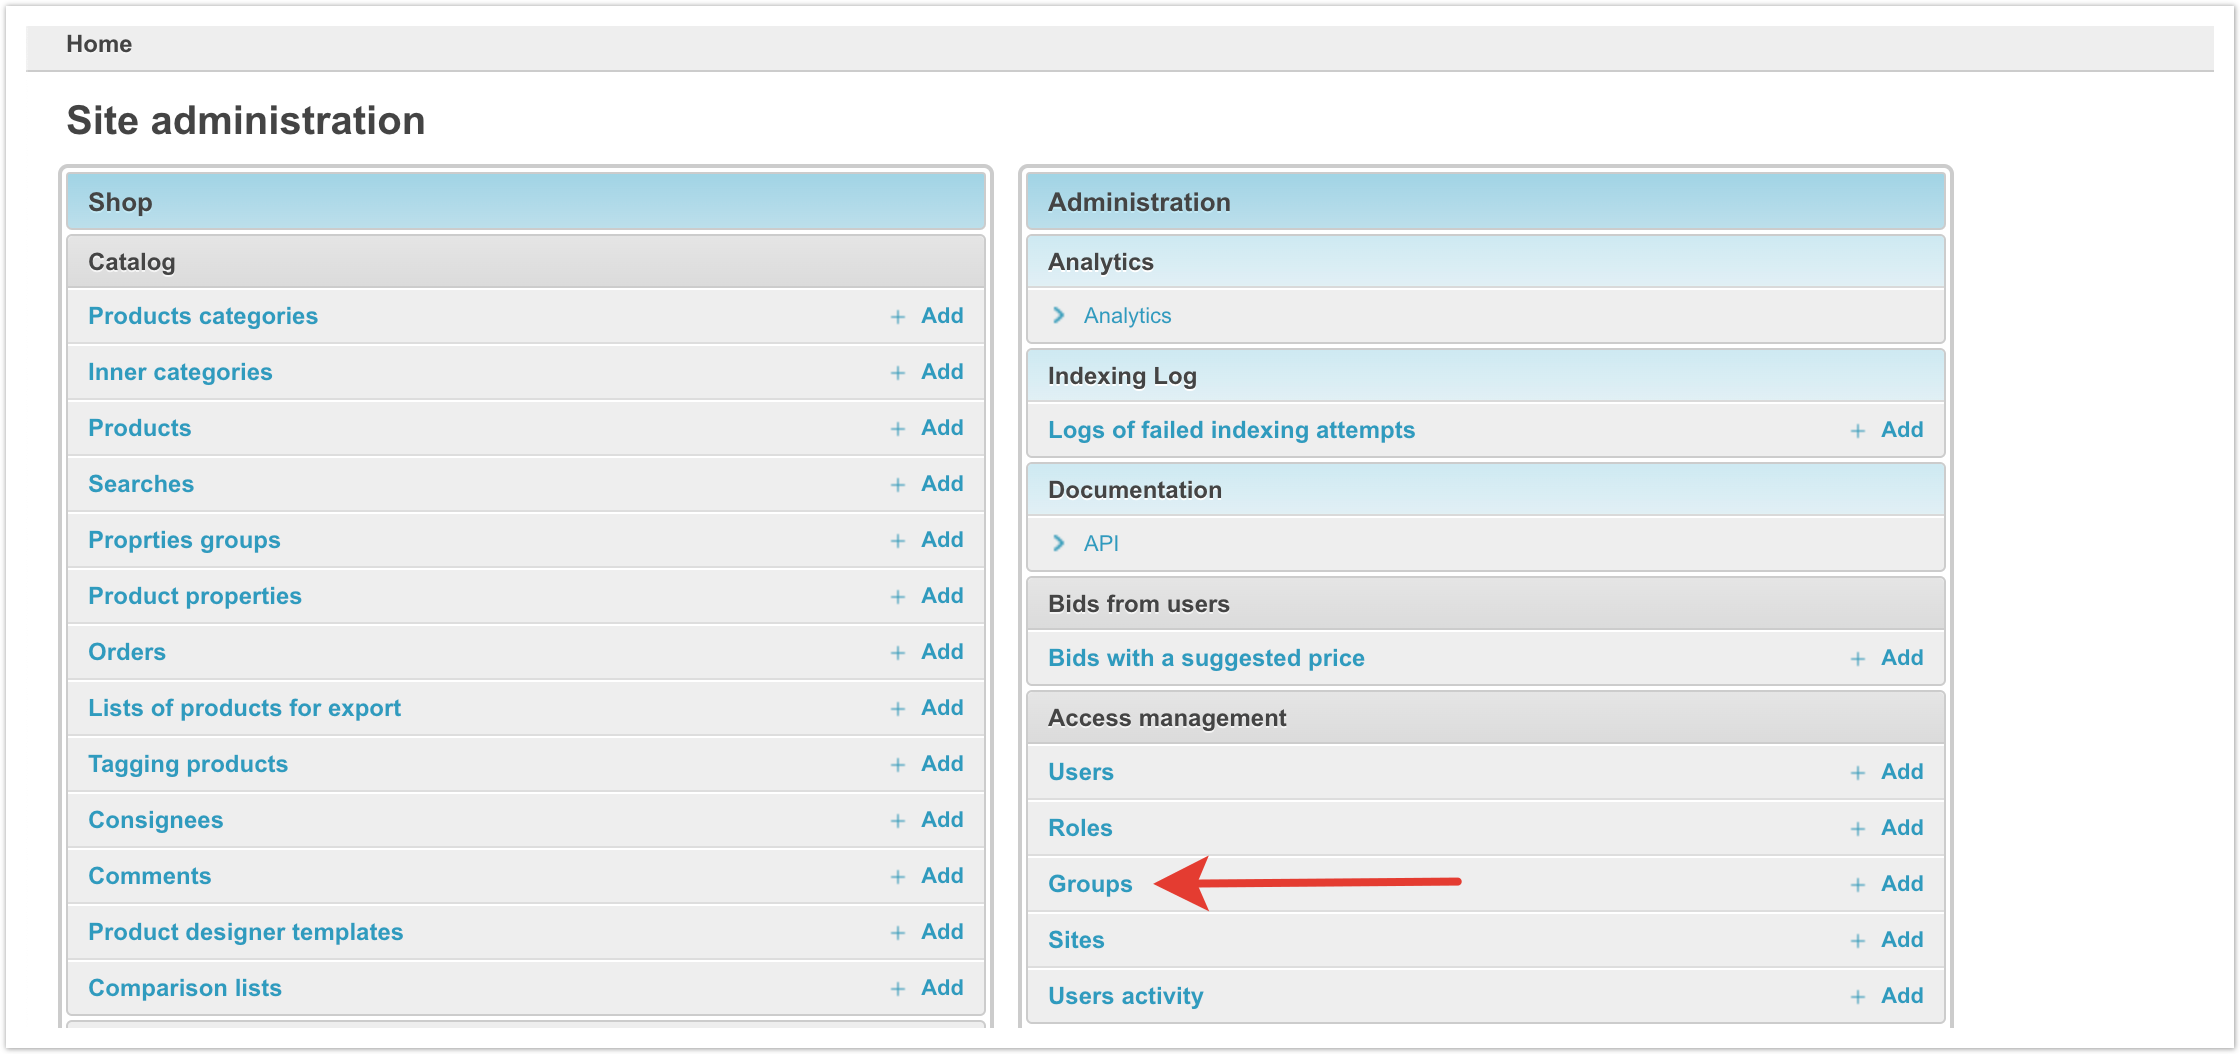
Заведение и настройка новых пользователей системыРоли, описанные выше создаются на платформе автоматически. Но для работы с ними необходимо создать пользователя. Для этого в административной панели кликните по кнопке Добавить в разделе Пользователи.
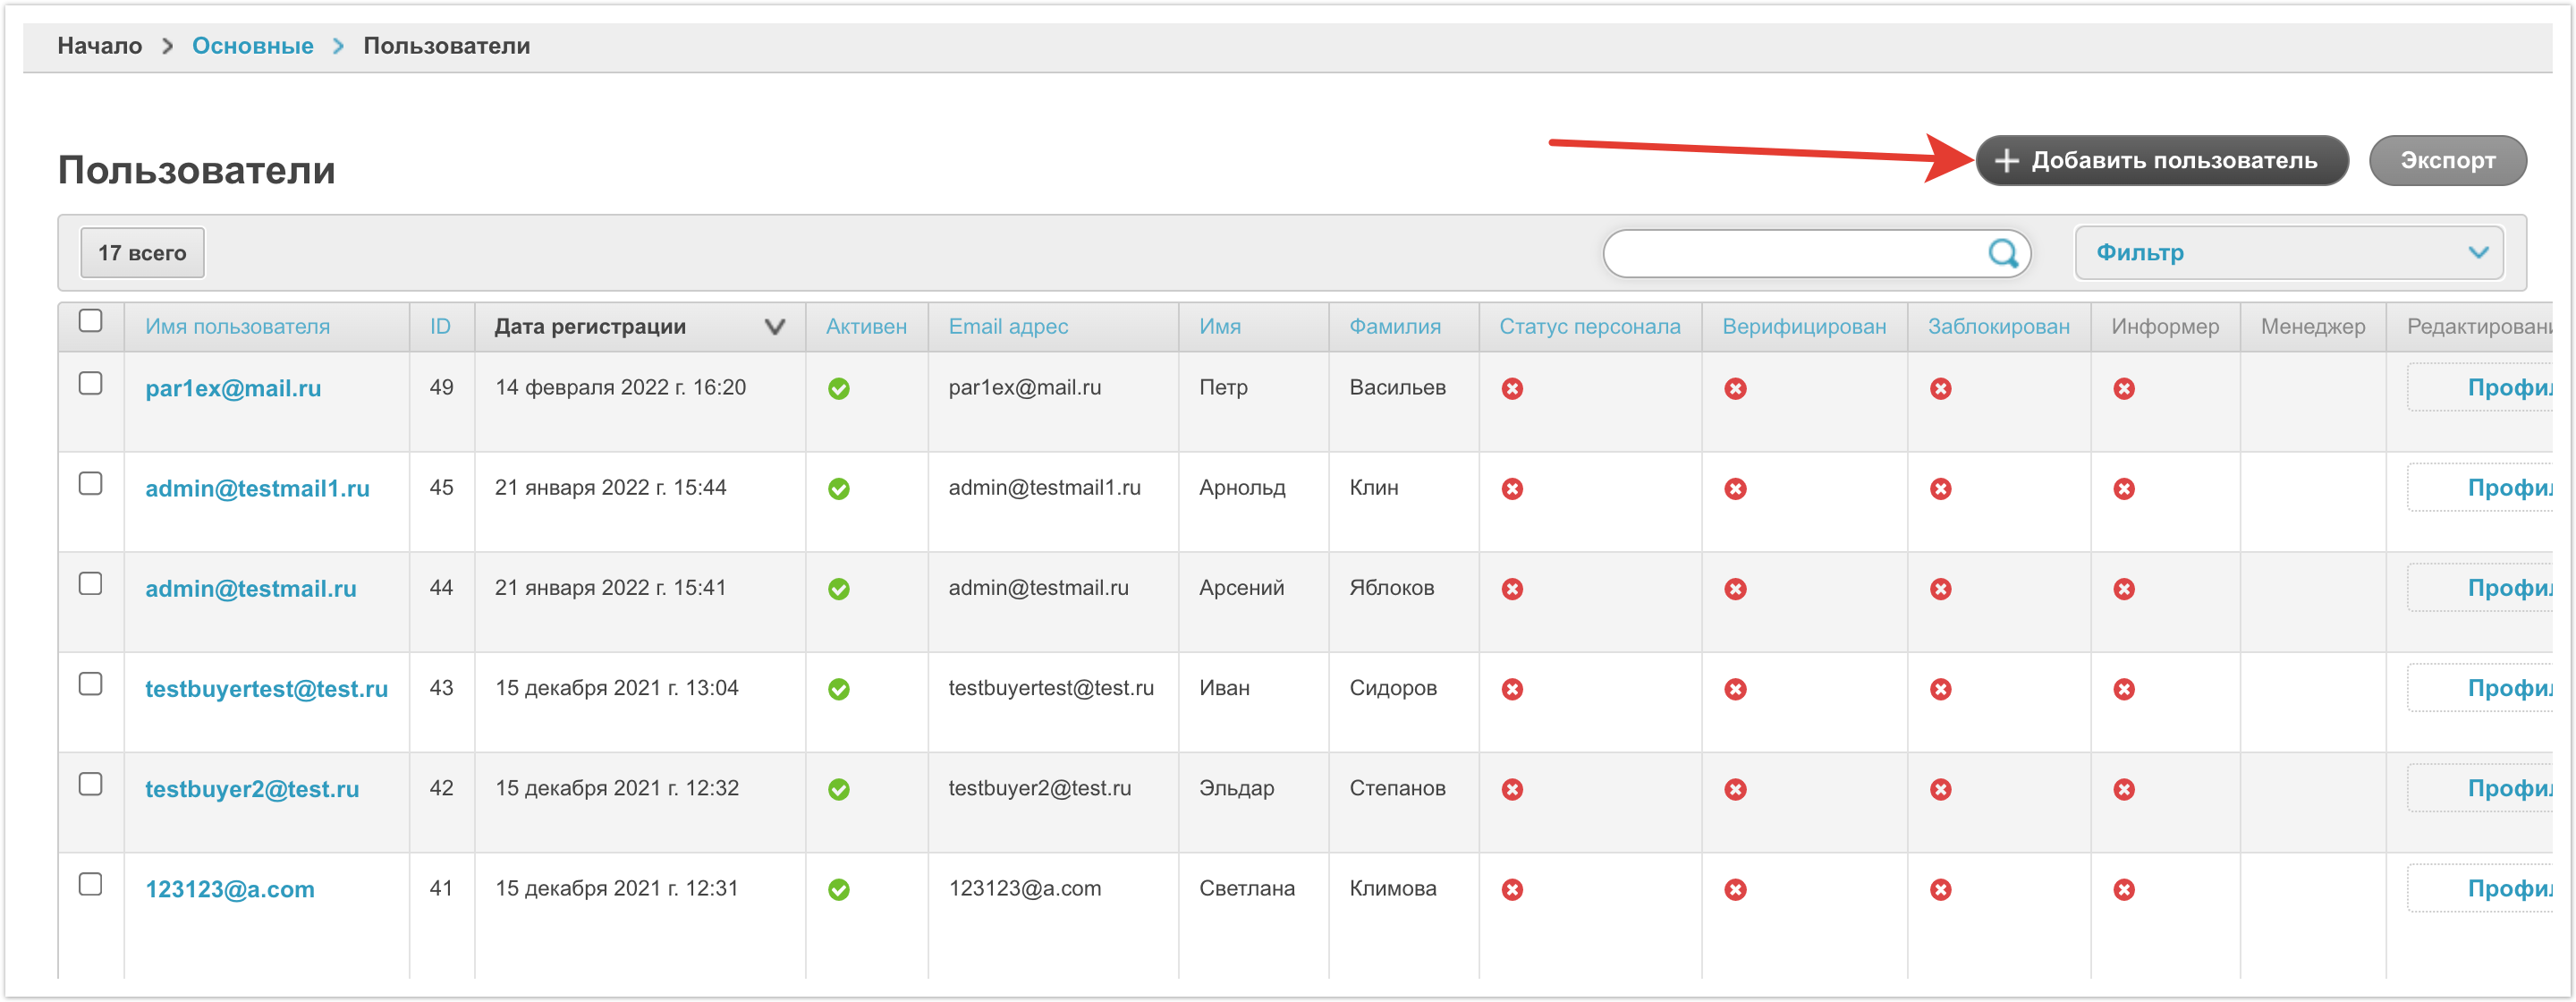
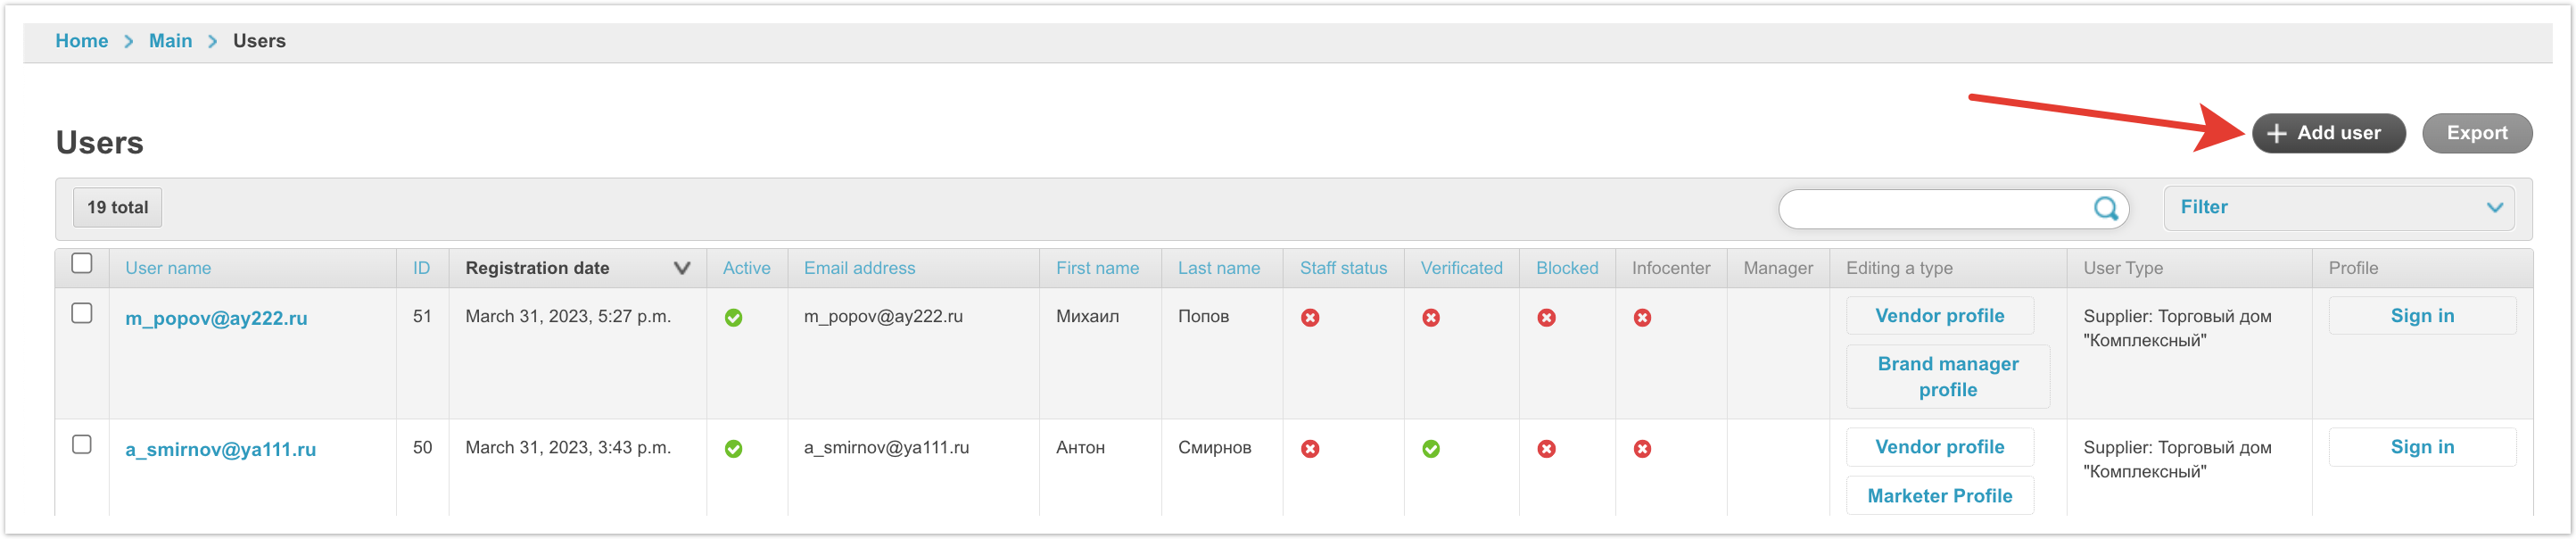
Или перейдите раздел Пользователи, а затем кликните по кнопке Добавить пользователя.
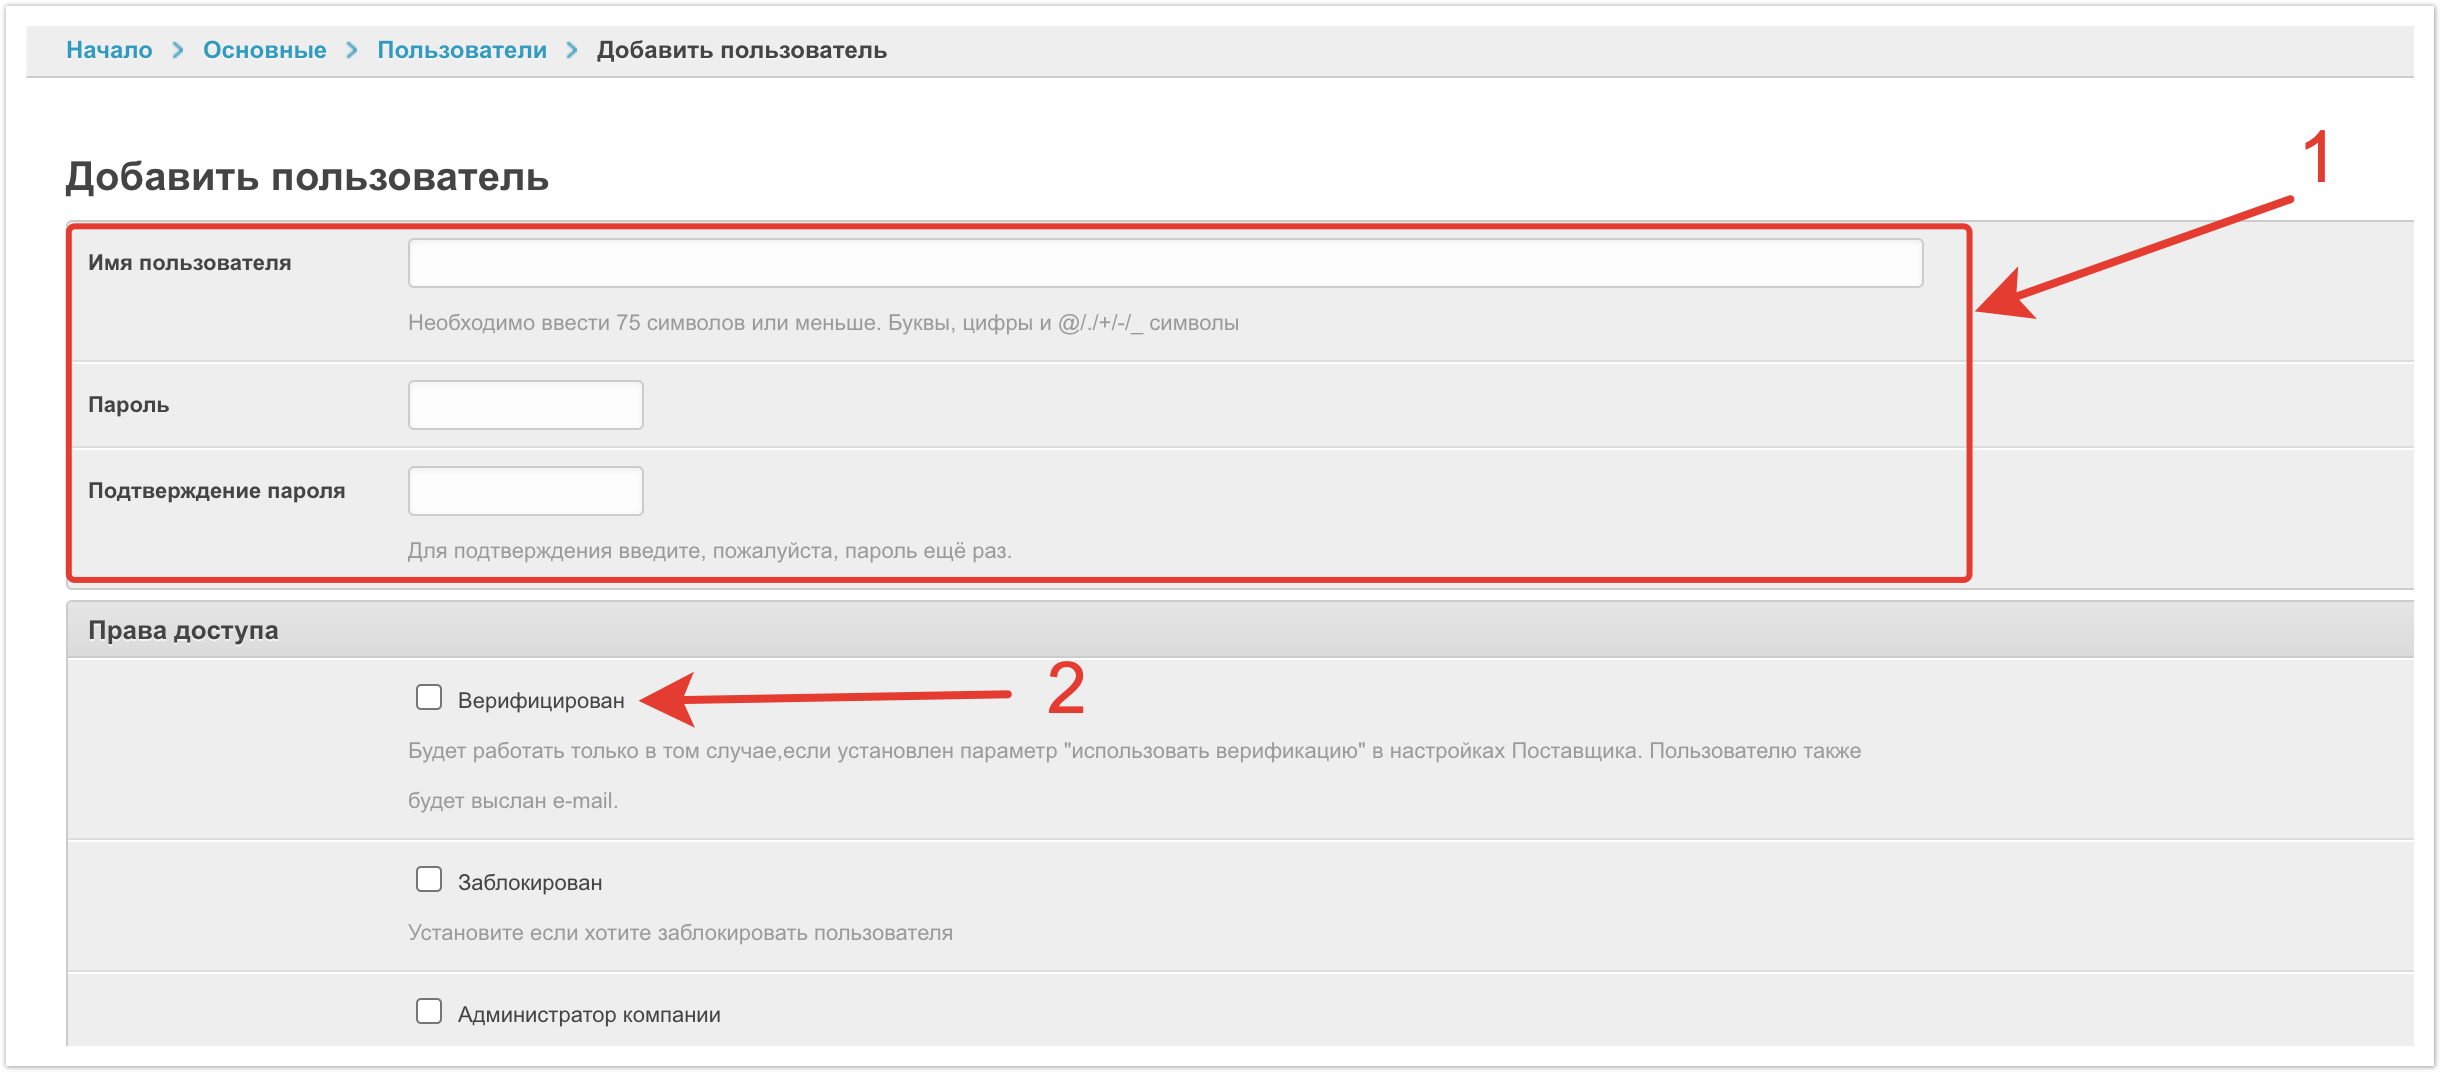
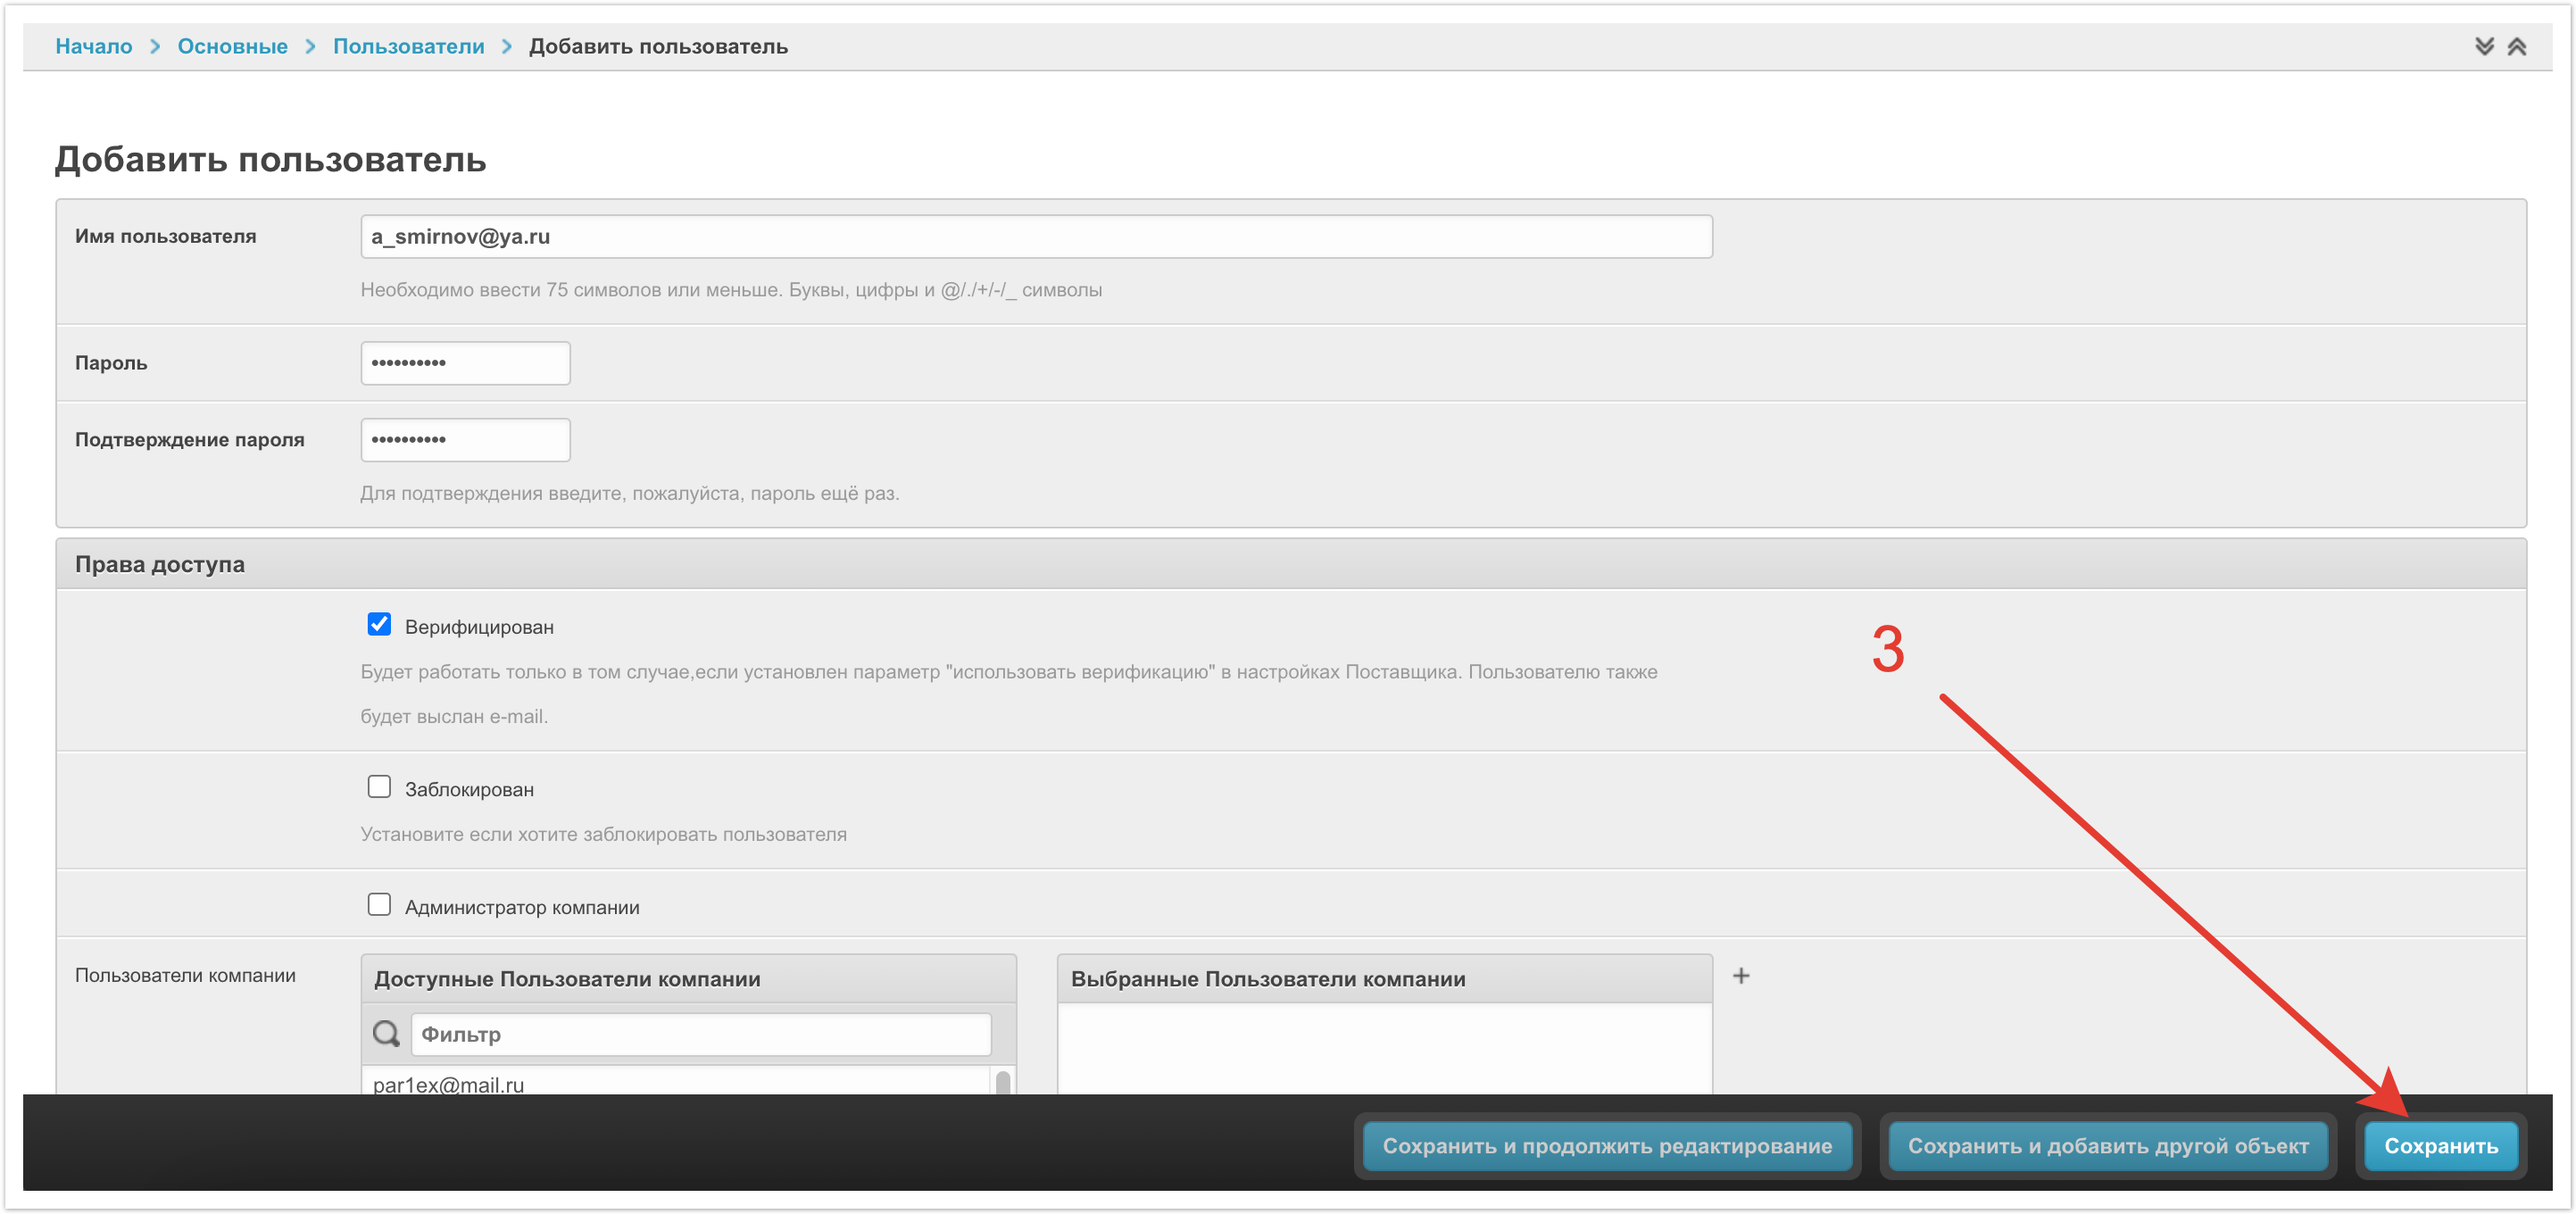
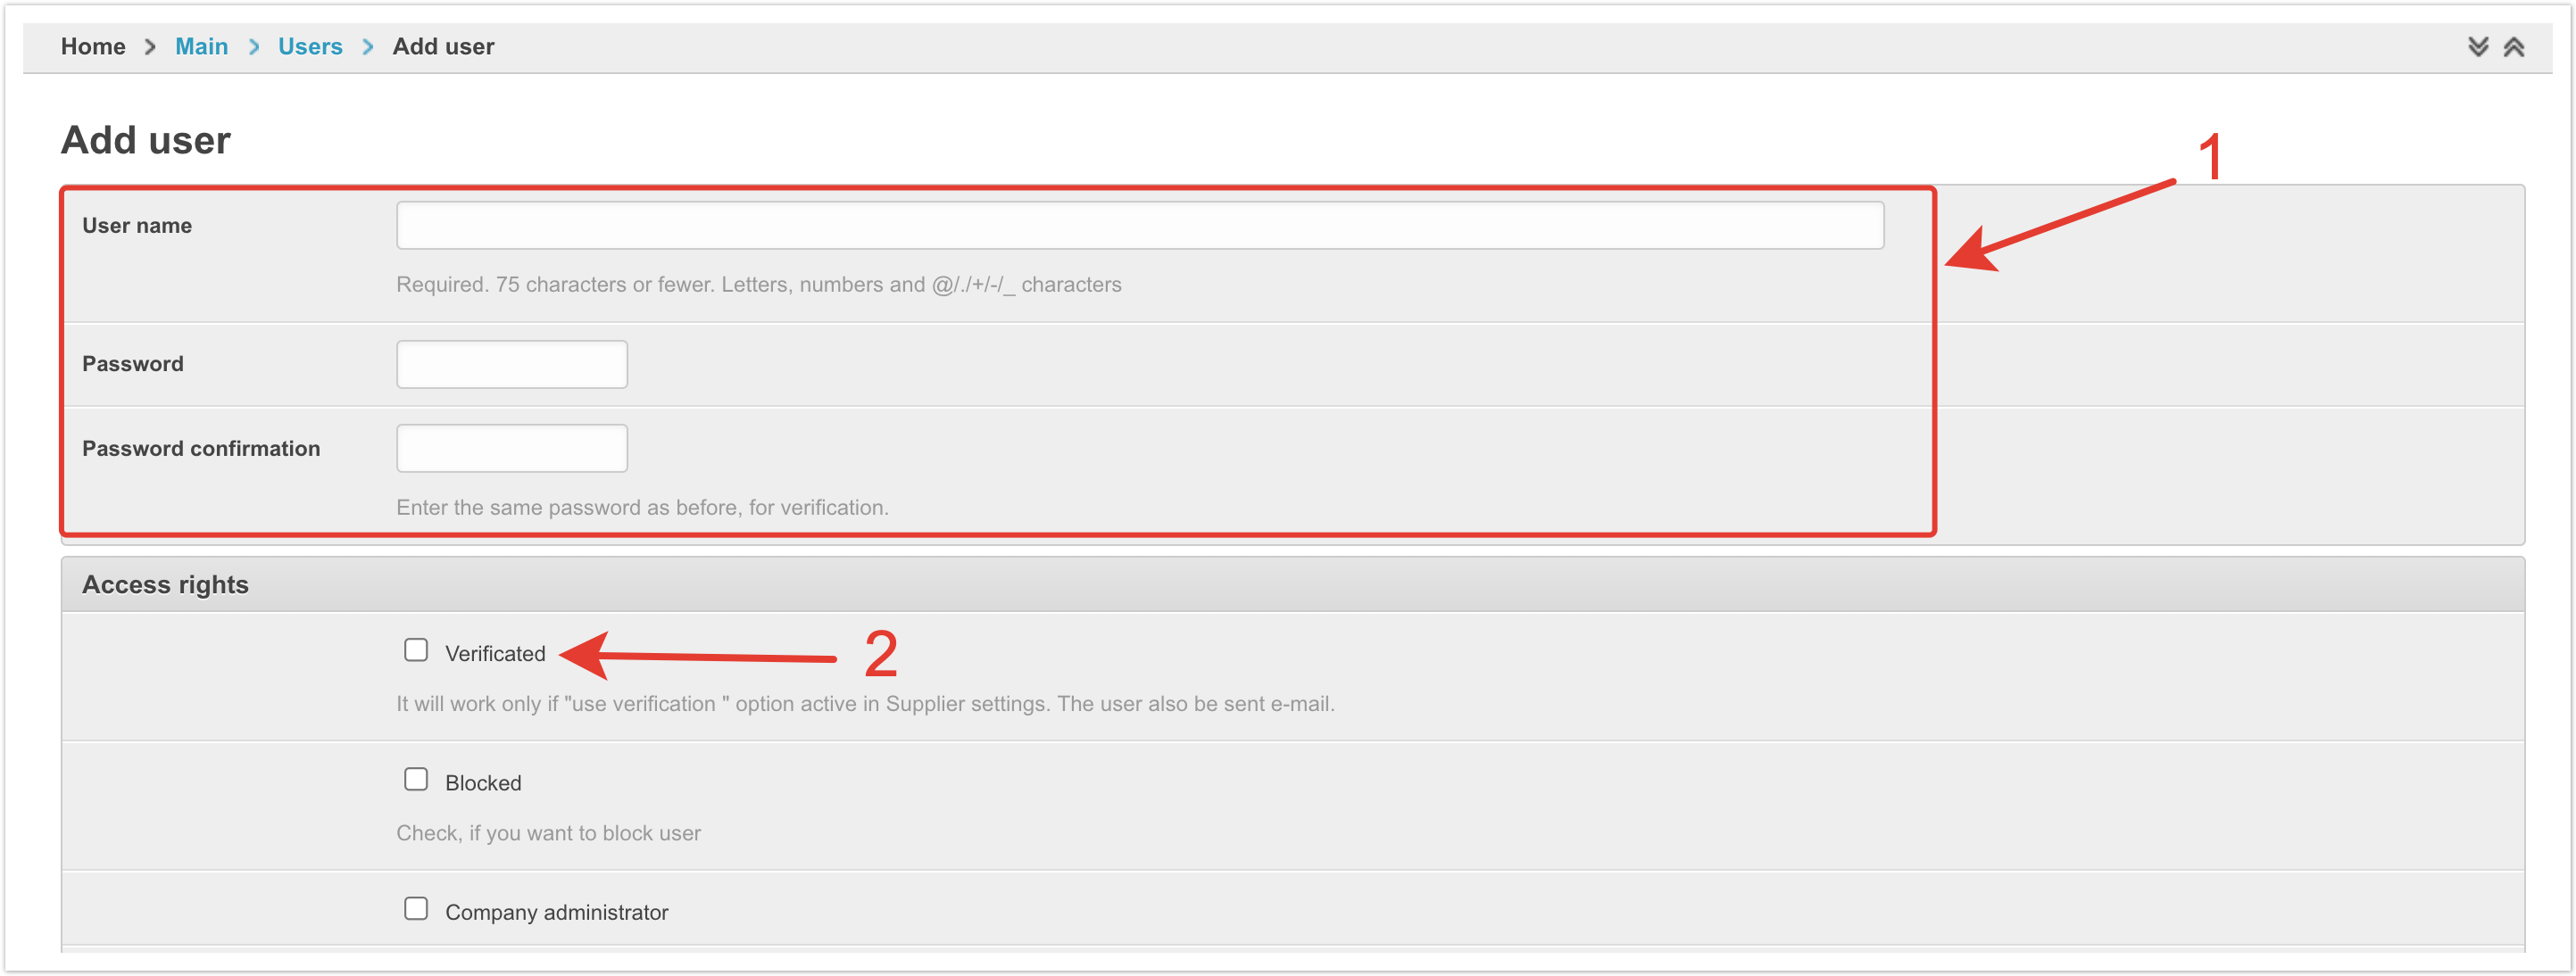
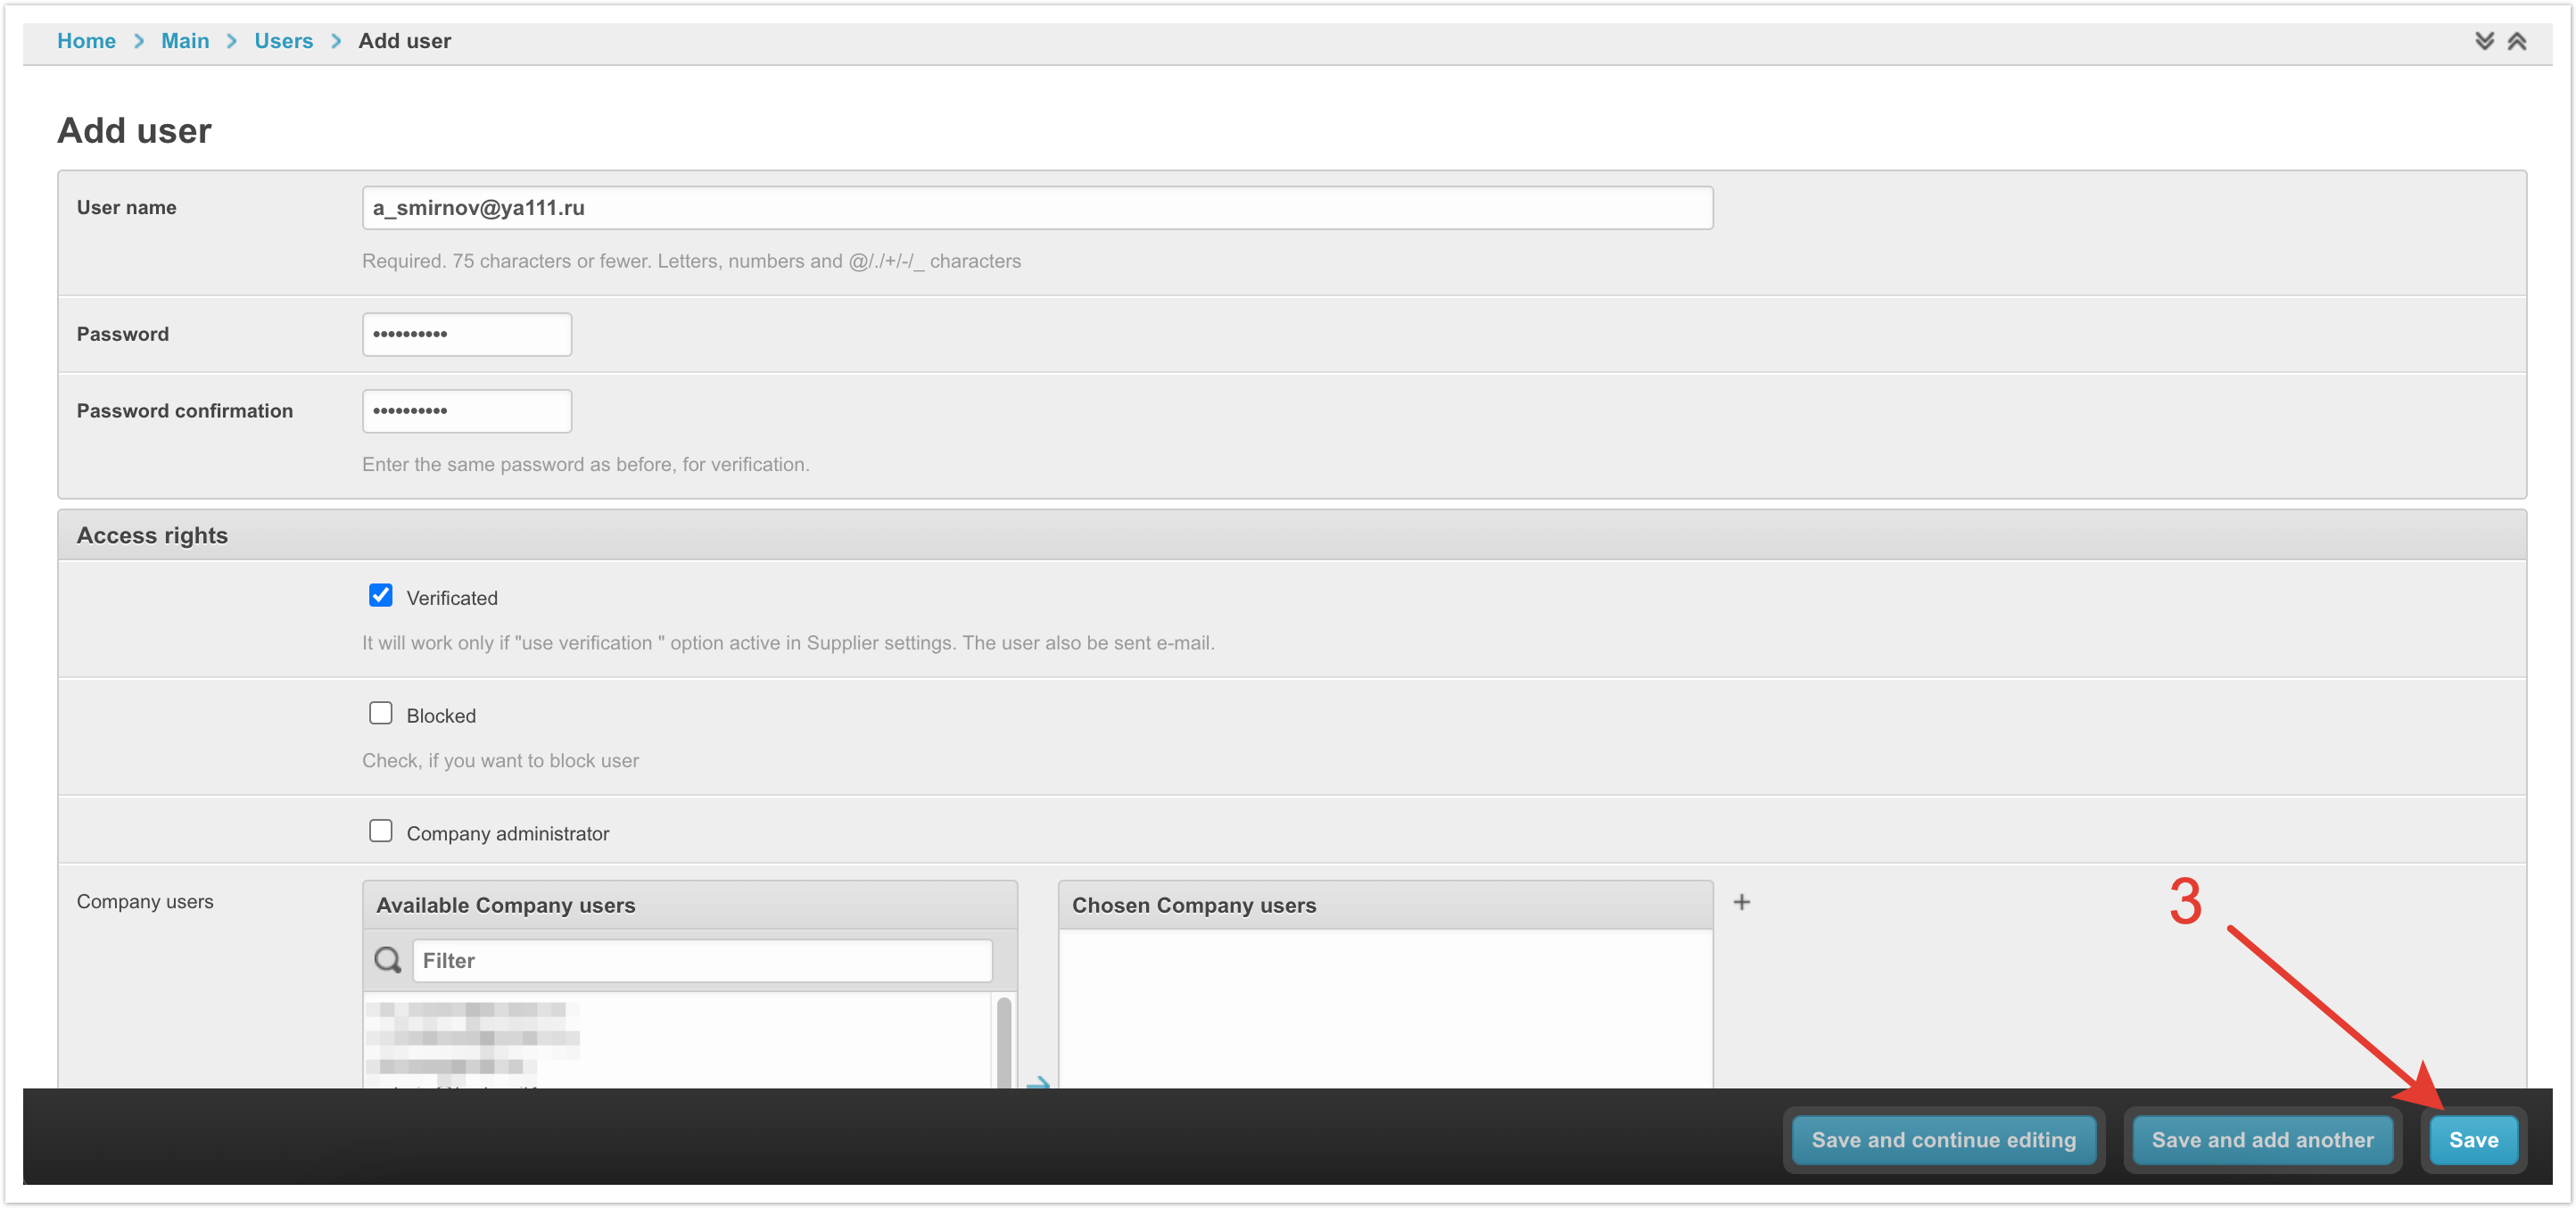
Откроется страница, где нужно заполнить необходимые поля. Для регистрации достаточно задать имя пользователя и пароль, а также поставить чек-бокс верификации, если она используется на проекте. В качестве имени пользователя лучше всего использовать адрес электронной почты.
Завершите регистрацию с помощью кнопки Сохранить.
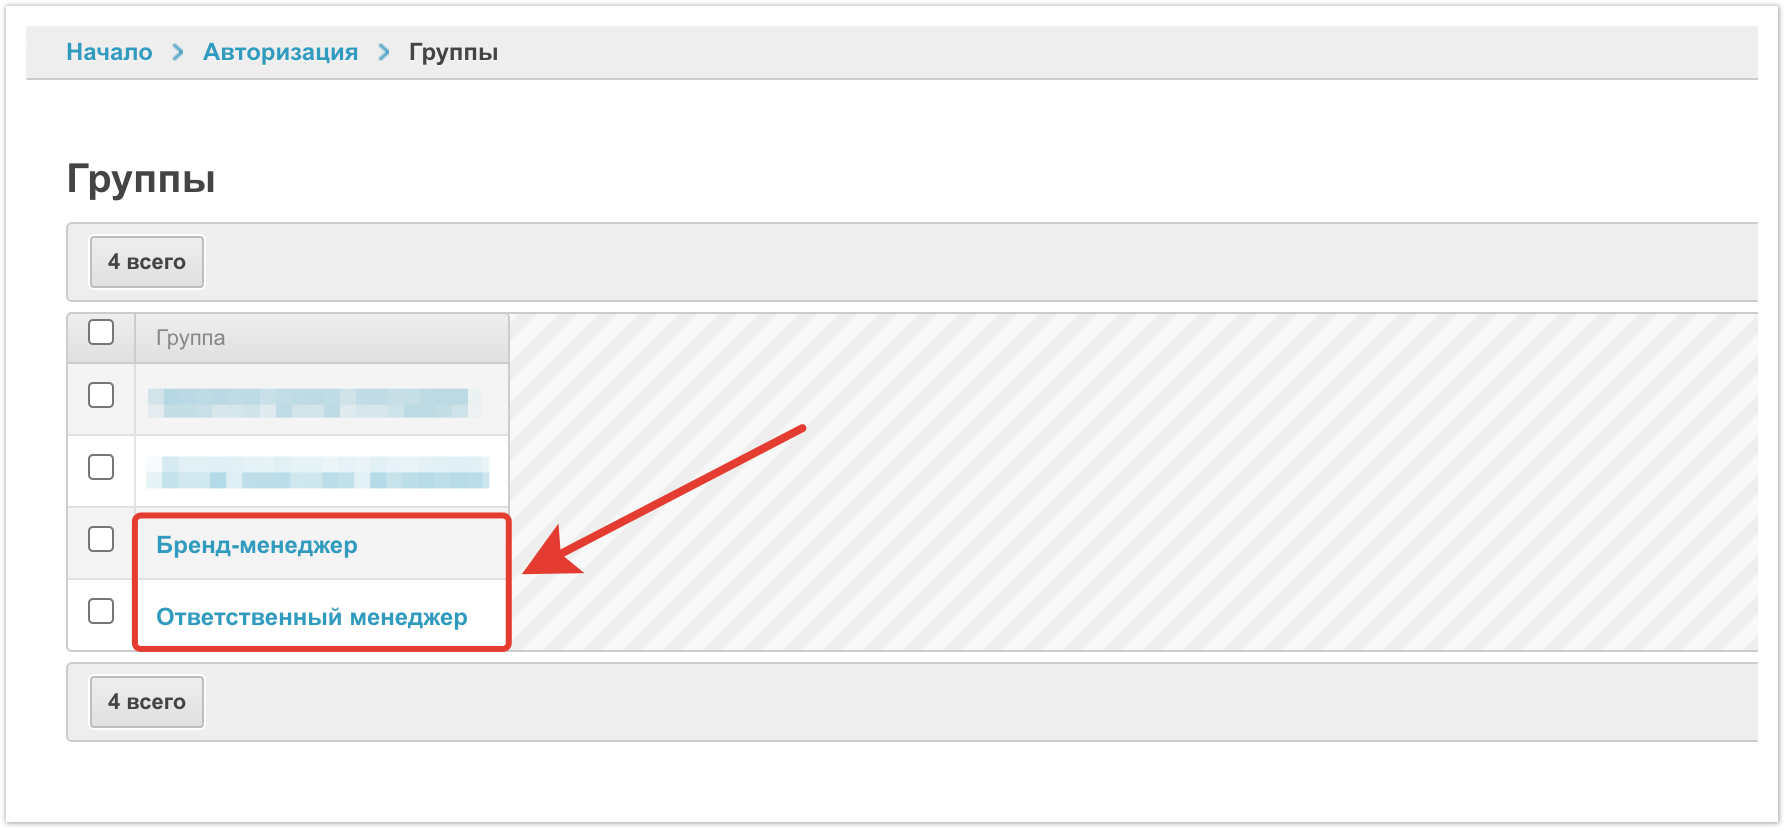
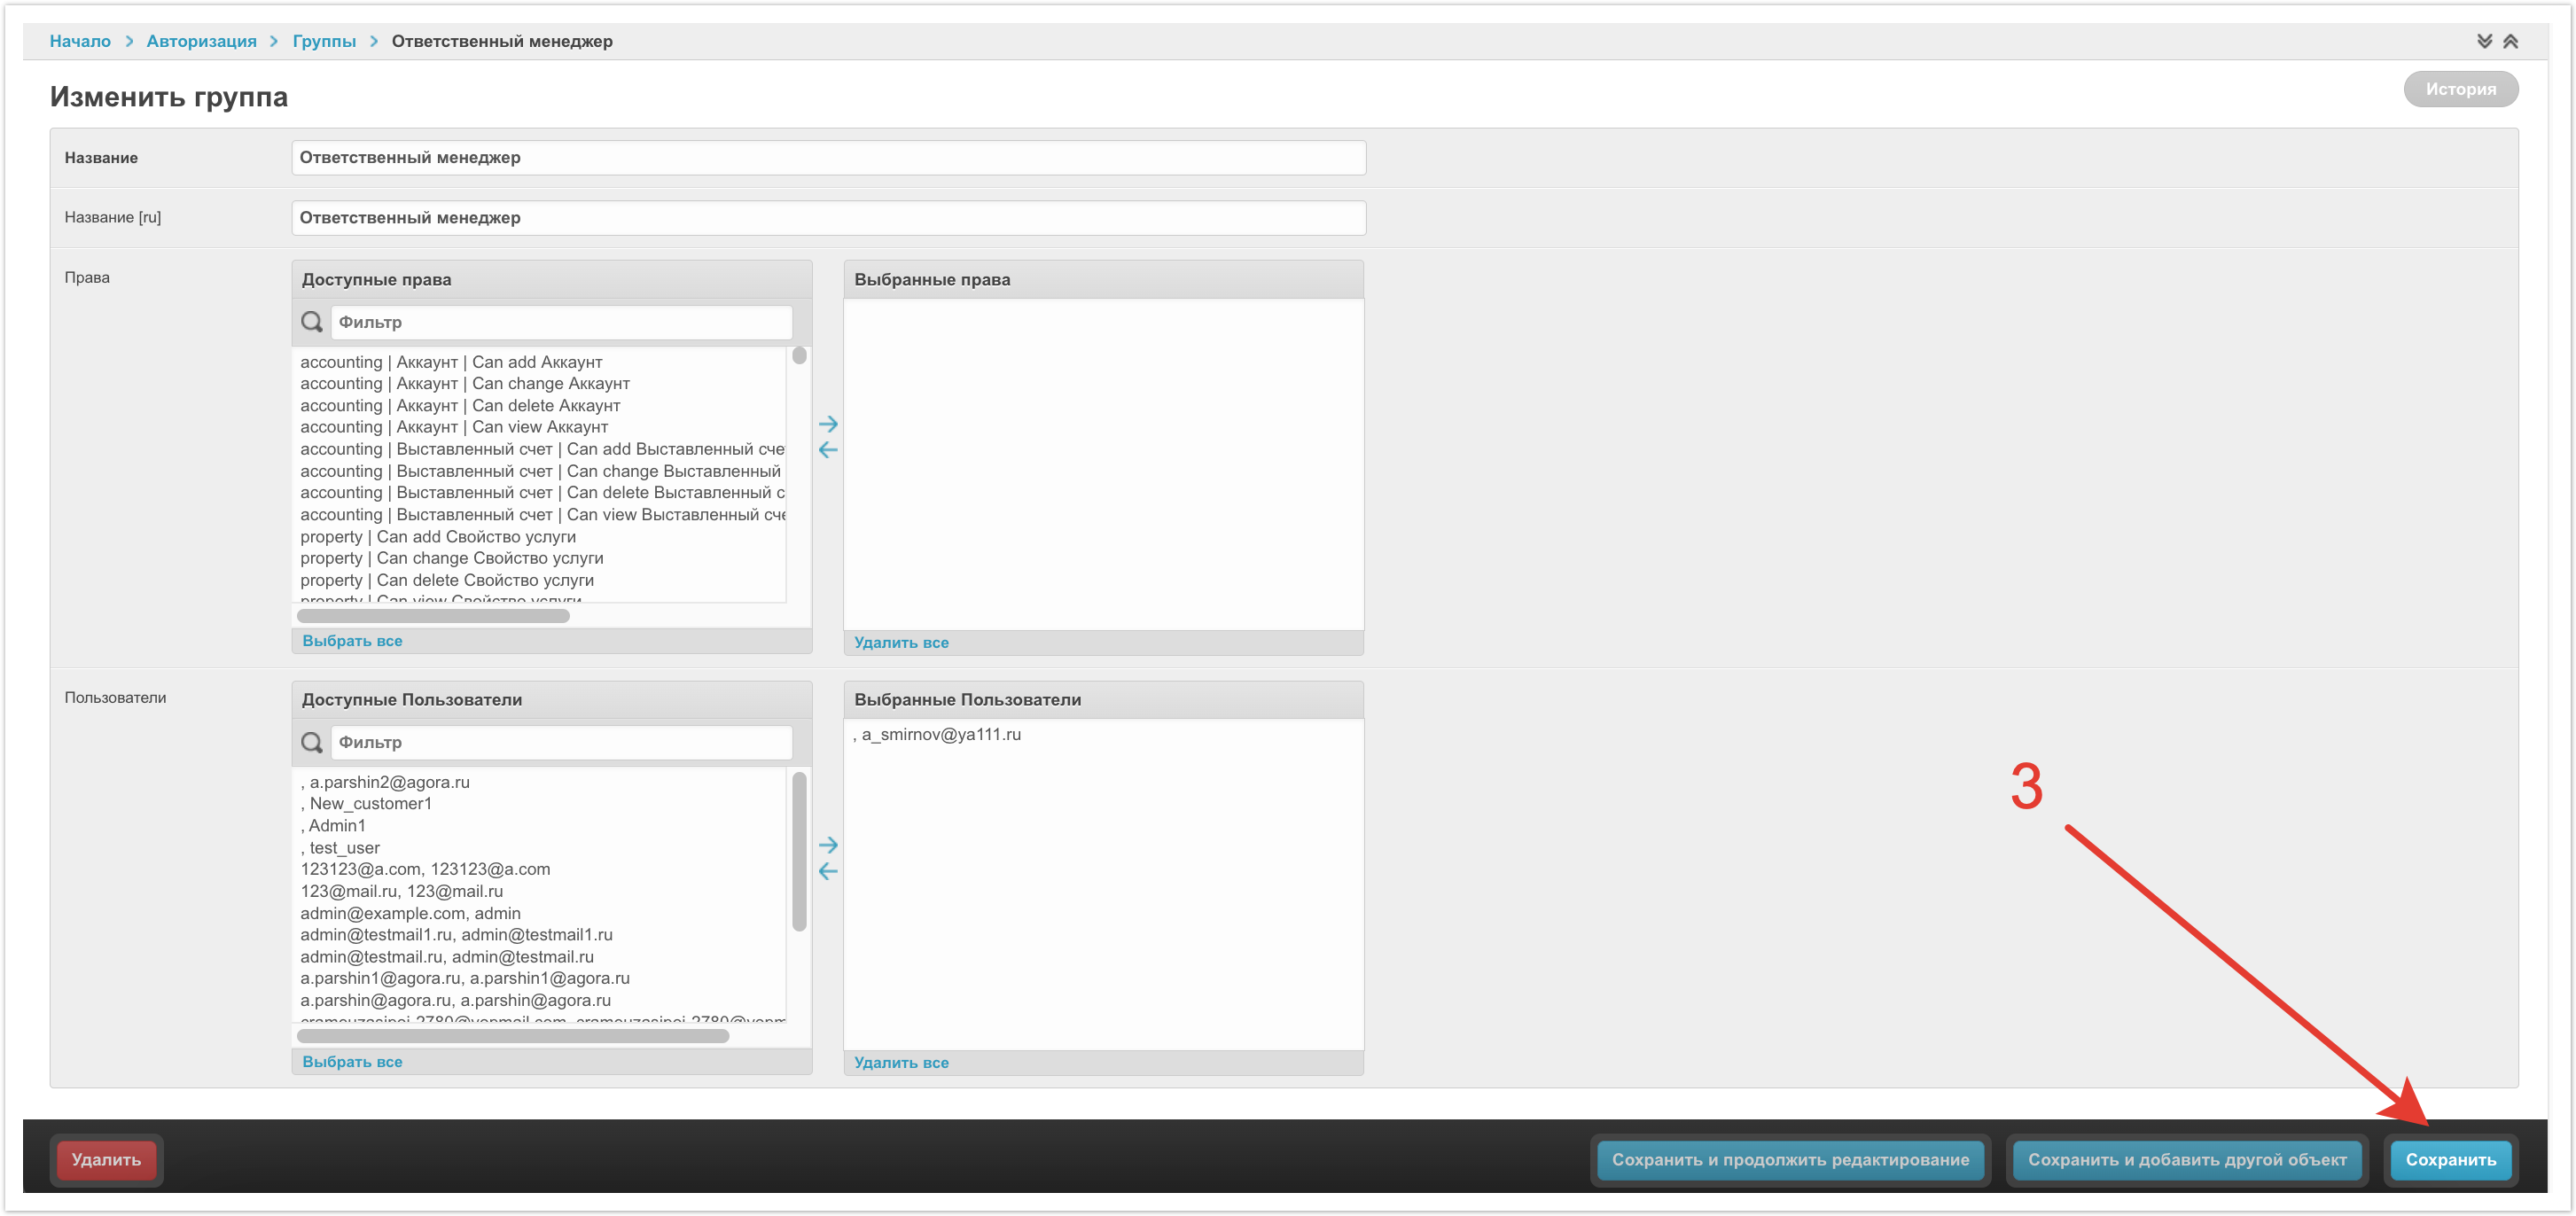
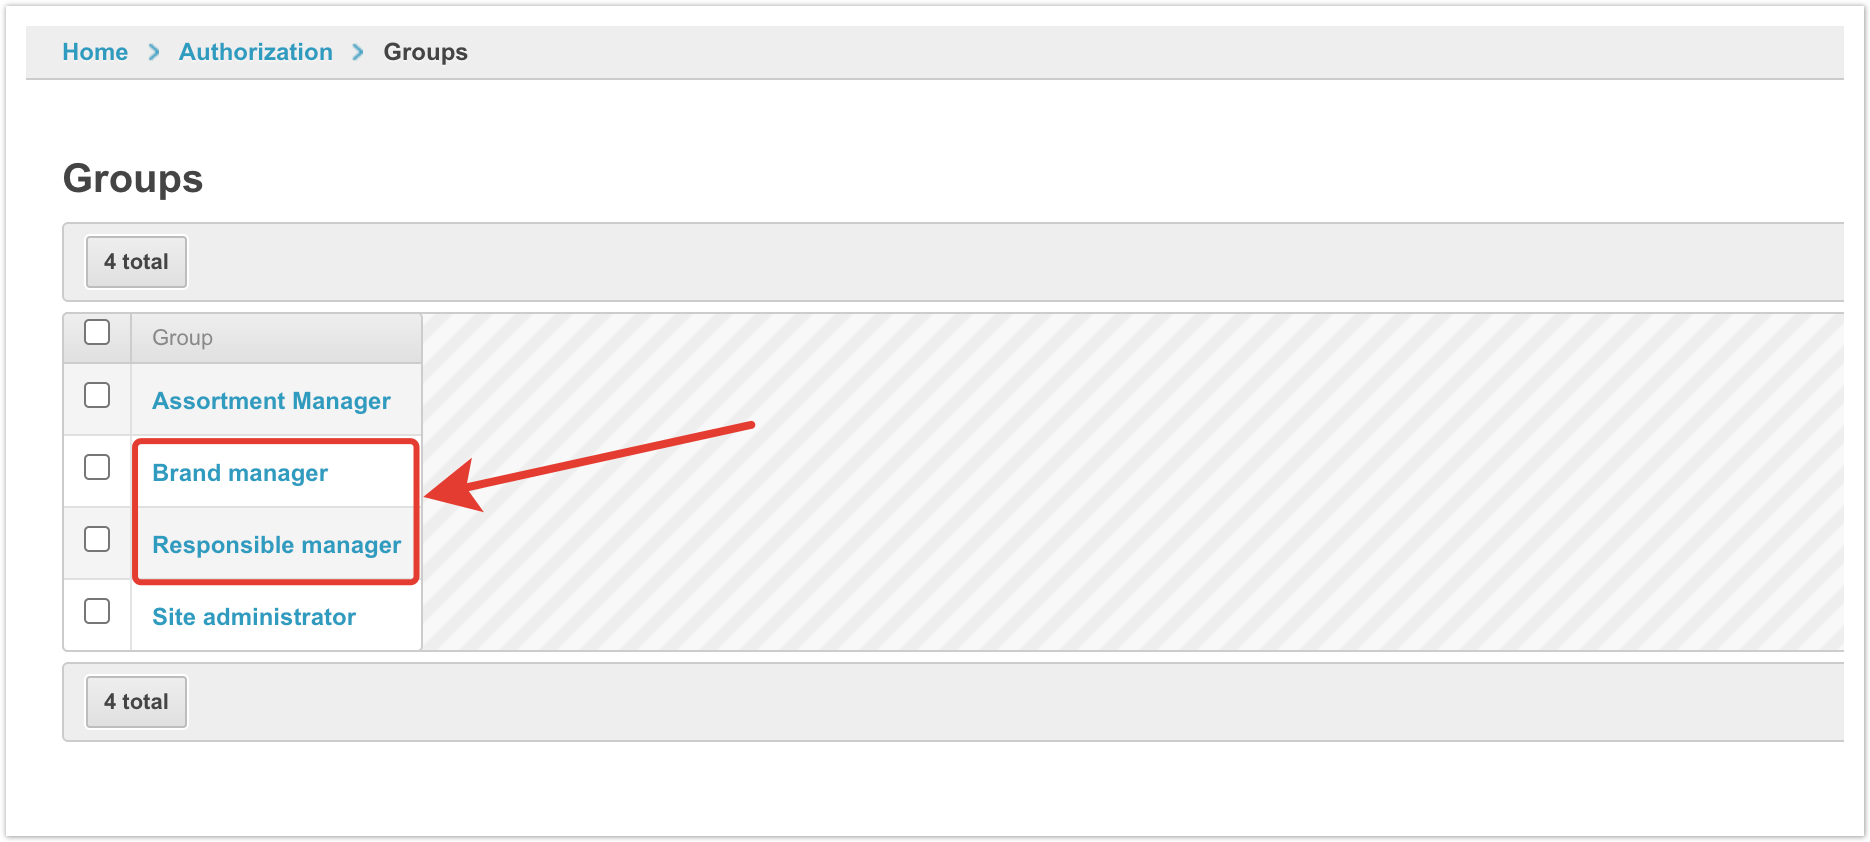
Далее нужно выдать пользователю набор прав для его роли. Чтобы сделать это, перейдите в раздел Группы.
Затем выберите нужную группу. Рассмотрим на примере Ответственного менеджера. Для Бренд-менеджера, алгоритм действий будет аналогичным.
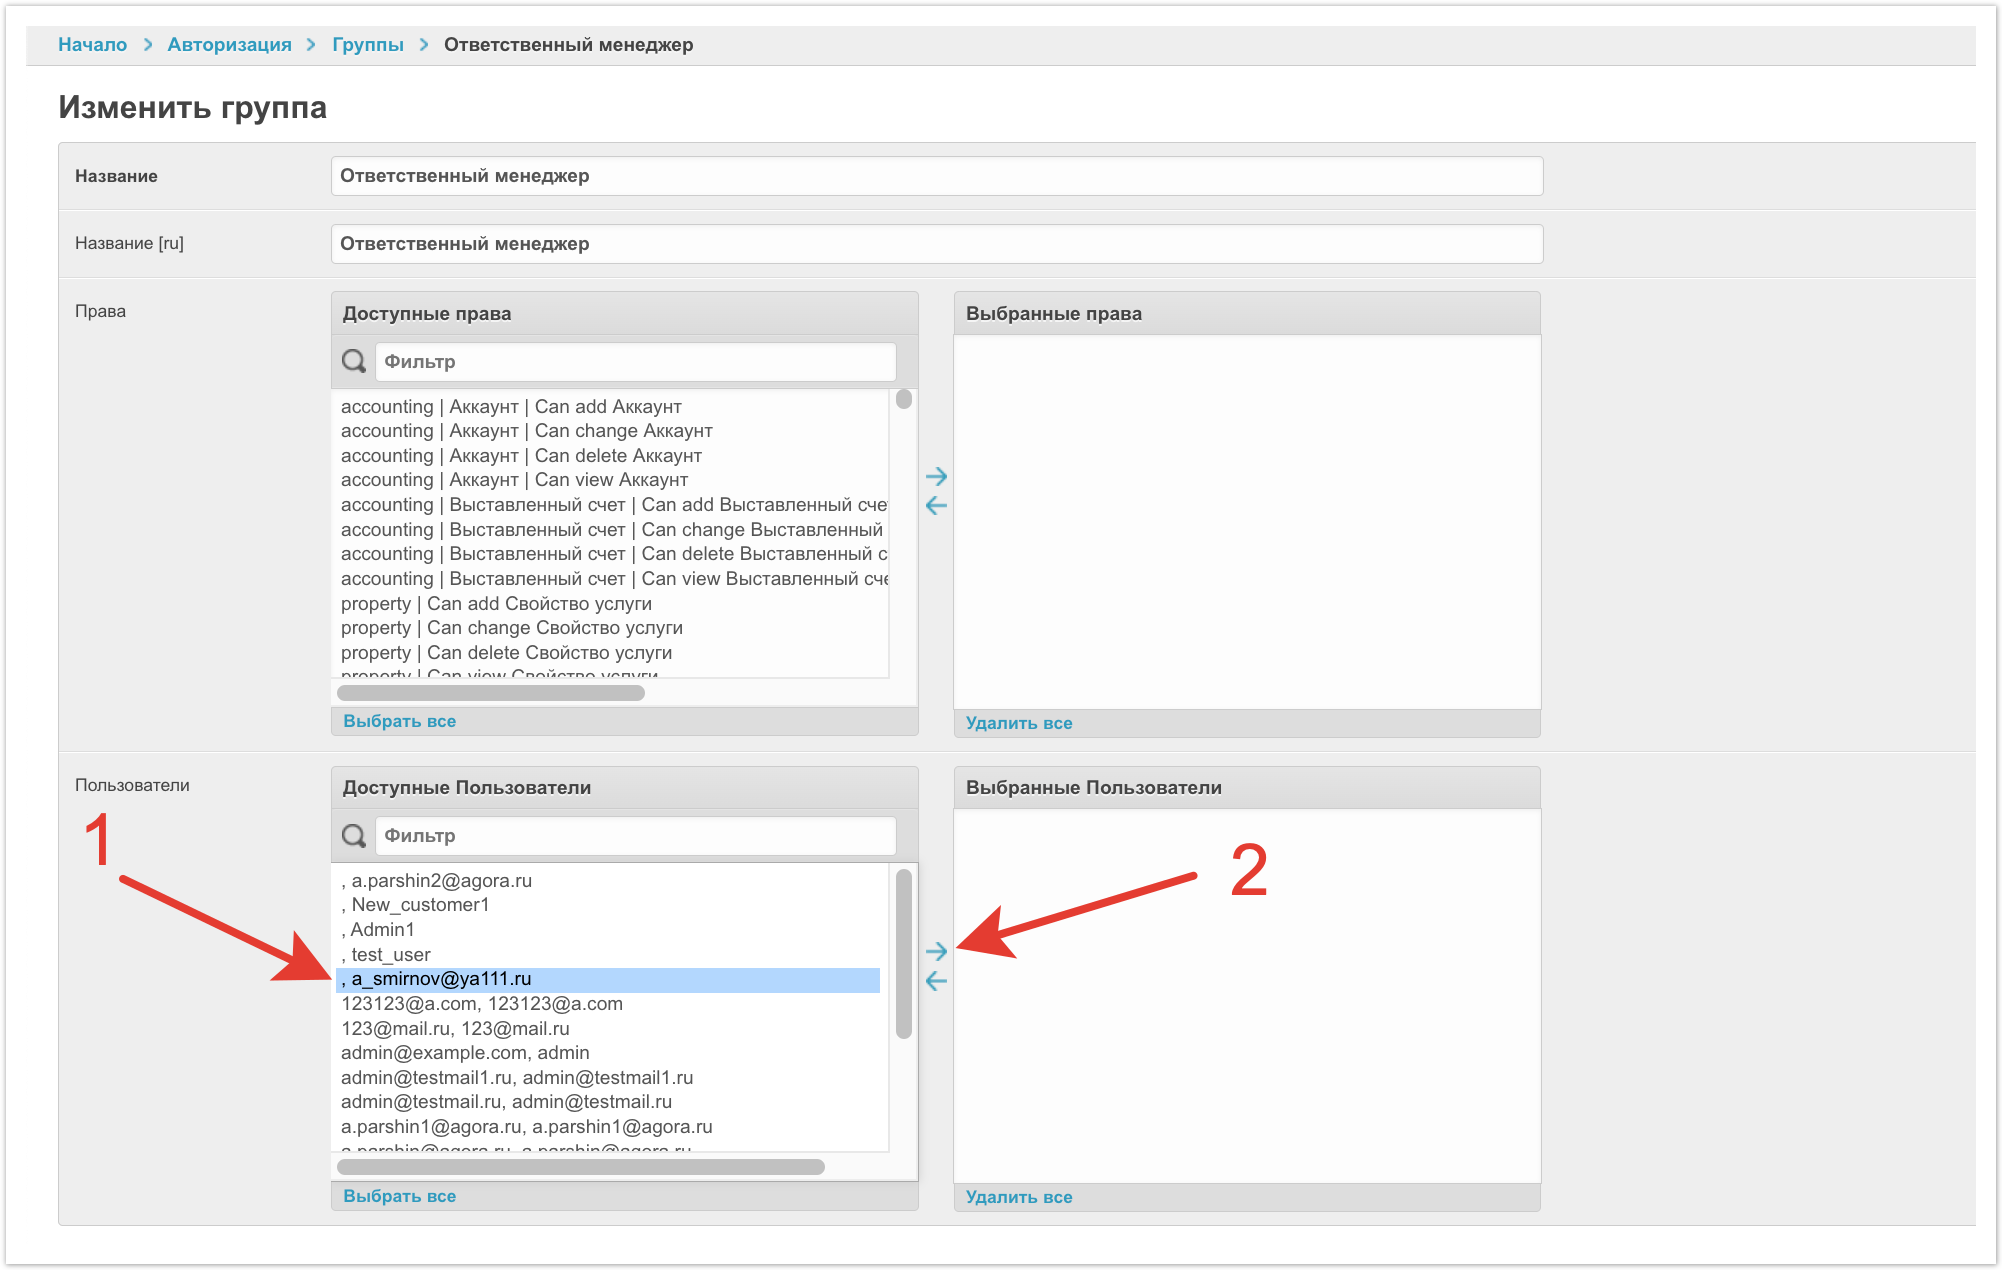
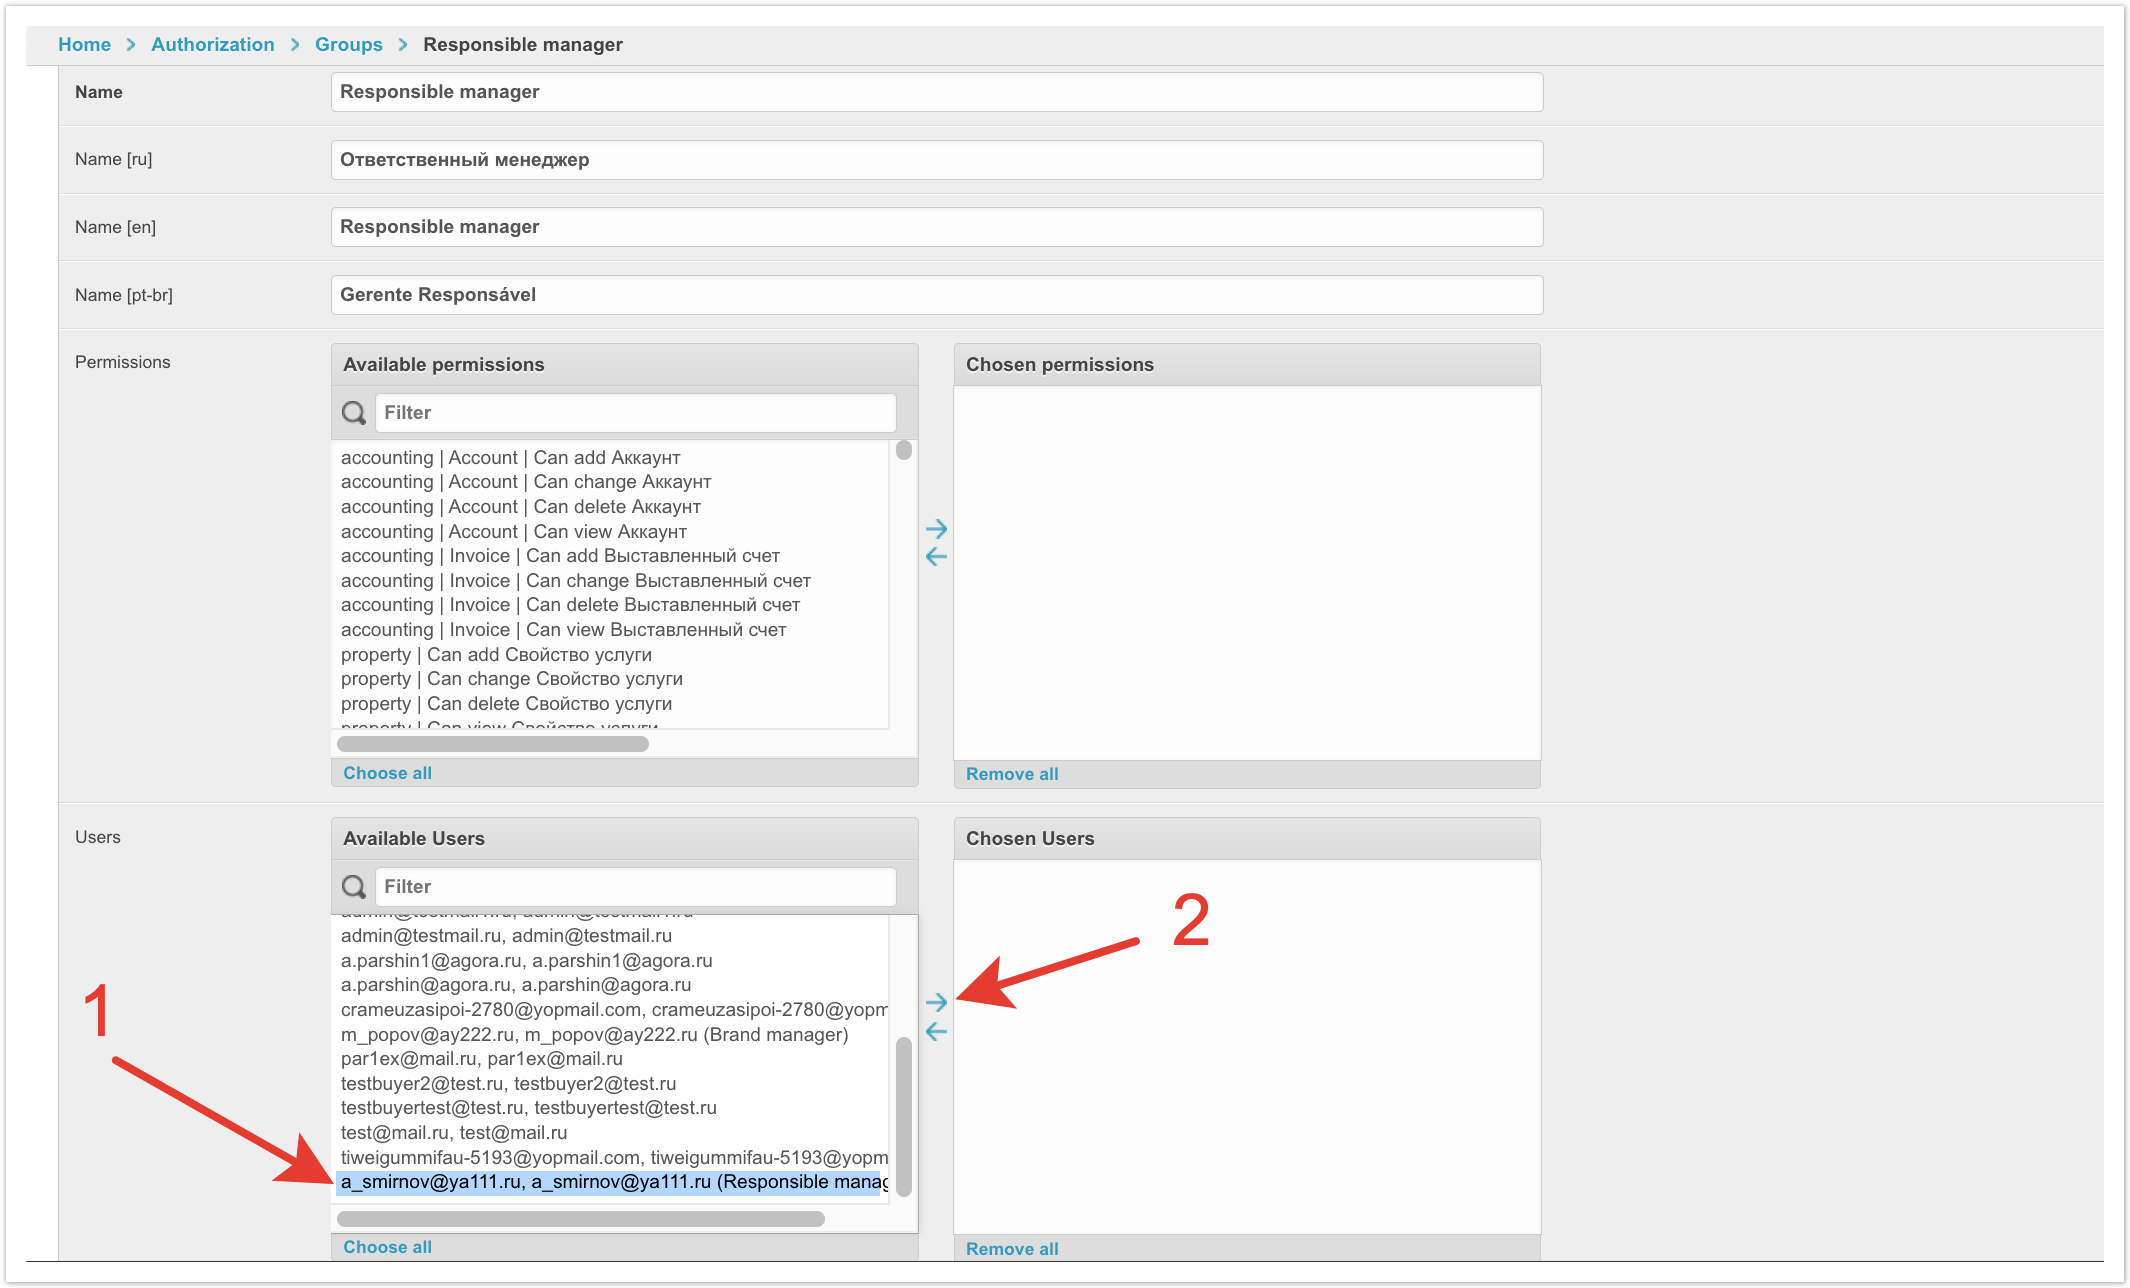
На открывшейся странице в поле Пользователи нужно найти созданного ранее пользователя, который должен получить эту роль. С помощью стрелки вправо переместить его в столбец выбранных пользователей.
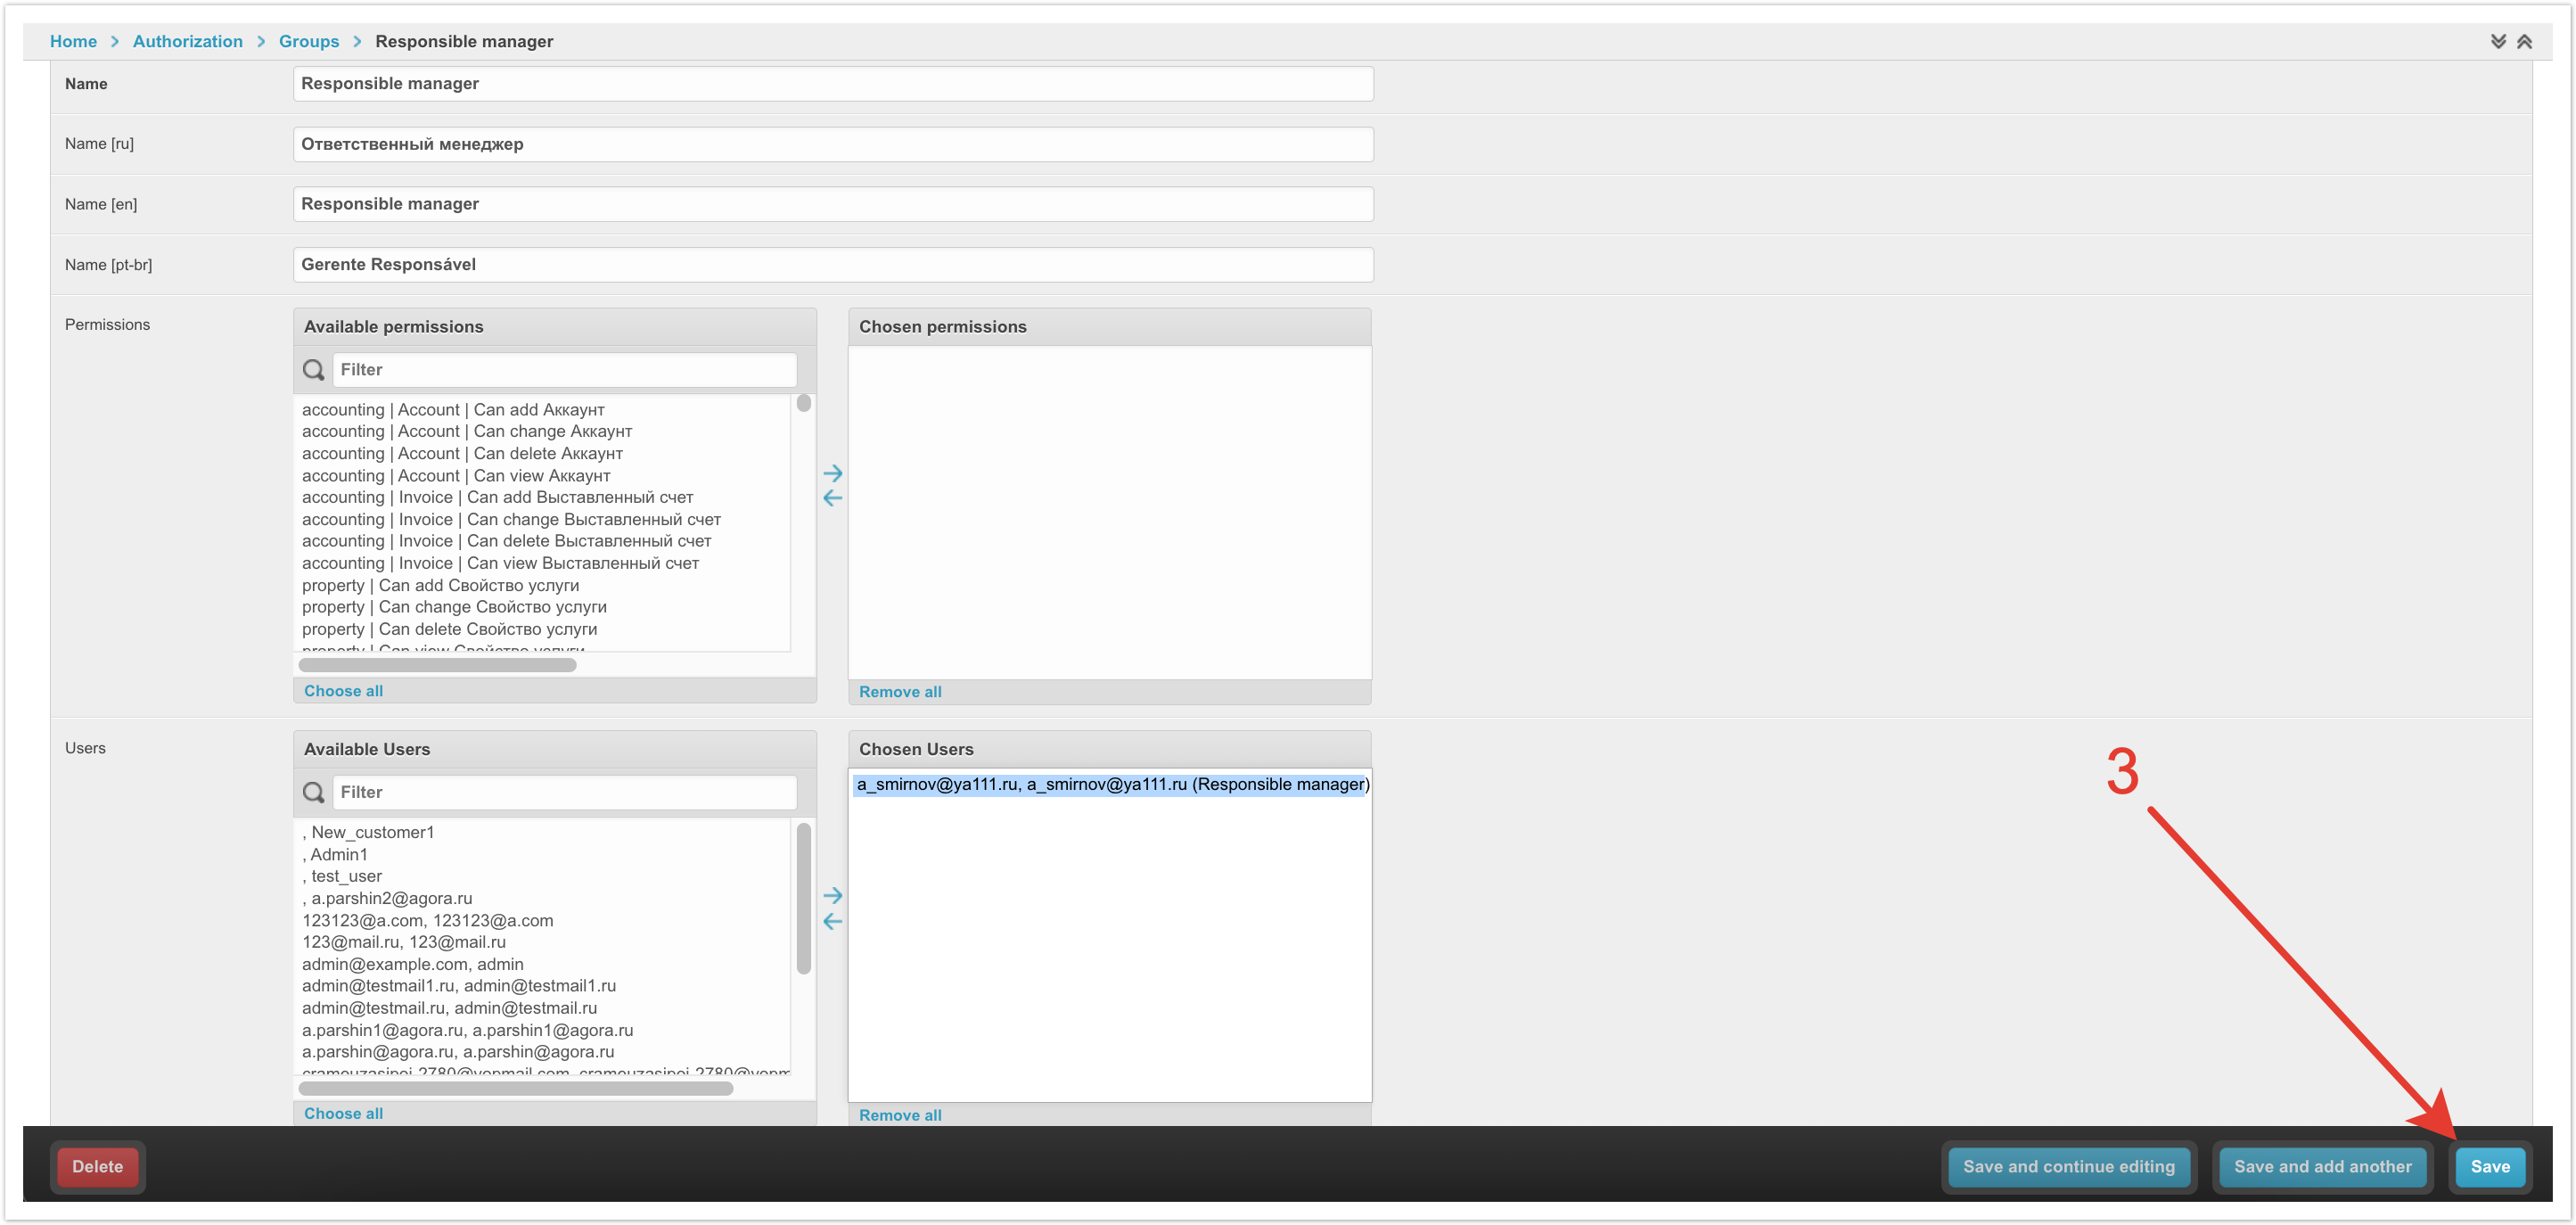
Далее необходимо Сохранить изменения.
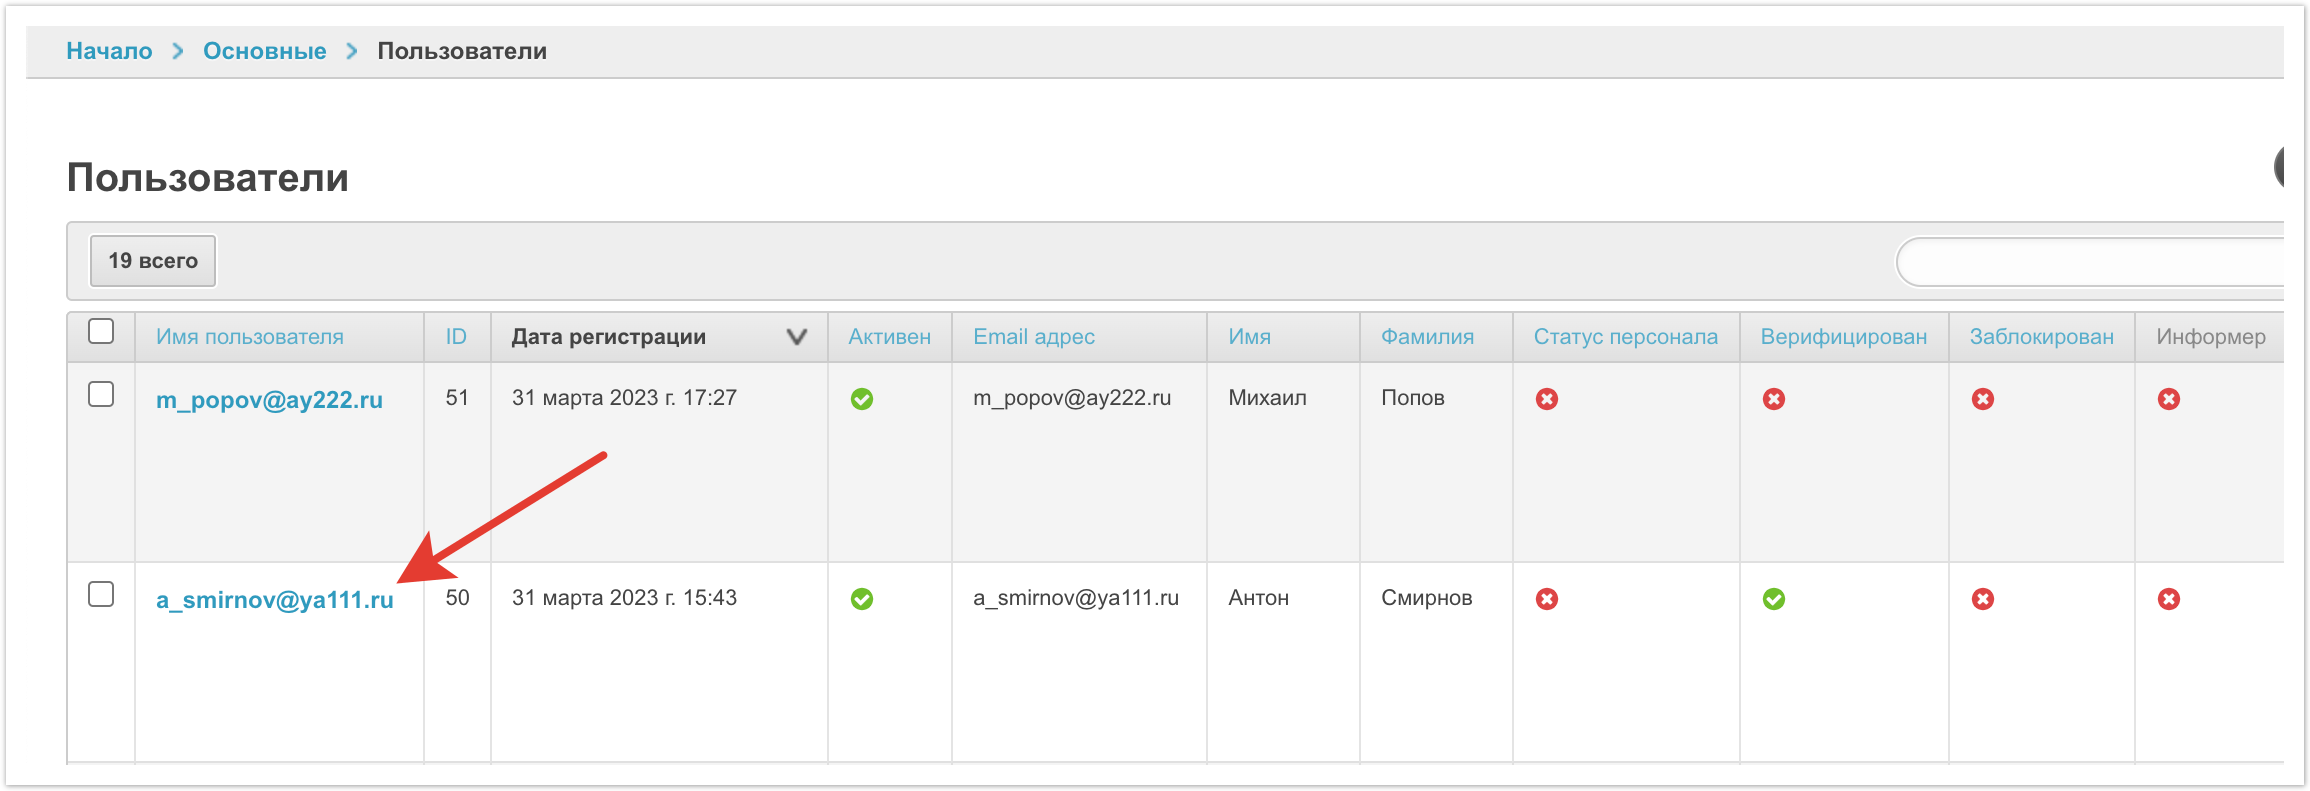
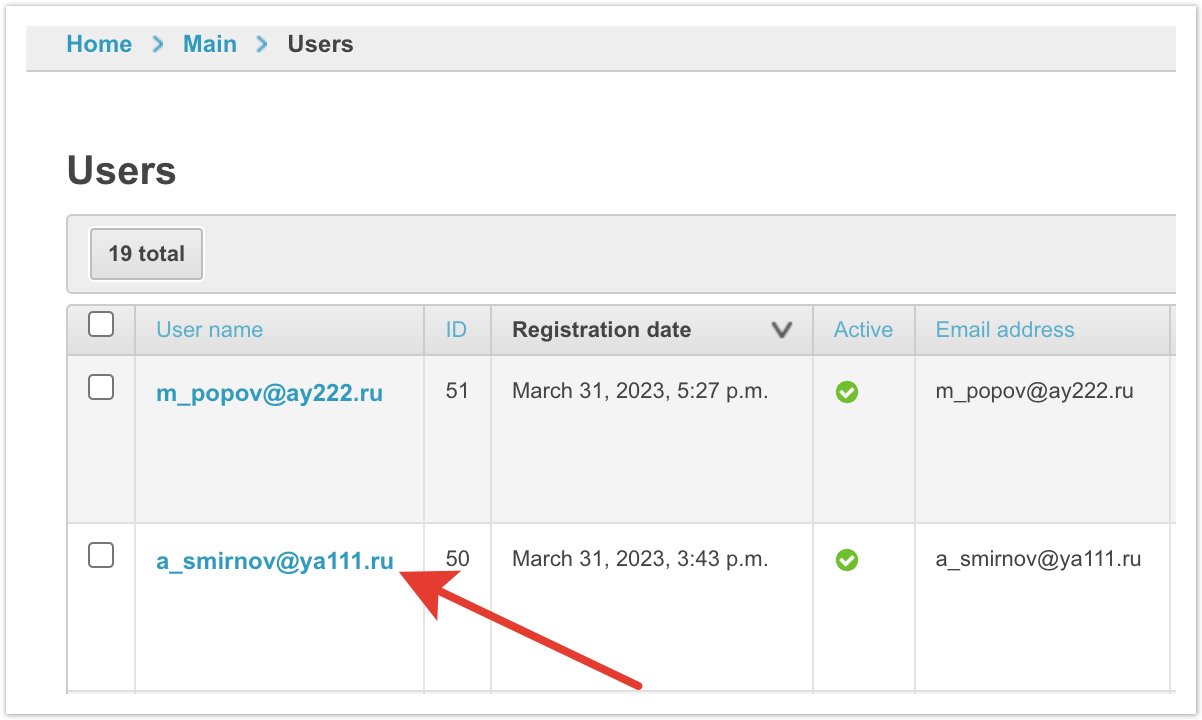
После этого нужно связать менеджера с поставщиком. Для этого нужно перейти в раздел Пользователи. Далее нажать на логин пользователя, которого мы настраиваем.
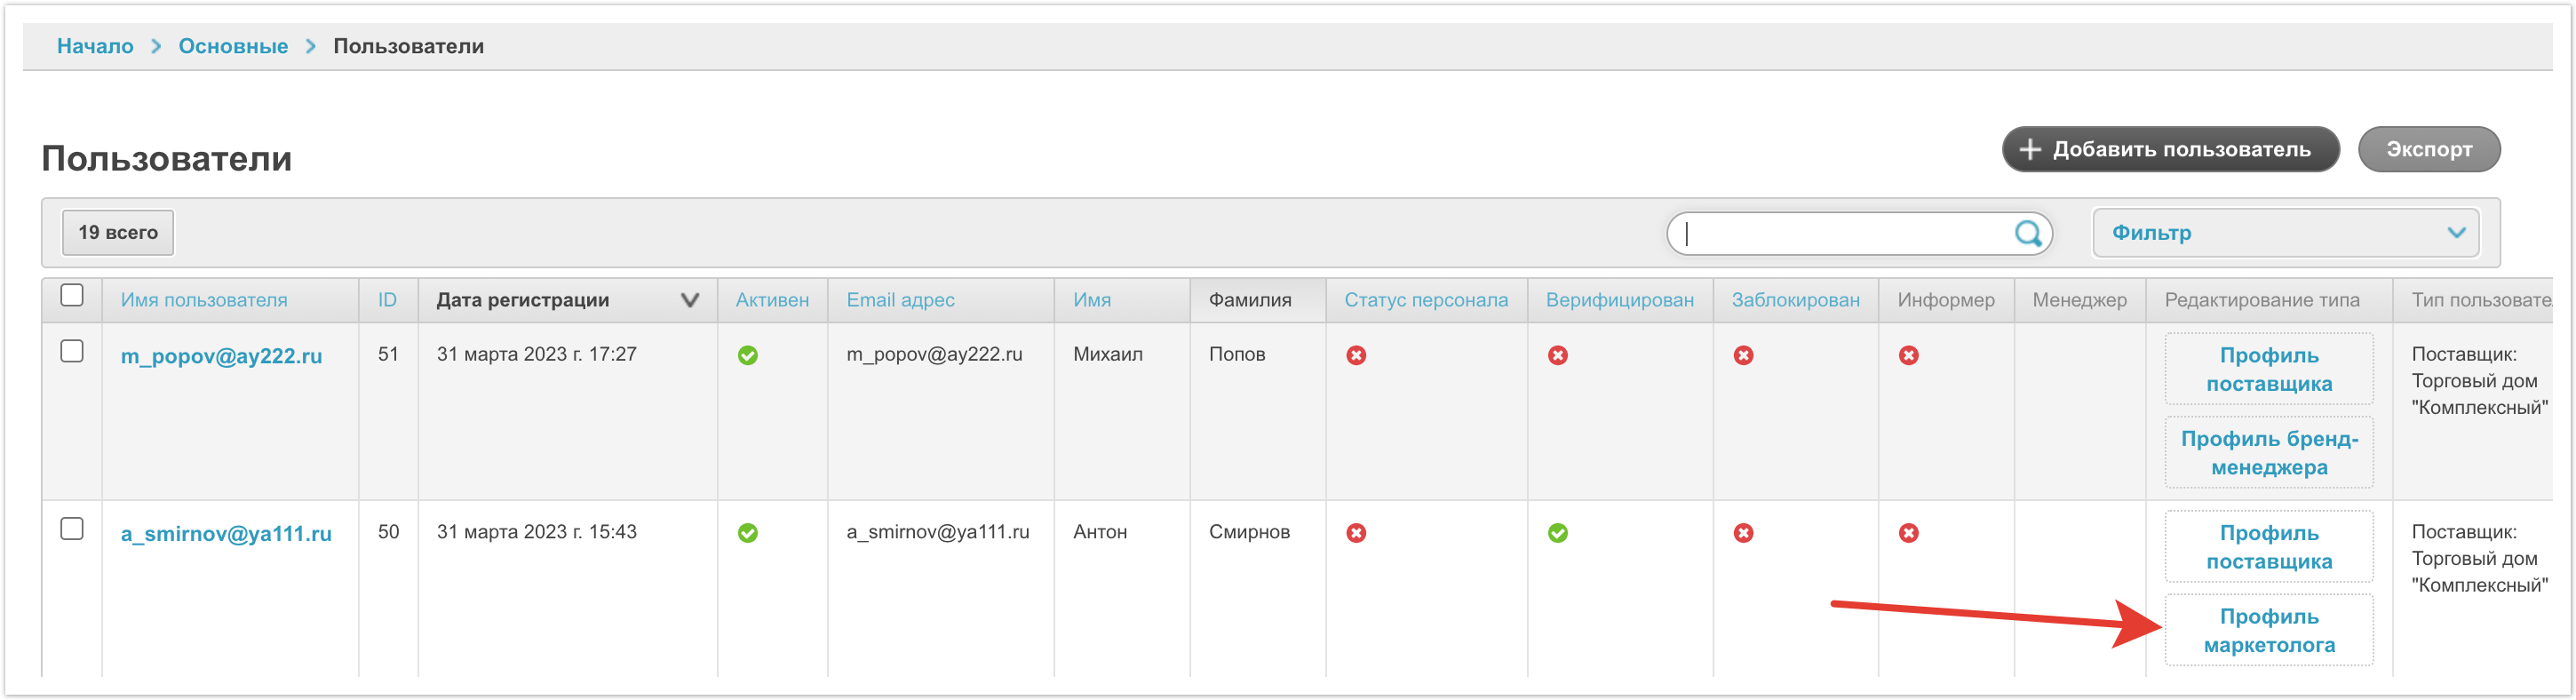
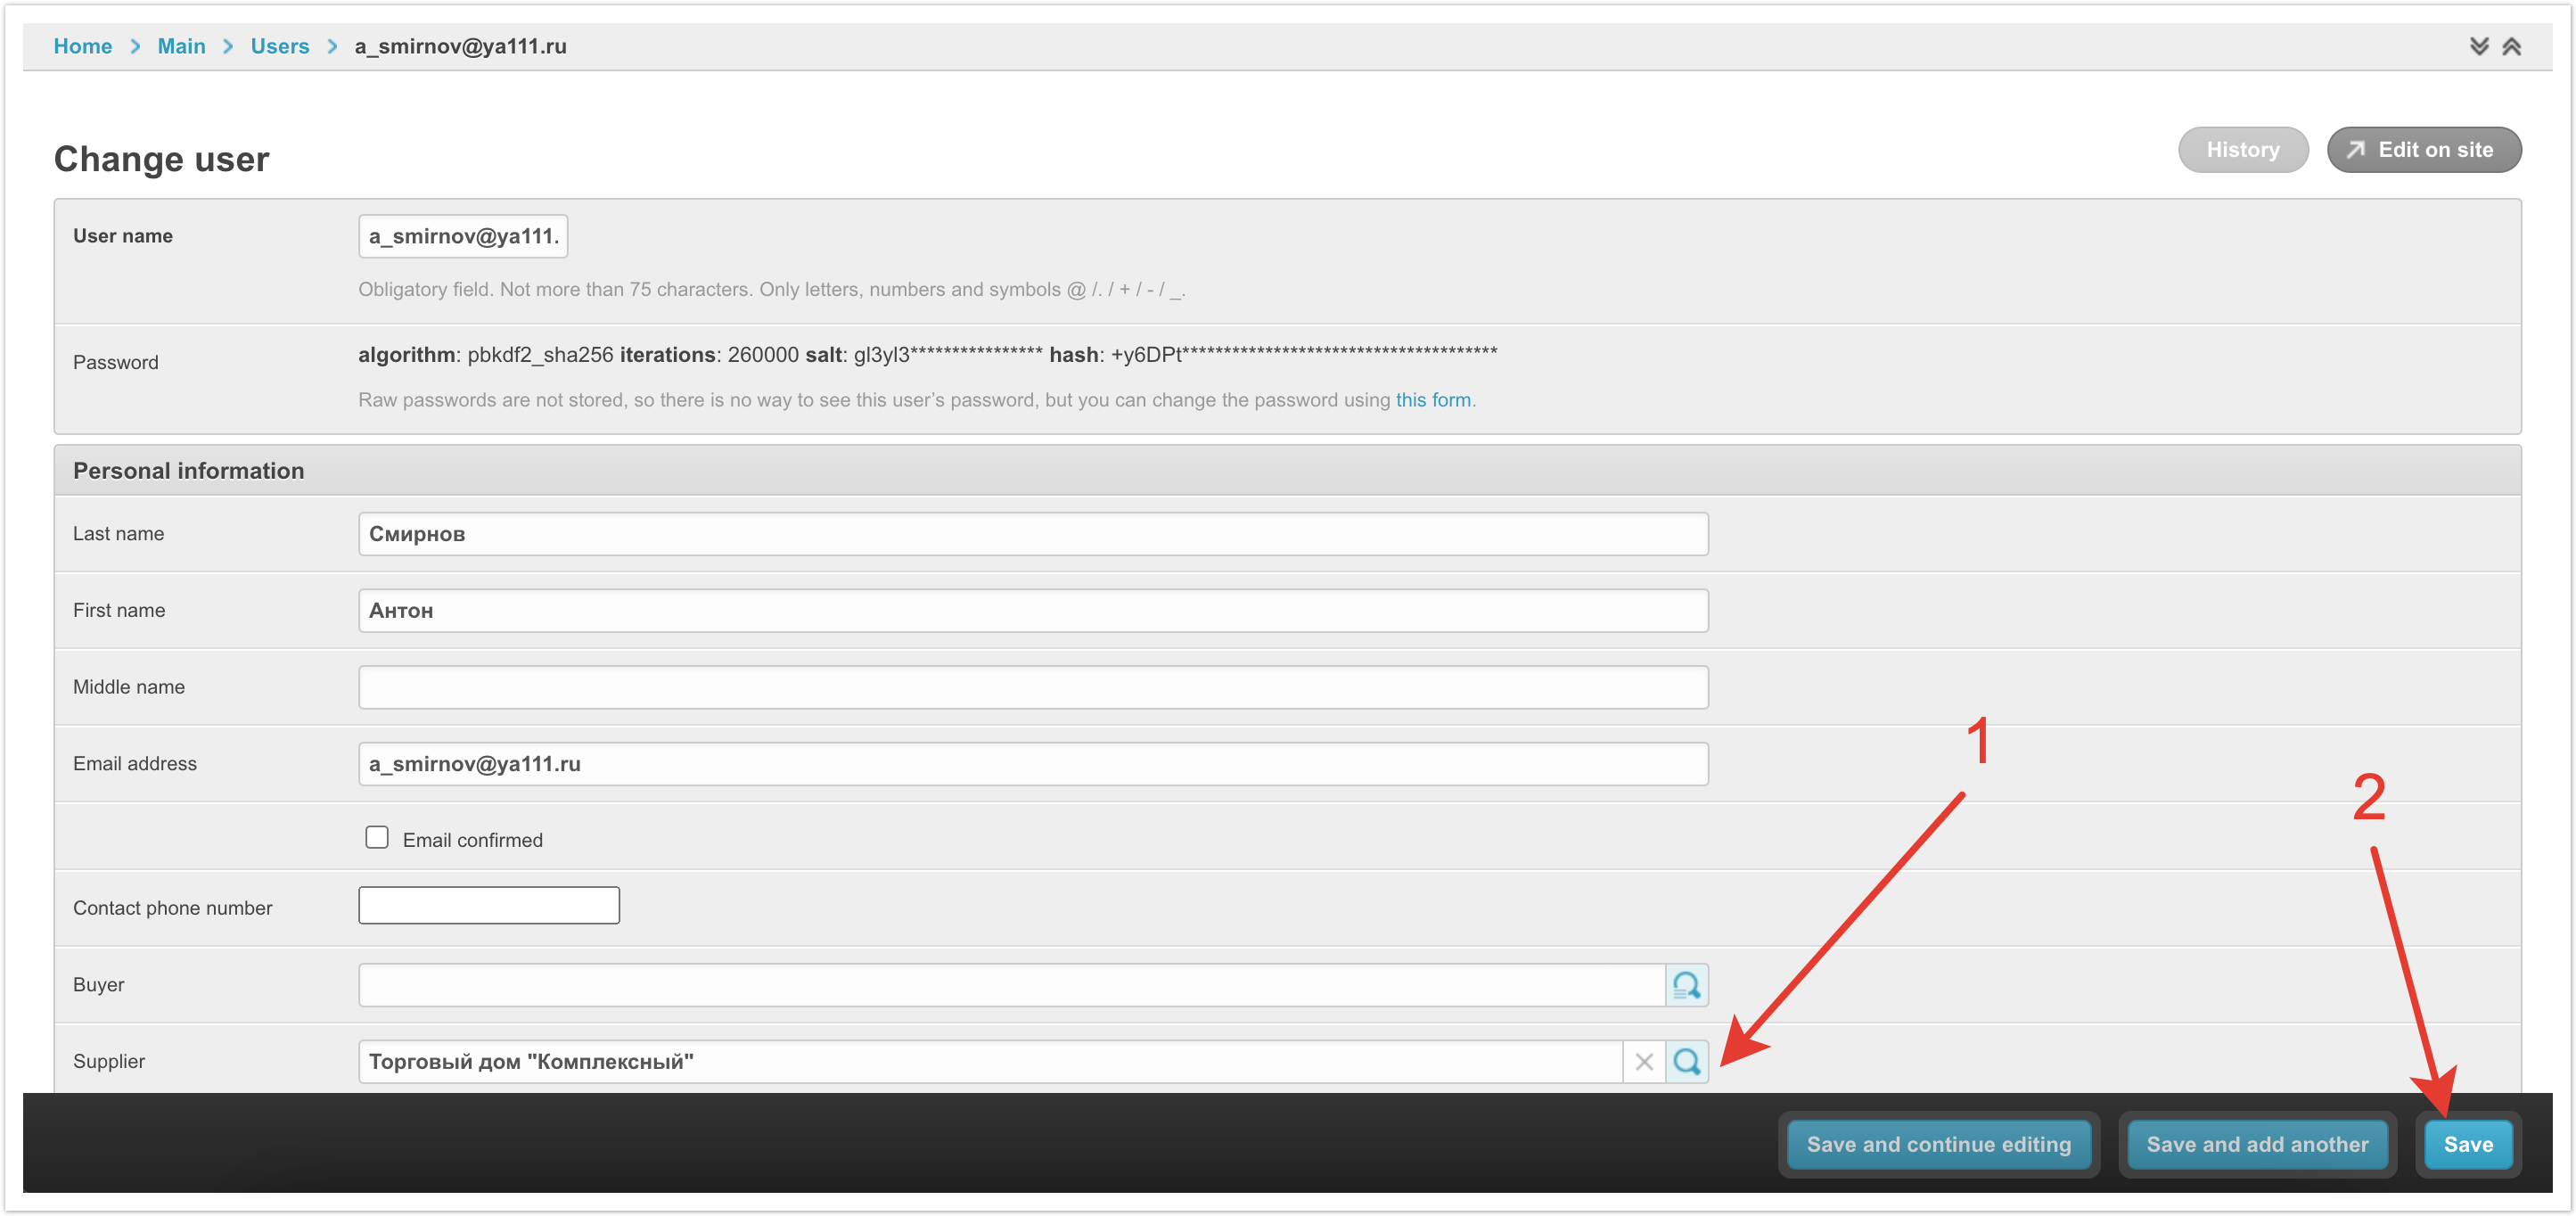
На открывшейся странице в поле Поставщик нужно задать Поставщика платформы и затем Сохранить изменения.
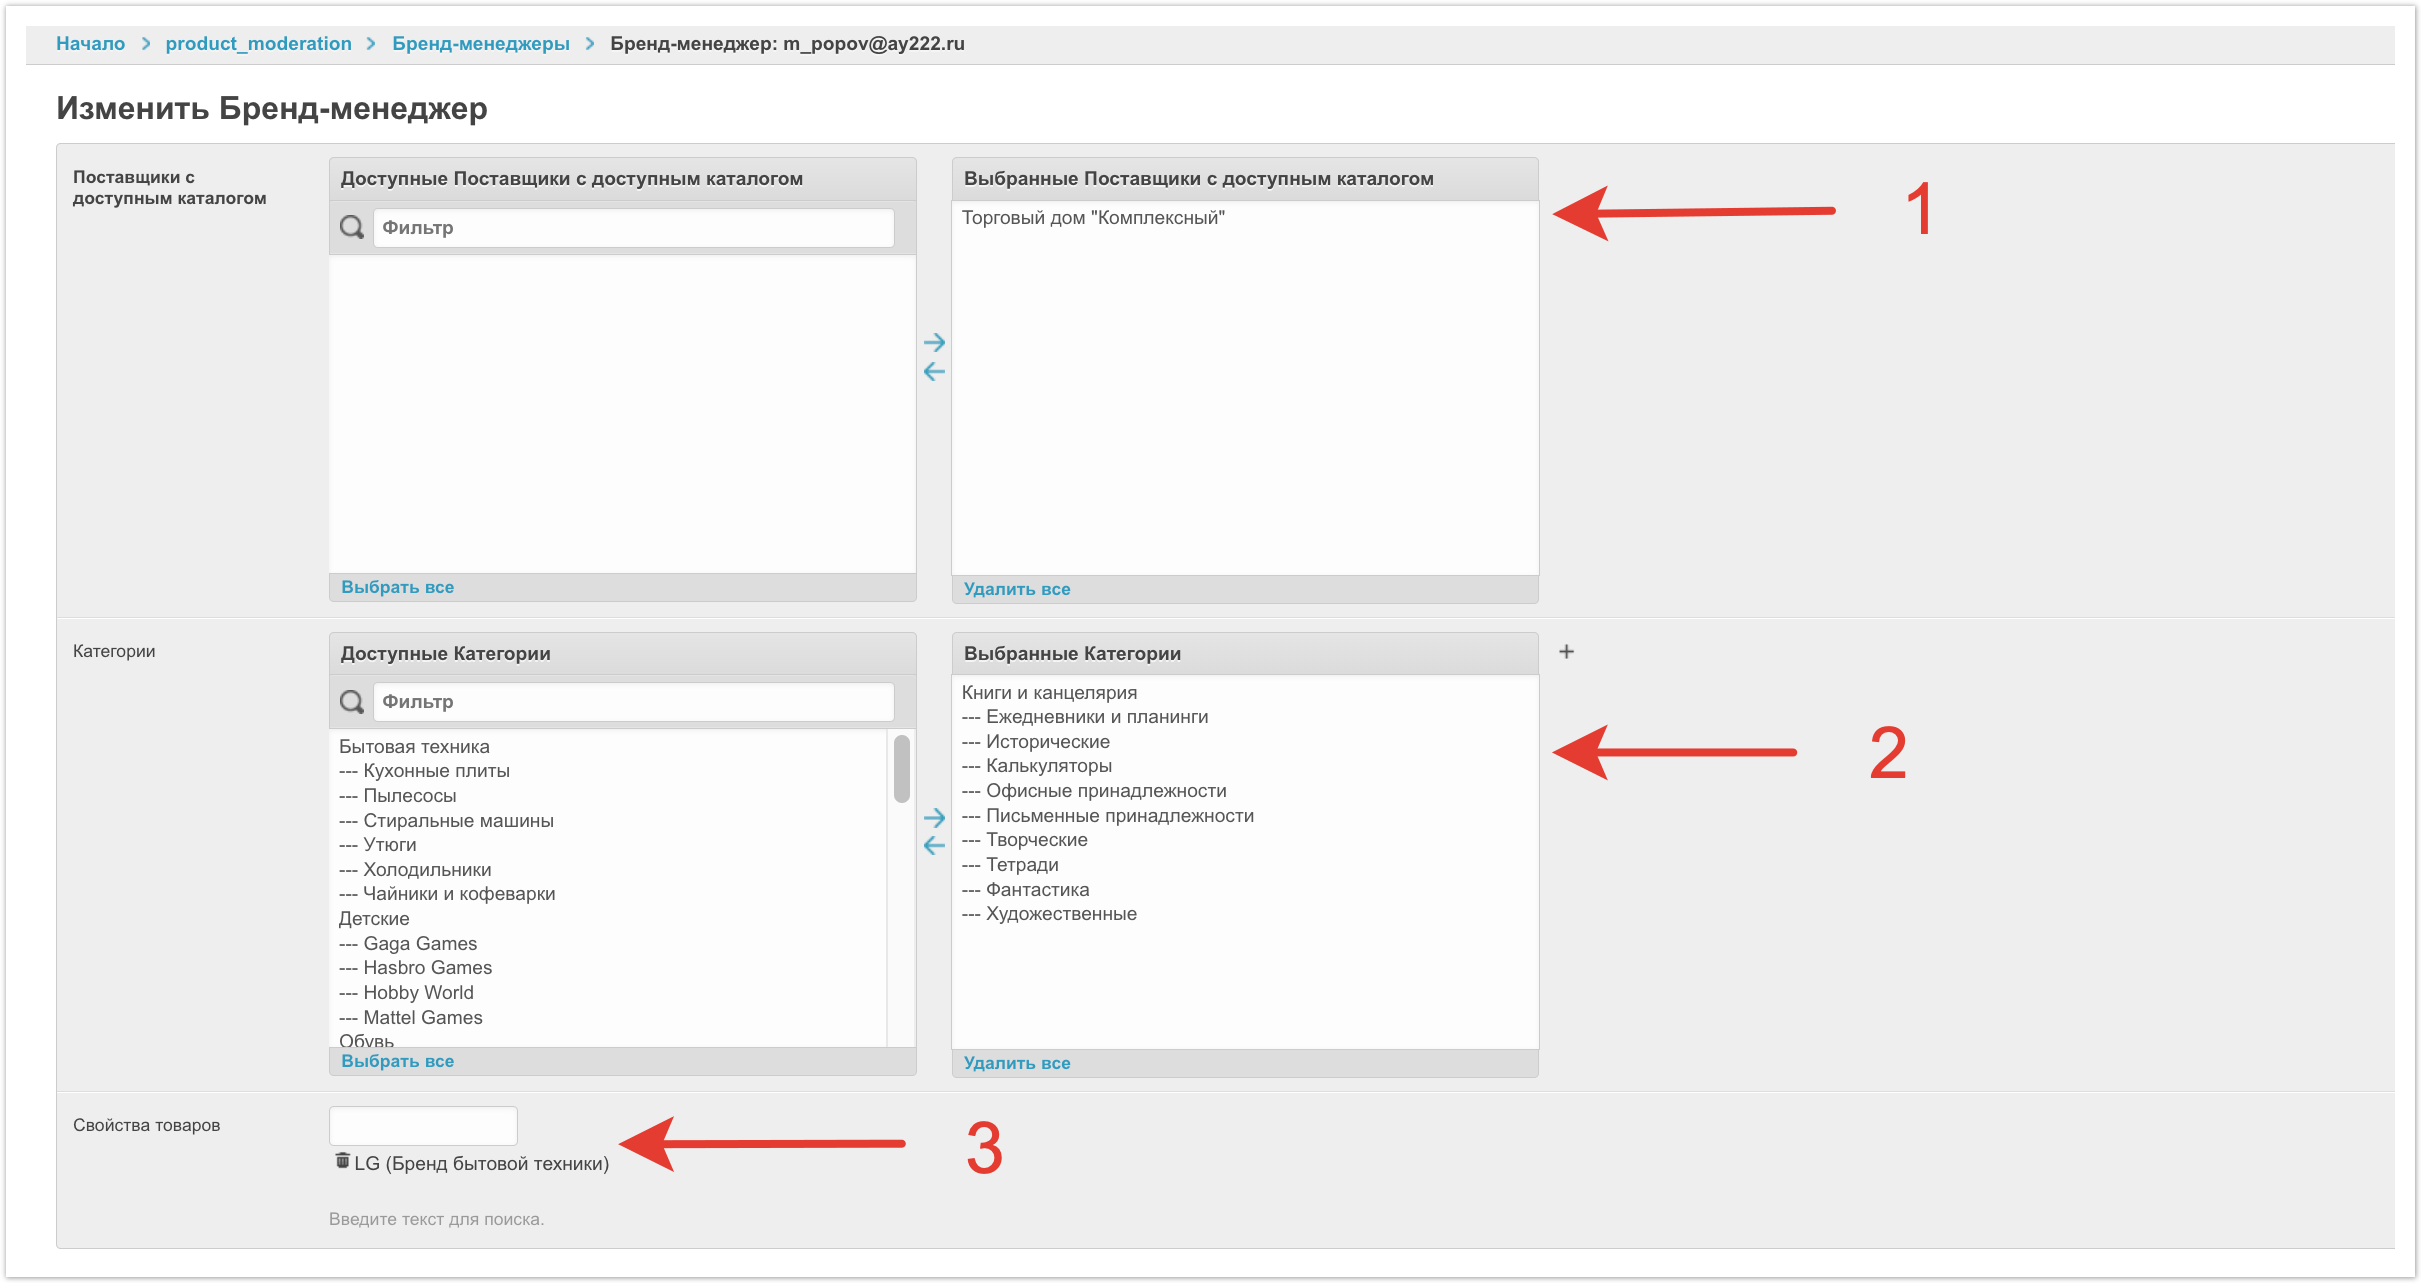
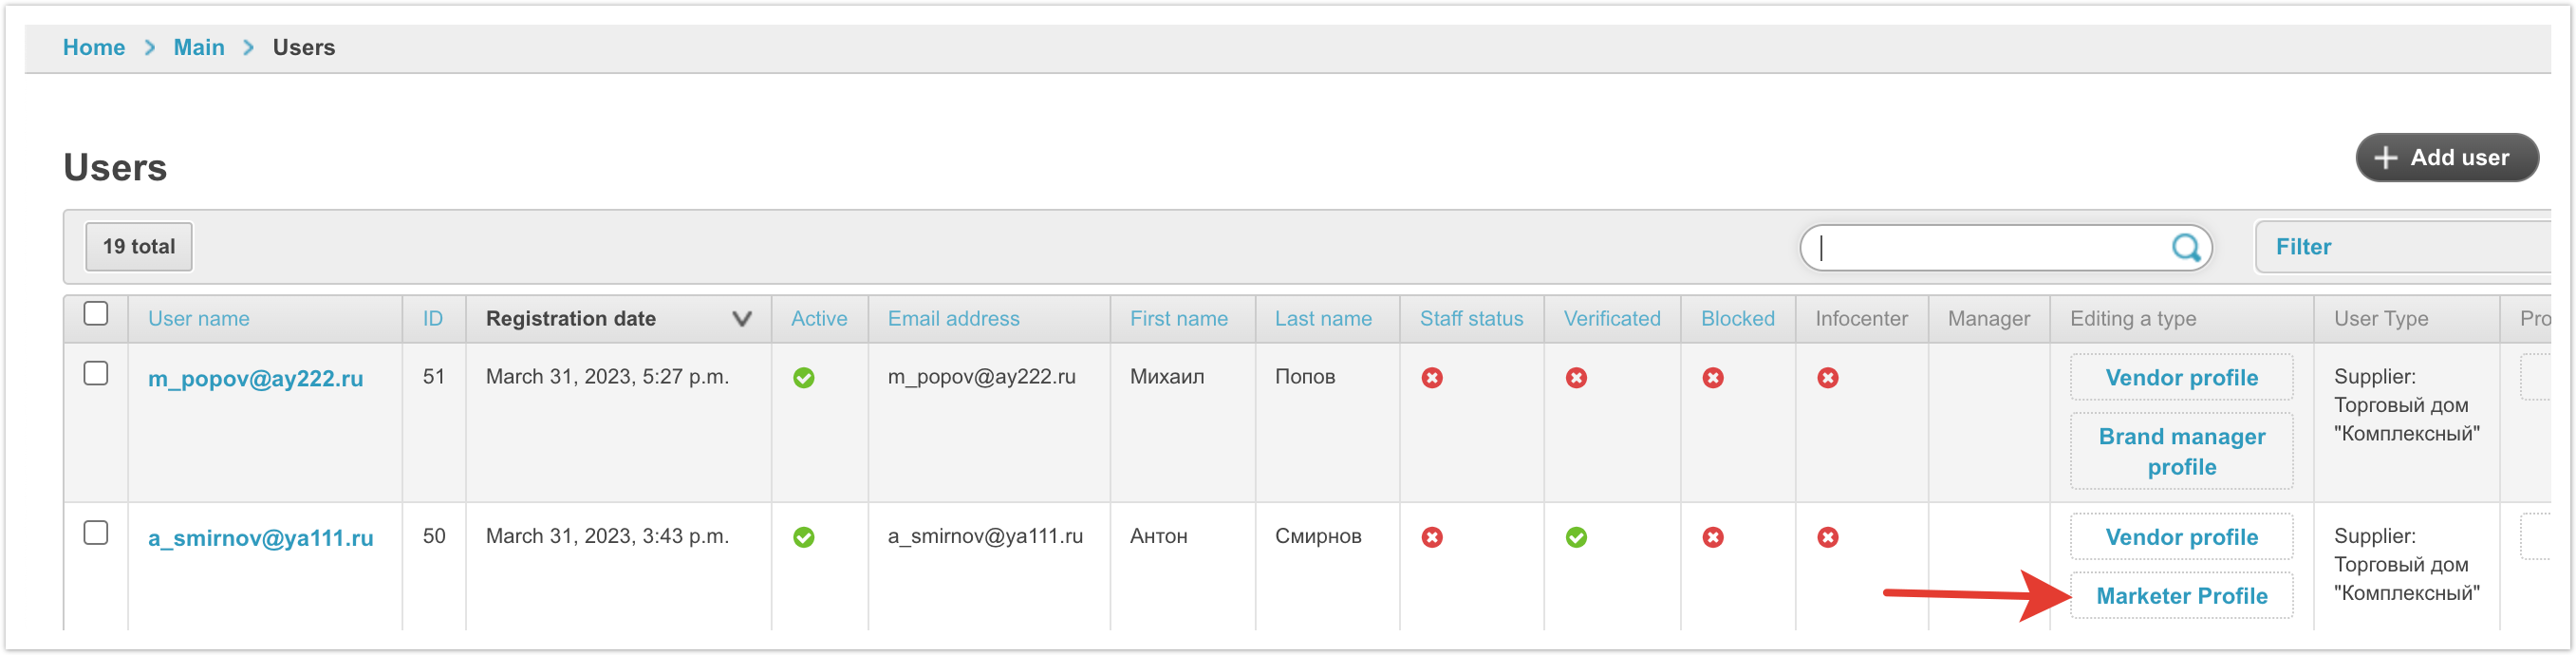
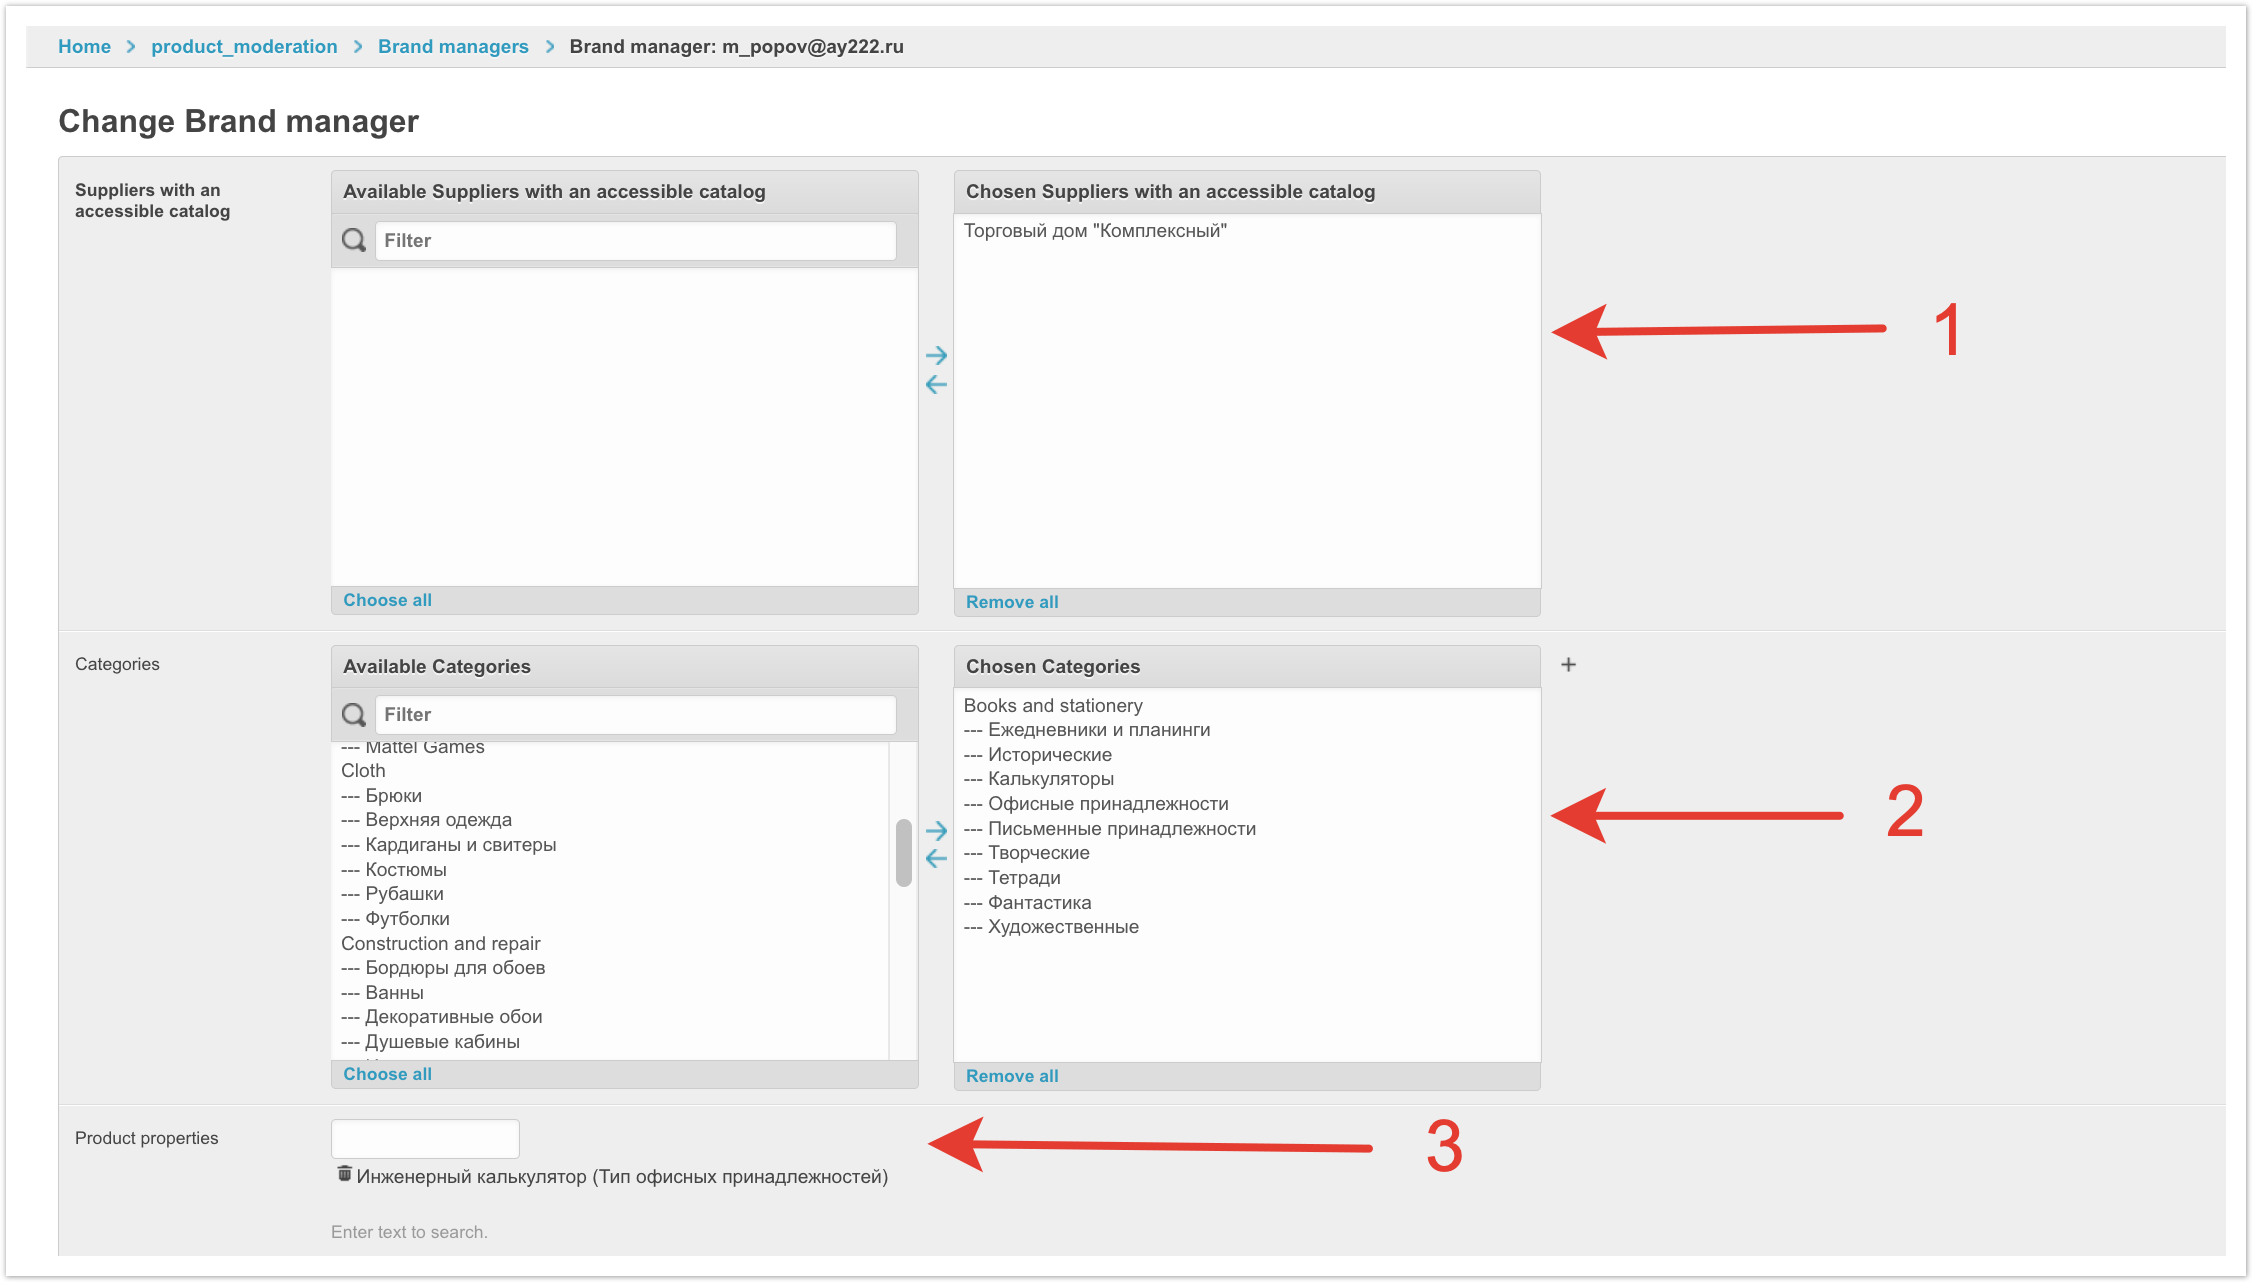
После этого у пользователя появятся кнопки для перехода в профиль поставщика и в профиль маркетолога или бренд-менеджера. Нажимаем на кнопку Профиль маркетолога.
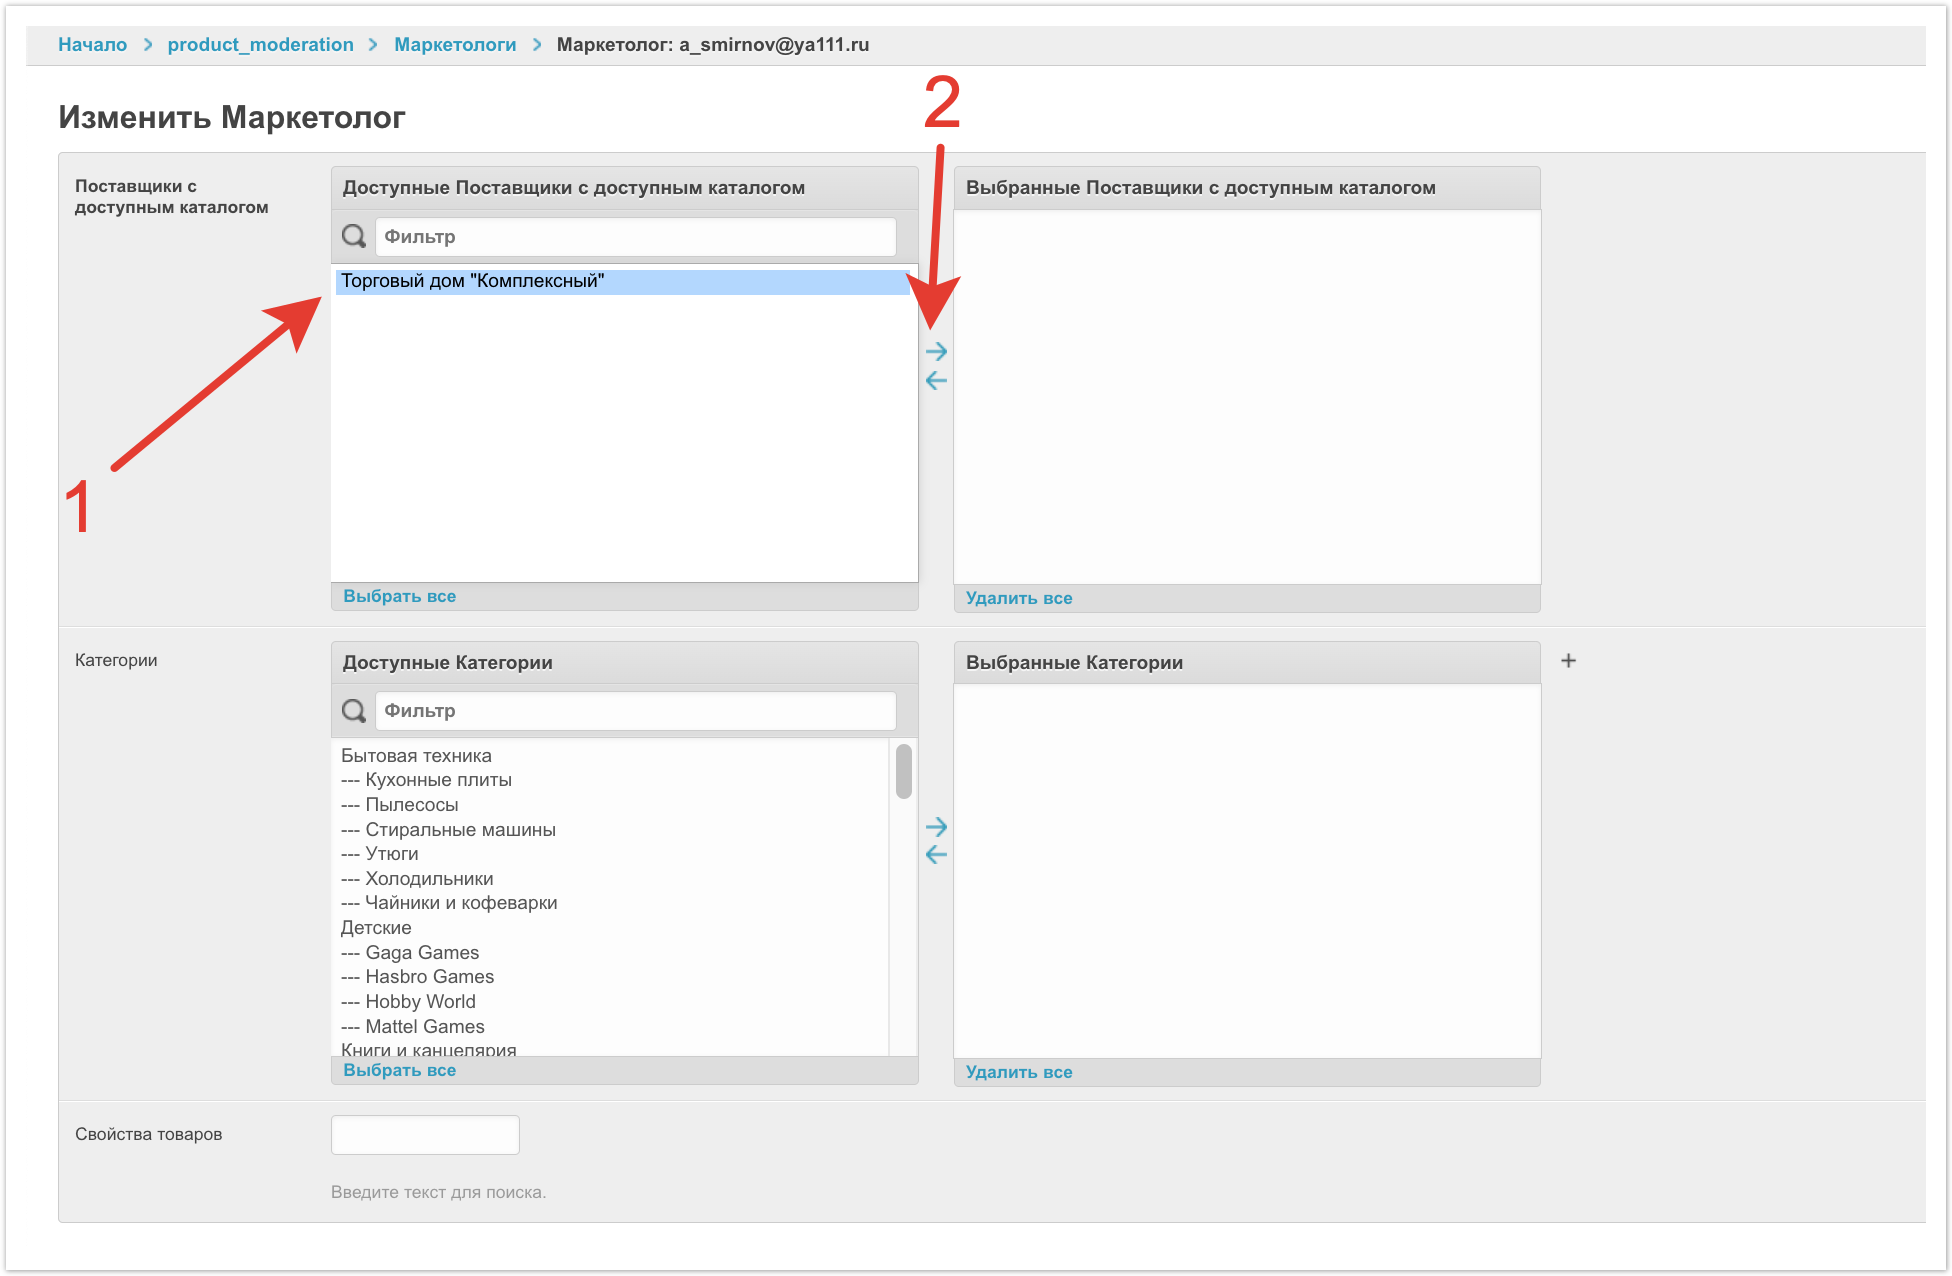
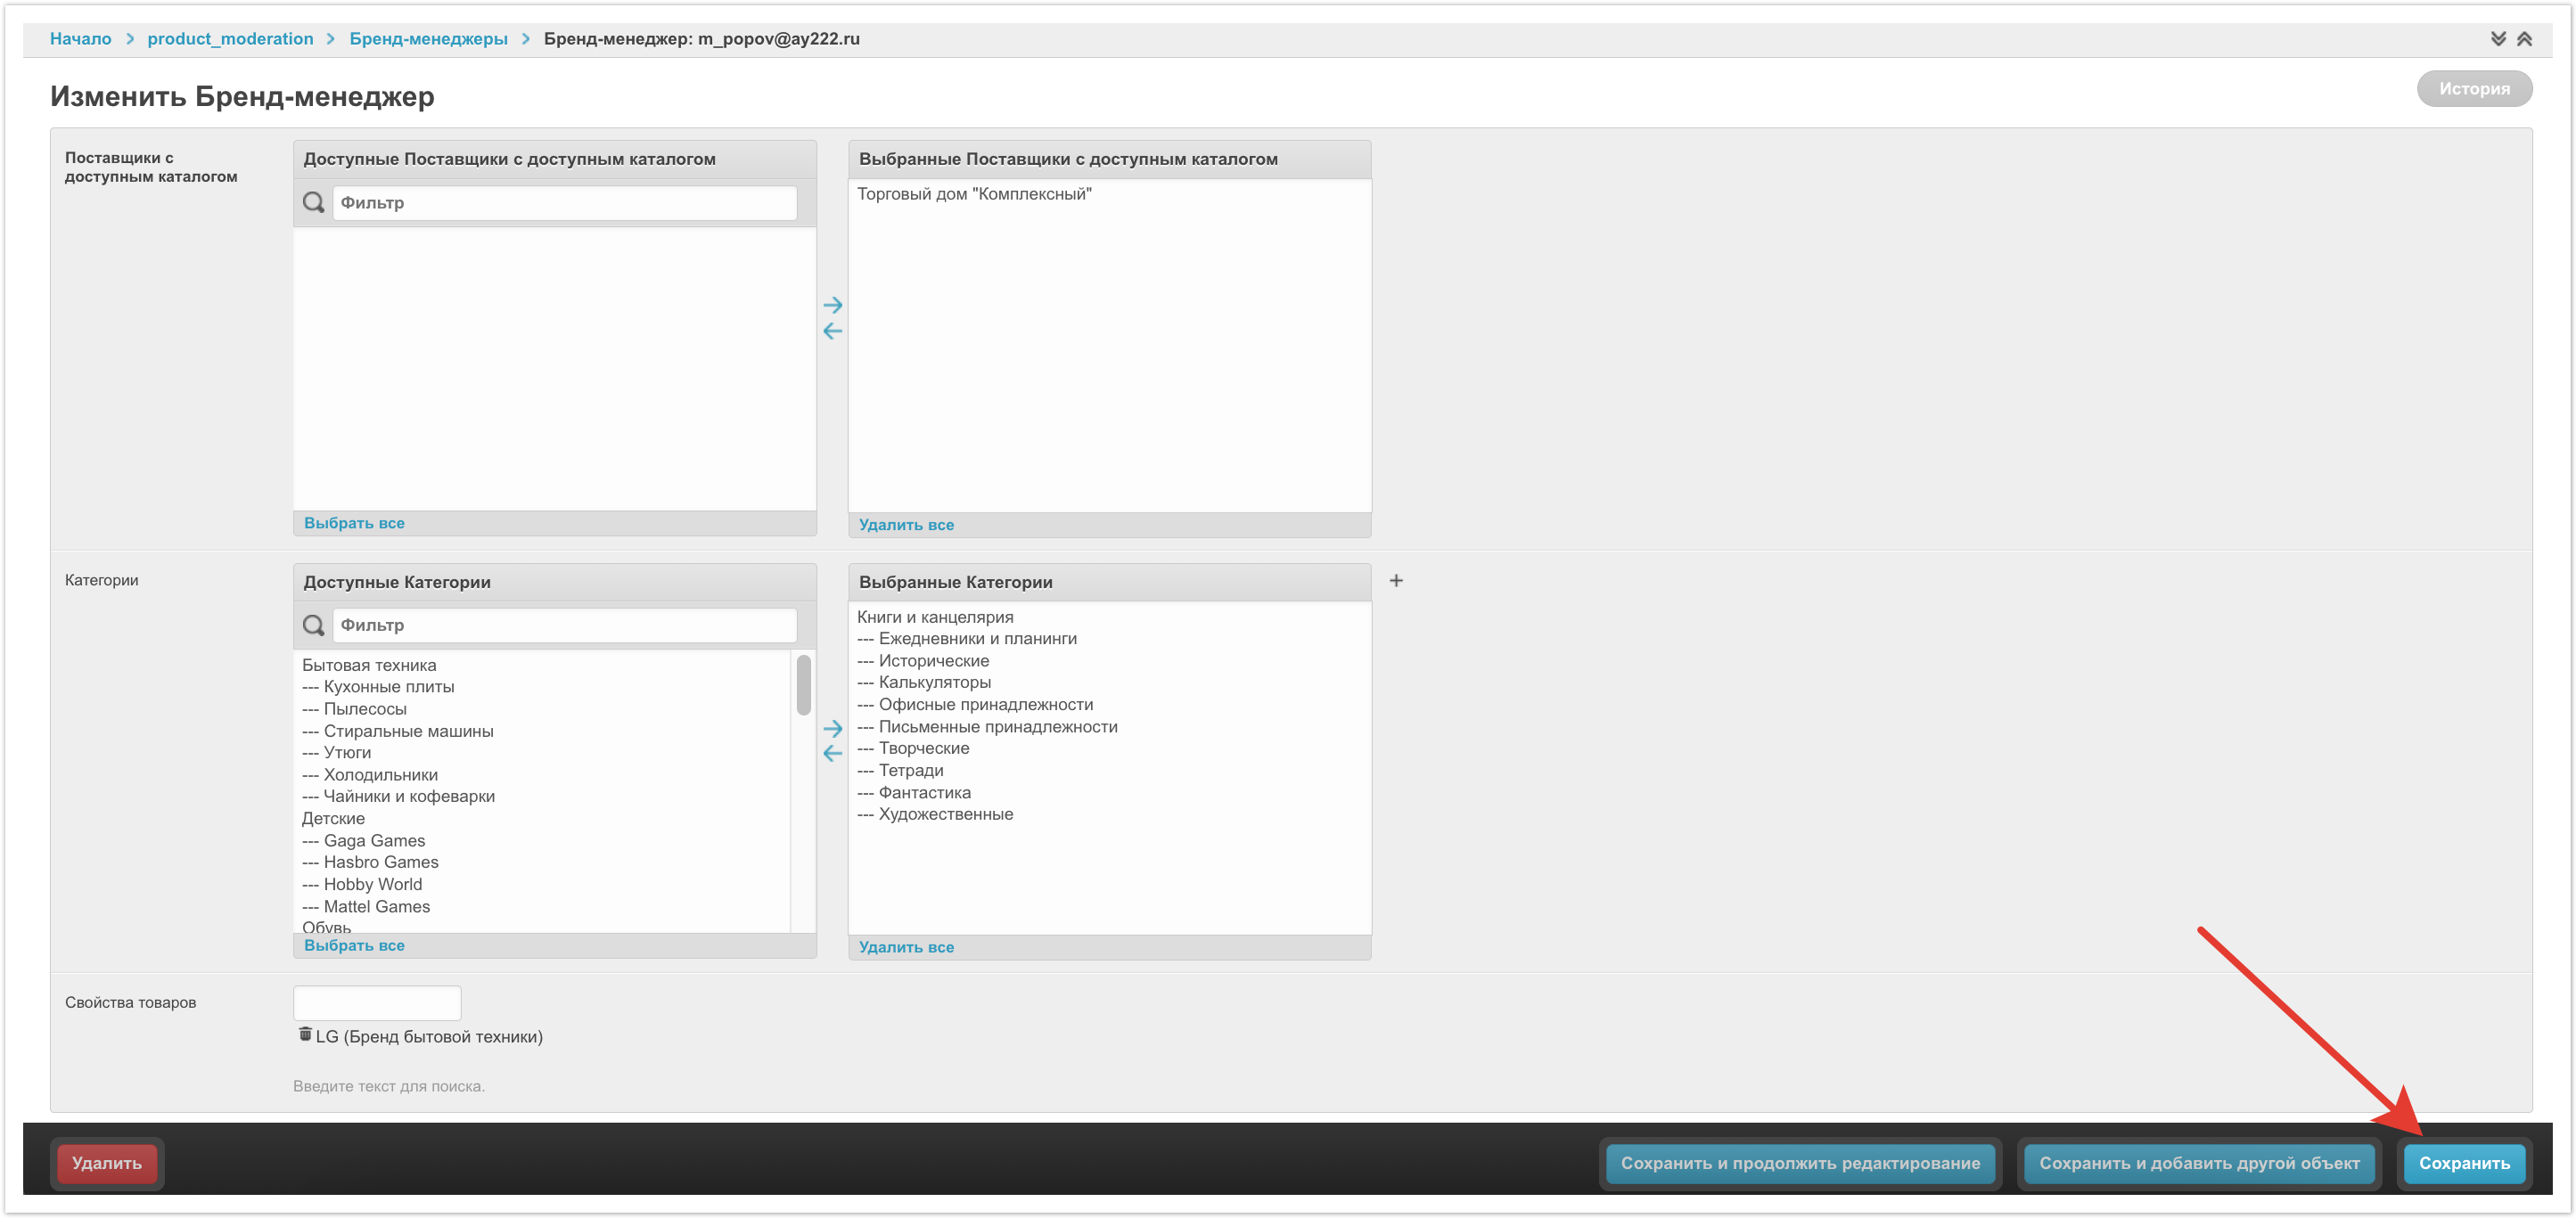
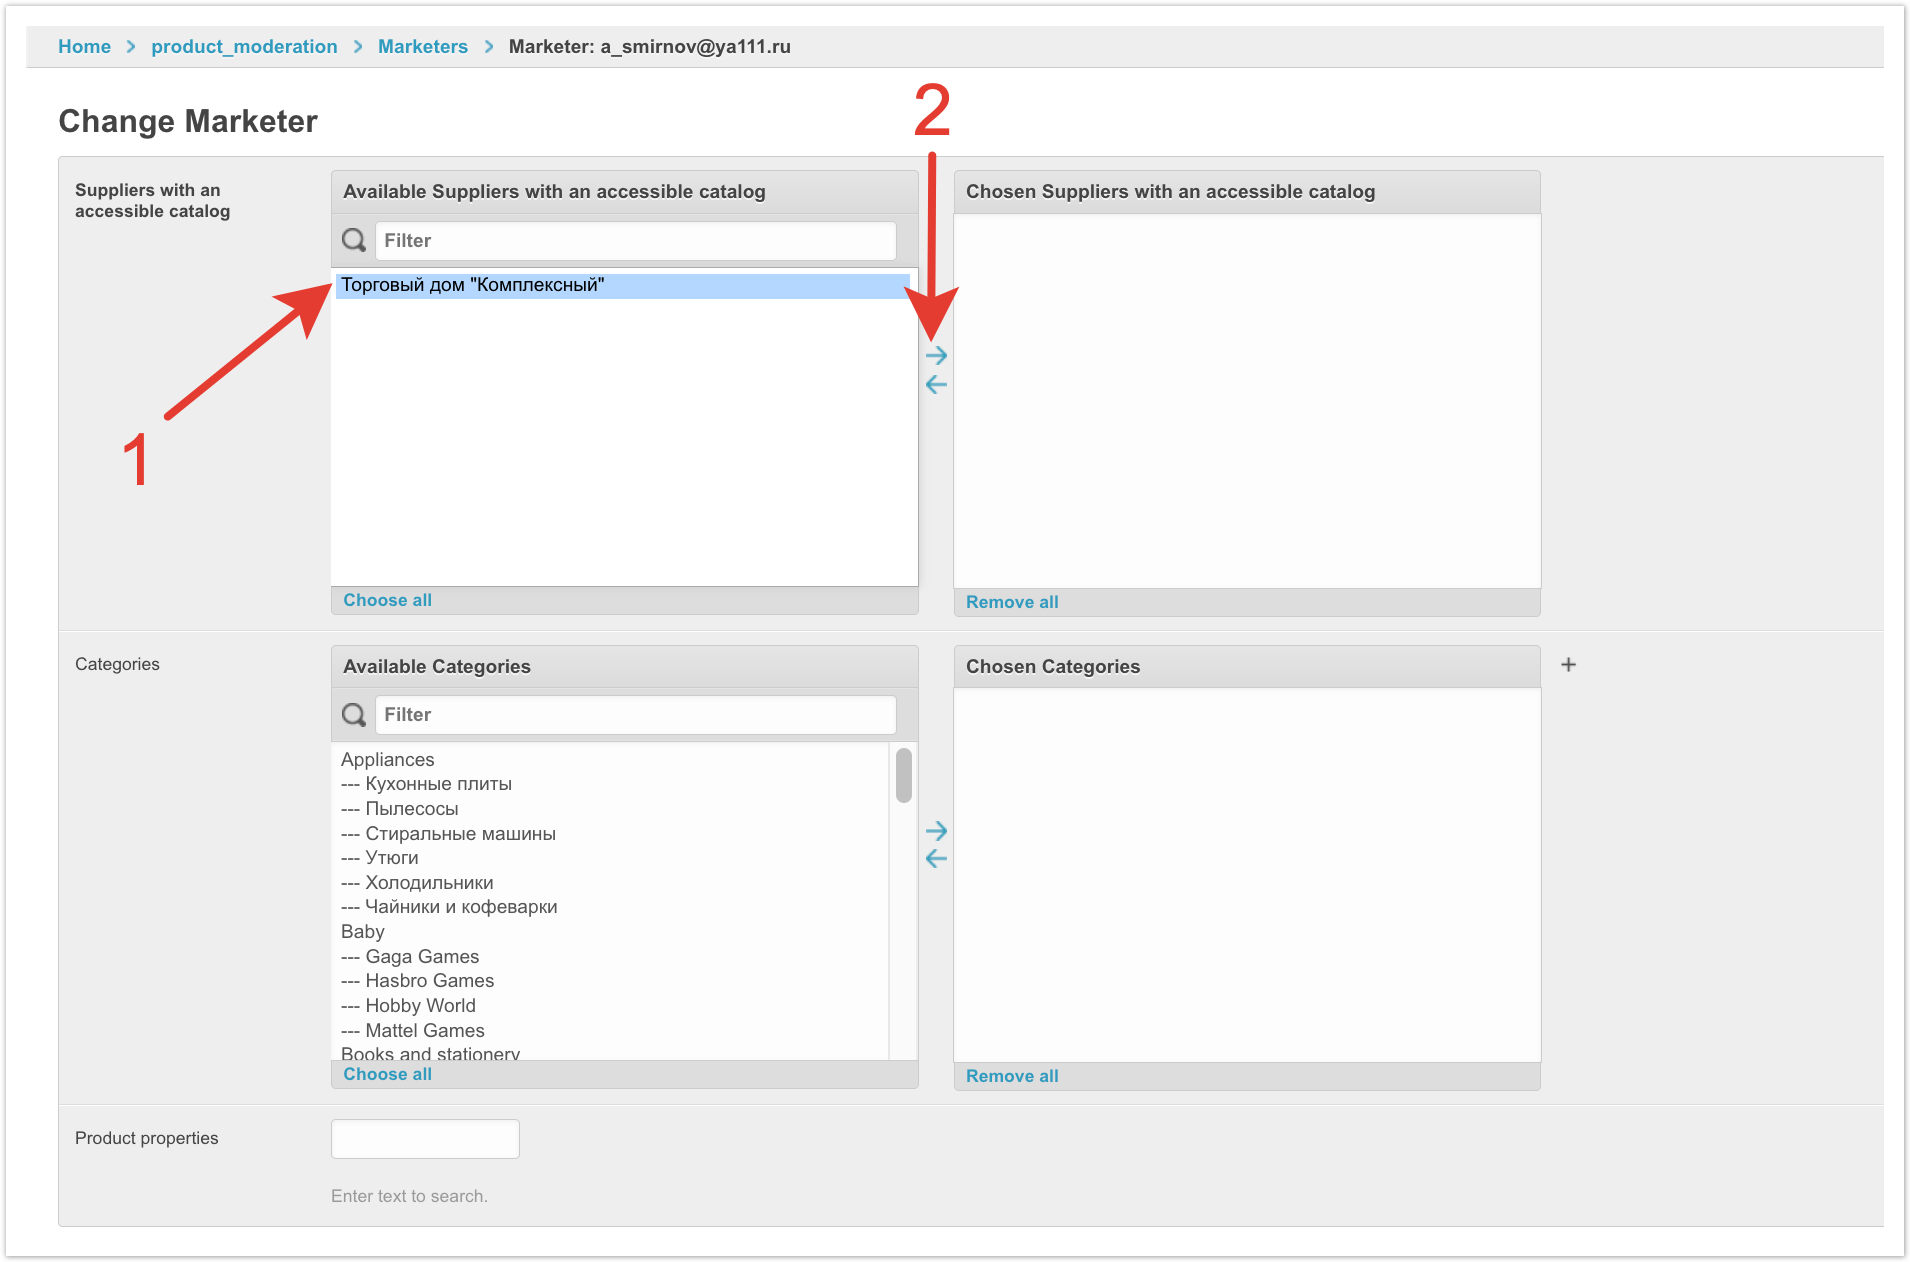
Далее в поле Поставщики с доступным каталогом переносим поставщика в правый столбец с помощью стрелки вправо. Настройка Ответственного менеджера на этом заканчивается. После сохранения изменений он может начинать работу на платформе.
После заполнения нажимаем кнопку Сохранить.
Теперь администратор платформы может предоставить сотруднику данные его учетной записи и пользователь сможет работать на платформе. Из соображений безопасности менеджер может задать собственный пароль от своей учетной записи, для этого можно воспользоваться формой для восстановления пароля. Импорт товаров на платформу
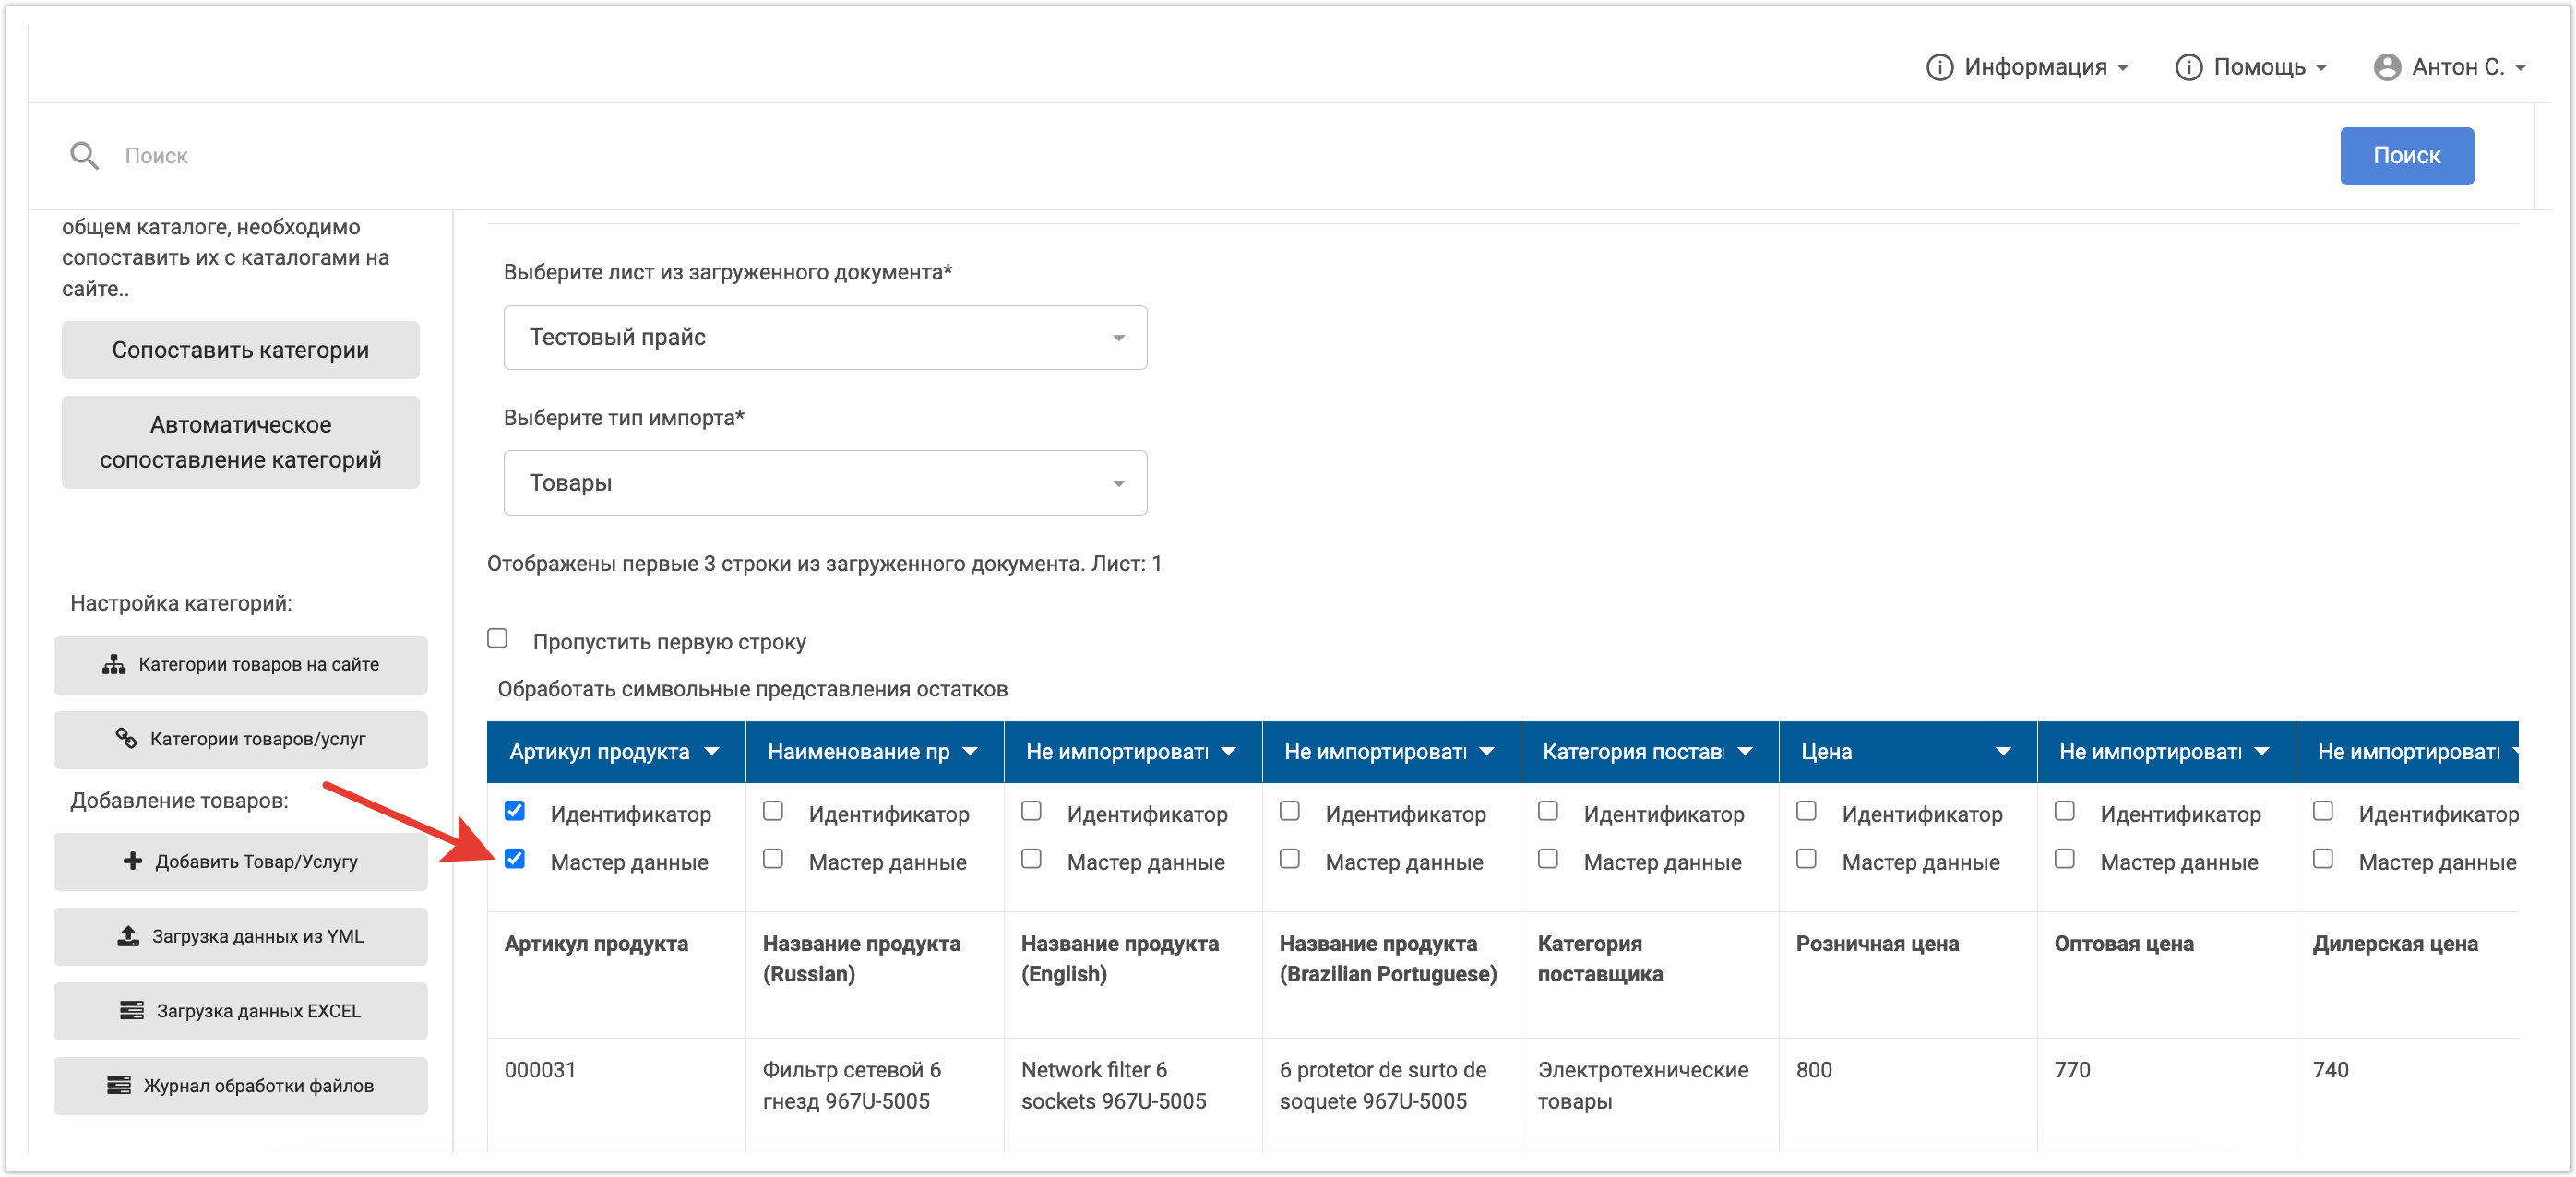
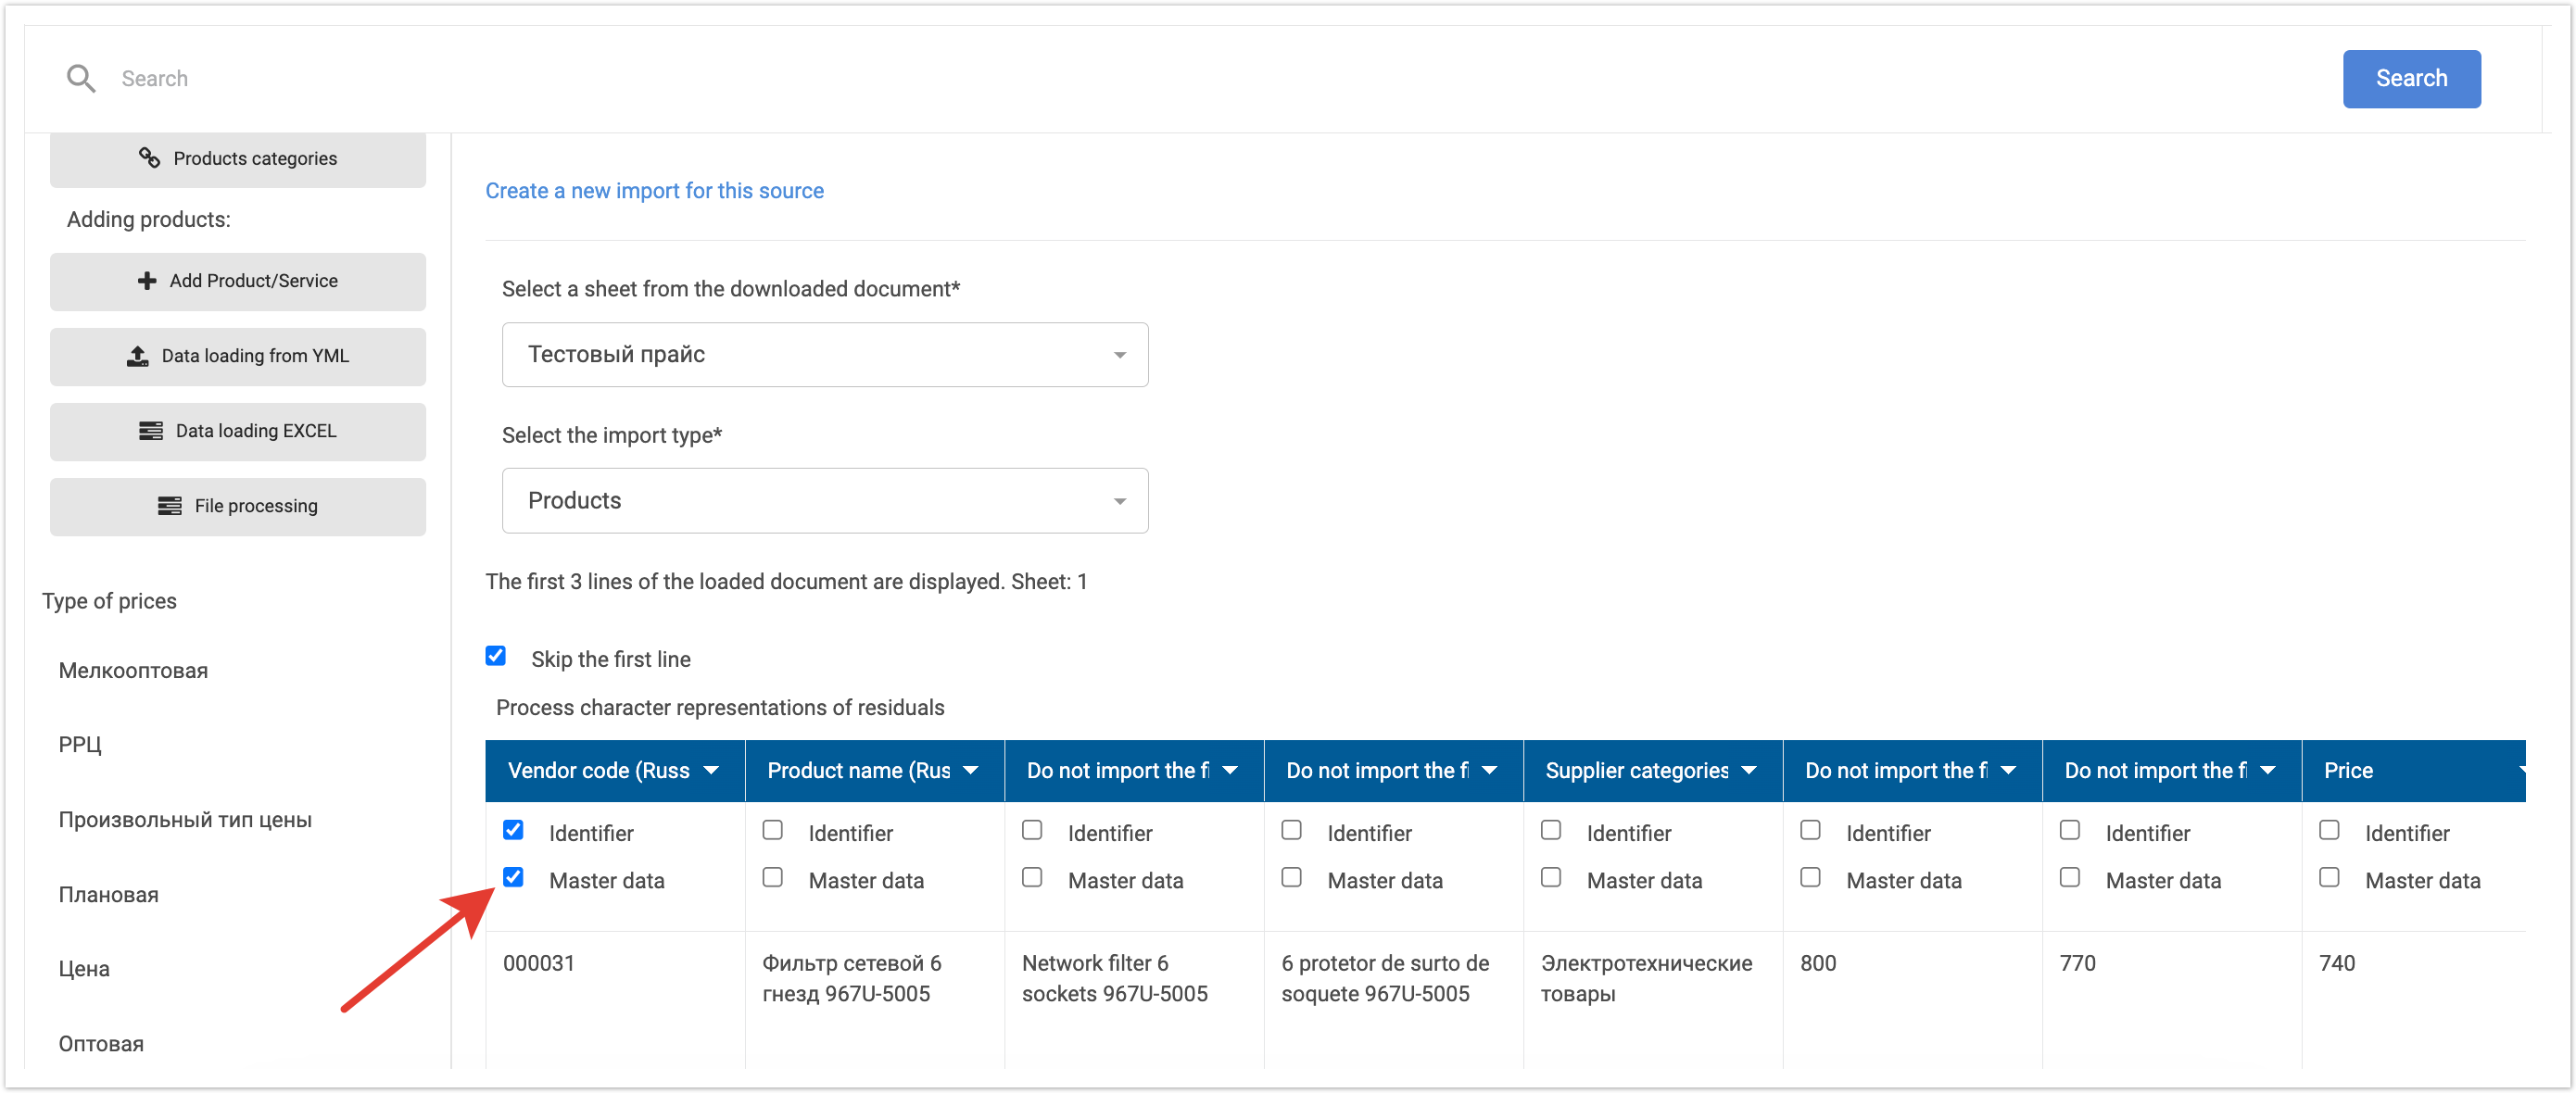
Затем нужно будет настроить поля для импорта товаров. Подробнее про загрузку файла описано на странице. Для корректного импорта обязательно должен быть указан уникальный идентификатор, например артикул, а также должны быть указаны Категория поставщика, Название, Цены и Остатки. Название типа цены и склада берется из первой строки файла, в которой предполагаются заголовки столбцов. Помимо стандартных настроек ответственный менеджер также может указать, в каких столбцах будут указаны Мастер данные. Мастер данные - это те данные, которые будут недоступны для редактирования бренд-менеджерам. Например, в качестве мастер-данных можно выбрать артикул.
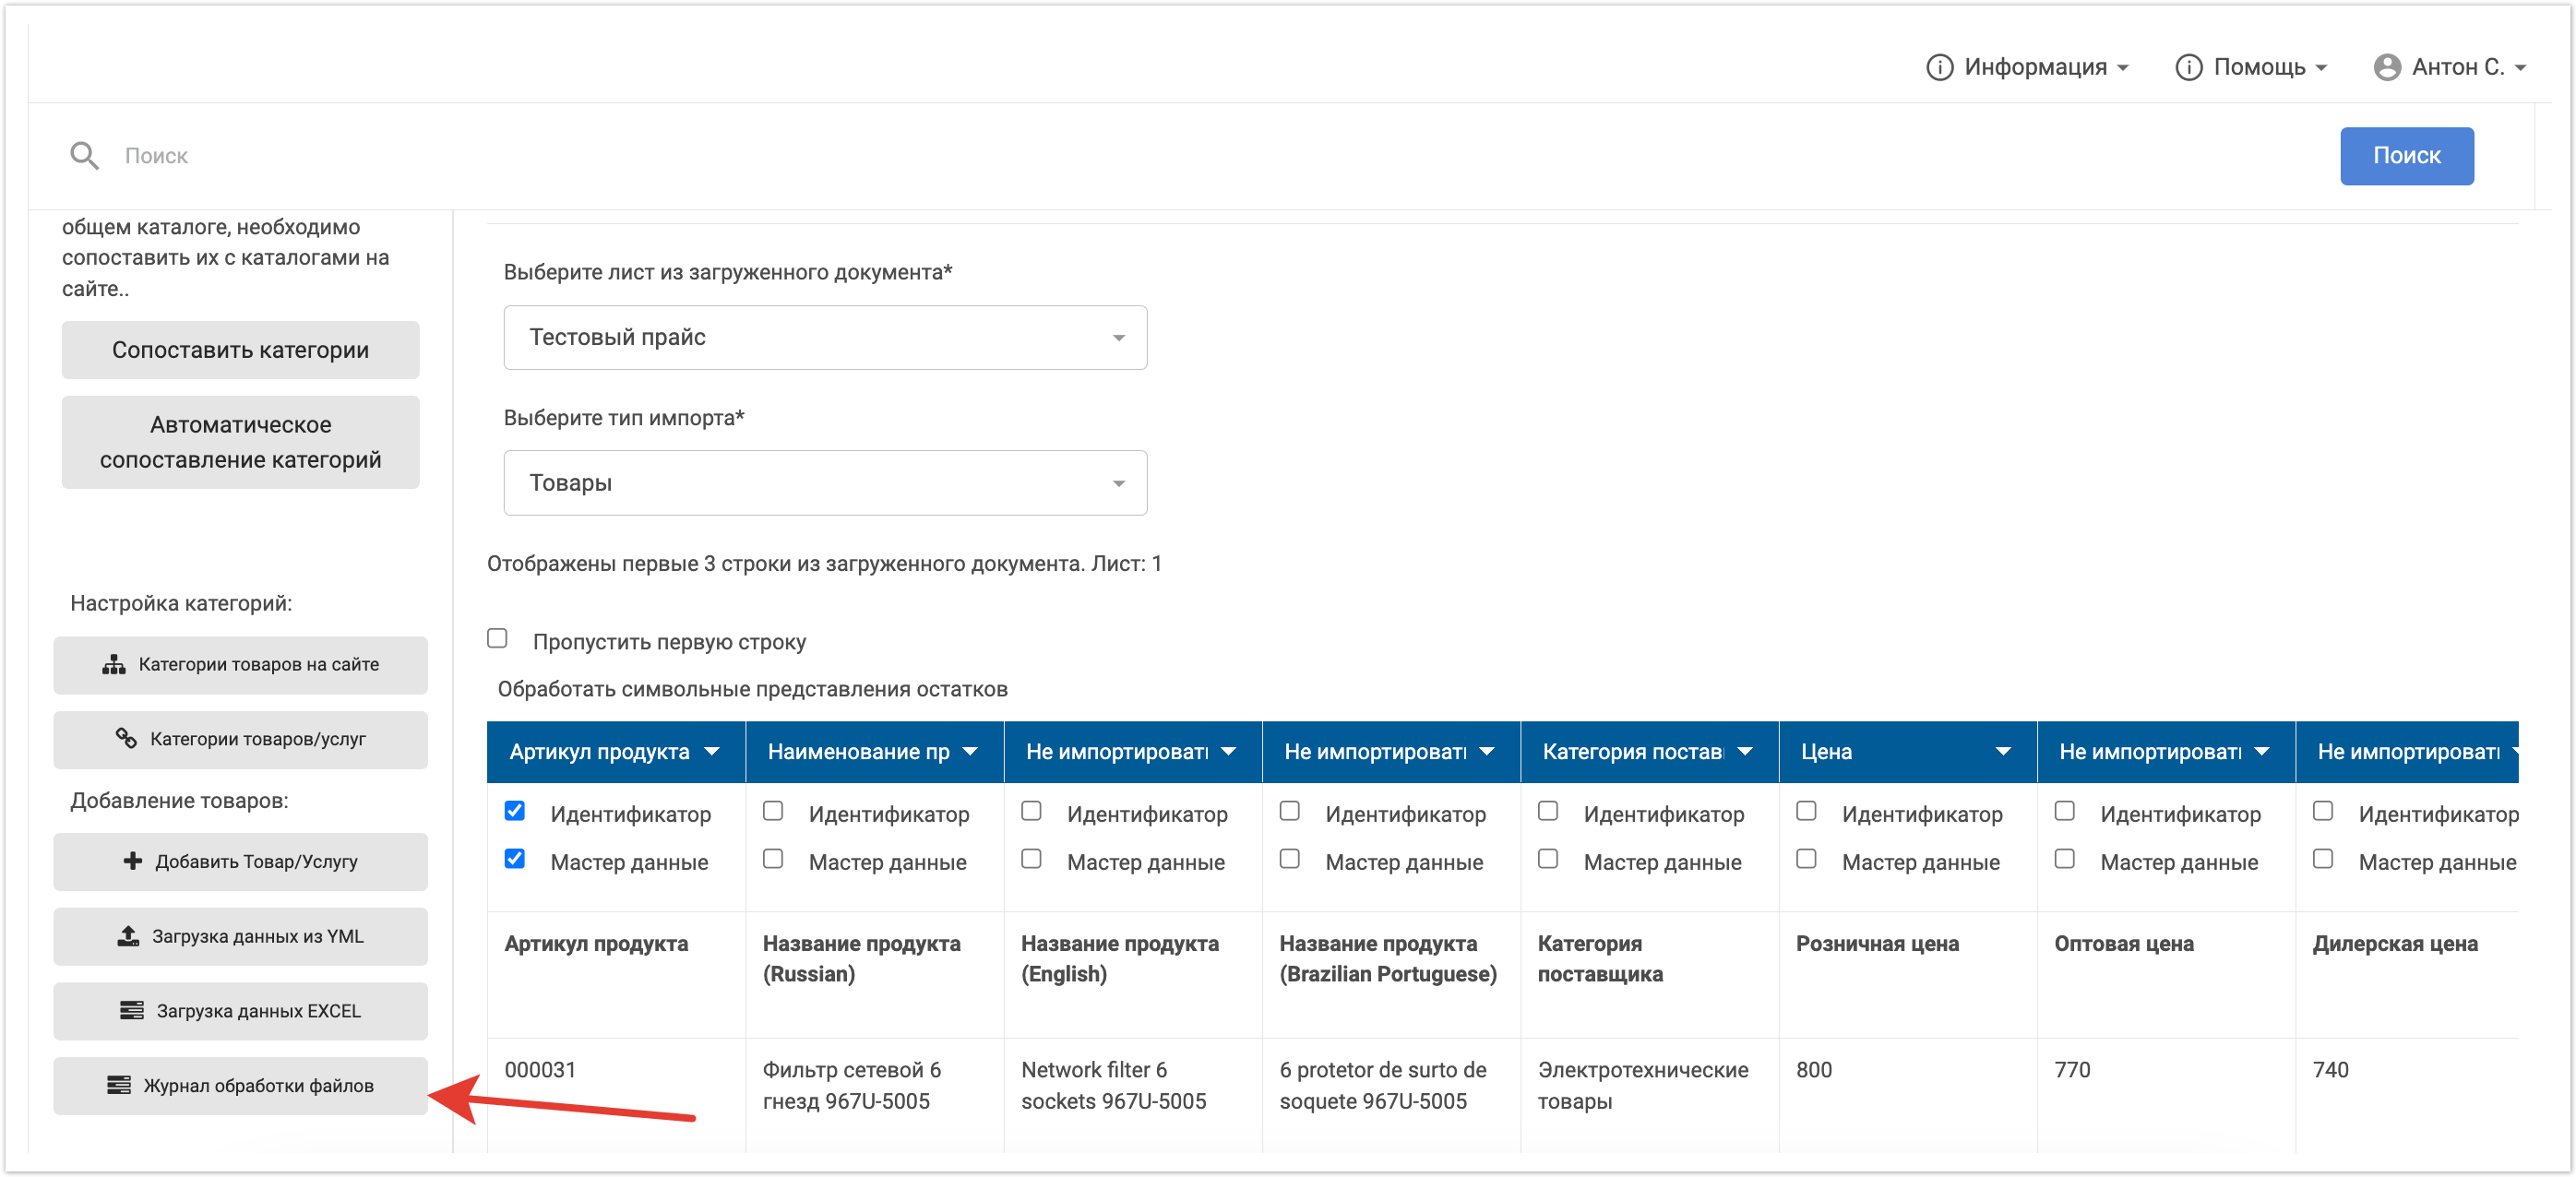
После заполнения всех параметров импорта нужно установить чек-бокс Пропустить первую строку, чтобы строка с заголовками столбцов не обрабатывалась. Далее можно запустить процесс обработки файла. Статус обработки файла можно увидеть в разделе Журнал обработки файлов. Если файл был успешно обработан, то данные по товарам запишутся на платформе. После этого они станут доступны бренд-менеджерам для редактирования и модерации.
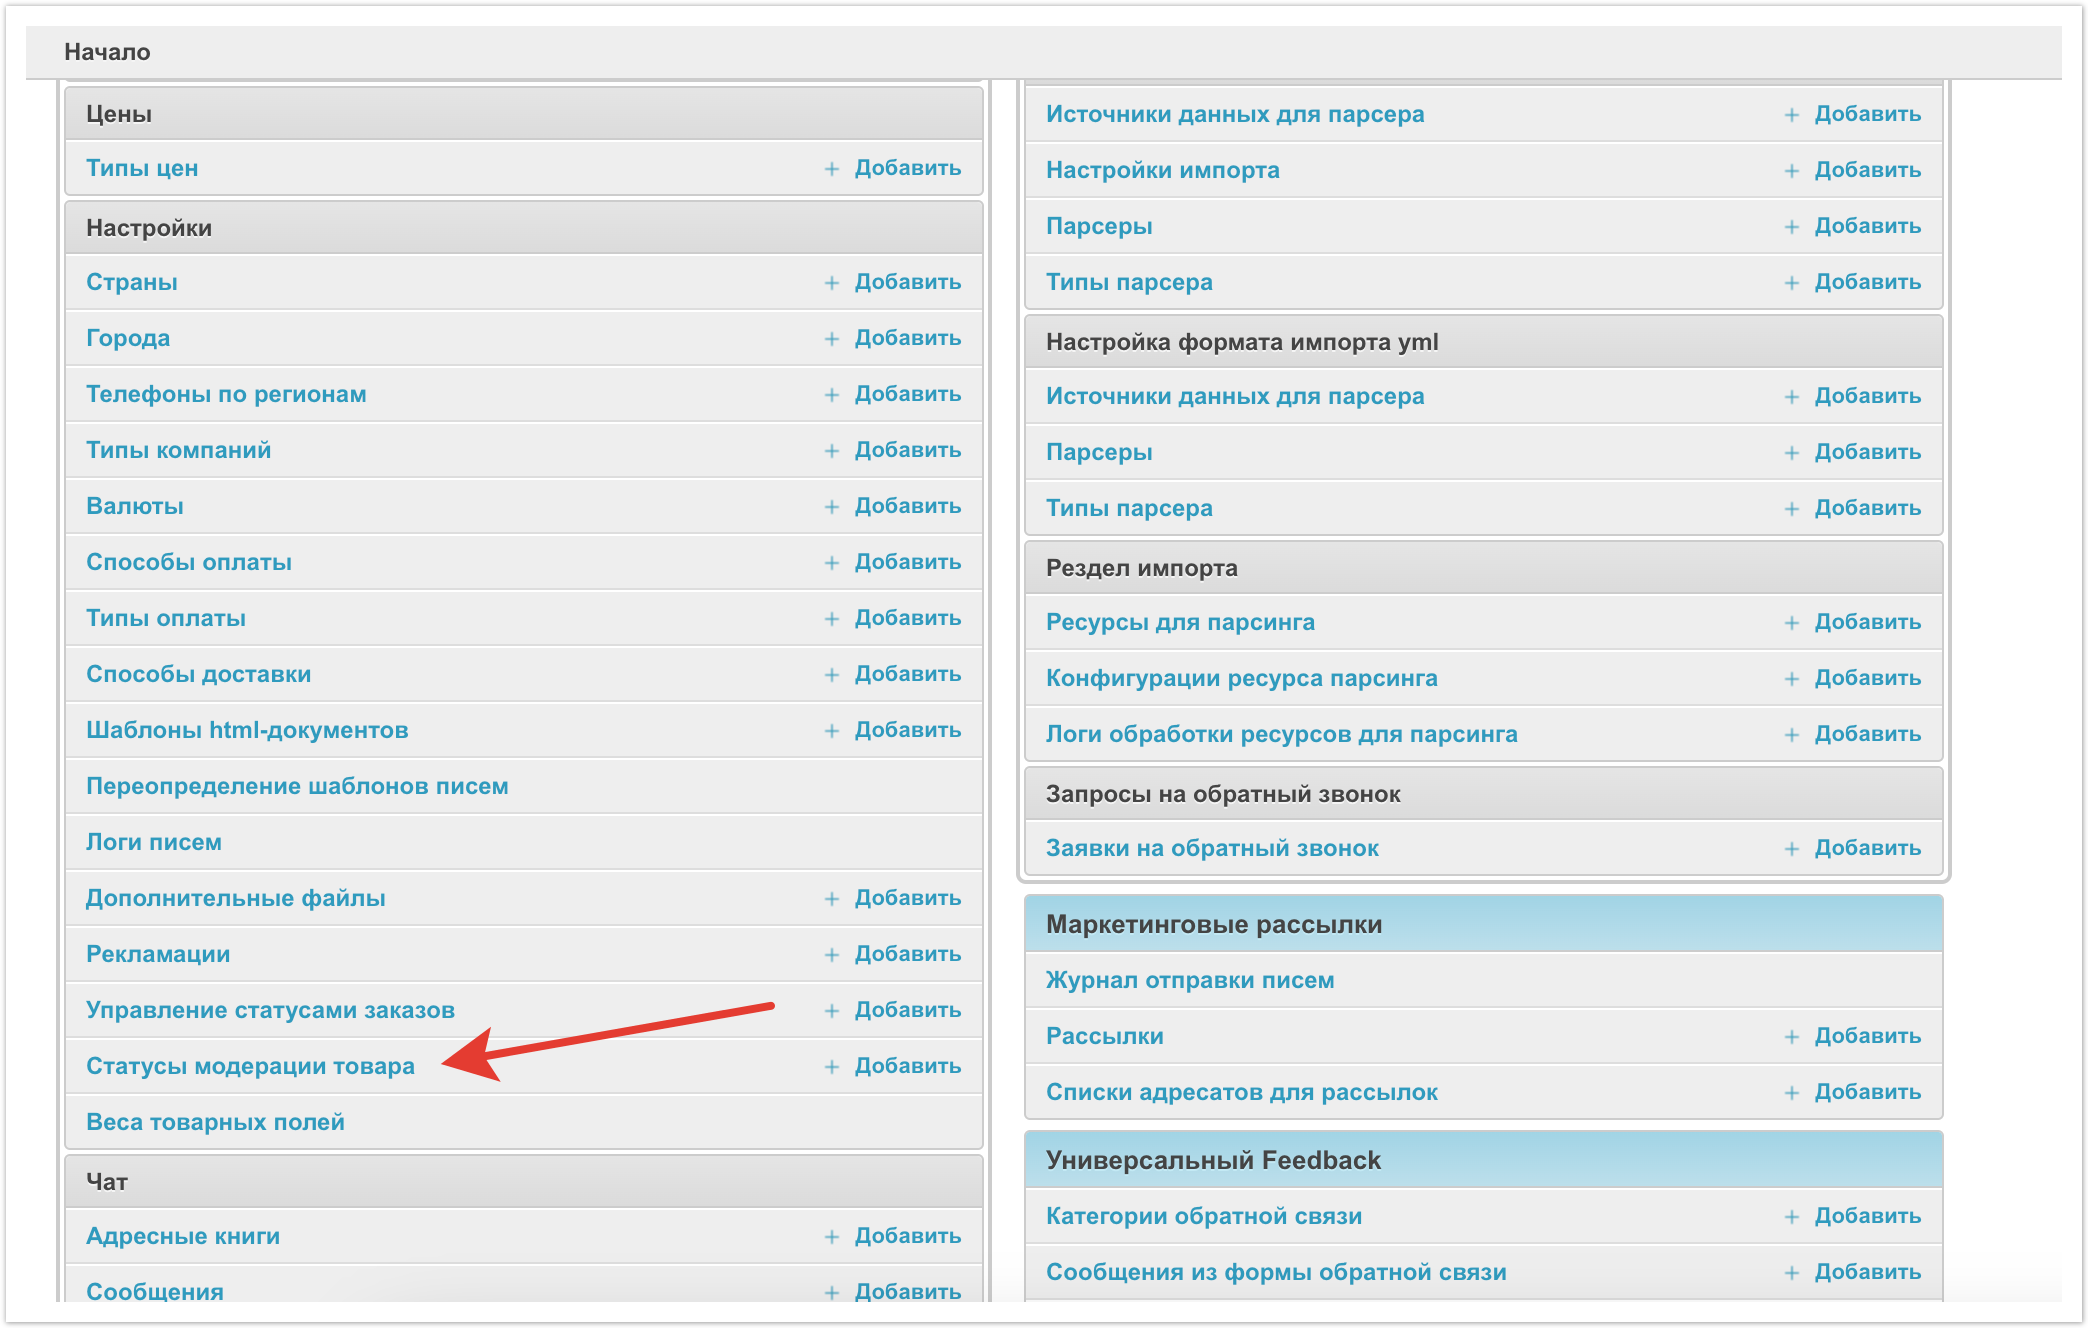
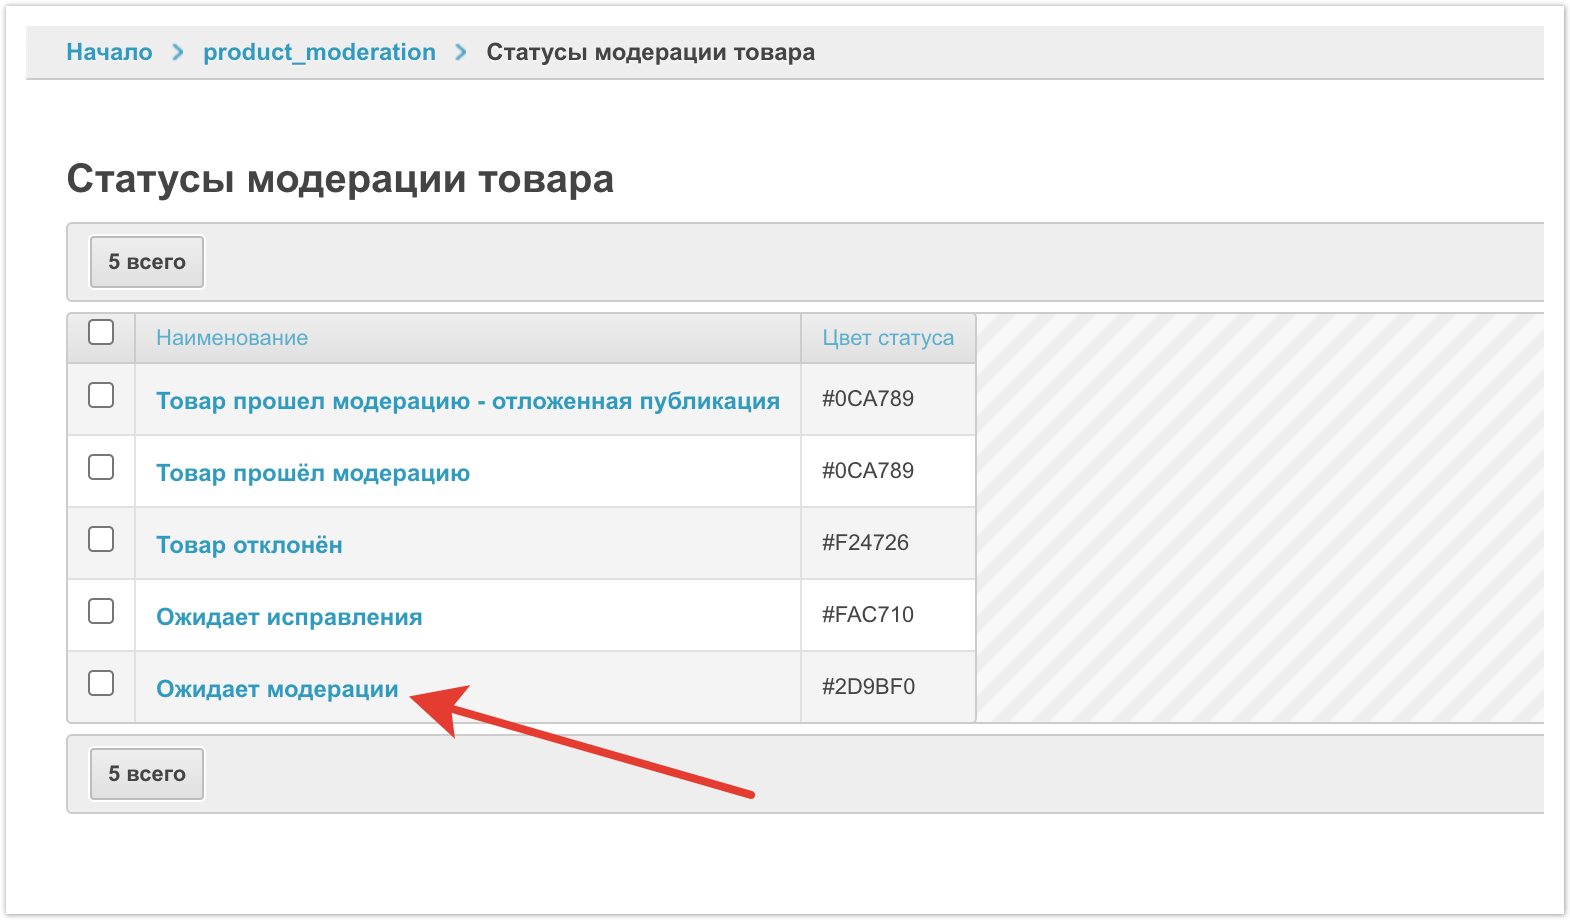
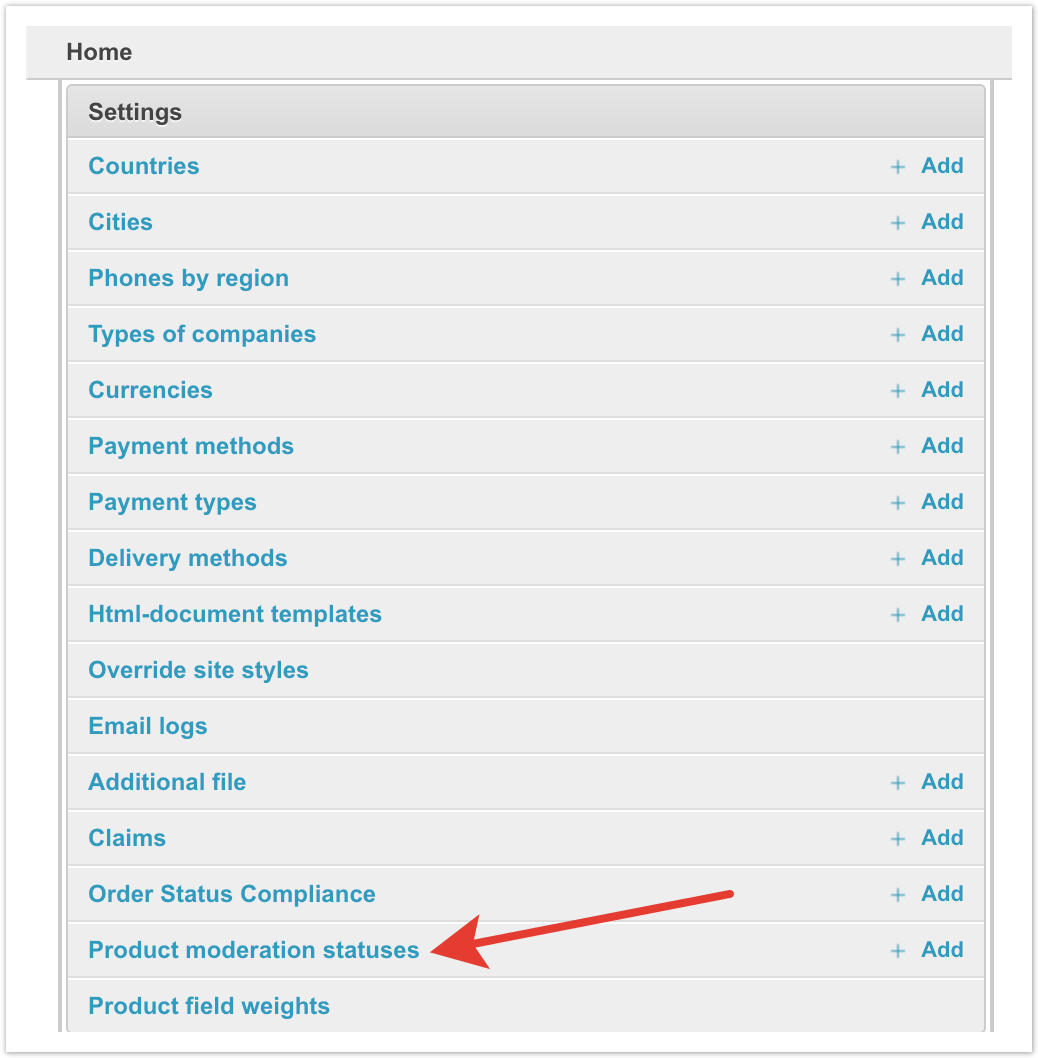
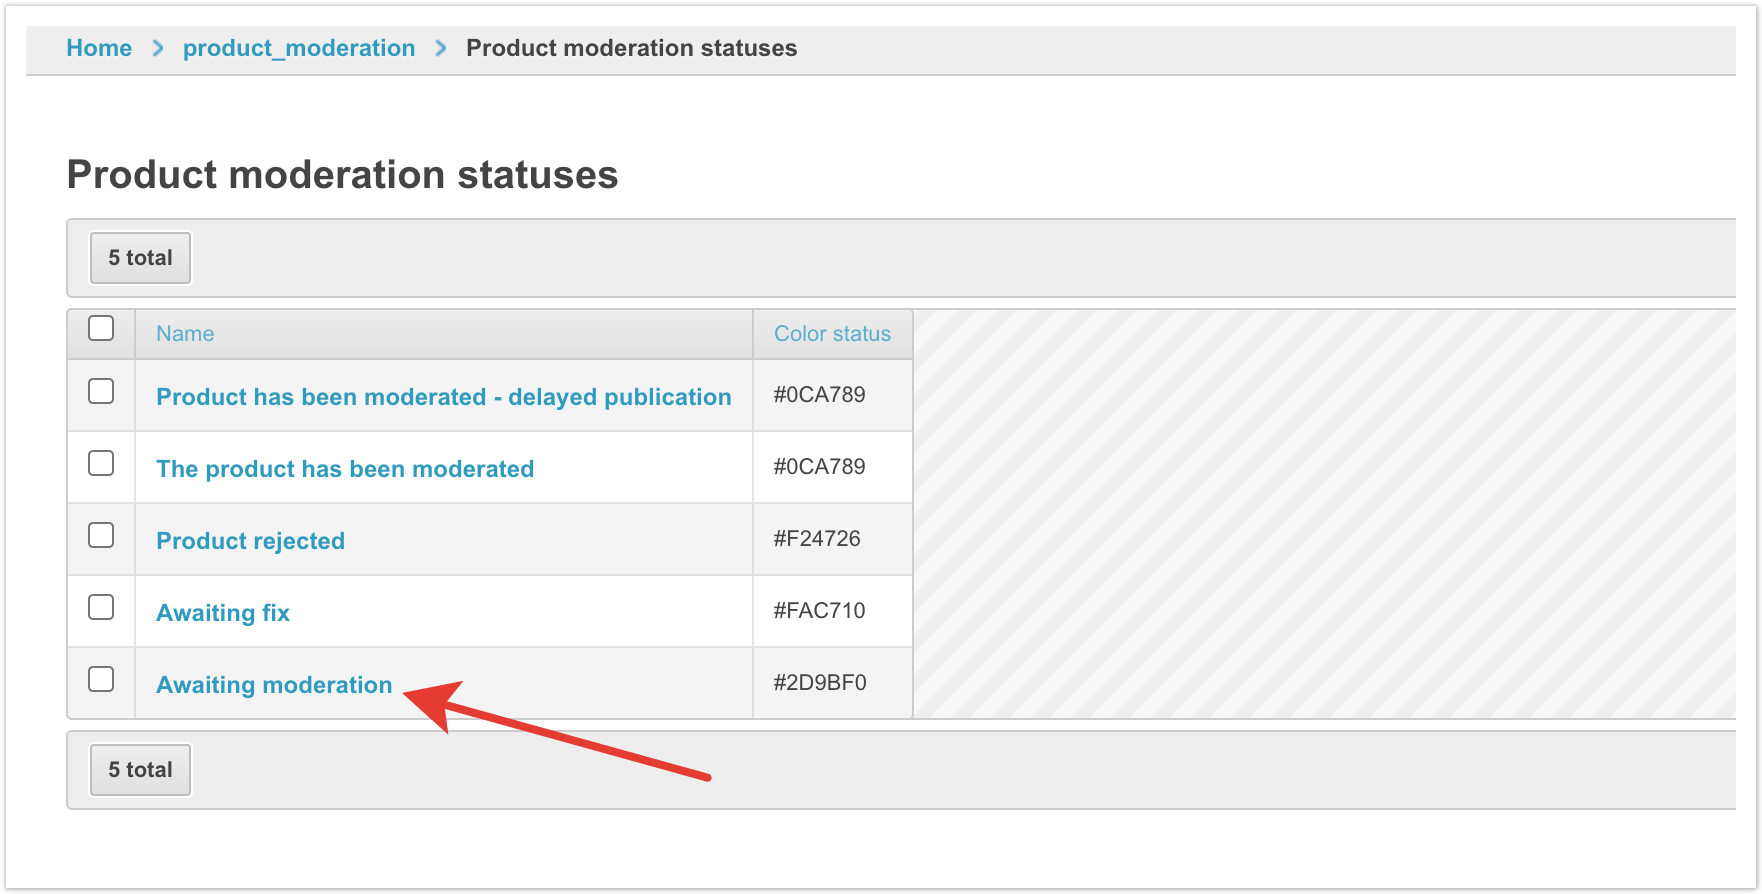
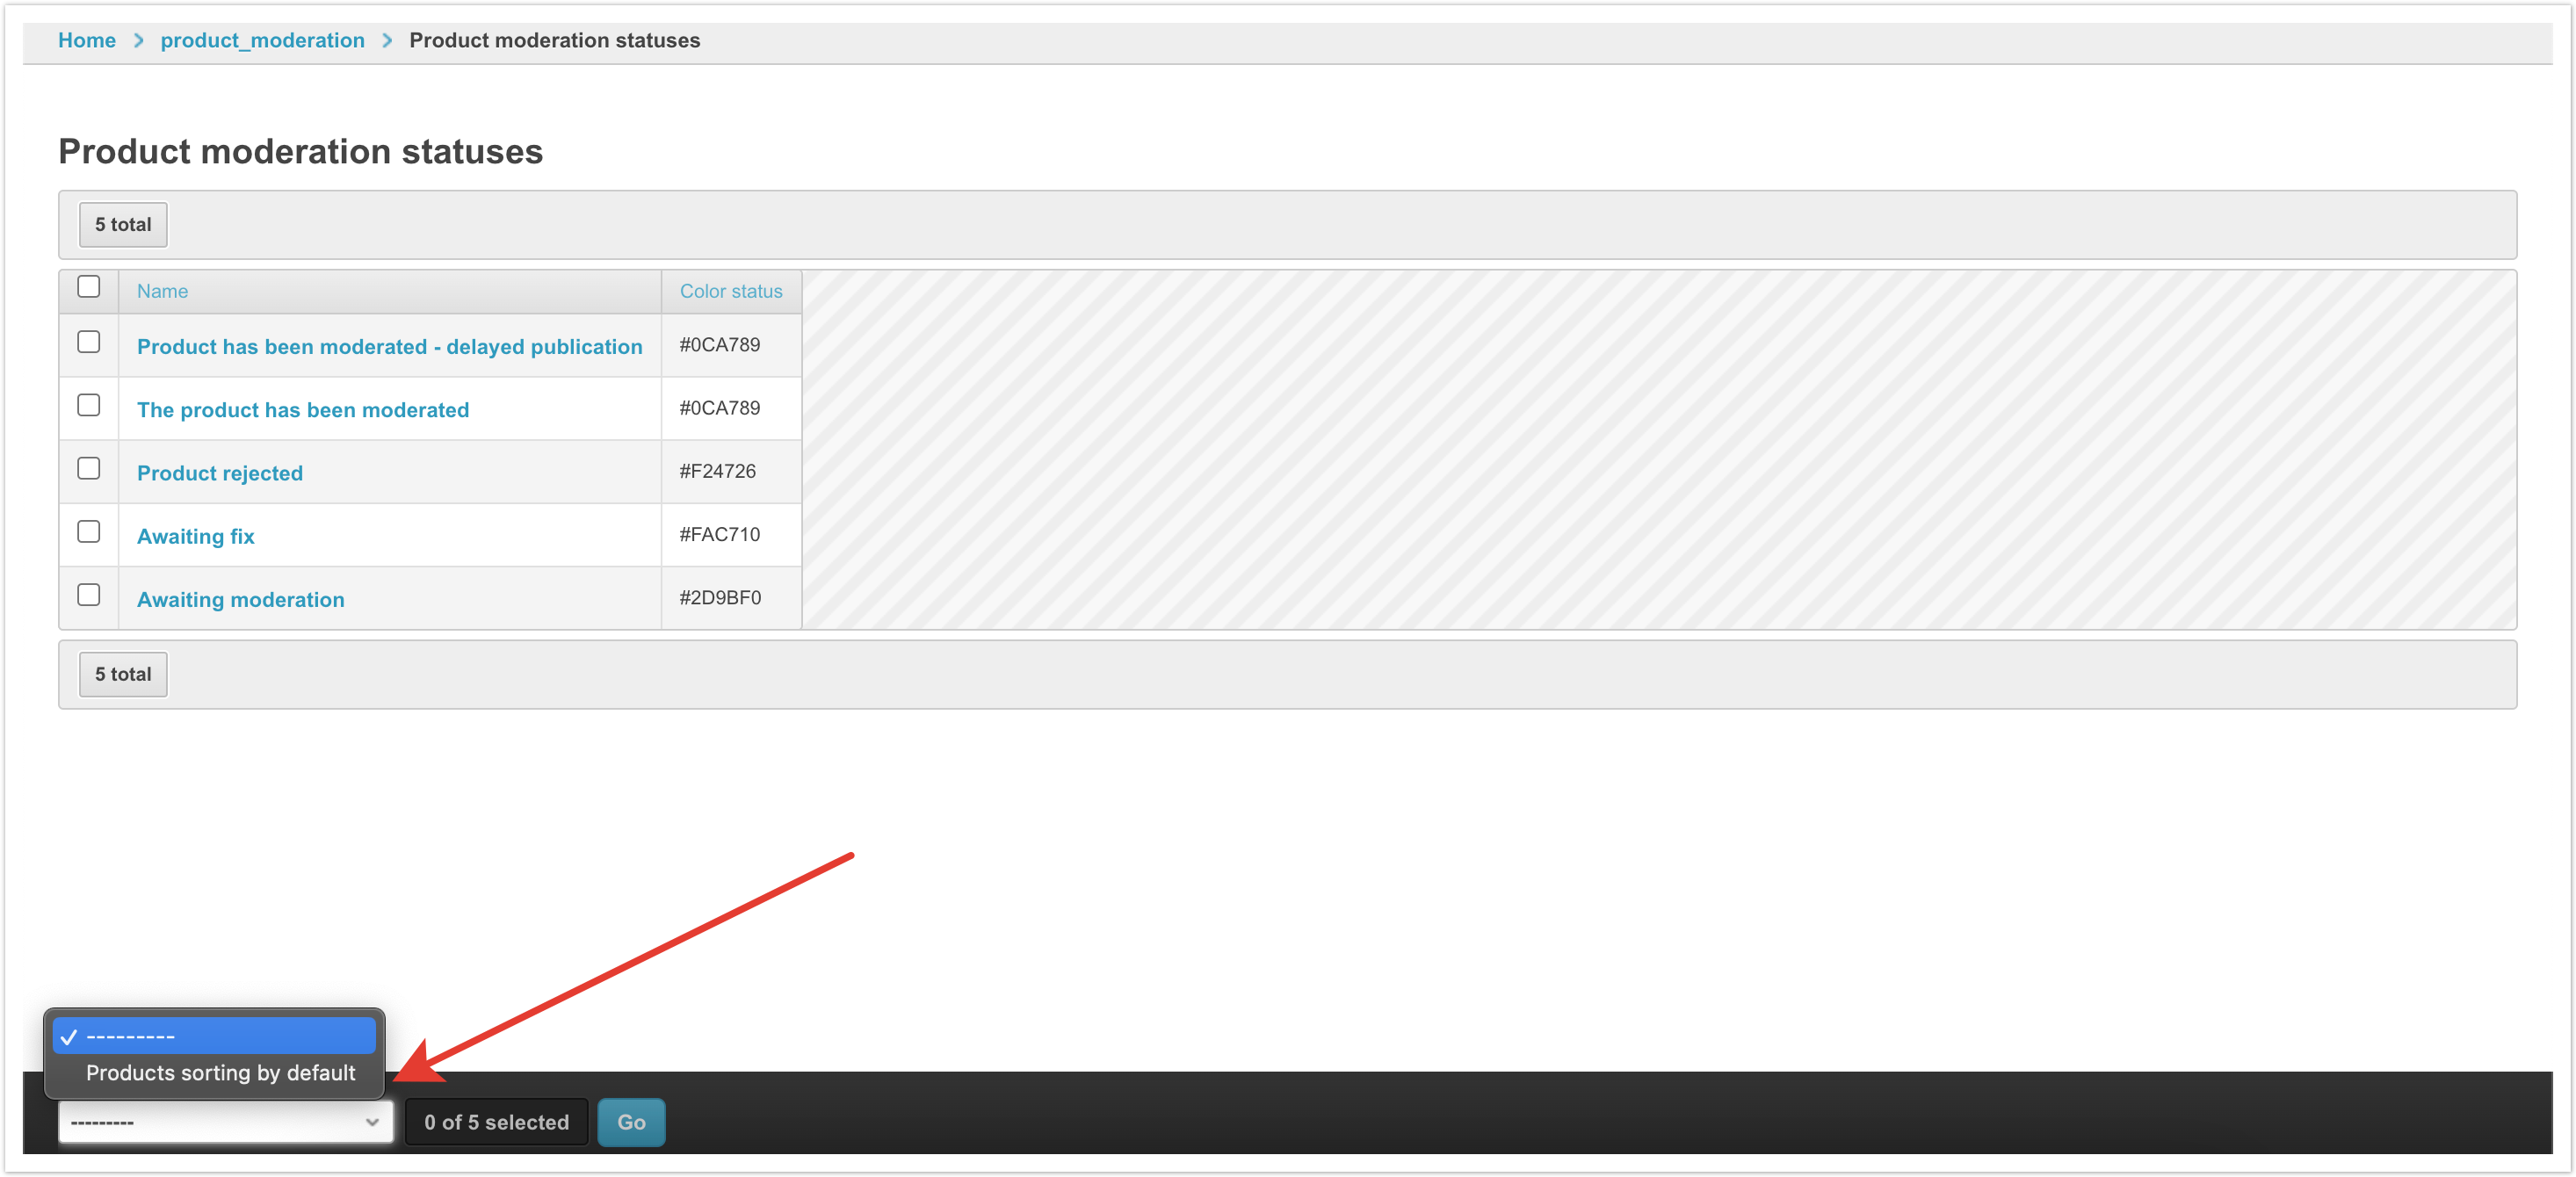
Модерация товаровНастройка статусов модерацииВ продукте PIM разработана статусная модель для проведения процесса модерации и публикации товаров конечному пользователю платформы. Настройка статусов модерации товаров производится в разделе административной панели Статусы модерации товара.
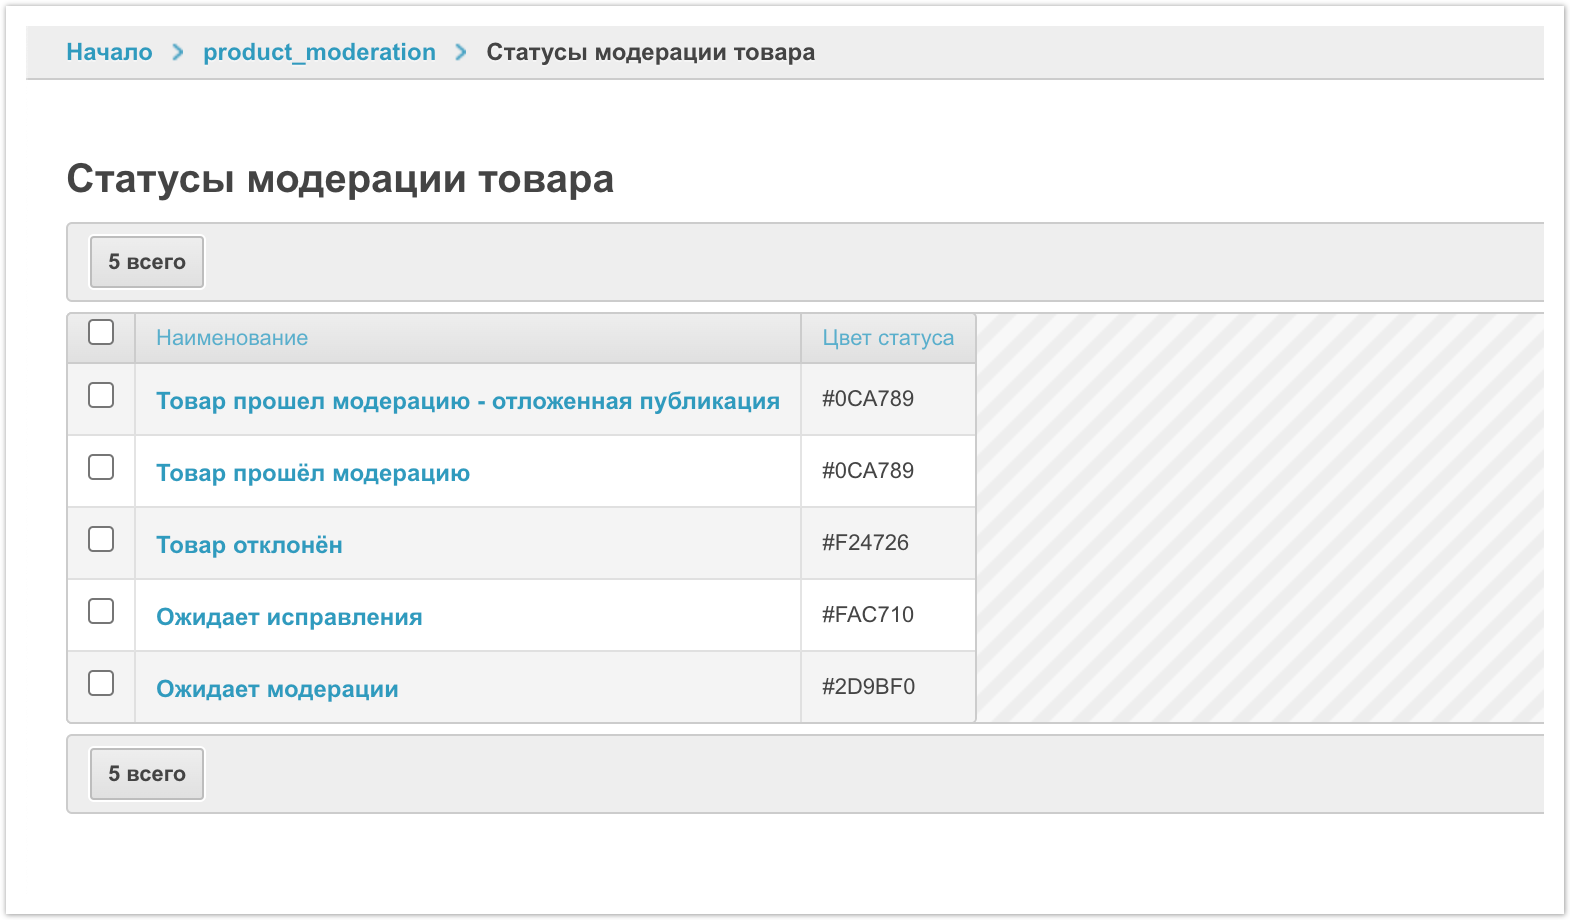
В разделе находятся все статусы модерации товаров, настройками которых администратор платформы может управлять.
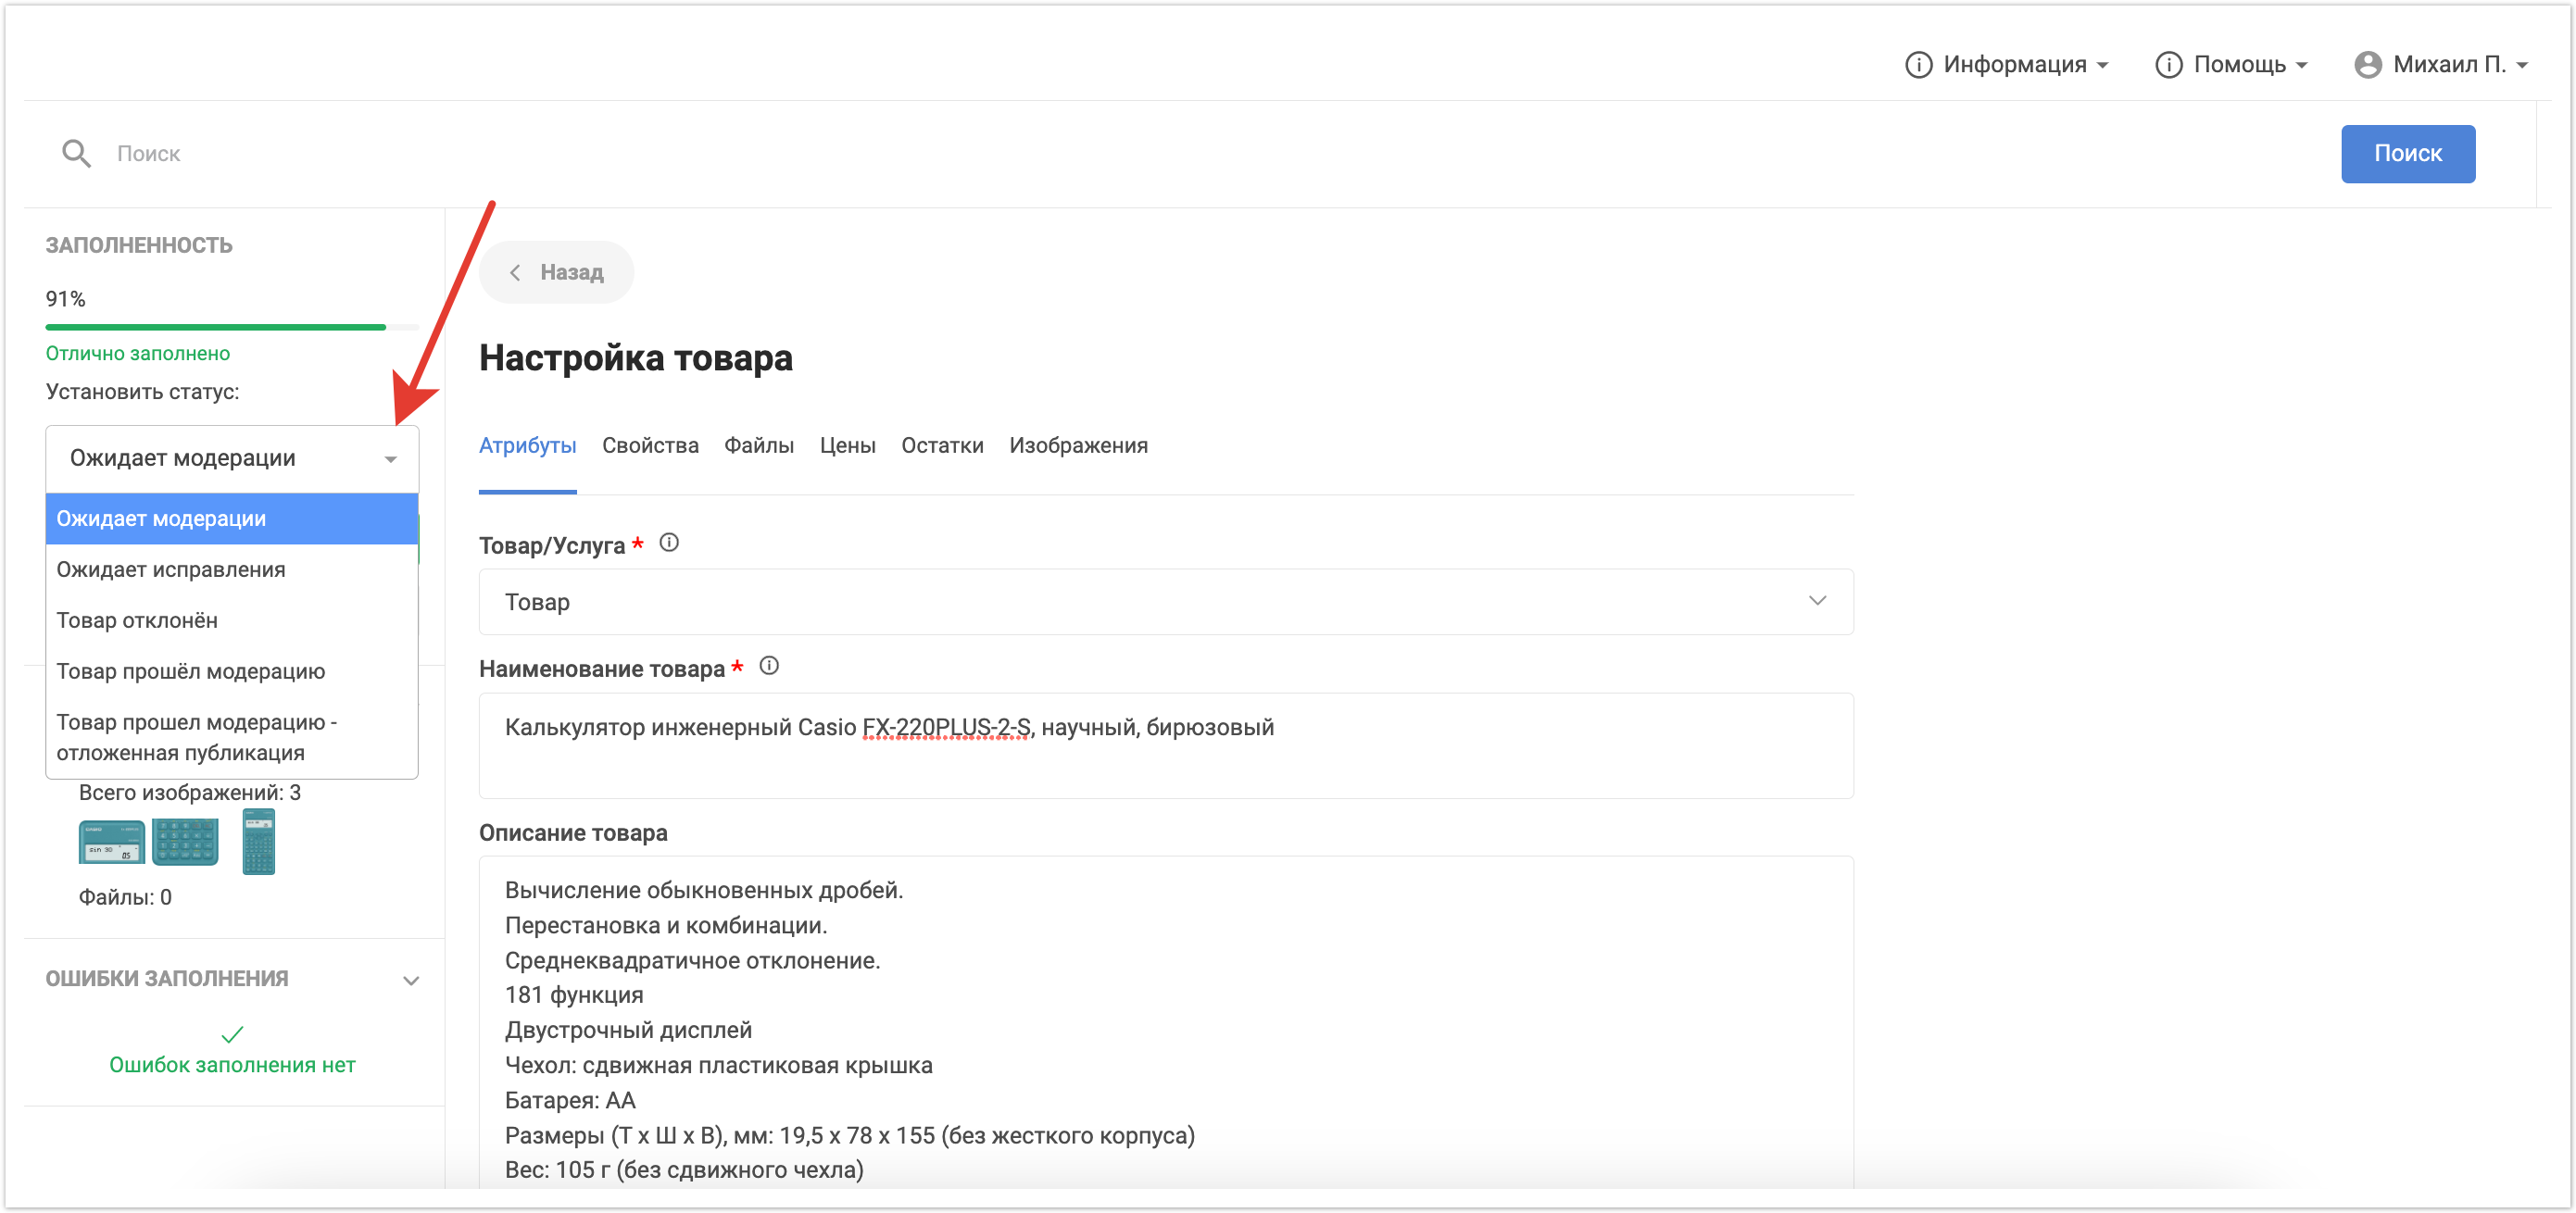
Ожидает модерации - товар загружен на площадку и попал в зону ответственности менеджера. Данный товар не отображается покупателям, поскольку еще не прошел проверку. Ожидает исправления - этот статус присваивается товару в случае, если бренд-менеджер взял его в работу, но для публикации не достаточно данных. Например, бренд-менеджеру не достаточно изображений, и он запрашивает их у другого сотрудника компании, либо уточняет какие-либо детали о значениях характеристик или детали описания. В этом статусе товар не опубликован в открытом каталоге и не доступен покупателям. Товар отклонен - товар был загружен на платформу, но ни при каких условиях он не может быть проверен и опубликован в открытом каталоге. Например, это какой-либо товар не подходящий под тематику площадки, или ошибочно загруженный товар. В этом случае, ему можно присвоить данный статус. Товар будет сохранен в базе, но он не будет доступен в каталоге покупателей. Товар прошёл модерацию - данный статус присваивается товару, когда ответственный сотрудник провел проверку и редактирование карточки товара и убедился в том, что все параметры номенклатуры и контент соответствуют требованиям компании. В этом случае товару выставляется данный статус и он становится доступным для покупателей. Покупатель может найти товар в каталоге с помощью инструментов поиска, просмотреть карточку товара, сравнить его, добавить в избранное, купить и добавить его к файлу экспорта для выгрузки контента. Товар прошел модерацию - отложенная публикация - данный статус используется в случае, если требуется отложить публикацию товара на определенный день и время. Например, компания выводит на рынок новый продукт. В этом случае, товар может быть импортирован на площадку и проверен заранее. Для товара выбирается дата и время, когда он должен быть опубликован в каталоге покупателей и товар публикуется автоматически в заданные дату и время. Чтобы изменить настройки статуса, кликните по его названию.
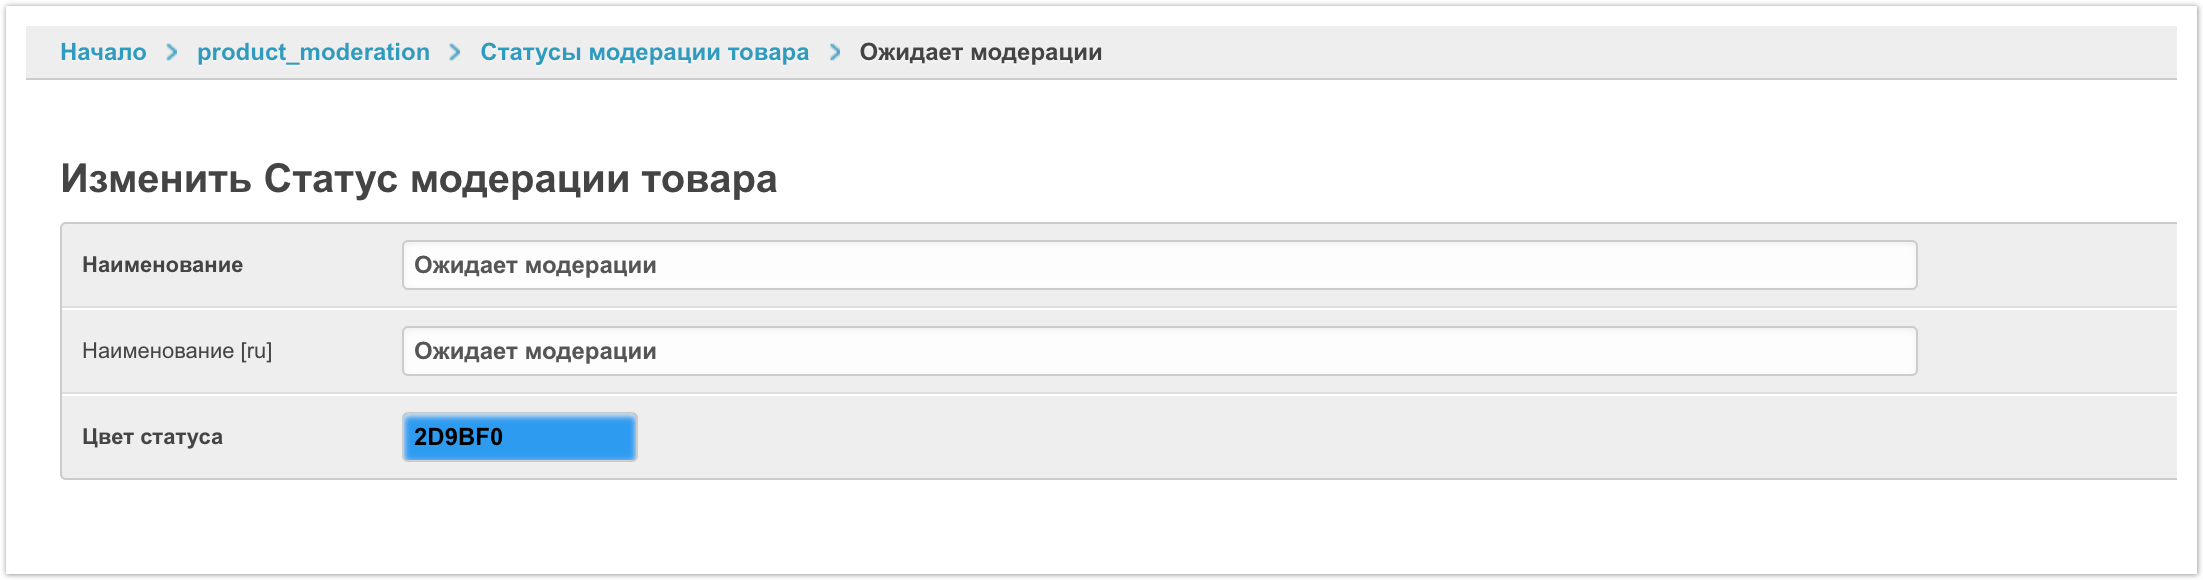
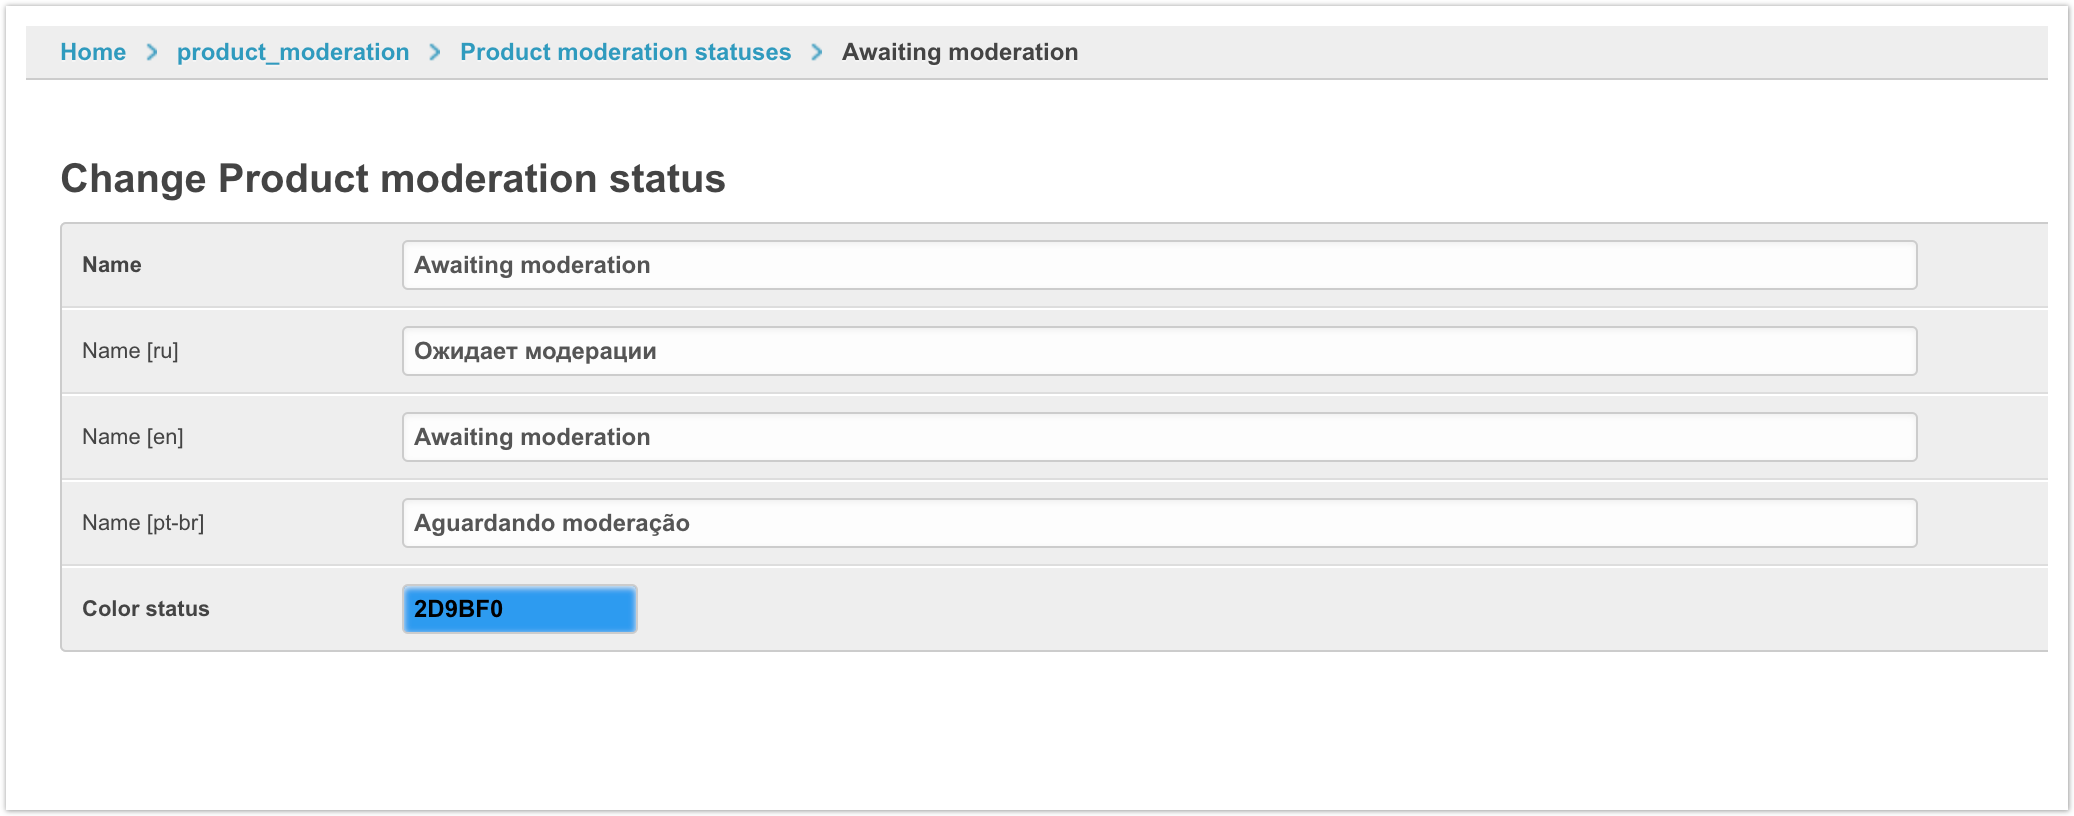
На открывшейся странице будут указаны текущие настройки.
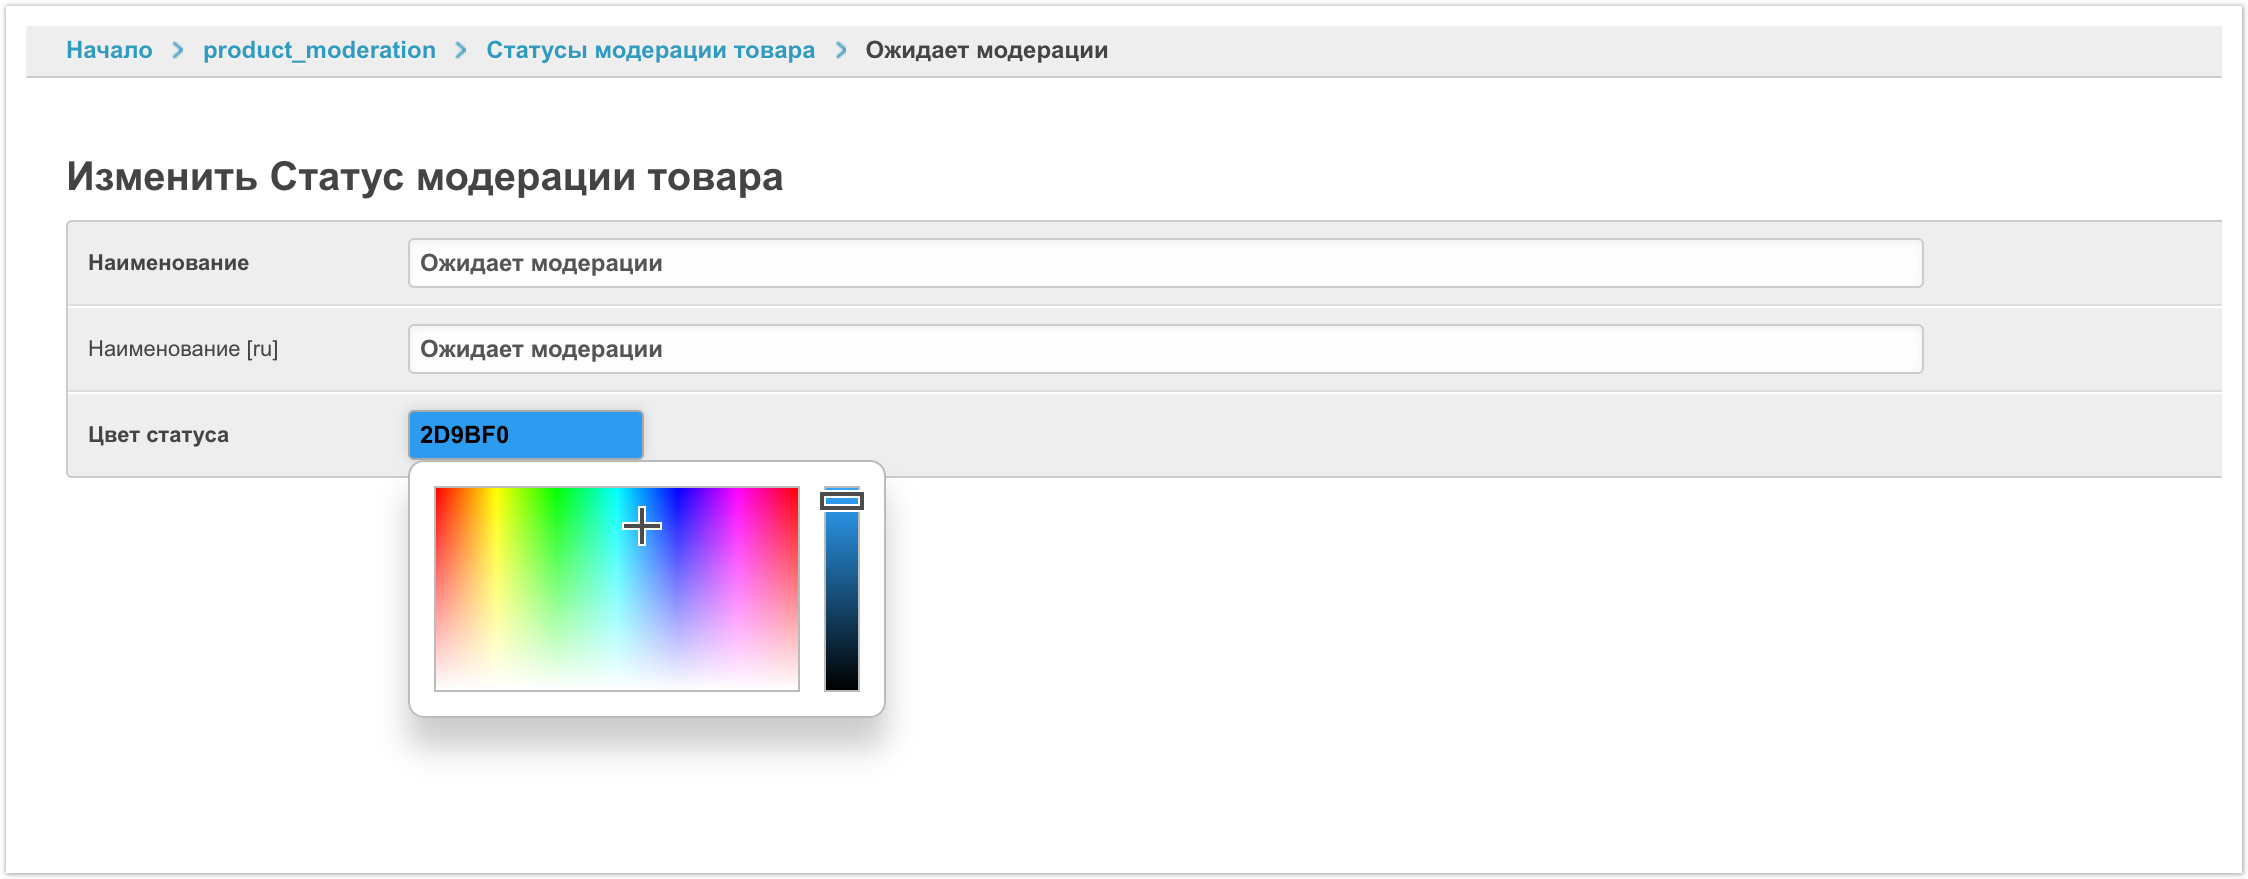
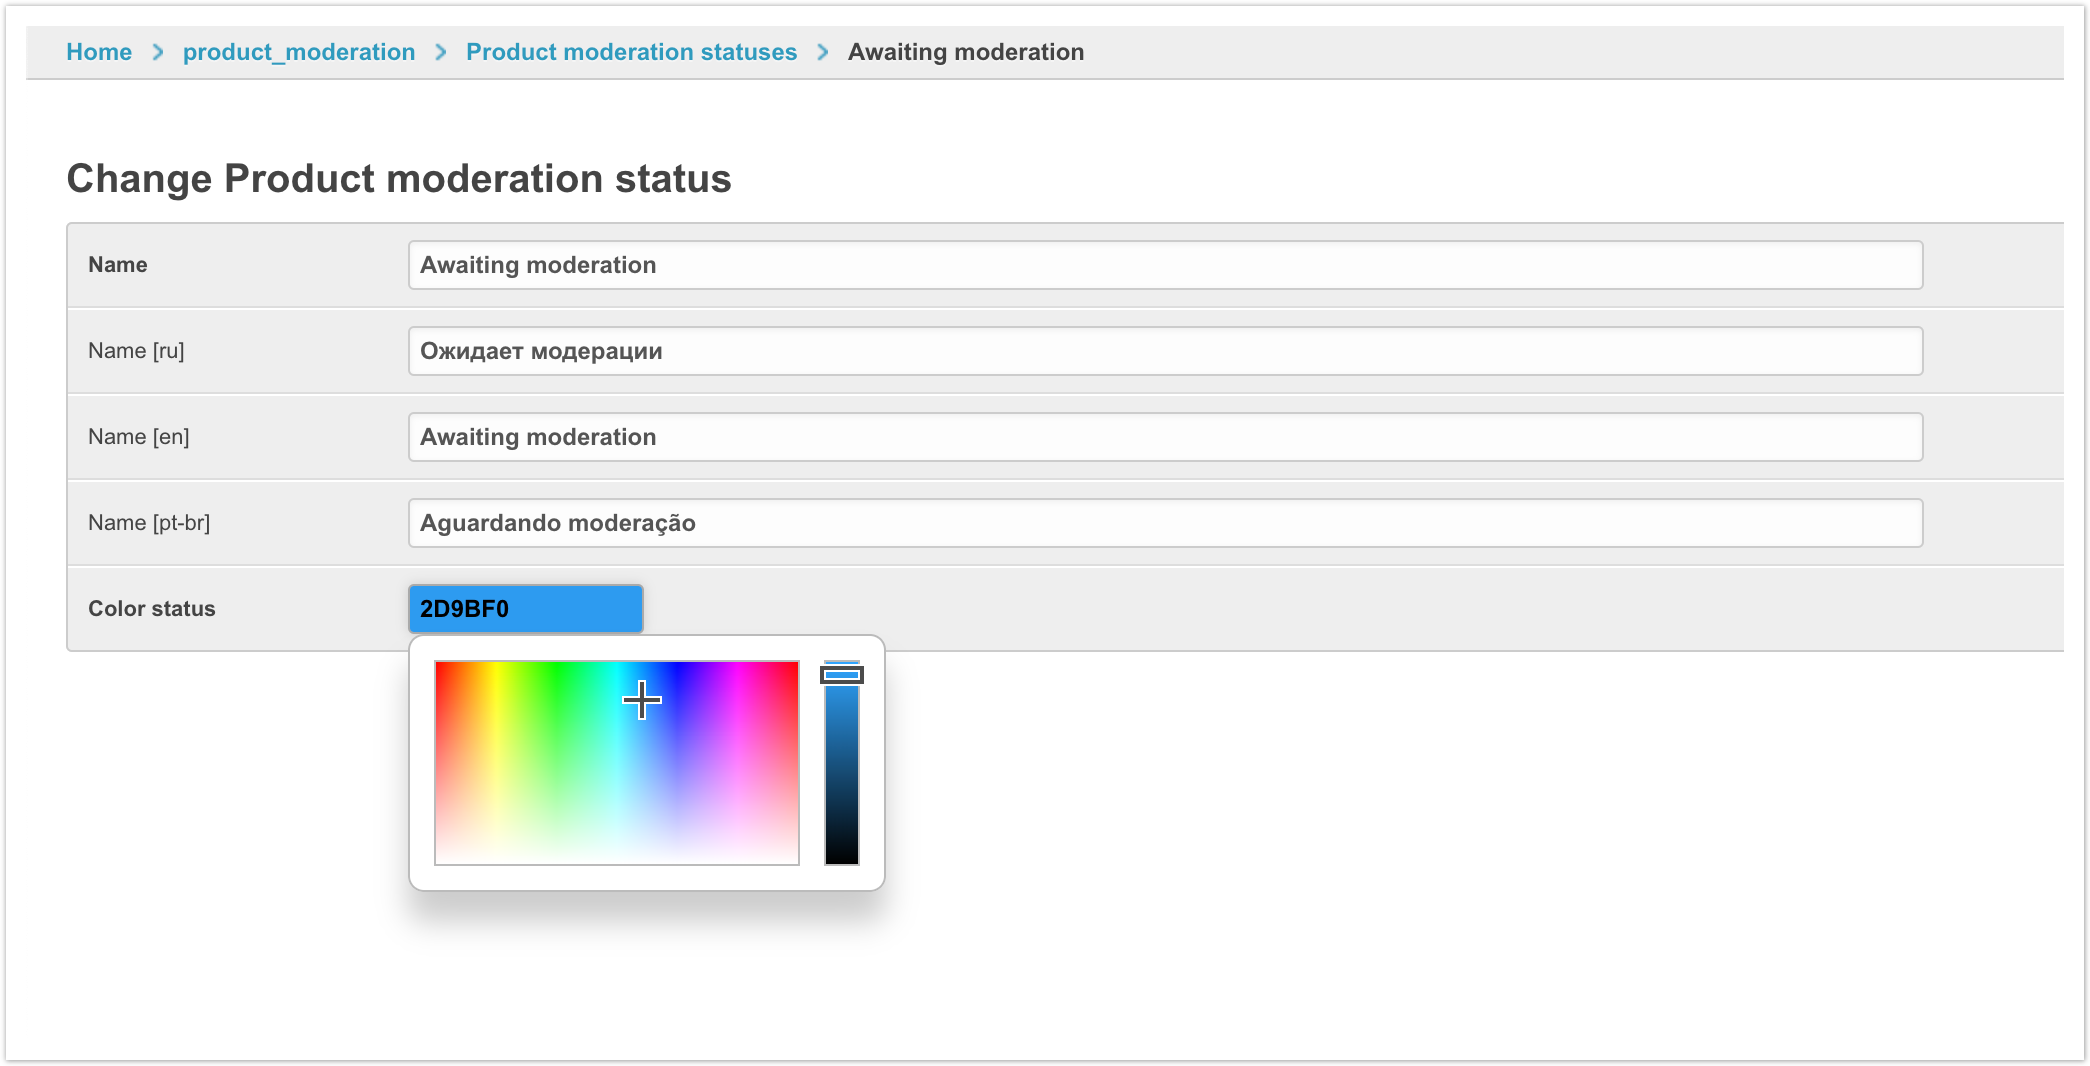
Вы можете изменить название на русском и других языках, если они подключены. А также можно изменить цвет статуса с помощью палитры или указав шестизначный код цвета.
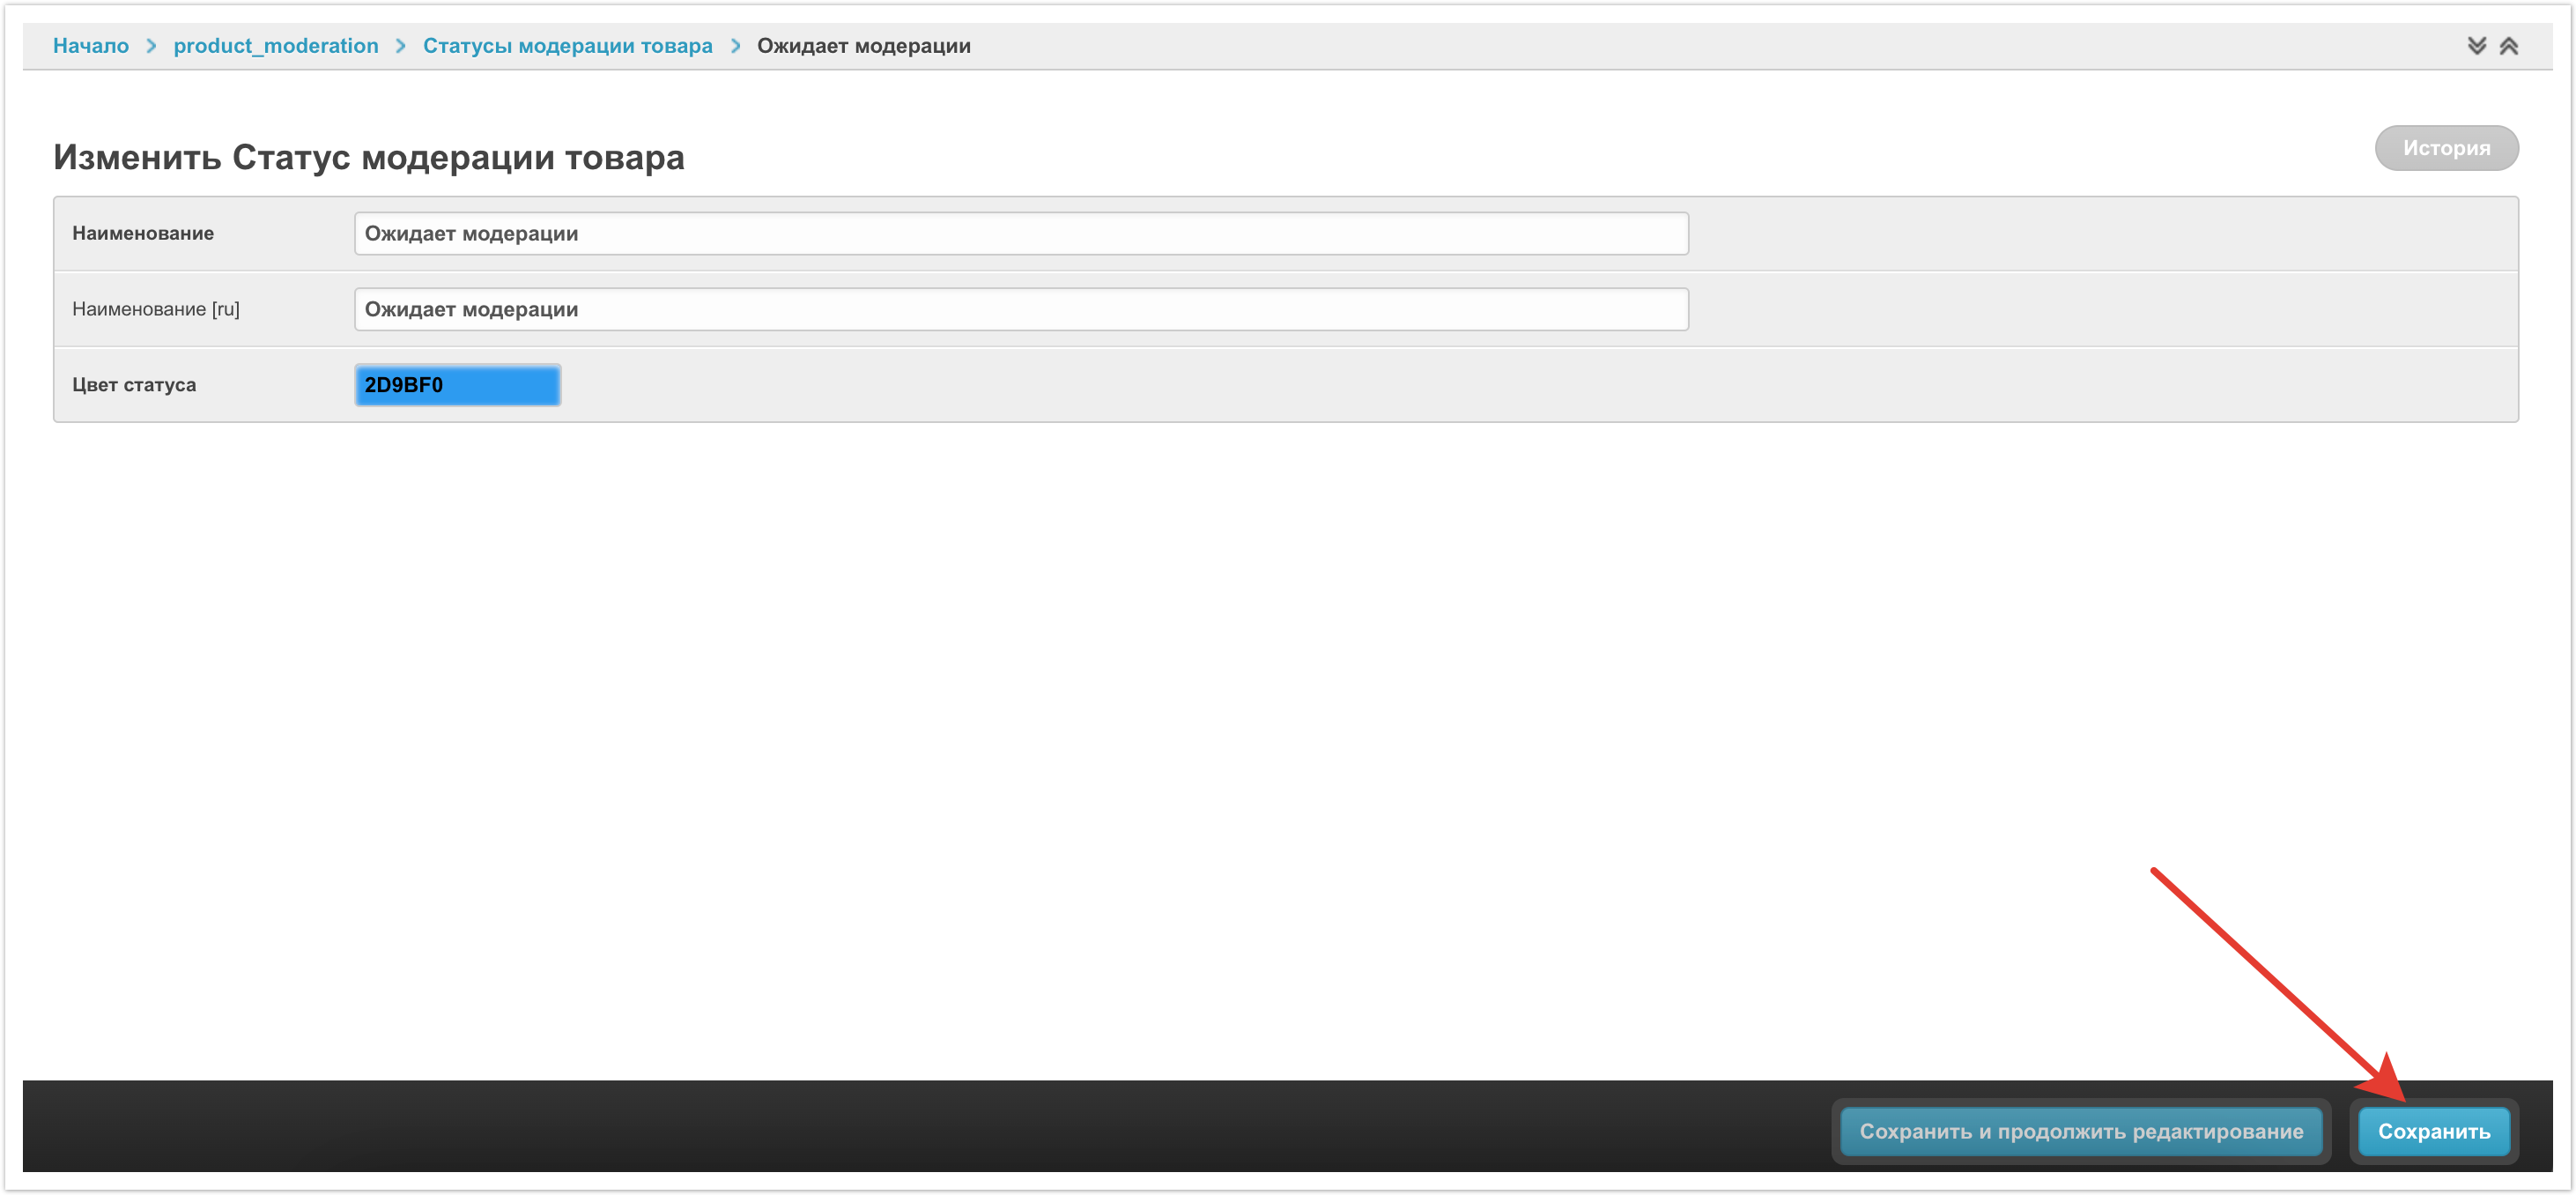
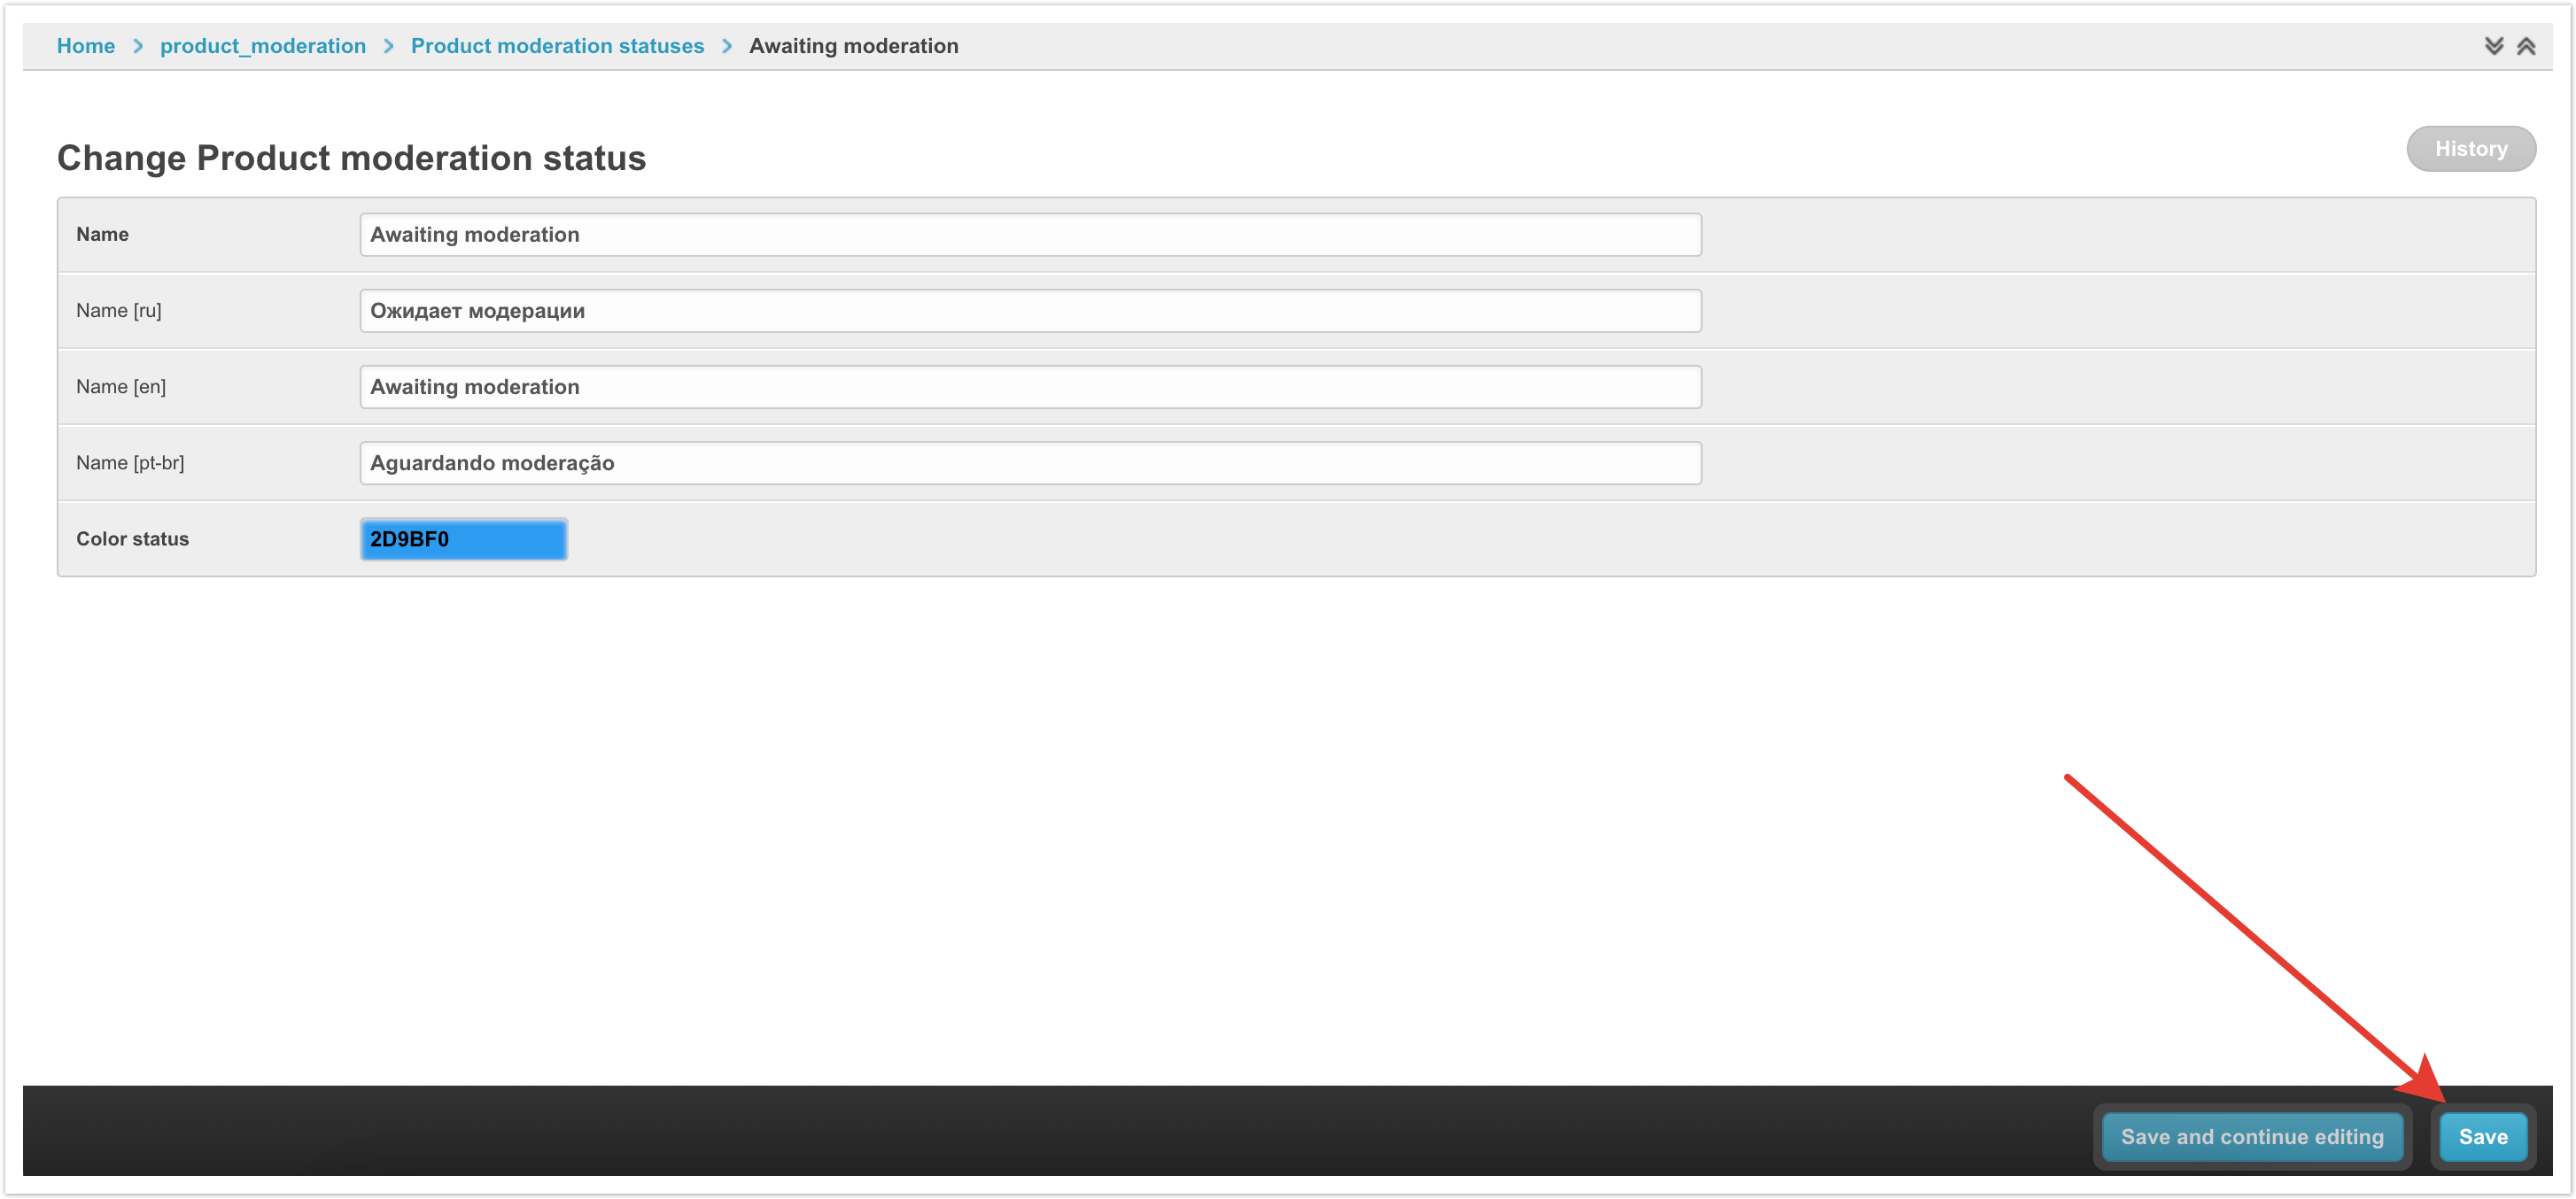
Чтобы изменения вступили в силу, Сохраните изменения.
Если необходимо вернуть исходные настройки статусов модерации товаров, нужно в панели массовых операций выбрать Вернуть наименование статусов по умолчанию. Выделять отдельные статусы чек-боксами при этом не нужно.
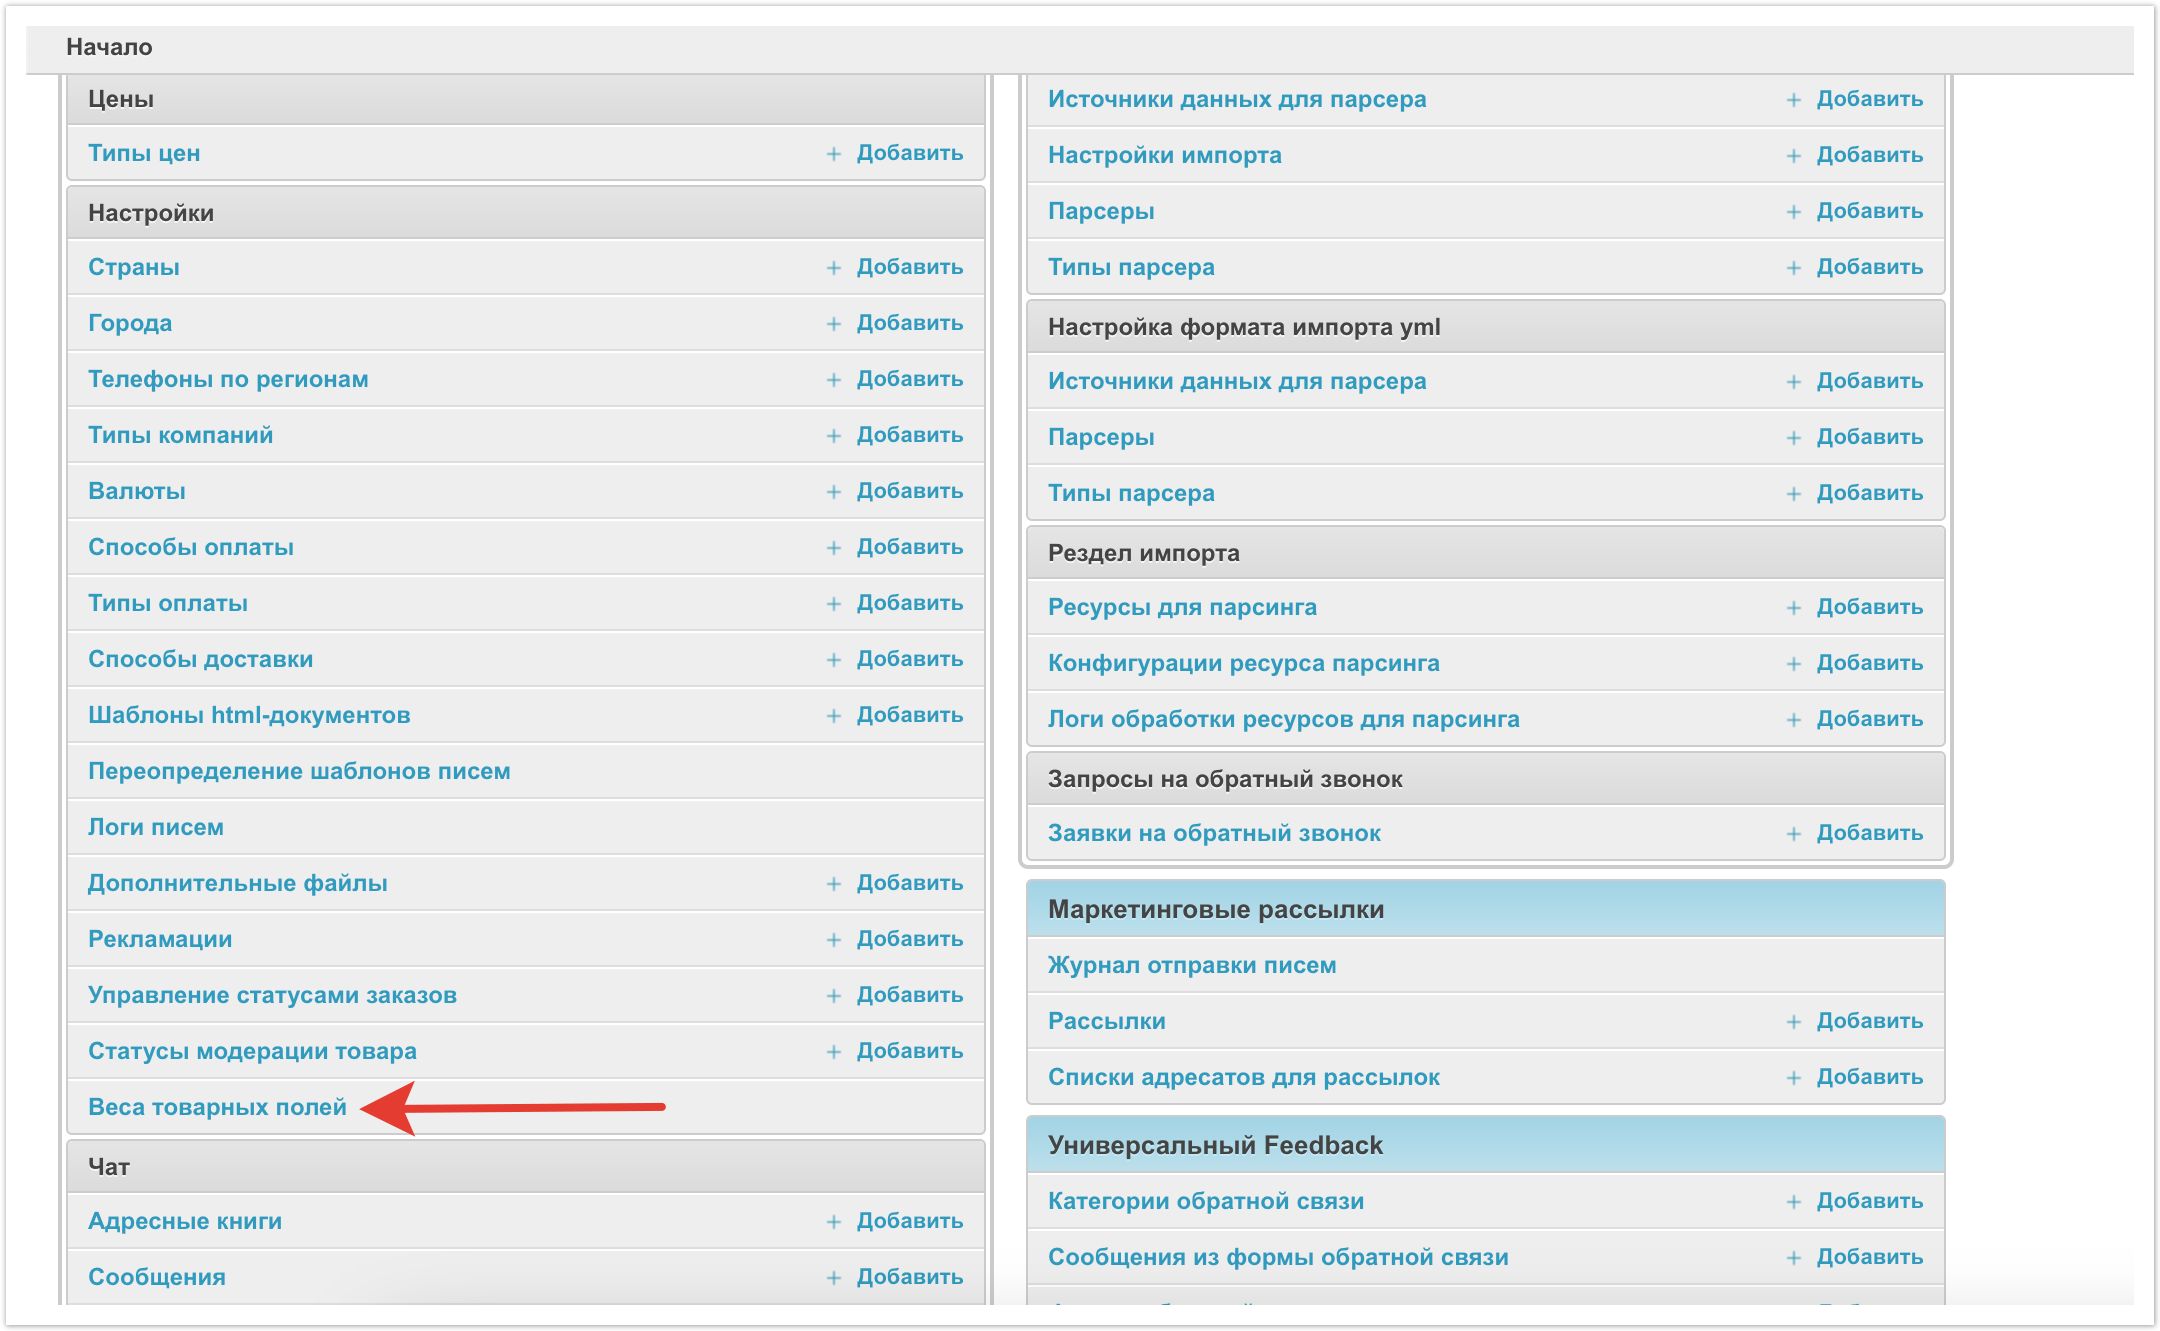
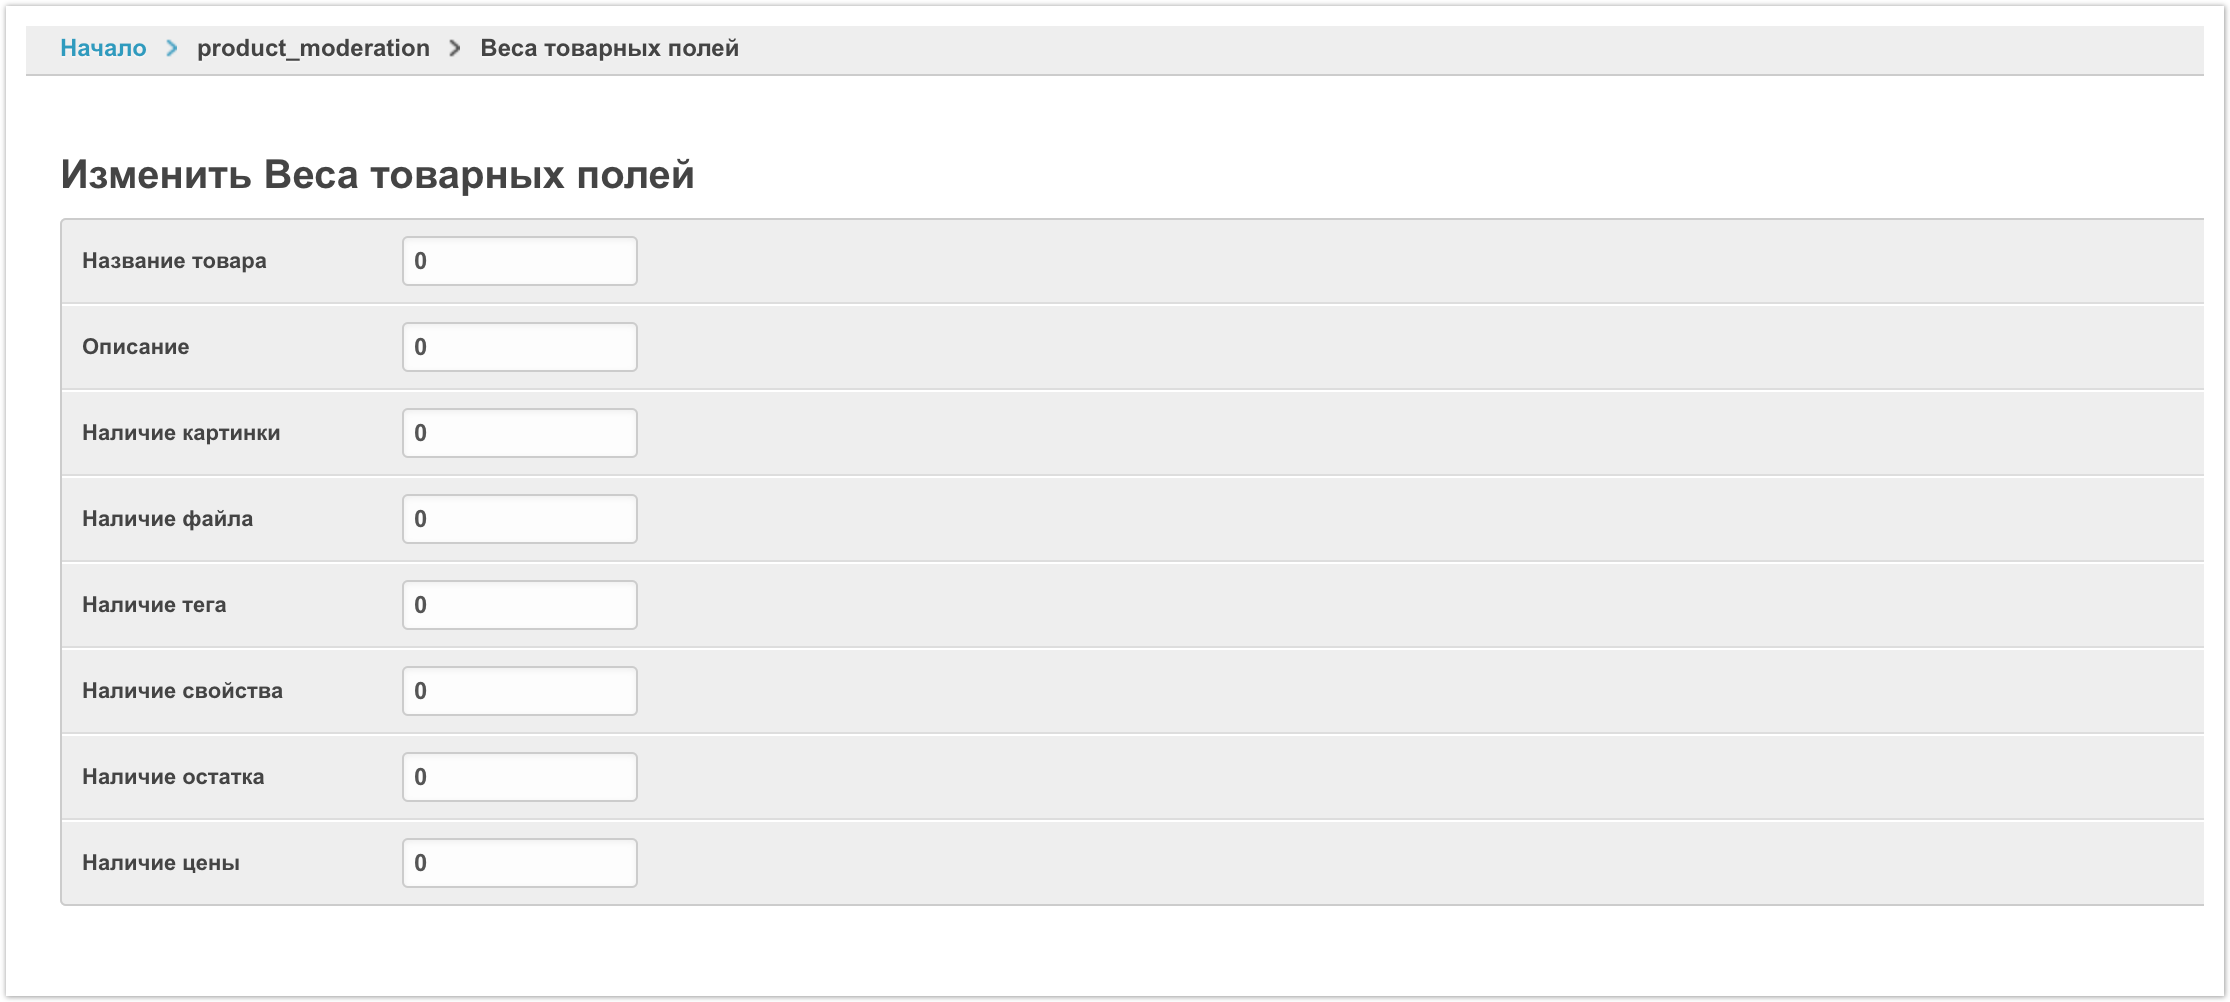
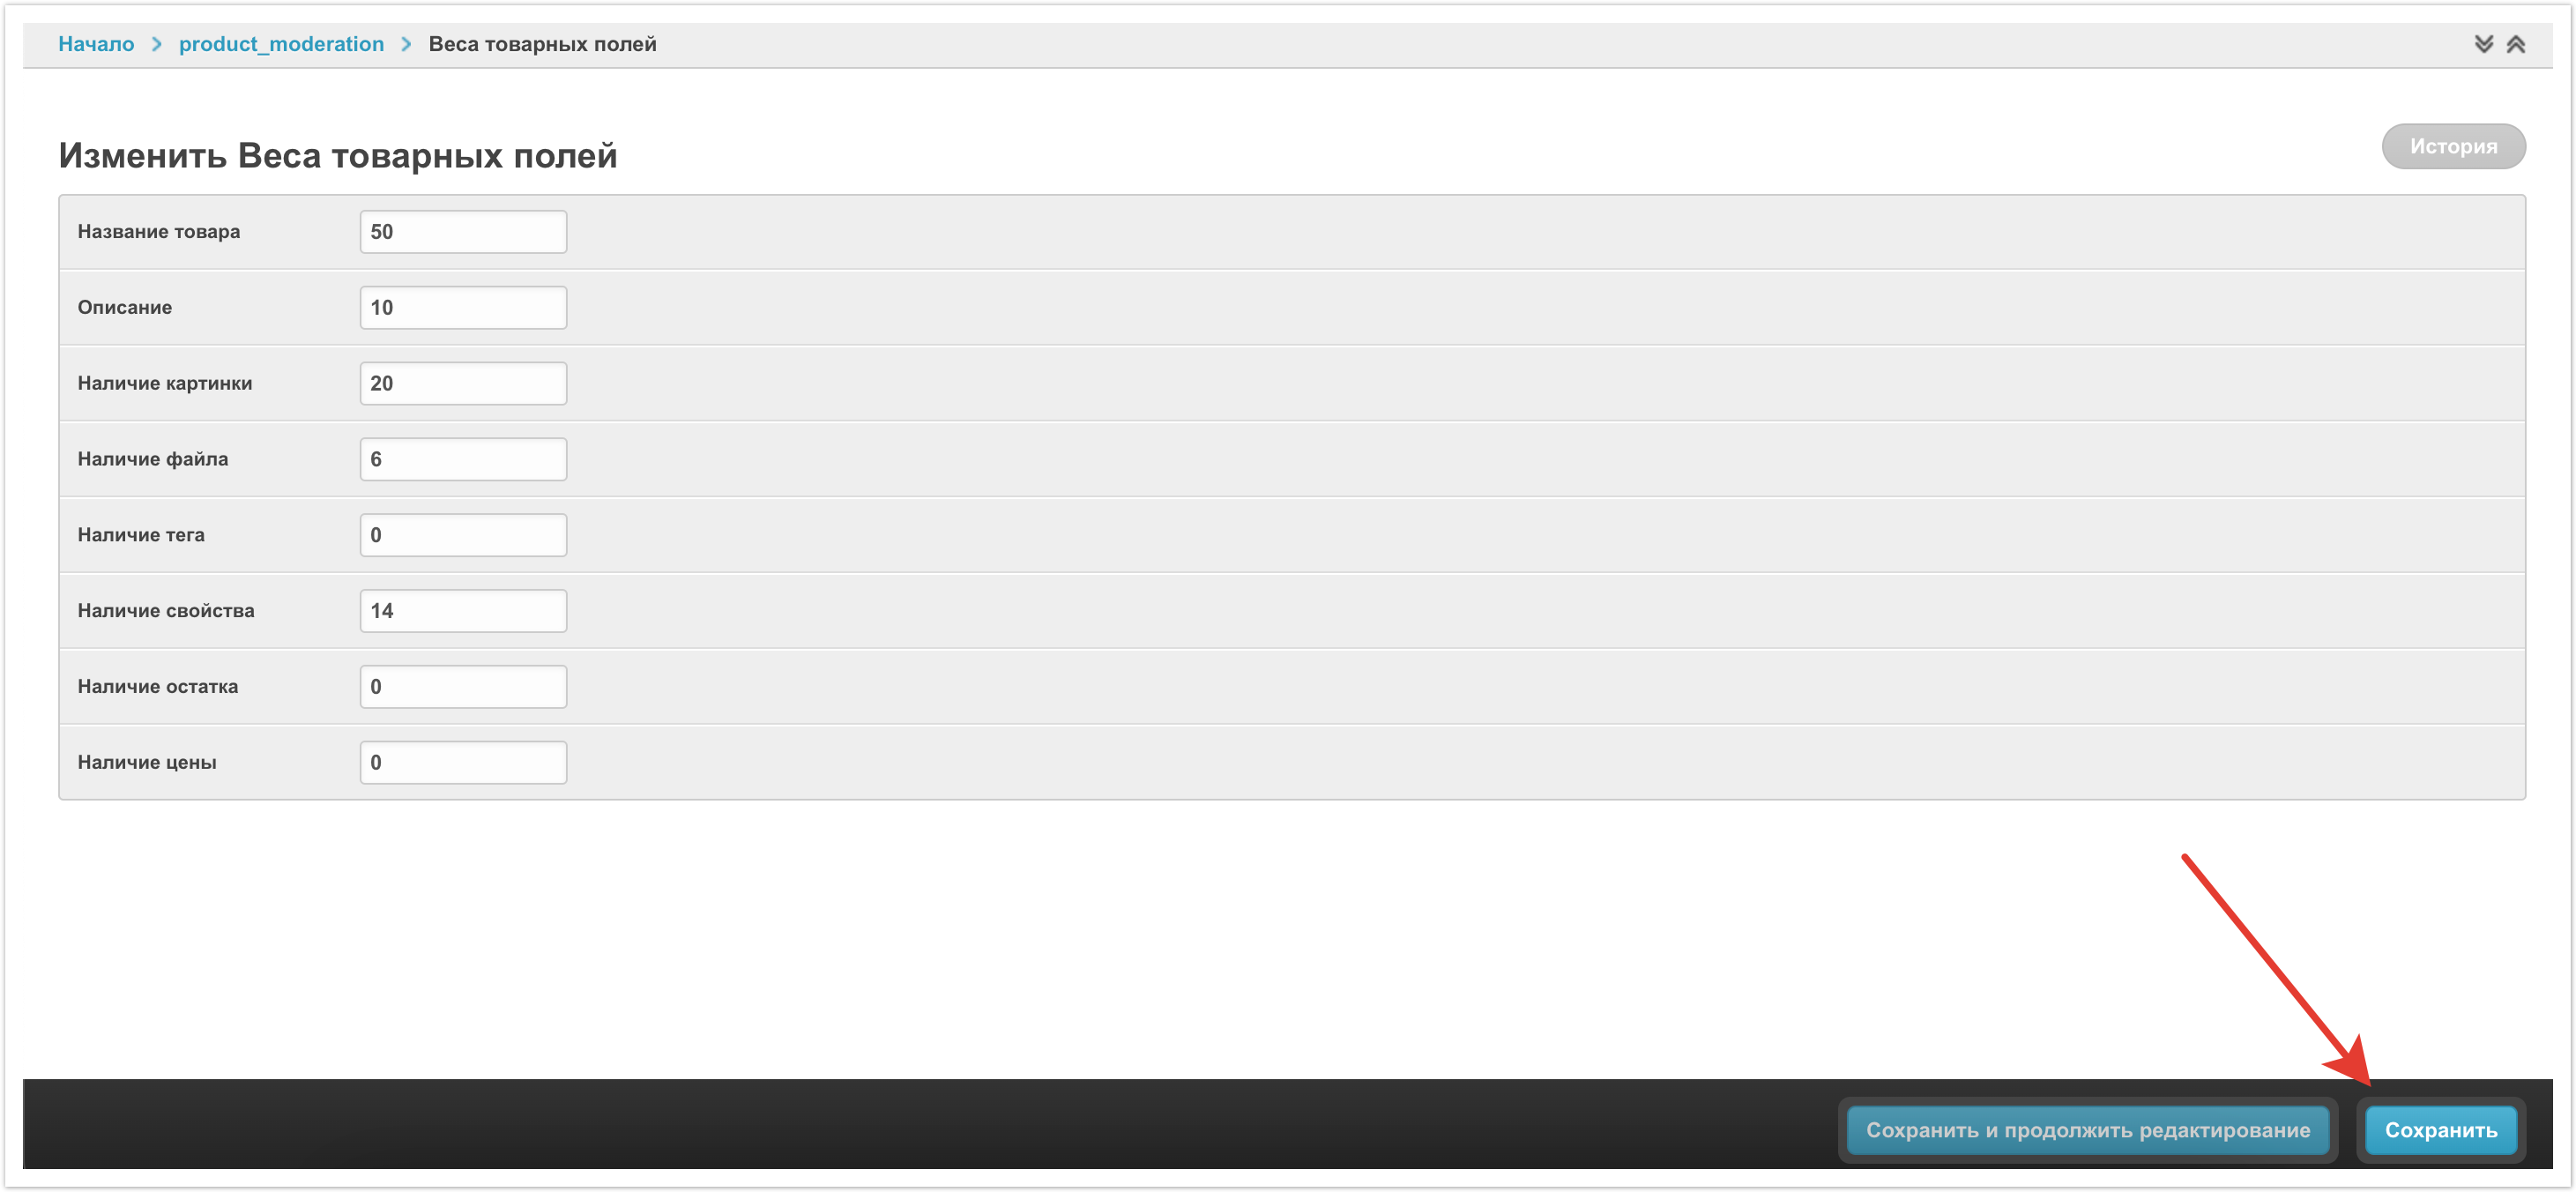
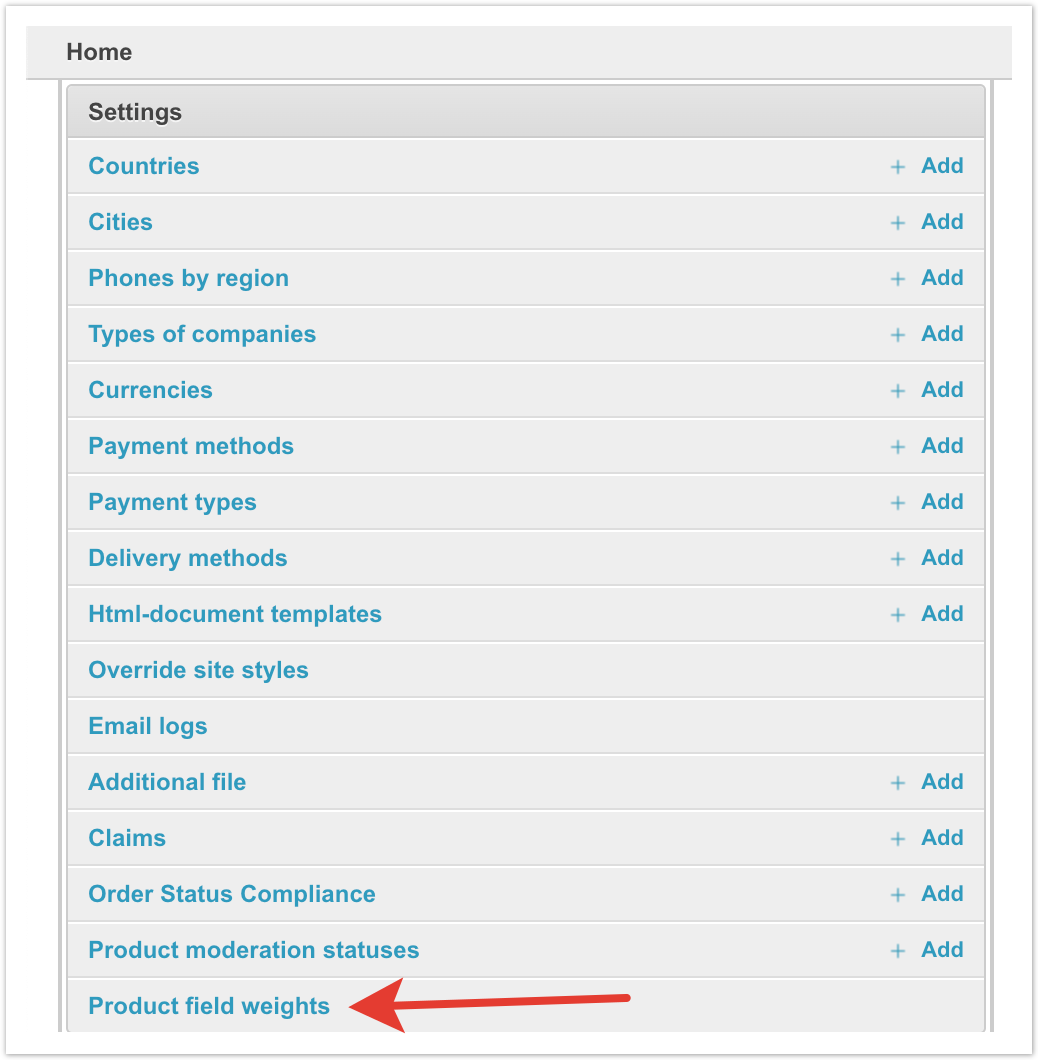
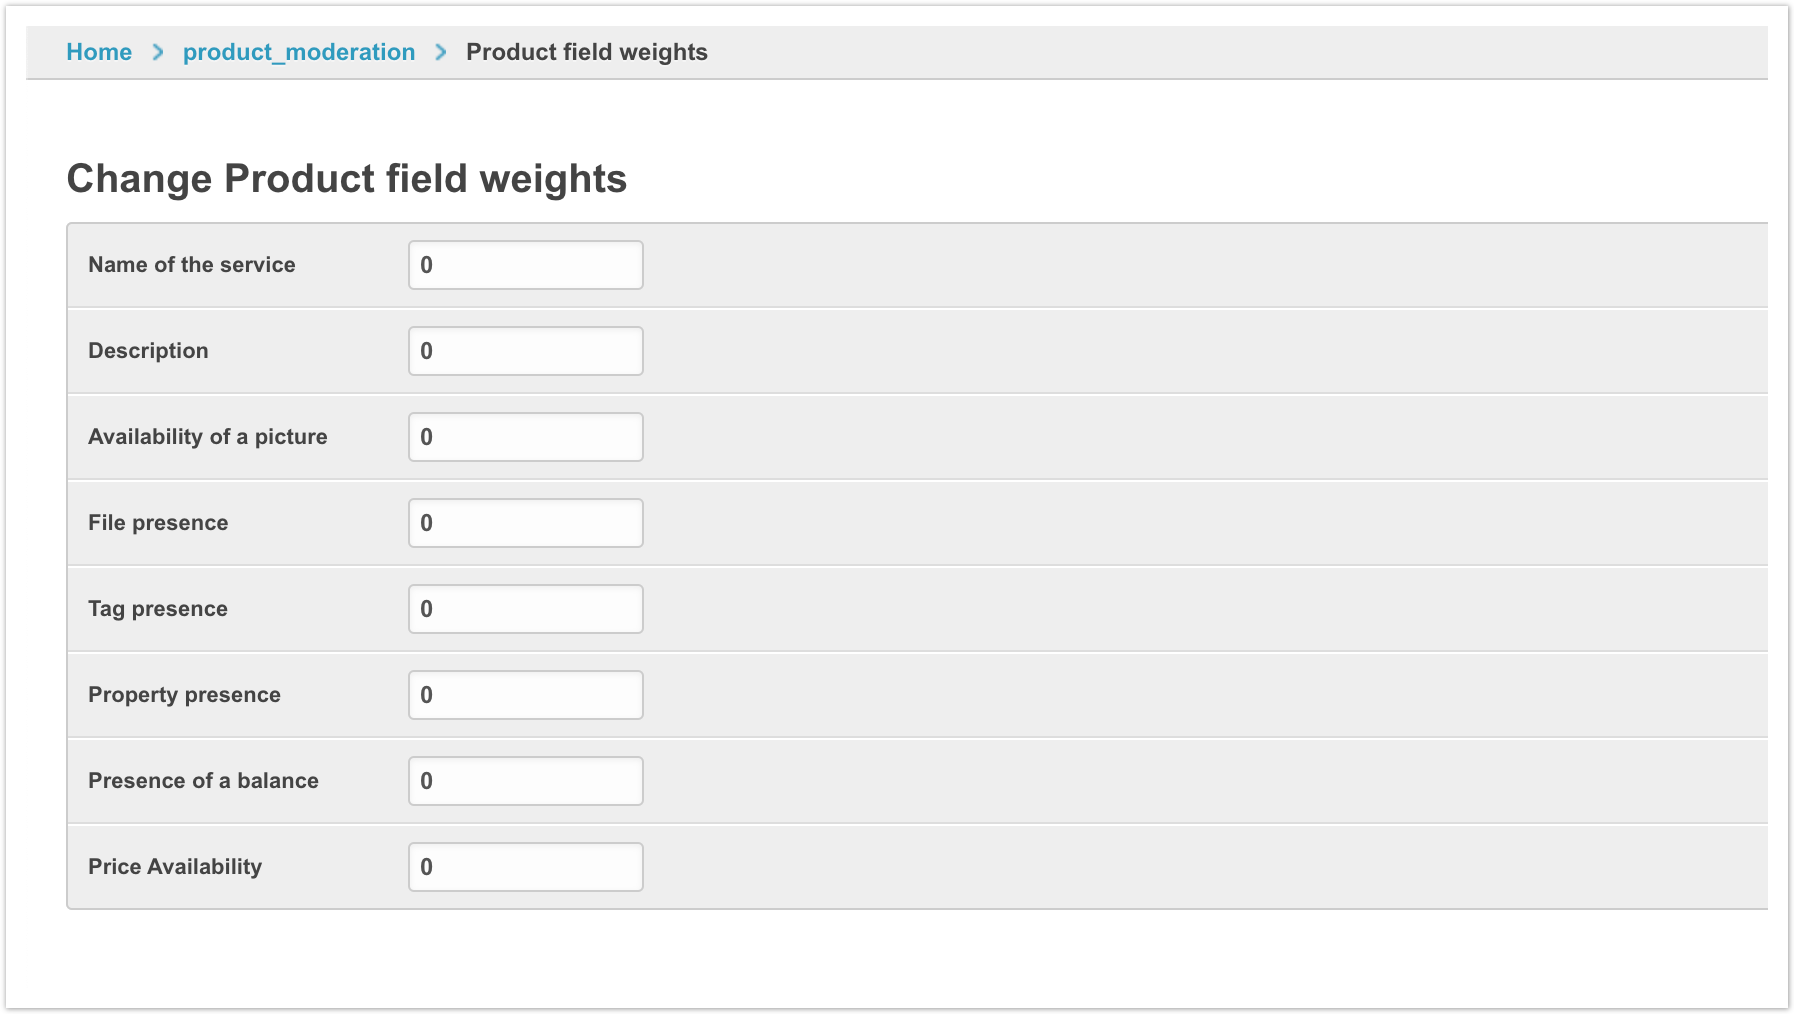
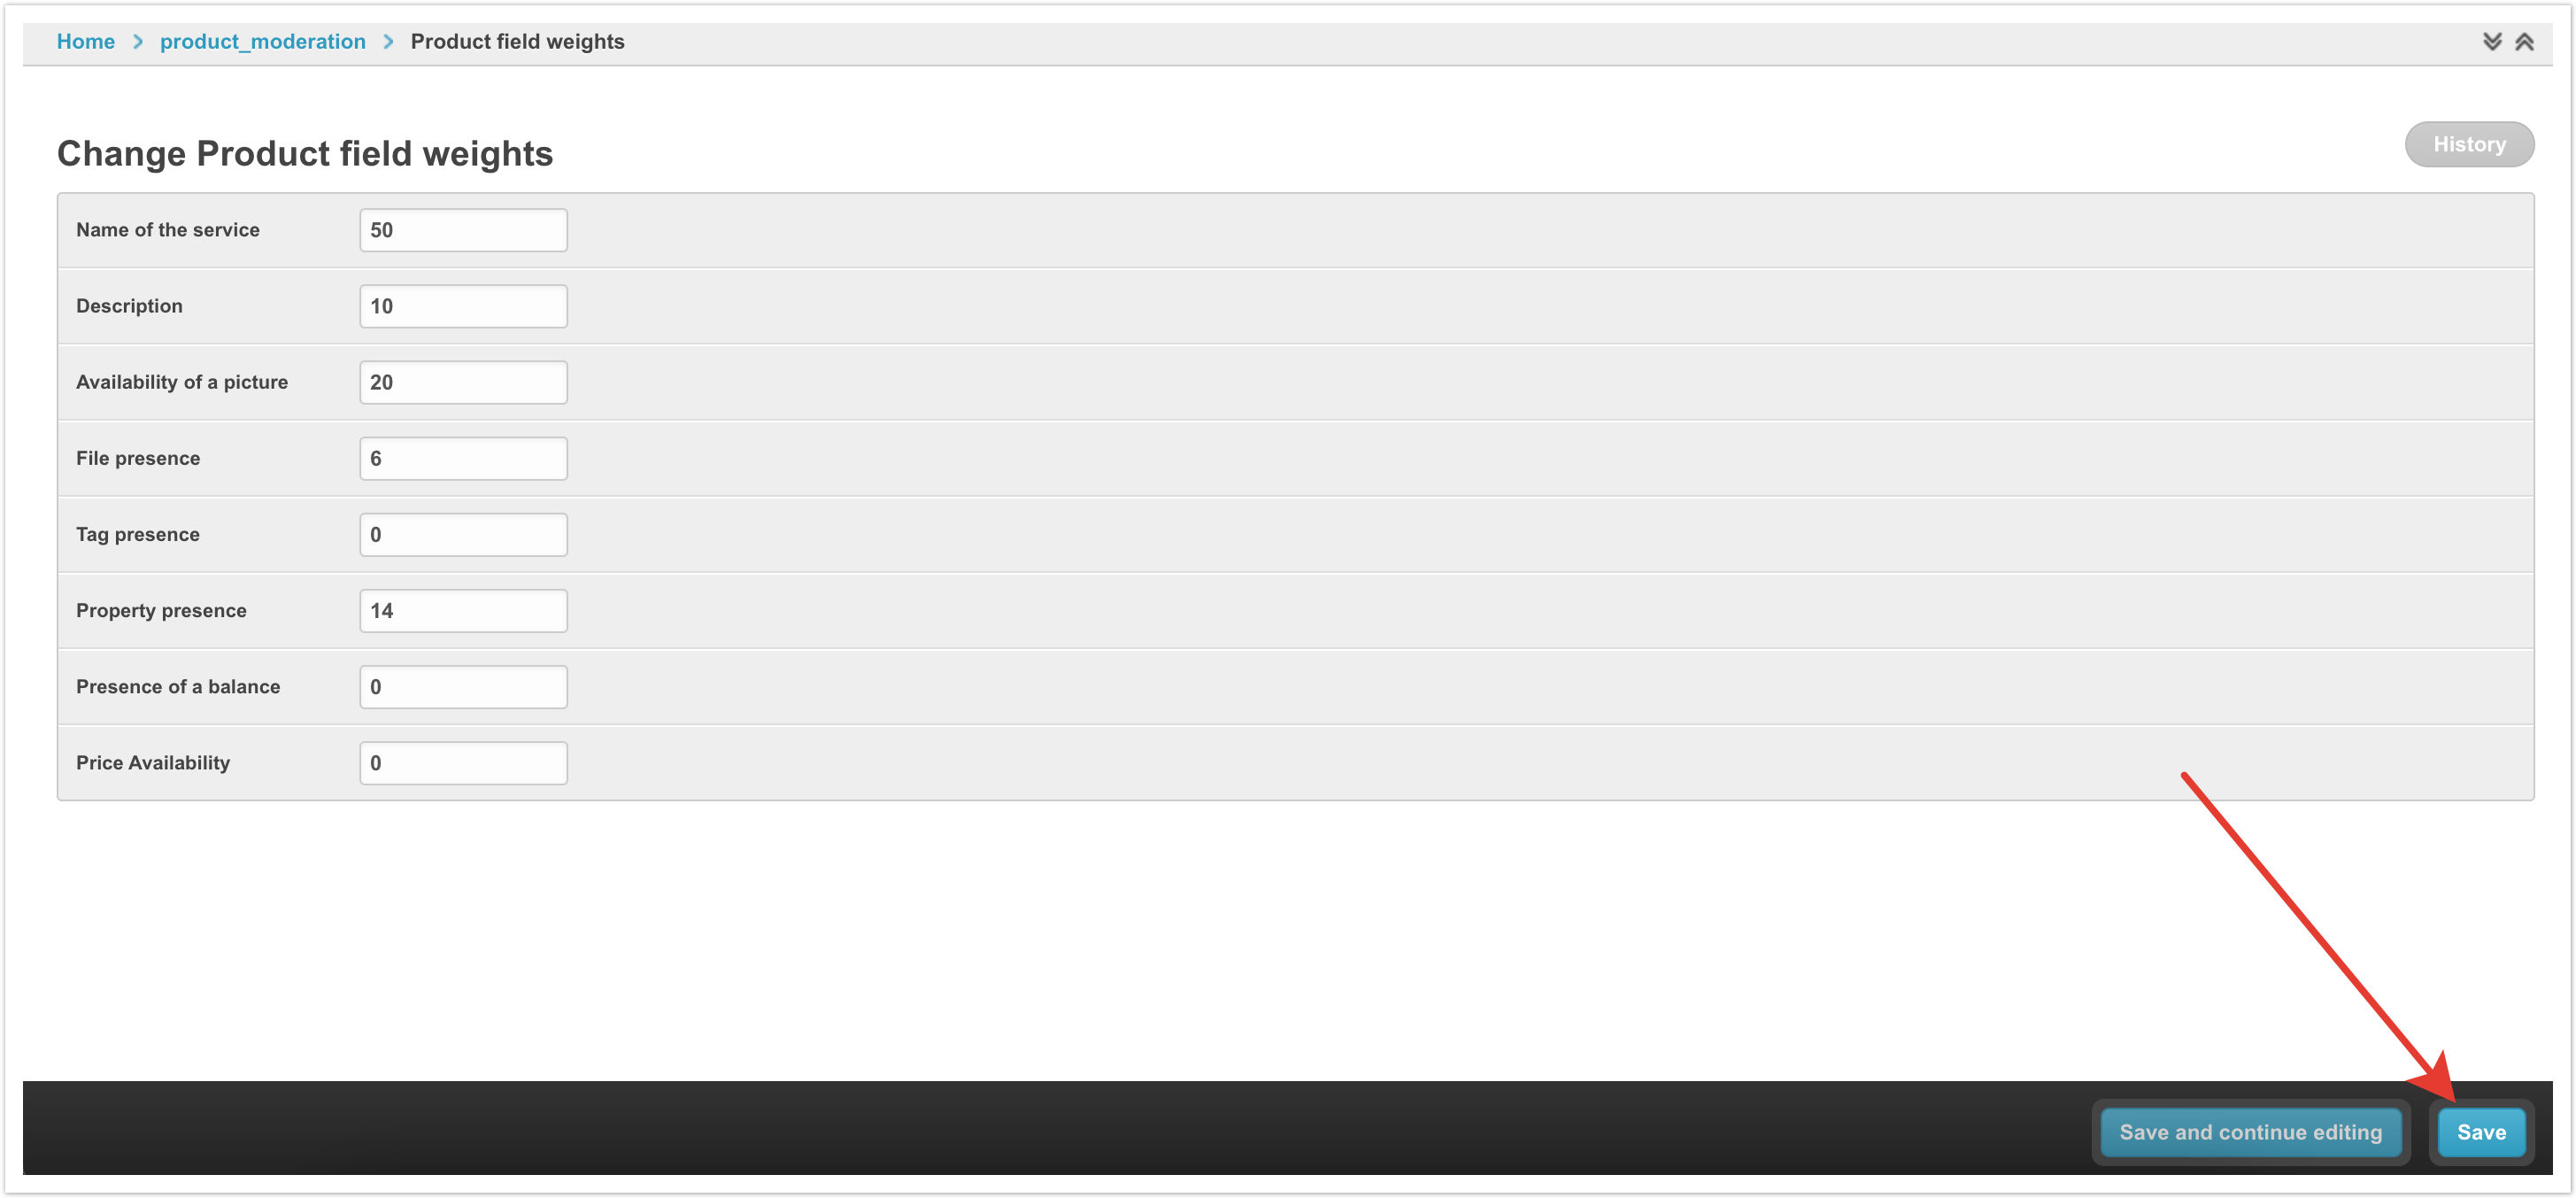
Настройка весов товарных полейЧтобы наглядно видеть процент заполнения карточки товара нужно настроить Веса товарных полей. Настройка выполняется в одноименном разделе панели администратора.
На открывшейся странице будет список полей товара, для которых можно задать и вес при расчете процента заполнения карточки товара.
Название товара - коэффициент веса названия товара в расчете процента заполненности. Описание - коэффициент веса наличия заполненного описания товара в расчете процента заполненности. Наличие картинки - коэффициент веса наличия изображения товара при расчете процента заполненности. Наличие файла - коэффициент веса наличия файла (блок Файлы) при расчете процента заполненности. Наличие тега - коэффициент веса наличия тега у товара при расчете процента заполненности. Наличие свойства - коэффициент веса наличия свойства (характеристики) товара при расчете процента заполненности. Наличие остатка - коэффициент веса наличия остатков по товару при расчете процента заполненности. Наличие цены - коэффициент веса наличия цен по товару при расчете процента заполненности.
После того как все расчеты проведены и данные по весам заполнены для всех полей, то нужно Сохранить изменения.
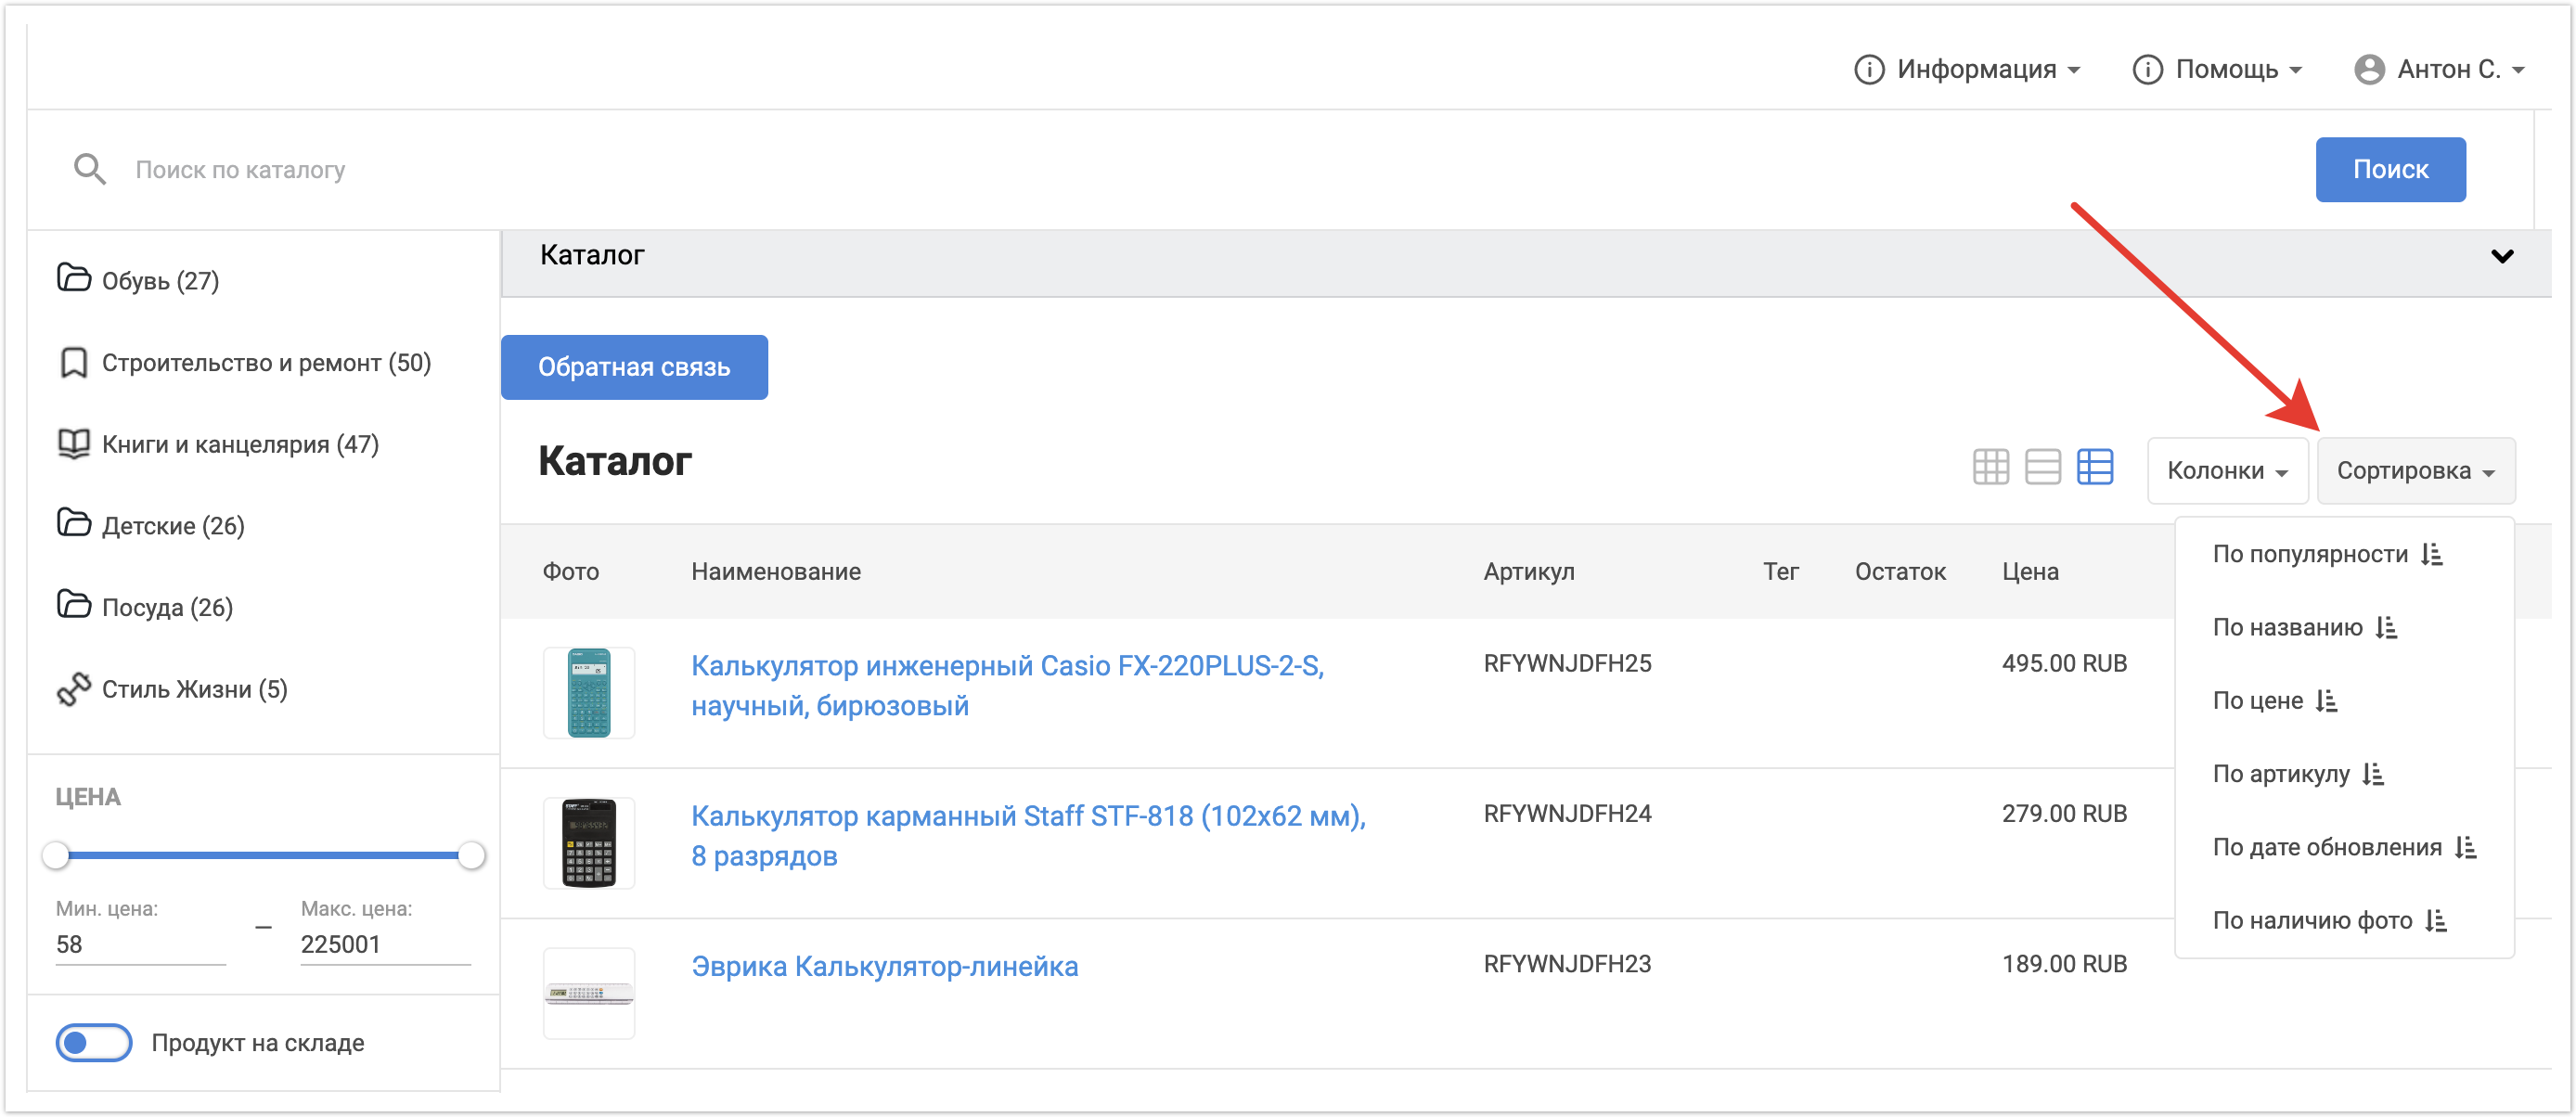
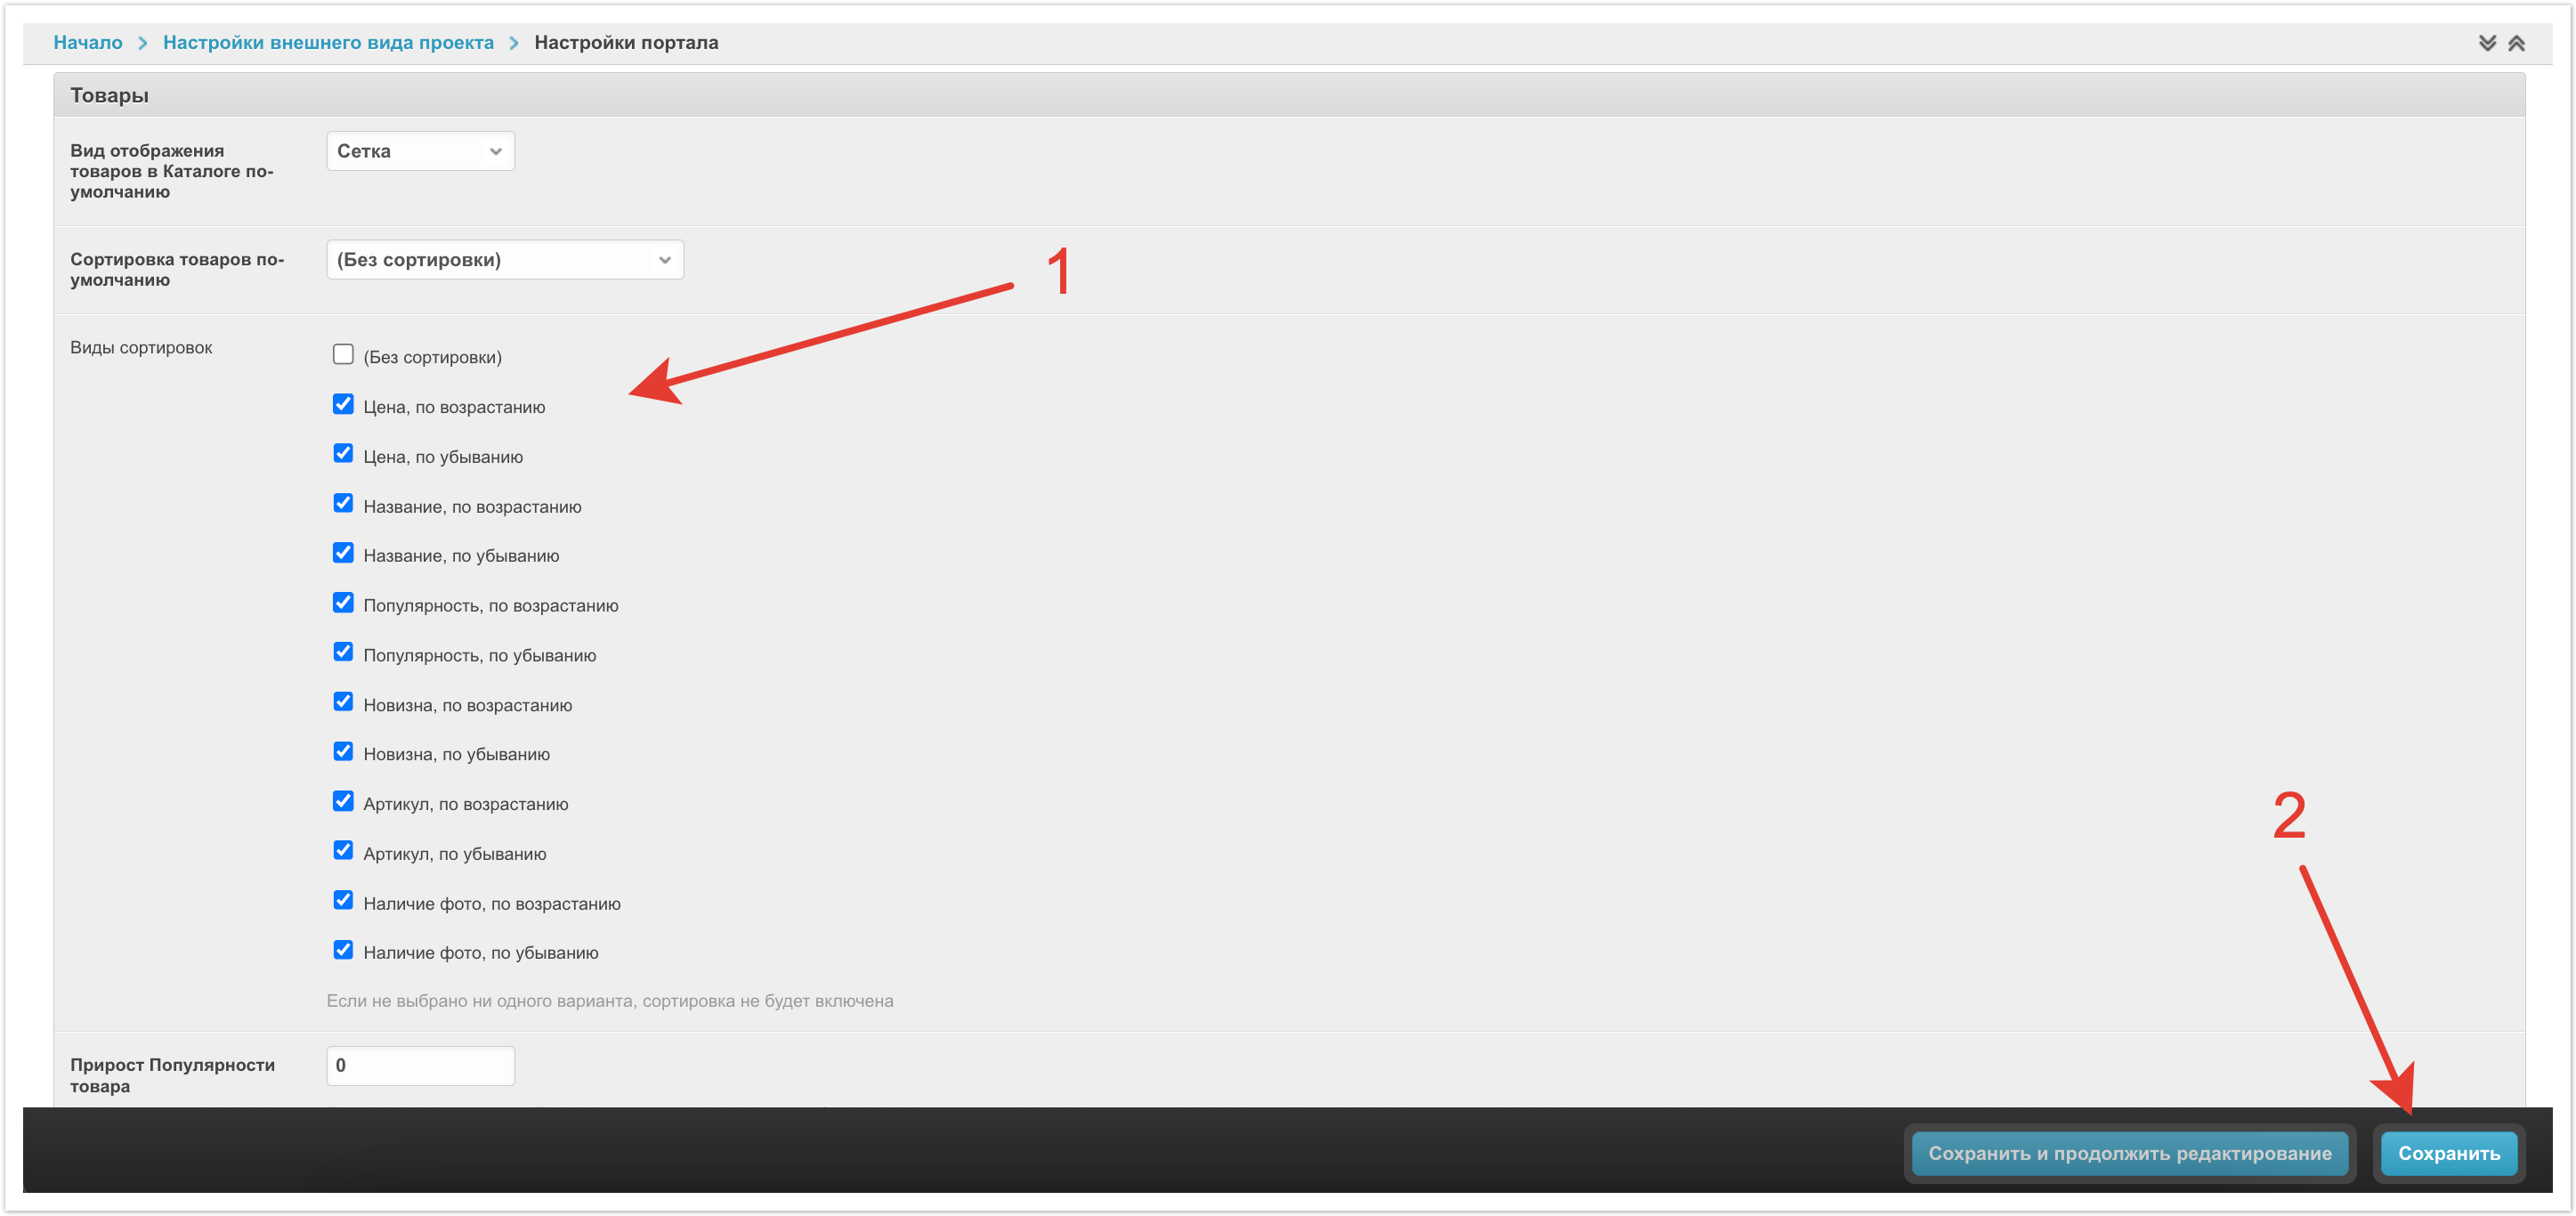
Настройка доступных сортировок в каталогеАдминистратор платформы может также настроить виды сортировок, которые будут доступны пользователям в их каталоге.
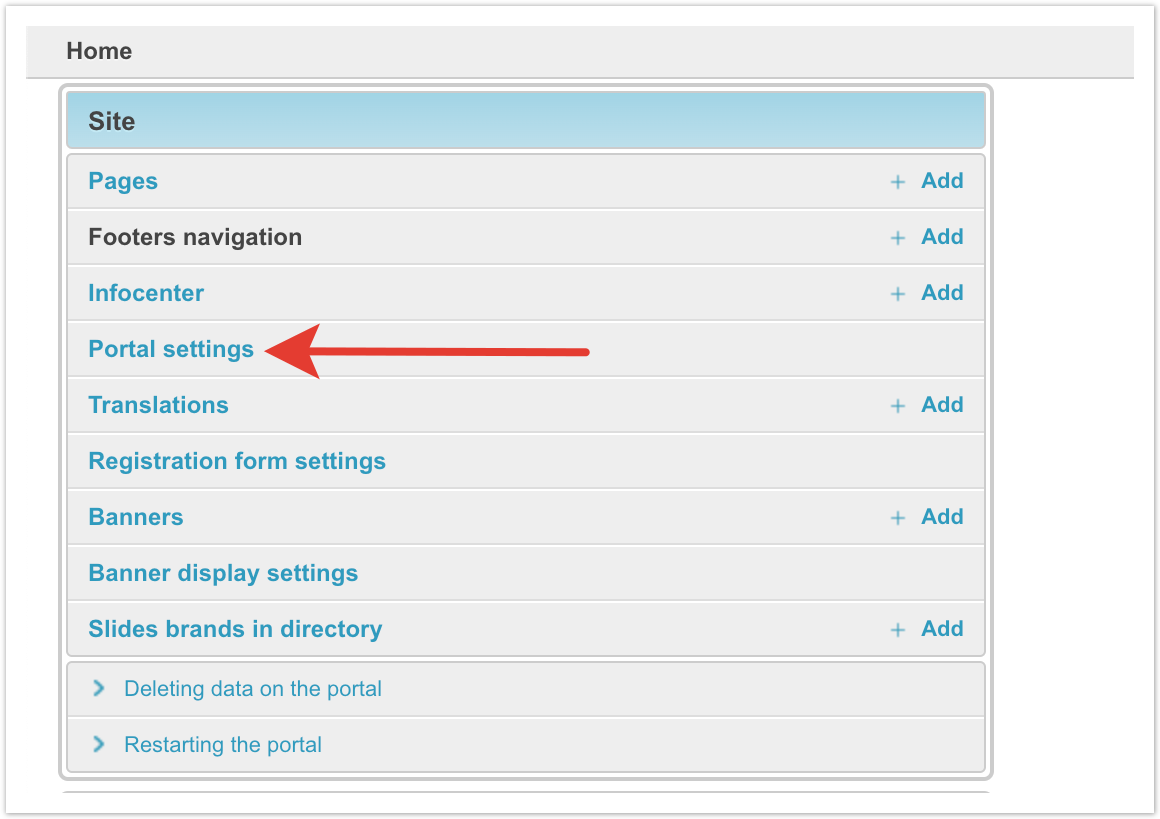
Для этого нужно перейти в раздел Настройки портала.
Пролистать страницу до блока Товары. В поле Виды сортировок с помощью чек-боксов выбрать те, которые должны быть доступны для пользователей платформы. После внесения изменений нужно их Сохранить.
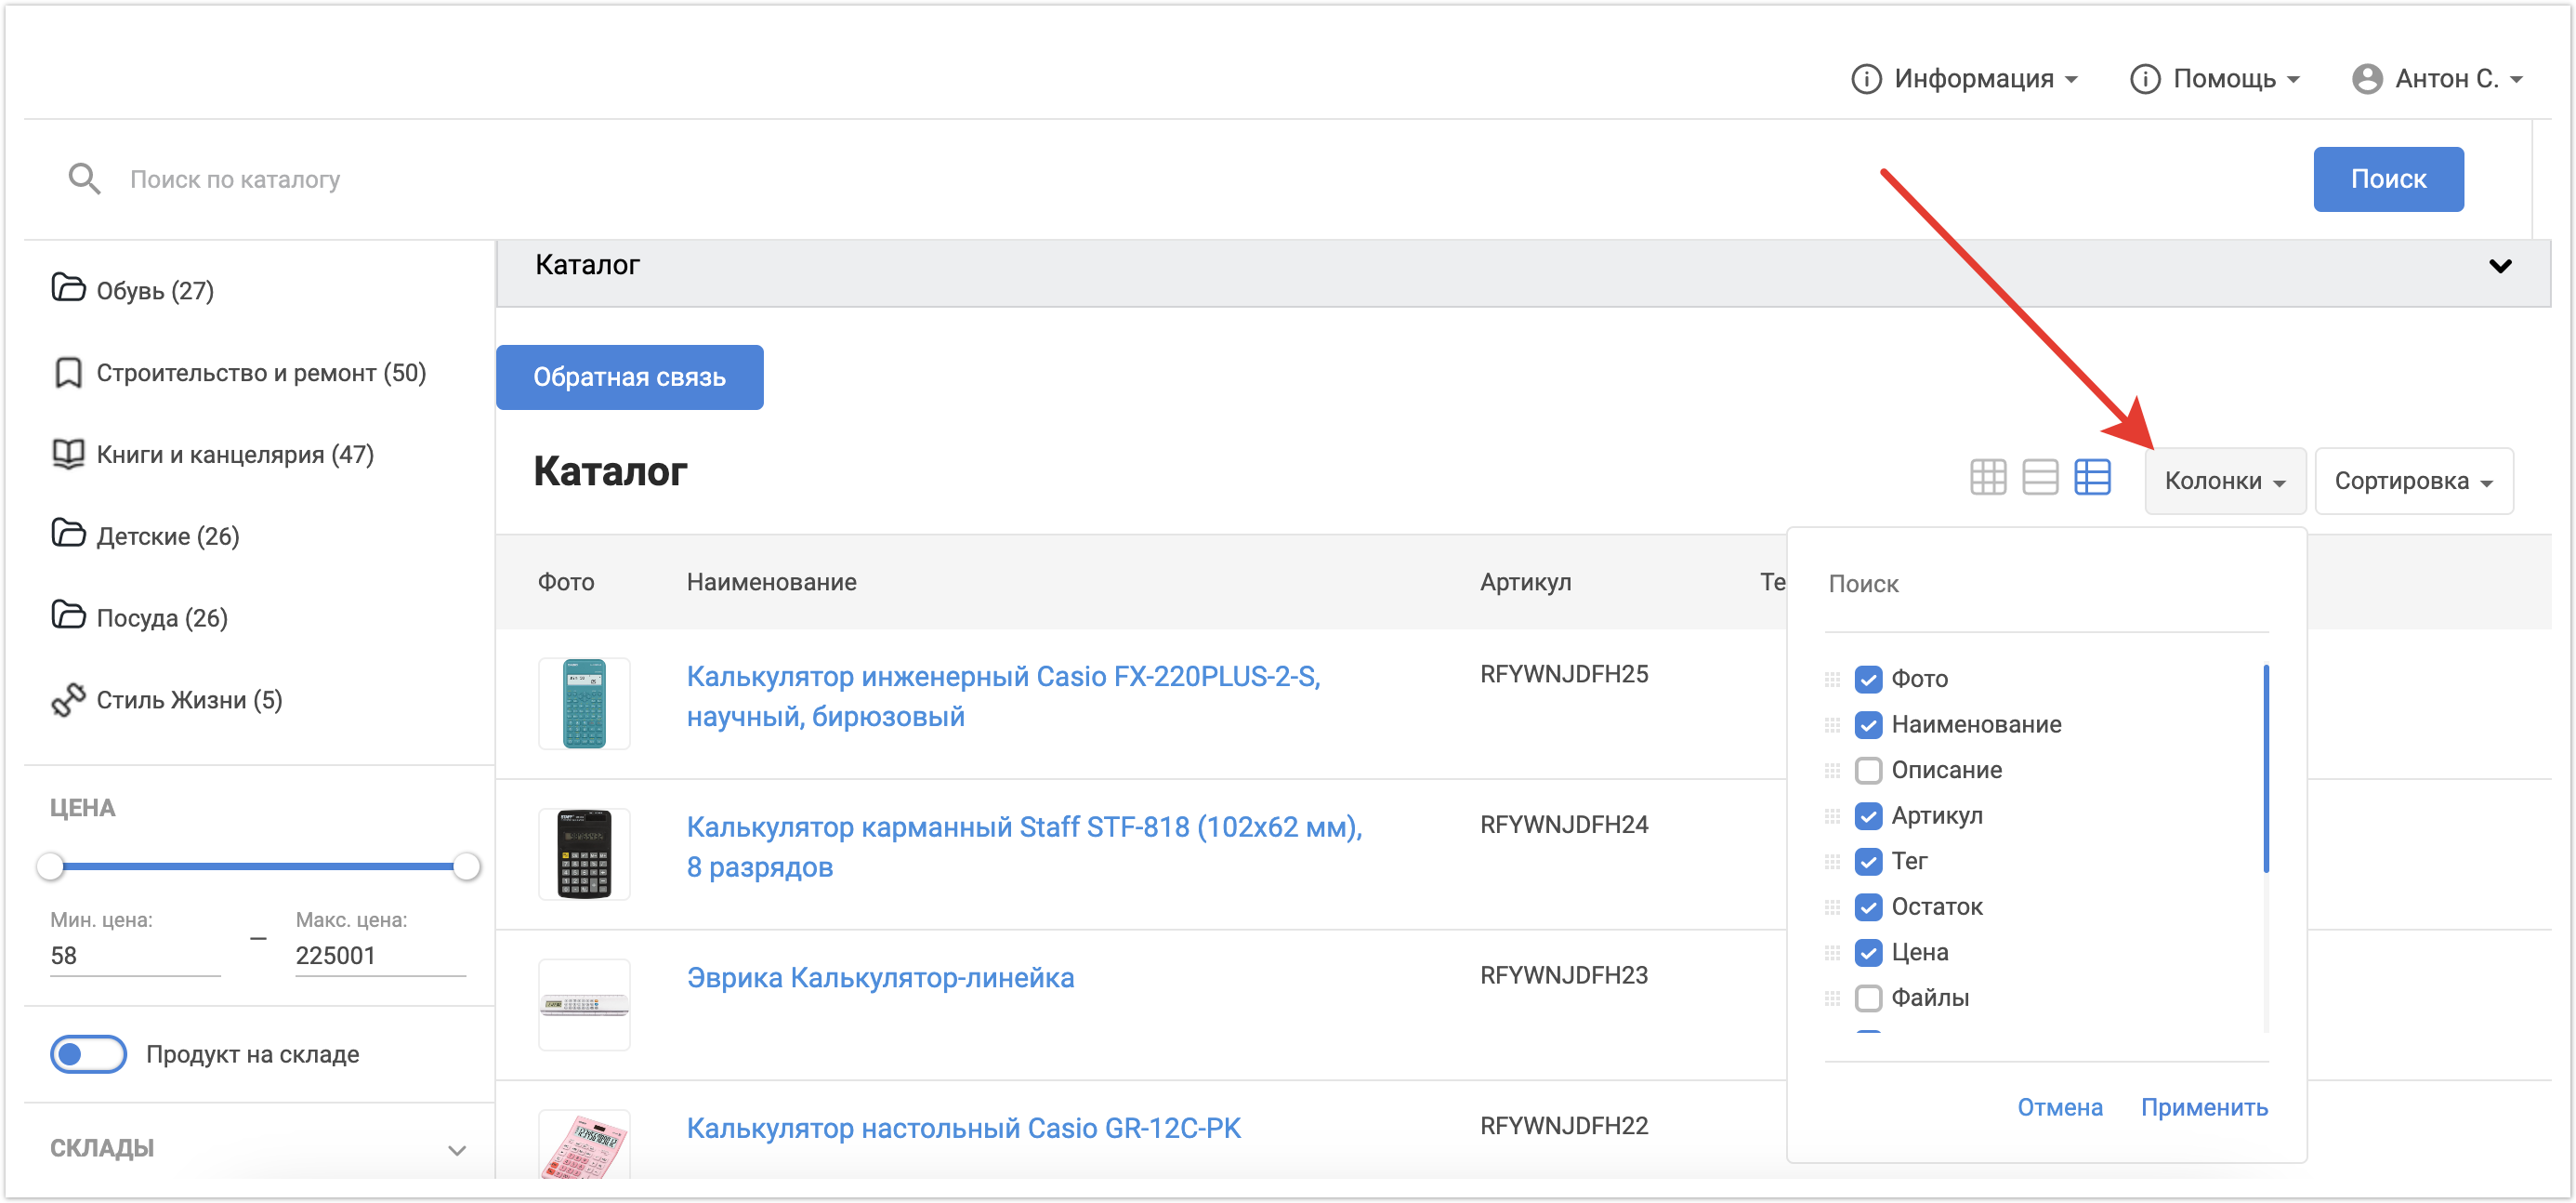
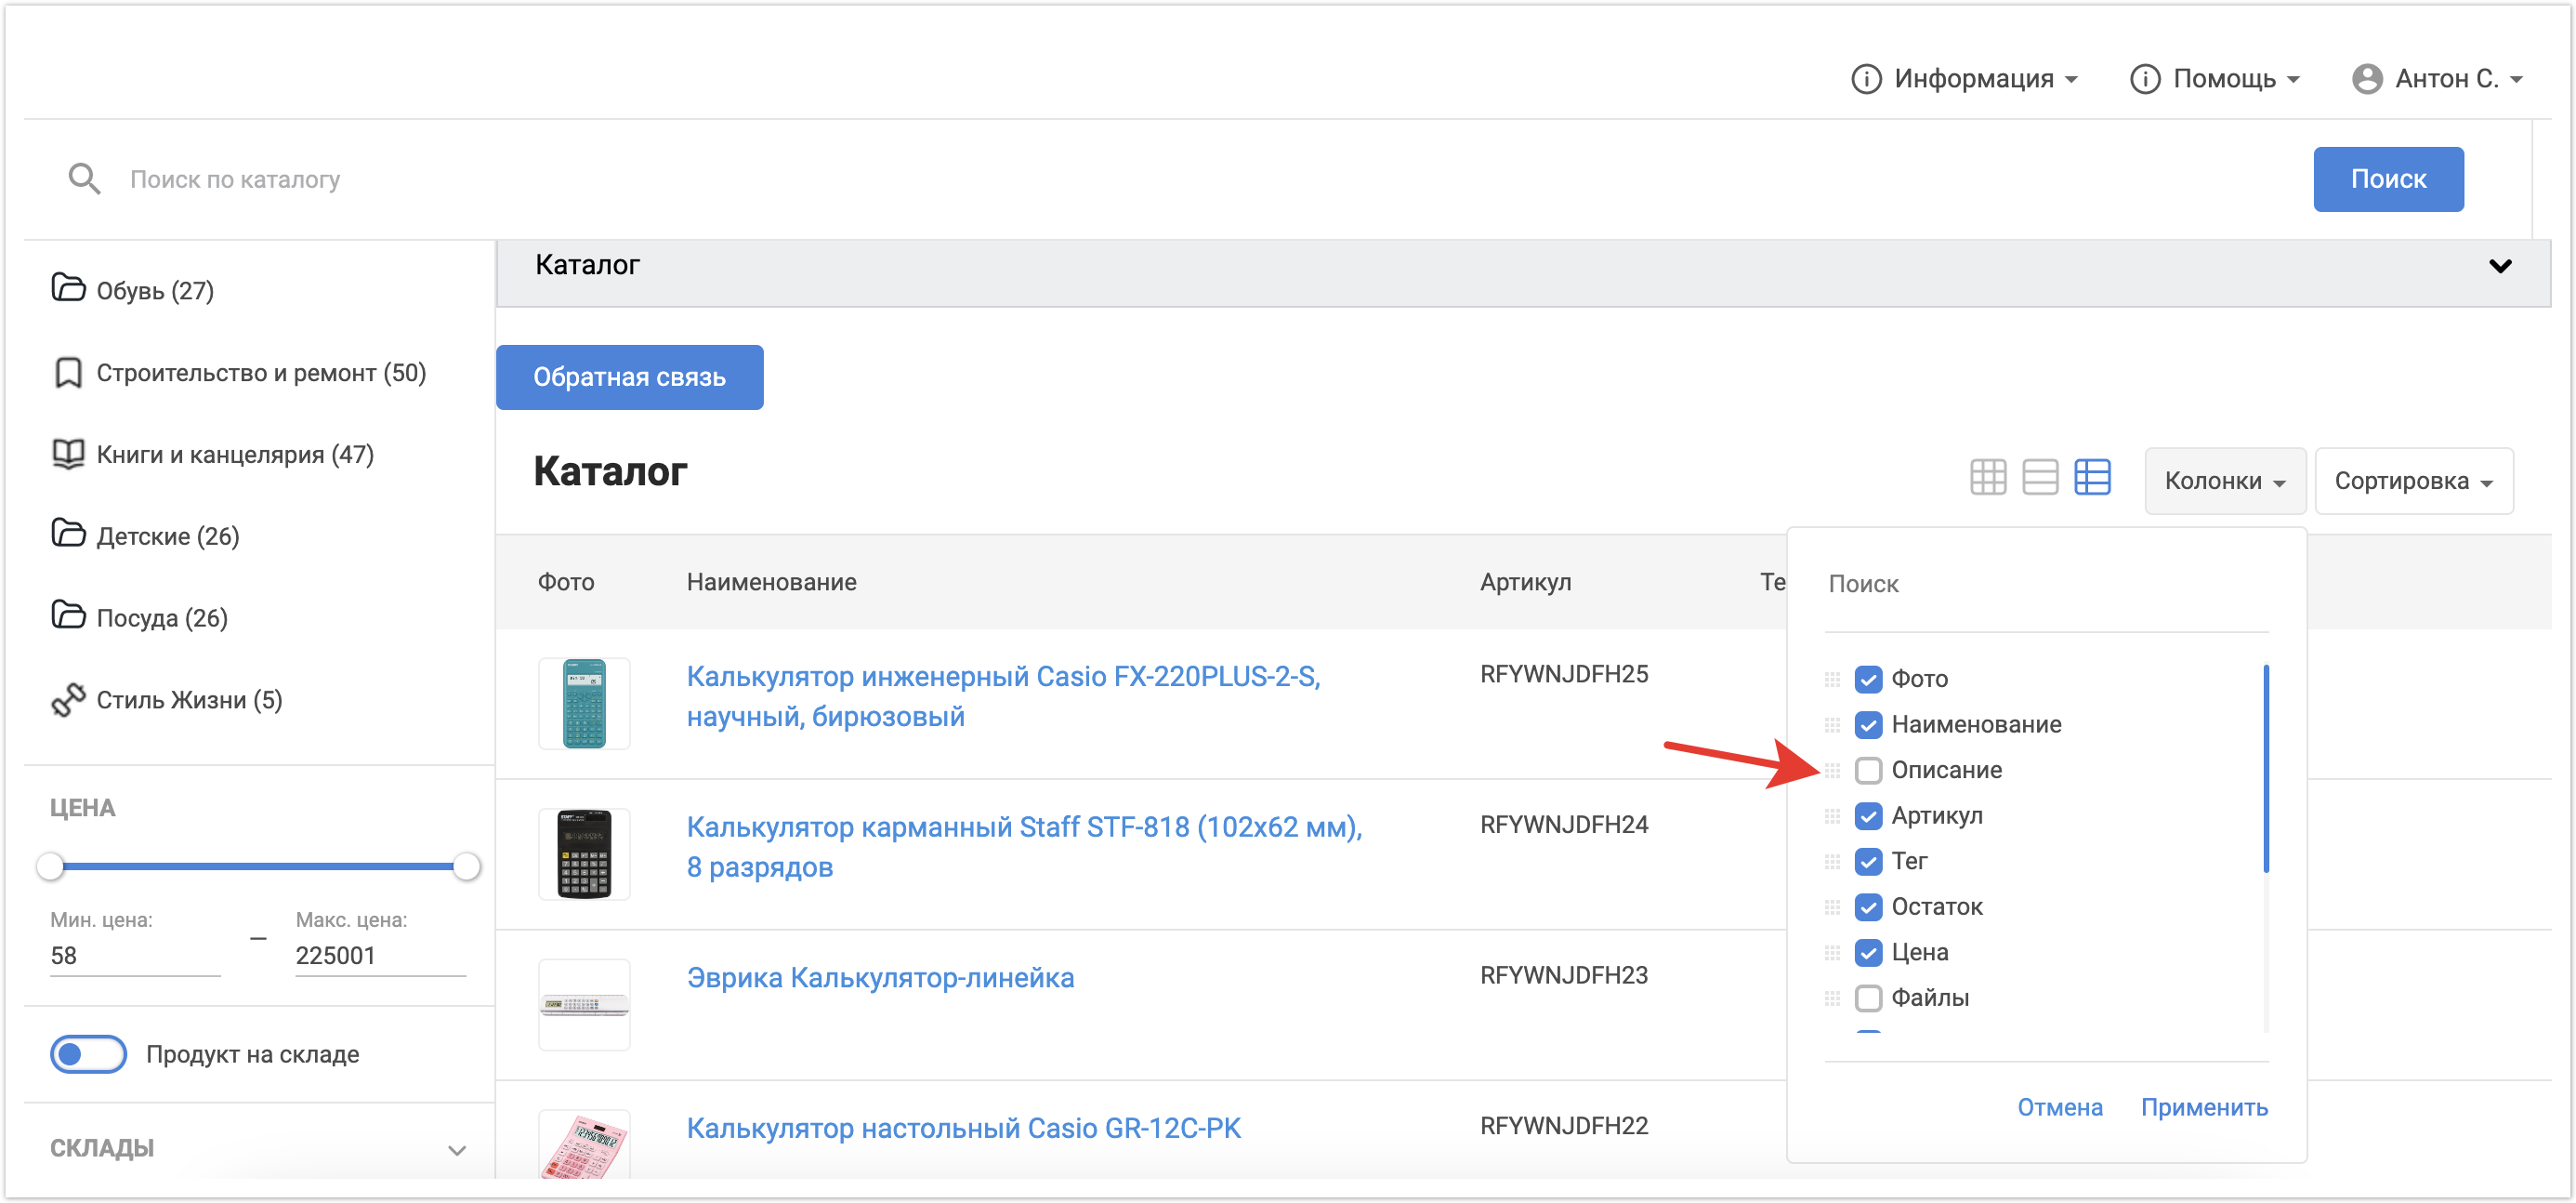
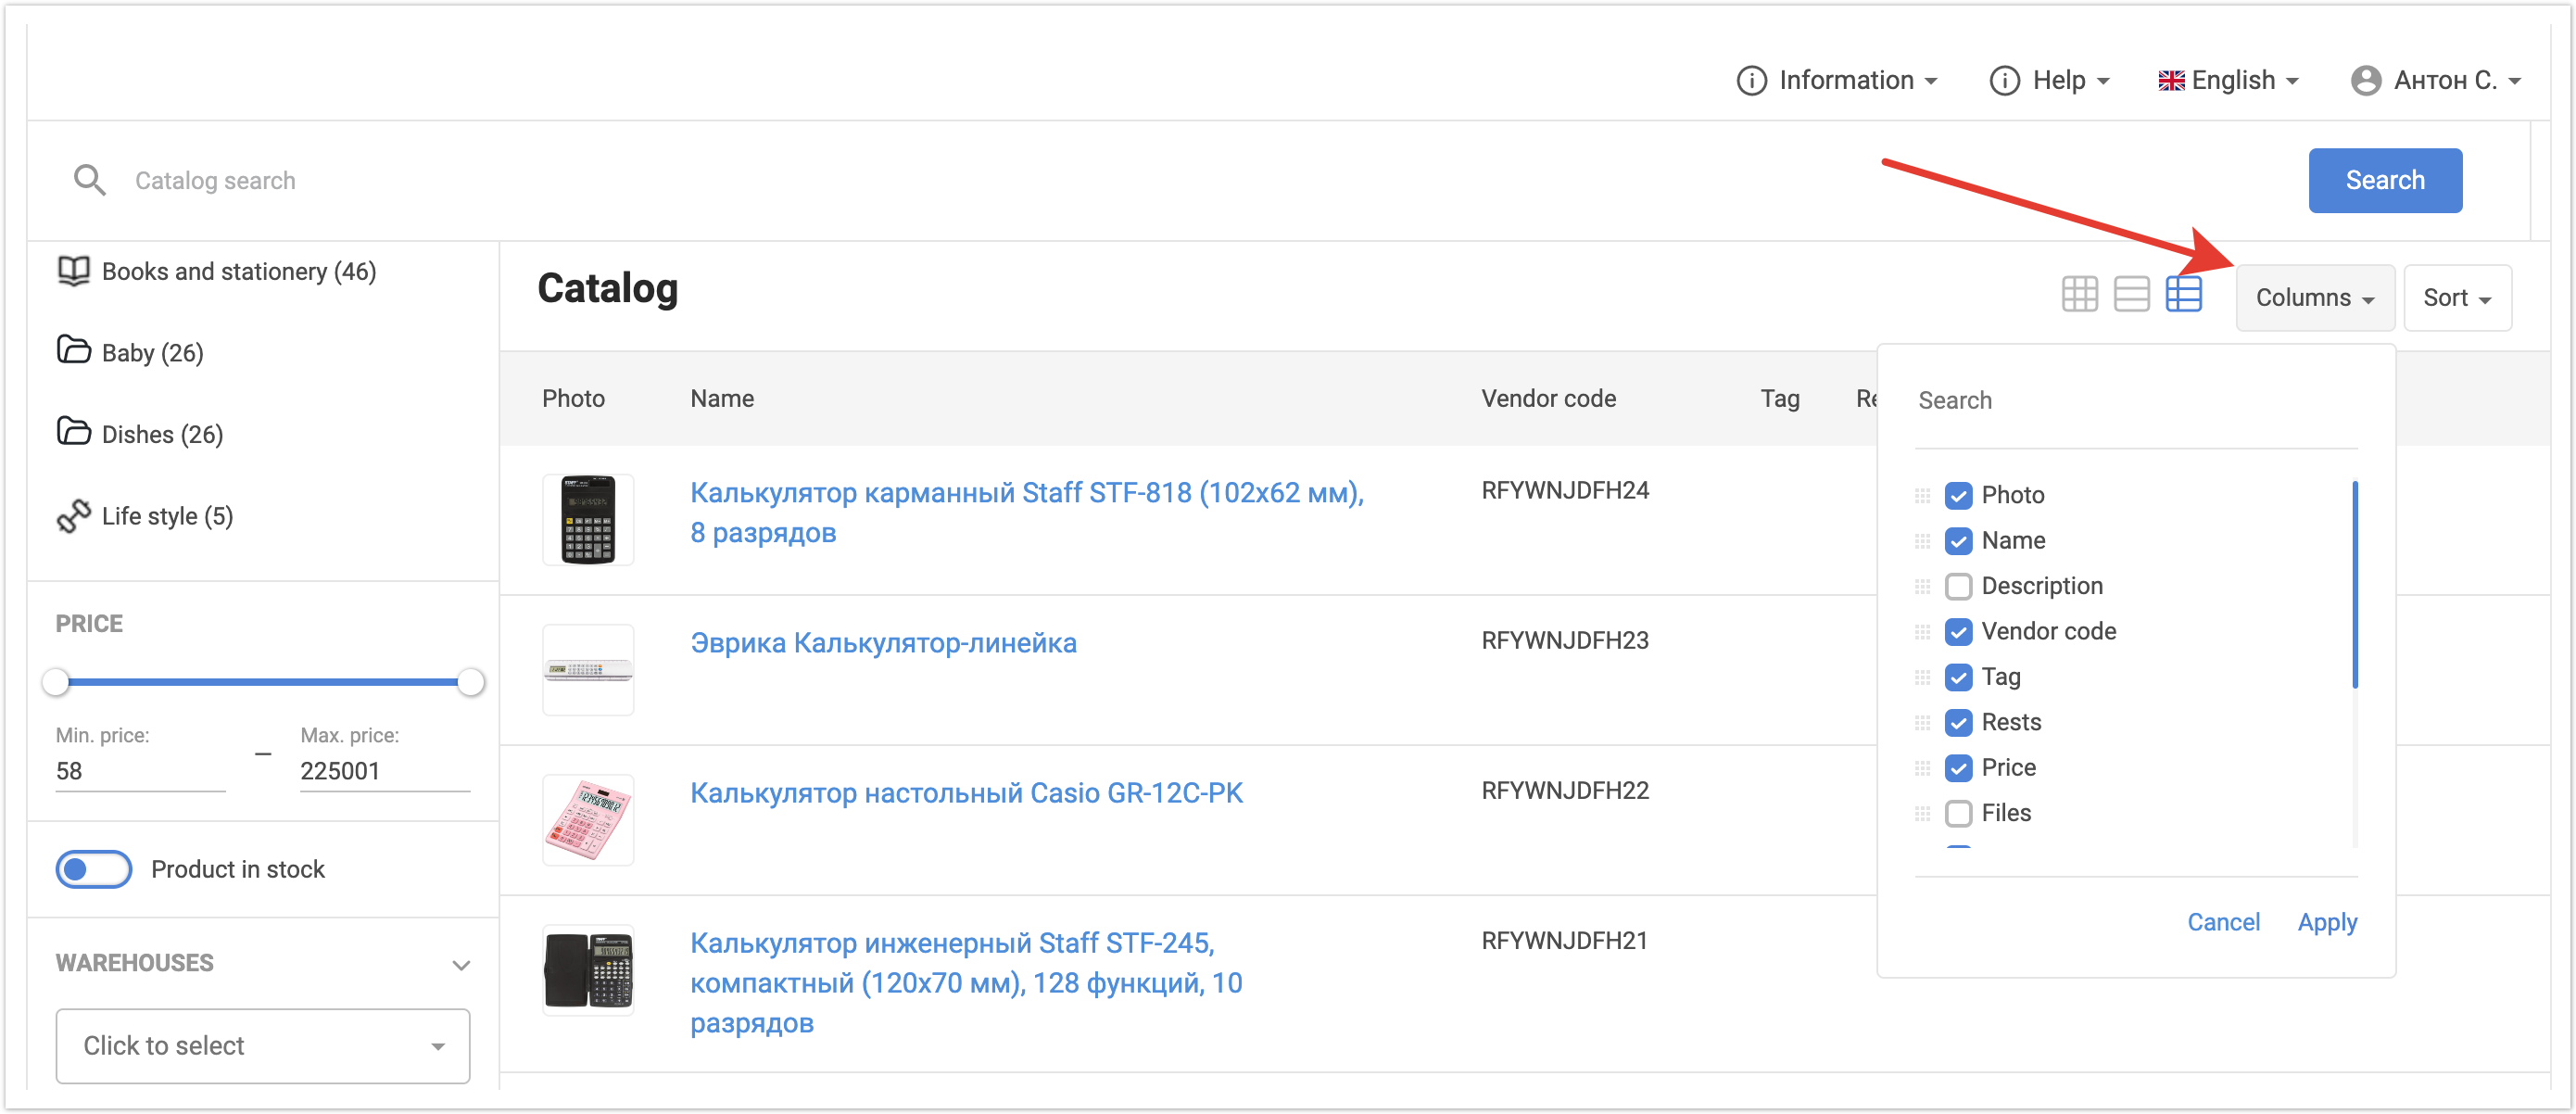
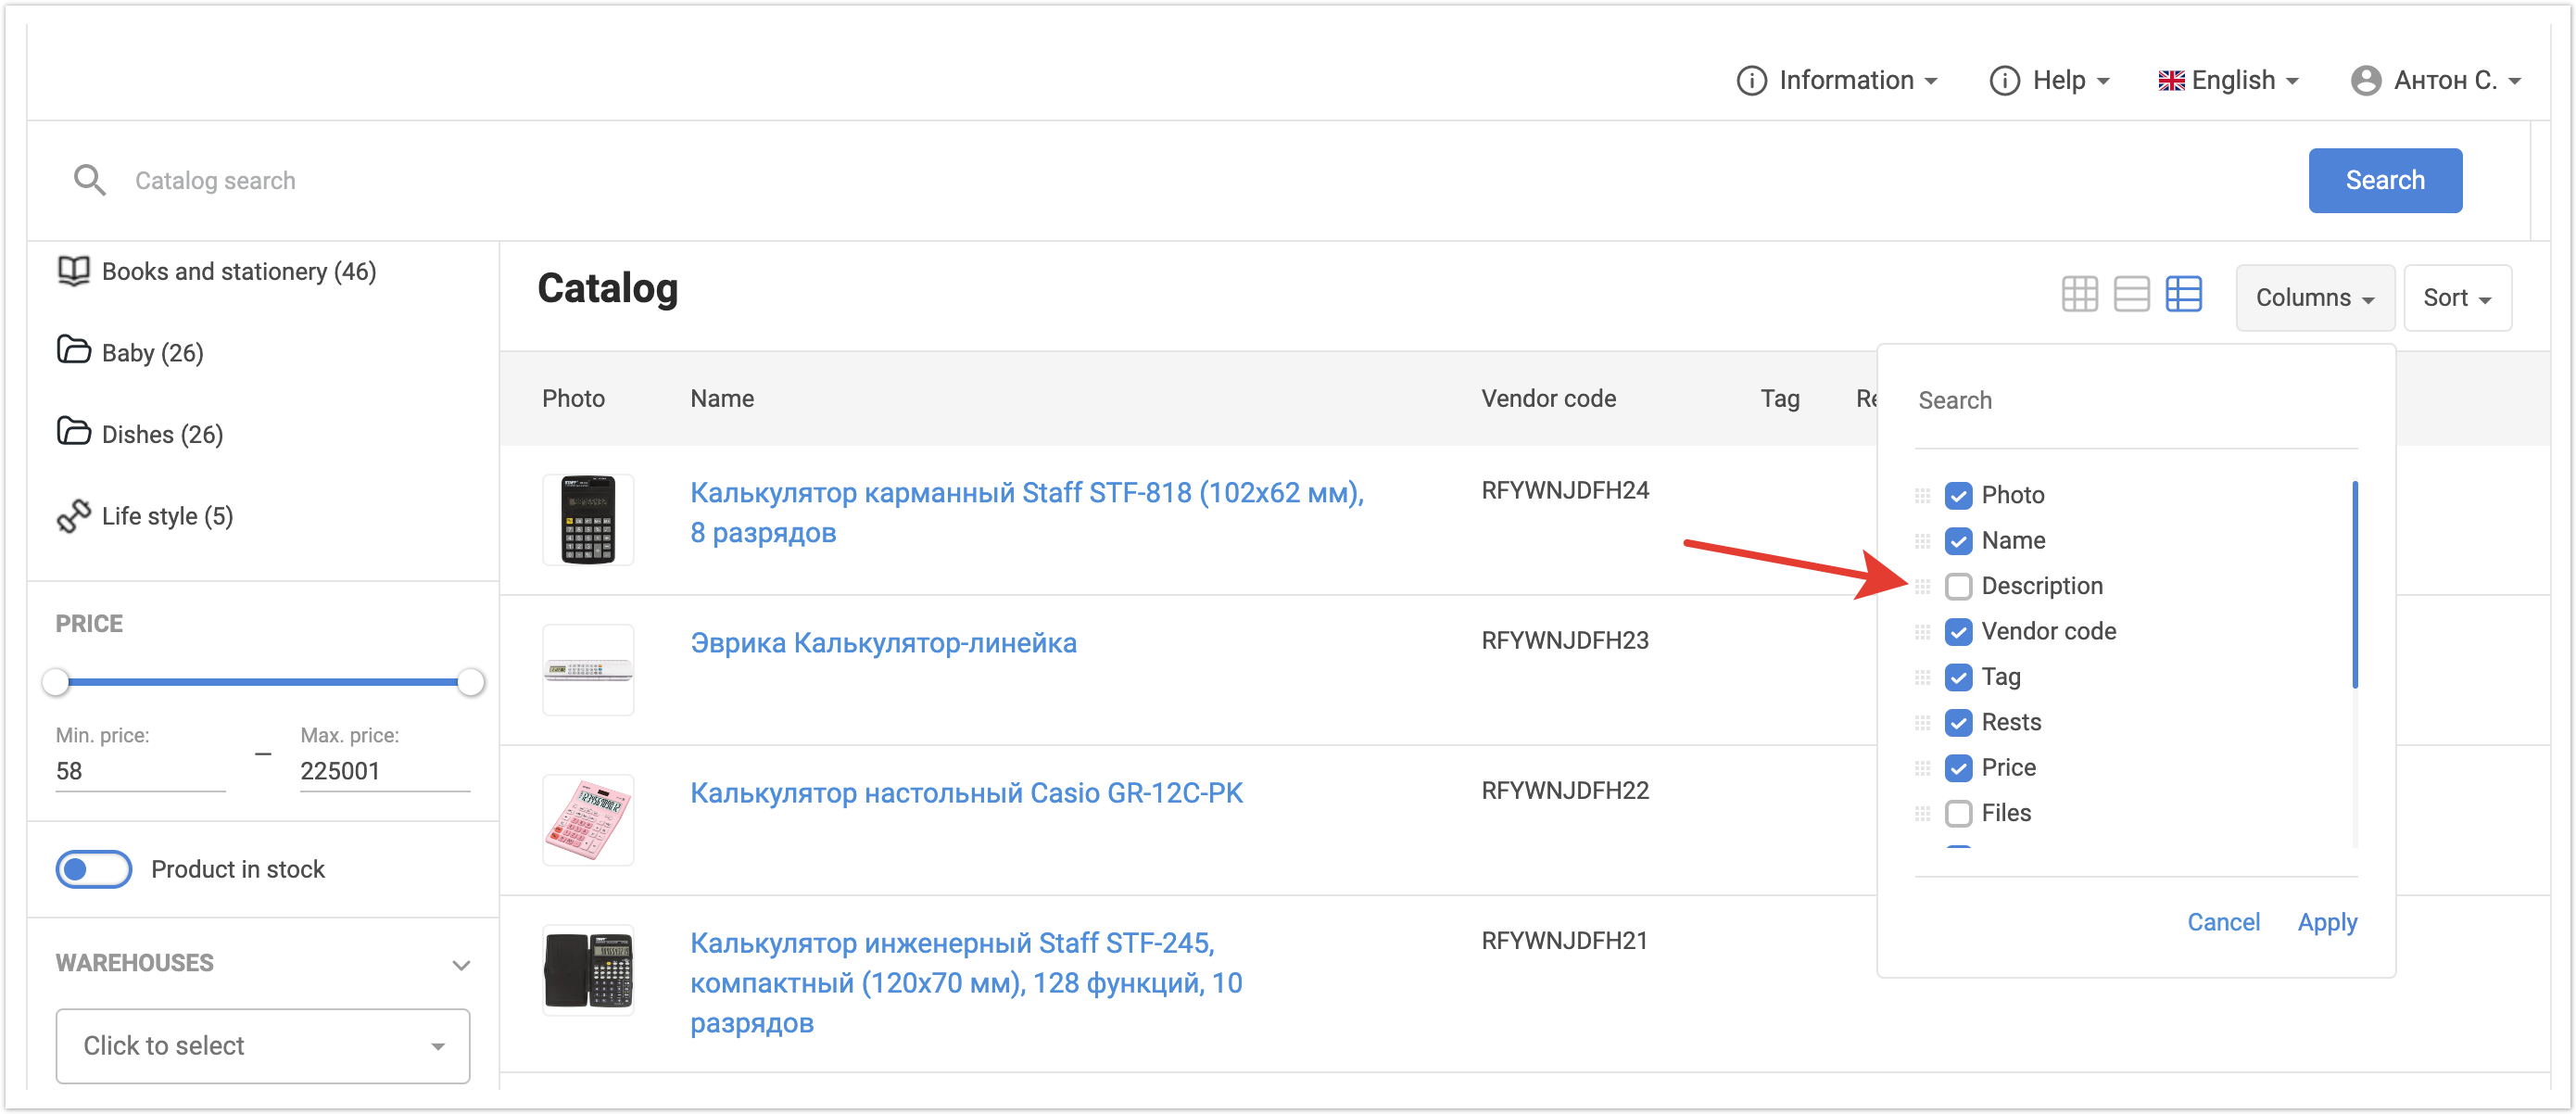
Настройка доступных столбцов в каталогеПользователи платформы могут персонально настроить колонки, которые будут выводится в их каталоге.
С помощью чек-боксов они могут включать и отключать вывод определенных столбцов в каталоге.
Кроме того, с помощью функционала drag-and-drop можно менять порядок выводимых столбцов. Для этого нужно навести на квадратный символ с точками и перетащить столбец на нужное место.
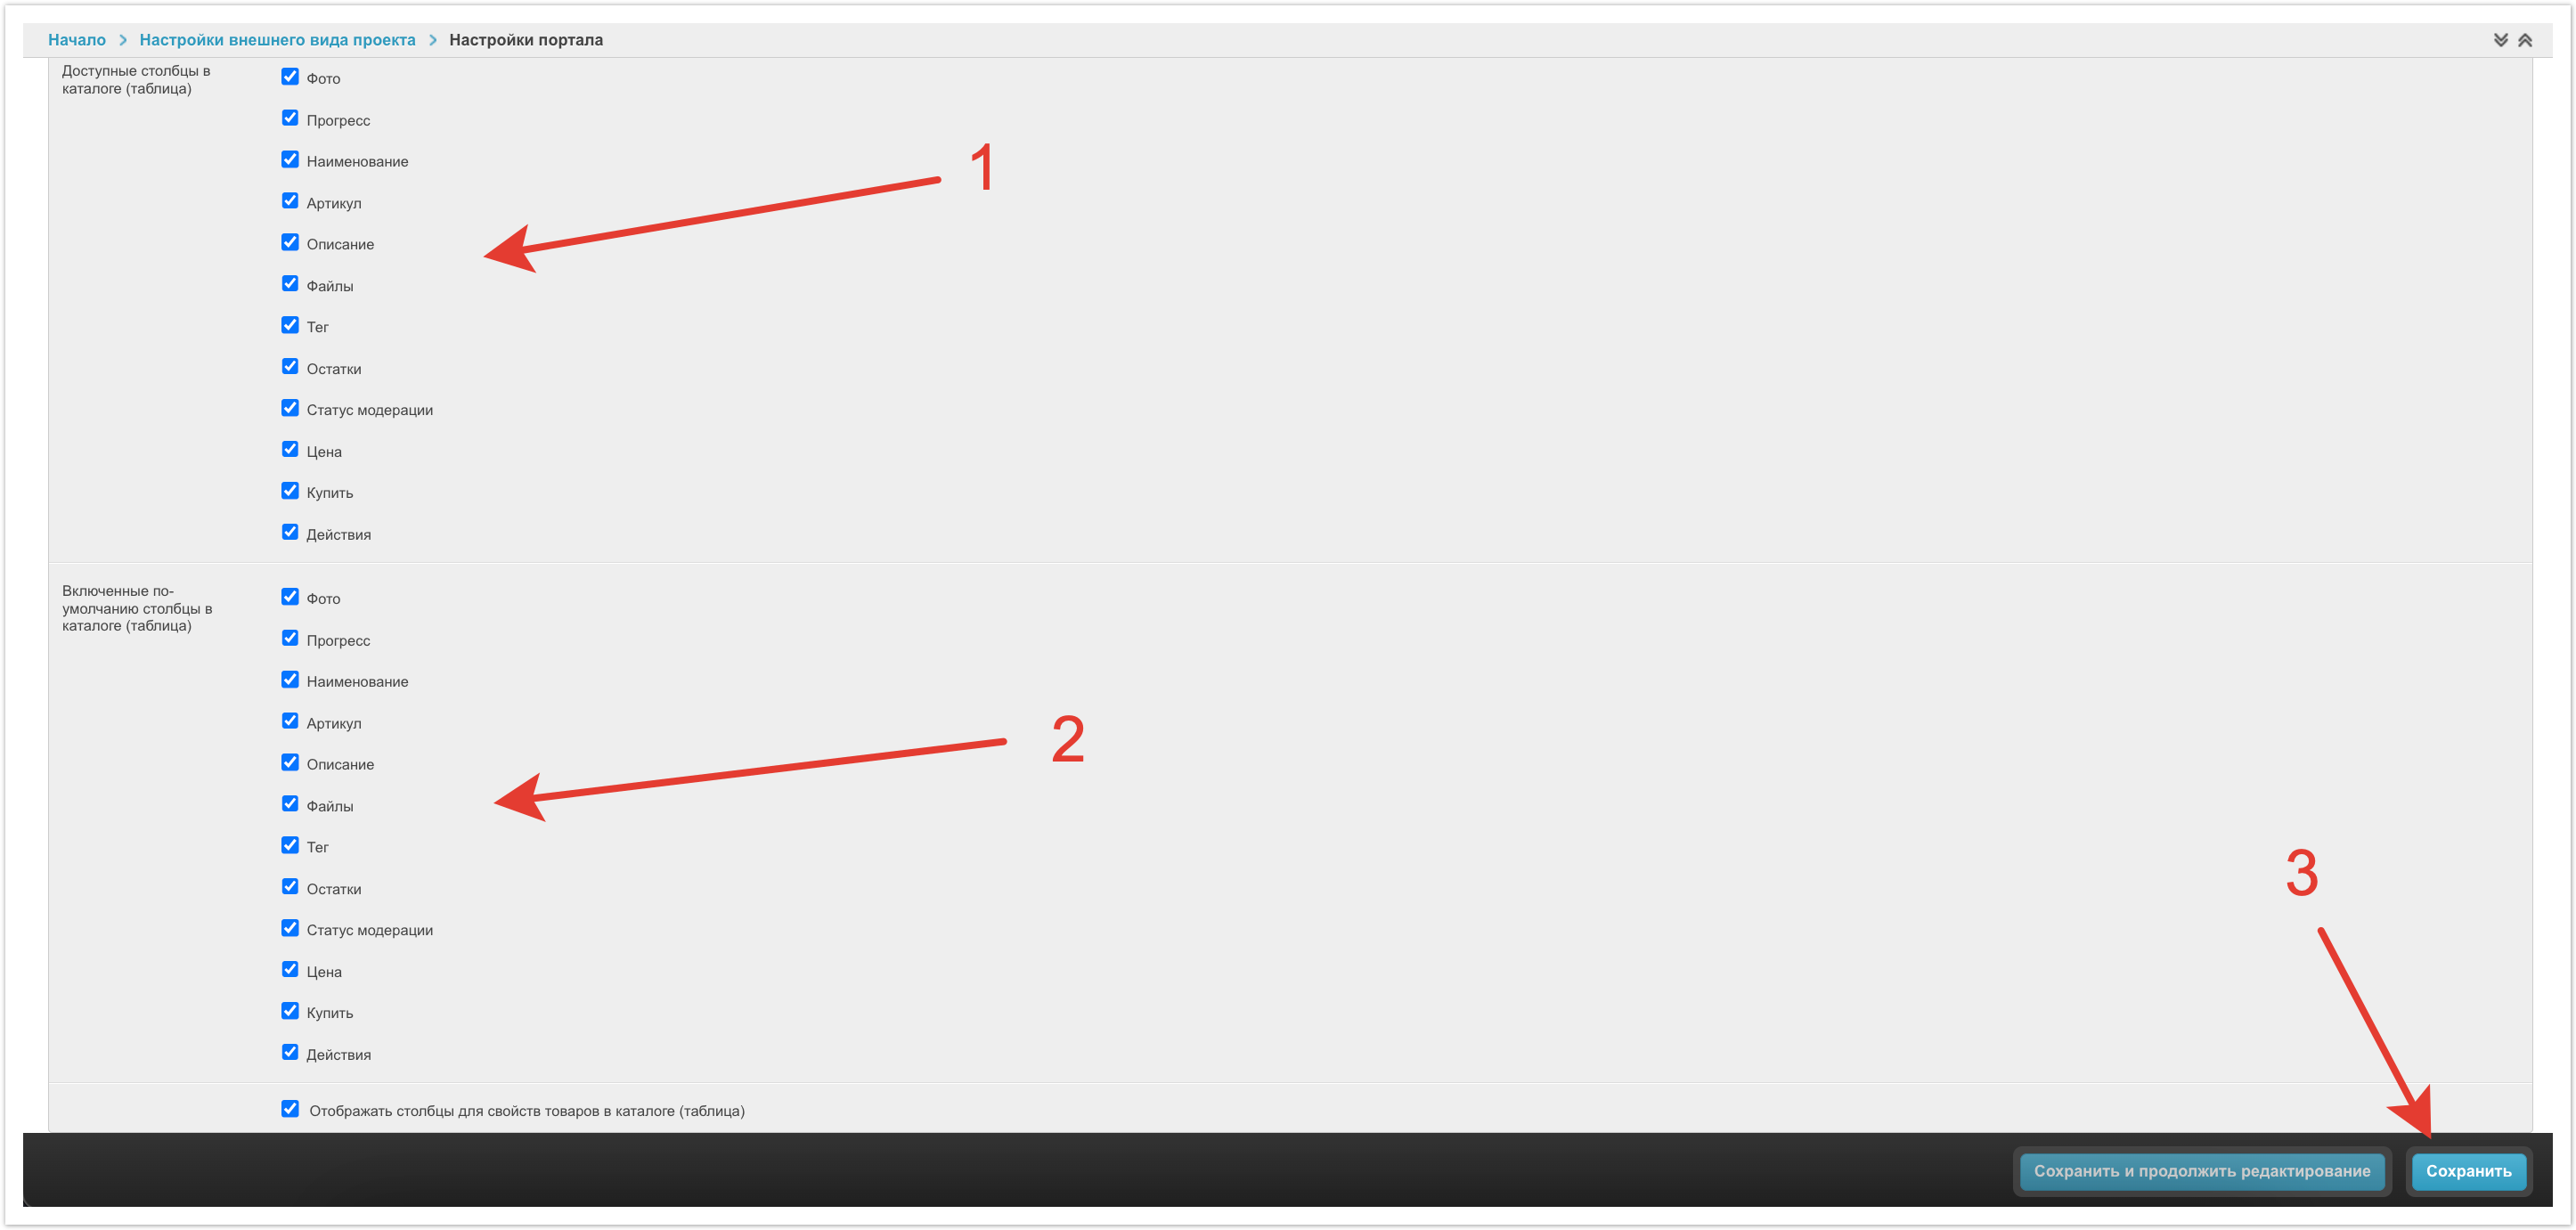
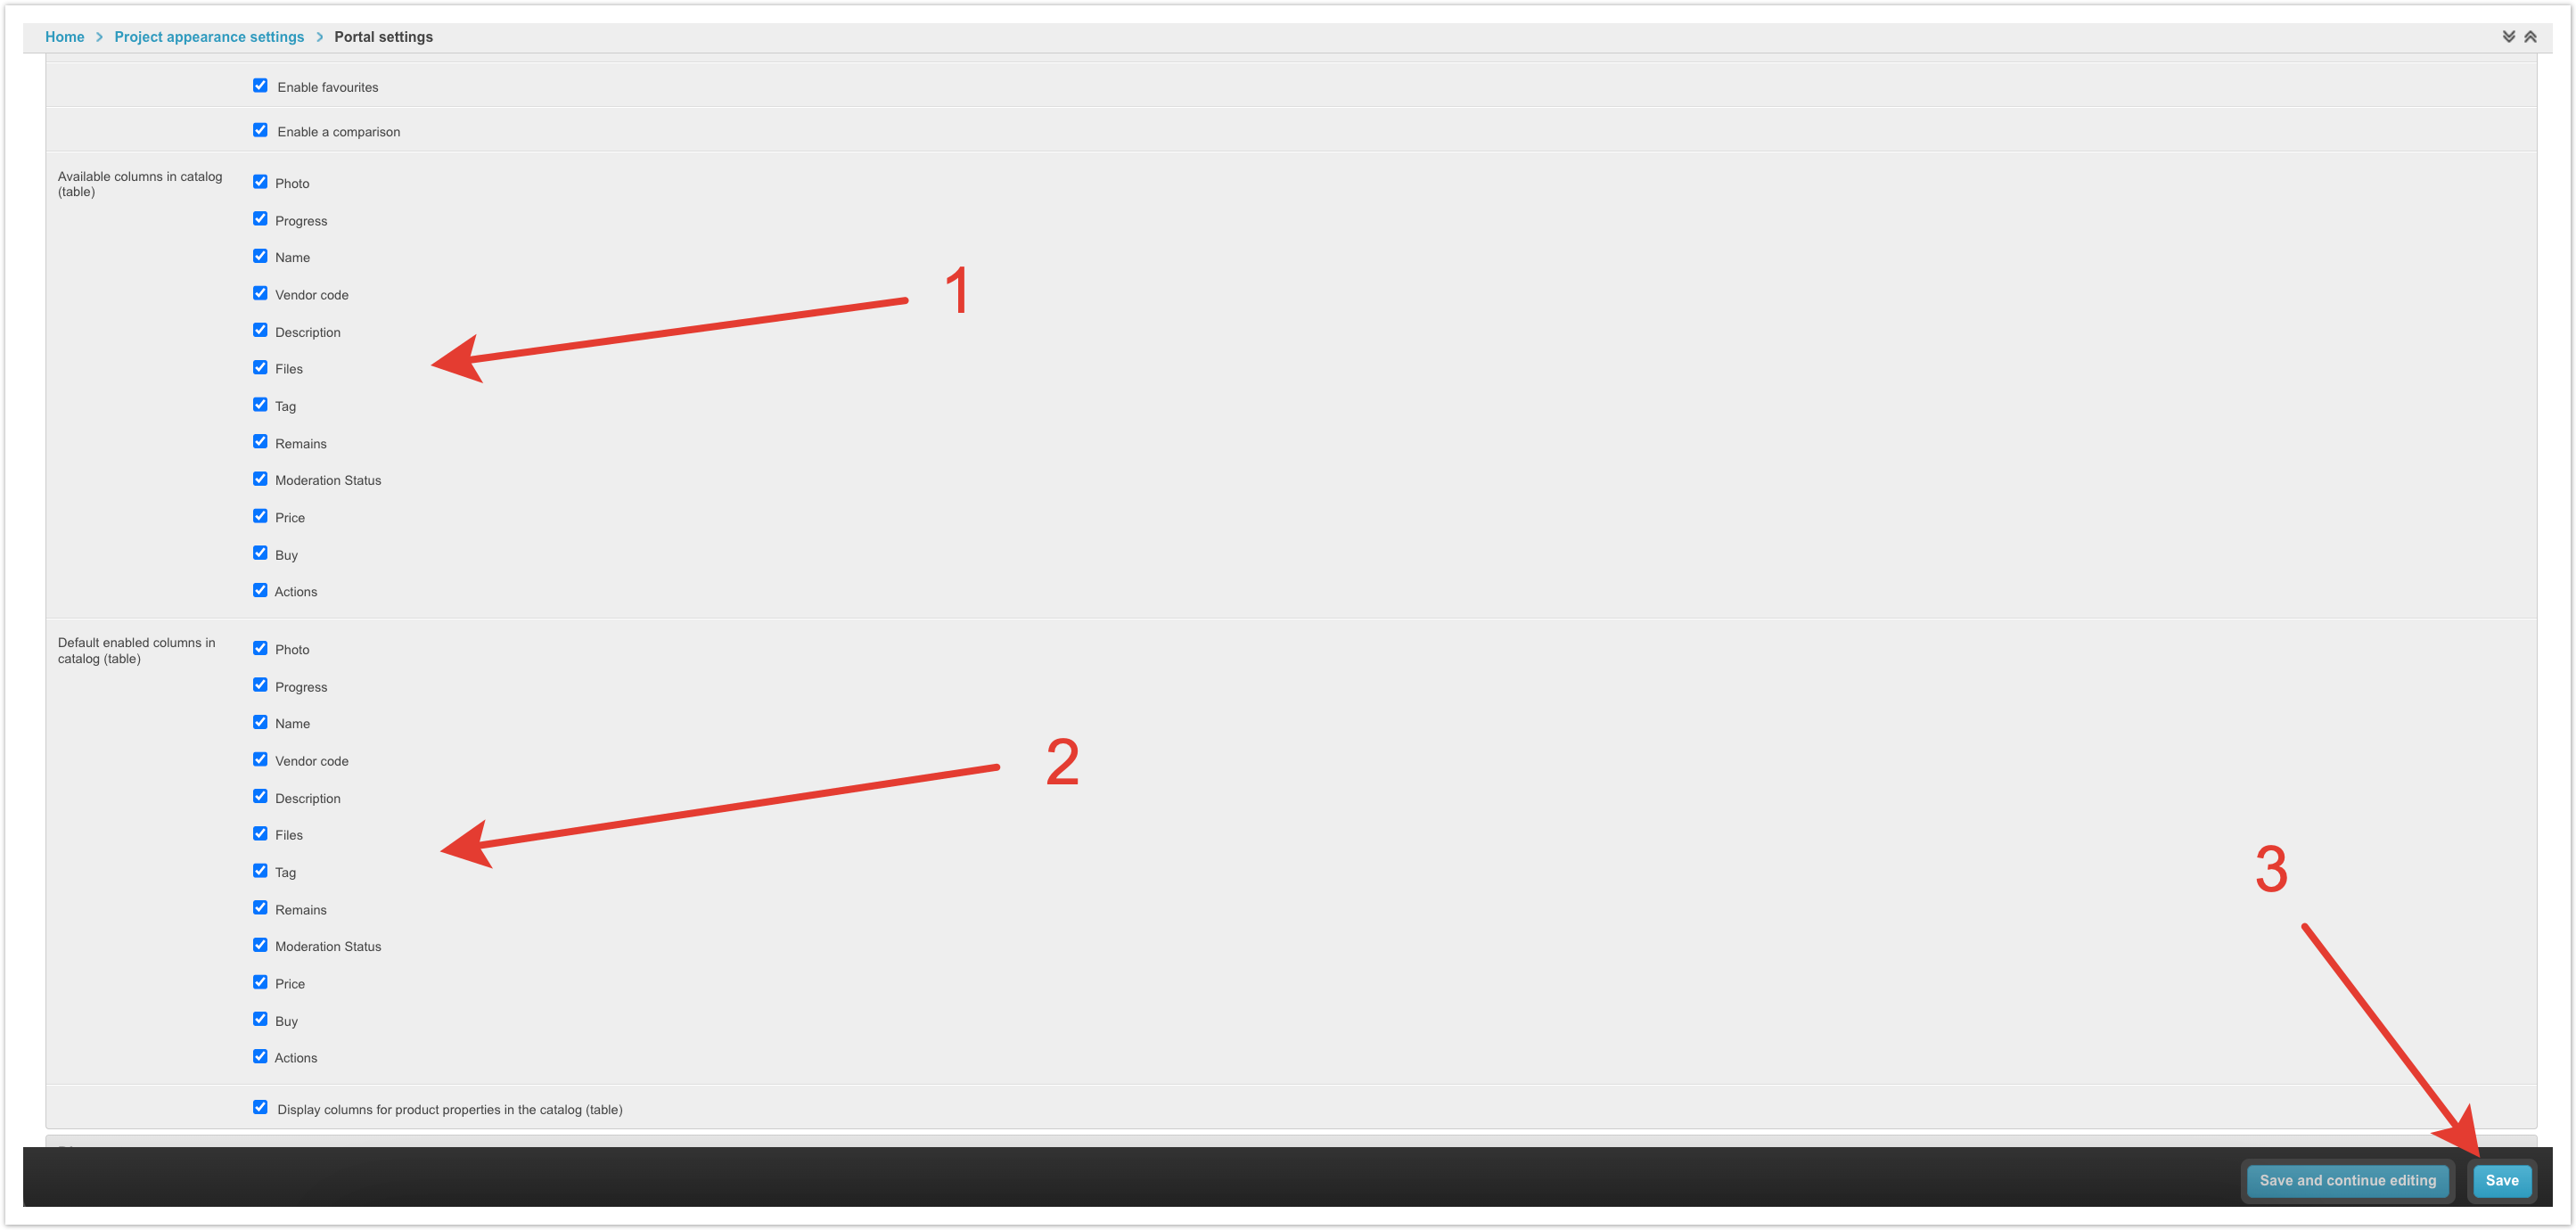
Со стороны администратора платформы можно настроить какие колонки будут доступны для выбора пользователям платформы. Чтобы их настроить нужно перейти в панели администратора в раздел Настройки портала.
Далее пролистать страницу до блока Каталог. В поле Доступные столбцы в каталоге(таблица) можно выбрать какие колонки будут доступны для выбора пользователю при режиме просмотра каталога Таблица. В поле Включенные по-умолчанию столбцы в каталоге(таблица) можно выбрать какие колонки будут по умолчанию выводится пользователю при режиме отображения каталога Таблица. После внесения изменений нужно их Сохранить.
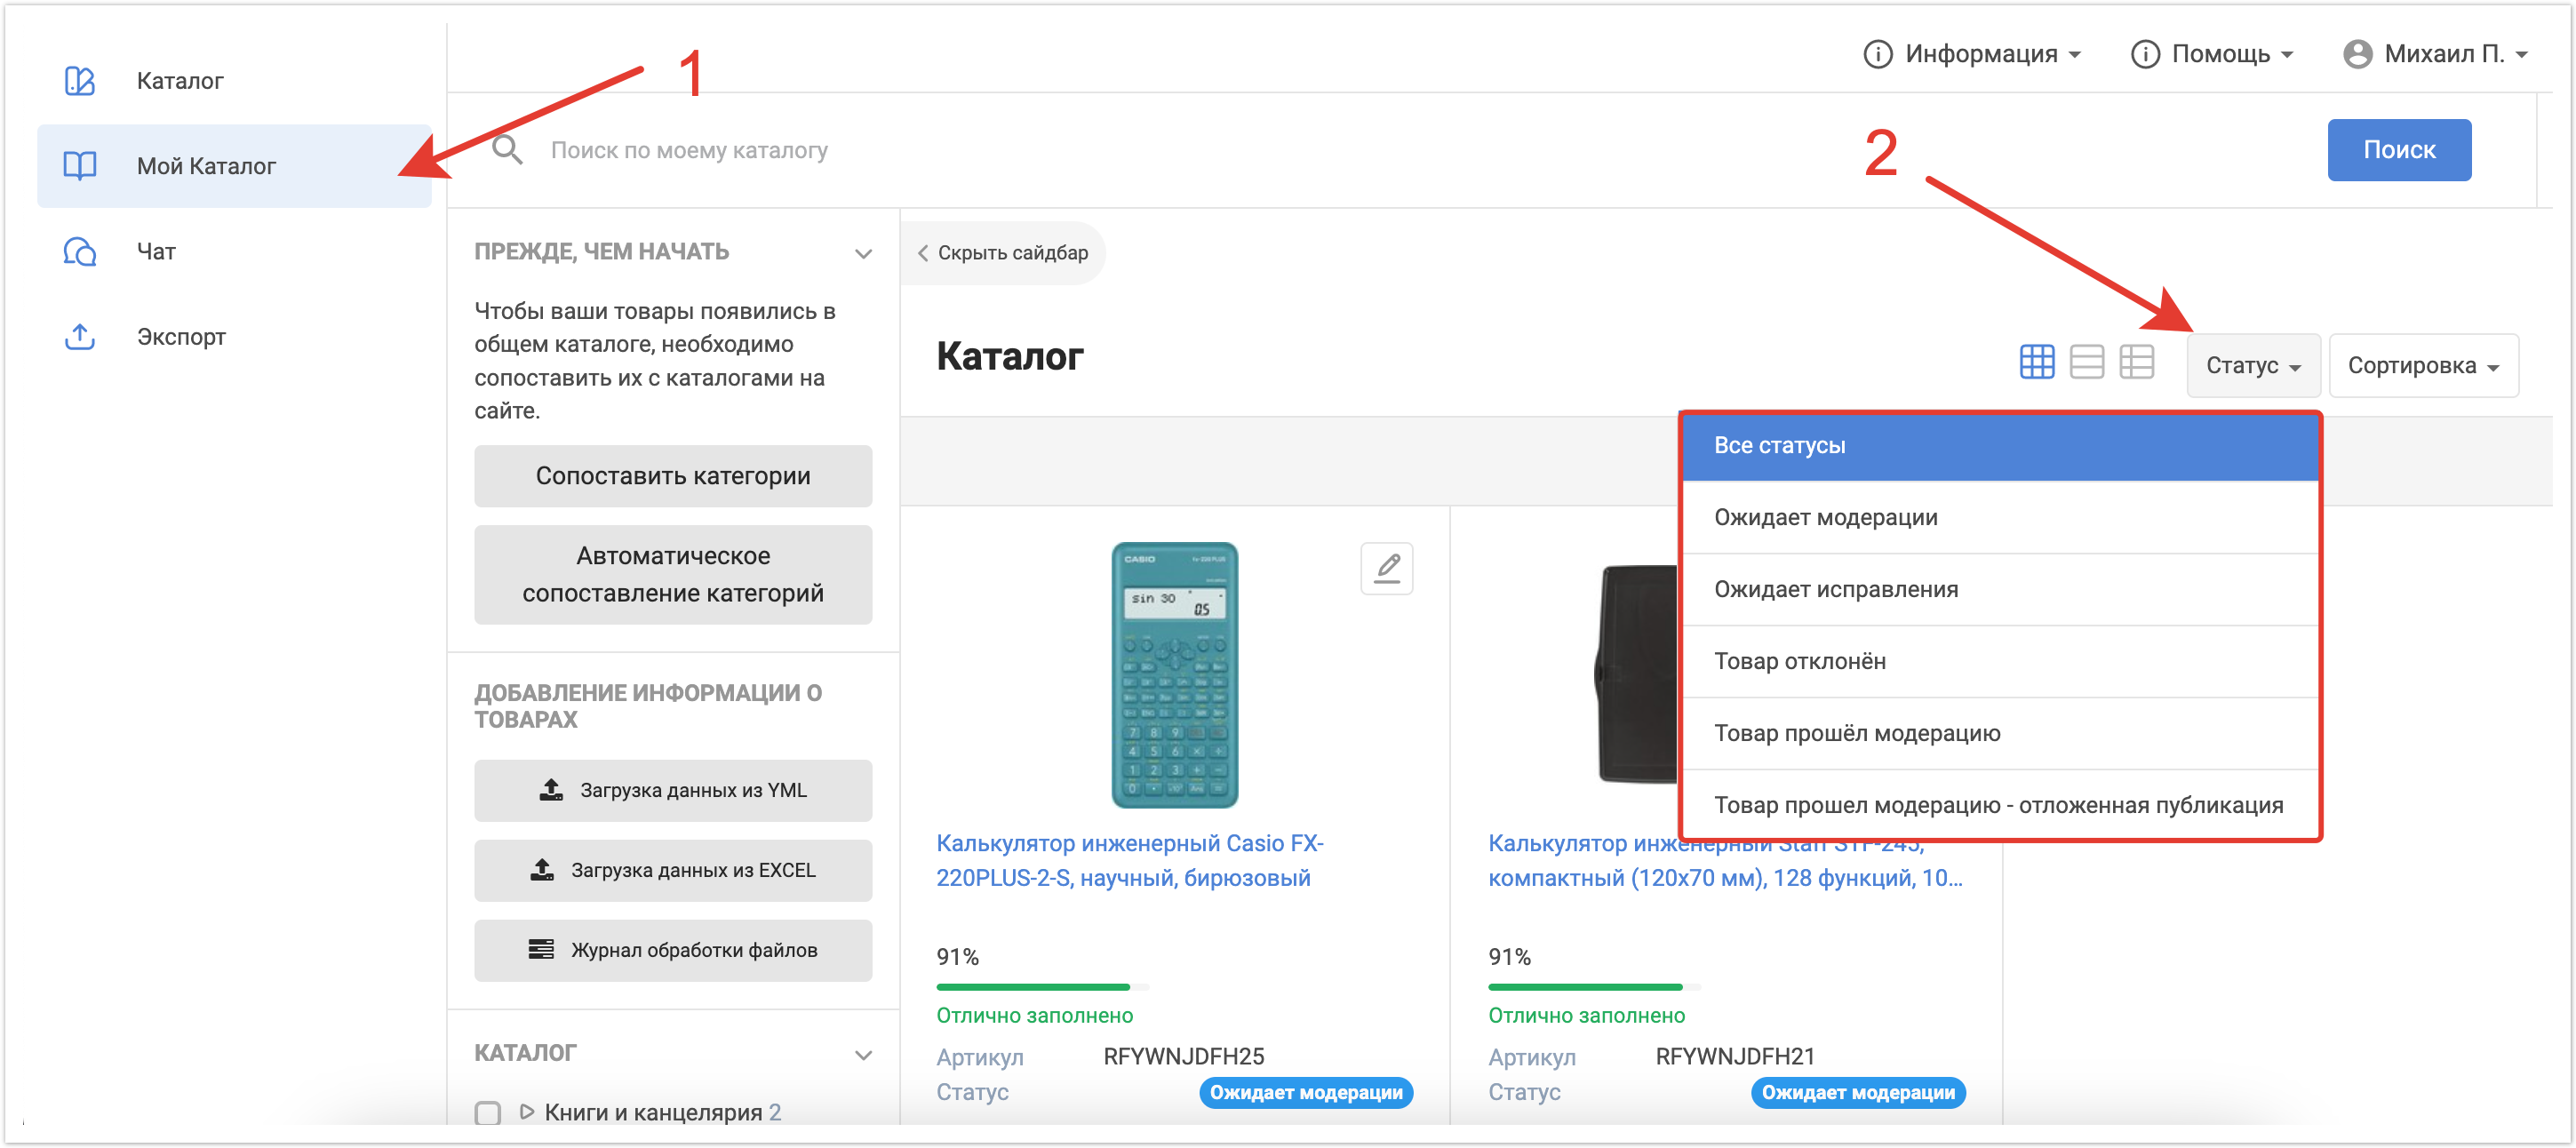
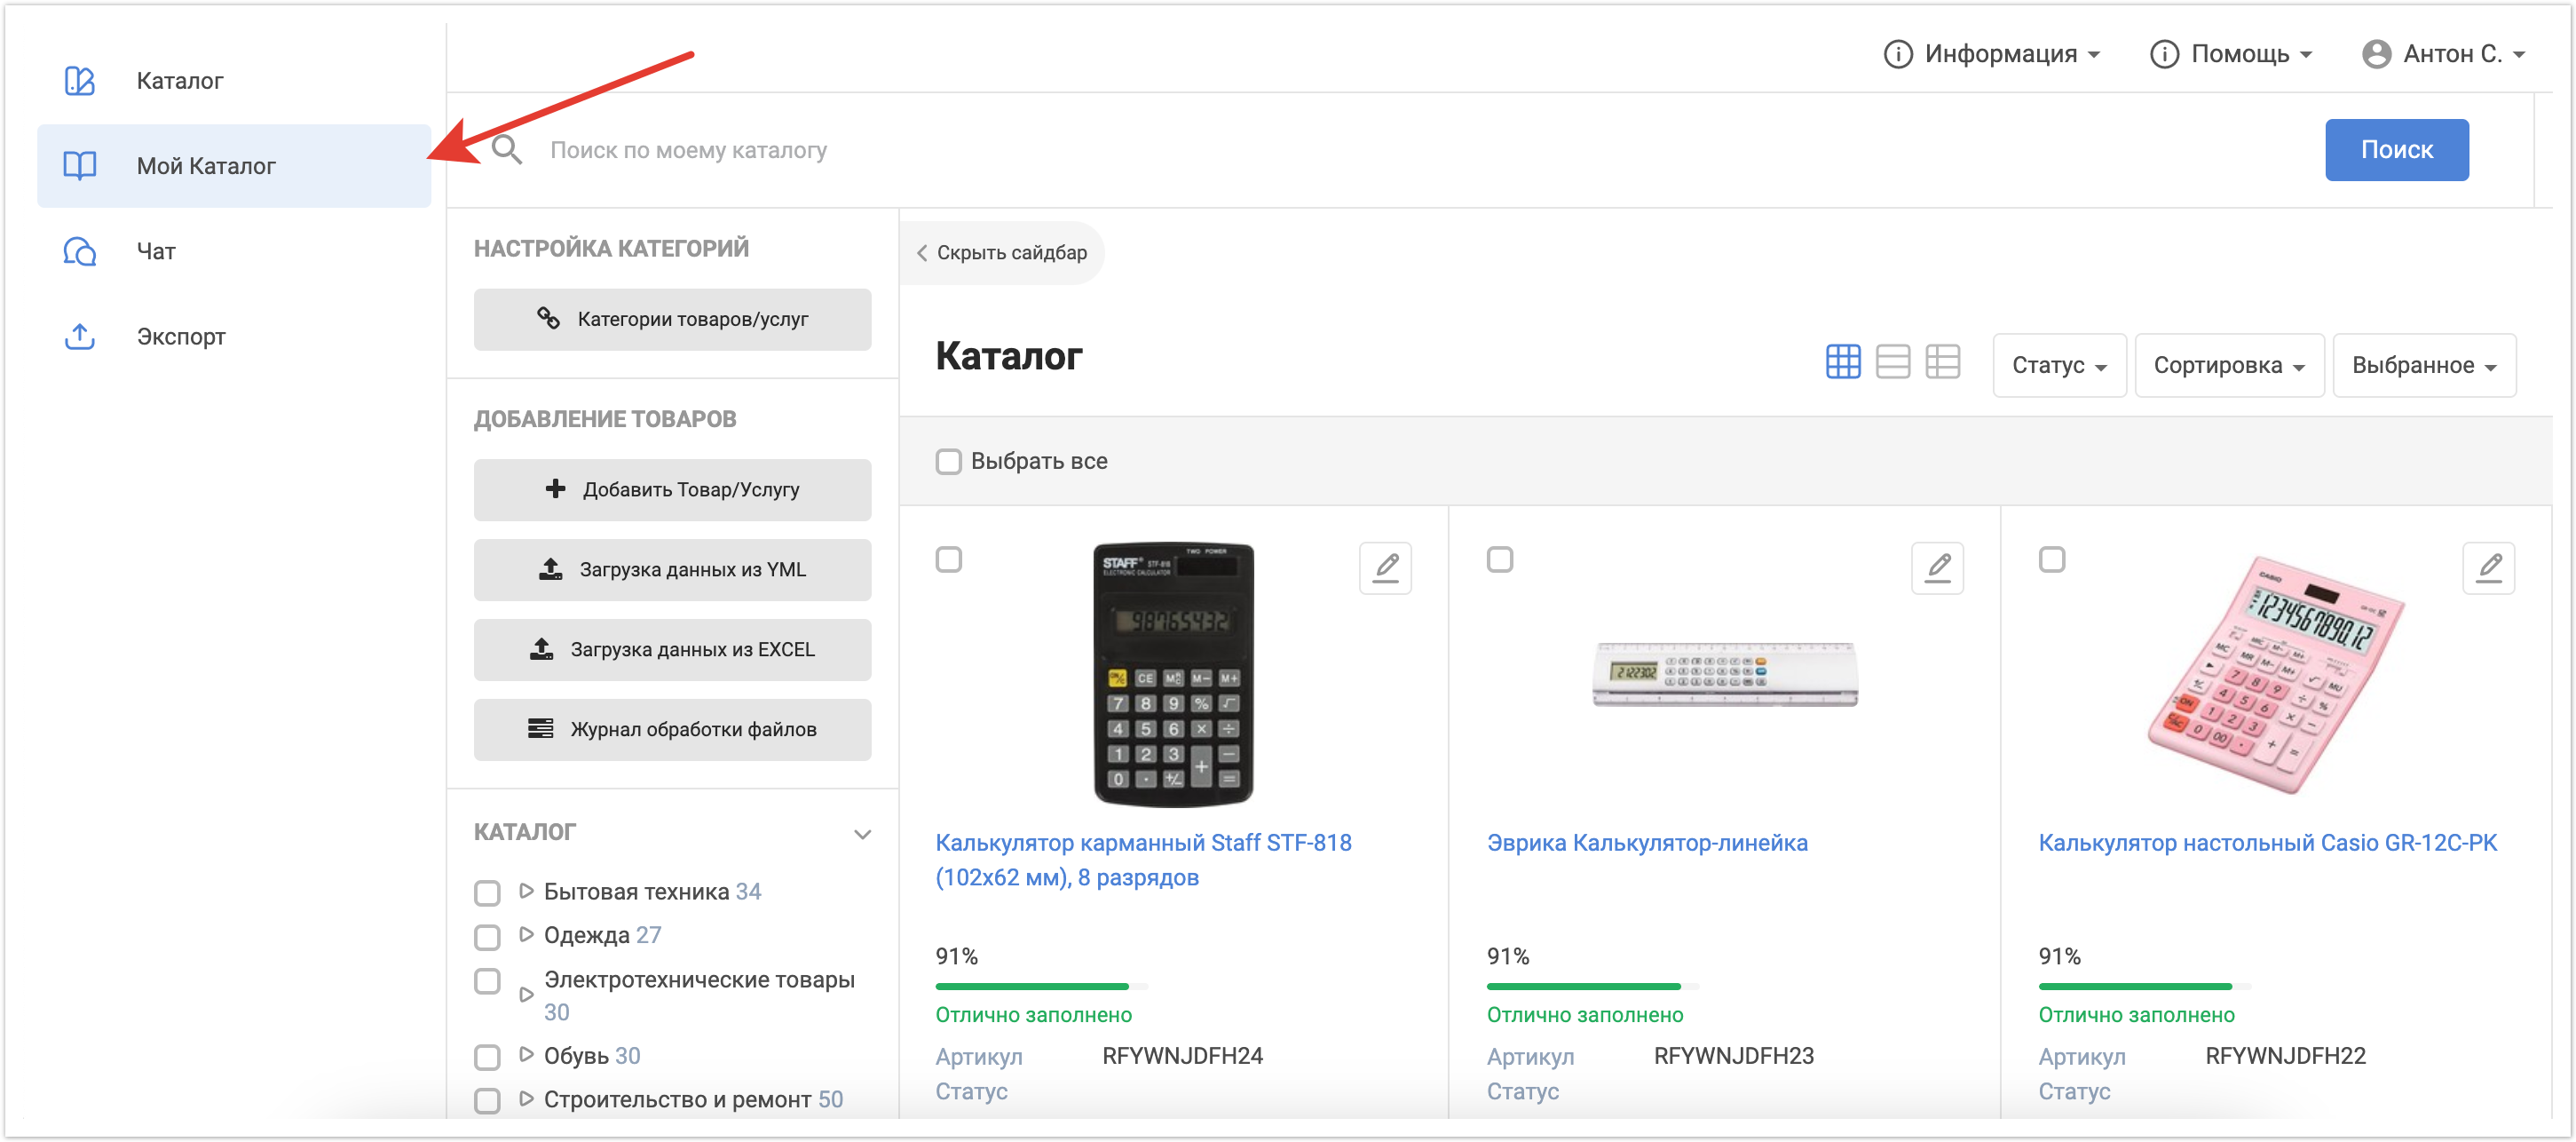
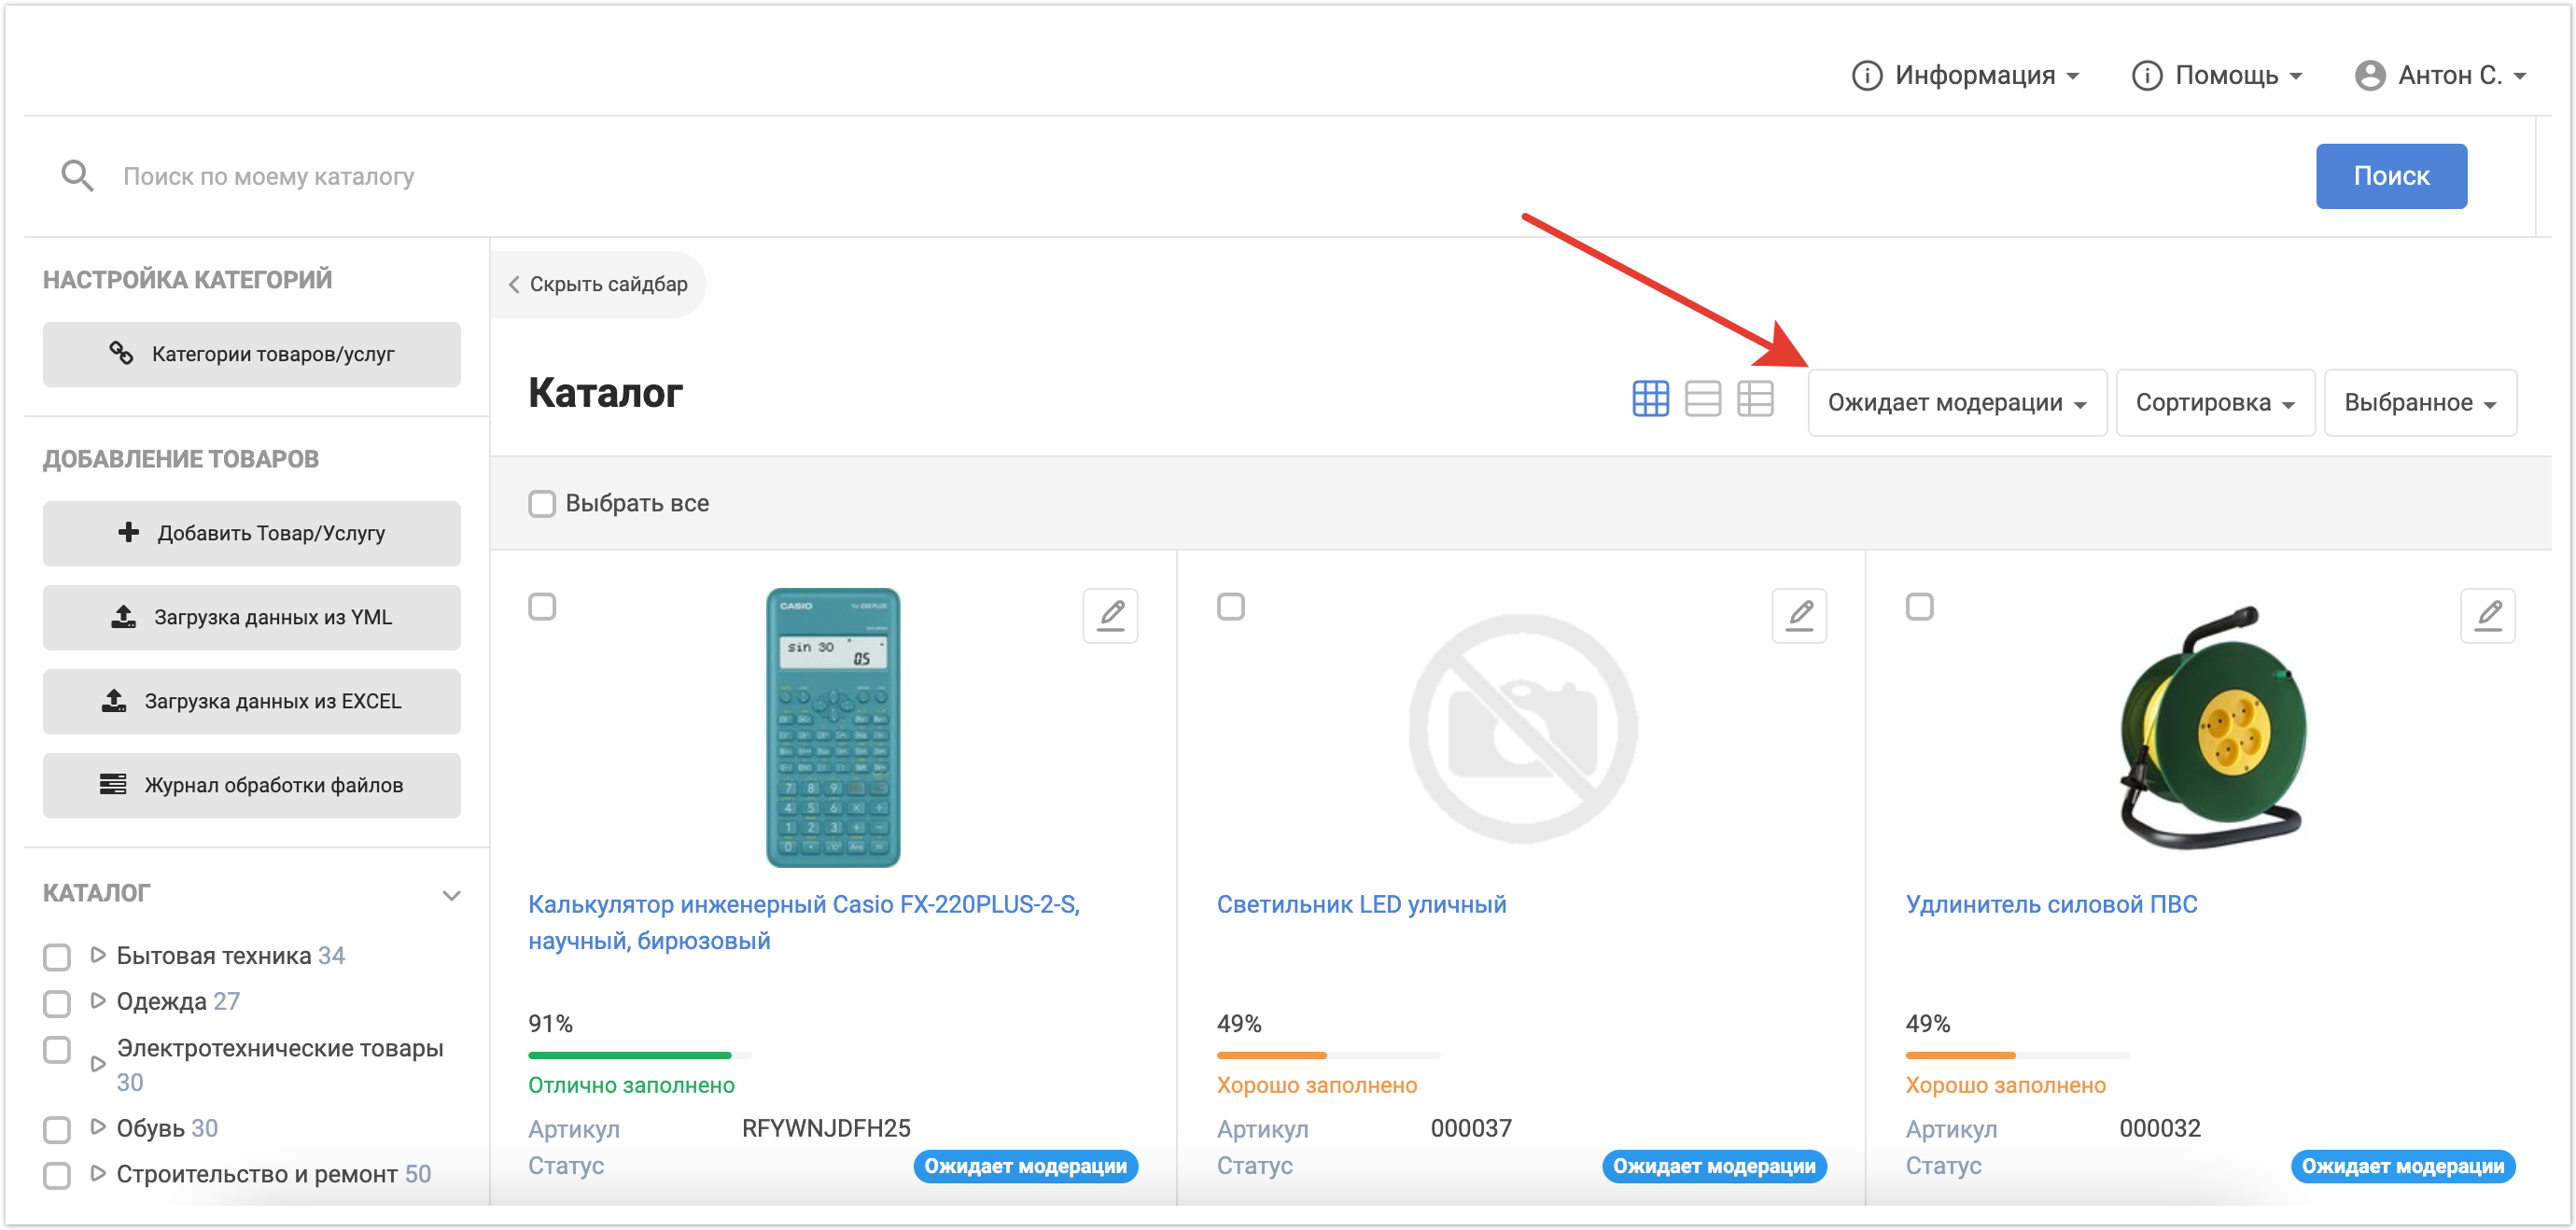
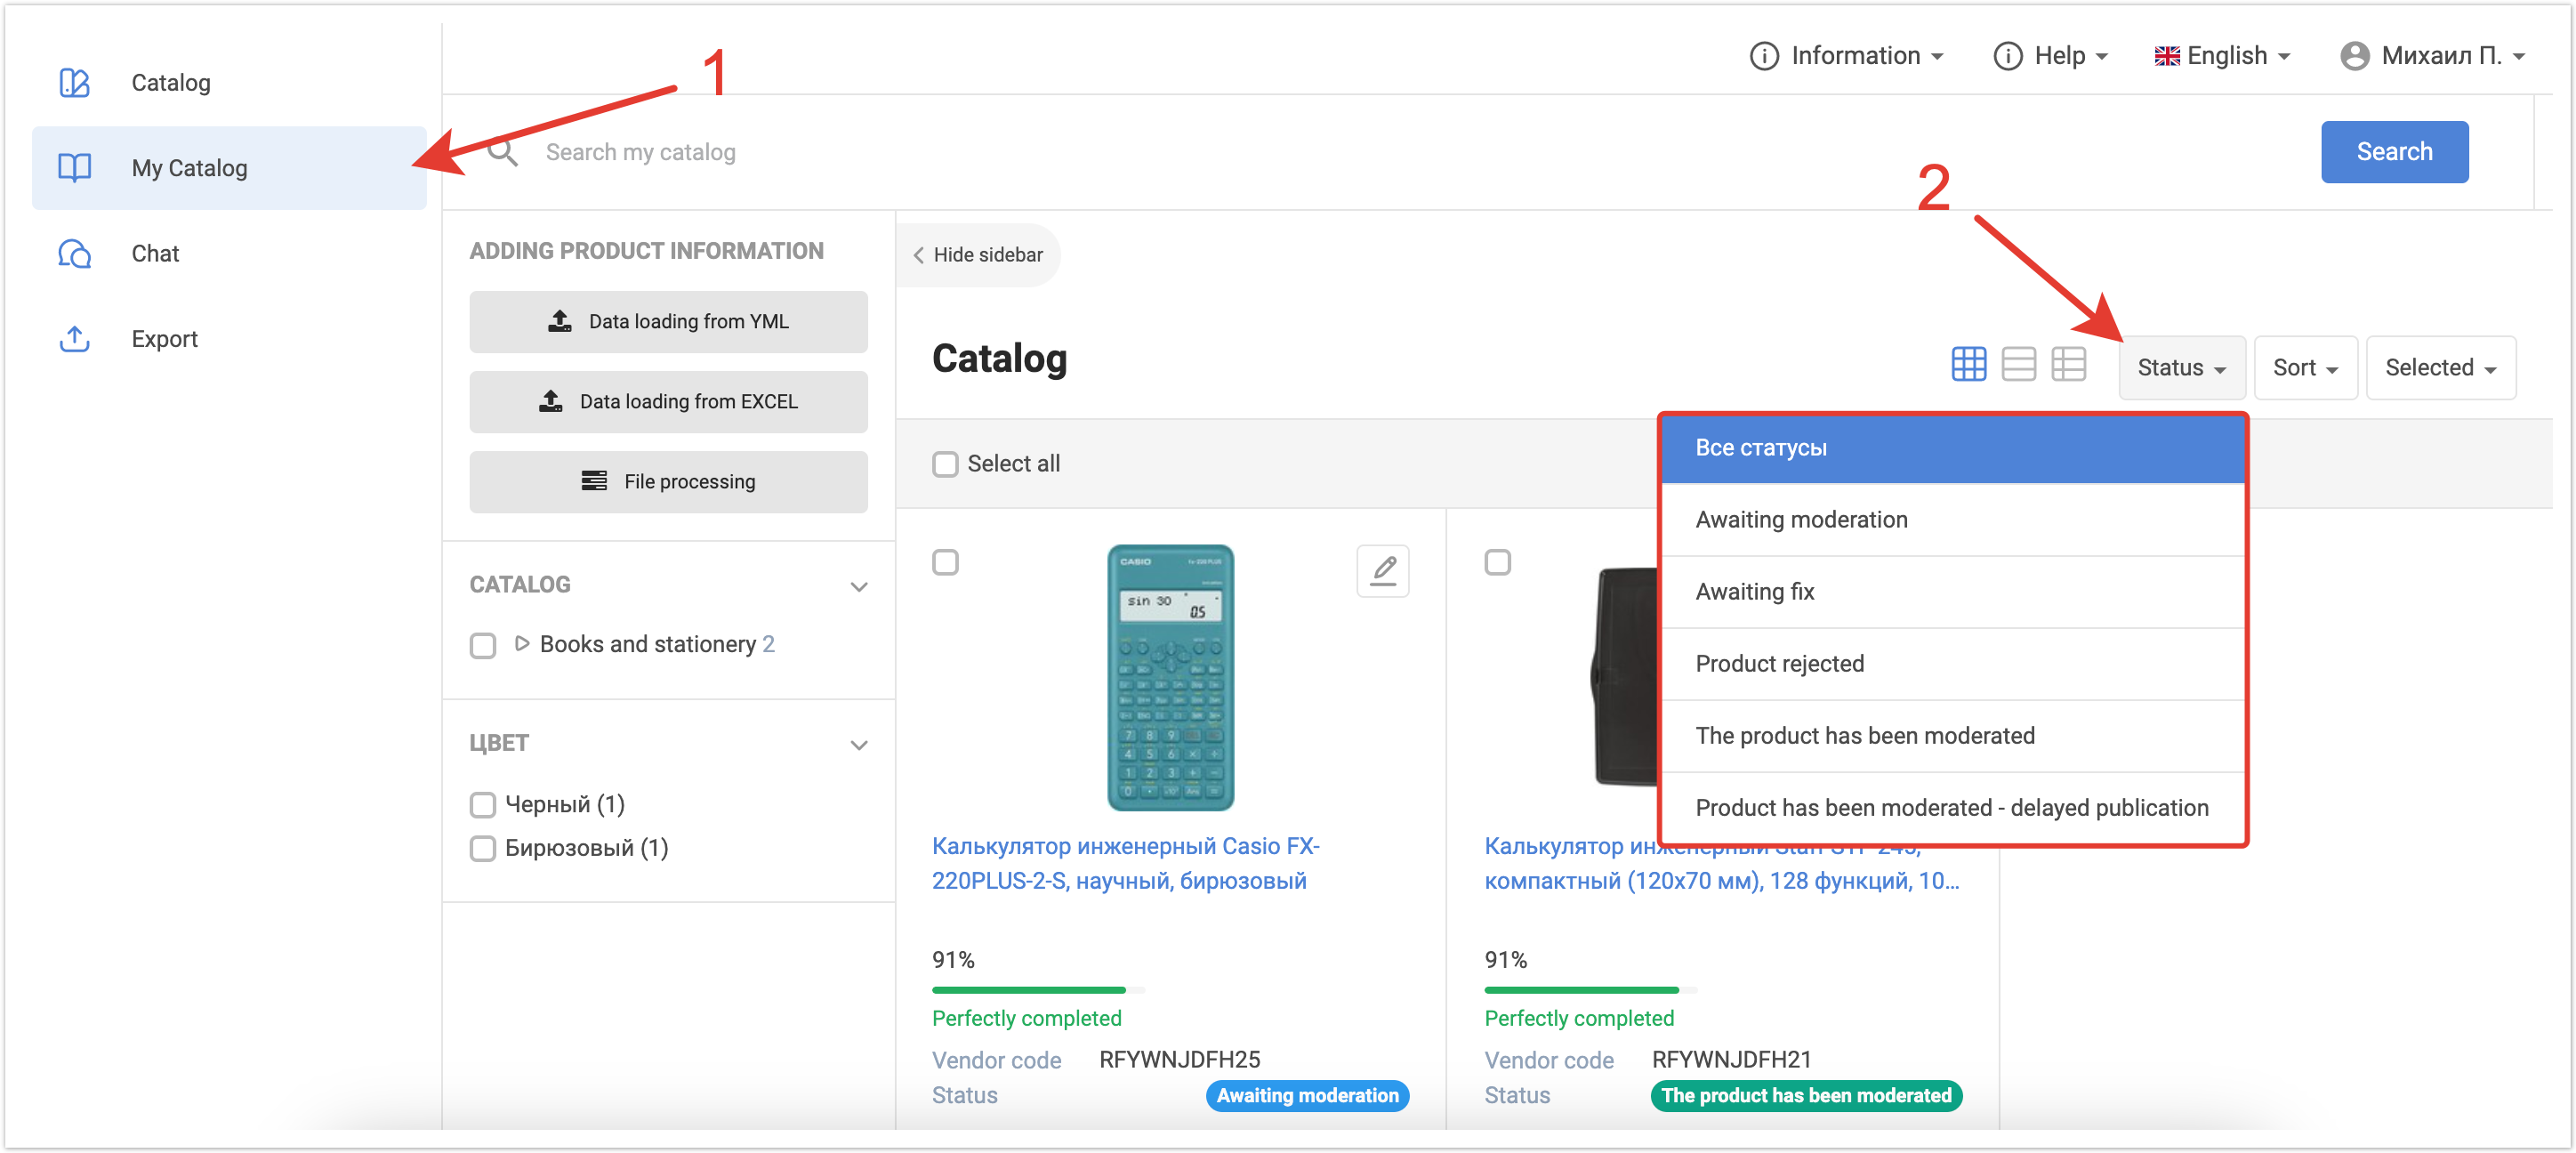
Модерация товаров бренд-менеджеромПосле того, как Ответственный менеджер импортировал товары на платформу, Бренд-менеджер может приступать к их модерации. Он авторизуется в своем личном кабинете и переходит во вкладку Мой каталог. Бренд-менеджер видит только тот список товаров, который ему был присвоен на этапе настройки пользователя. Загруженным товарам автоматически присваивается статус Ожидает модерации. Можно выставить фильтрацию по этому статусу и таким образом увидеть список загруженных недавно товаров, которые ожидают проверки. При необходимости можно найти нужный товар через поиск по каталогу или фильтрацию по свойствам.
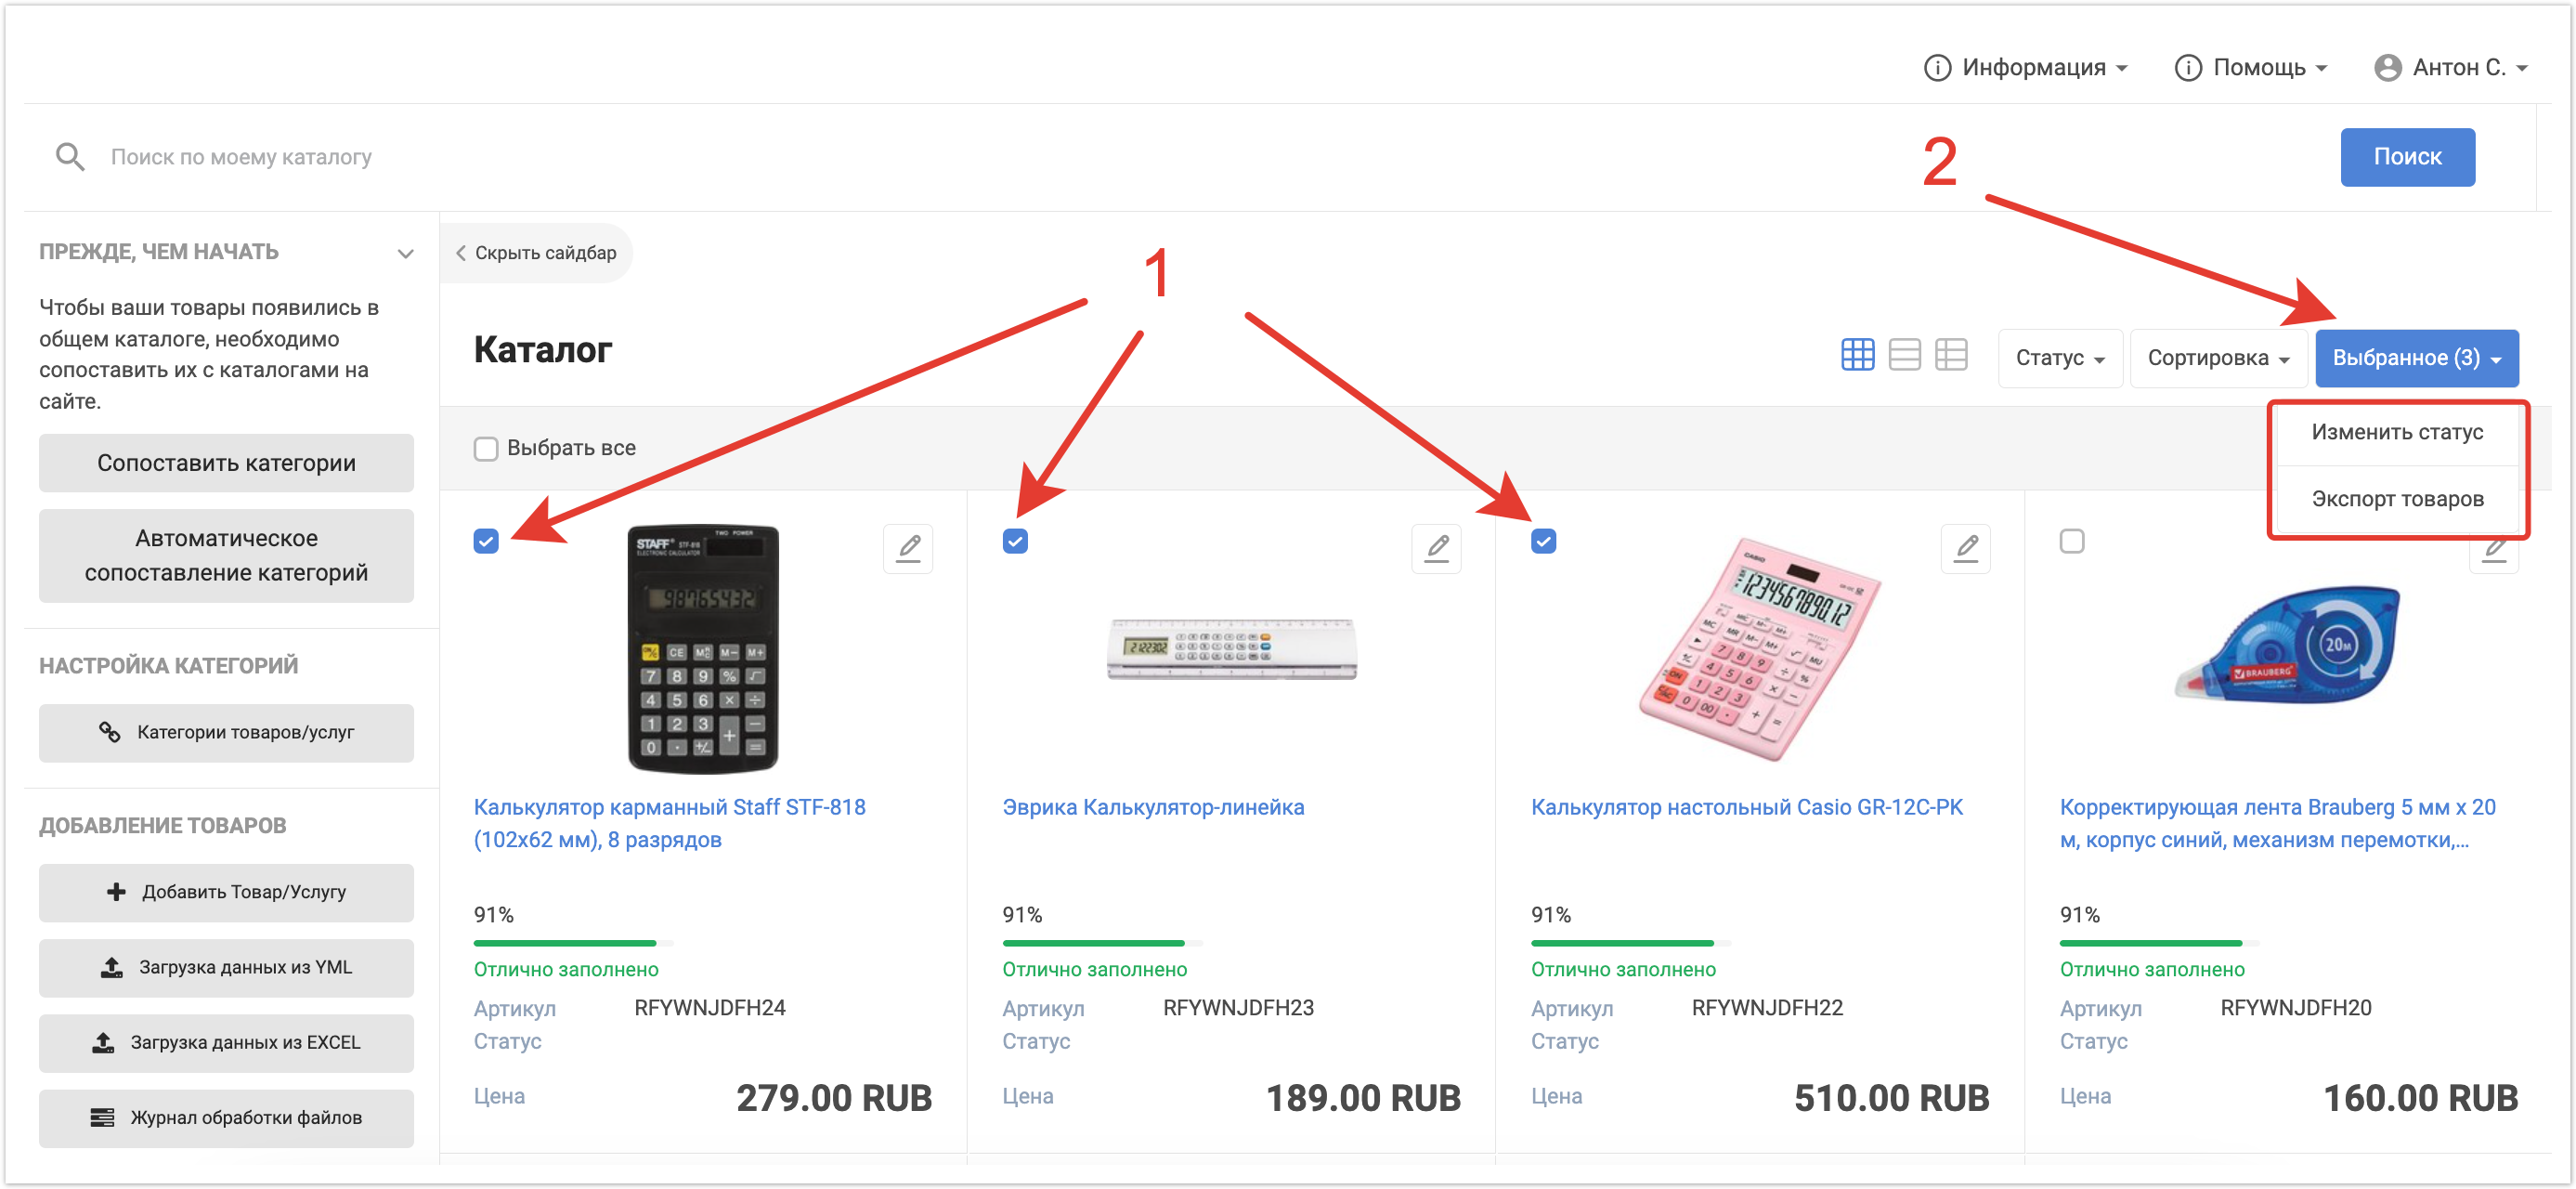
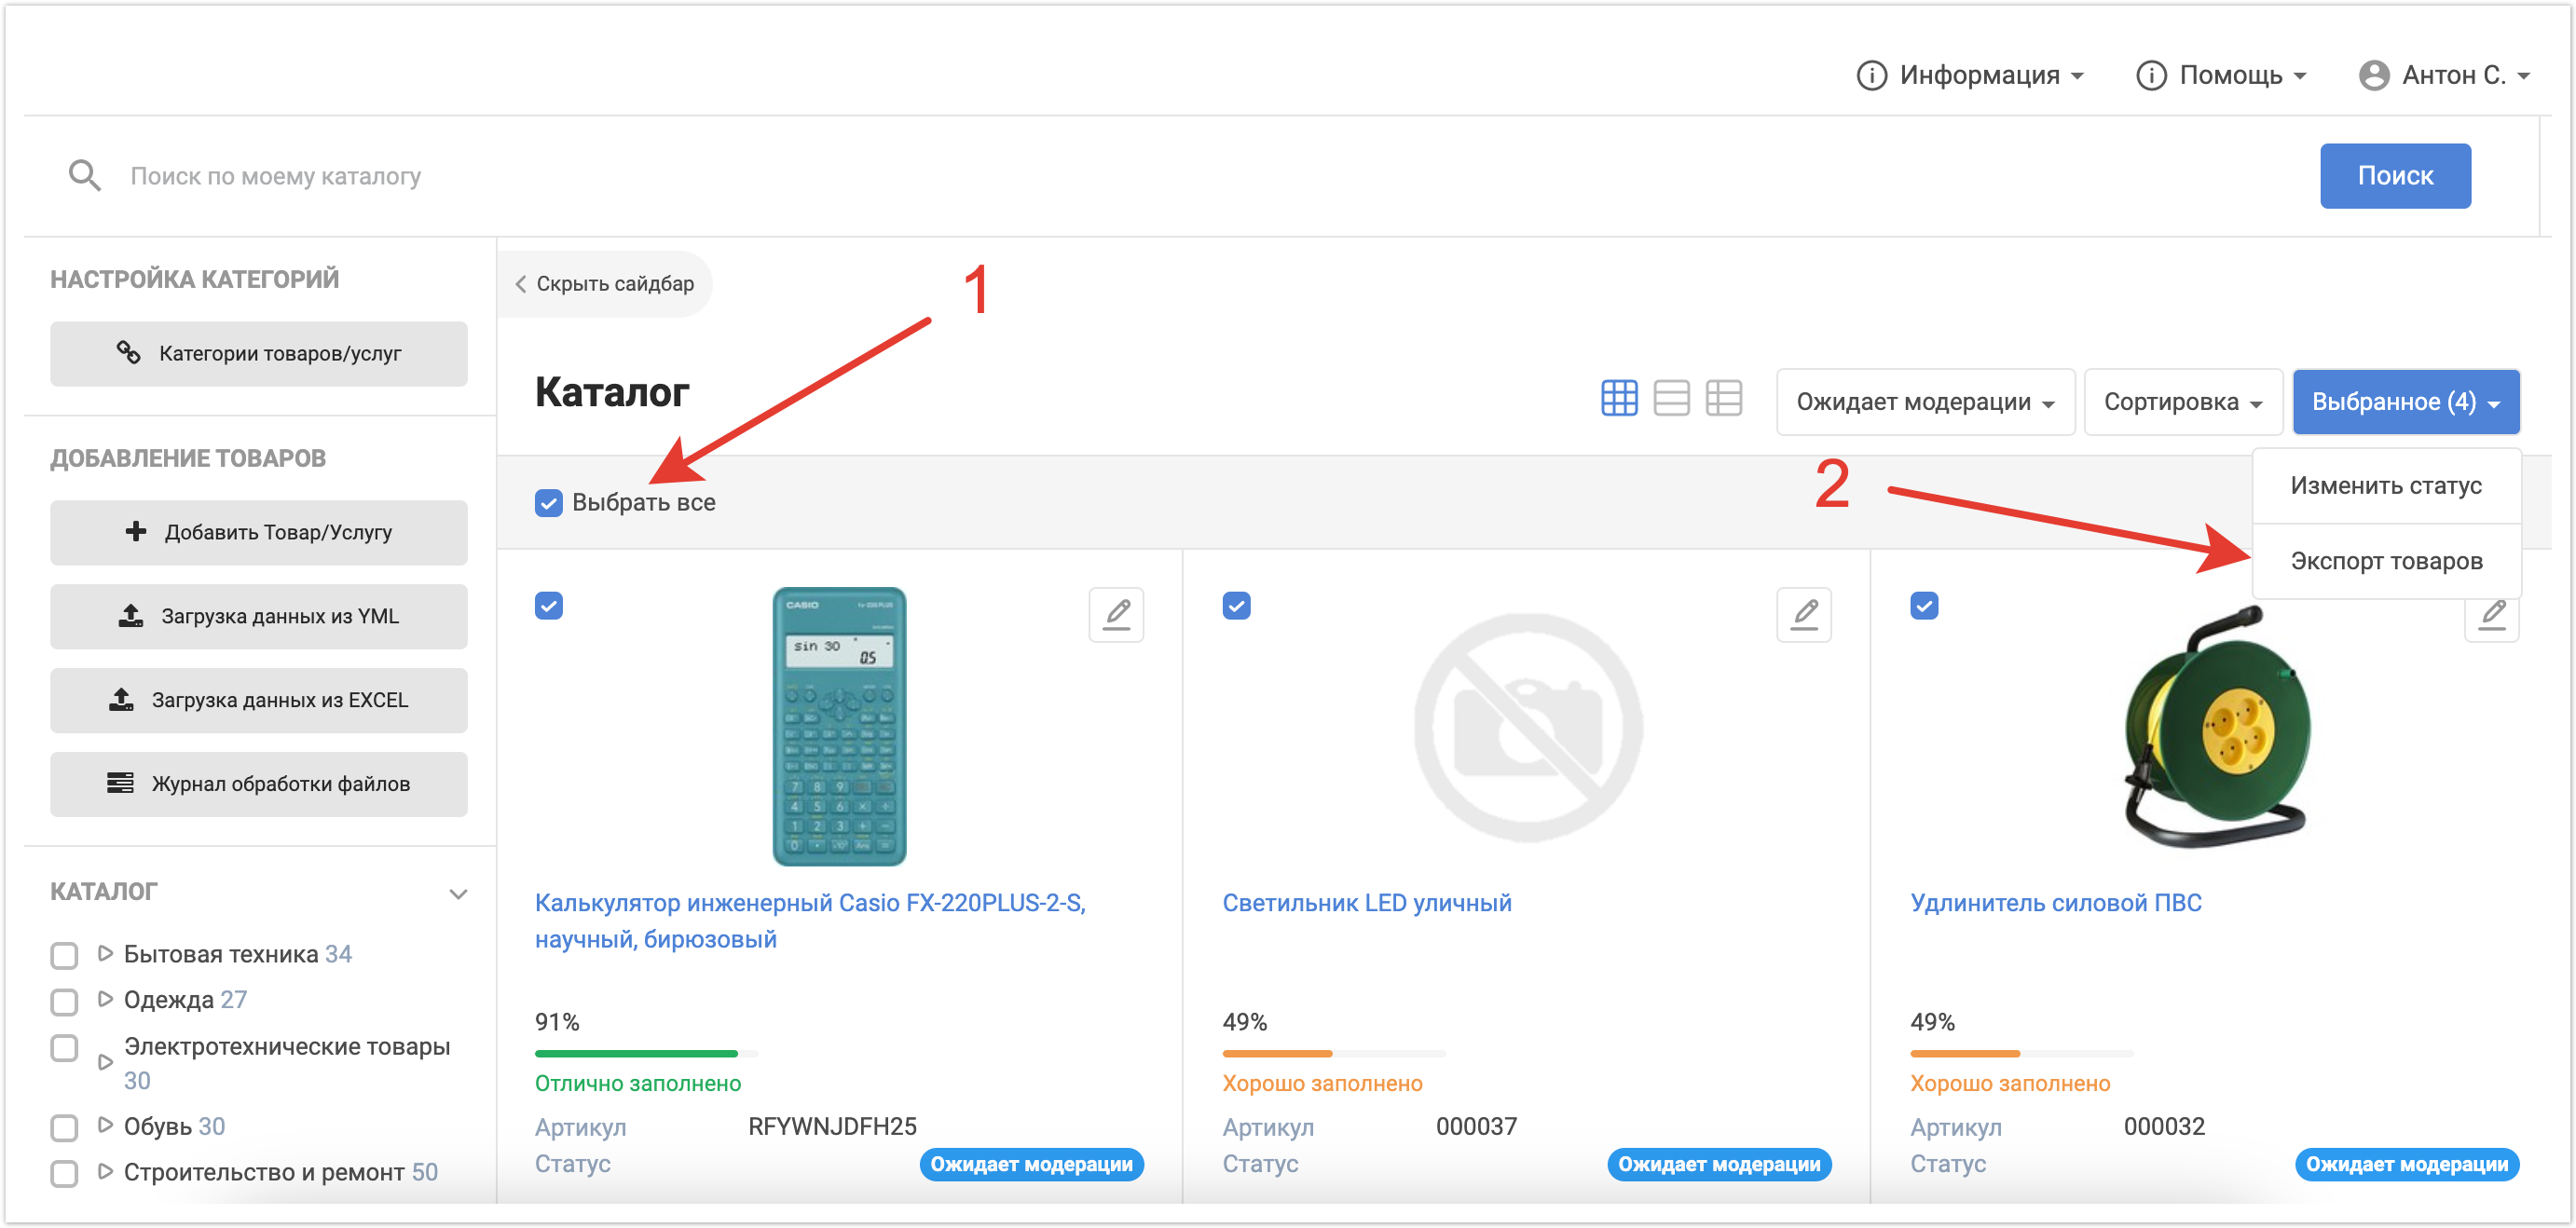
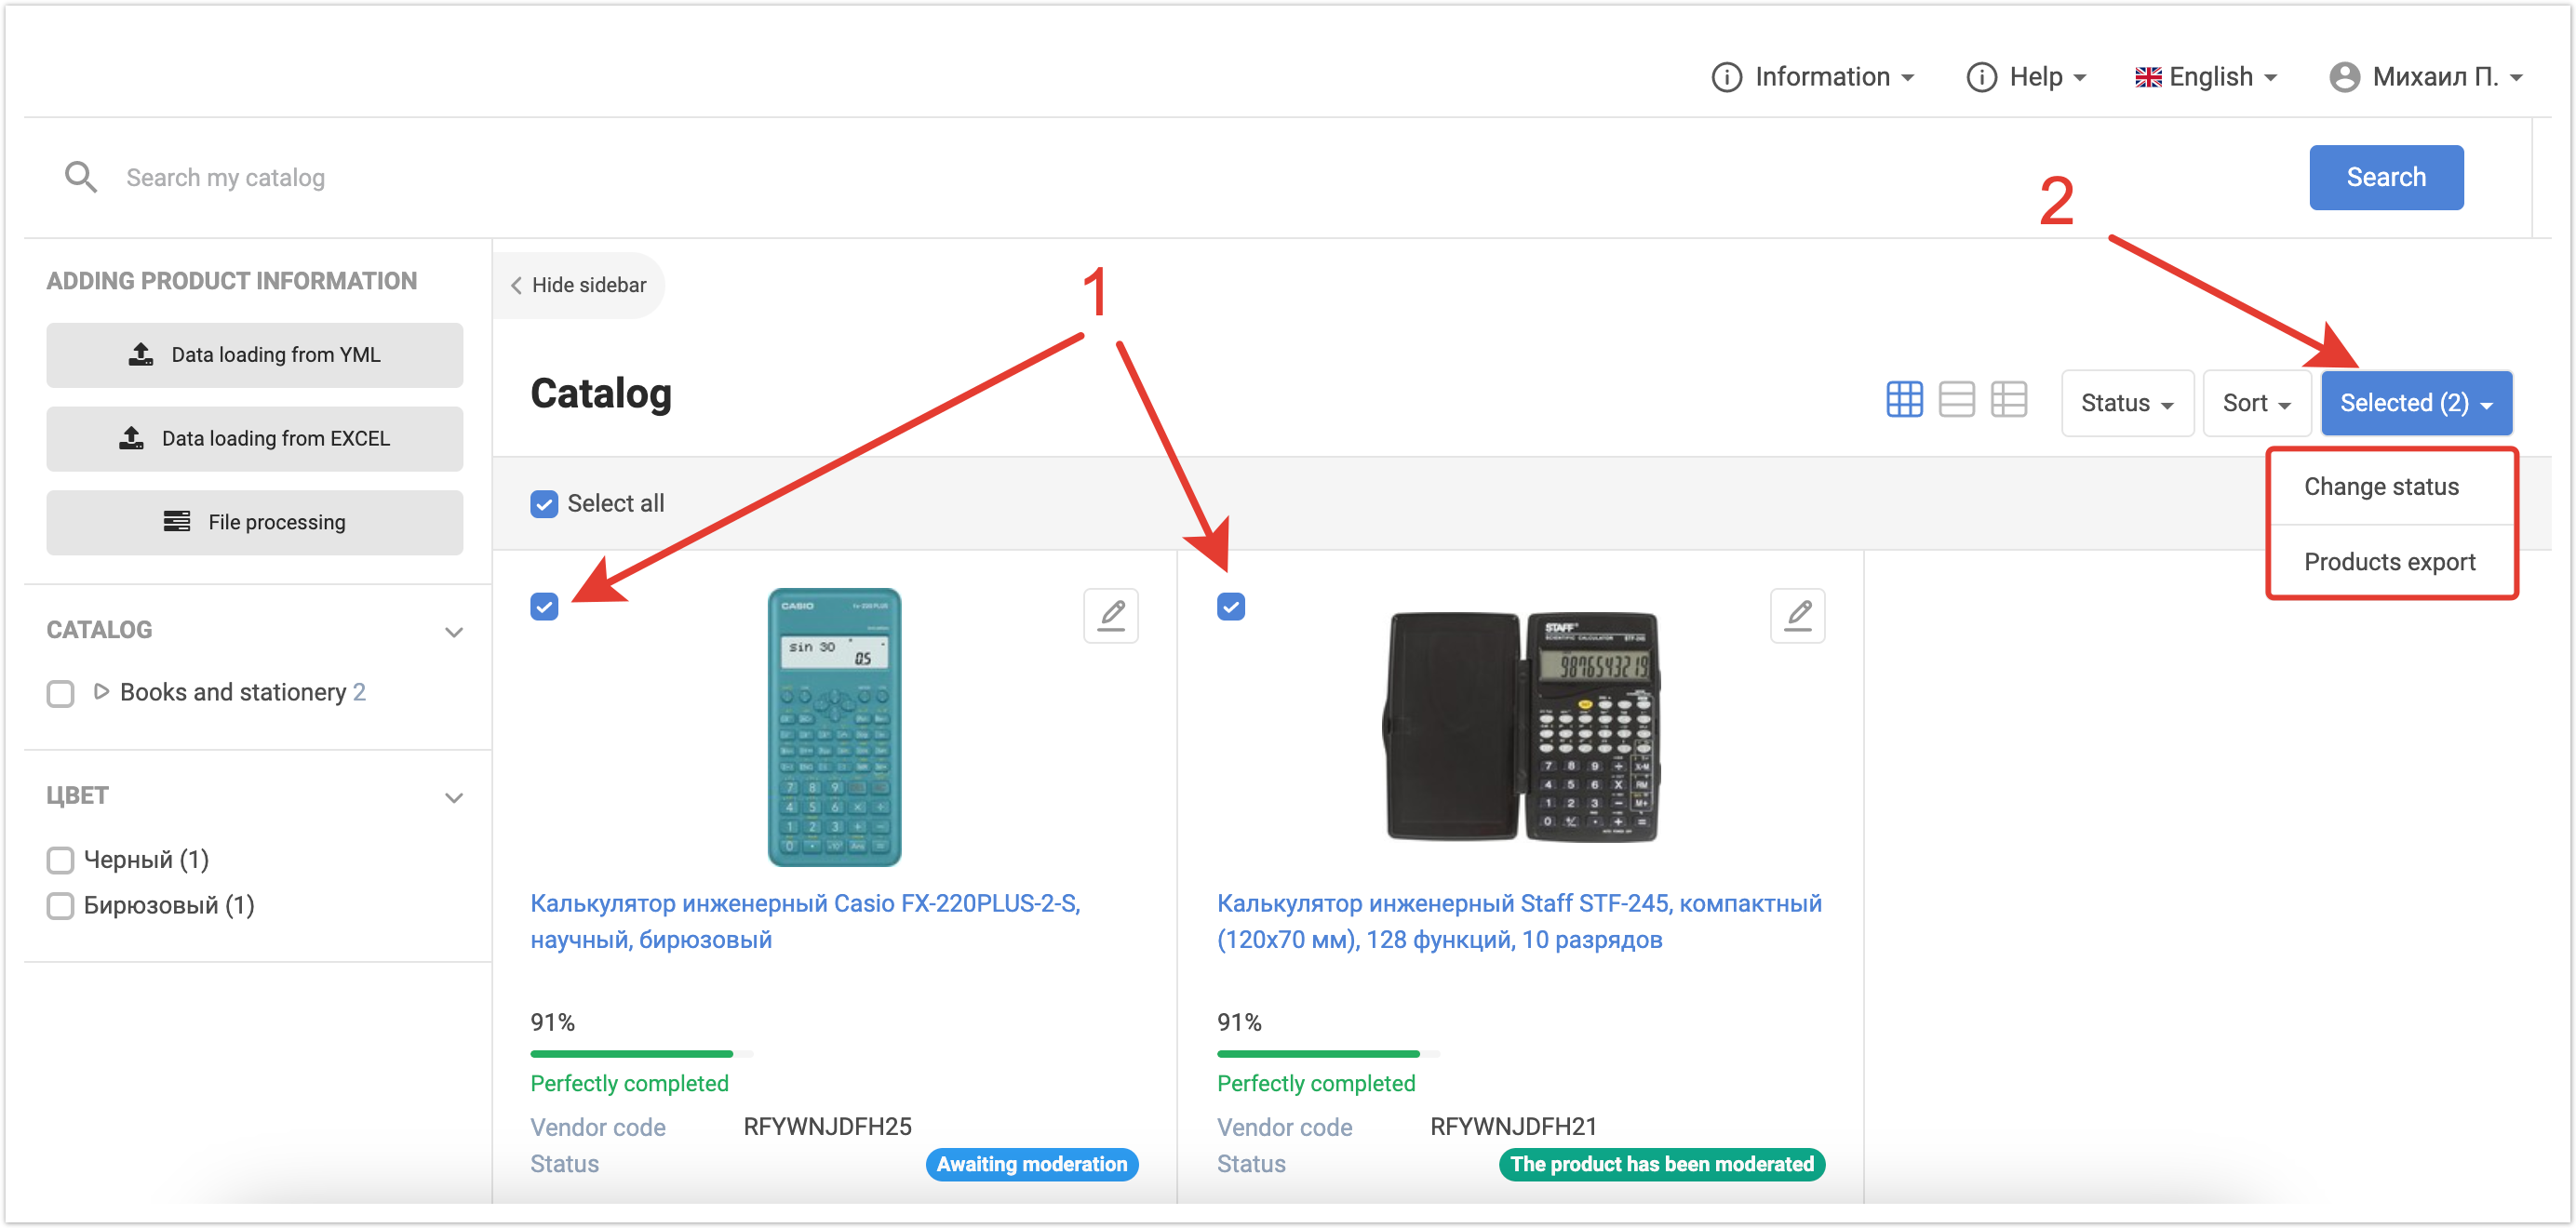
Провести модерацию товара и изменить его статус можно с помощью массовых действий или вручную для каждого товара. Чтобы выполнить это через массовые действия нужно выбрать товары с помощью чек-боксов, а далее в выпадающем списке выбрать Изменить статус.
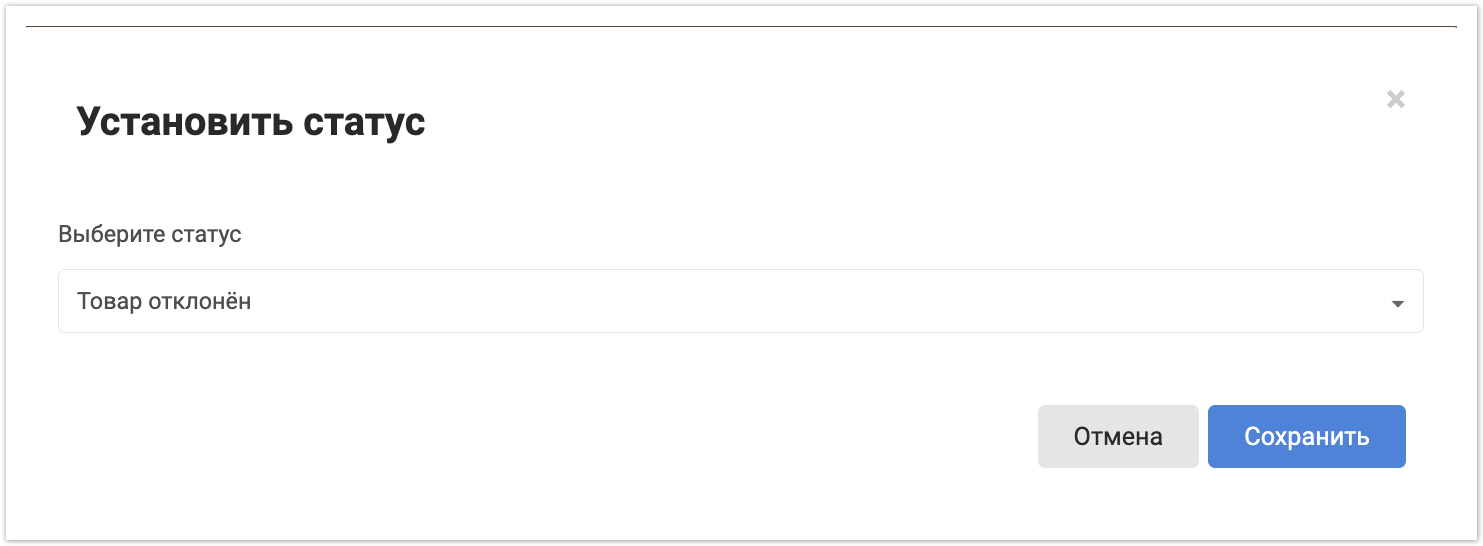
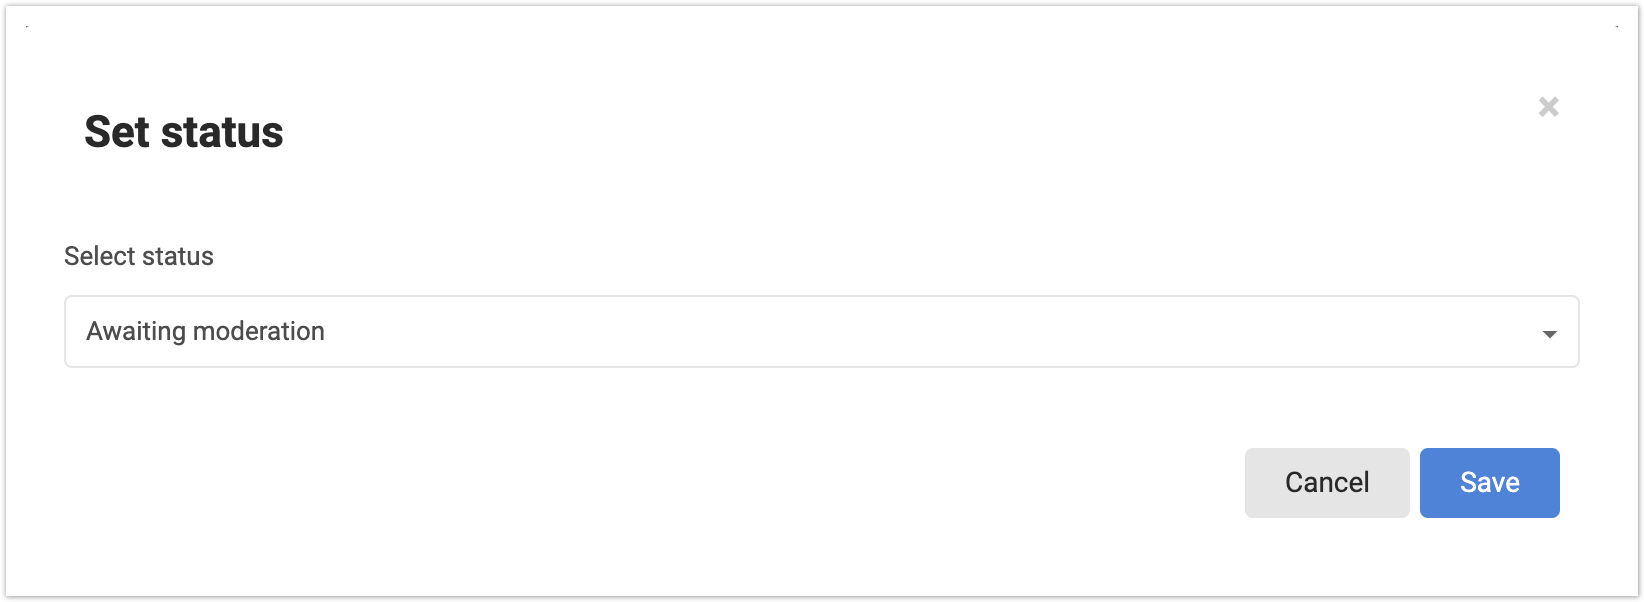
Откроется окно, где нужно будет выбрать статус для выделенных товаров. Например, таким образом можно массово отклонить товары, если они были загружены ошибочно.
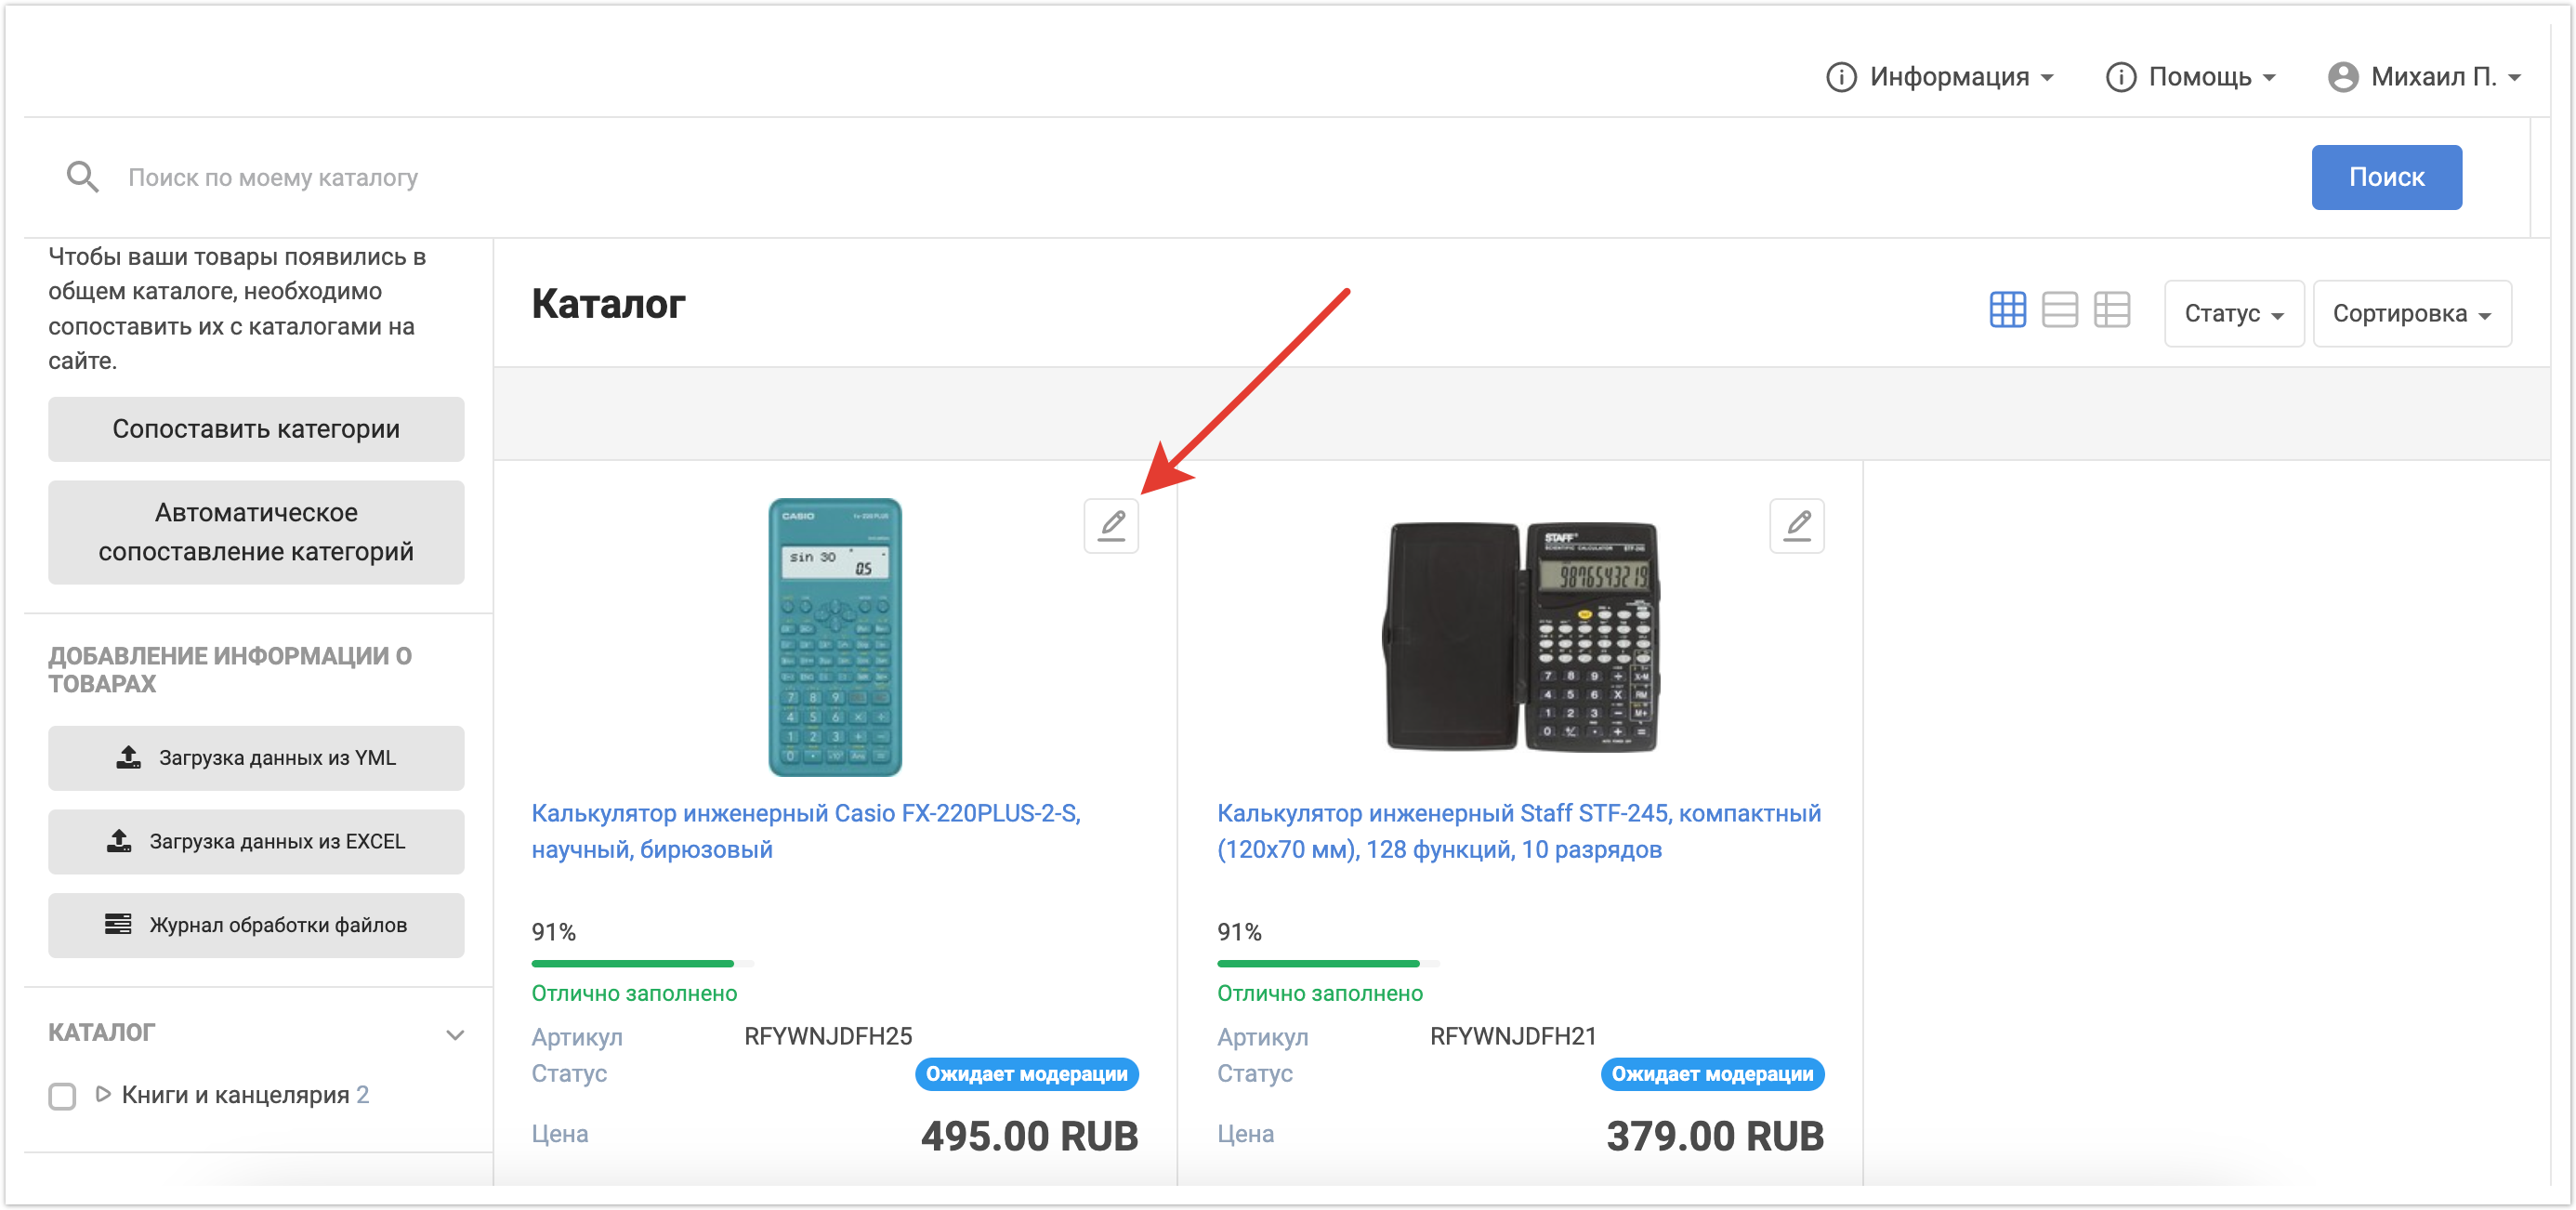
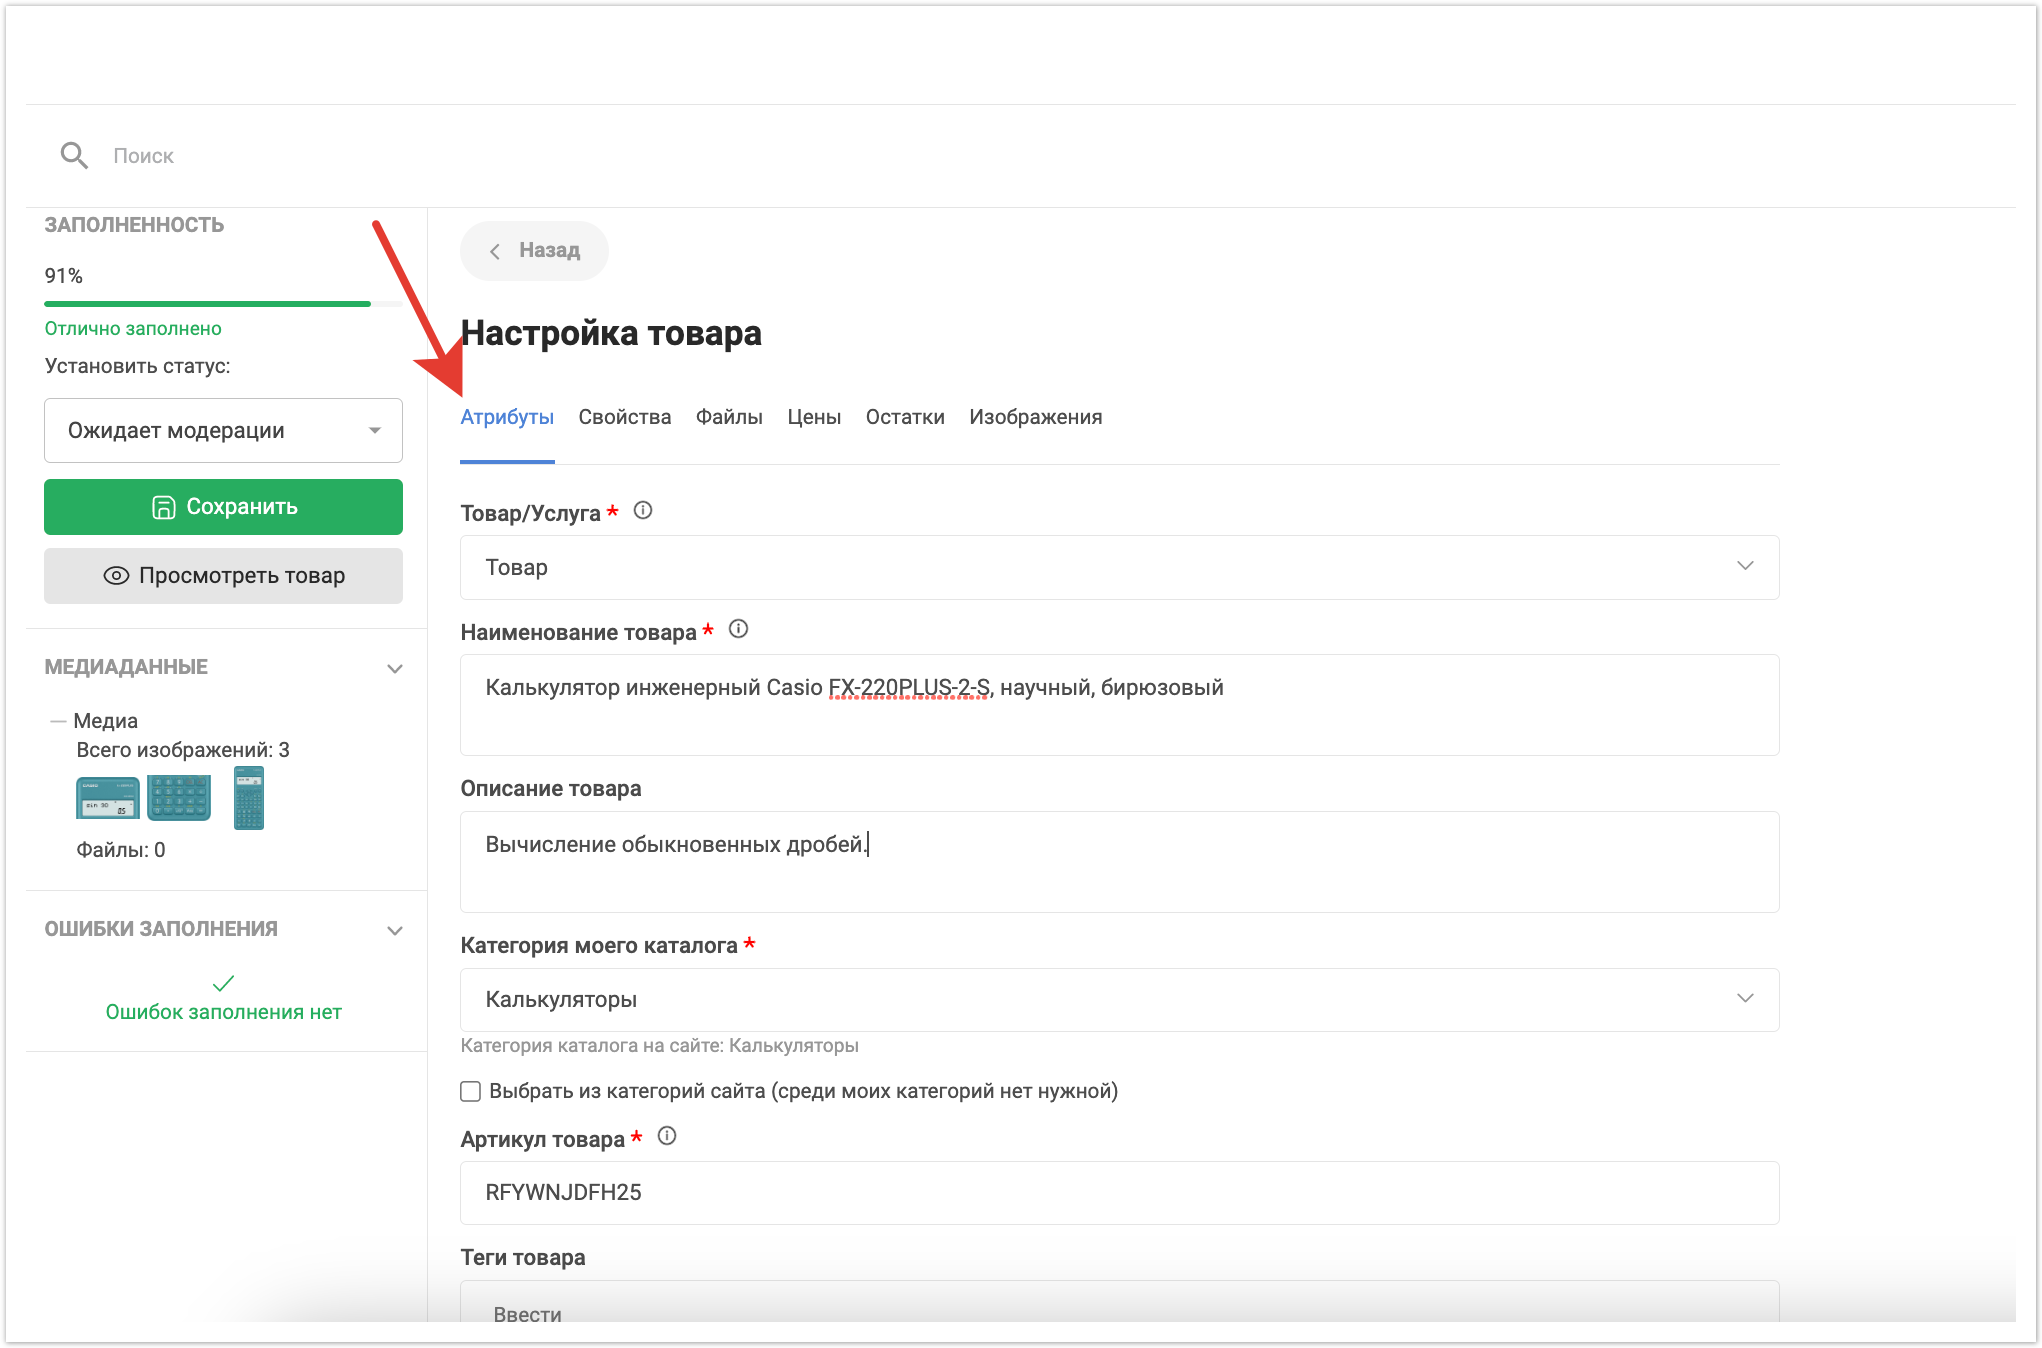
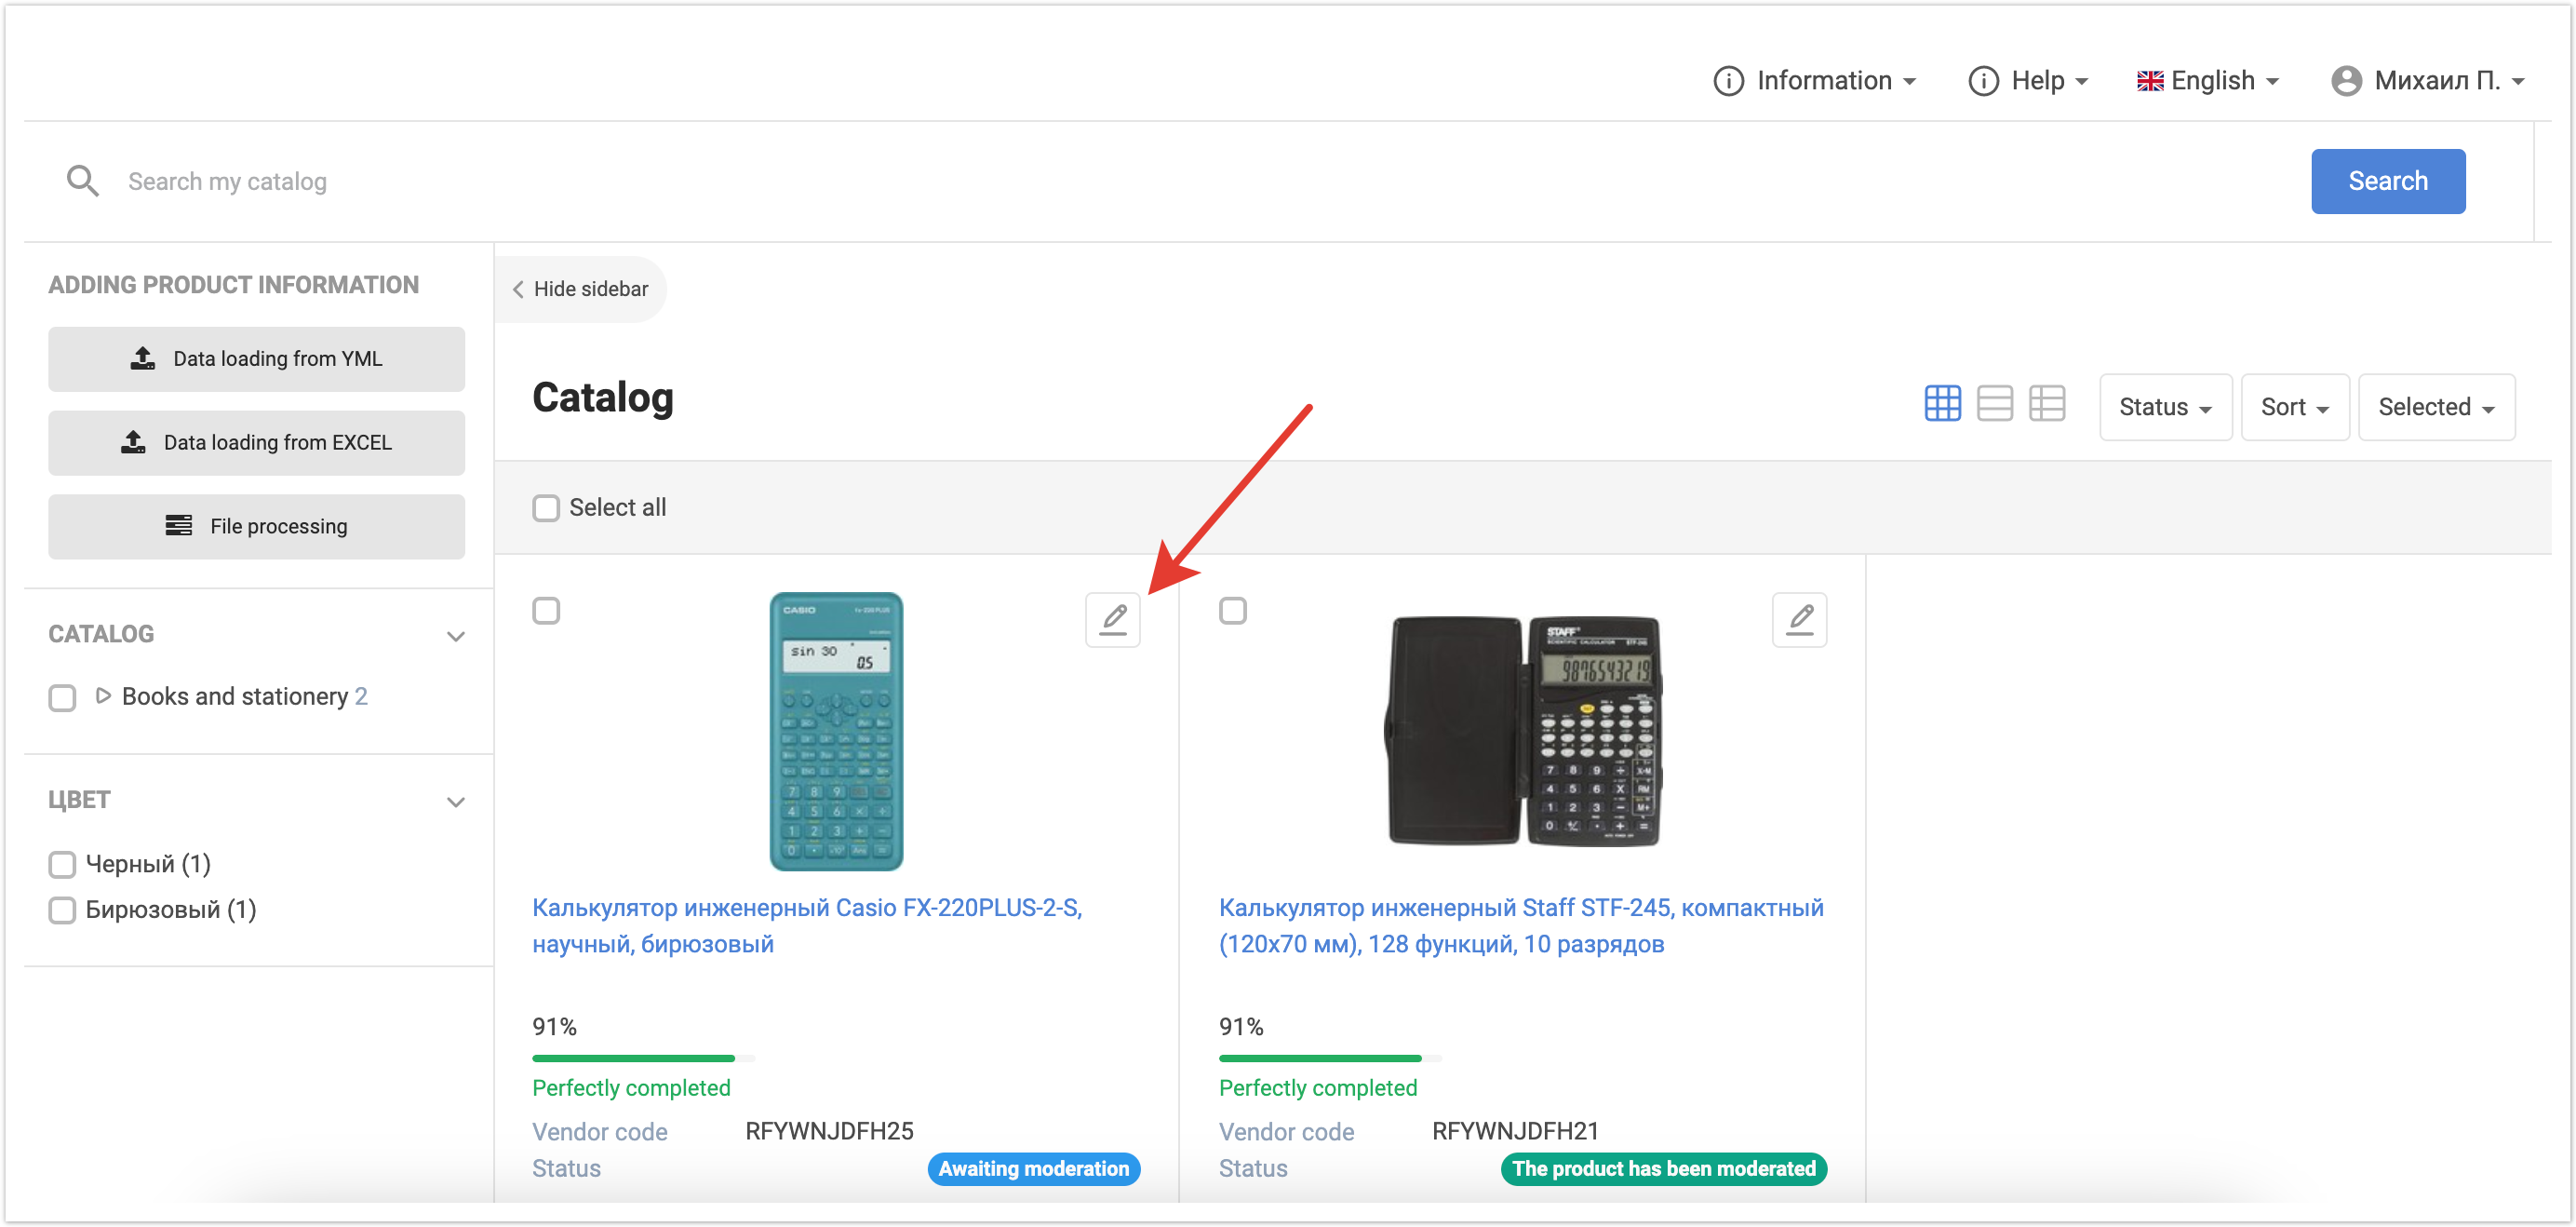
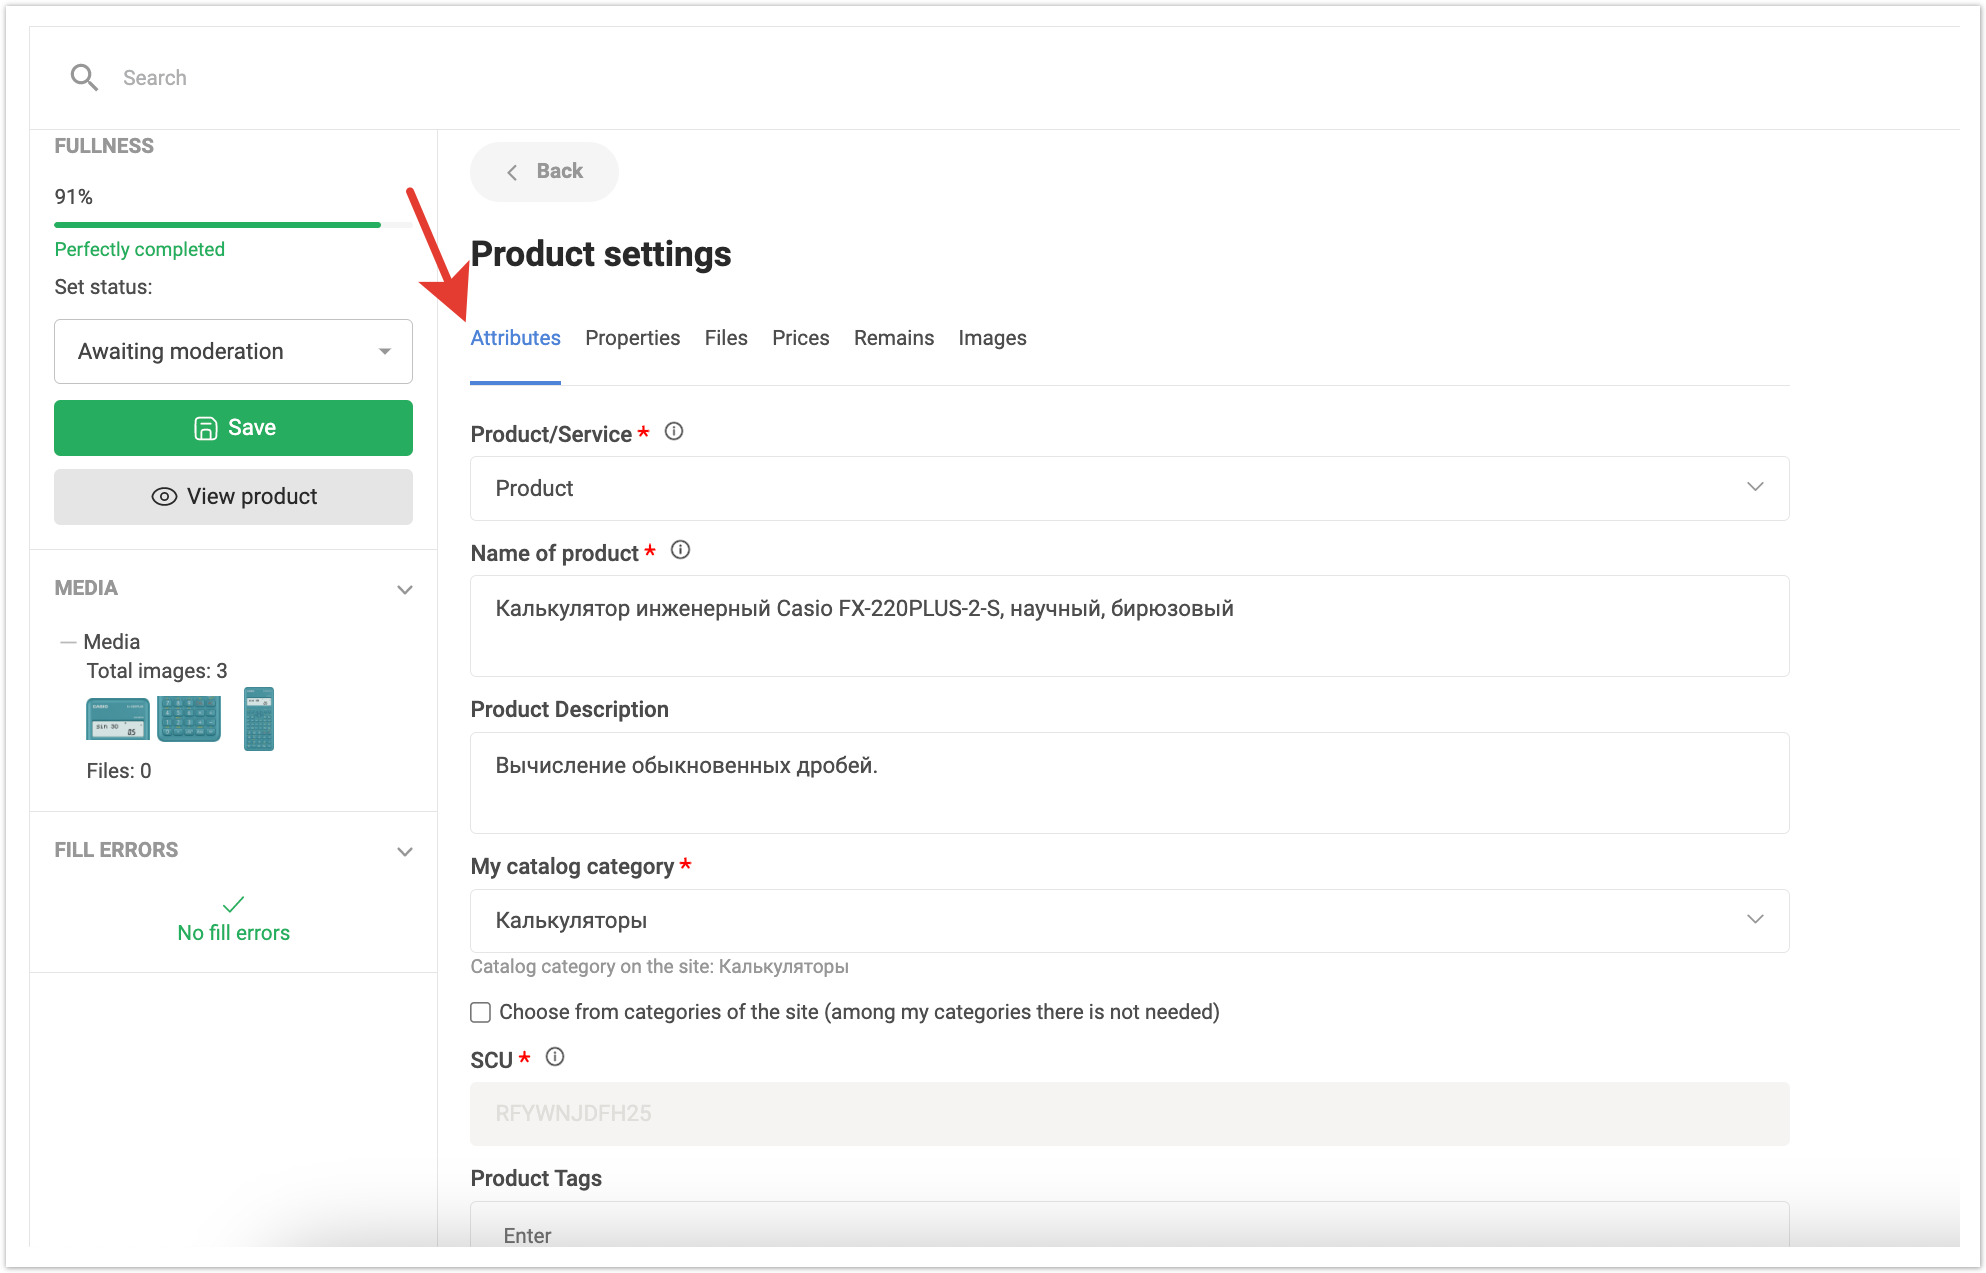
Для того, чтобы изменить статус для товара вручную, необходимо перейти в режим редактирования. Редактирование товараРучное редактирование товараРежим редактирования товара позволяет бренд-менеджеру внести исправления по товару, если они необходимы, а также изменить статус модерации. Для этого нужно нажать на кнопку для редактирования.
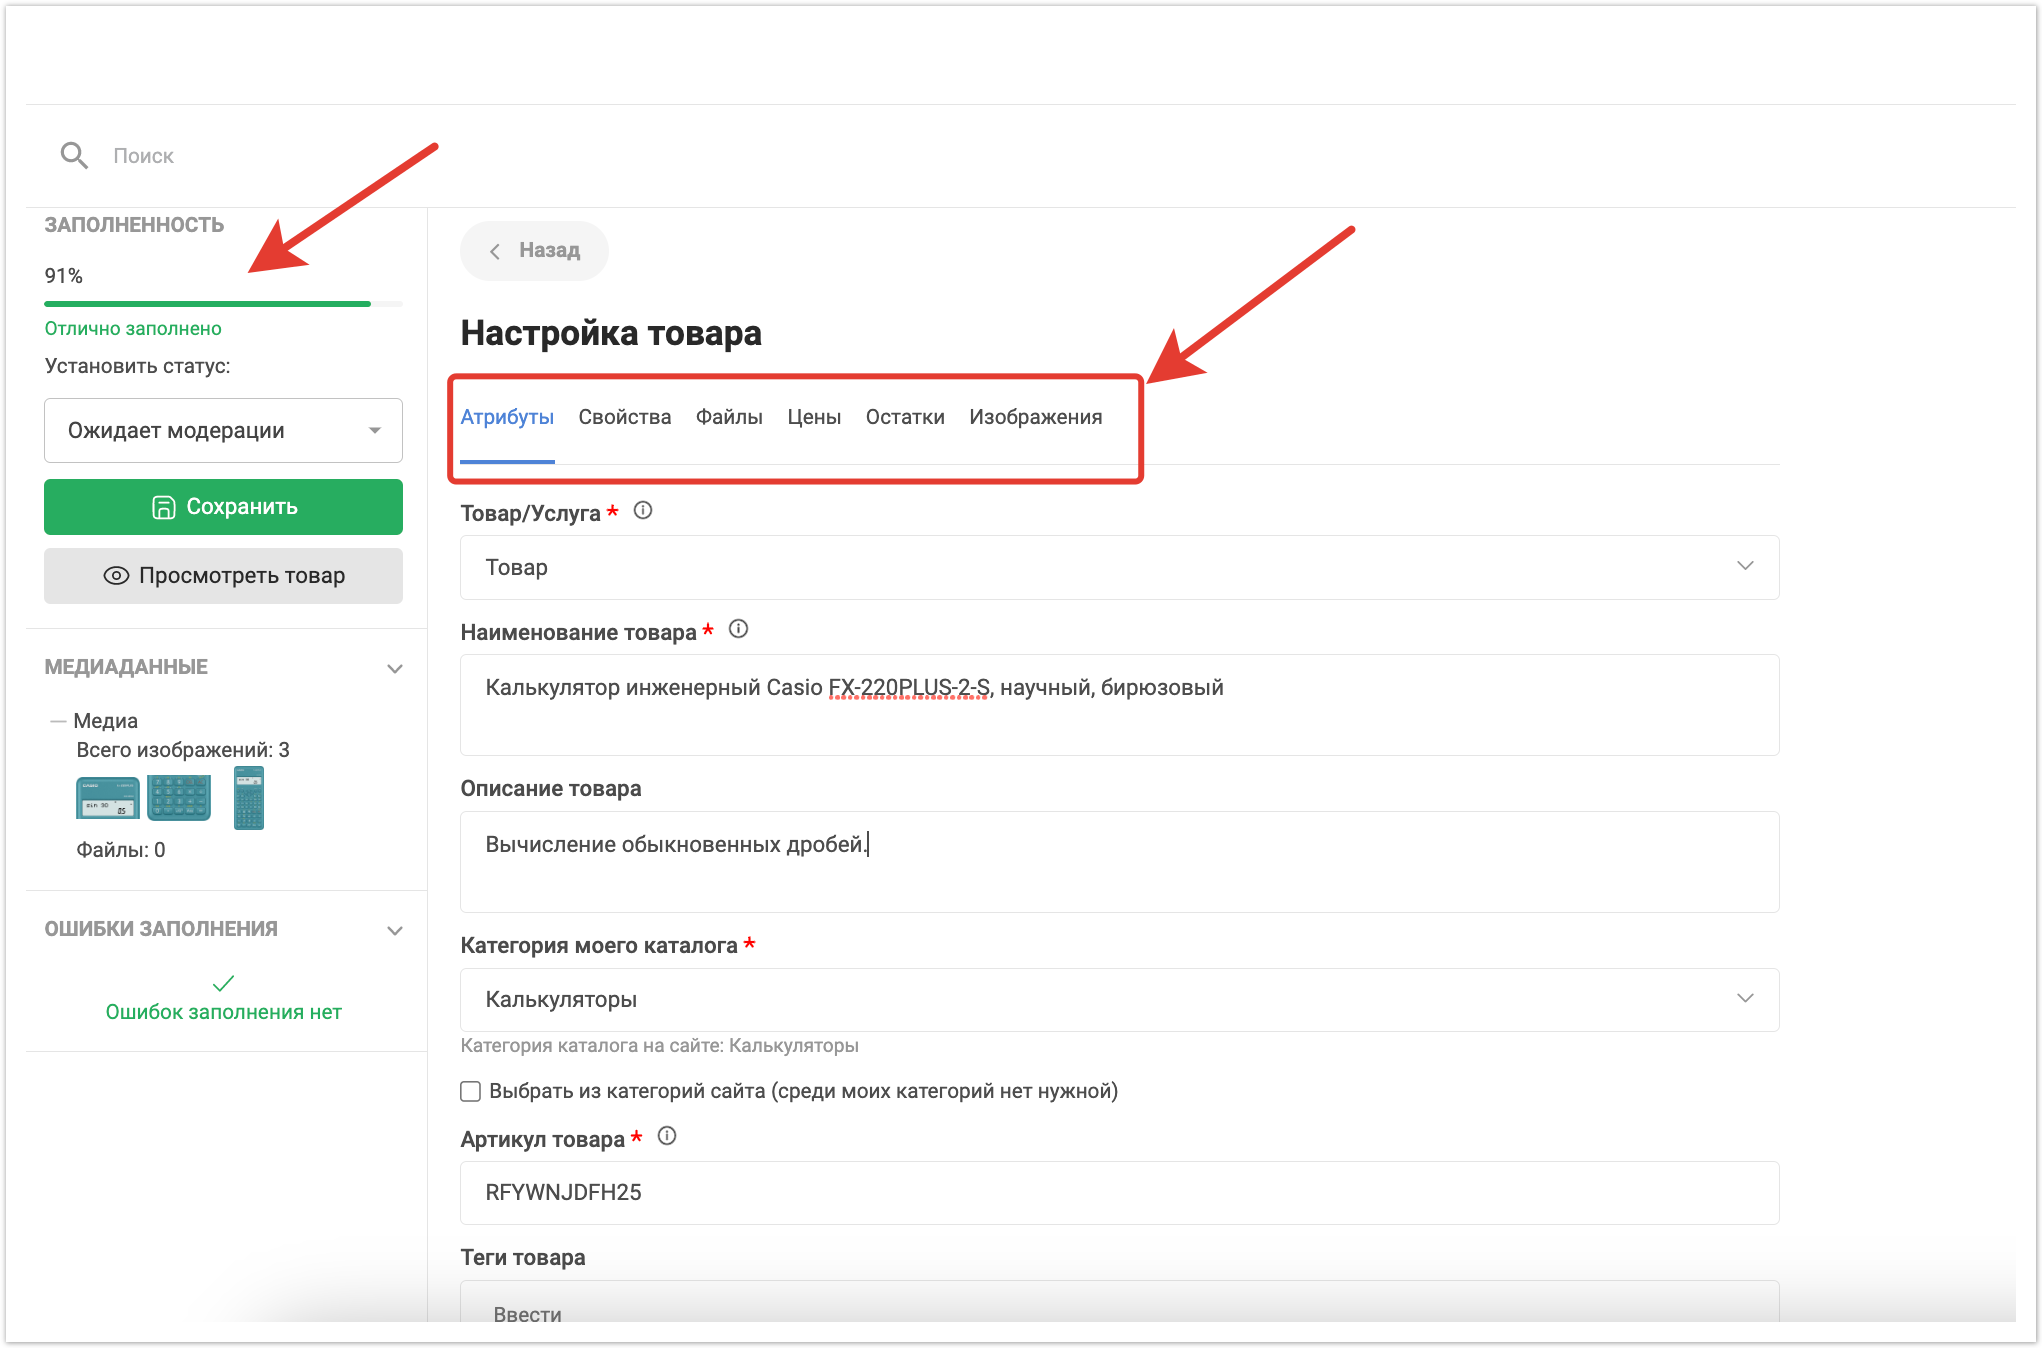
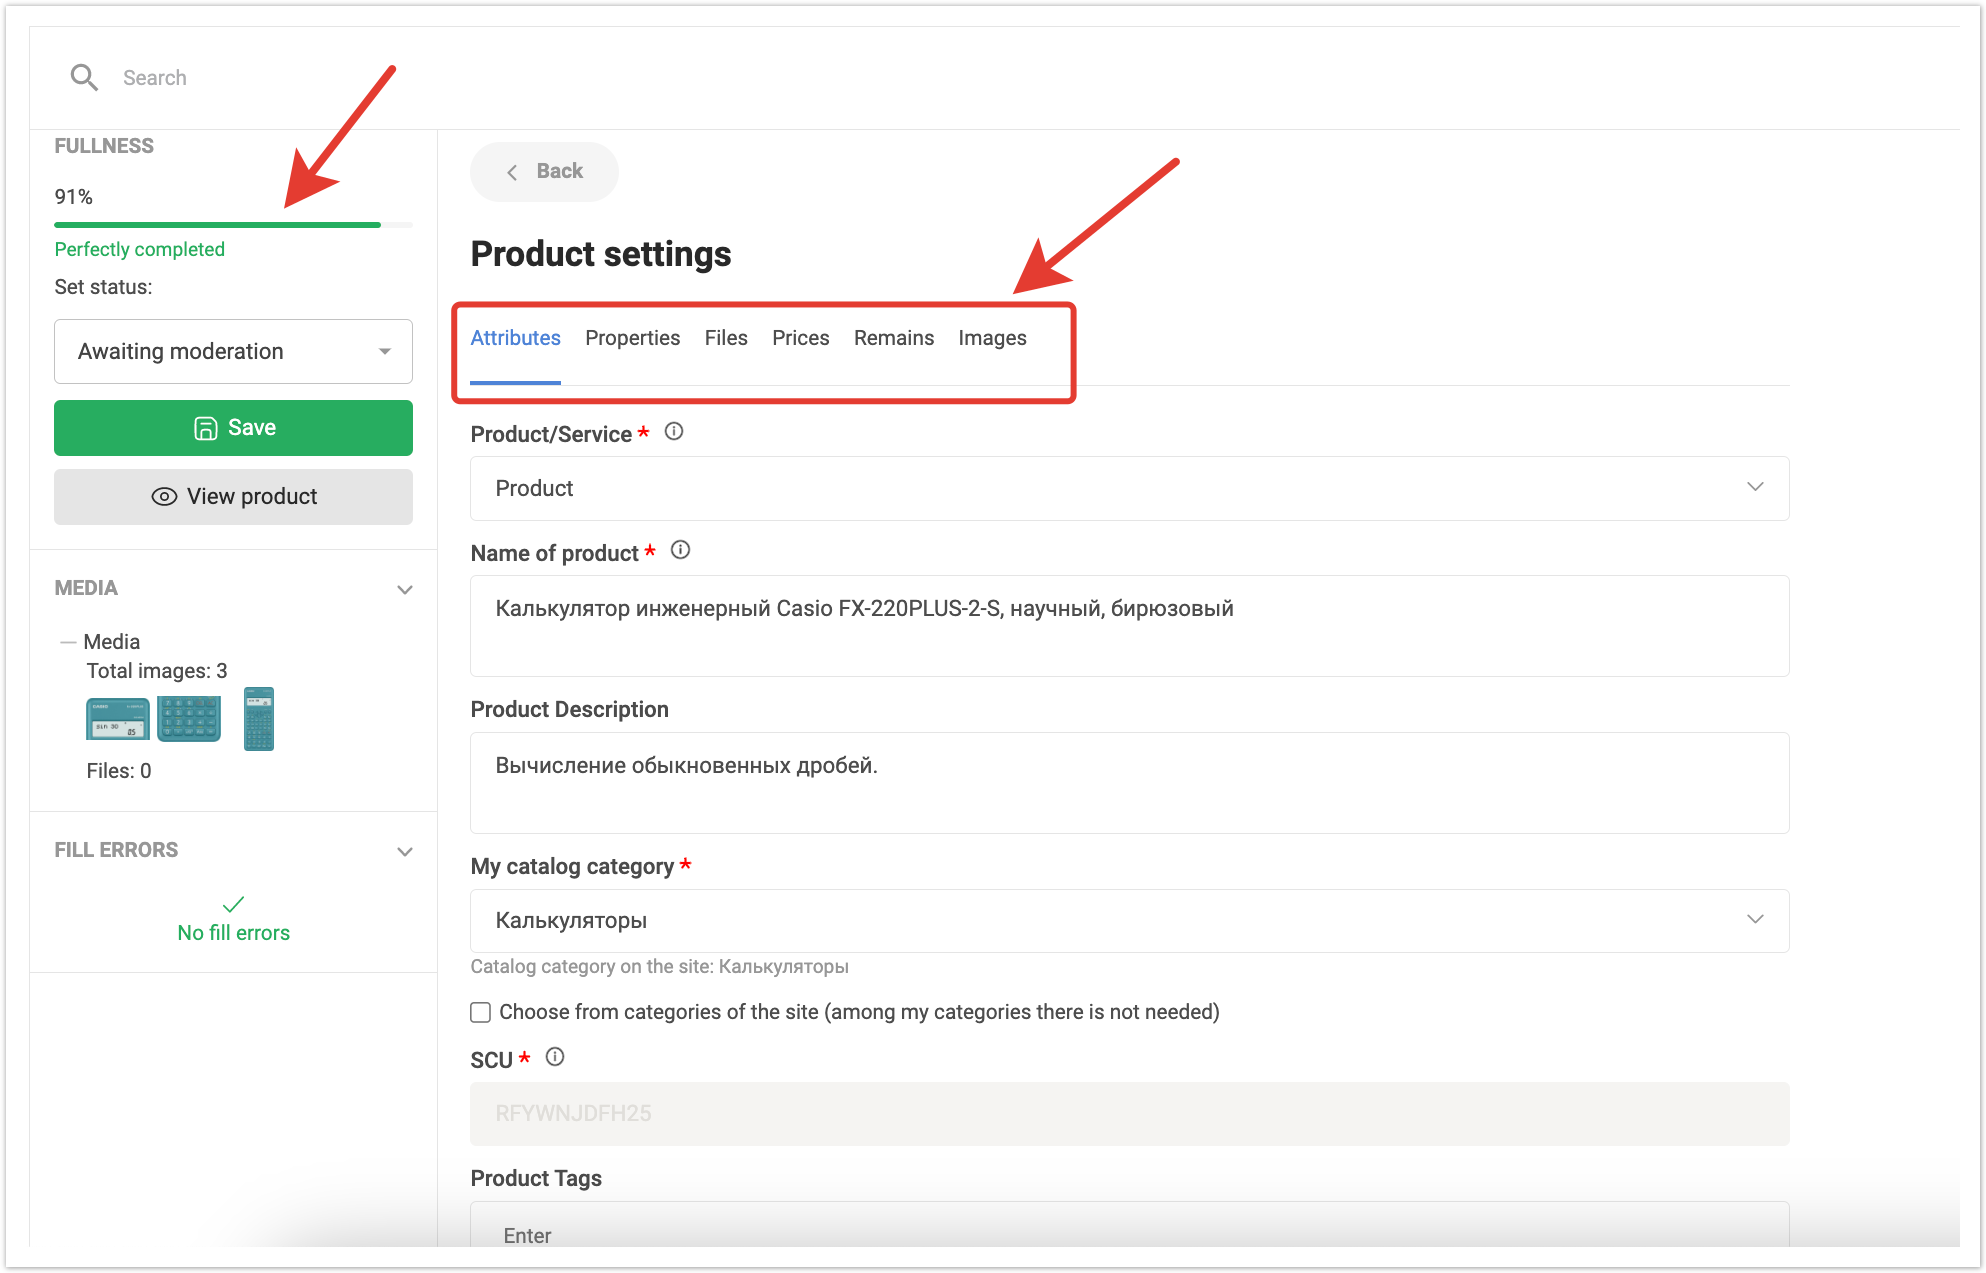
Откроется карточка товара, где будет виден процент заполненности и можно будет скорректировать необходимые данные. Данные находятся на нескольких вкладках: Атрибуты, Свойства, Файлы, Цены, Остатки, Изображения.
Вкладка Атрибуты содержит следующие данные:
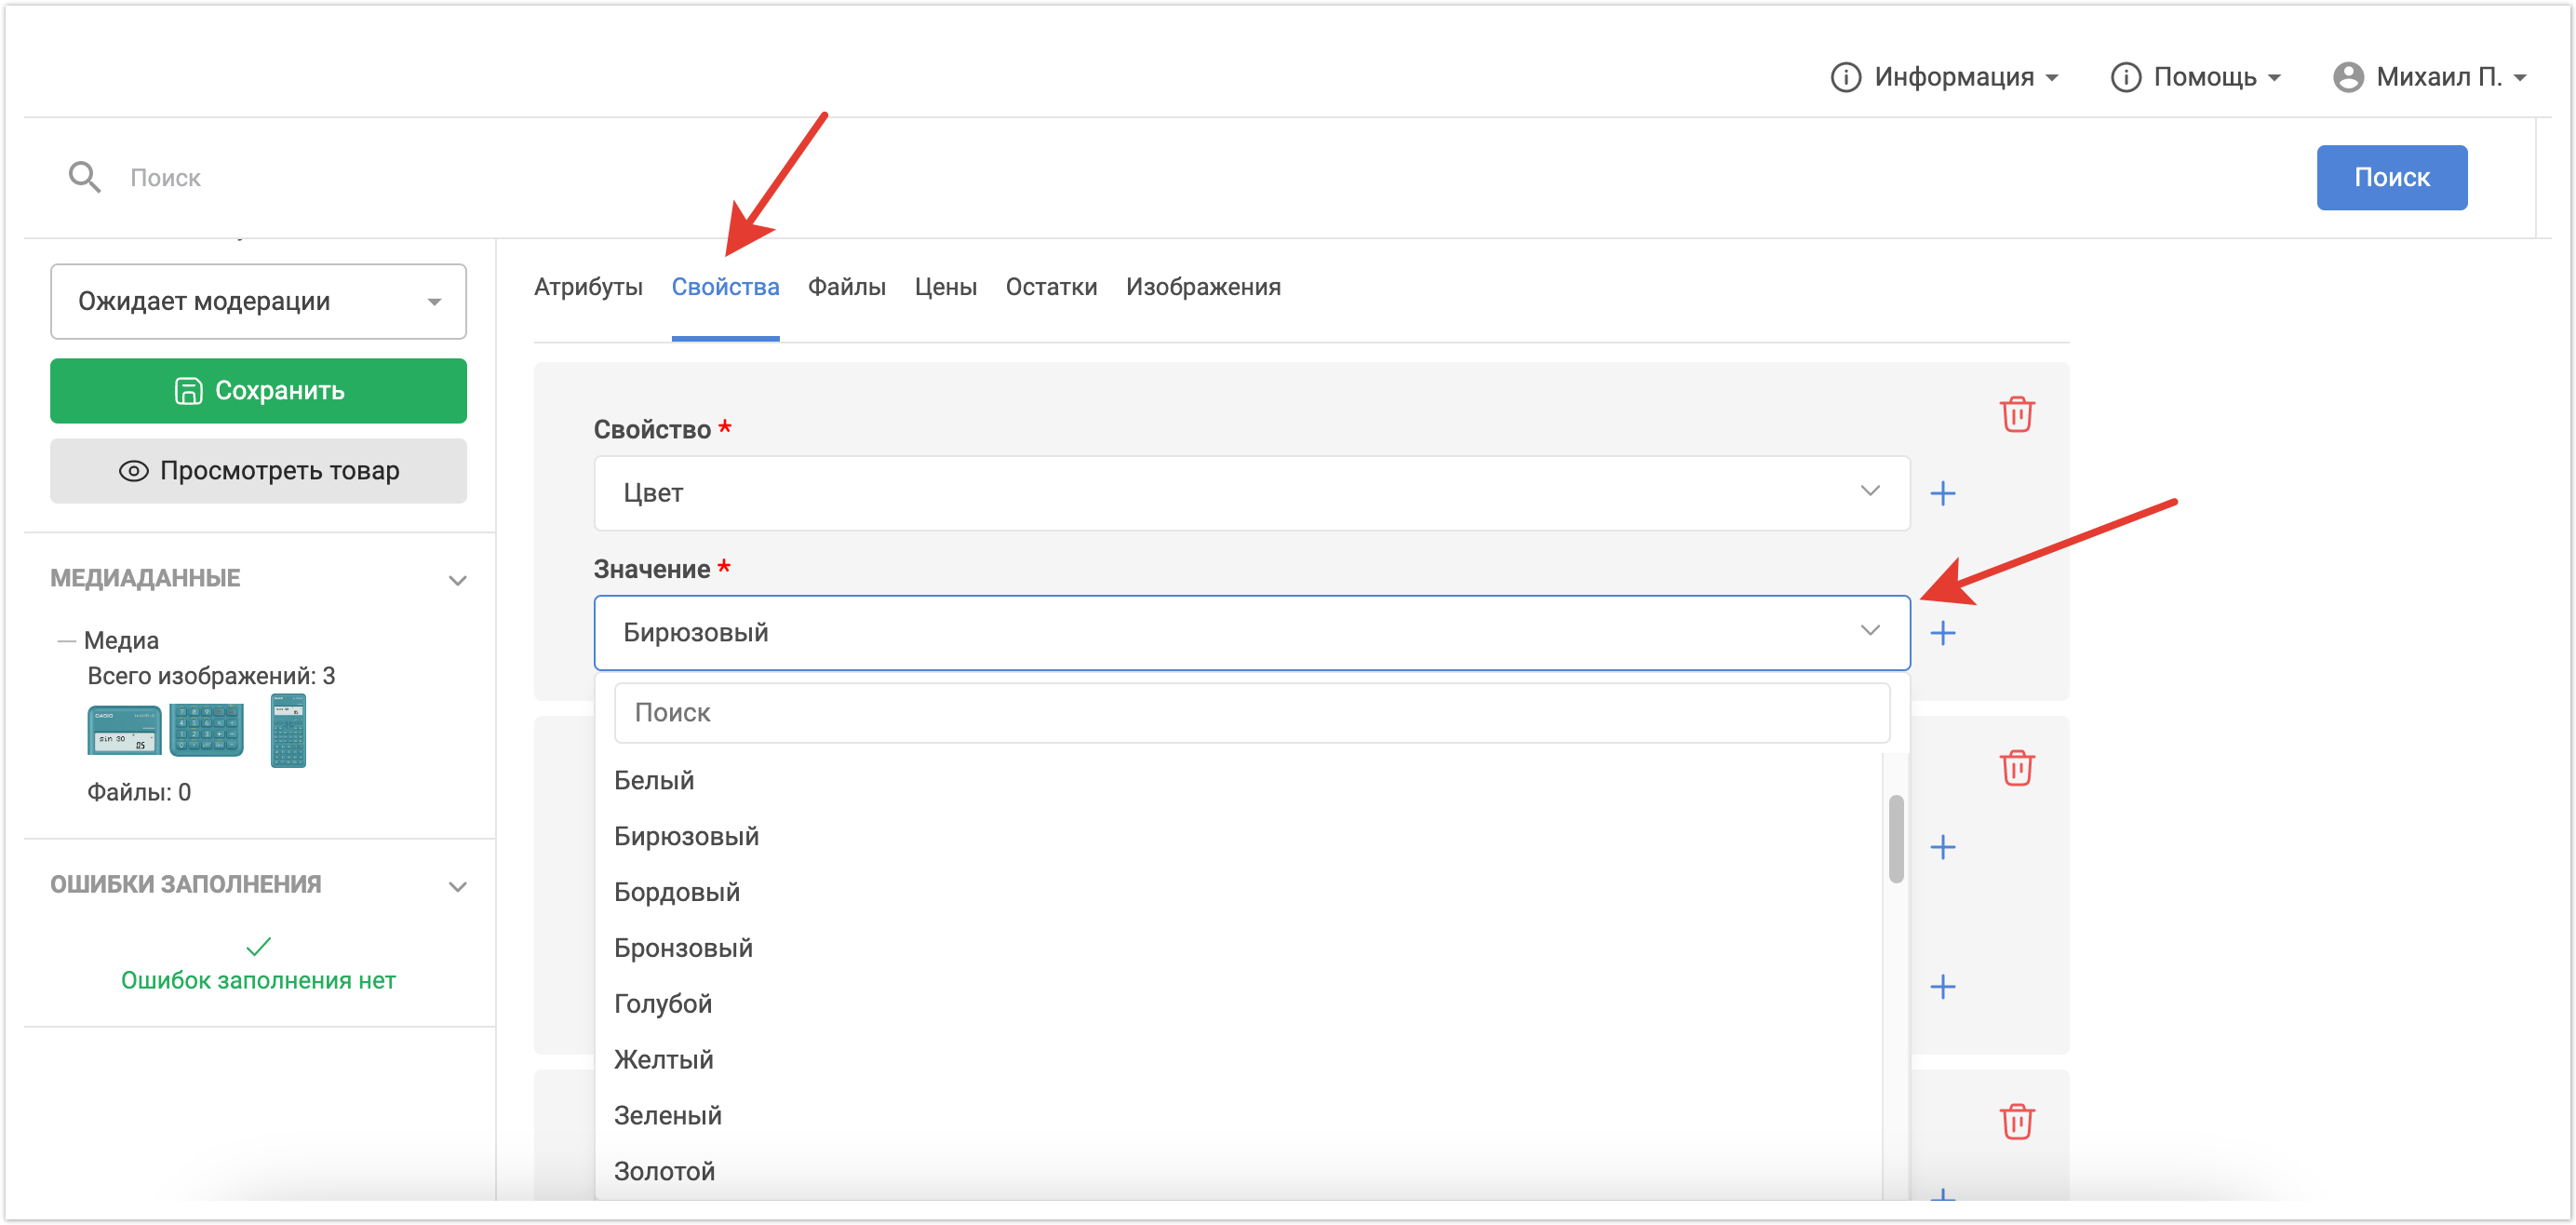
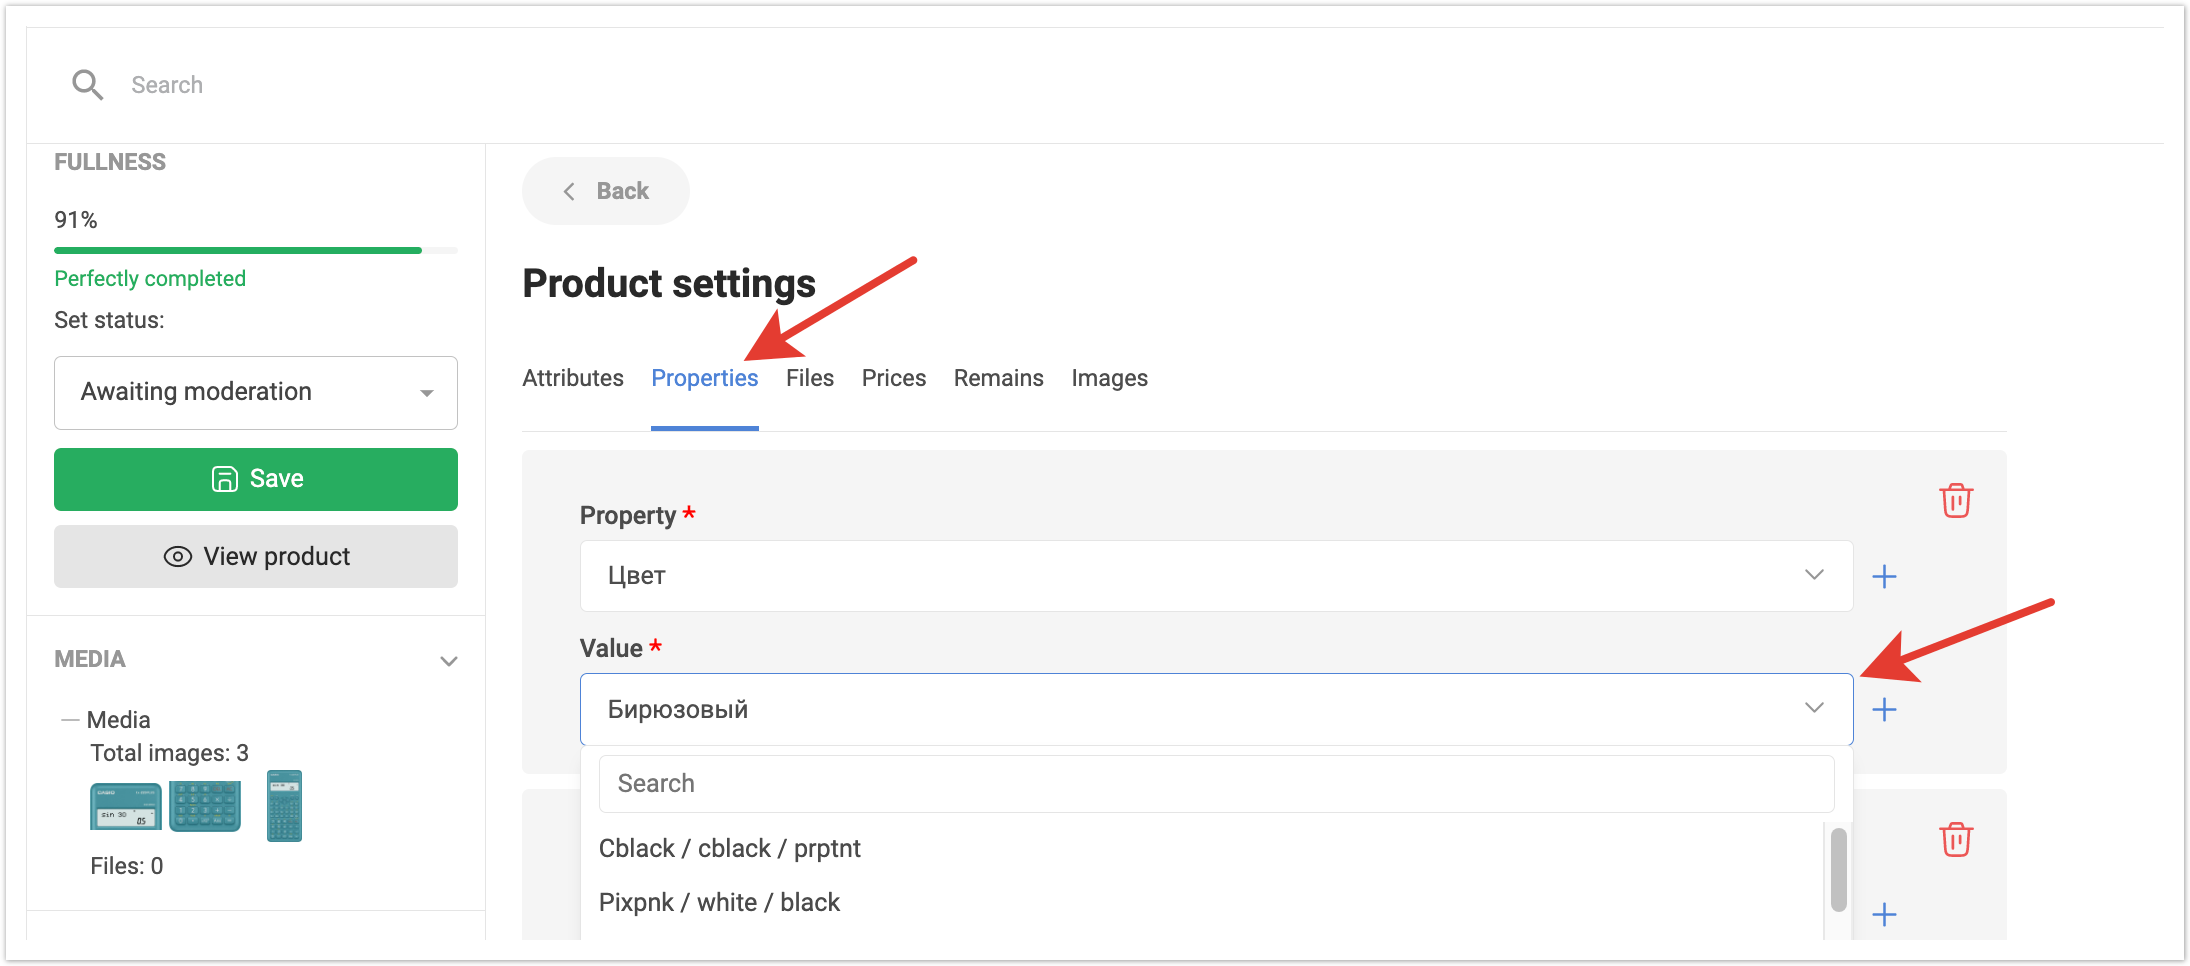
Вкладка Свойства содержит в себе все импортированные свойства для товара, а так же их значения. В этом разделе Бренд-менеджер может изменить свойство продукта или его значение, воспользовавшись выпадающим списком. Он также может удалить лишние свойства при необходимости или добавить новое свойство по кнопке Добавить свойство.
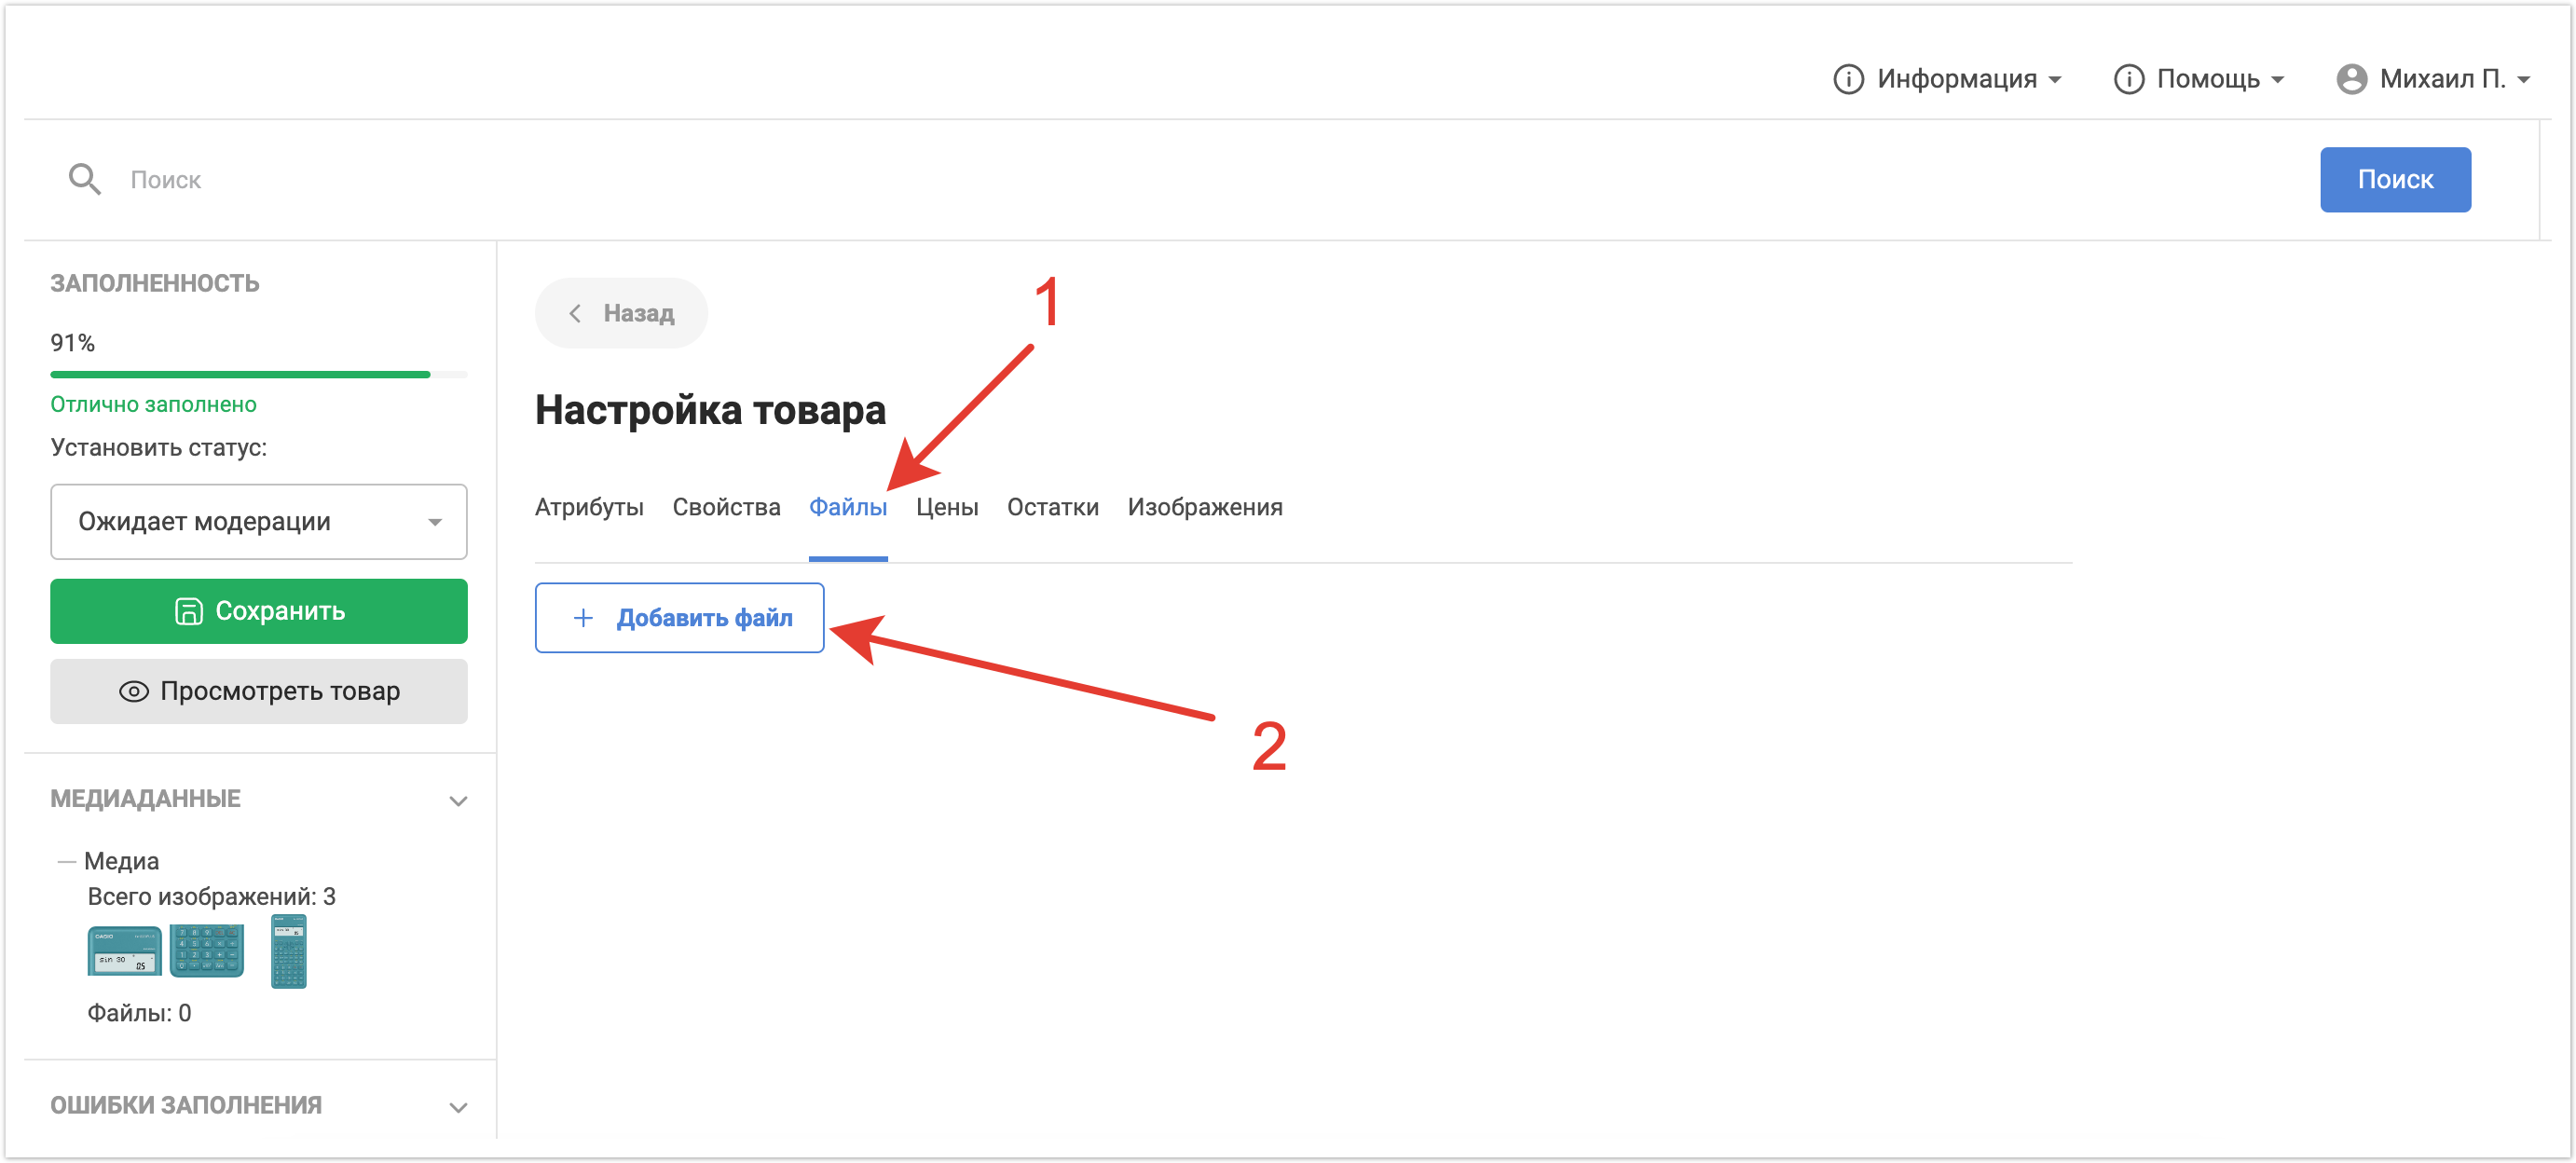
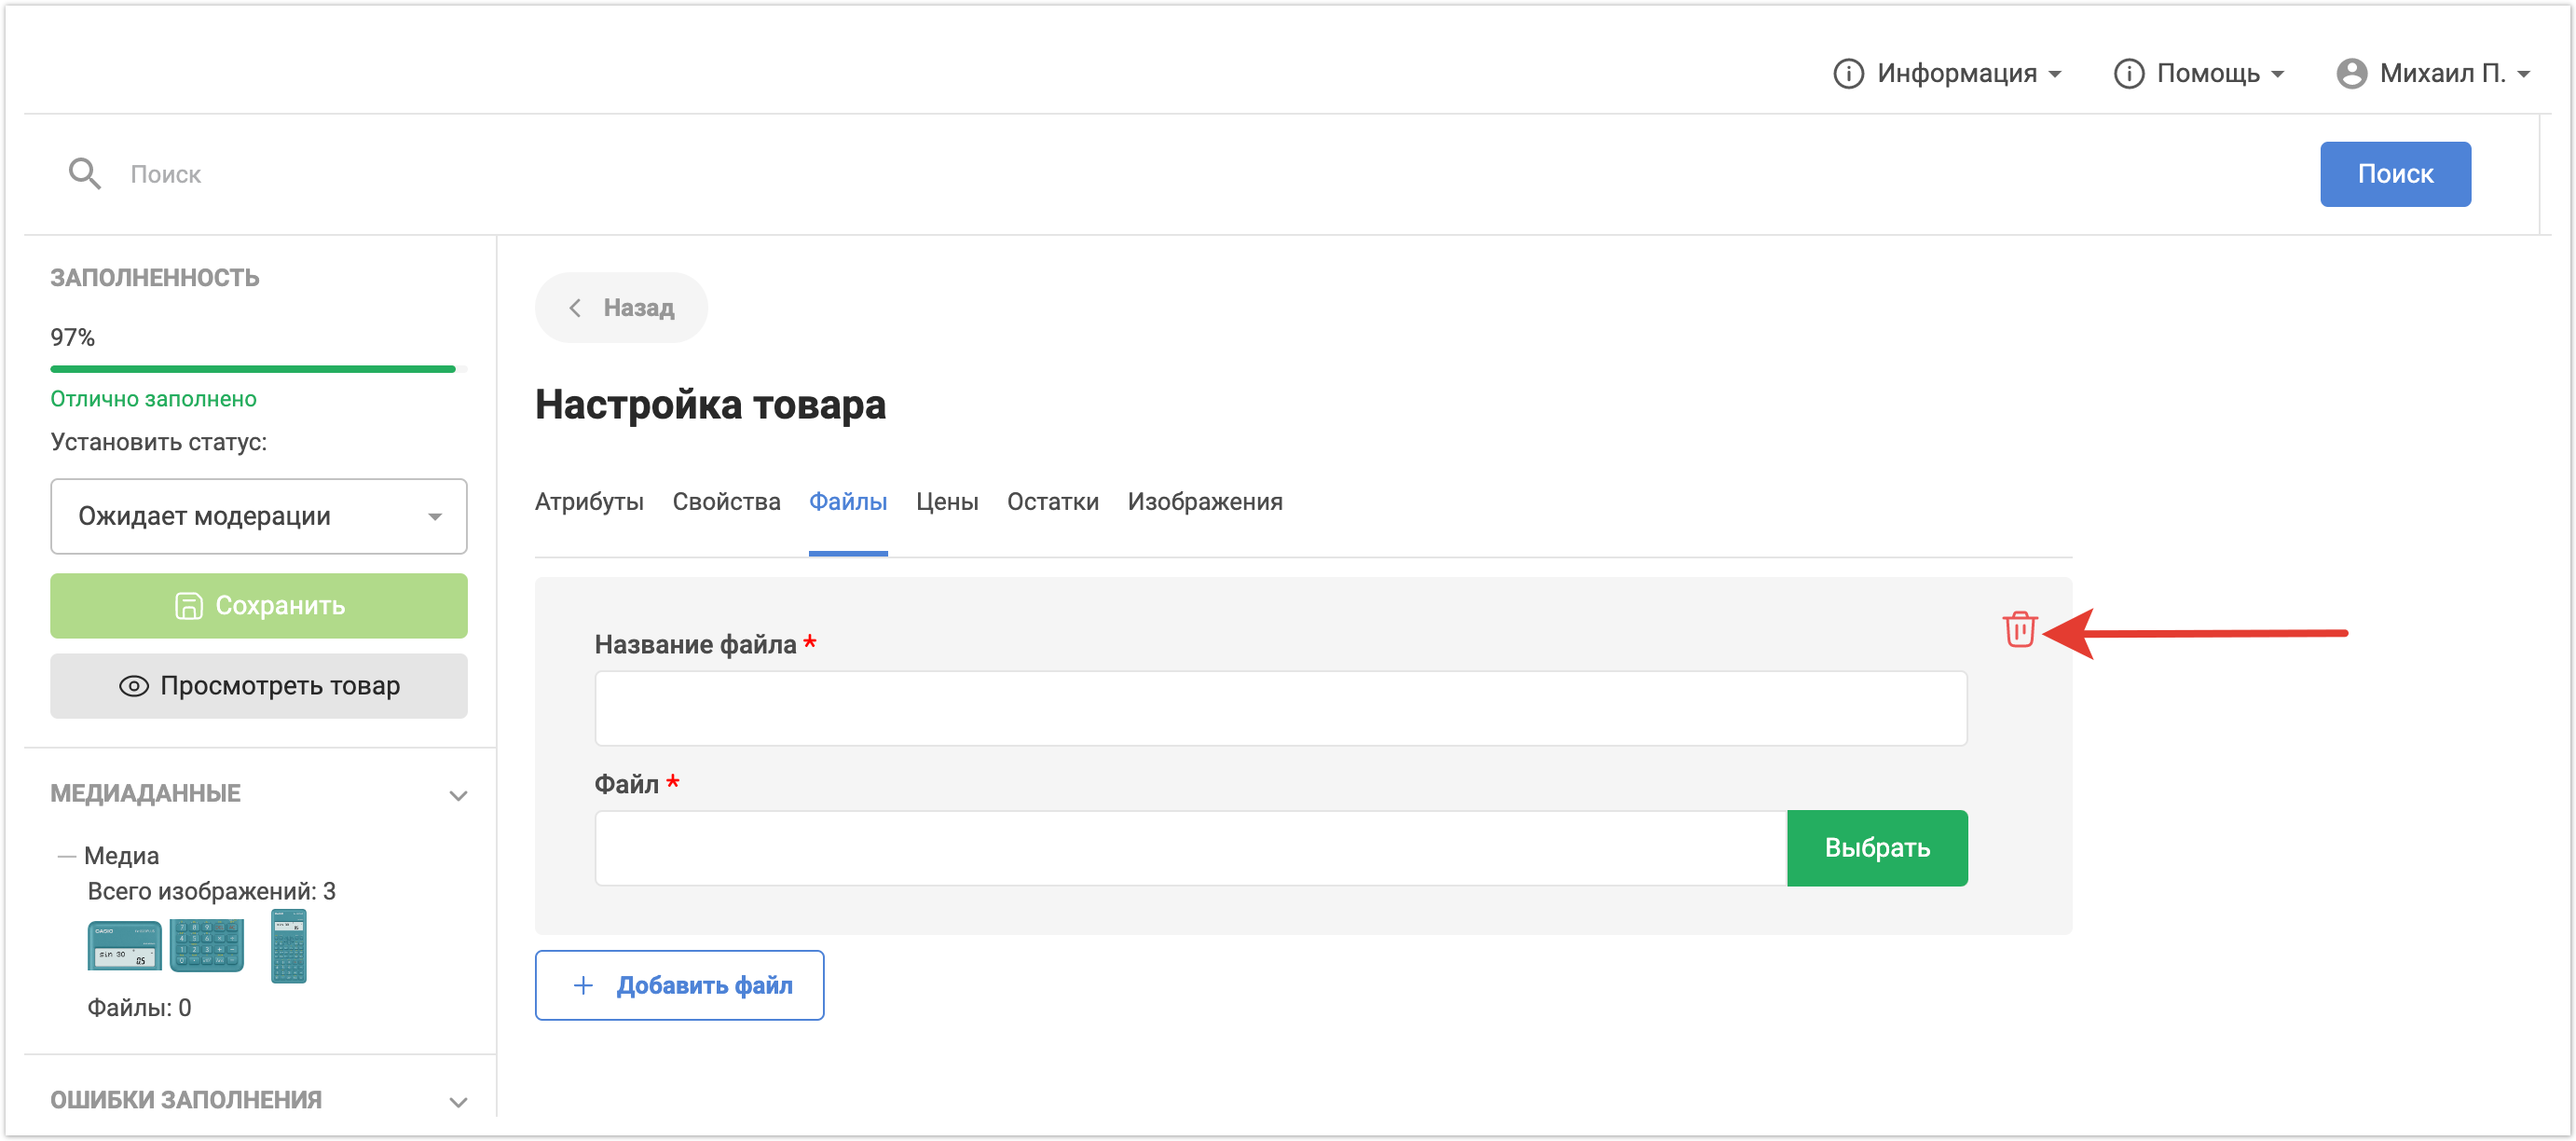
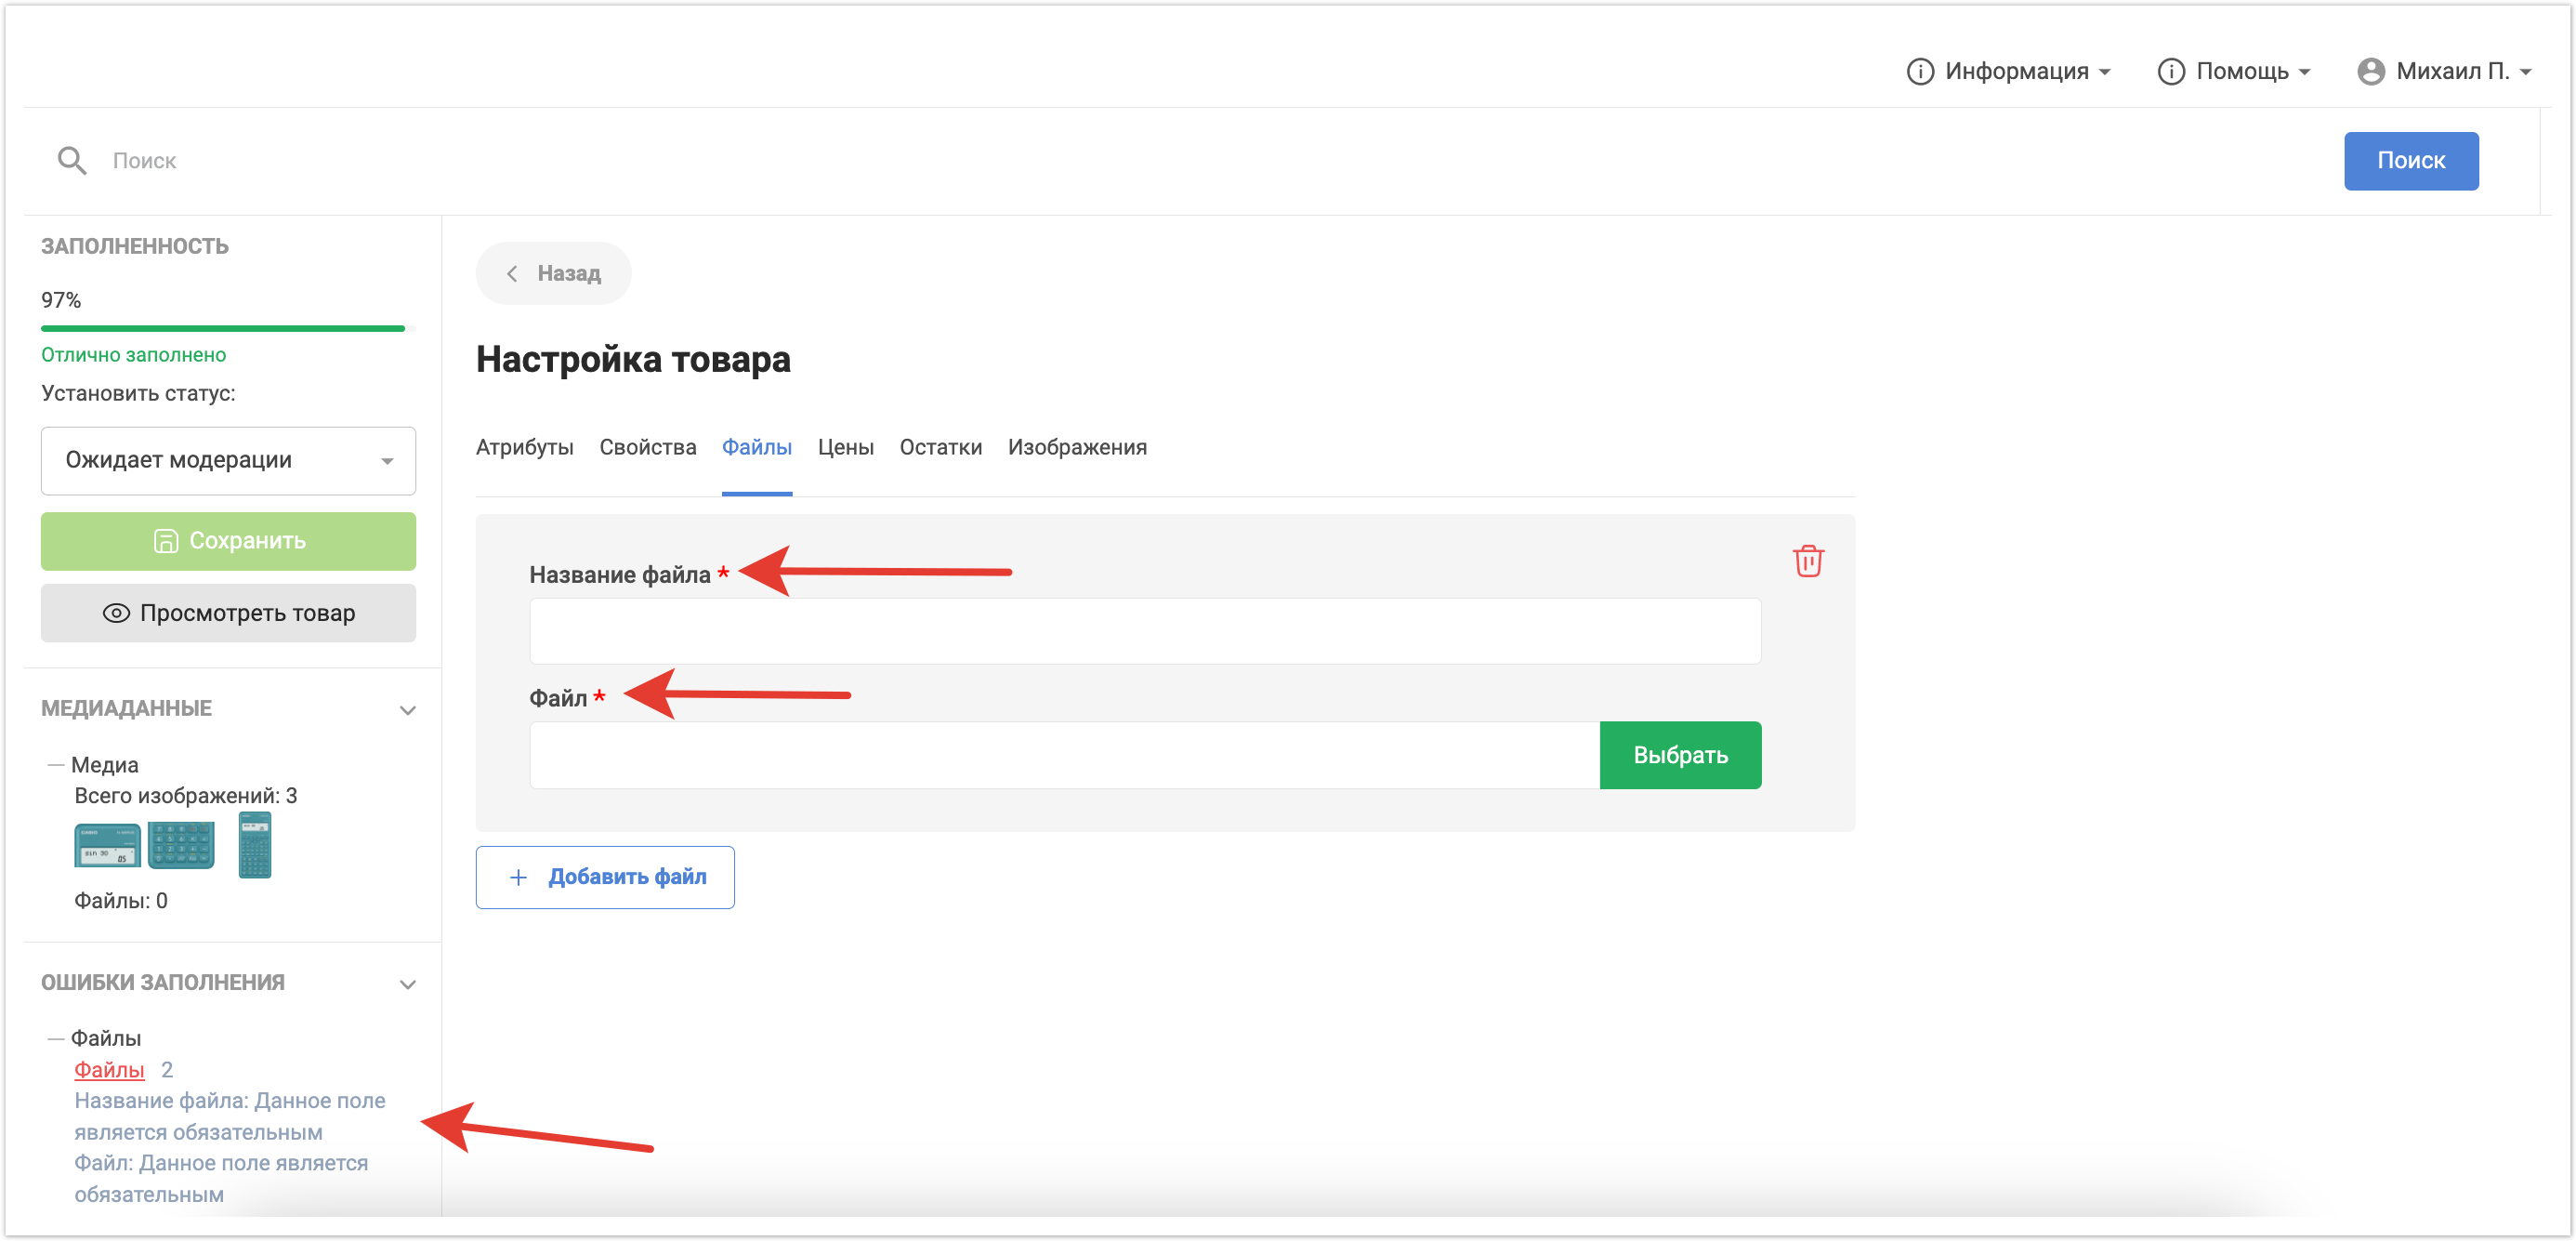
Можно также удалить ранее загруженный файл, если он более не актуален.
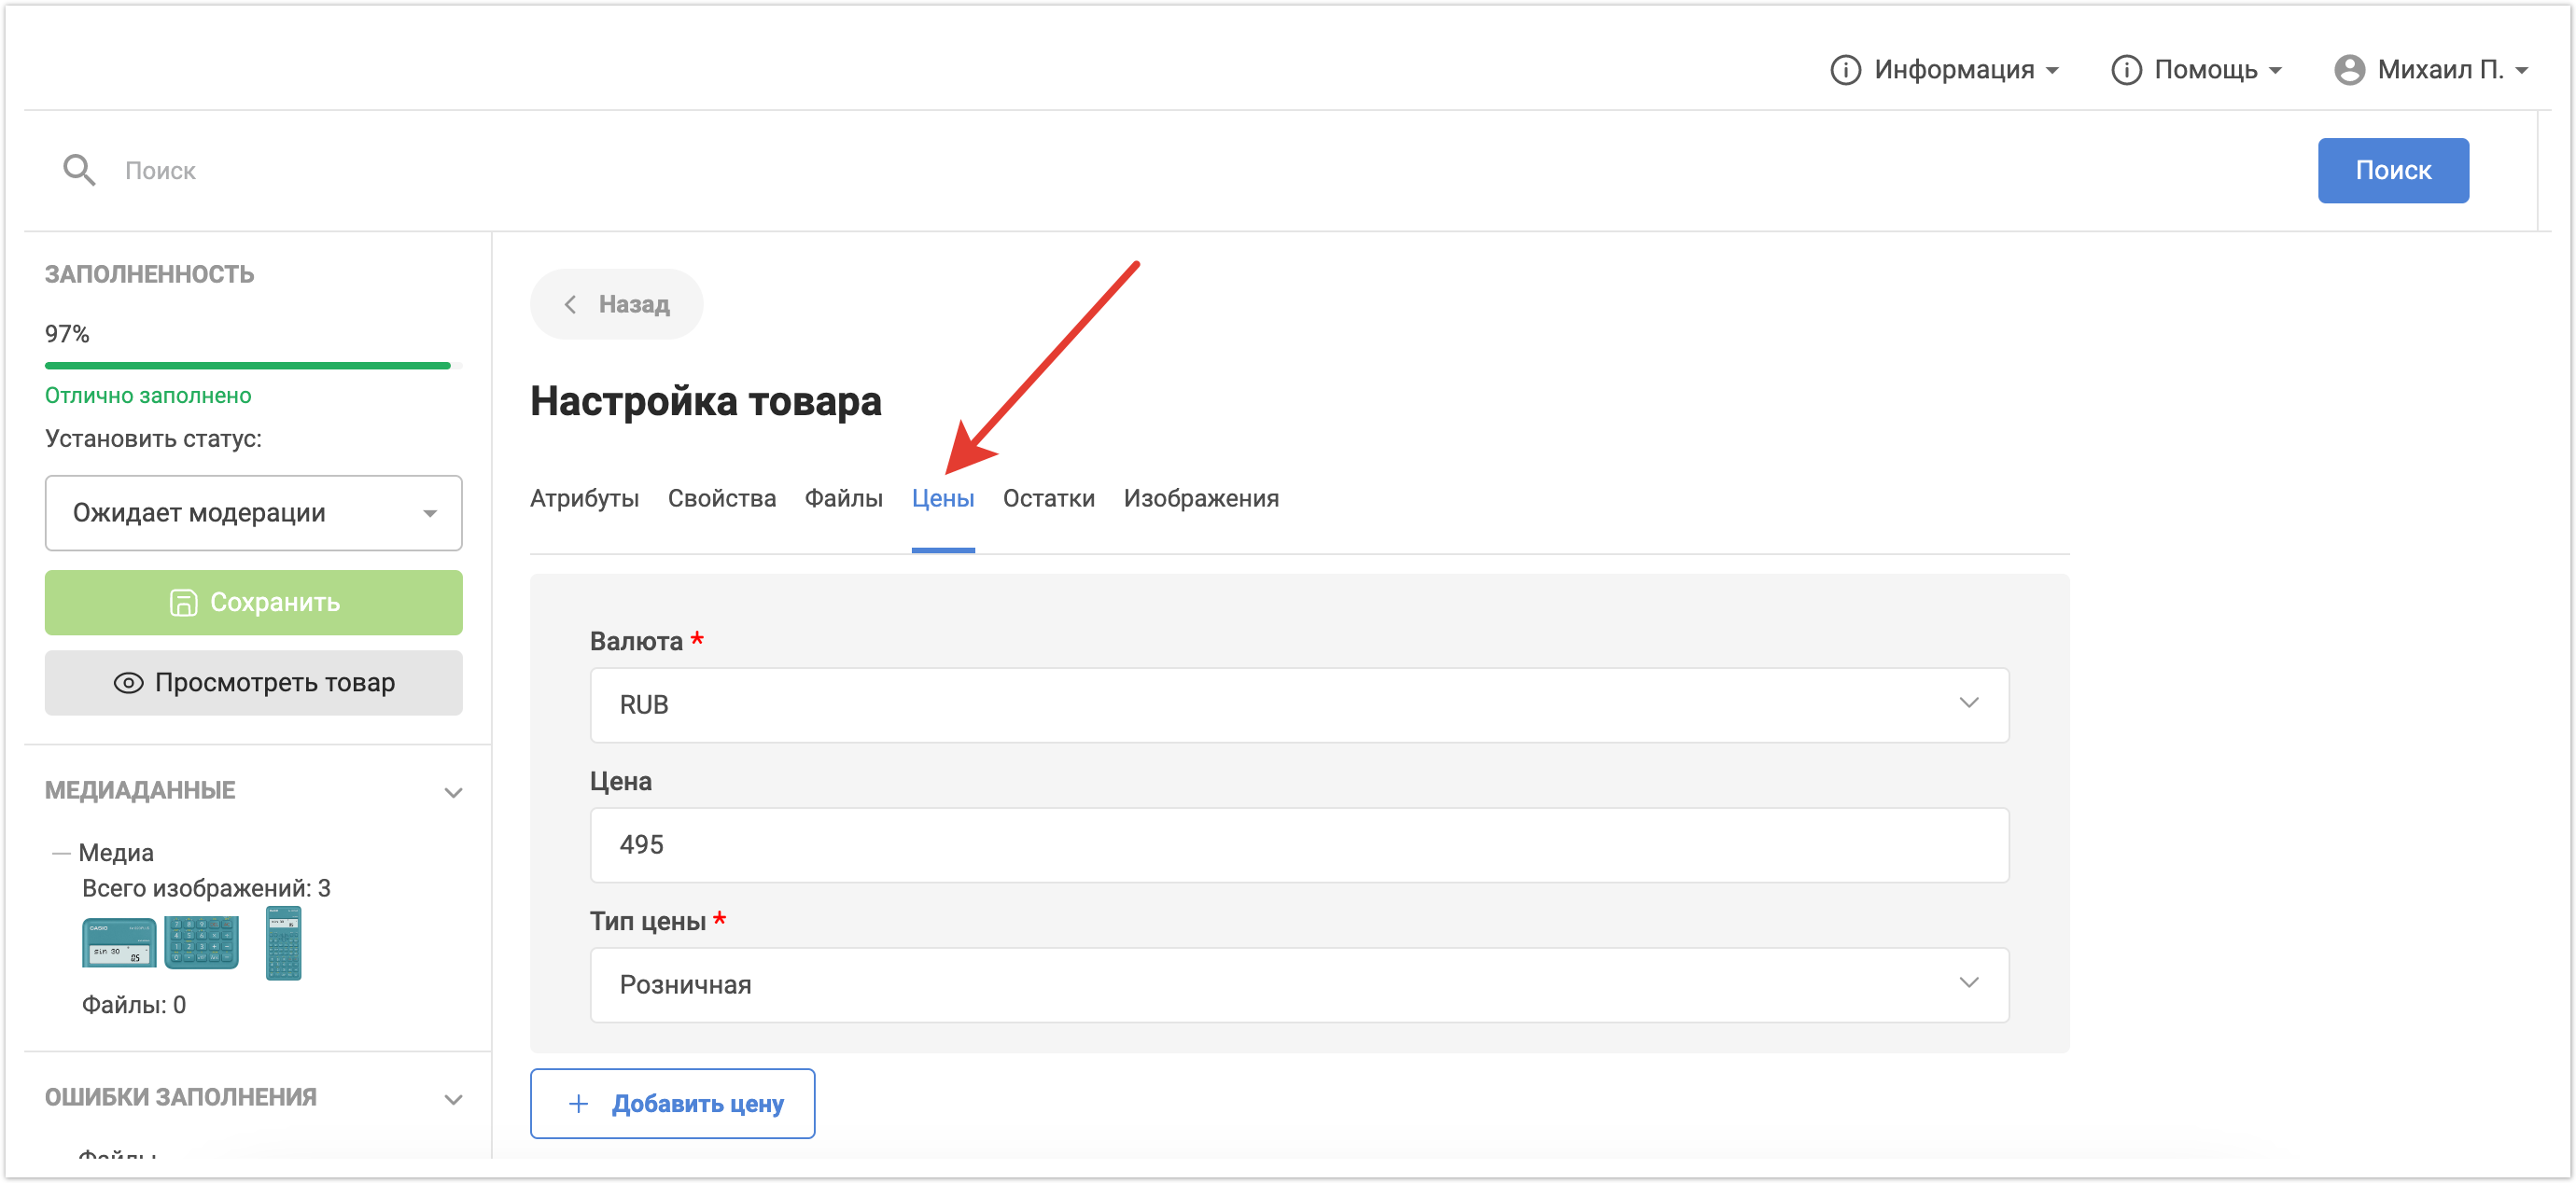
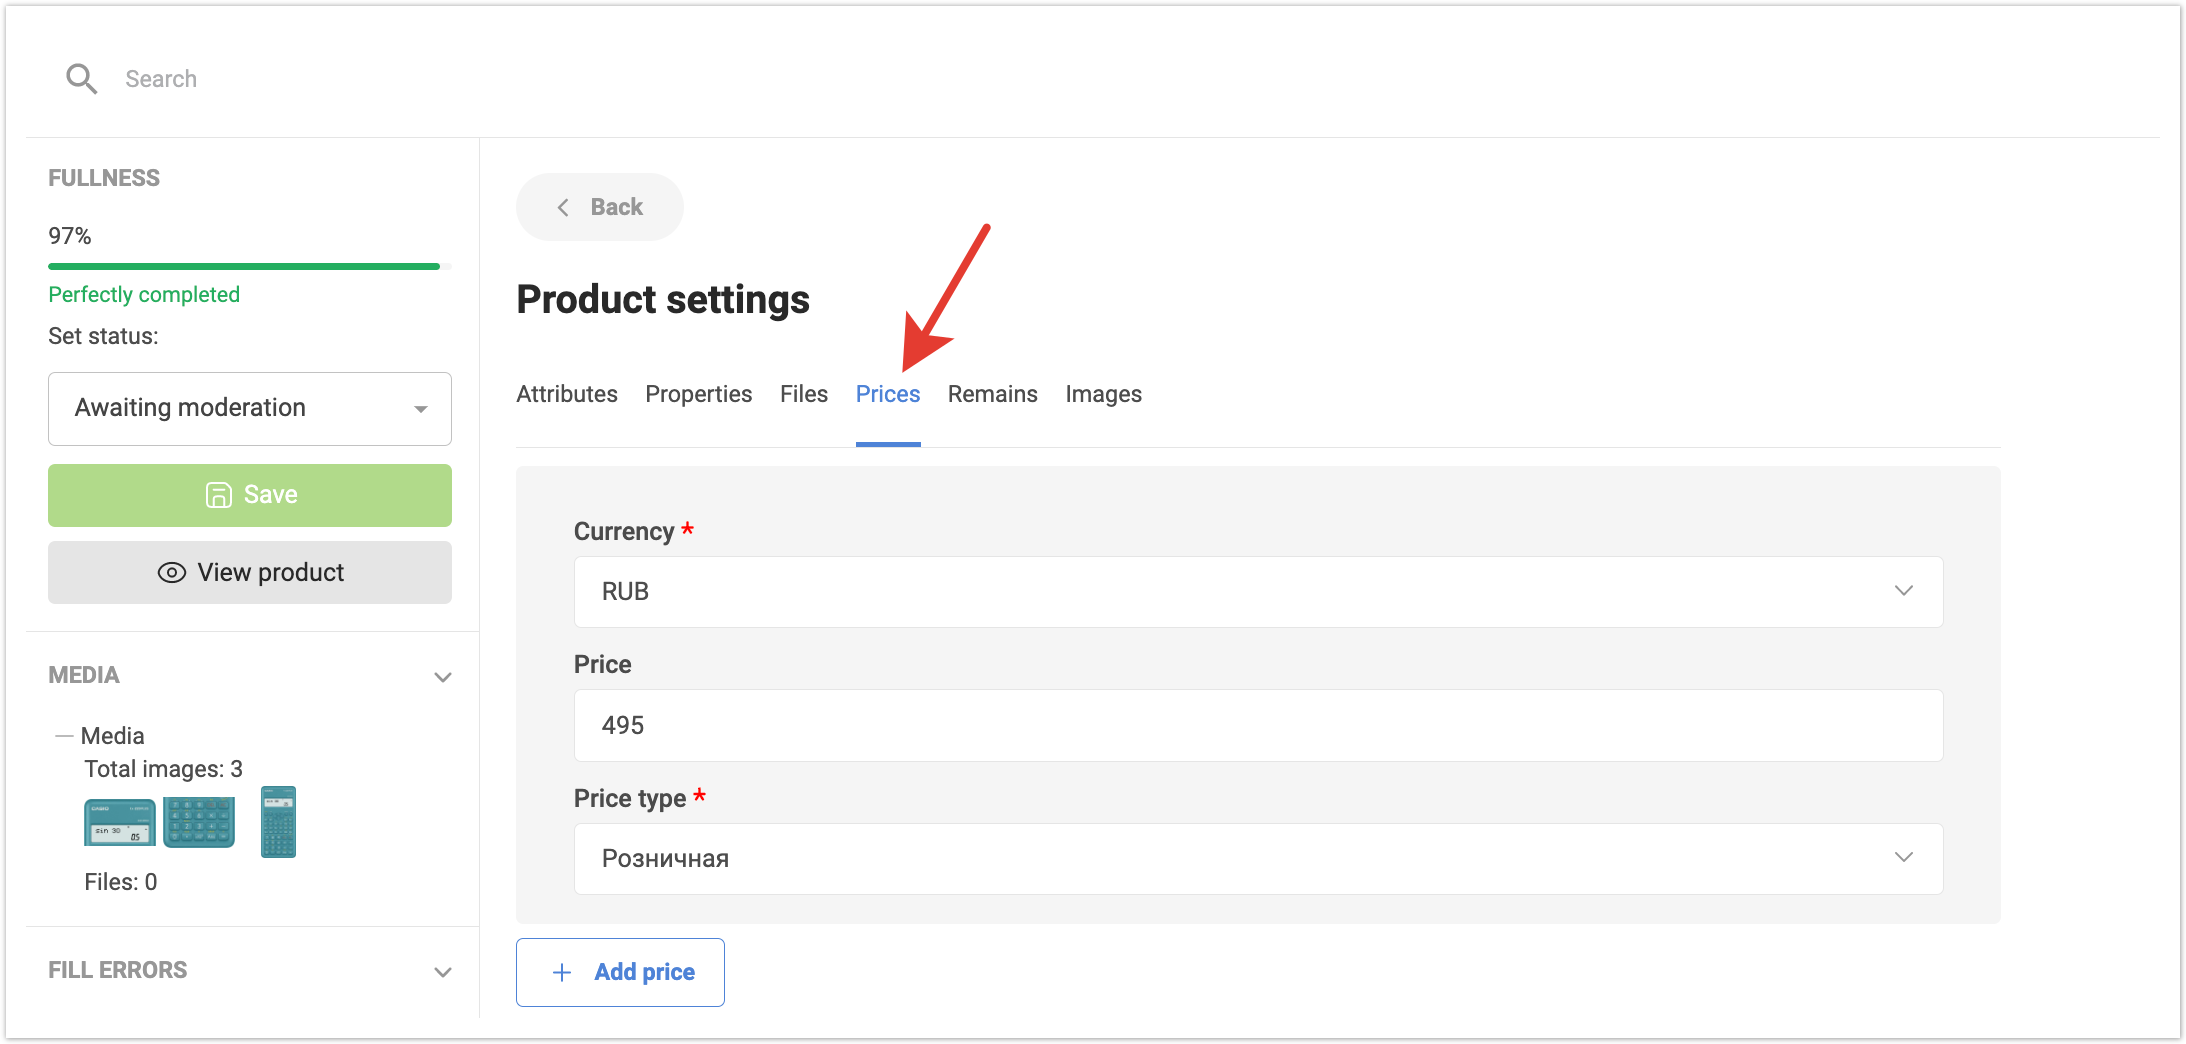
На вкладке Цены можно изменить значение цены для товара. Также можно добавить еще один тип цены и его значение по кнопке Добавить цену.
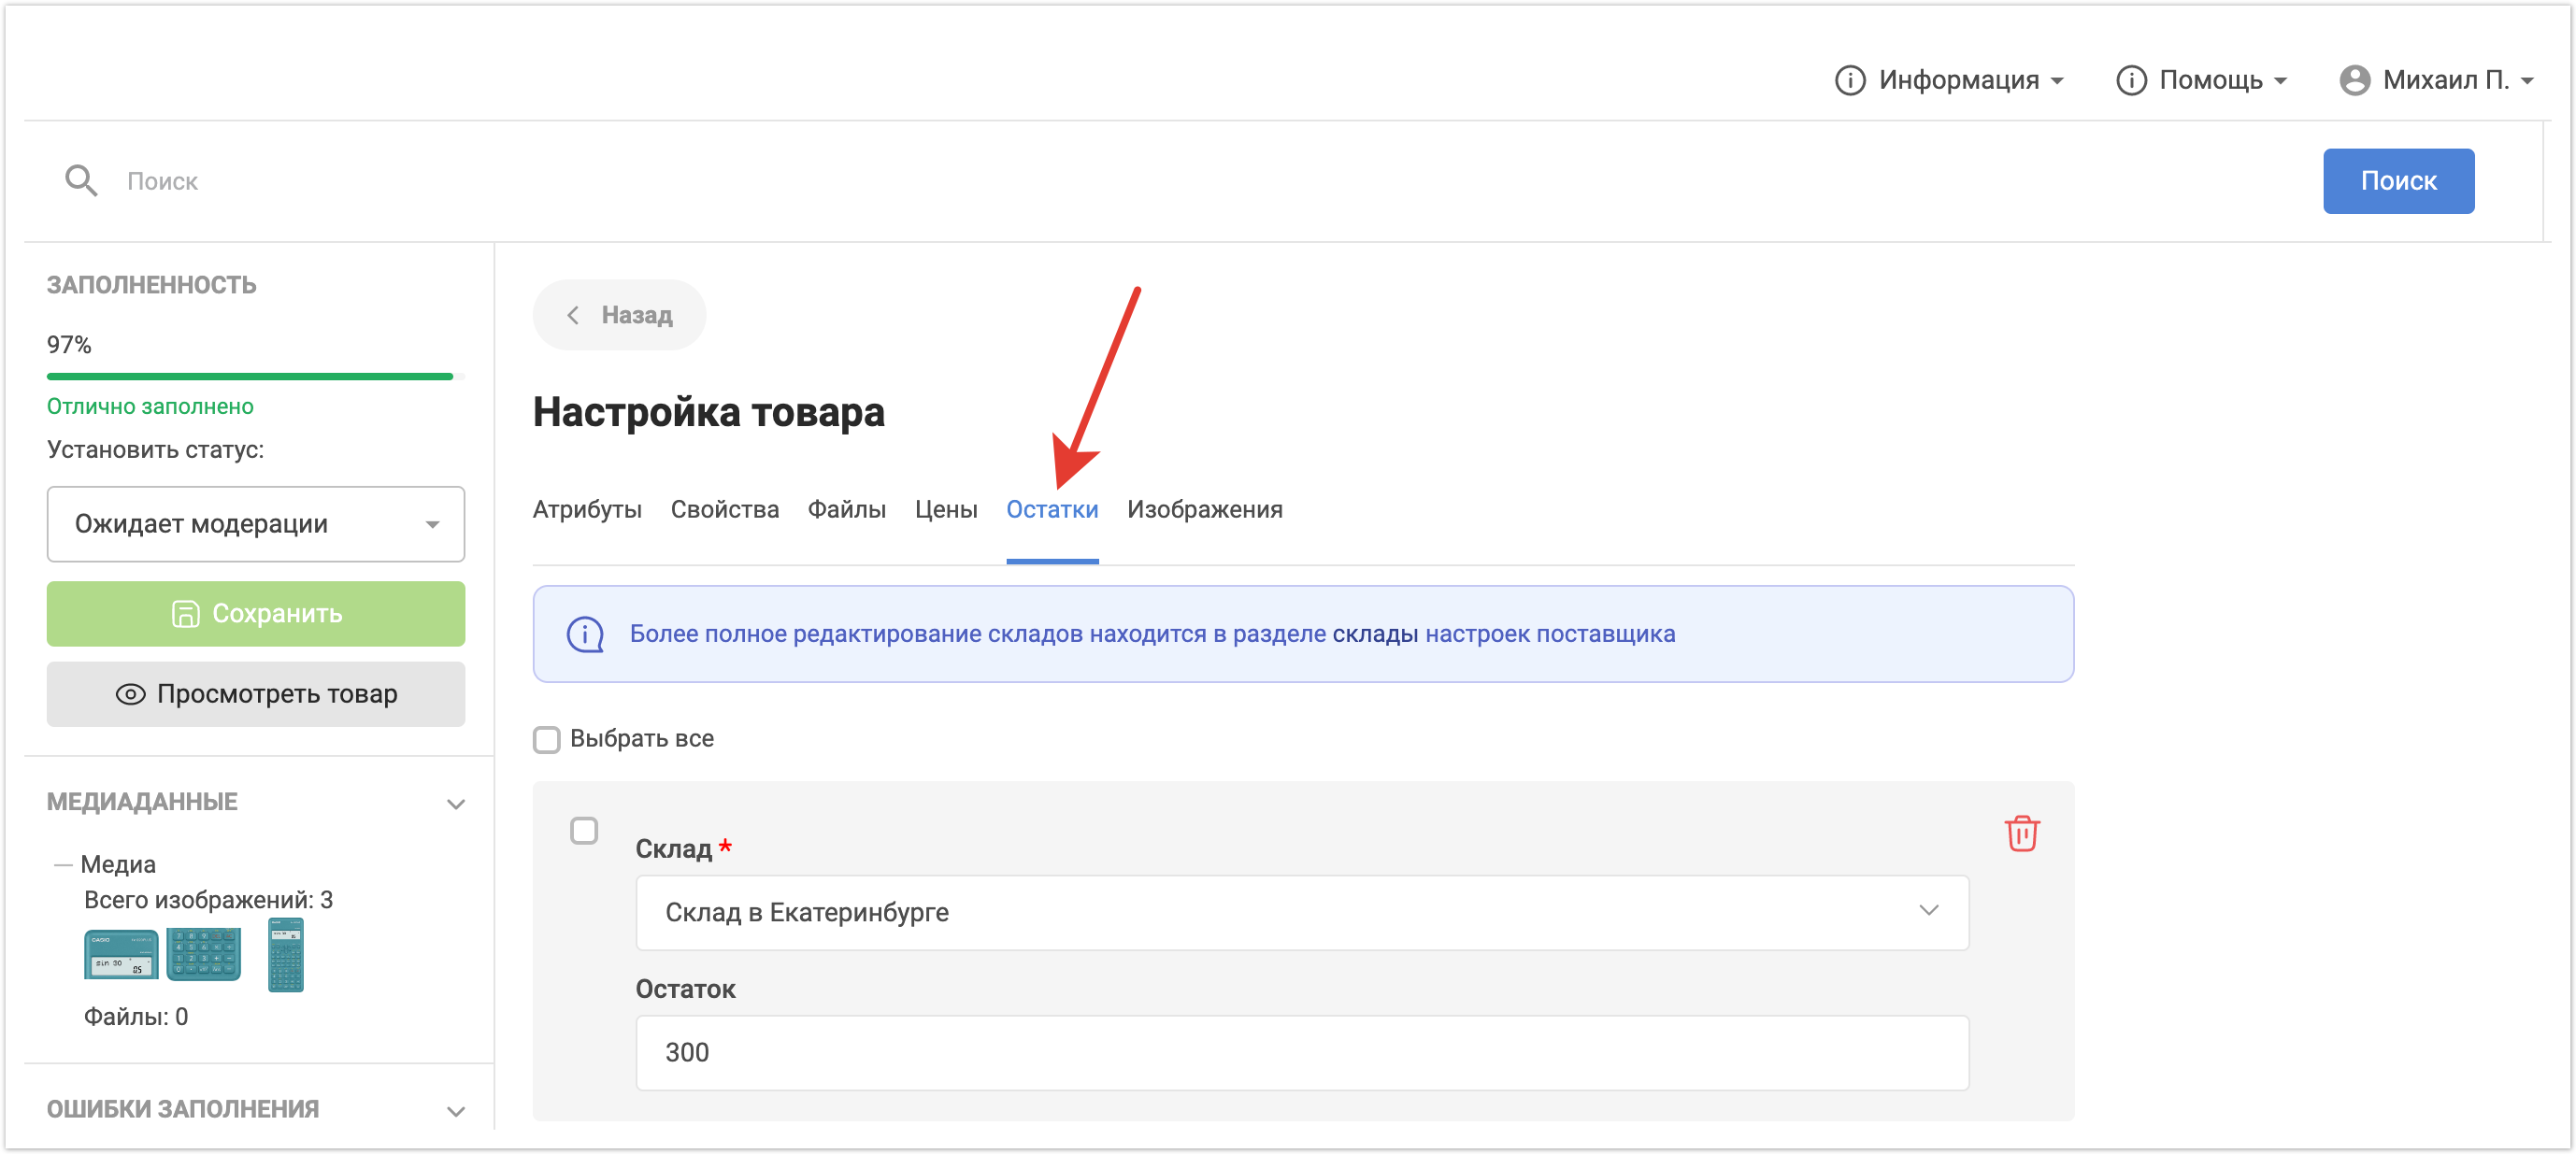
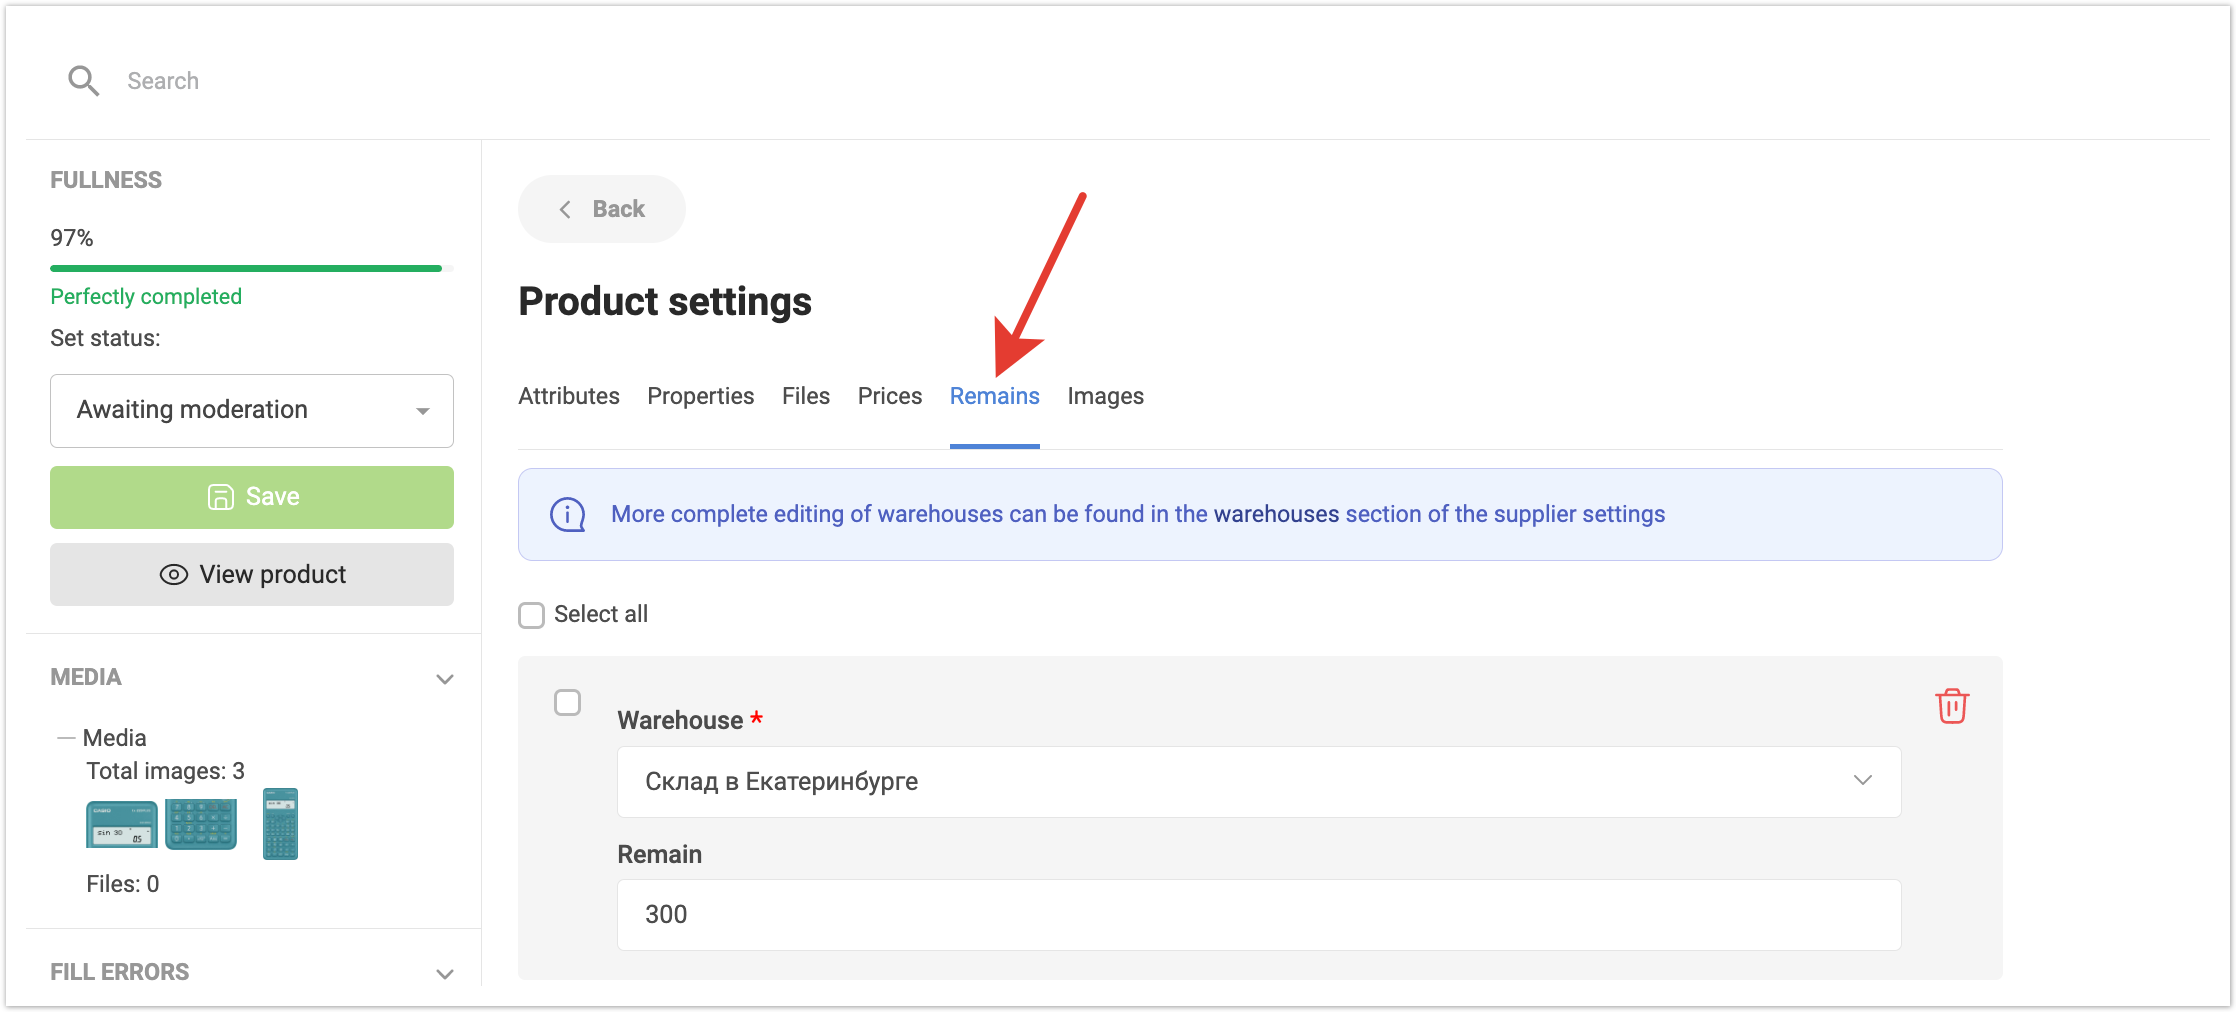
На вкладке Остатки можно отредактировать остатки товара на конкретном складе или удалить их полностью. Внизу страницы также есть кнопка Добавить остаток, по которой можно добавить остаток на новом складе.
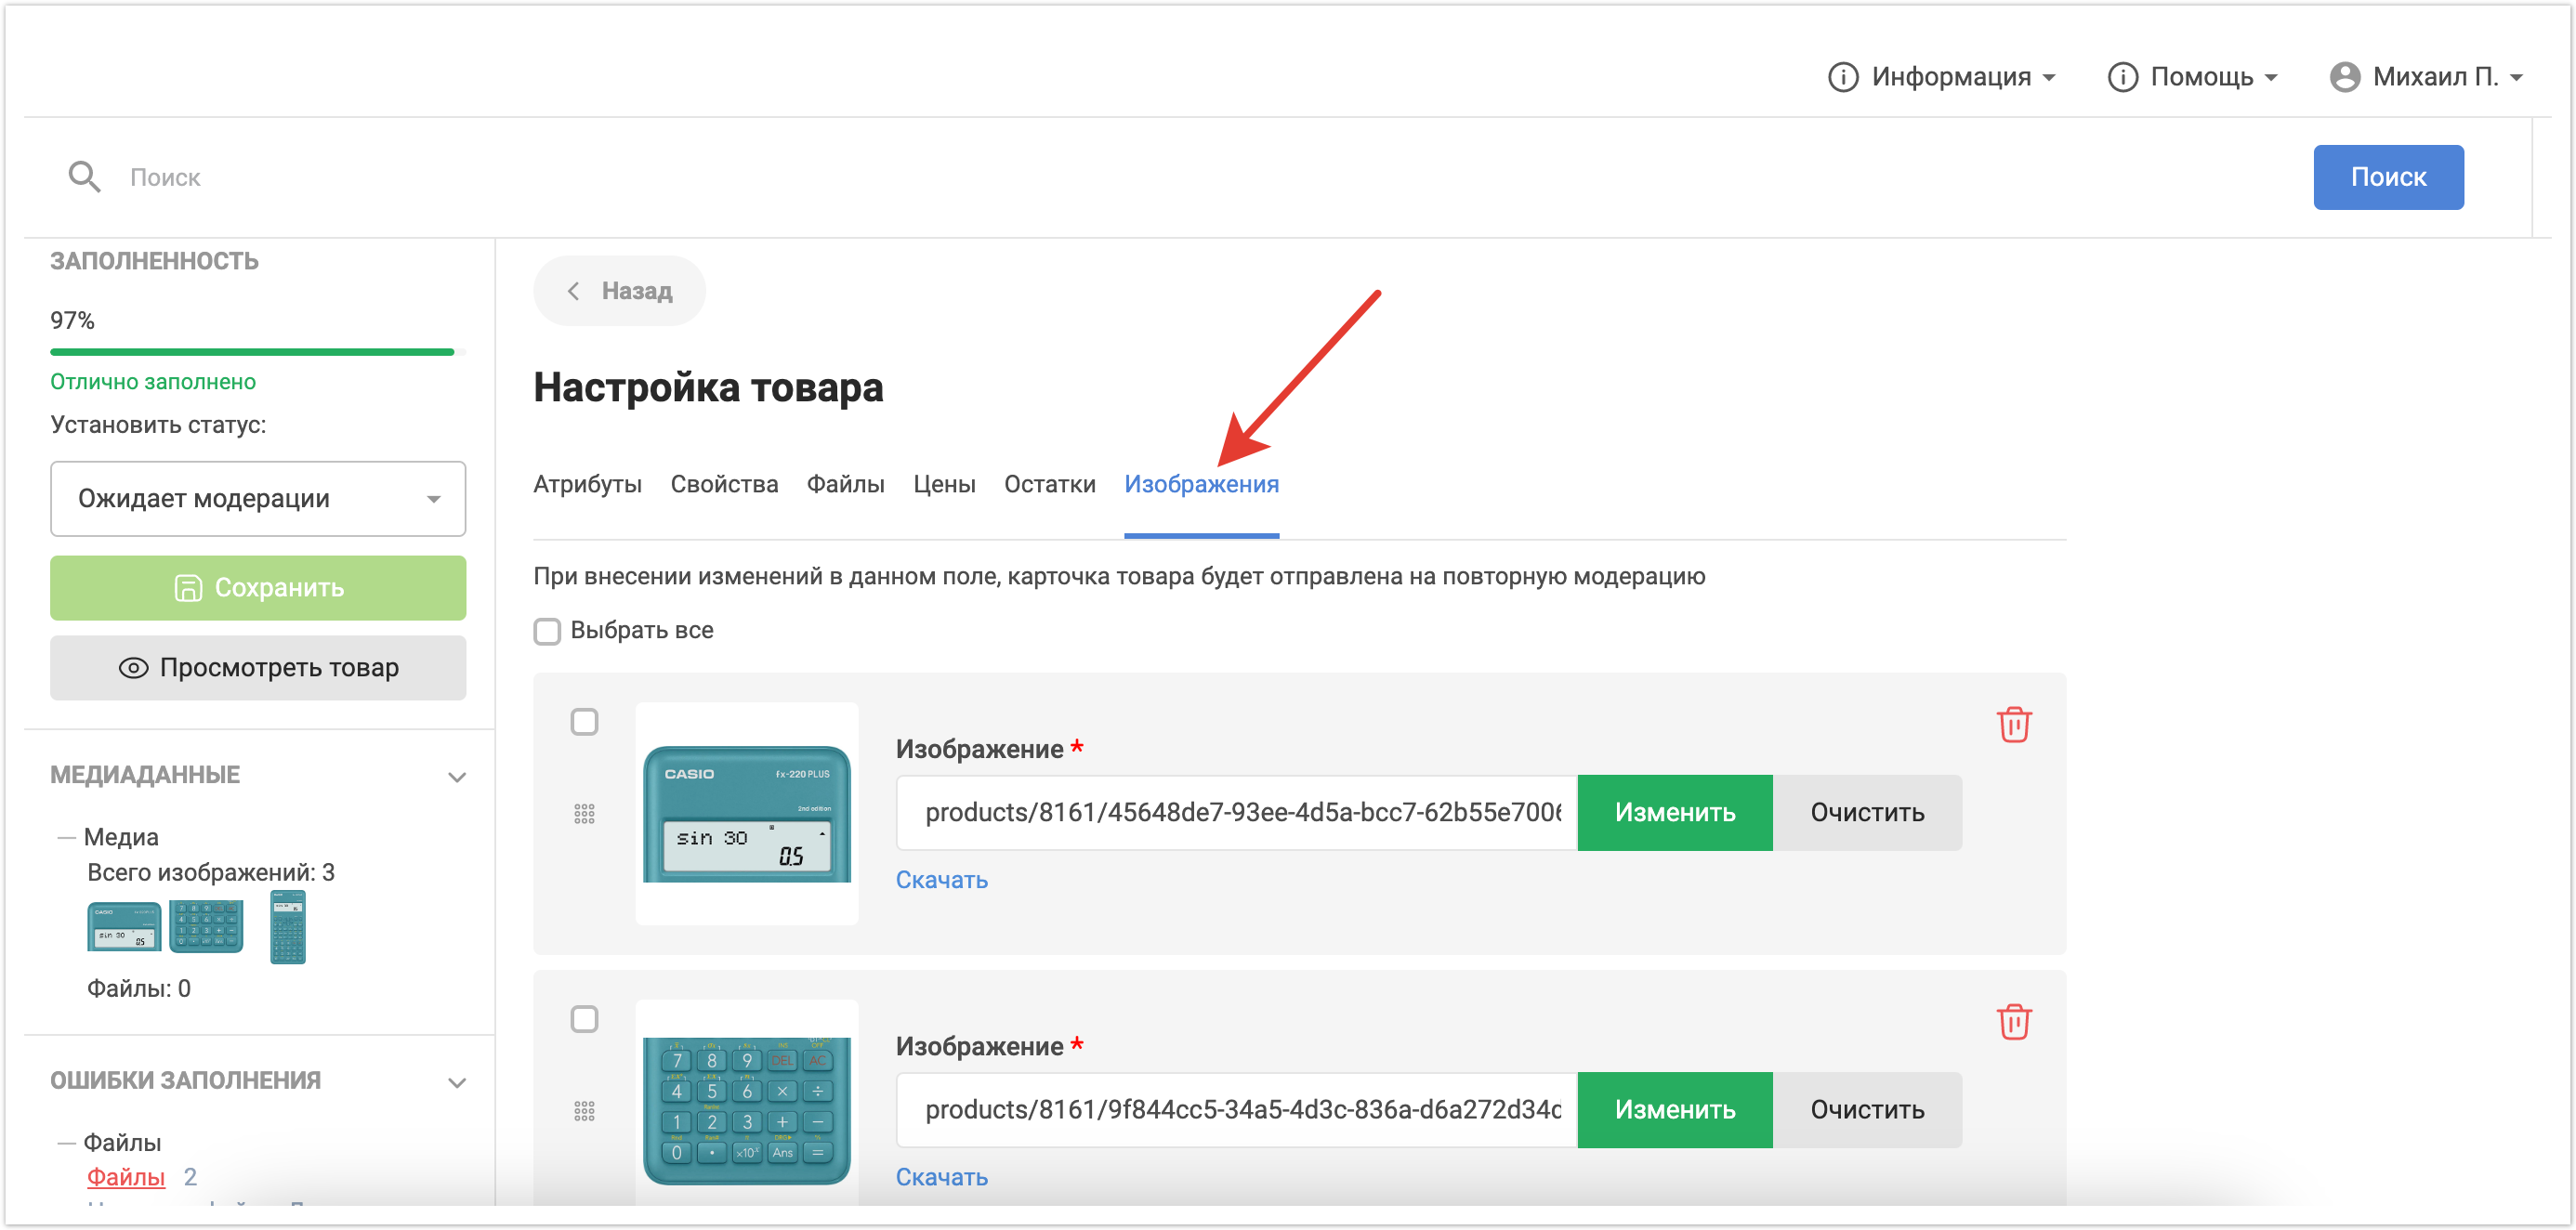
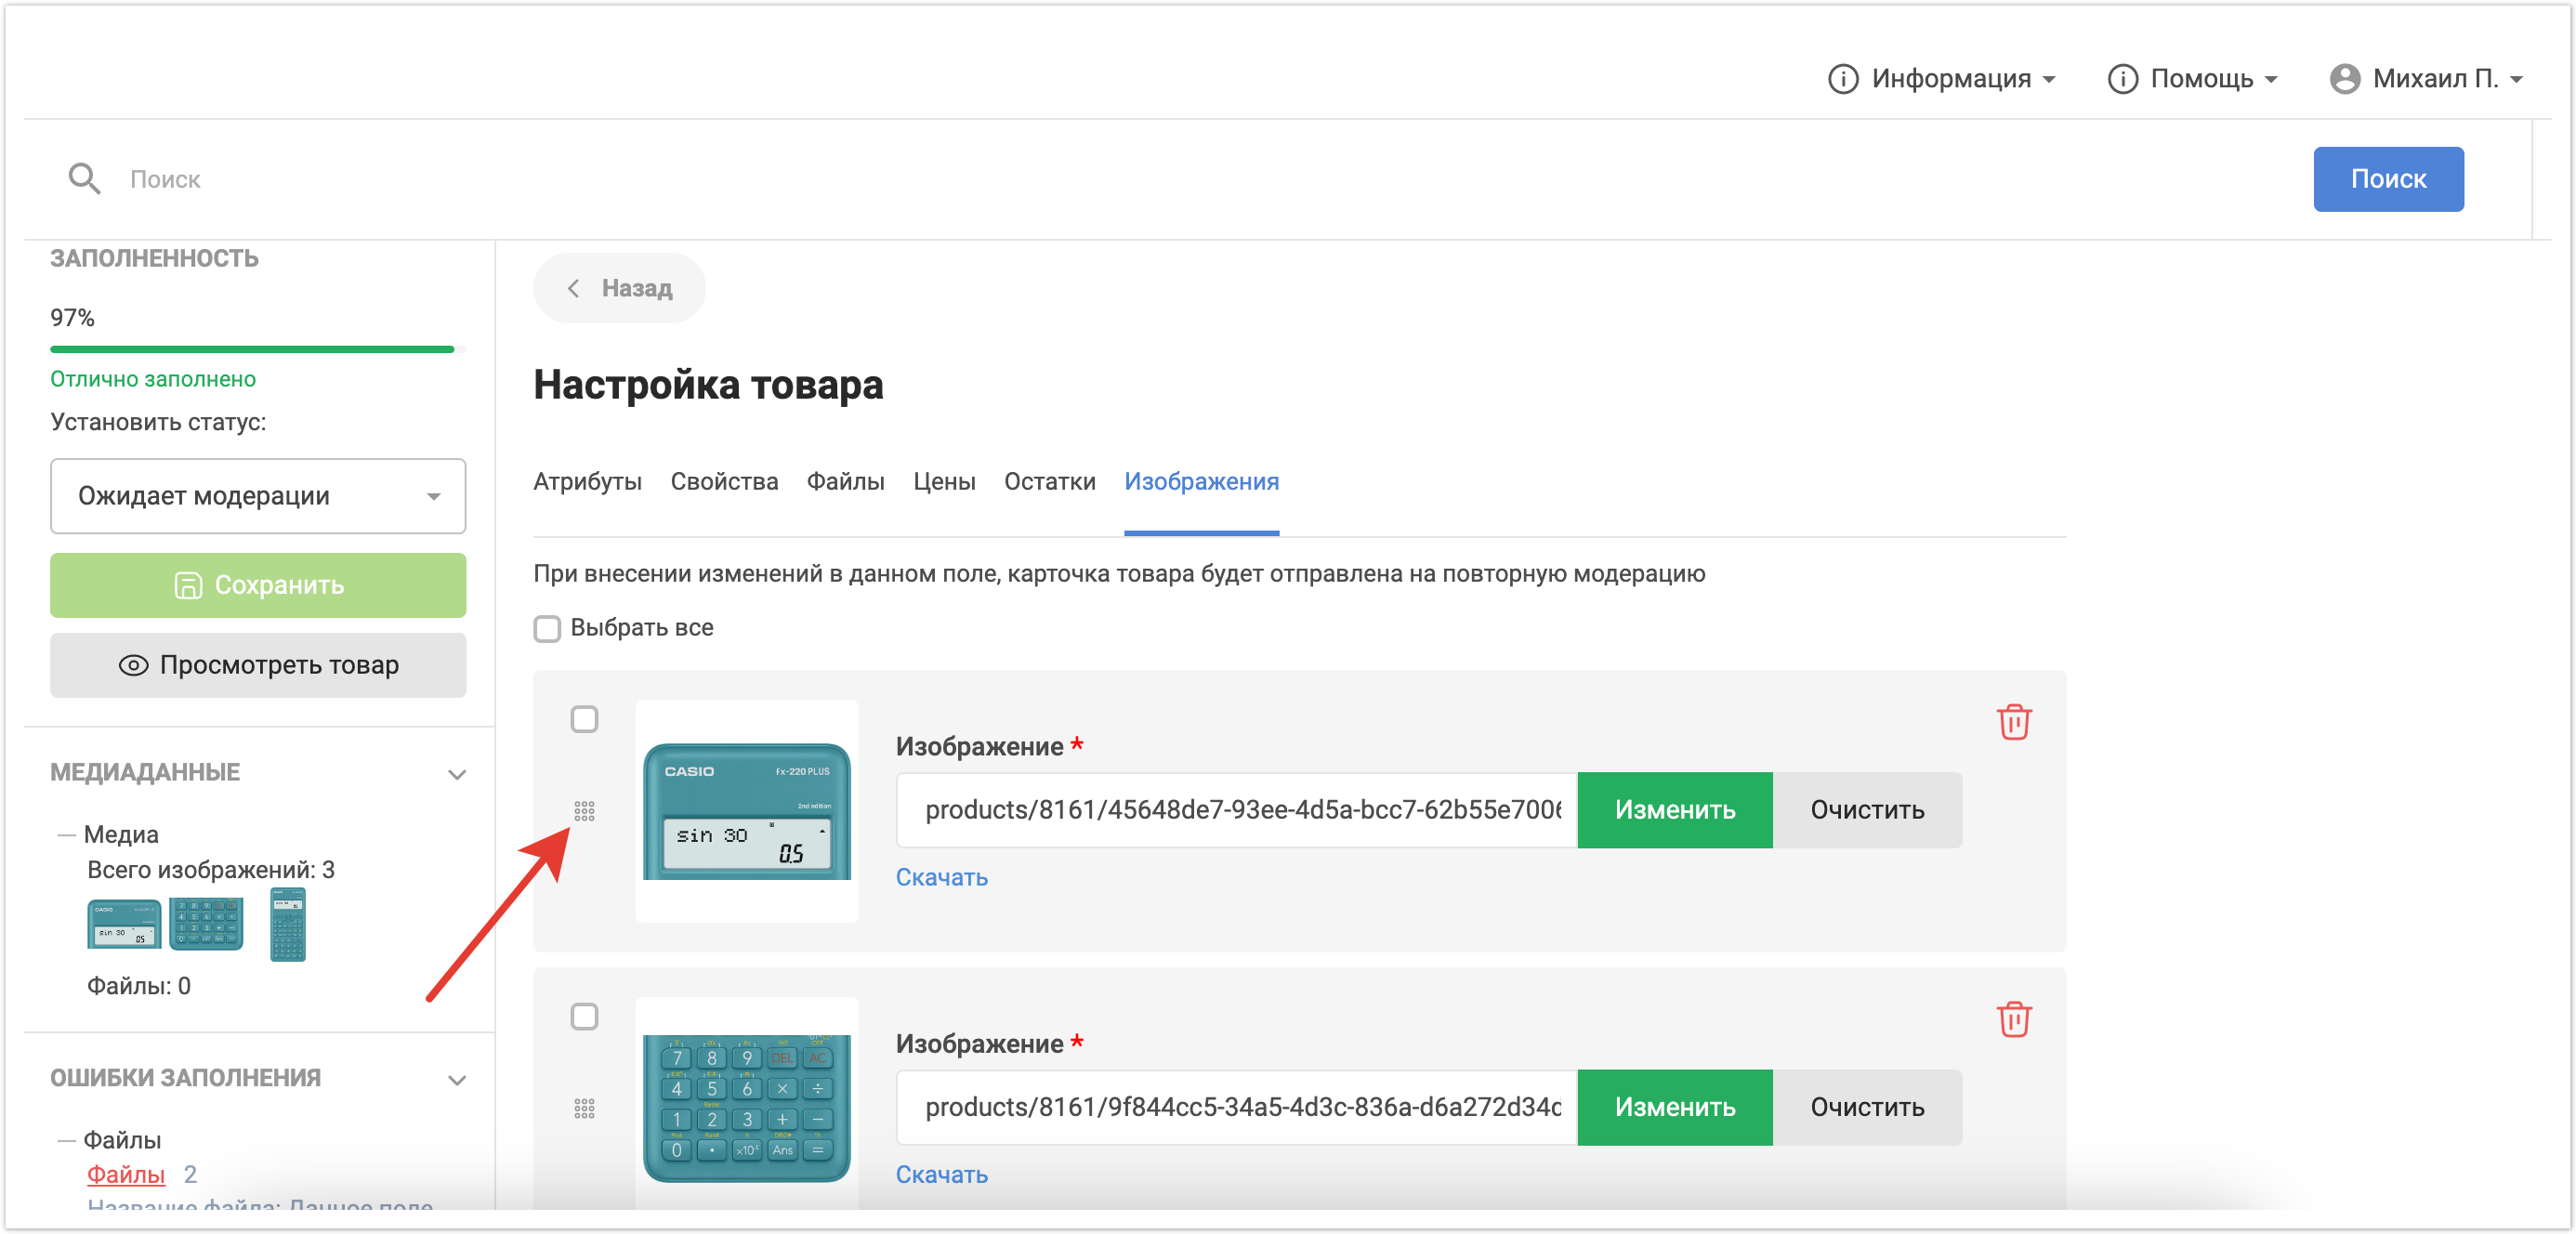
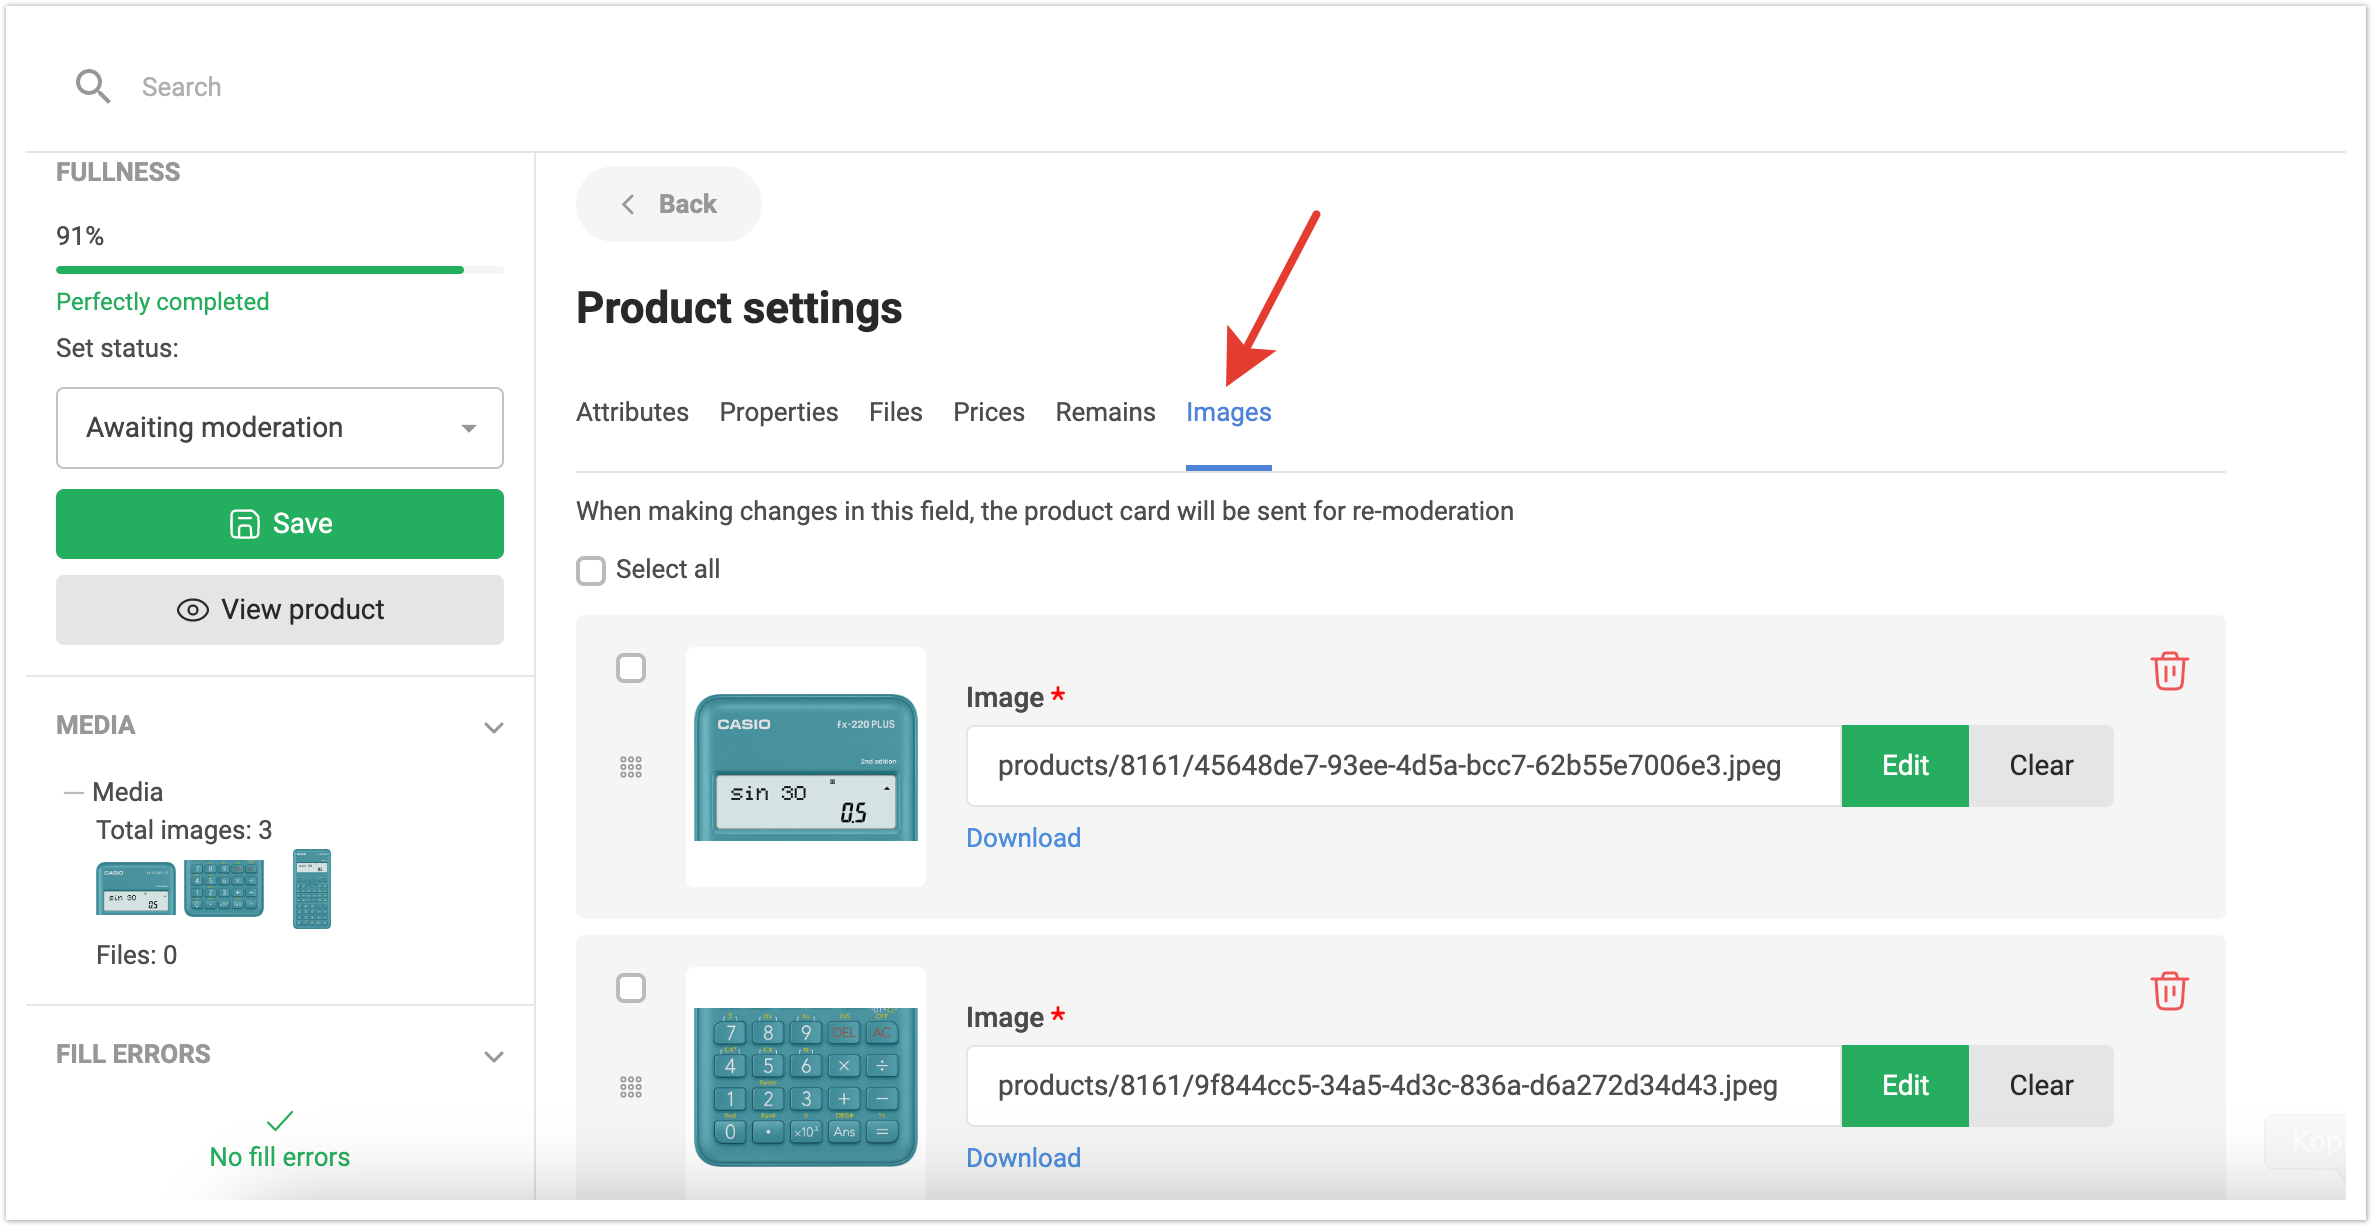
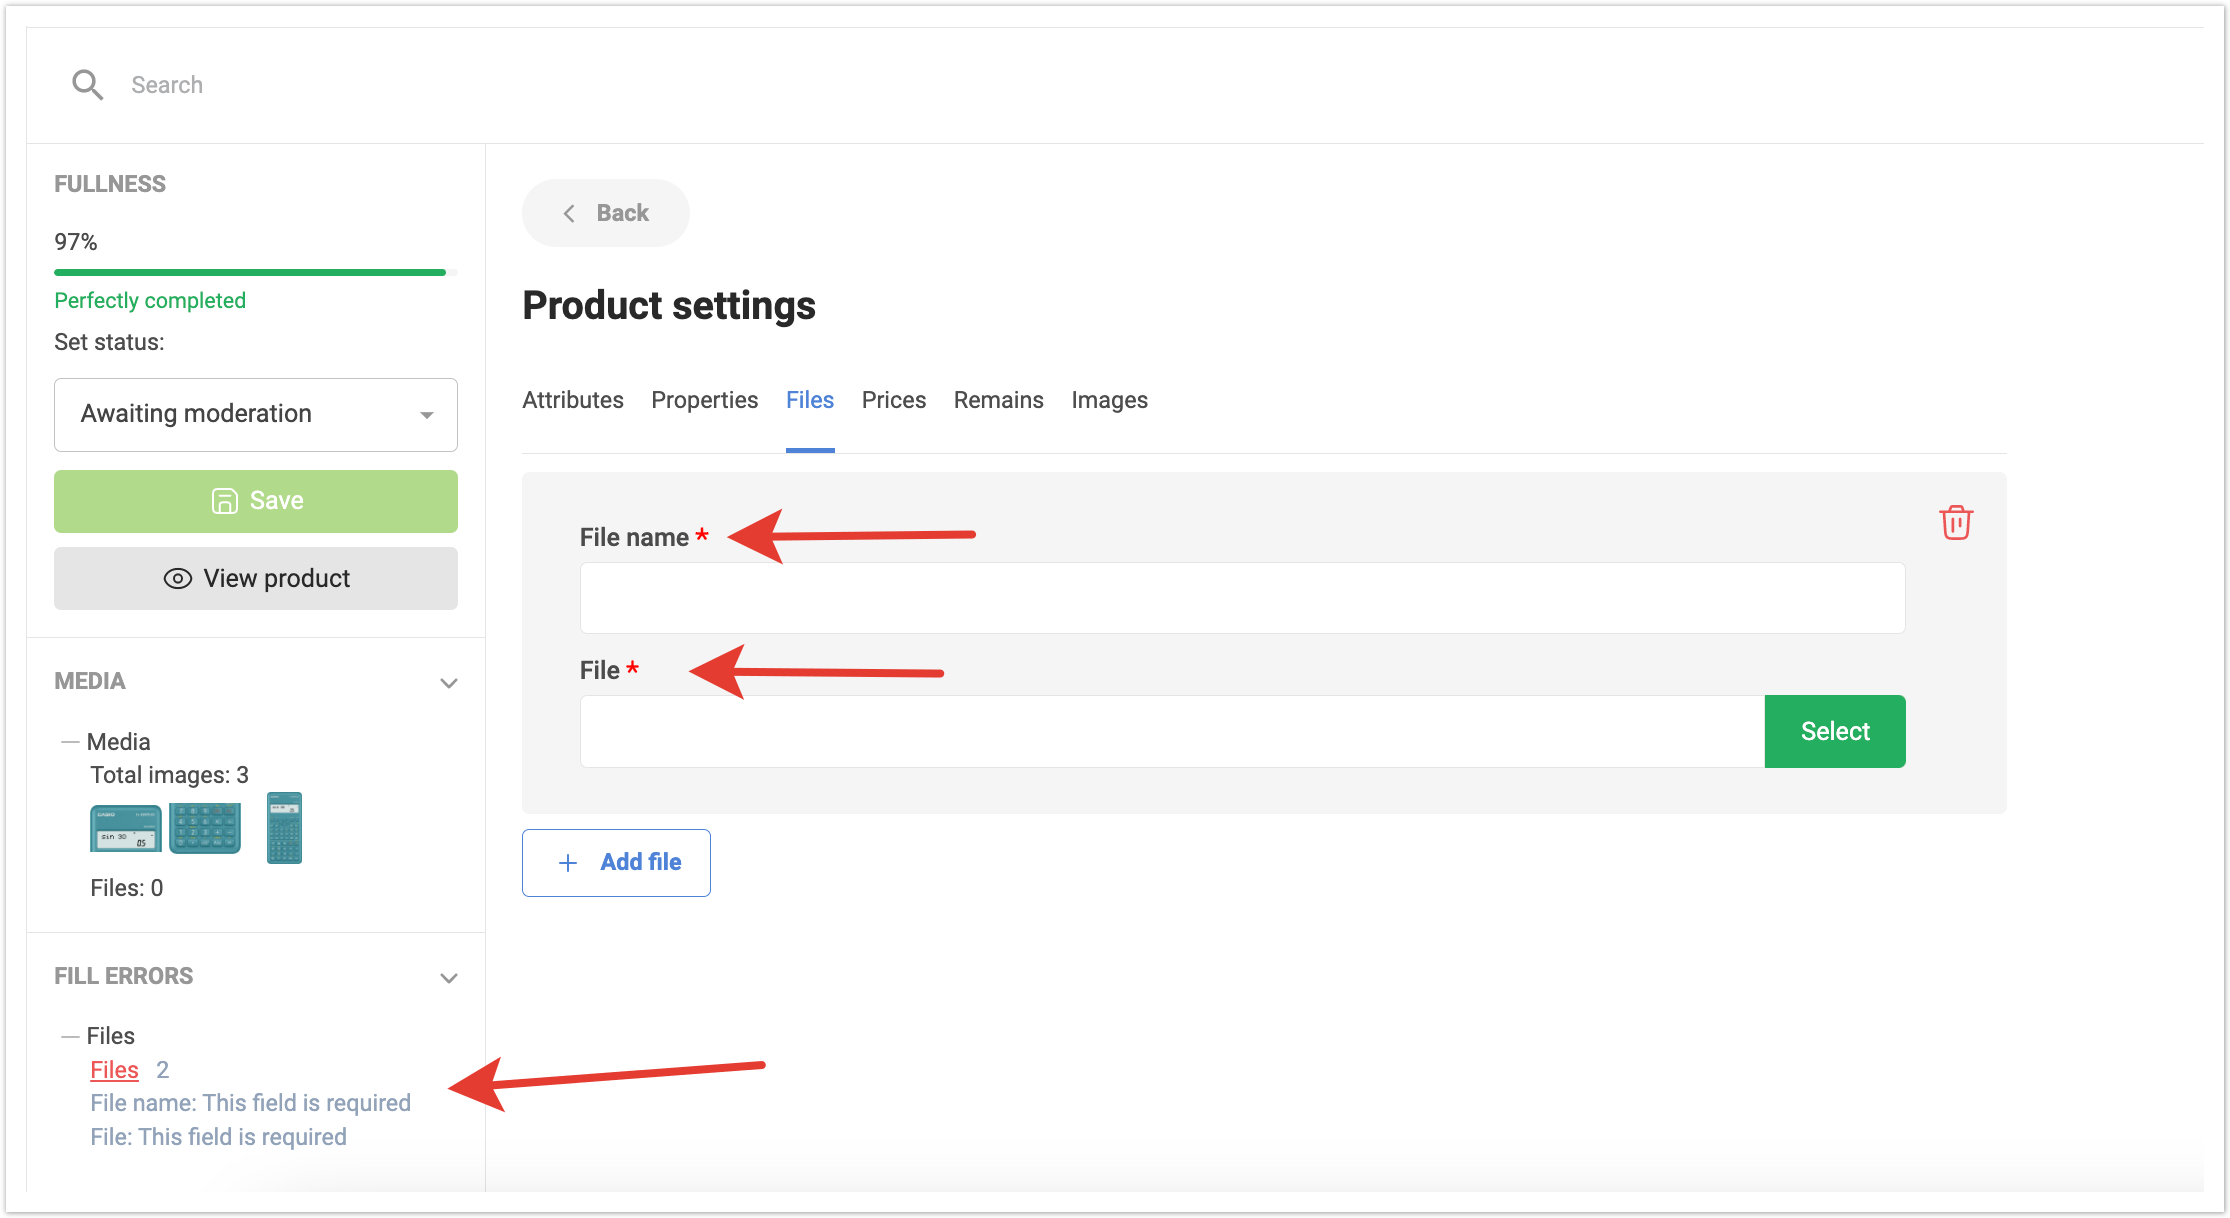
Вкладка Изображения содержит в себе список импортированных изображений для товара, а также предоставляет возможность догрузить изображения или удалить не актуальные.
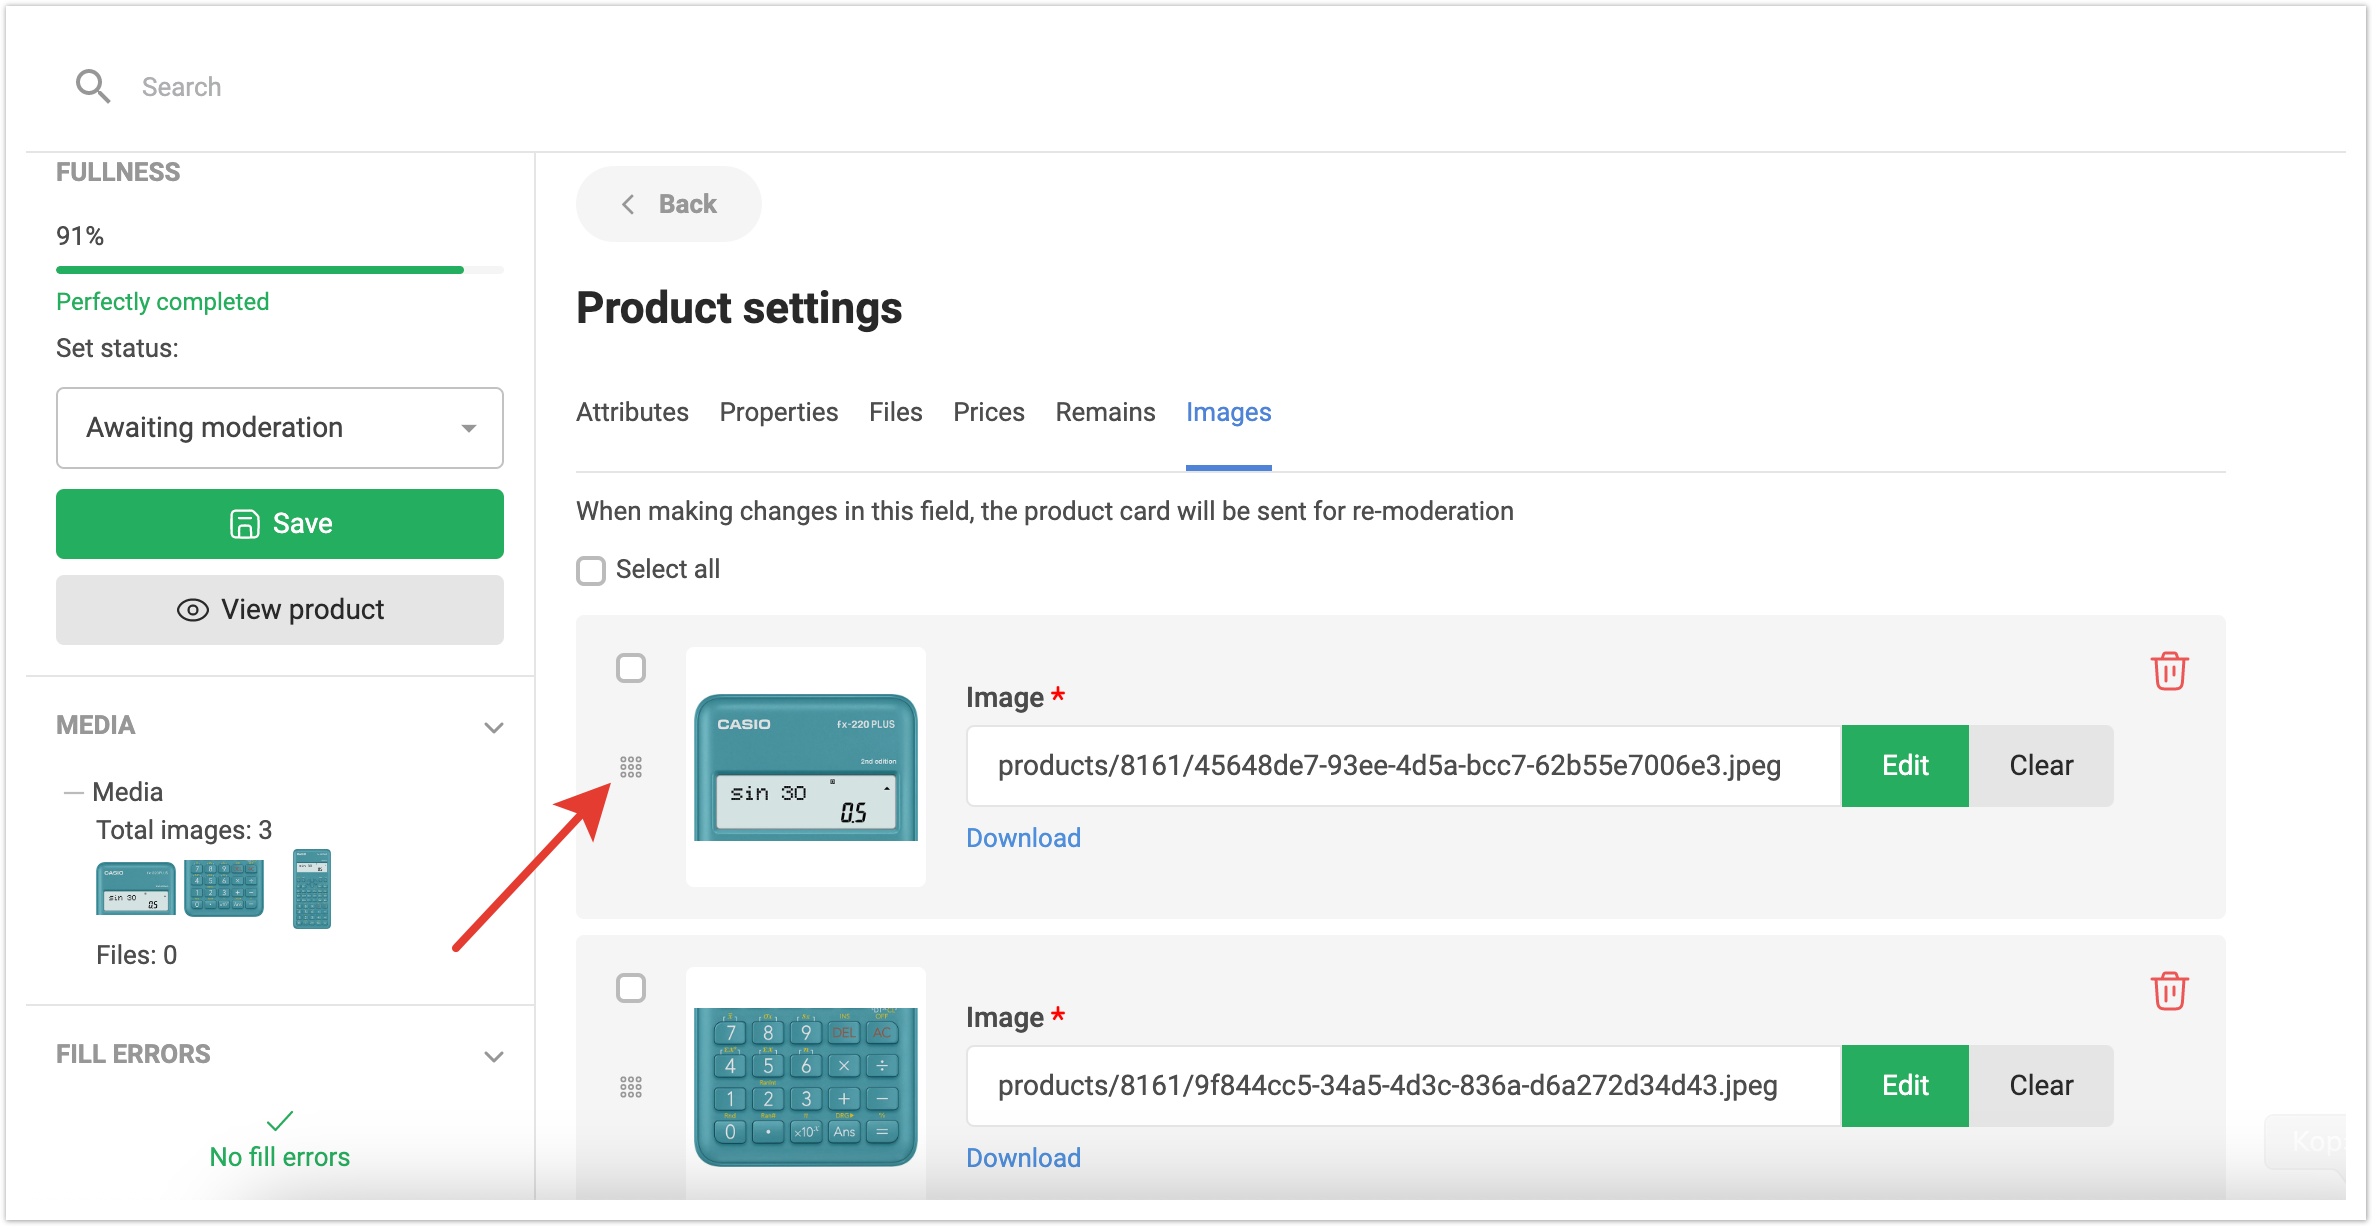
В случае, если изображений у товара несколько, то будет присутствовать возможность установить порядок отображения изображений в карточке продукта с помощью функционала drag-n-drop.
Обязательные для заполнения поля отмечены красной звездочкой. Если не указать по ним данные, то сохранить изменения не удастся и в области Ошибки заполнения будет указана ошибка.
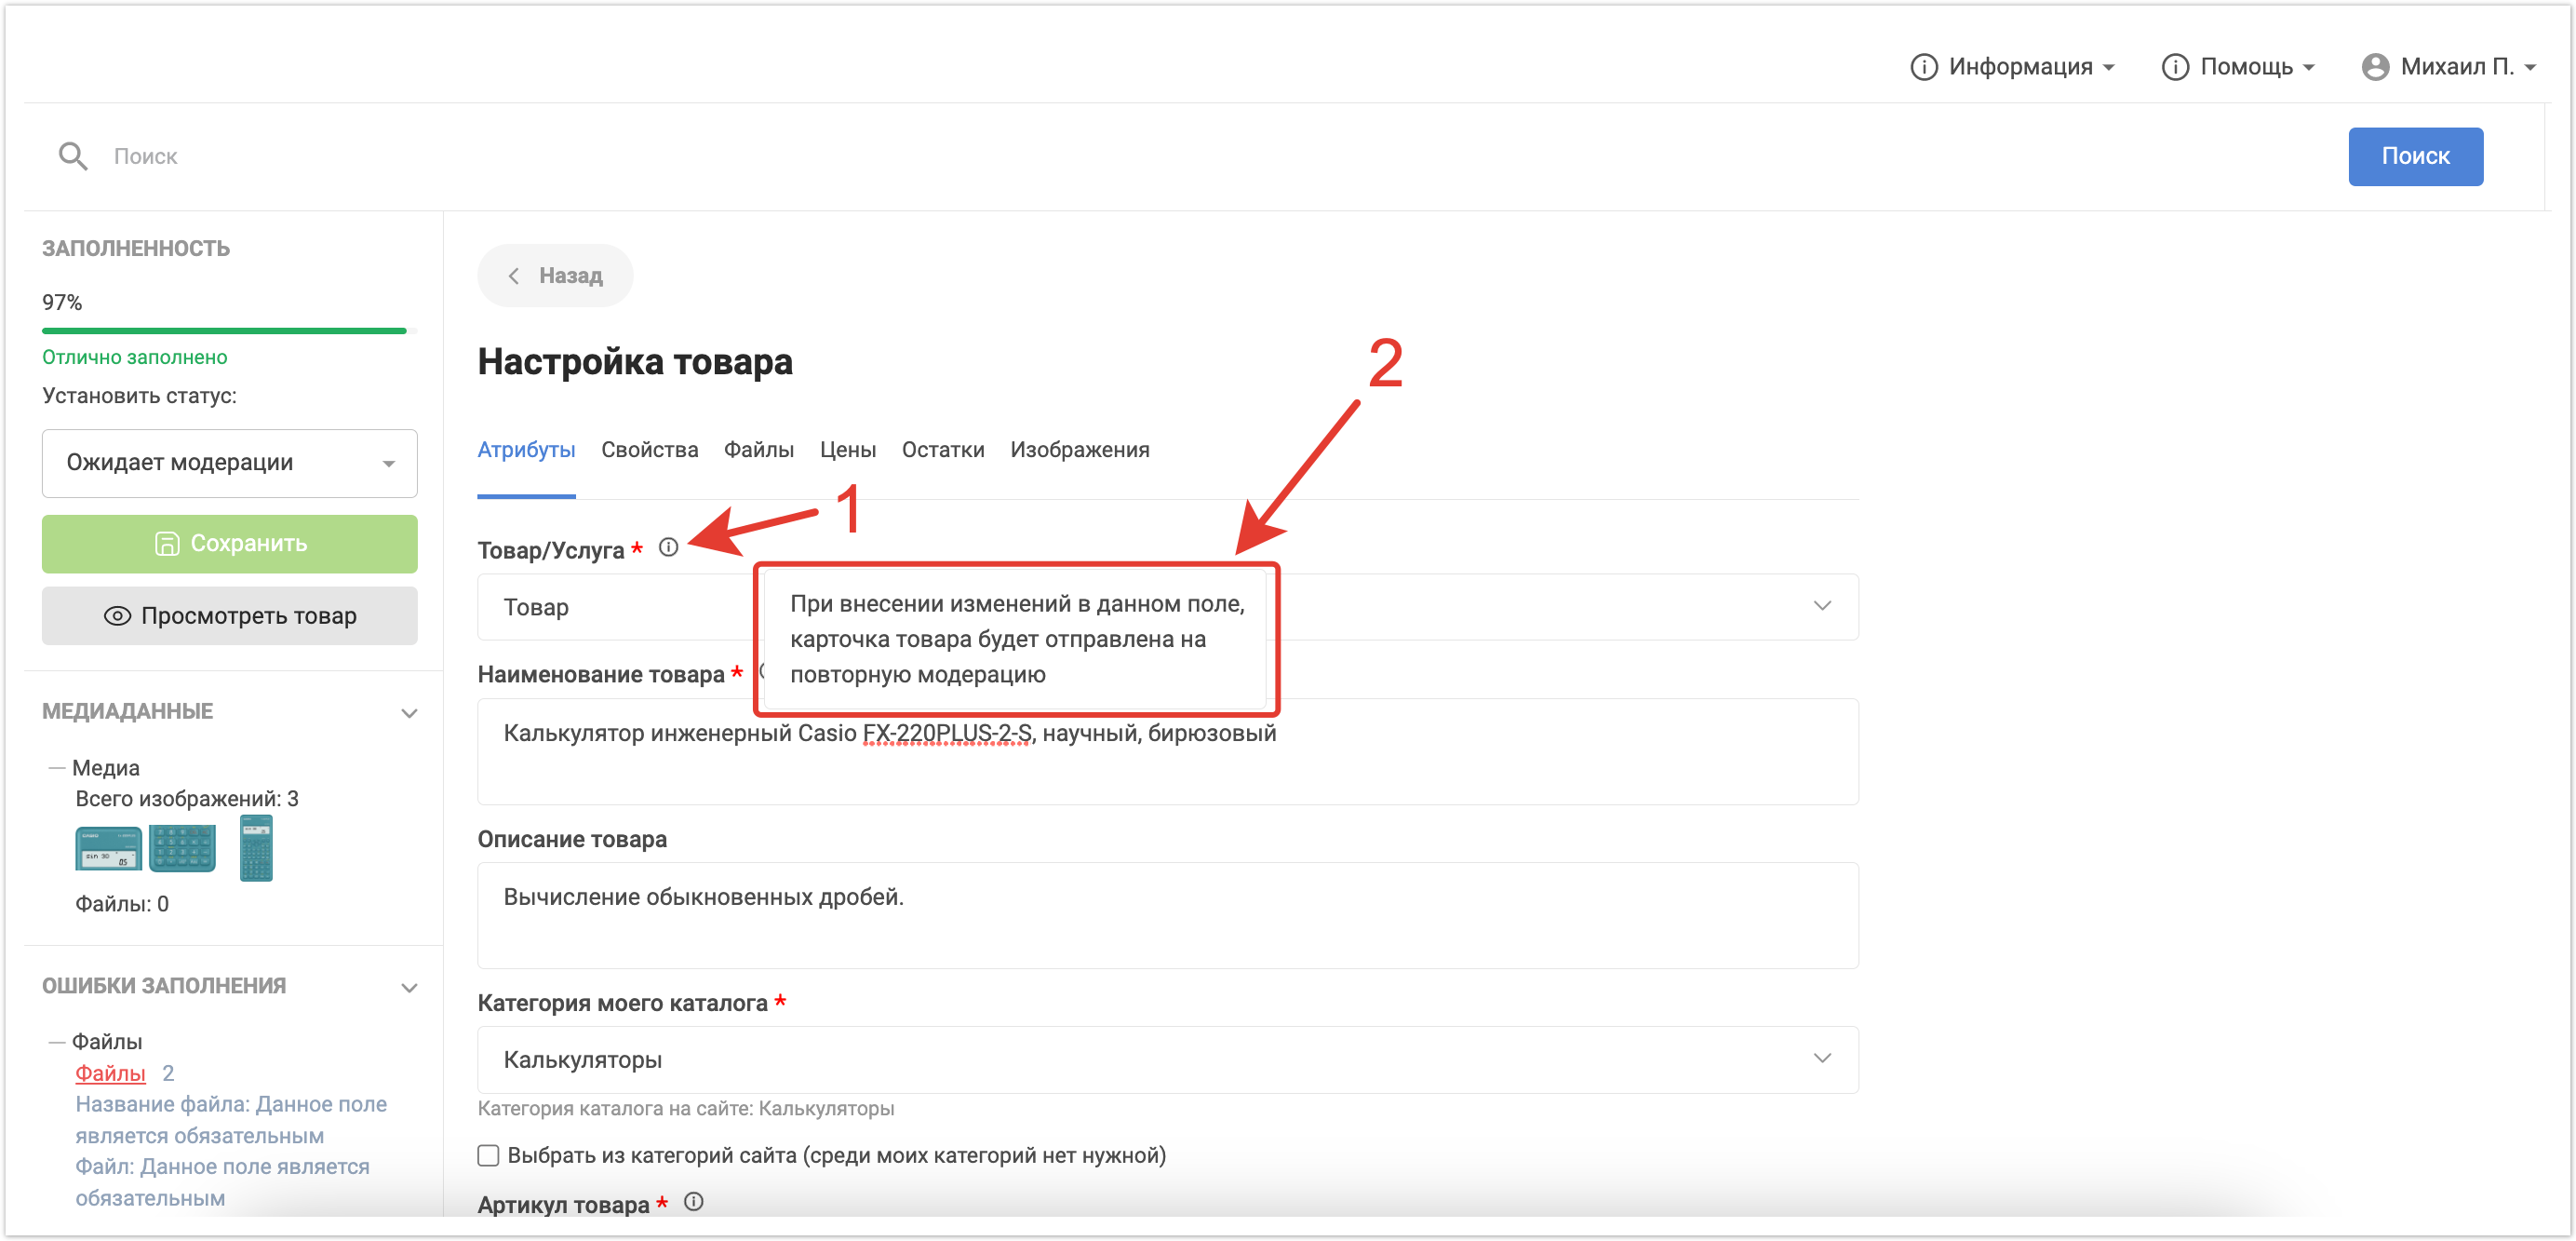
Если параметр товара участвует в логике Повторной модерации, то в данном поле будет отображен информер. Эта информация актуальна для случая, когда вносятся правки по товару, который ранее уже прошел модерацию и был опубликован в каталоге покупателя.
Мастер-данные, которые Ответственный менеджер отметил при импорте товаров, нельзя будет редактировать.
После внесения изменений можно сразу указать товару нужный статус, например если достаточно данных для публикации, то можно установить сразу статус Товар прошел модерацию и он будет опубликован в каталоге покупателей после сохранения изменений.
Перед сохранением изменений убедитесь, что по товару нет ошибок заполнения. После этого можно нажать на кнопку Сохранить.
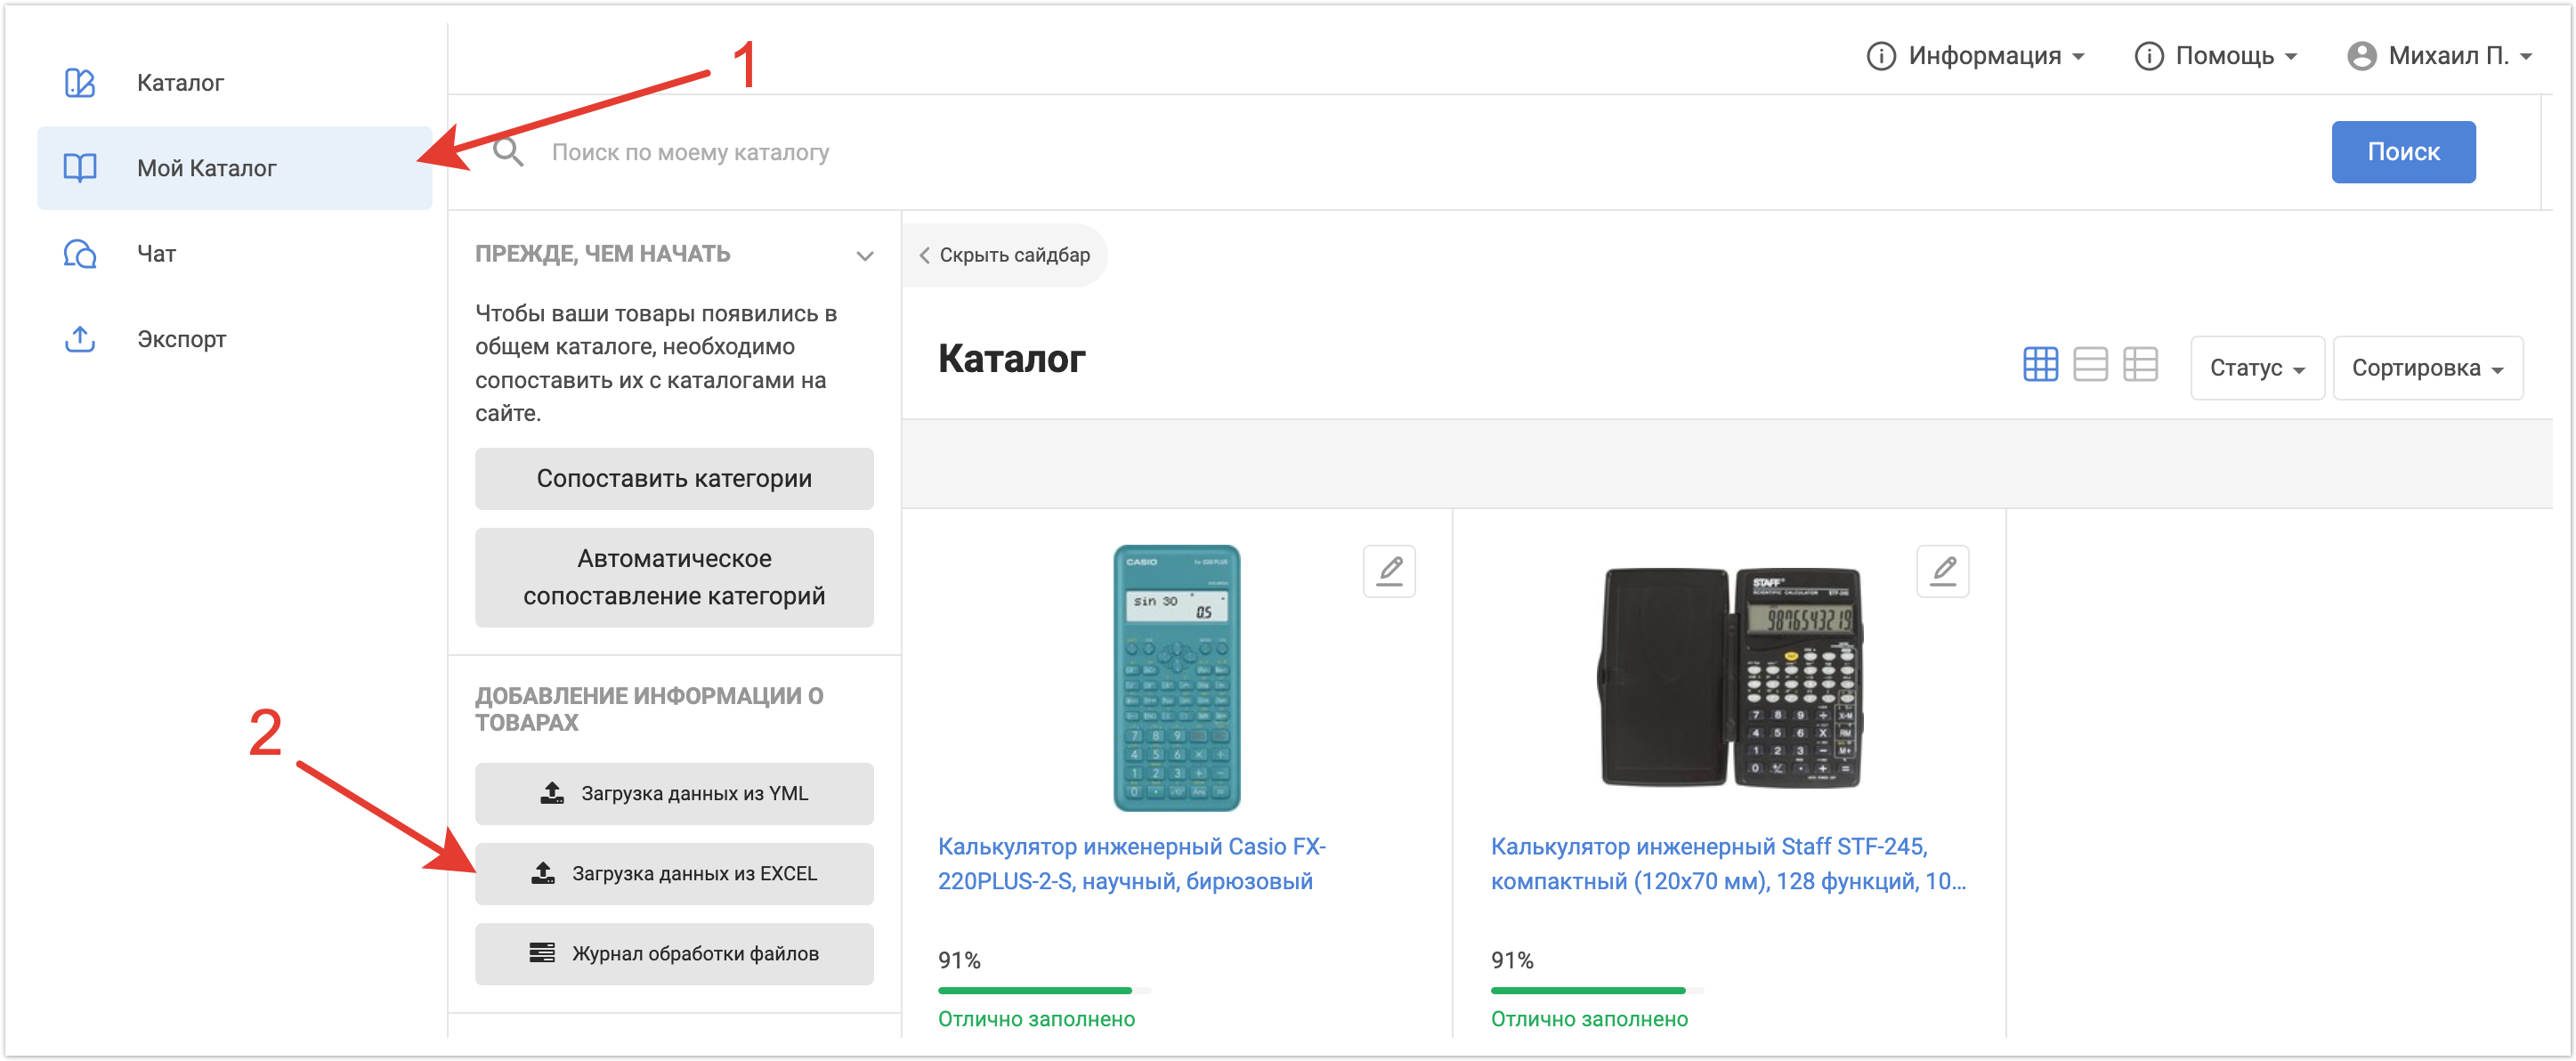
Редактирование товара через импорт xls-файлаВ случае, если у ряда товаров произошли массовые изменения, например добавилась новая характеристика или обновились изображения, можно загрузить XLS-файл, который содержит идентификатор товара и колонки с обновленными значениями. Таким образом пользователю не нужно редактировать каждый товар вручную, а изменения можно внести массово. Для импорта XLS-файла с изменениями, необходимо перейти в раздел Мой каталог и кликнуть по кнопке Загрузка данных из EXCEL. Подробнее про загрузку файла описано на странице.
Ответственный менеджер также может проводить модерацию и редактировать товары, например если какой-то из его сотрудников в отпуске. Экспорт данныхФункционал экспорта товаров и медиаконтента позволяет пользователям выгружать файл с товарами, которые выводятся им на платформе. Экспорт доступен пользователям со следующими ролями:
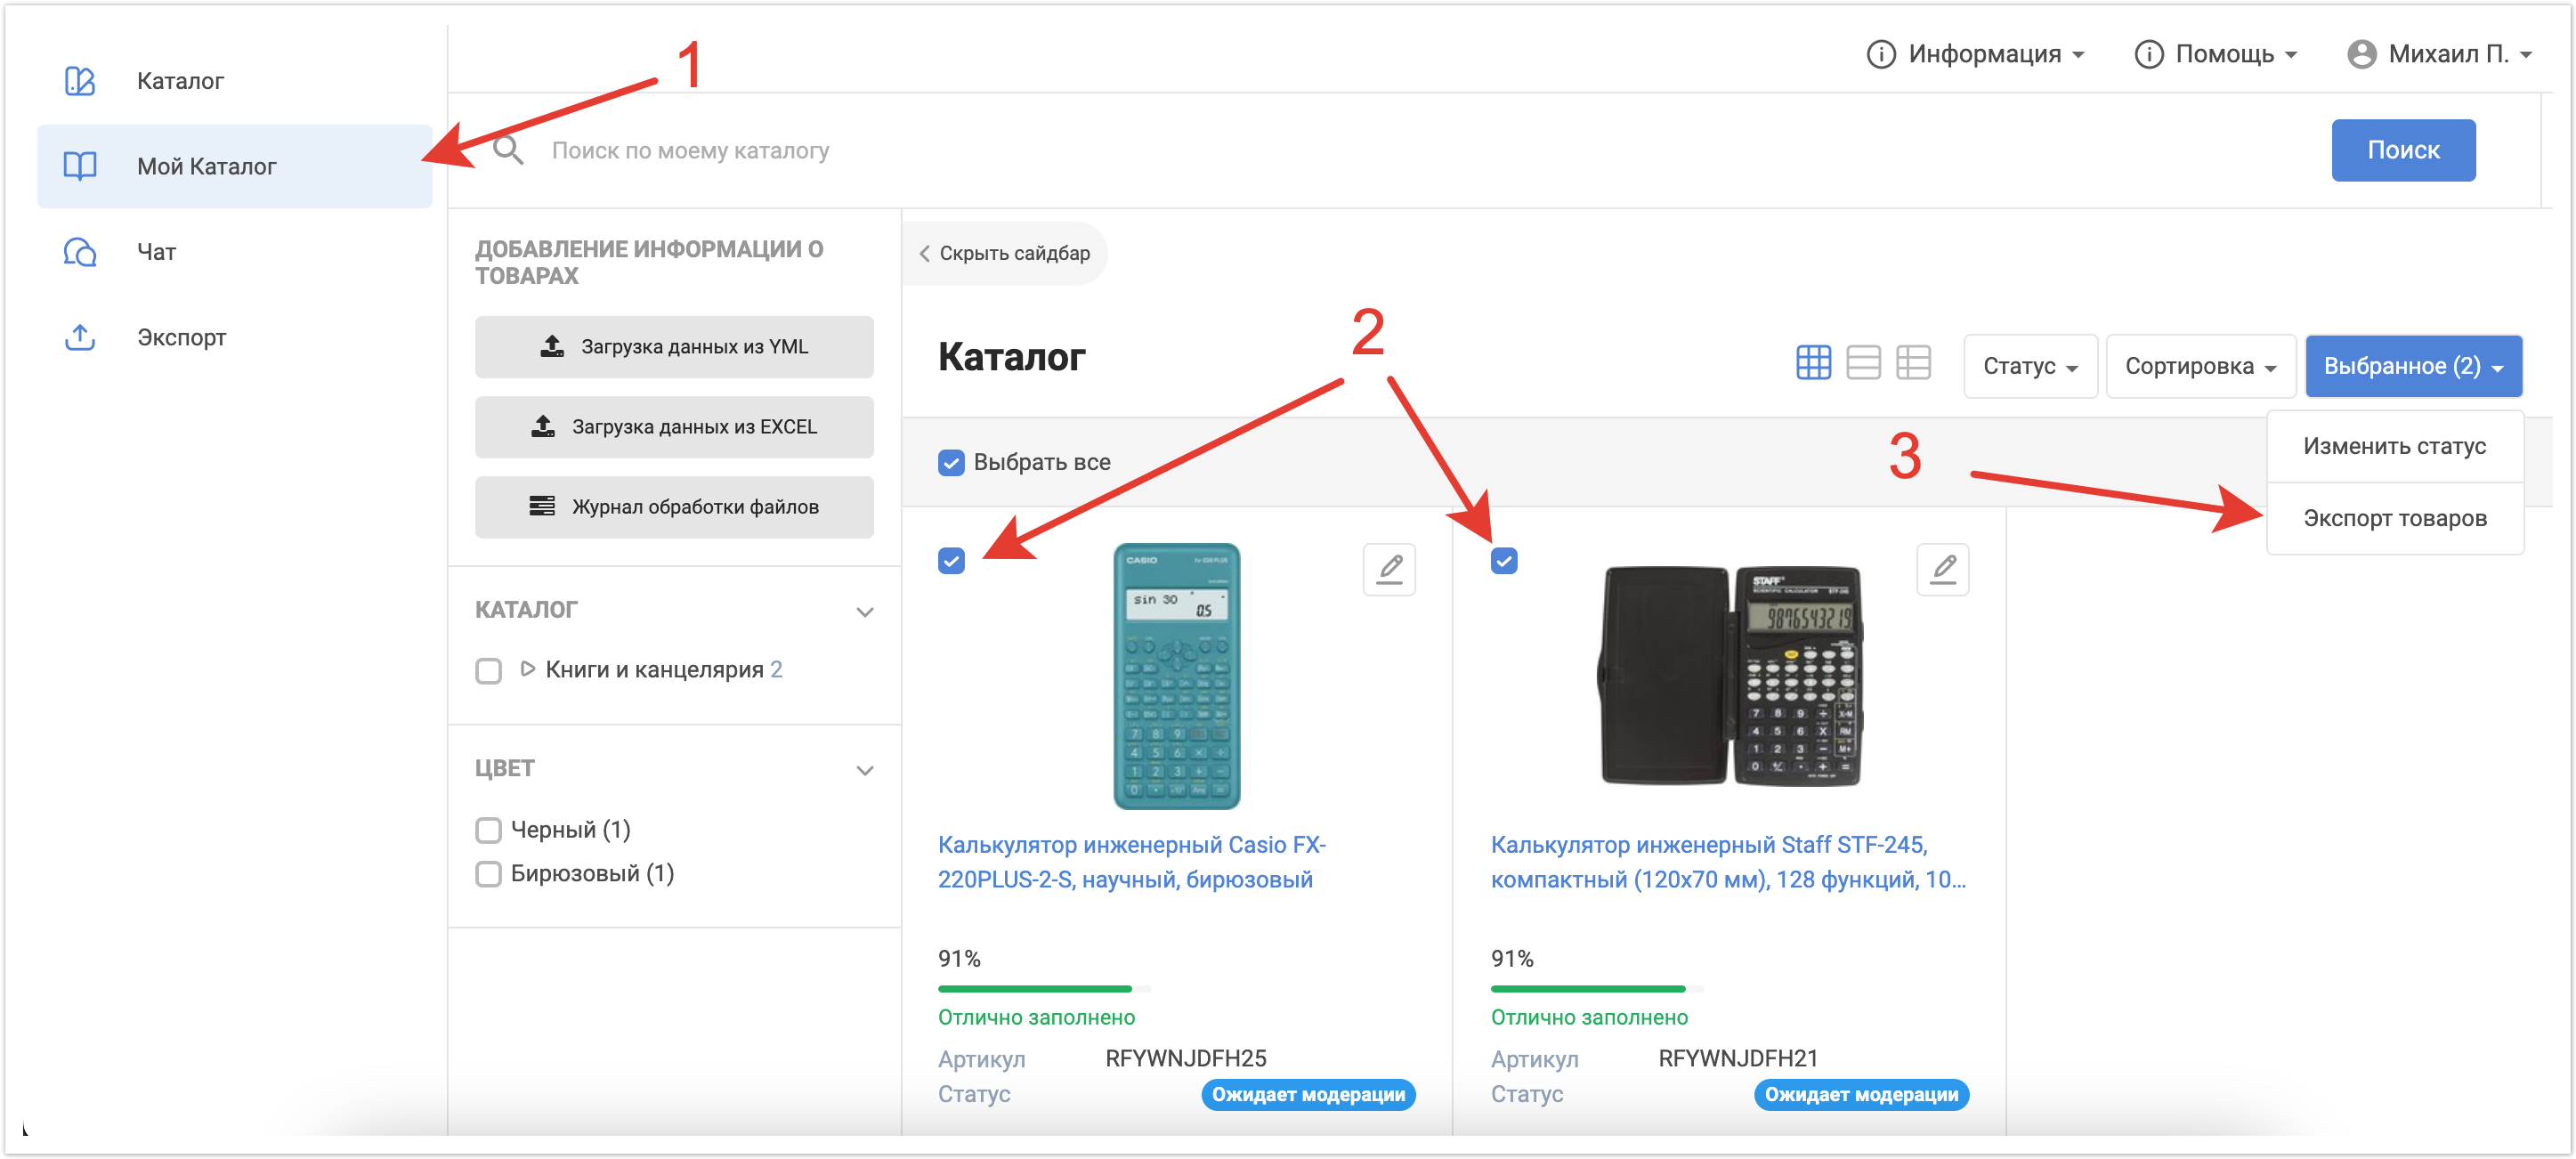
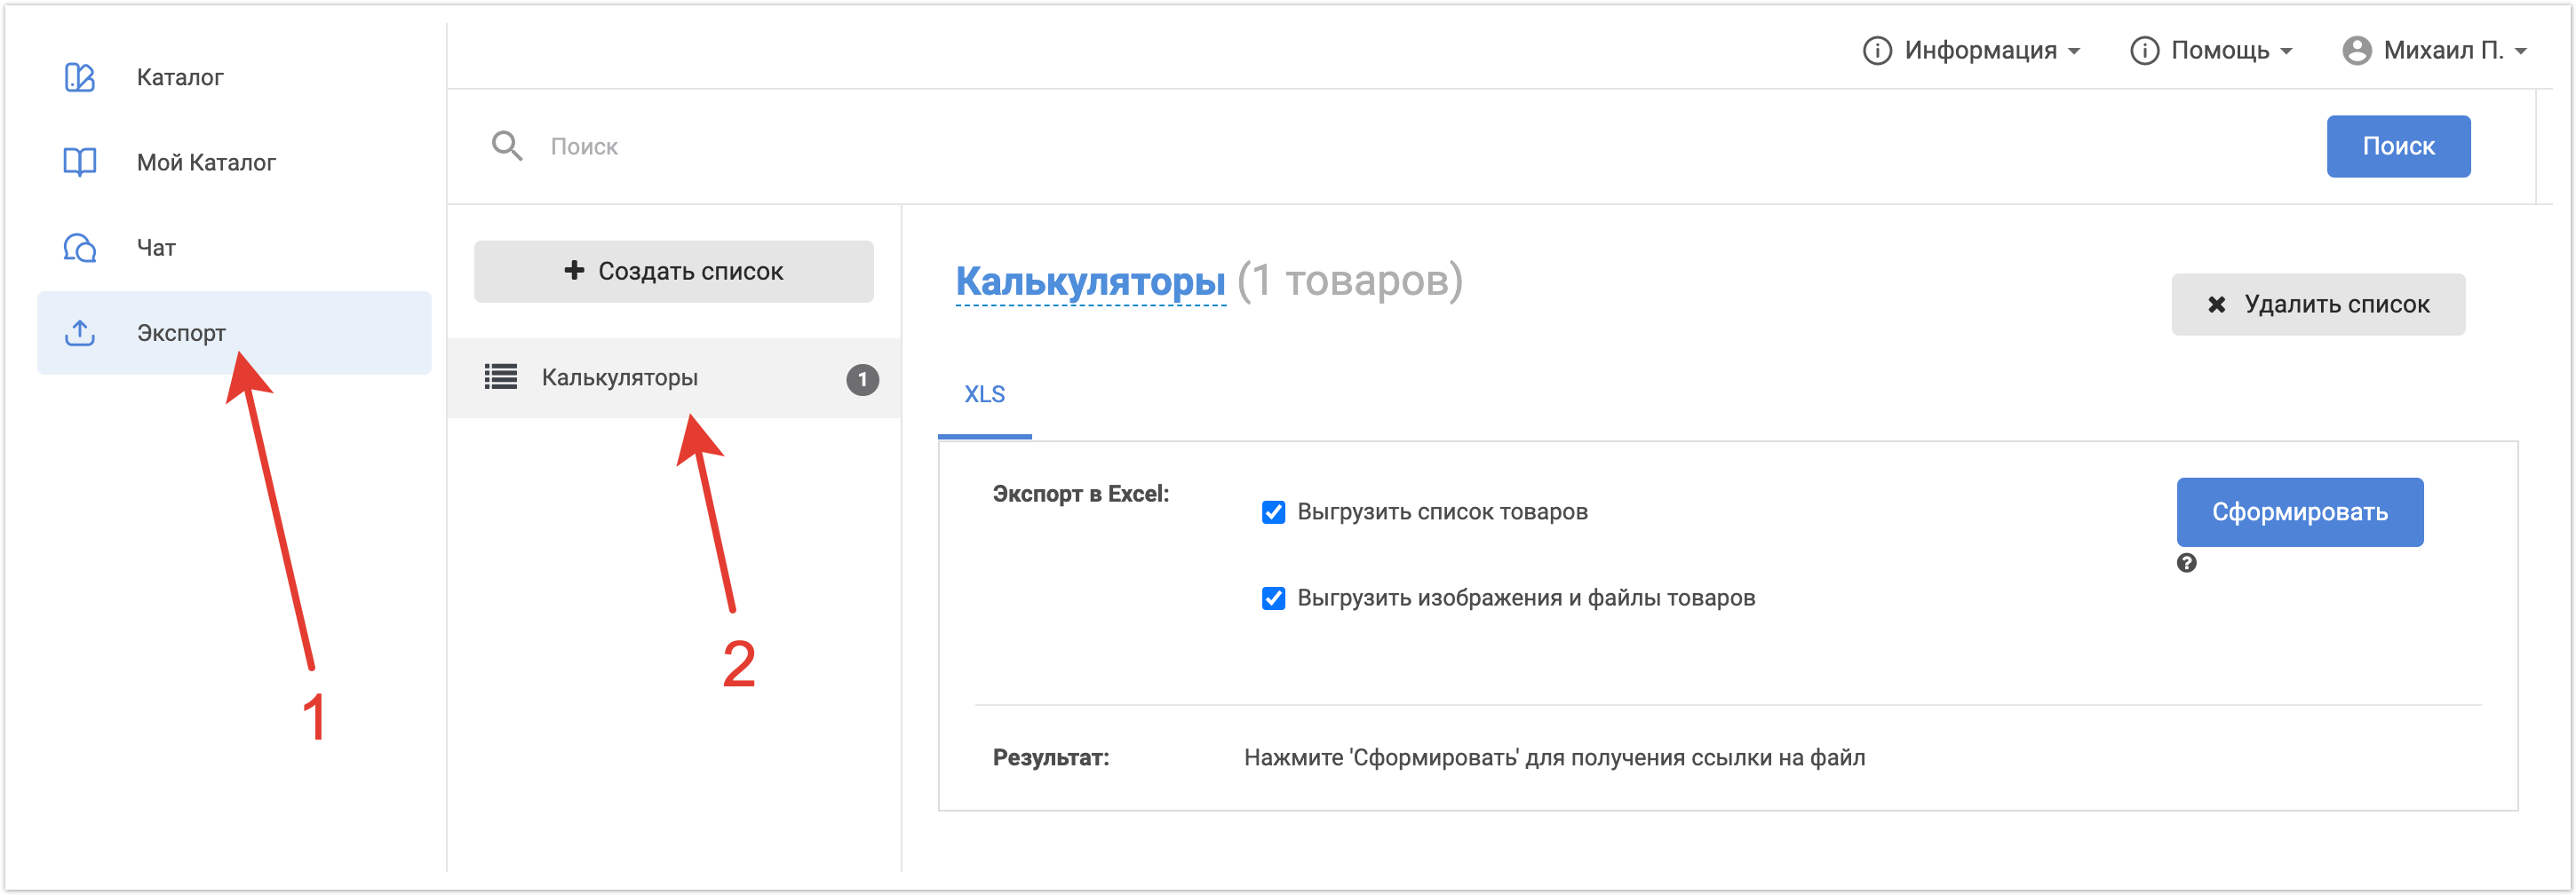
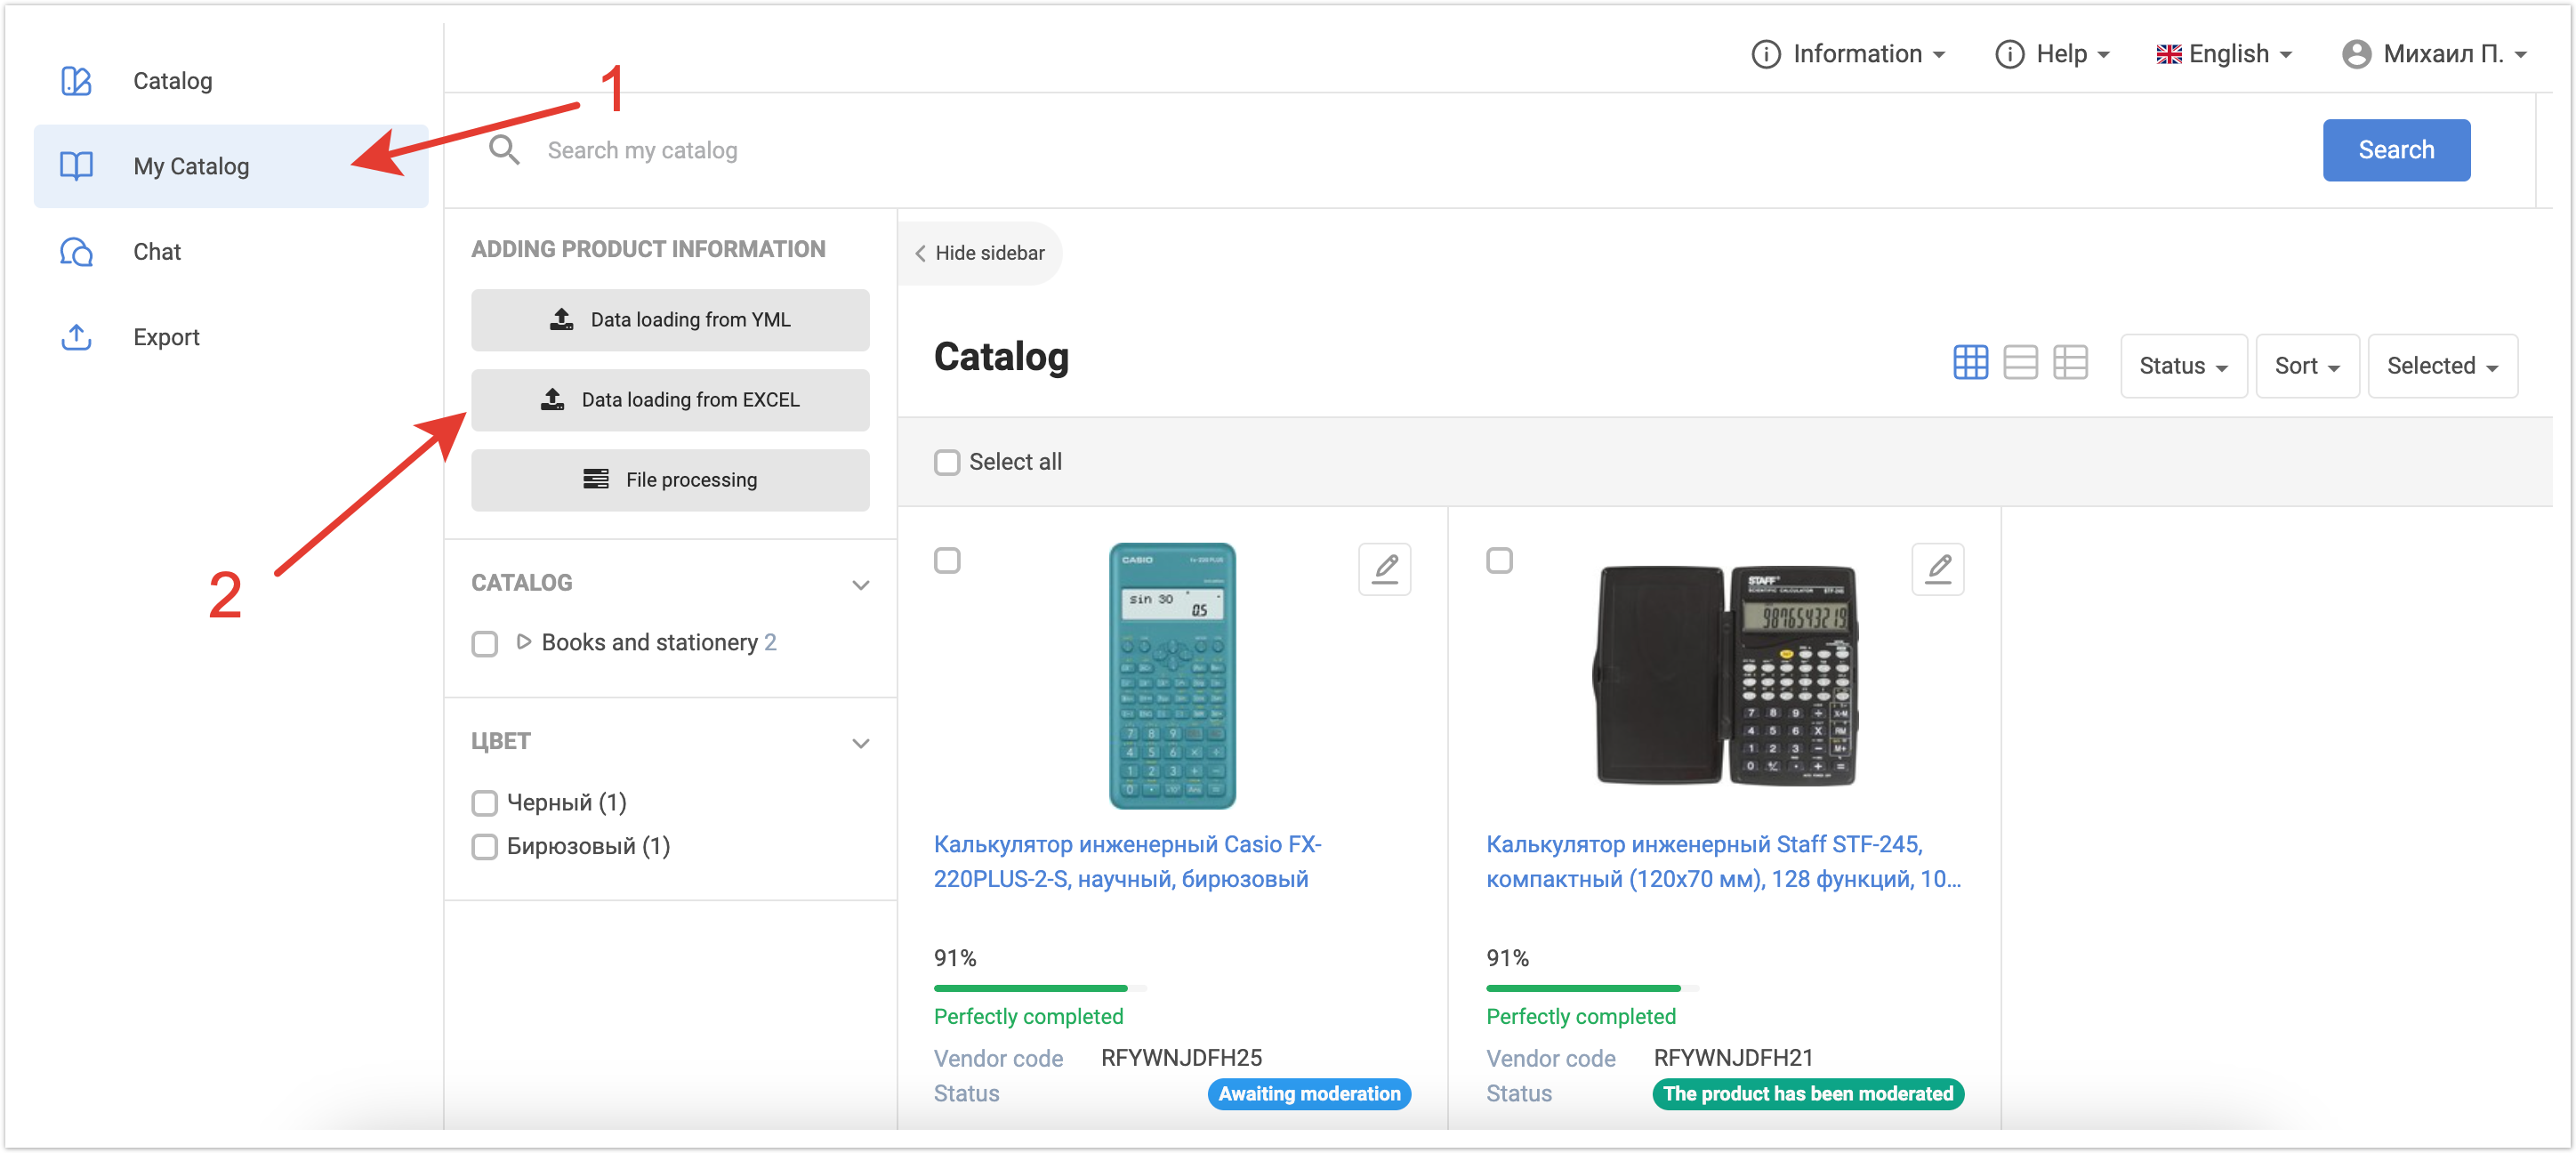
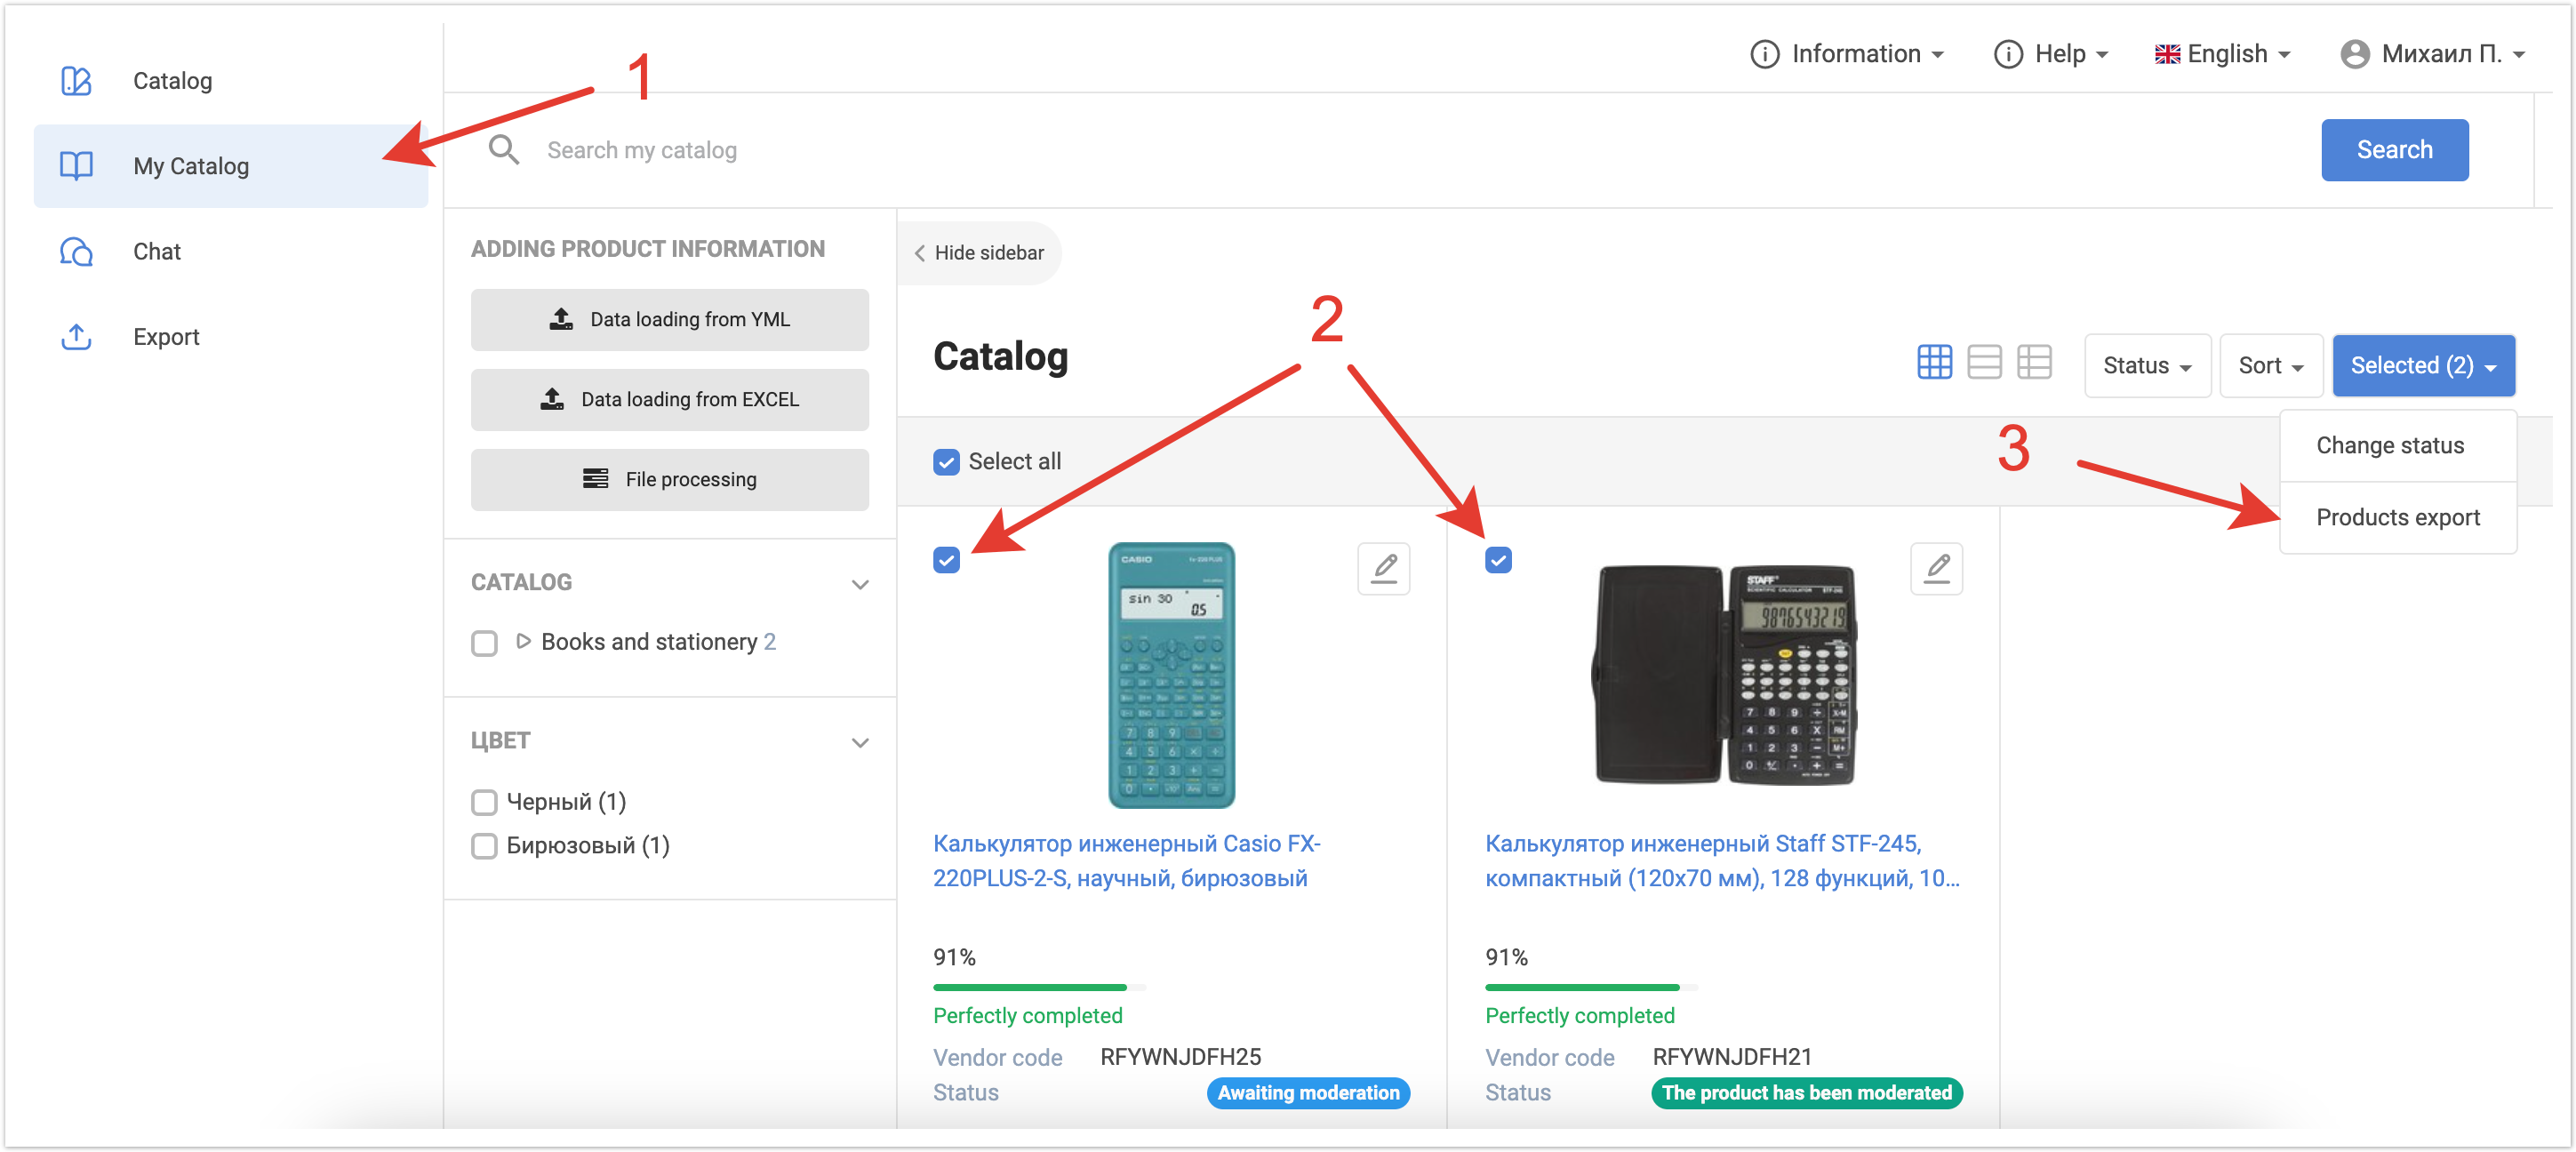
Каждый пользователь может решить свои задачи с помощью экспорта. Ответственный менеджер(руководитель) получает отчет по работе своих сотрудников(бренд-менеджеров). Бренд-менеджер получает информацию по товарам и может получить файлы и изображения по каждому из товаров для проверки. Покупатель получает возможность выгрузить файл с товарами для последующей загрузки его на торговые площадки, например если он закупает у поставщика на платформе, а далее продает в розницу. Выгрузка текстовой информации по товарам производится в виде XLS-файла. Файл представляет из себя таблицу со всеми данными, которые содержит в себе карточка товара. Выгрузка медиа-контента осуществляется в виде архива, который содержит в себе вложенные архивы с медиа (изображения, файлы) по товарам. Каждый архив с медиа-контеном товара имеет название, совпадающее с артикулом, таким образом можно удобно найти данные по конкретному товару. Экспорт товаров для бренд-менеджераДля экспорта файла по товарам пользователю нужно перейти в раздел Мой каталог. Далее выбрать нужные товары, отметив их чек-боксами, и в выпадающем списке выбрать Экспорт товаров.
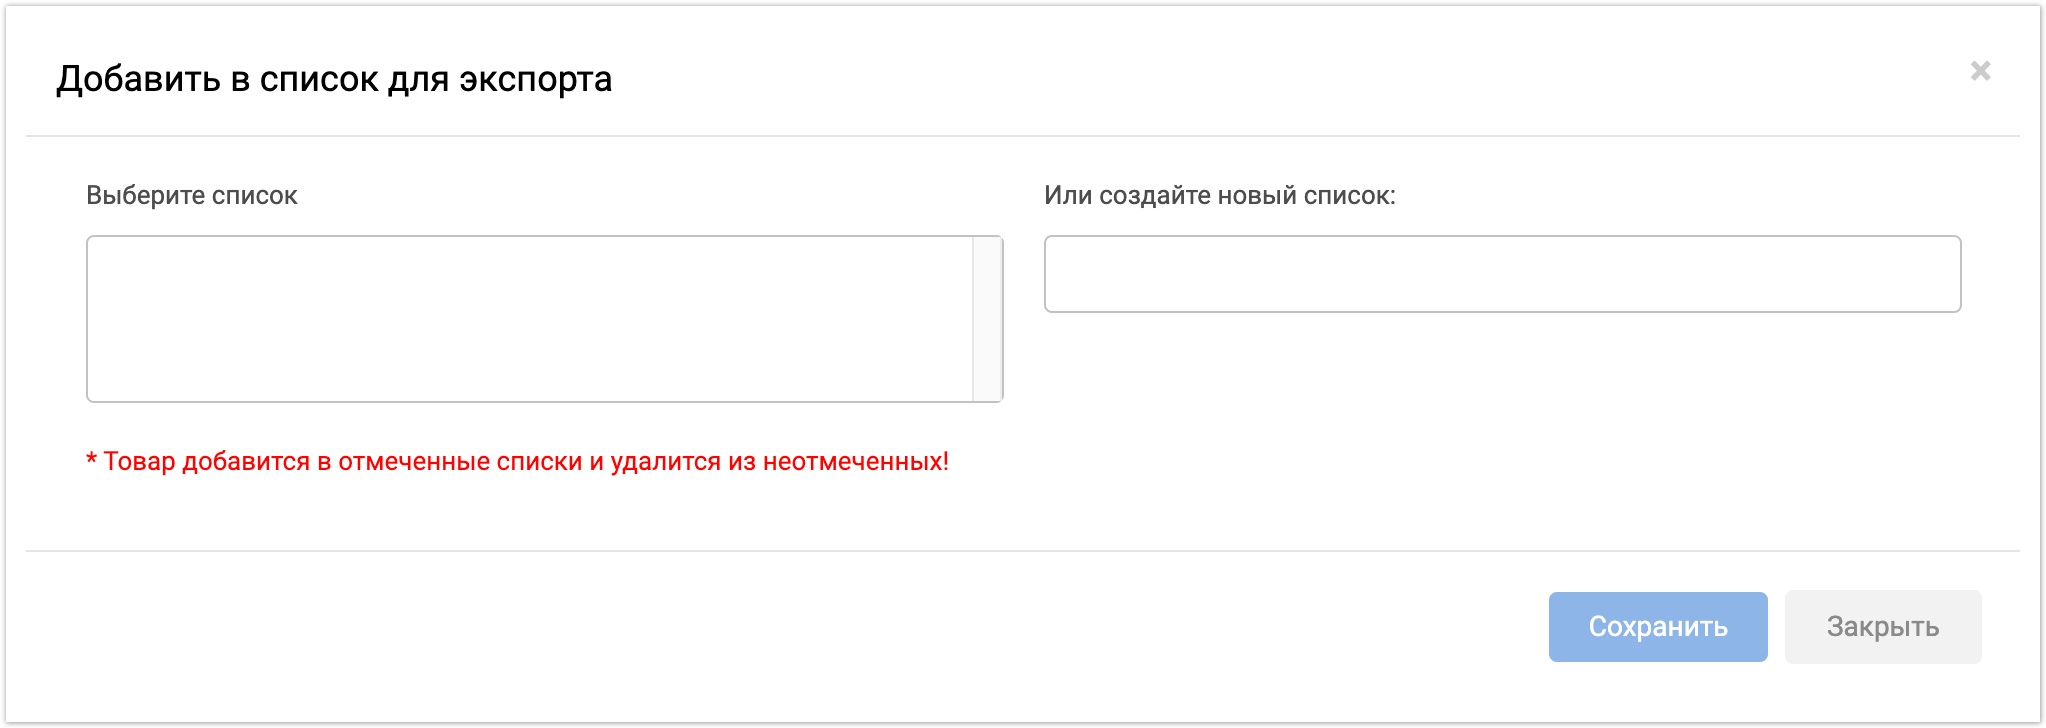
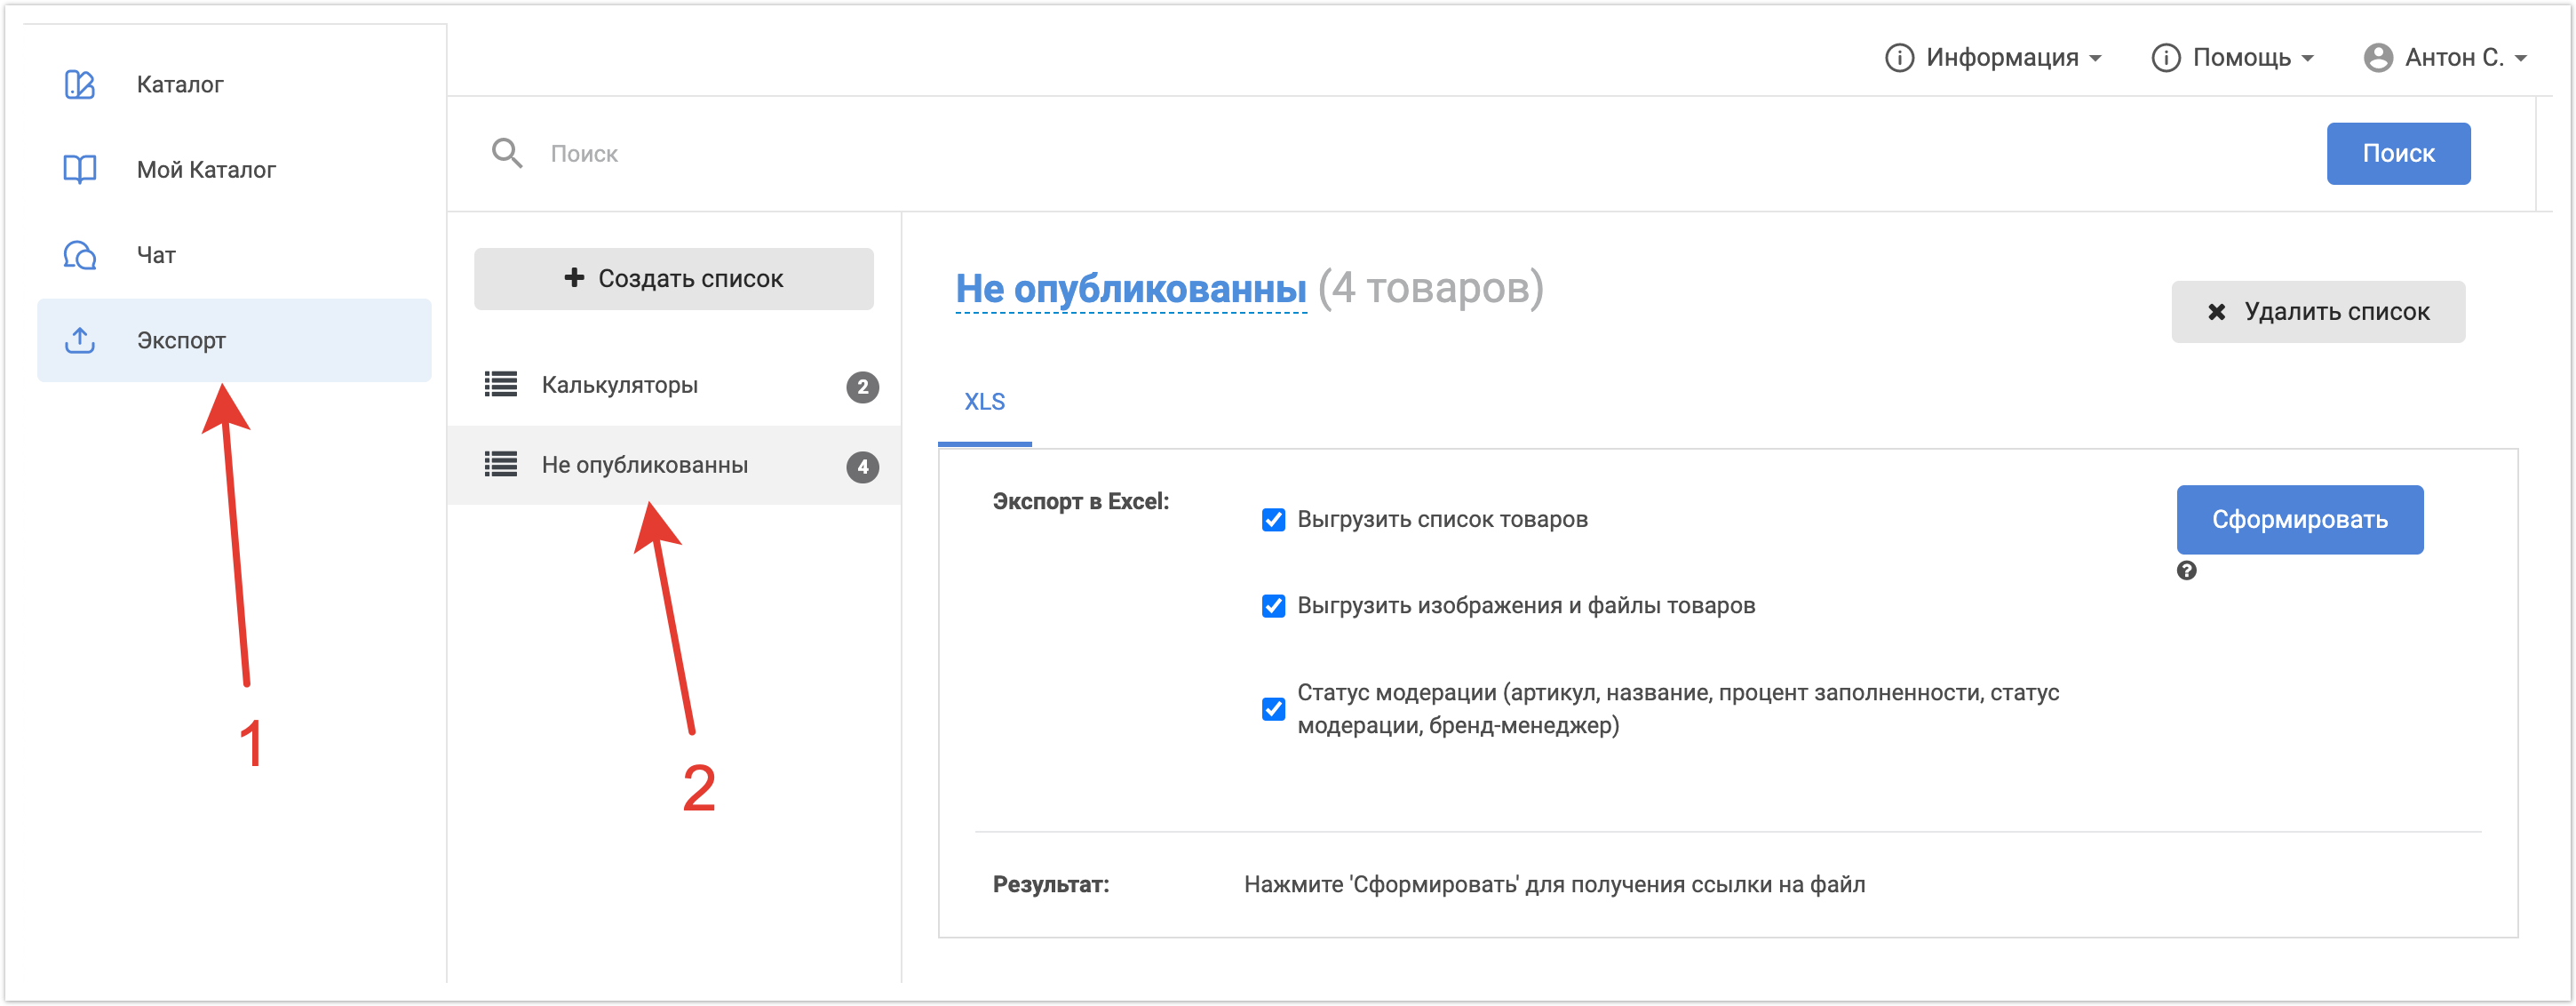
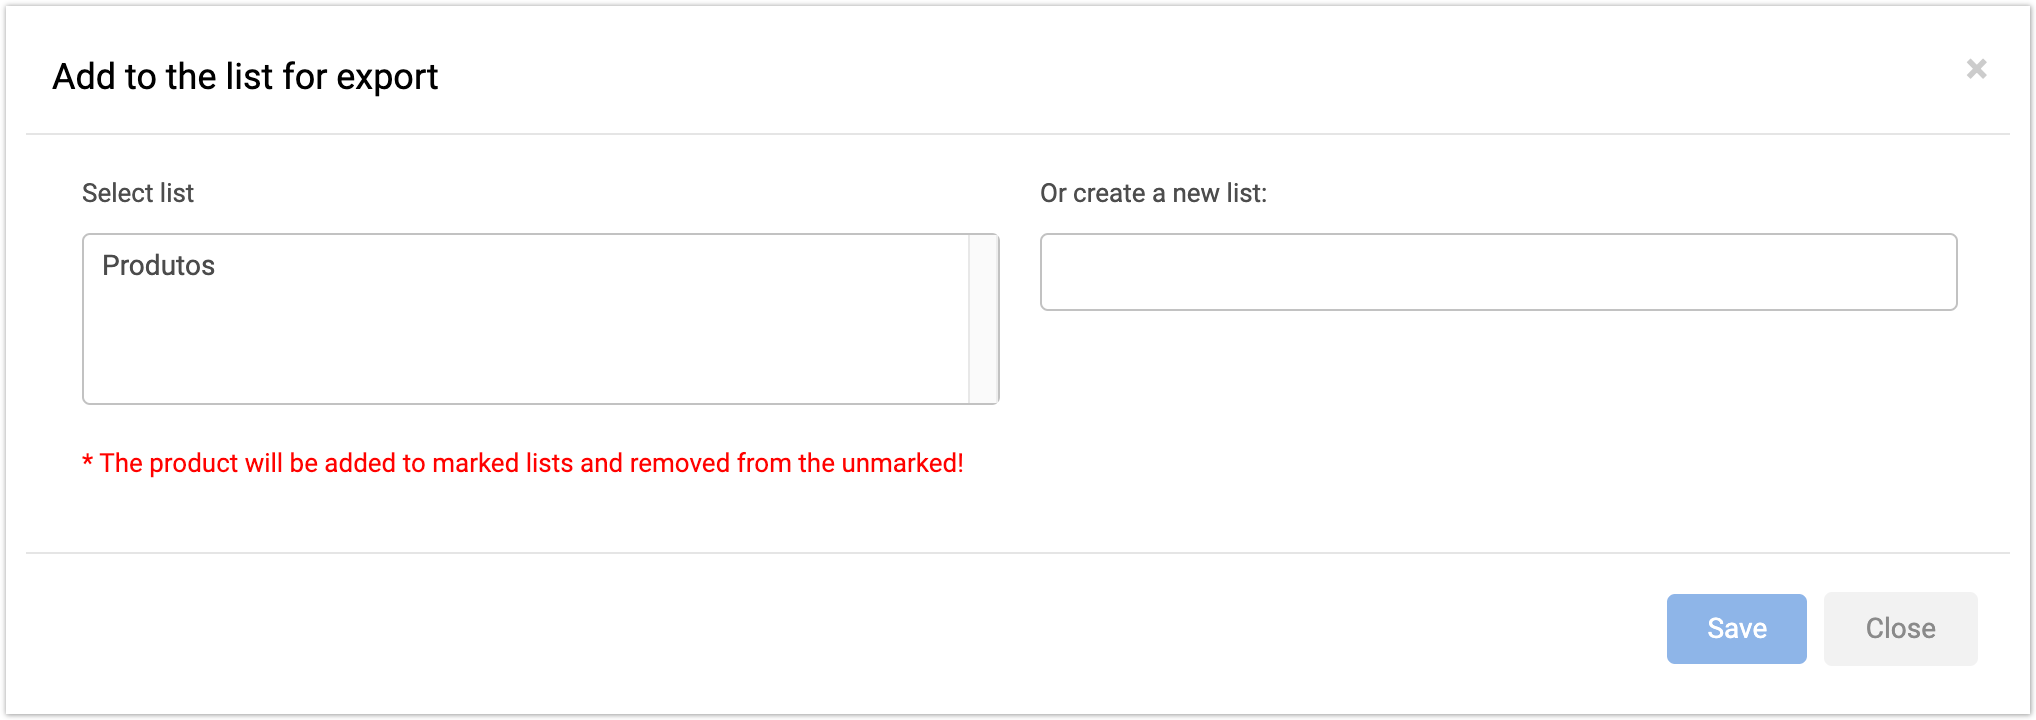
Будет предложено добавить товары к существующему списку экспорта, если он ранее создавался, или создать новый список. Выберите тот вариант, который вам подходит.
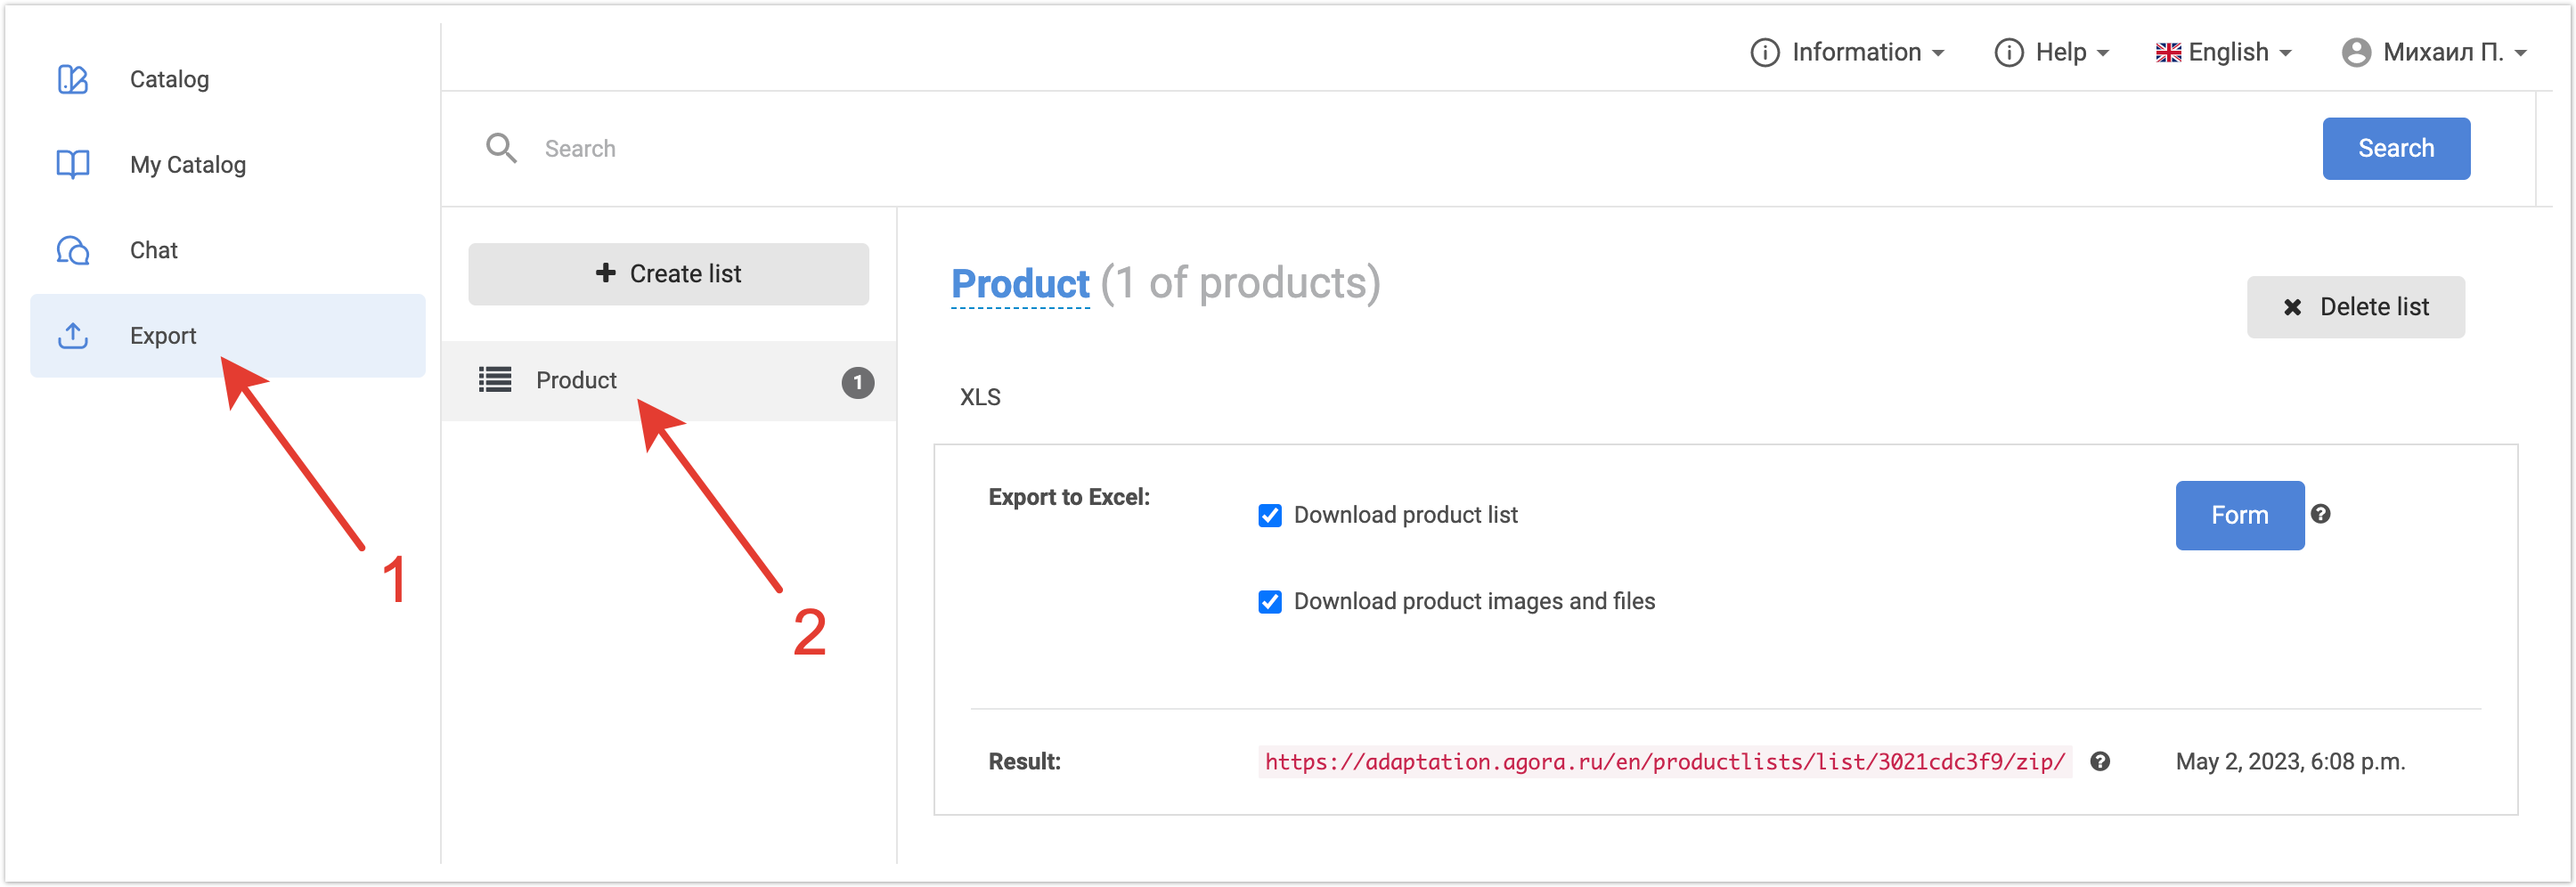
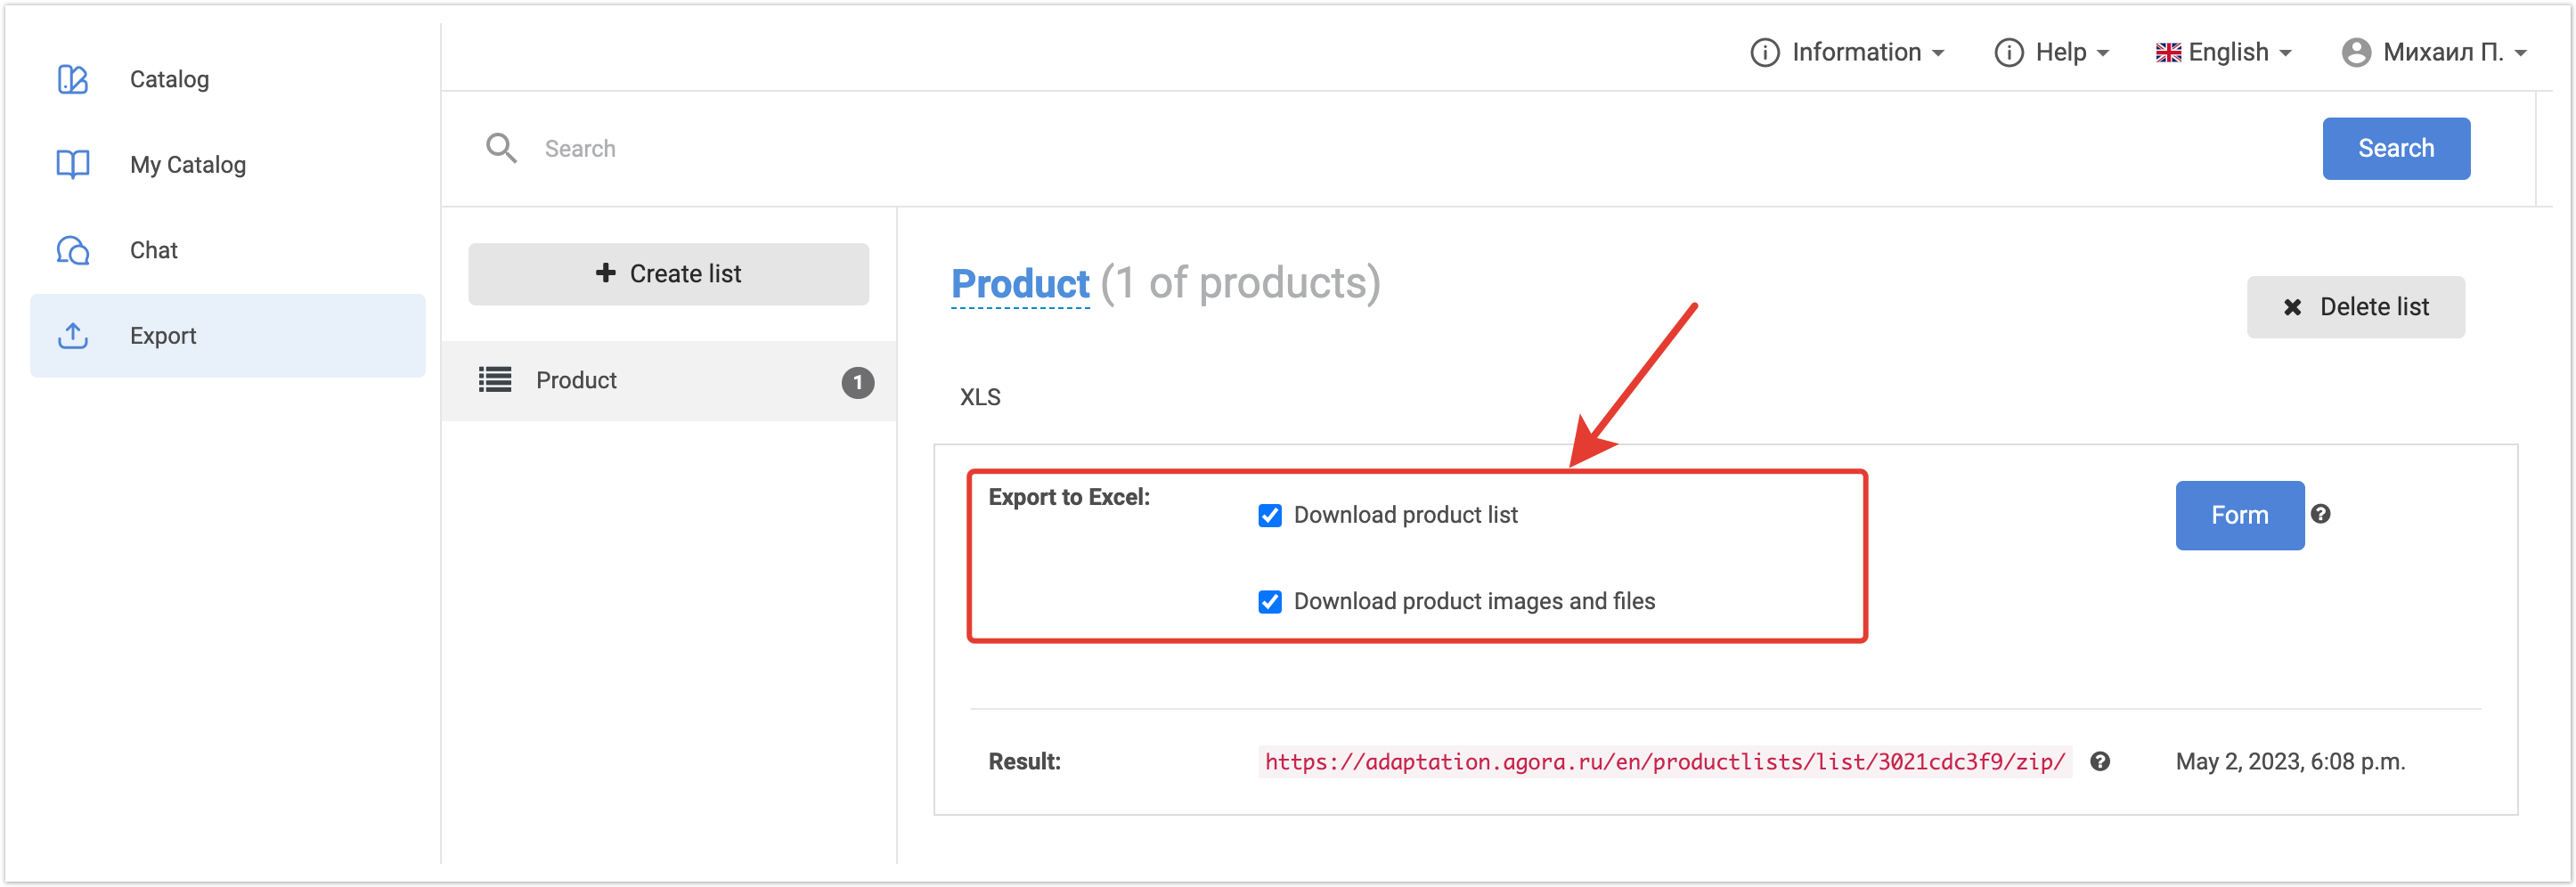
После сохранения нужно перейти в раздел Экспорт и выбрать нужный список товаров.
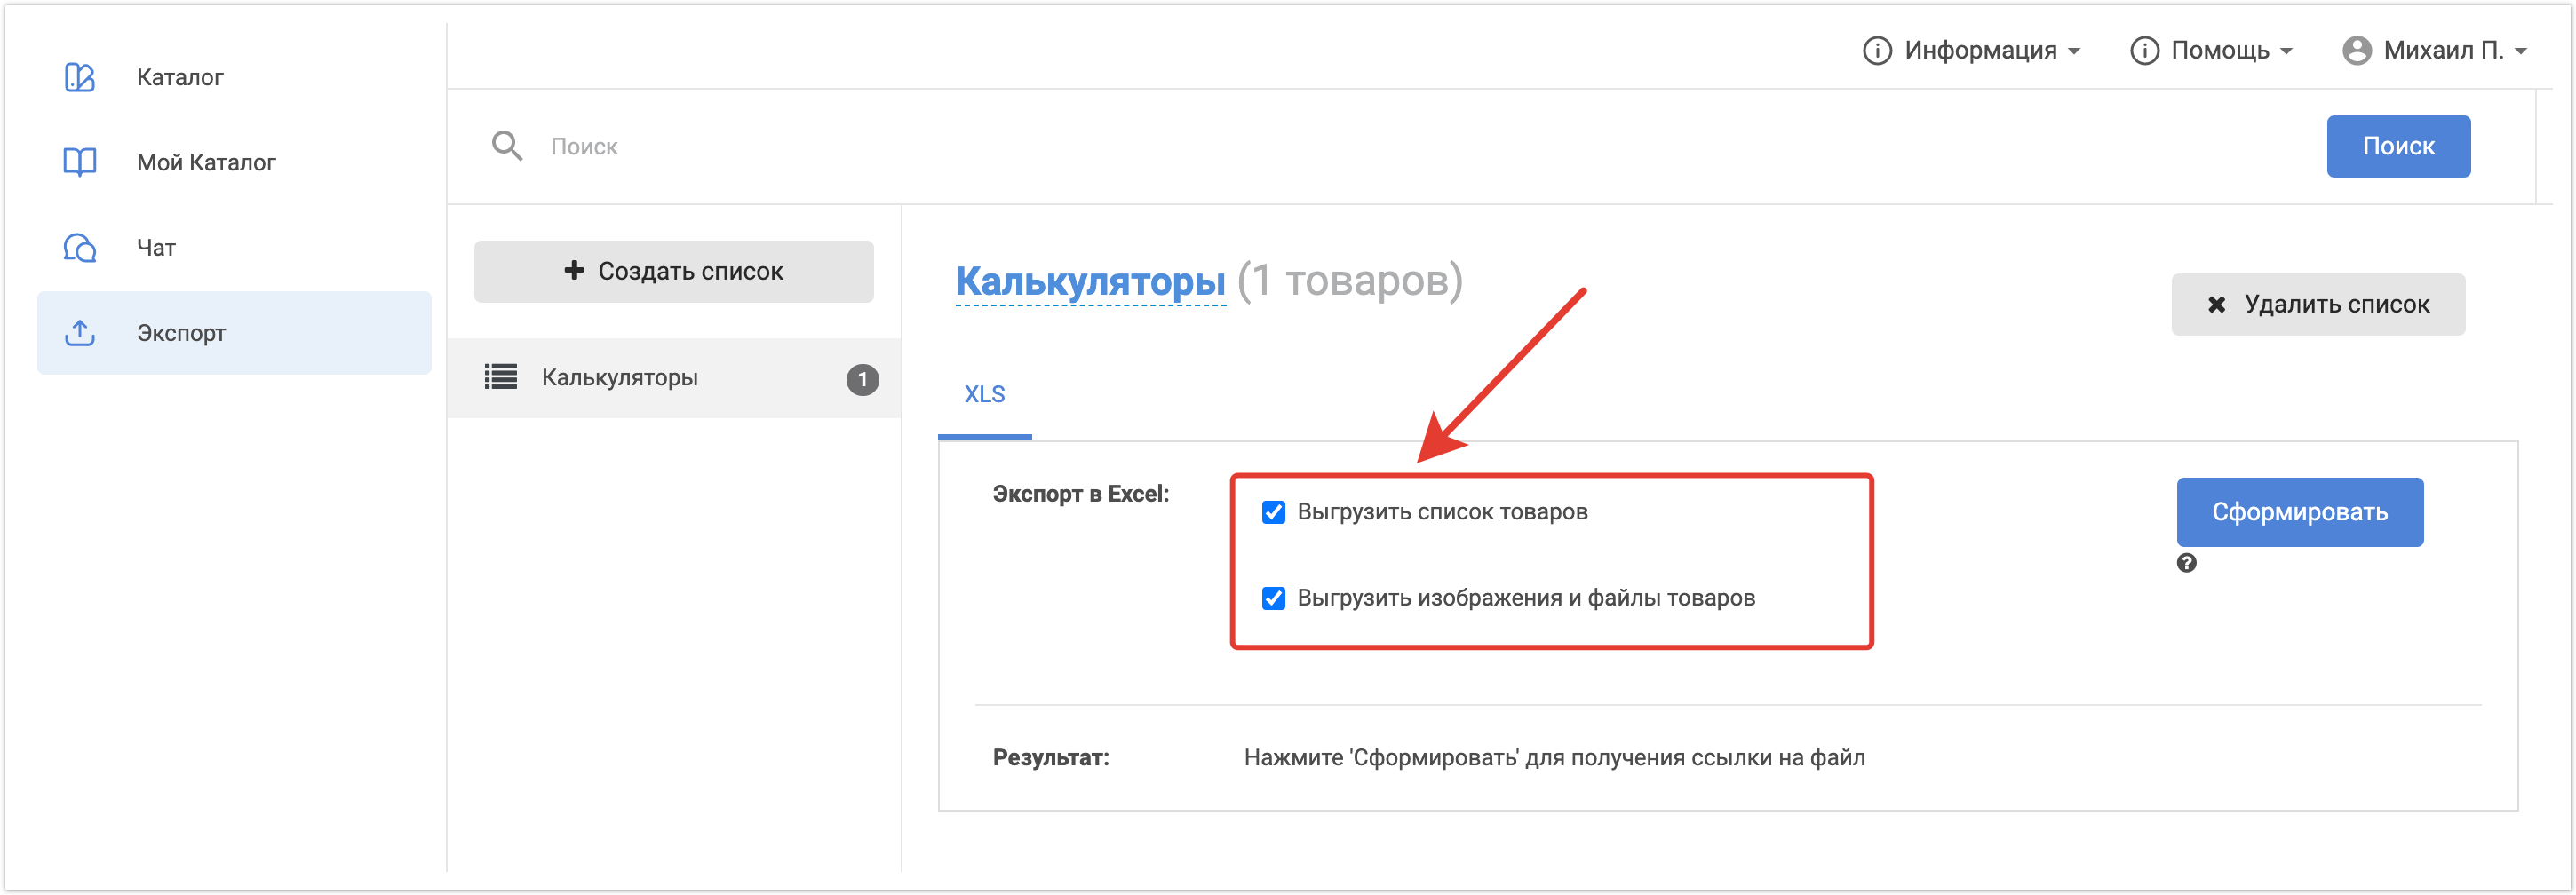
Далее нужно выбрать что требуется выгрузить: Выгрузить список товаров или Выгрузить изображения и файлы товаров. В первом случае будет сформирована только таблица с товарами, а если выбрать вторую настройку тоже, то будут также добавлены архивы с медиаконтентом.
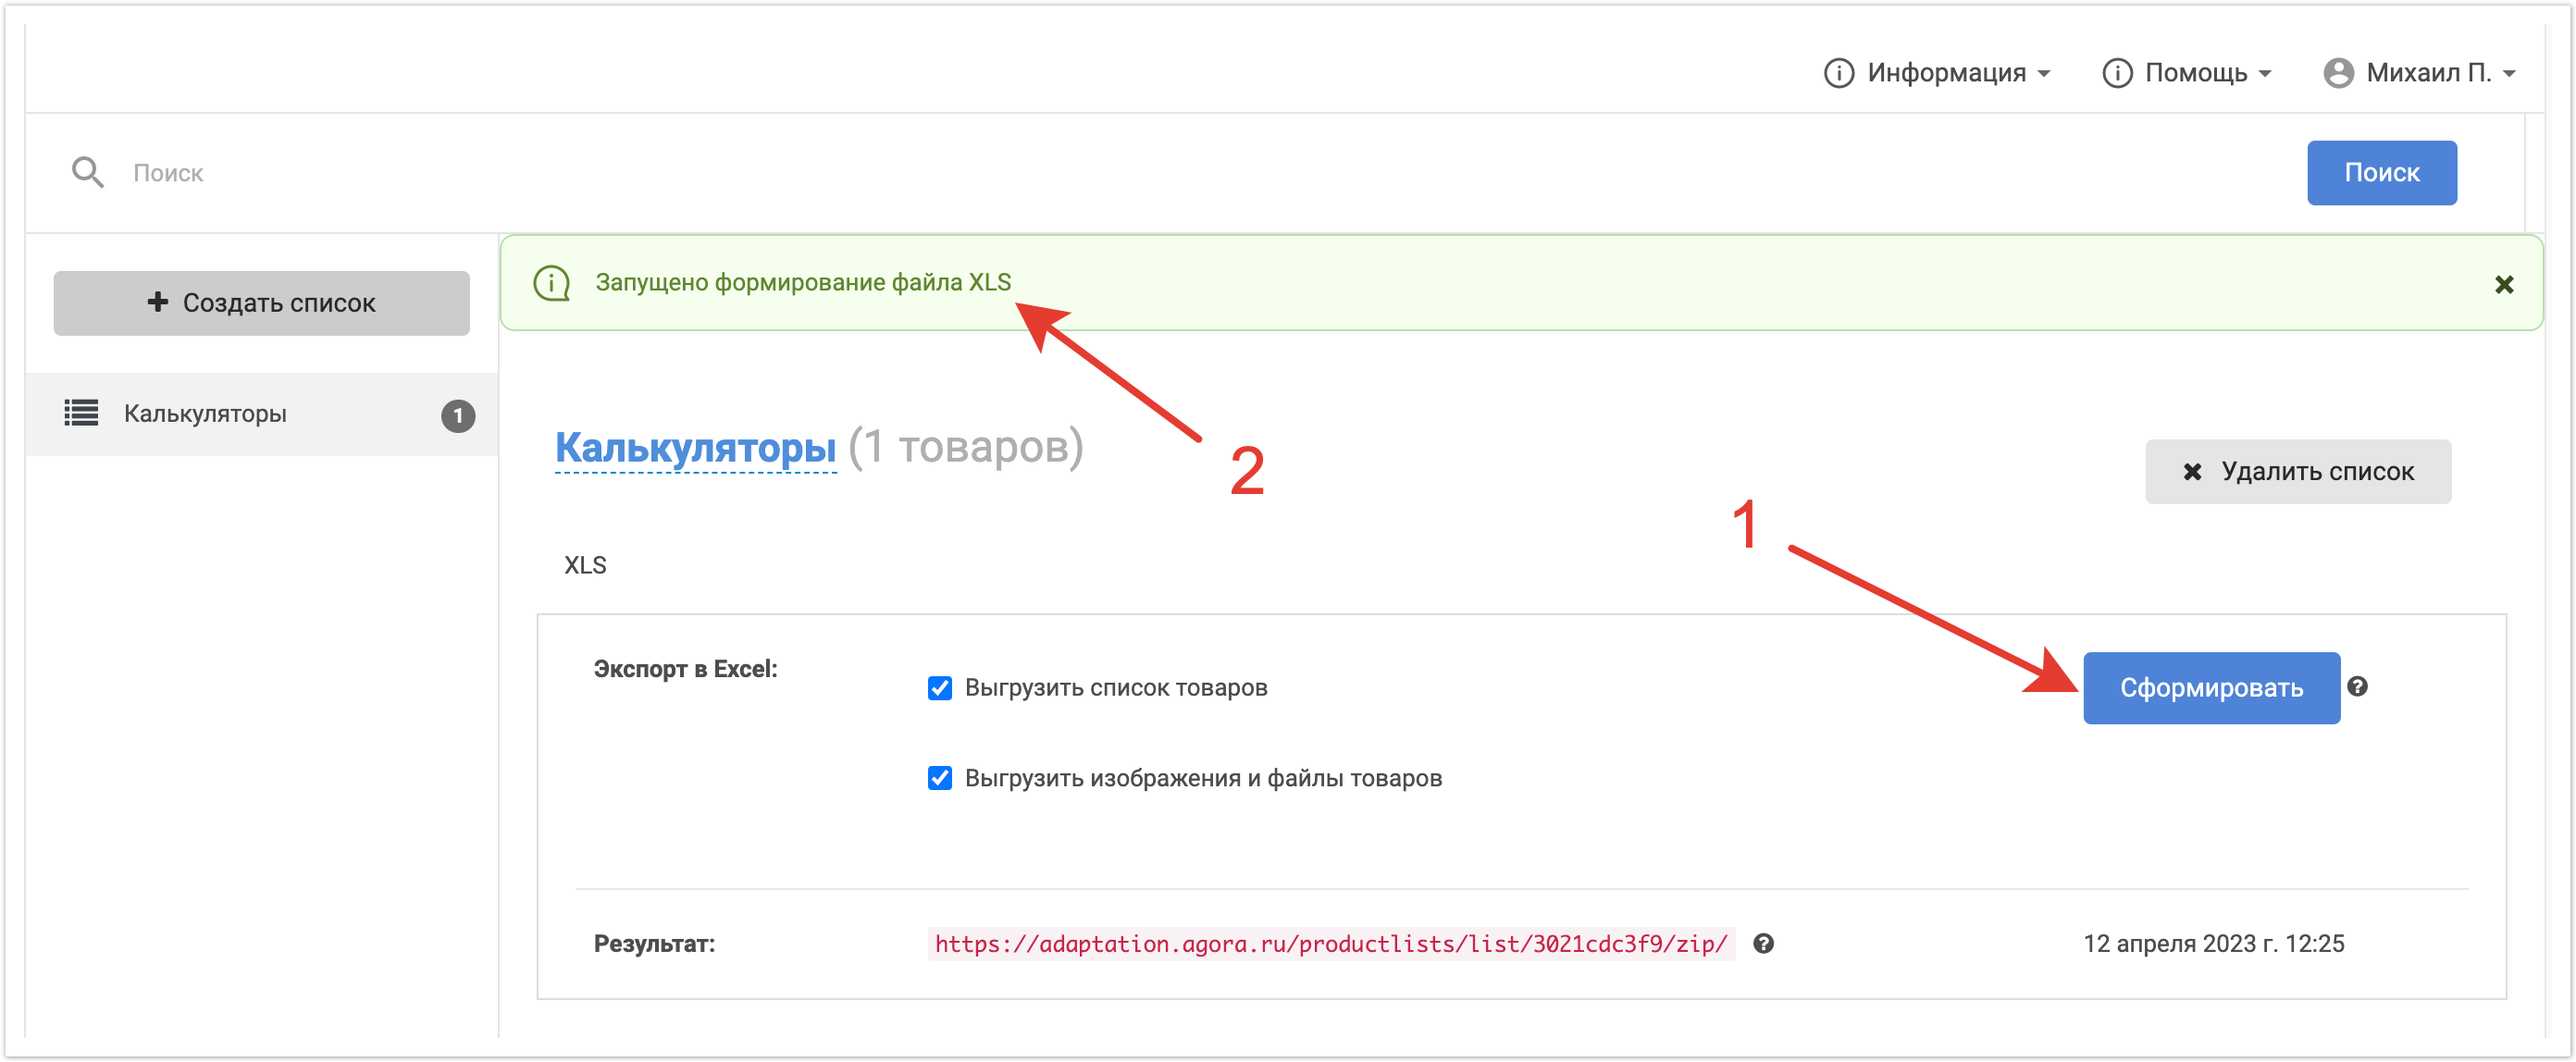
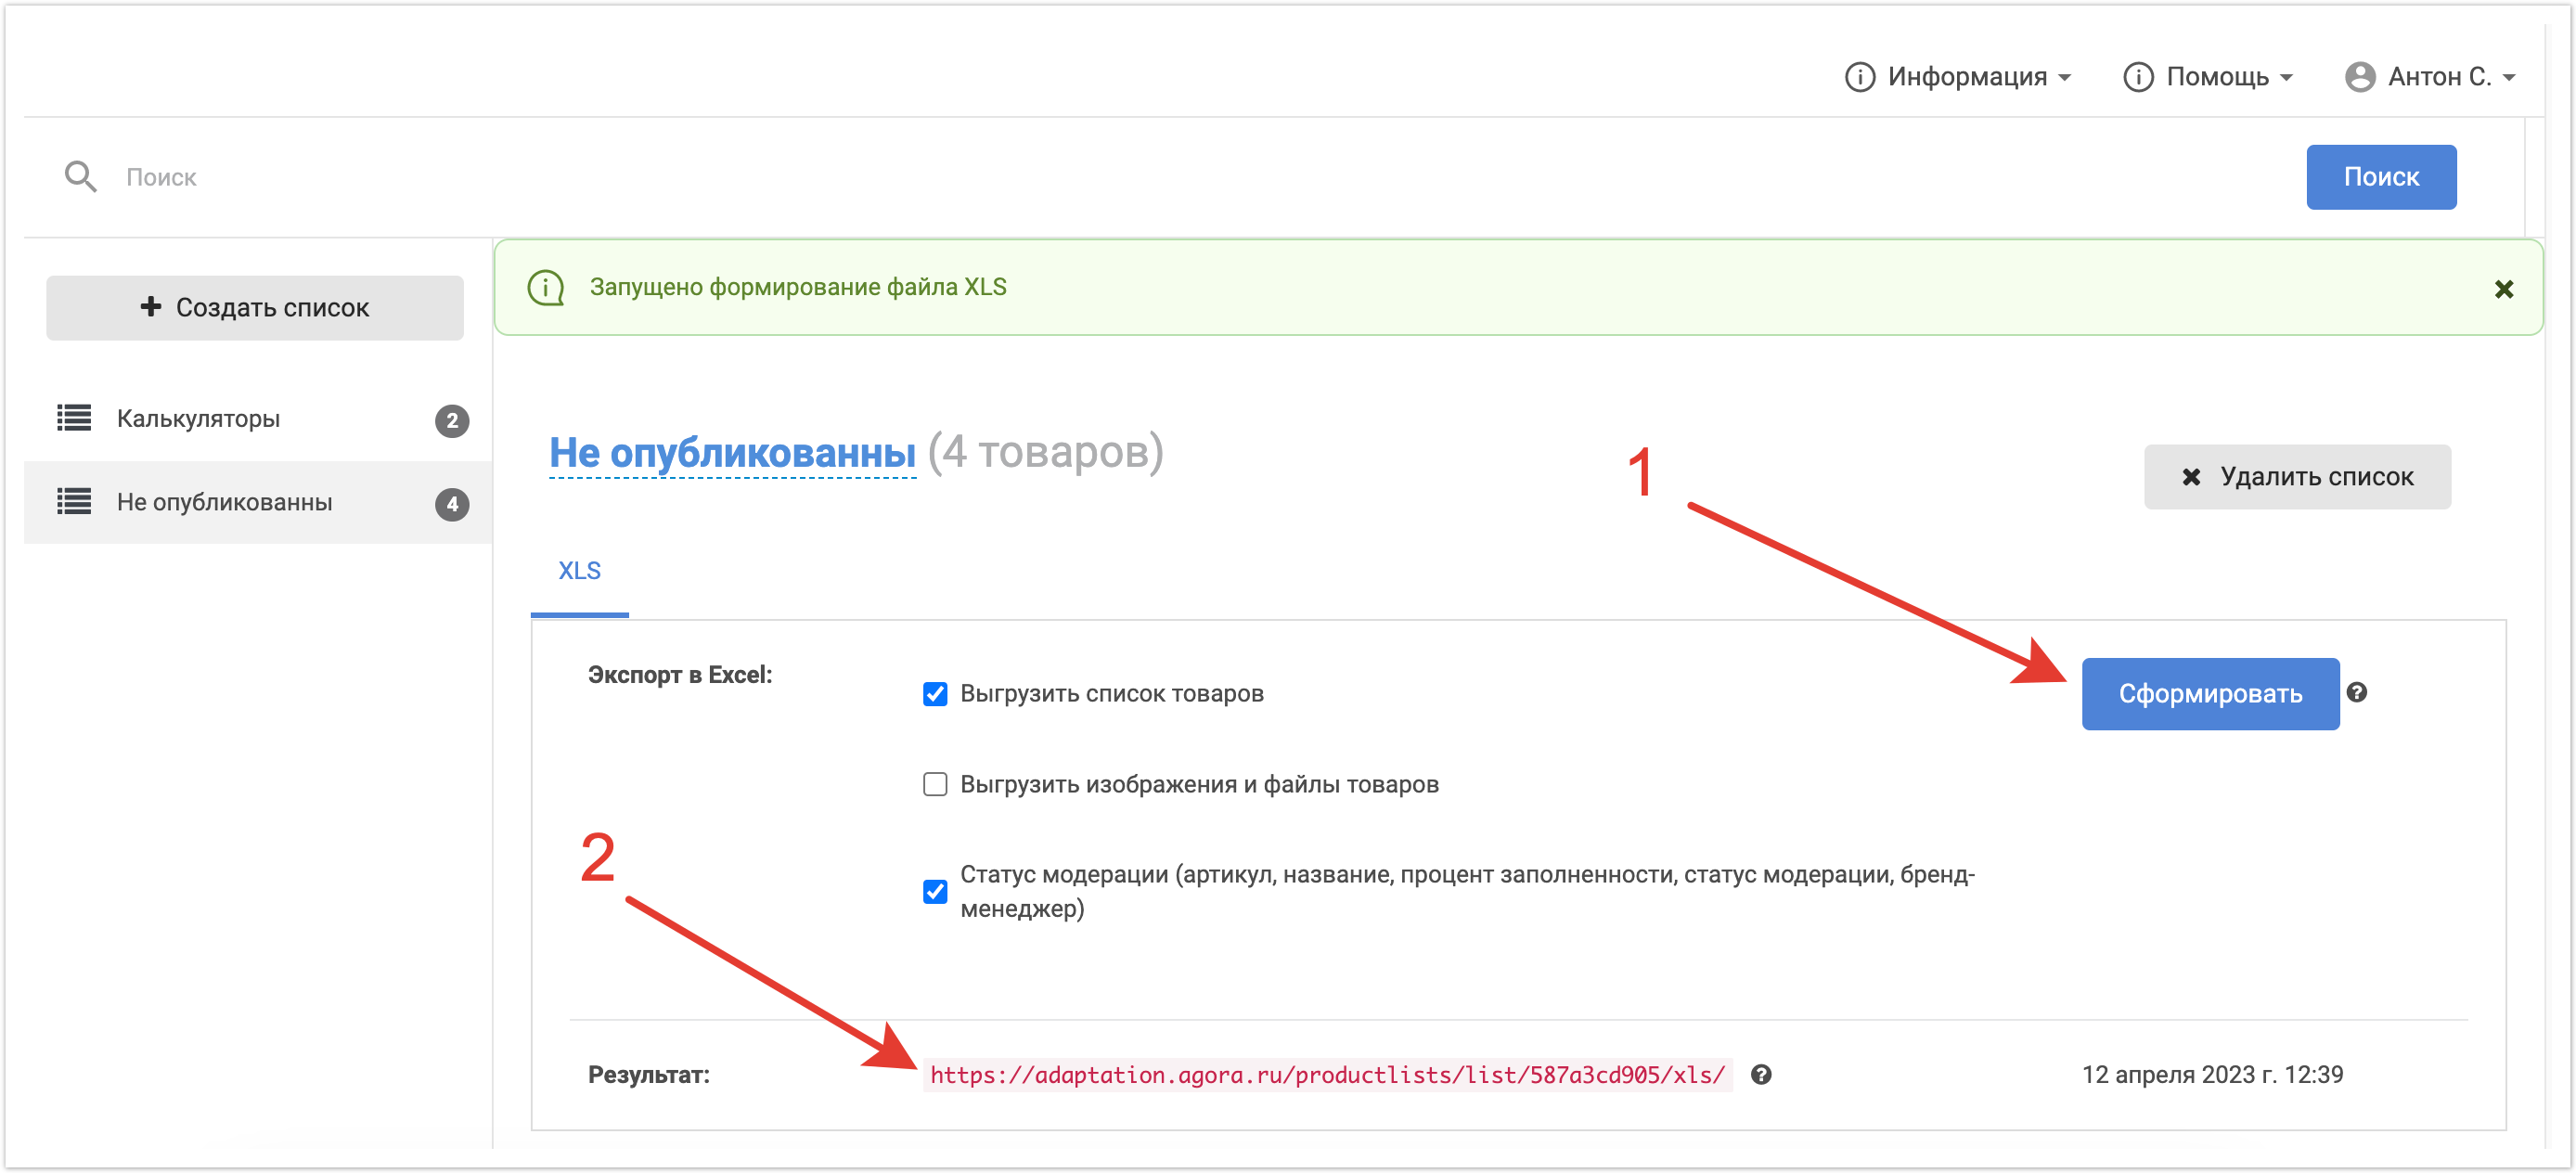
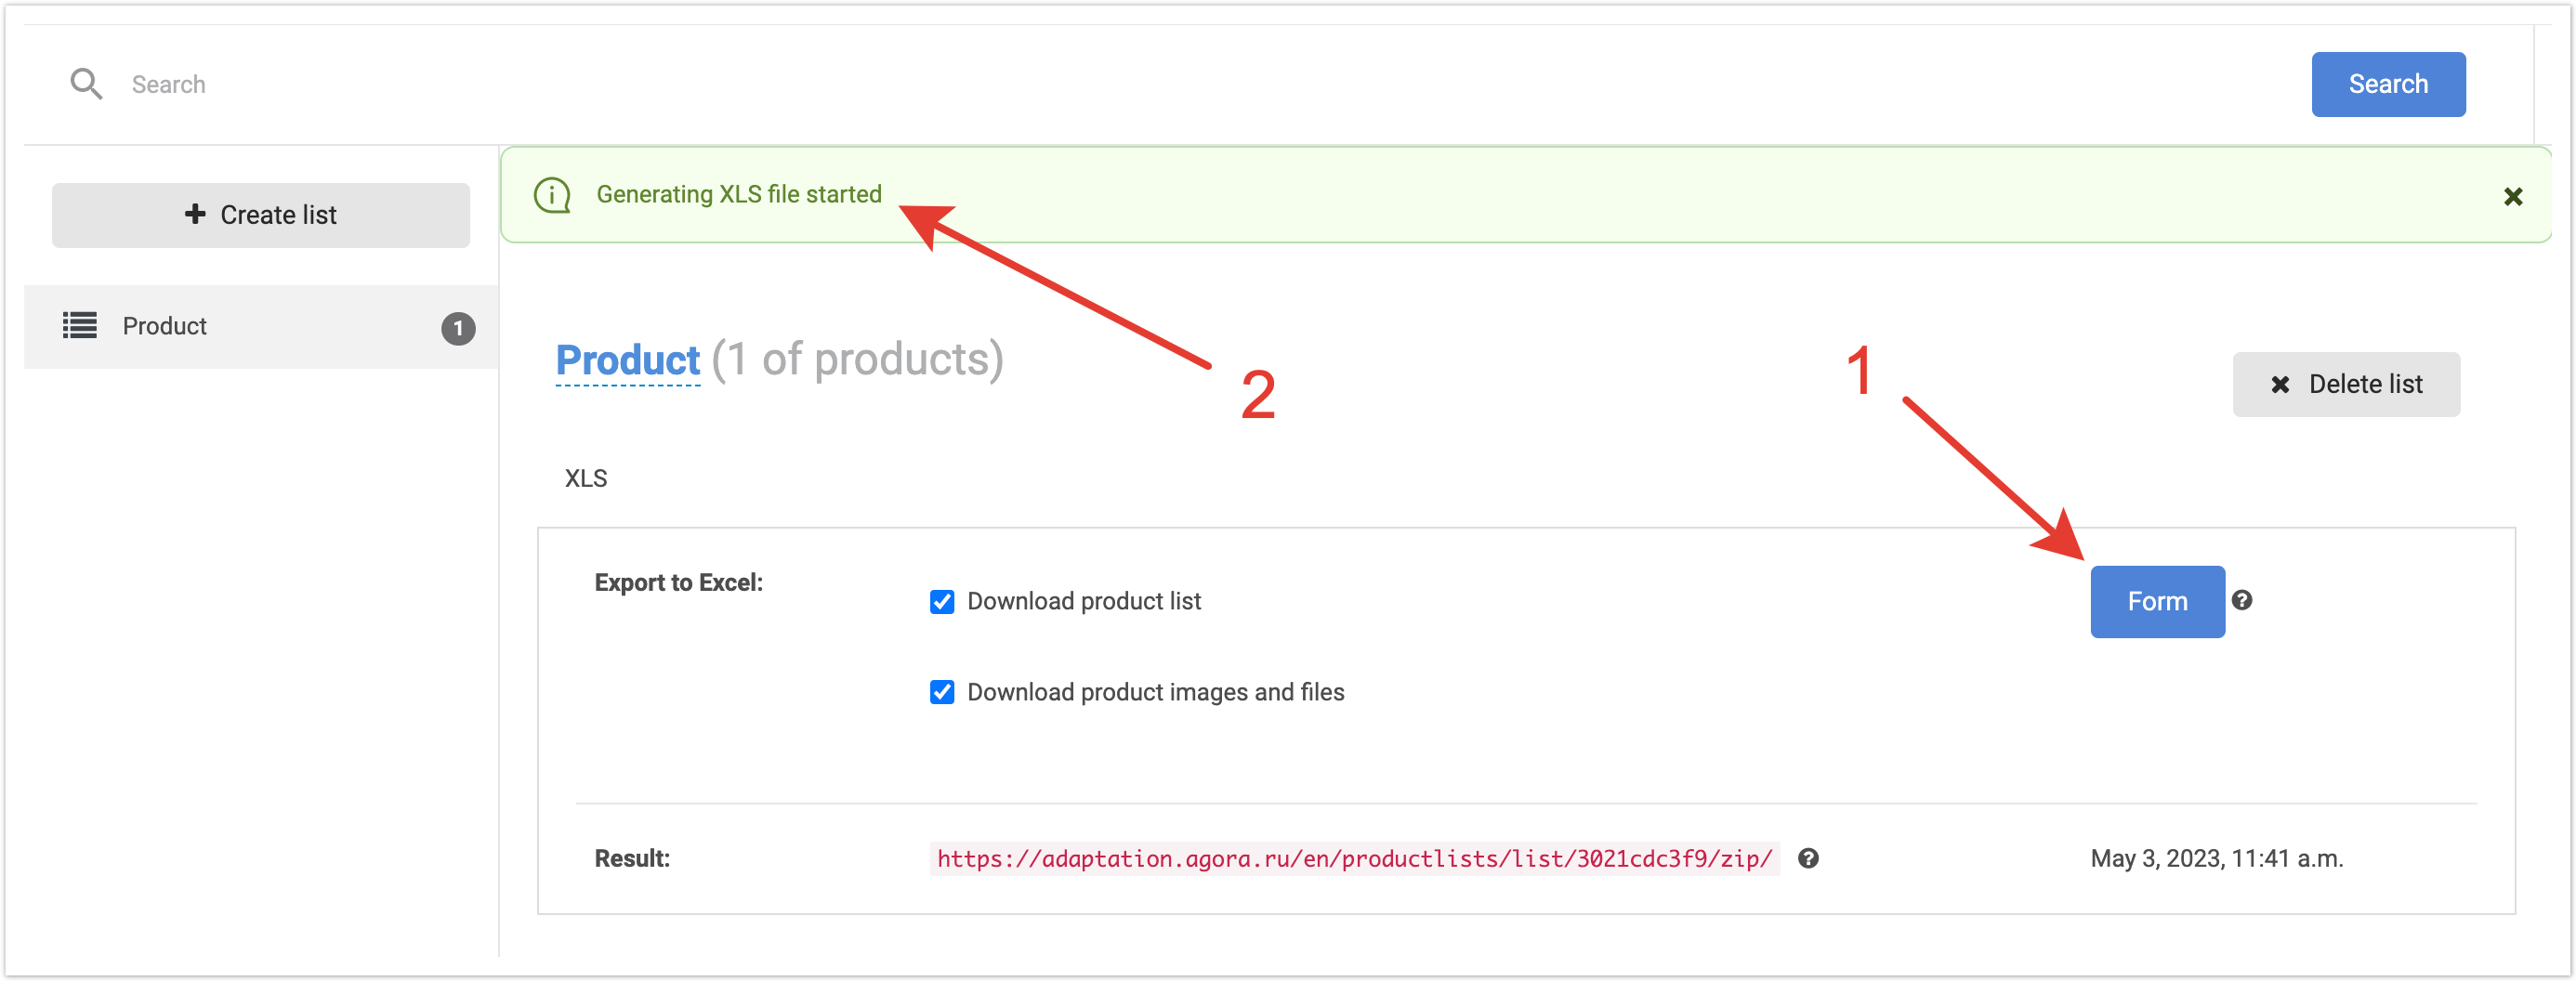
После выбора нужных настроек необходимо нажать на кнопку Сформировать и будет запущено формирование файла.
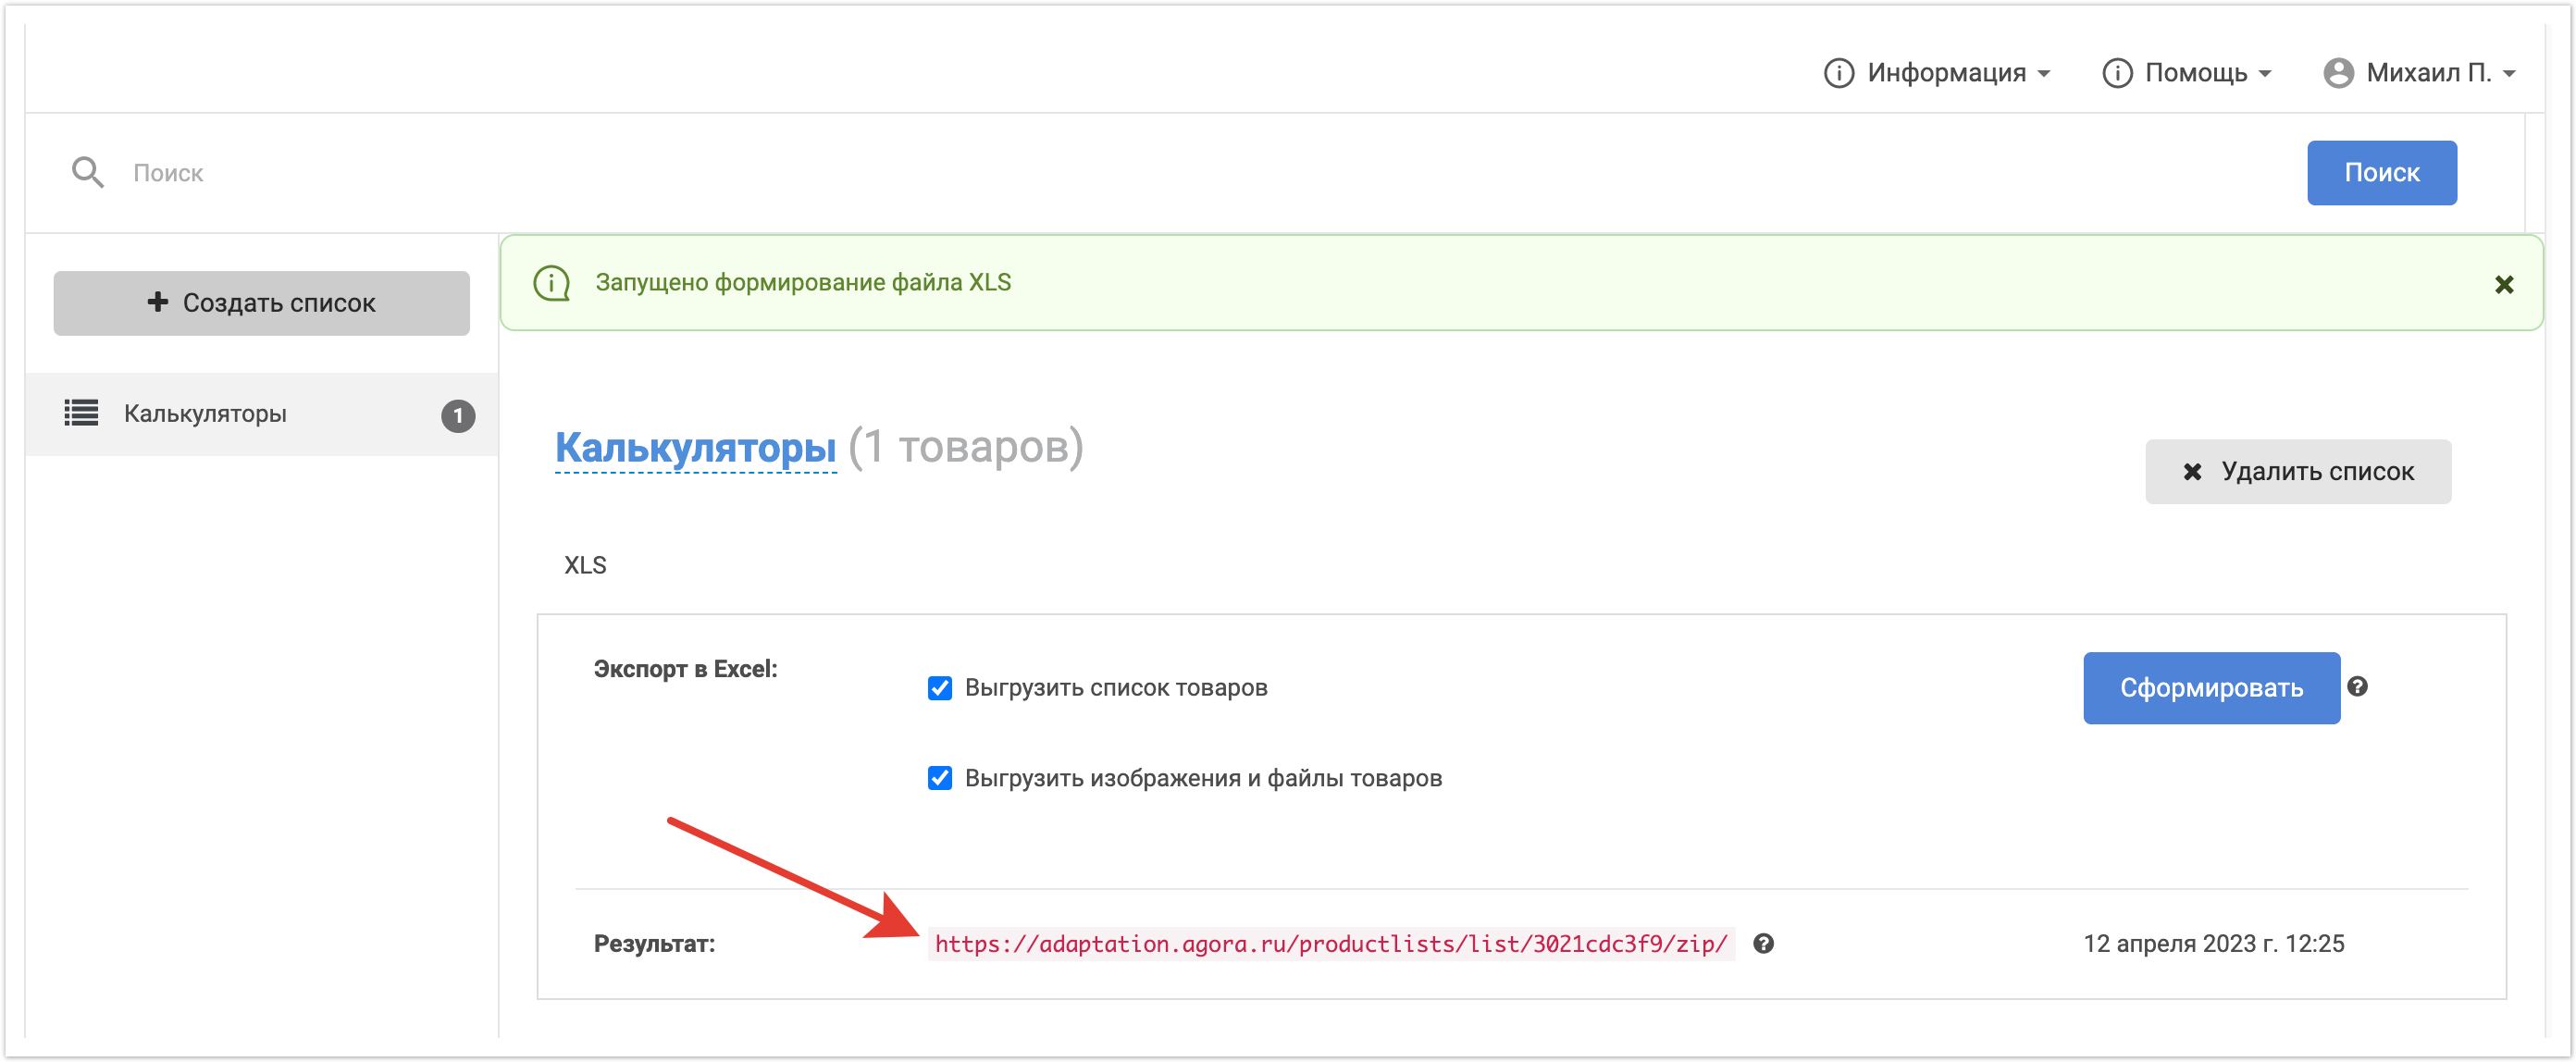
После завершения процесса формирования файла появится ссылка, по которой его можно будет скачать.
При клике на ссылку, архив будет сохранен на локальную машину. Распаковав файл пользователь получит:
Экспорт отчета о качестве работы бренд-менеджераОтветственный менеджер имеет возможность выгрузить отчет о качестве работы своих подчиненных (Бренд-менеджеров). Для выгрузки отчета Ответственный менеджер может авторизоваться в личном кабинете на платформе и перейти в раздел Мой Каталог.
Далее, воспользовавшись инструментами поиска, он может сформировать список товаров, по которым он хочет посмотреть отчет. Например, можно отфильтровать товары по статусу Ожидает модерации.
C помощью чек-бокса Выбрать все и массового действия Экспорт товаров можно добавить товары к существующему списку экспорта, если он ранее создавался, или создать новый список.
Далее необходимо перейти в раздел Экспорт и выбрать нужный список.
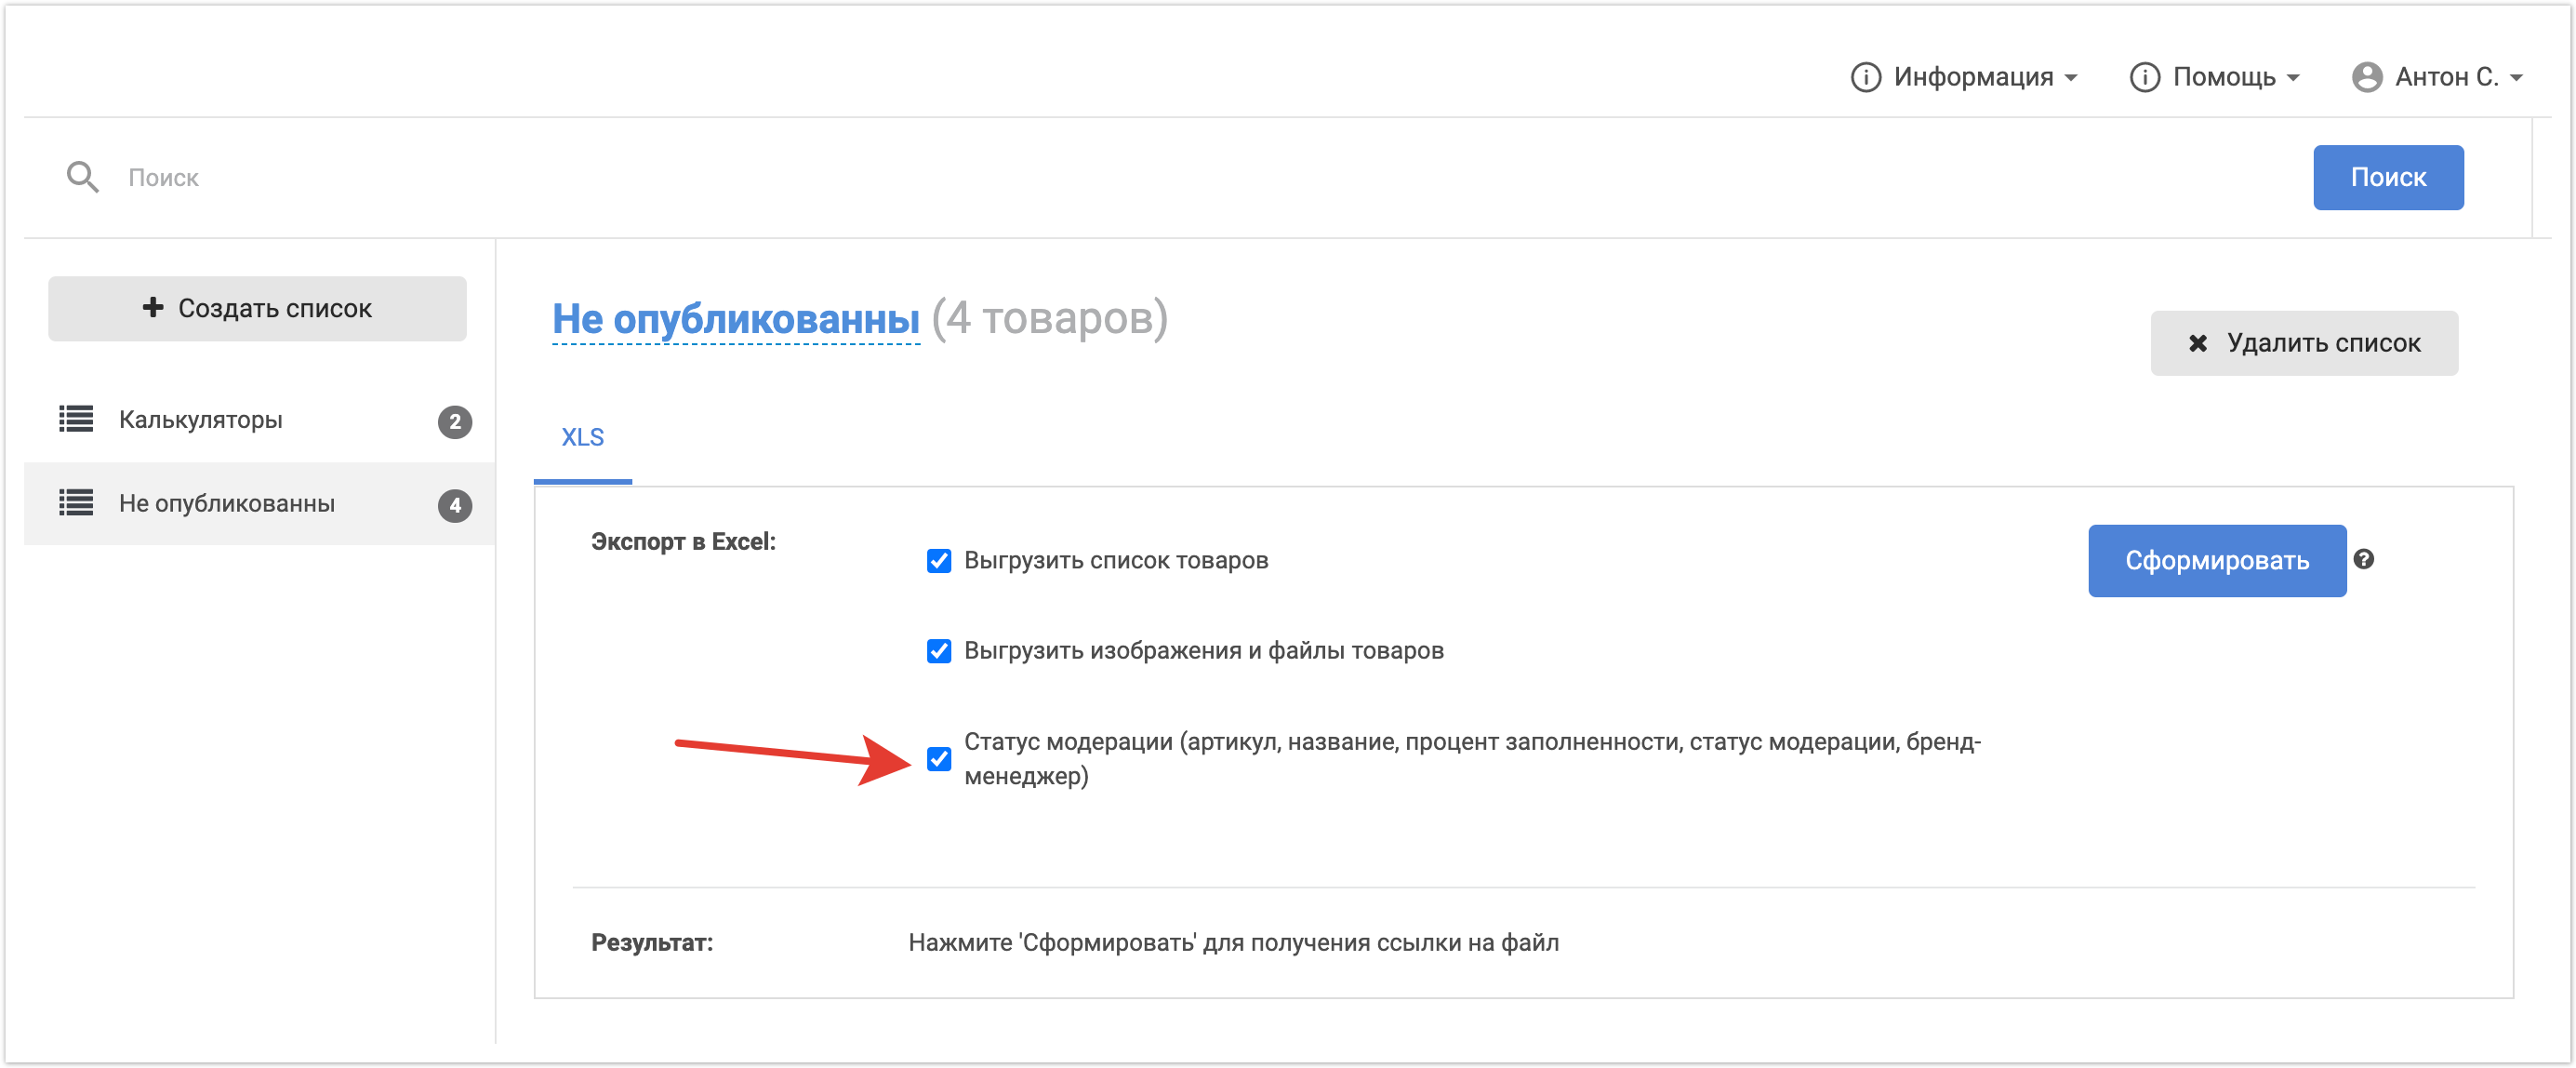
На открывшейся странице будет доступна дополнительная настройка Статус модерации. При ее включении руководитель получит в файле информацию об артикуле, наименовании, проценте заполненности, статусе модерации товара и бренд-менеджере, ответственном за этот товар.
Для формирования файла экспорта, необходимо кликнуть по кнопке Сформировать. Далее система запустит формирование файла, и после завершения его формирования, будет доступна ссылка для скачивания архива с данными. Таким образом, Ответственный менеджер может в любое удобное время проверить качество работы своих подчиненных, сформировав отчет в своем личном кабинете.
|


| Sv translation | |||||||||||||||||||||||||||||||||||
|---|---|---|---|---|---|---|---|---|---|---|---|---|---|---|---|---|---|---|---|---|---|---|---|---|---|---|---|---|---|---|---|---|---|---|---|
| |||||||||||||||||||||||||||||||||||
Product moderation functionality is enabled through the Portal Settings in the admin panel.
You need to find the setting Turn on product moderation on the portal and activate it. Next, in the Field in the product setting, you need to select the fields, when changed, the product will be sent for re-moderation. To select multiple fields, hold down the CTRL (or Command on Mac) key. Re-moderation is a re-check of a product previously published in the catalog when important data on it changes. Save your changes for the settings to take effect.
Role model of users participating in product moderationThere are several user roles on the platform that are involved in the PIM system. Consider the features of each of the roles, and what tasks they solve. The platform administrator is the client_amin user who has access to the platform's administrative panel. This user can administer the product moderation status model, adjust the available catalog sorting options, set the weight of product fields, and change any other settings that are set through the admin panel. Responsible manager (Marketer) is a user for the head of the content department. He has the following rights:
A brand manager is a role for an employee of the content department who performs direct verification and enrichment of the product card with the necessary data for publication in the buyer's catalog. A user with this role has the following rights:
Adding and configuring new system usersThe roles described above are created automatically on the platform. But to work with them, you need to create a user. To do this, in the administrative panel, click on the Add button in the Users section.
Or go to the Users section, and then click the Add User button.
A page will open where you need to fill in the required fields. To register, it is enough to set a username and password, as well as check the verification box if it is used on the project. It is best to use an email address as the username.
Next, you need to give the user a set of rights for his role. To do this, go to the Groups section.
Then select the desired group. Consider the example of the Responsible Manager. For the Brand Manager, the algorithm of actions will be similar.
On the page that opens, in the Users field, you need to find the previously created user who should receive this role. Use the right arrow to move it to the selected users column.
Next, you need to Save changes.
After that, you need to associate the manager with the supplier. To do this, go to the Users section. Next, click on the username of the user we are setting up.
On the page that opens, in the Supplier field, you need to specify the Platform Supplier and then Save changes.
After that, the user will have buttons to go to the supplier profile and to the marketer or brand manager profile. Click on the Marketer Profile button.
Next, in the Suppliers with an accessible catalog field, move the supplier to the right column using the right arrow. Setting up the Responsible Manager ends here. After saving the changes, he can start working on the platform.
After filling, click the Save button.
Now the platform administrator can provide the employee with his account information and the user will be able to work on the platform. For security reasons, the manager can set his own password for his account, for this you can use the password recovery form. Importing products to the platform
Then you will need to set up the fields for importing goods. More details about downloading a file are described on the page. For correct import, a unique identifier must be specified, for example, an article, and the Supplier Category, Name, Prices and Remains must also be specified. The name of the price and stock type is taken from the first line of the file, which assumes column headings. In addition to the standard settings, the responsible manager can also specify in which columns the Master data will be indicated. Master data is the data that will not be editable by brand managers. For example, you can select the article and product name as master data.
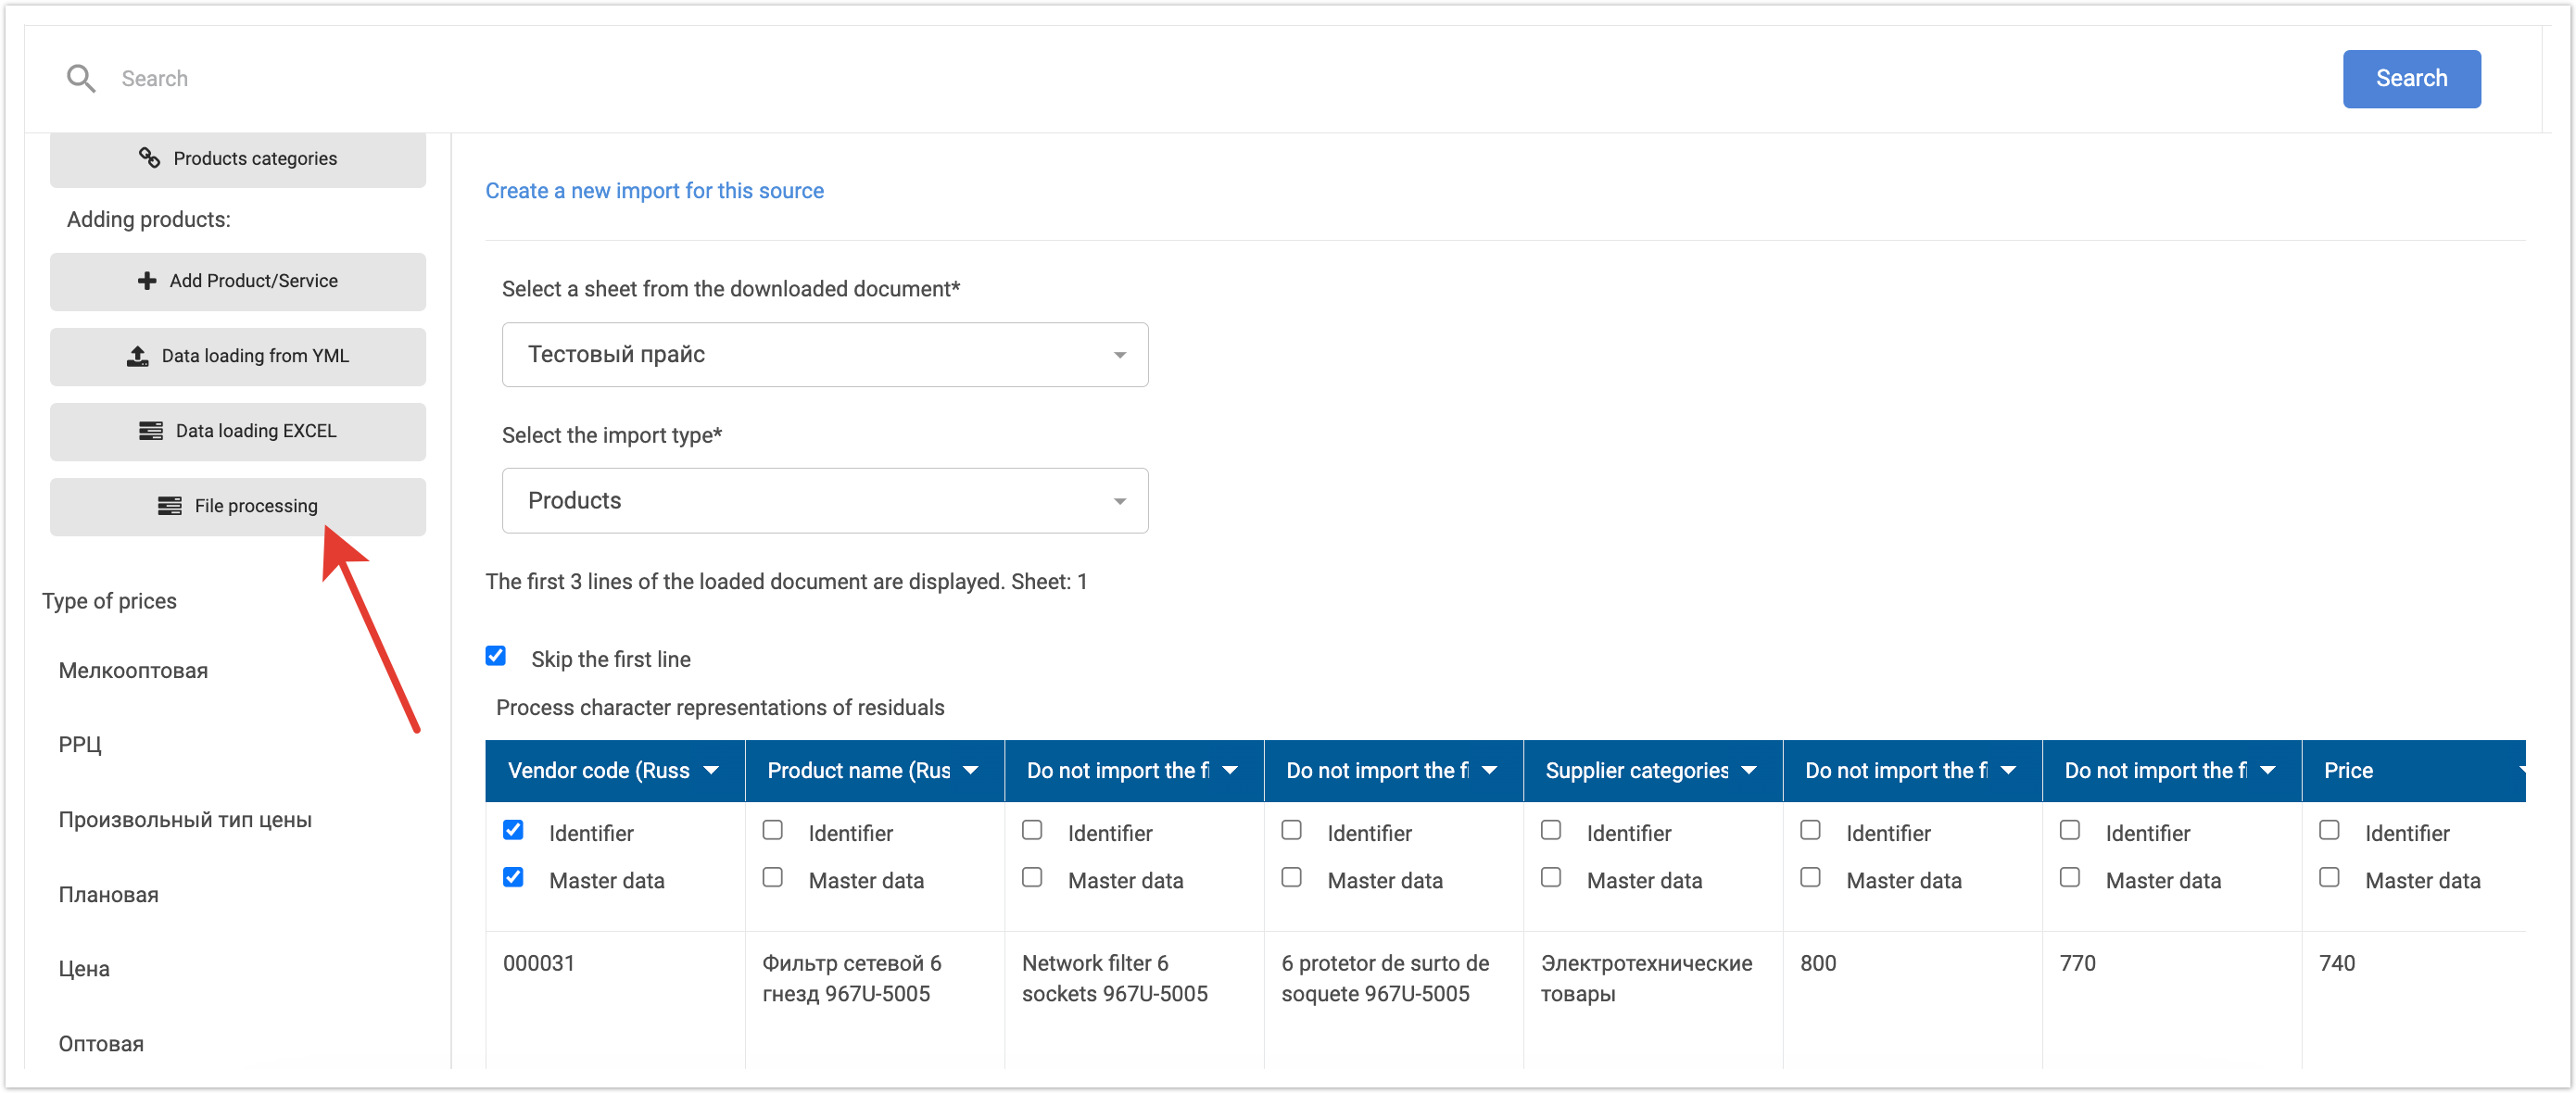
After filling in all the import parameters, you need to set the Skip the first line checkbox so that the row with column headers is not processed. Next, you can start processing the file. The file processing status can be seen in the File processing section. If the file has been processed successfully, the product data will be written to the platform. After that, they will become available to brand managers for editing and moderation.
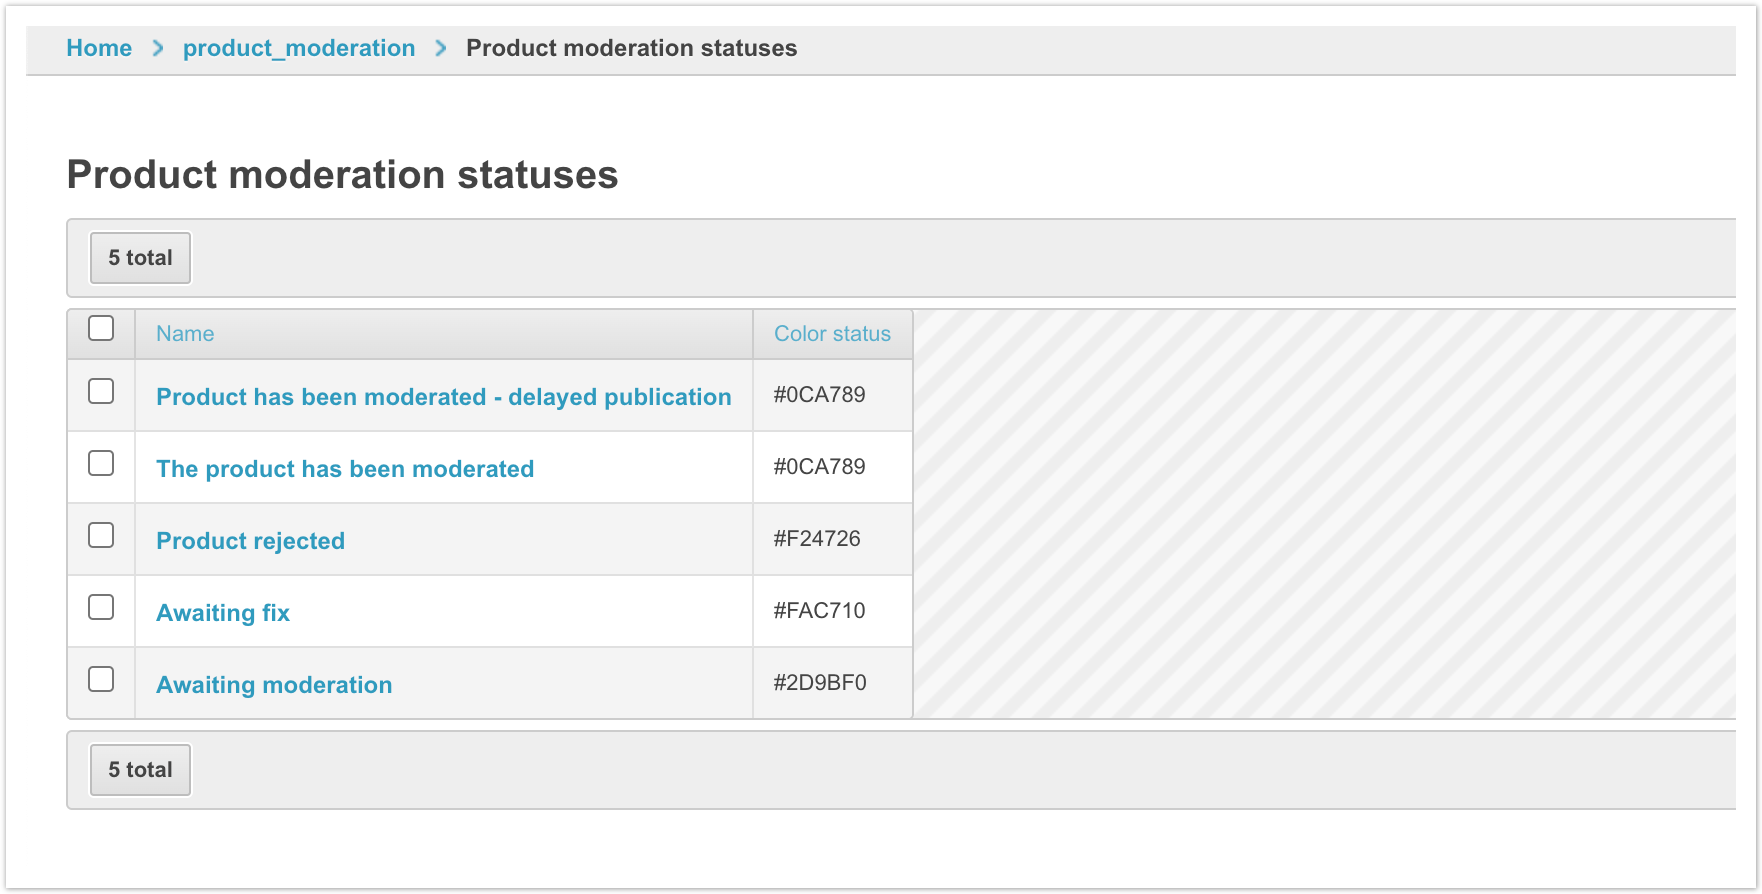
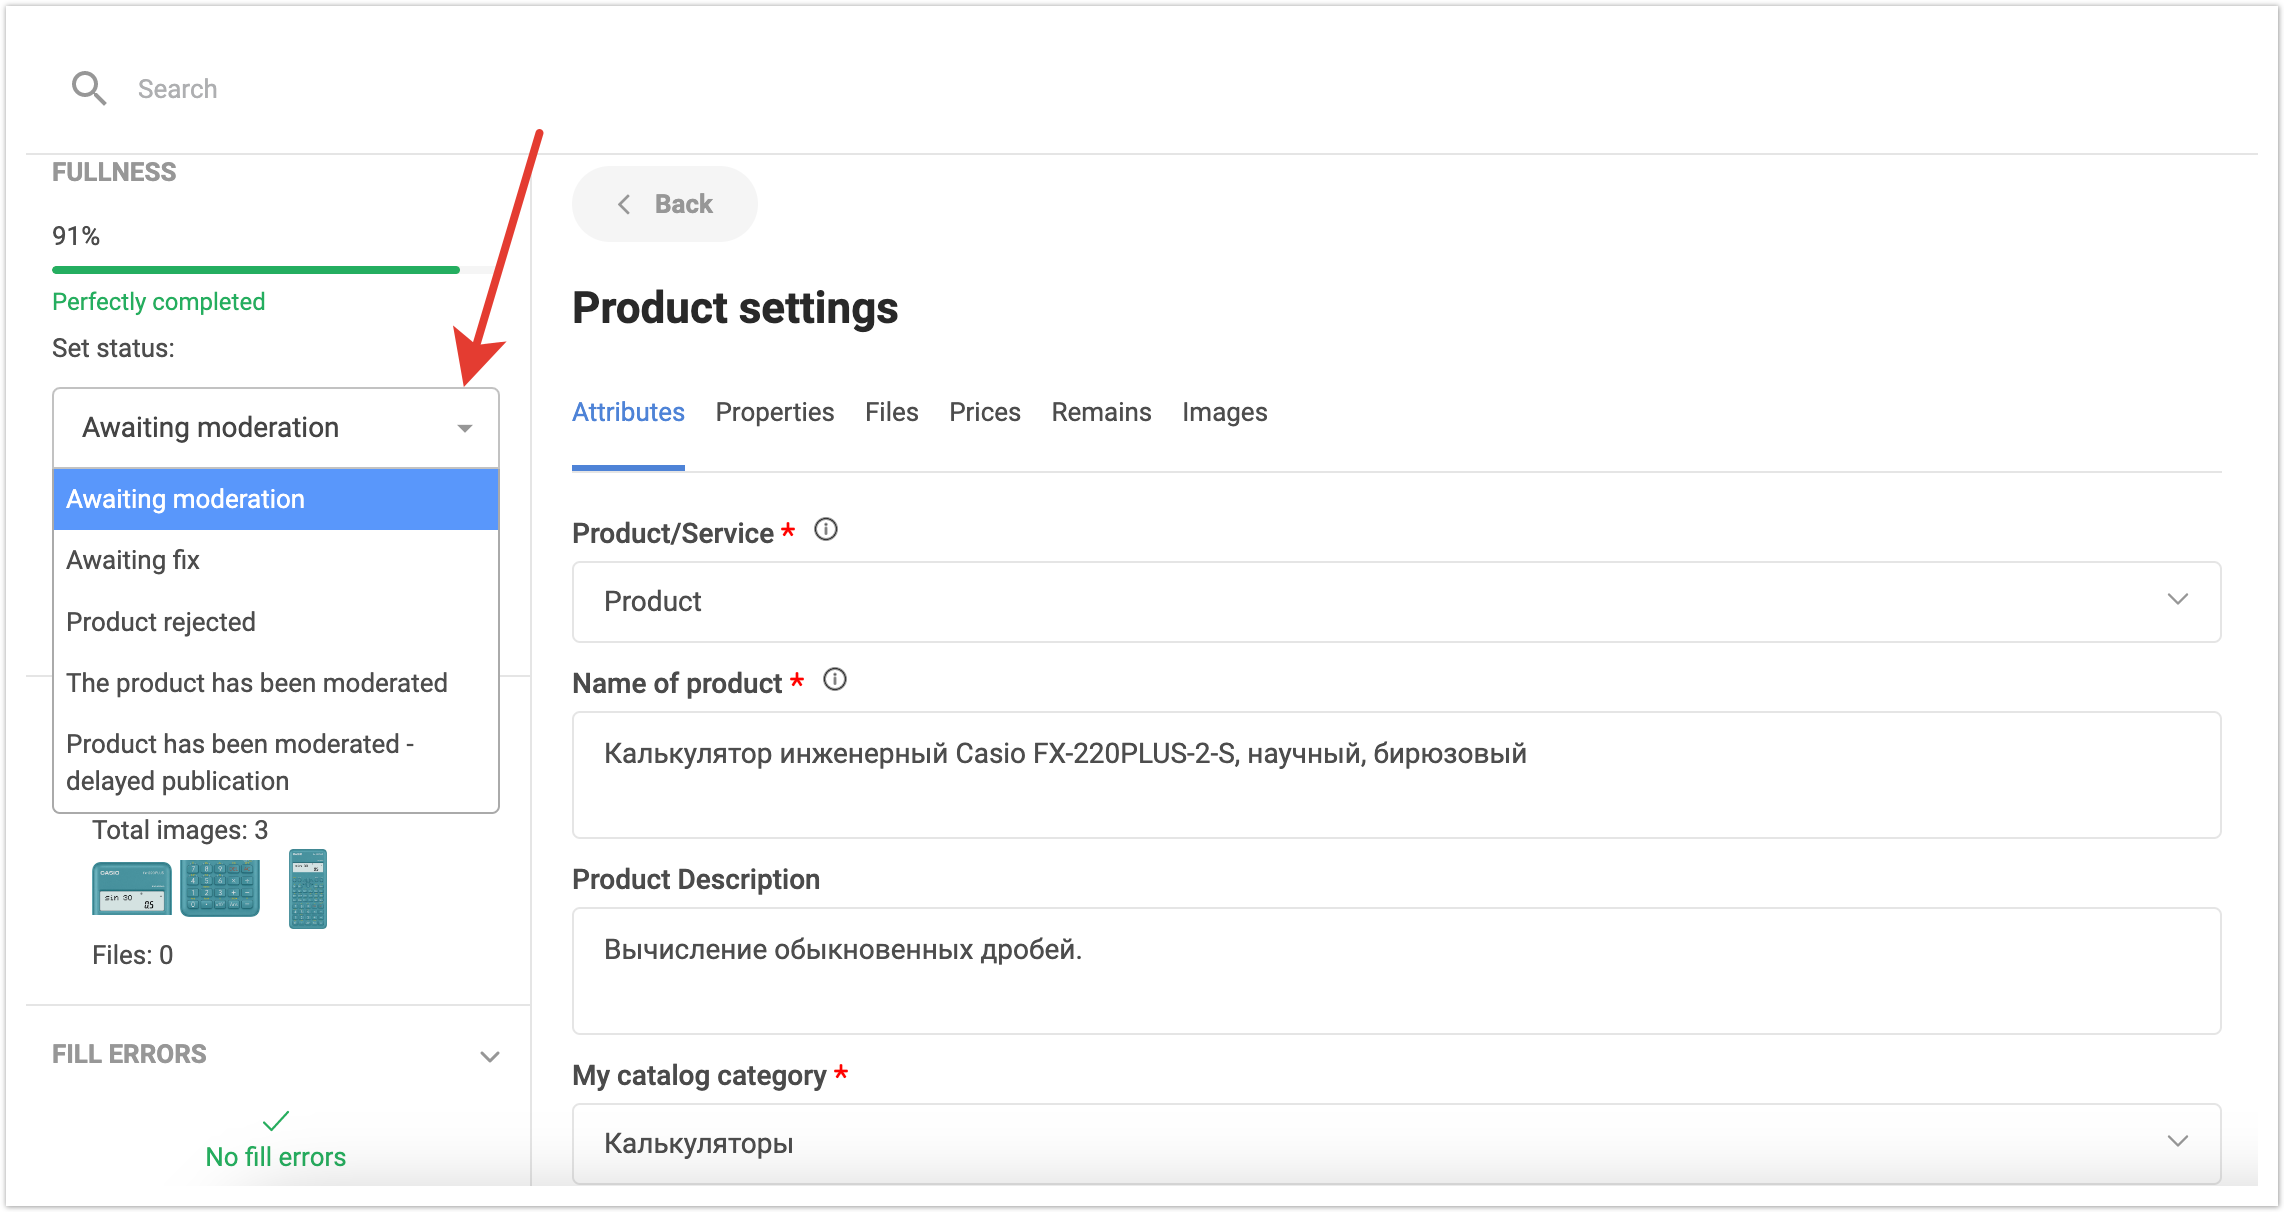
Products moderationSetting up moderation statusesIn the PIM product, a status model has been developed for conducting the moderation process and publishing products to the end user of the platform. Product moderation statuses are configured in the Product moderation statuses section of the administrative panel.
The section contains all product moderation statuses, the settings of which the platform administrator can manage.
Awaiting moderation - the product has been uploaded to the site and fell into the manager's area of responsibility. This product is not displayed to customers because it has not yet been verified. Awaiting fix - this status is assigned to the product if the brand manager has taken it to work, but there is not enough data for publication. For example, a brand manager may not have enough images, and he requests them from another employee of the company, or clarifies some details about the values of characteristics or details of the description. In this status, the product is not published in the open catalog and is not available to customers. Product rejected - the product has been uploaded to the platform, but under no circumstances can it be verified and published in the open catalog. For example, this is a product that does not fit the theme of the site, or an erroneously uploaded product. In this case, it can be assigned this status. The product will be saved in the database, but it will not be available in the customer catalog. The product has been moderated - this status is assigned to the product when the responsible employee has checked and edited the product card and made sure that all the parameters of the item and the content meet the requirements of the company. In this case, the product is given this status and it becomes available to buyers. The buyer can find a product in the catalog using the search tools, view the product card, compare it, add it to favorites, buy and add it to the export file to upload content. The product has been moderated - delayed publication - this status is used if it is required to postpone the publication of the product for a specific day and time. For example, a company introduces a new product to the market. In this case, the products can be imported to the site and checked in advance. For the product, the date and time are selected when it should be published in the buyers catalog and the product is published automatically at the specified date and time. To change status settings, click on its name.
The page that opens will display the current settings.
You can change the name in Russian and other languages if they are connected. You can also change the status color using the palette or by entering a six-digit color code.
For the changes to take effect, Save the changes.
If you need to restore the original settings of product moderation statuses, you need to select Products sorting by default in the bulk operations panel. It is not necessary to select individual statuses with checkboxes.
Setting the weights of product fieldsTo visually see the percentage of product card filling, you need to set up Product field weights. Configuration is performed in the admin panel section of the same name.
On the page that opens, there will be a list of product fields for which you can set the weight when calculating the percentage of filling the product card.
Name of the service - the weight coefficient of the product name in the calculation of the percentage of filling. Description - the weight coefficient of the presence of a completed product description in the calculation of the percentage of completeness. Availability of a picture - the coefficient of weight of the presence of an image of a product when calculating the percentage of fullness. File presence - weight coefficient of file presence (Files block) when calculating the percentage of fullness. Tag presence - coefficient of weight of the presence of a tag for a product when calculating the percentage of fullness. Property presence - the weight coefficient of the presence of a property (characteristic) of the product when calculating the percentage of occupancy. Presence of a balance - the weight coefficient of the presence of residues for the product when calculating the percentage of fullness. Price Availability - the coefficient of weight of availability of prices for the product when calculating the percentage of fullness.
After all the calculations are done and the data on the weights are filled in for all fields, you need to Save the changes.
Setting available sorts in the catalogThe platform administrator can also configure the sorts that will be available to users in their directory.
To do this, go to the Portal Settings section.
Scroll the page to the Products block. In the Sort types field, use the checkboxes to select those that should be available to platform users. After making changes, you need to Save them.
Setting available columns in the catalogPlatform users can personalize the columns that will be displayed in their catalog.
With the help of checkboxes, they can enable and disable the display of certain columns in the catalog.
In addition, using the drag-and-drop functionality, you can change the order of the displayed columns. To do this, you need to hover over the square symbol with dots and drag the column to the desired location.
From the side of the platform administrator, you can configure which columns will be available for selection by platform users. To configure them, you need to go to the admin panel in the Portal settings section.
Scroll down the page to the Catalog block. In the Available columns in the catalog (table) field, you can select which columns will be available for selection by the user when viewing the catalog Table. In the field Enabled by default catalog columns (table), you can select which columns will be displayed by default to the user when the catalog display mode is Table. After making changes, you need to Save them.
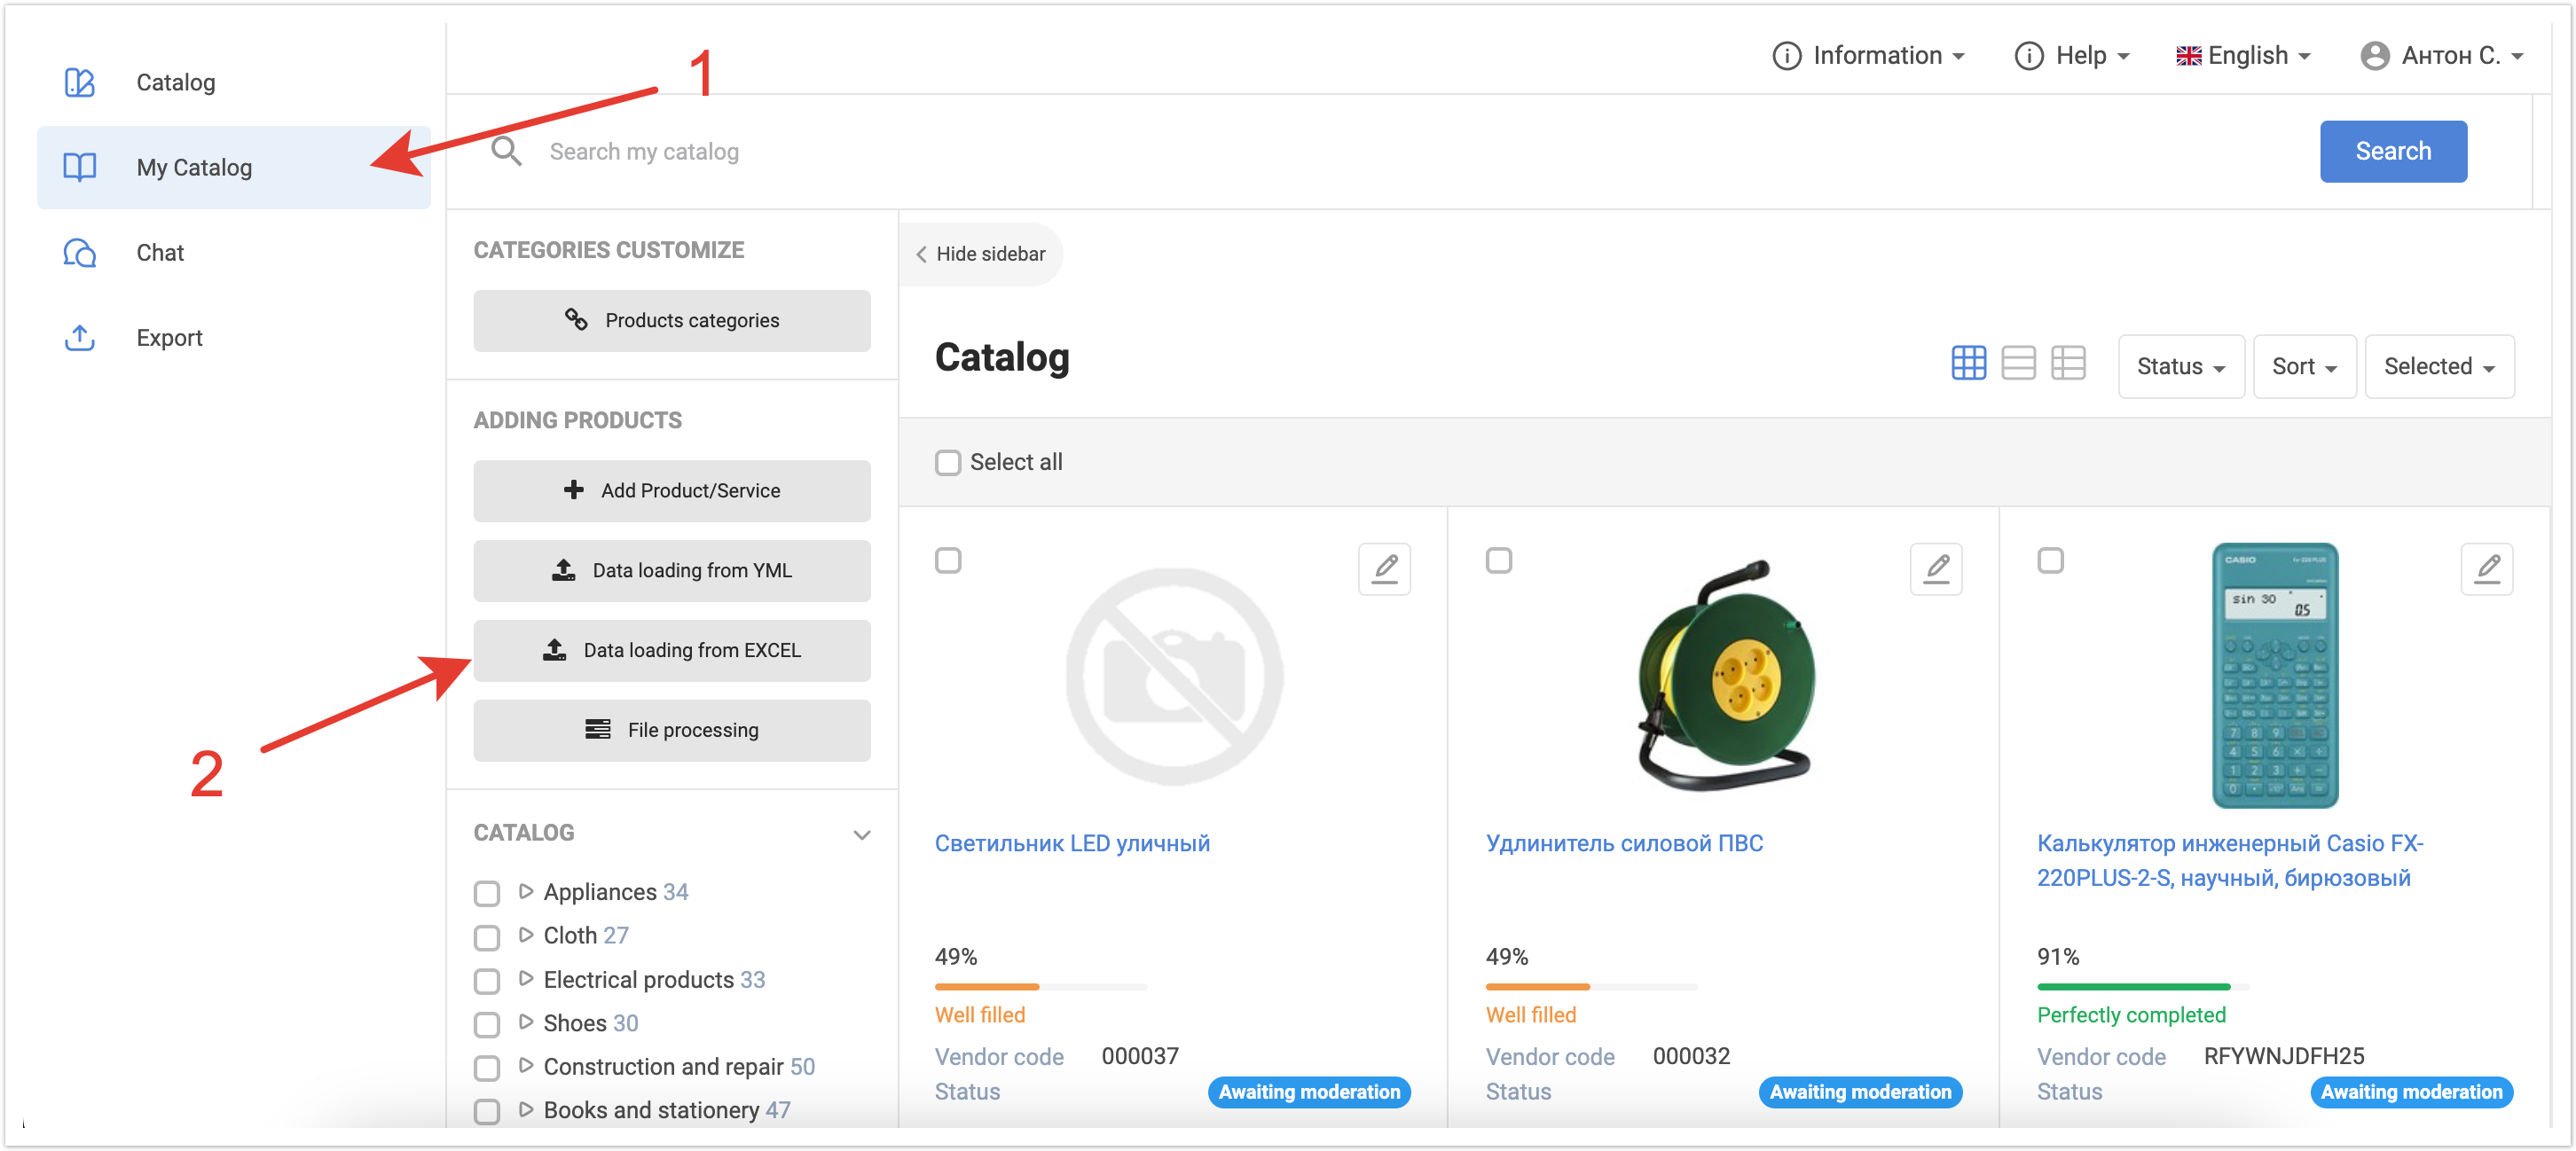
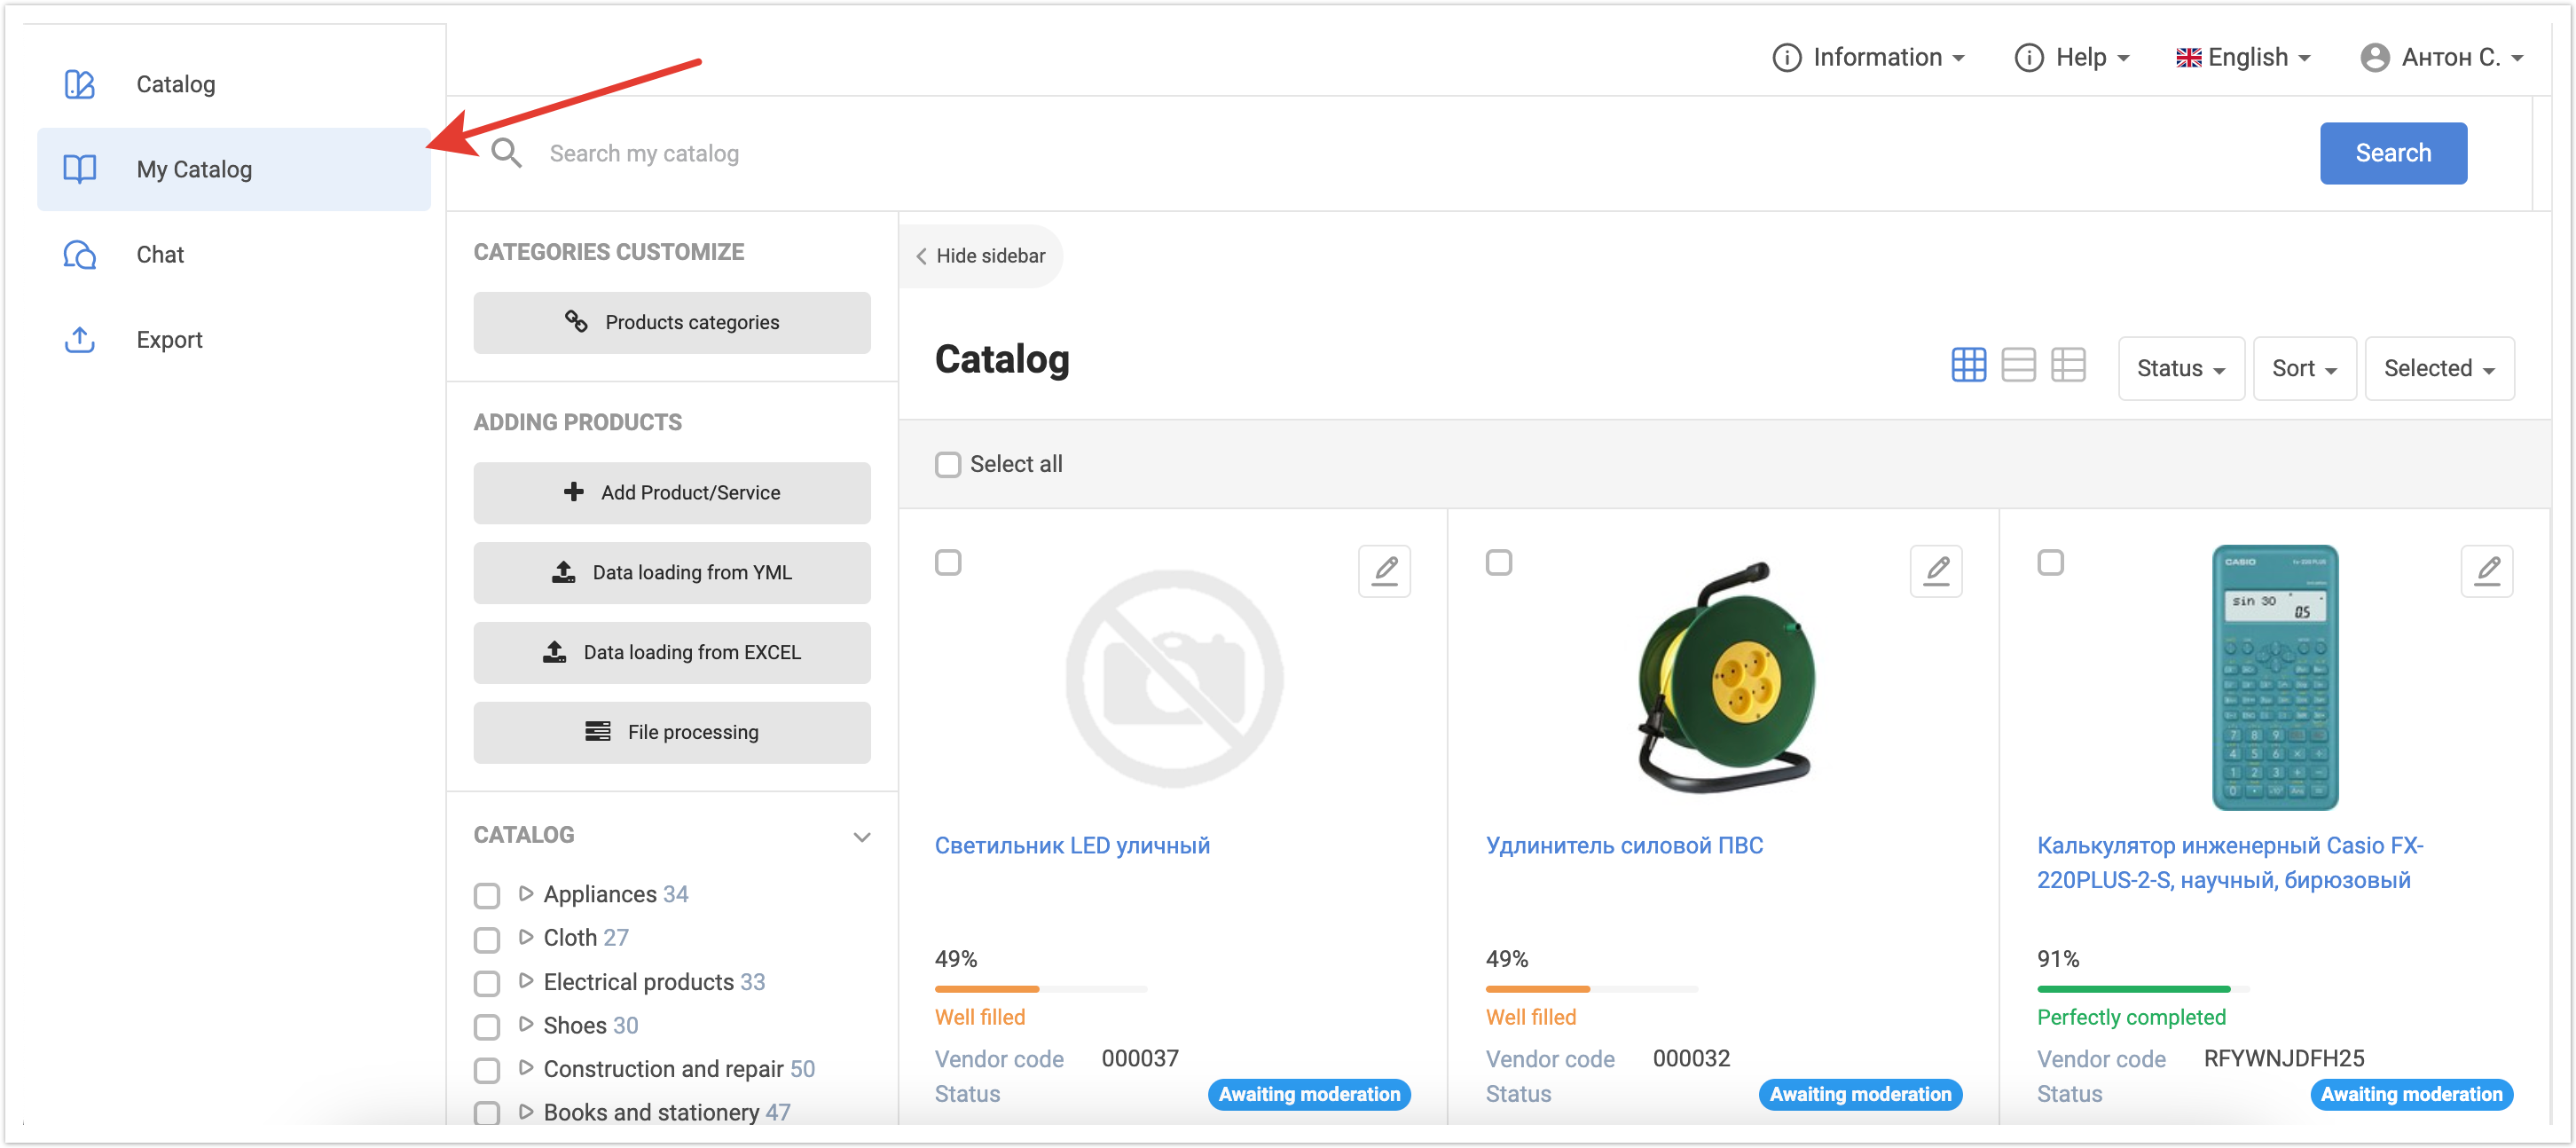
Moderation of products by a brand managerAfter the Responsible Manager has imported products to the platform, the Brand Manager can start moderating them. He logs in to his personal account and goes to the My Catalog tab. The brand manager sees only the list of products that was assigned to him at the user setup stage. Uploaded products are automatically assigned the status Awaiting moderation. You can filter by this status and thus see a list of recently uploaded products that are awaiting review. If necessary, you can find the desired product through a catalog search or filtering by properties.
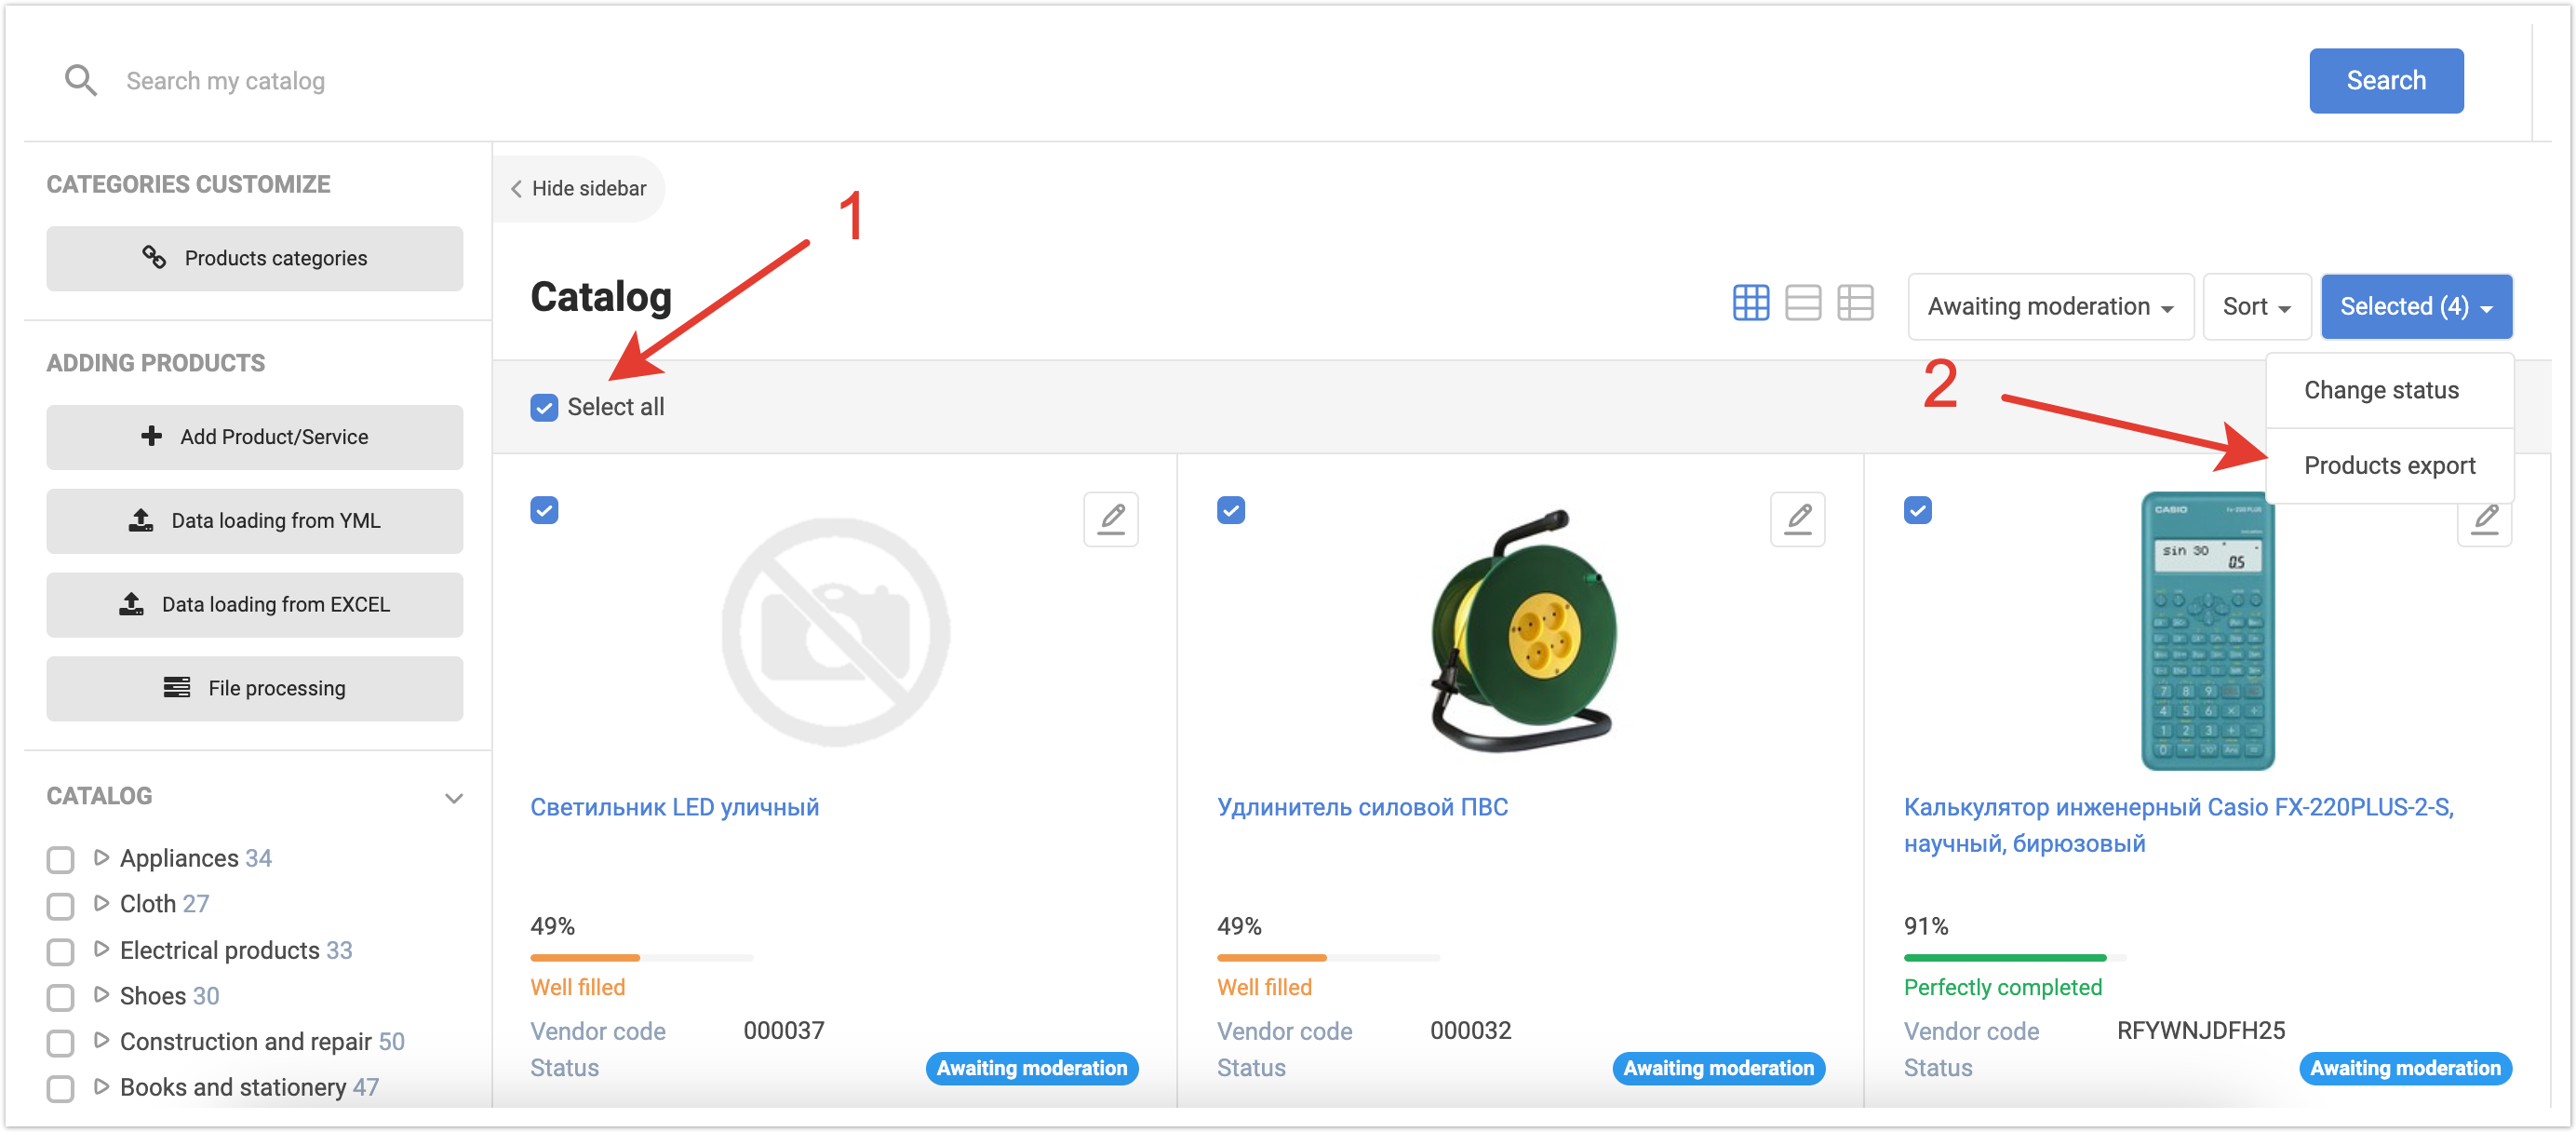
You can moderate a product and change its status using bulk actions or manually for each product. To do this through bulk actions, you need to select products using checkboxes, and then select Change status in the drop-down list. A window will open where you will need to select a status for the selected items. For example, this way you can bulk reject products if they were uploaded by mistake.
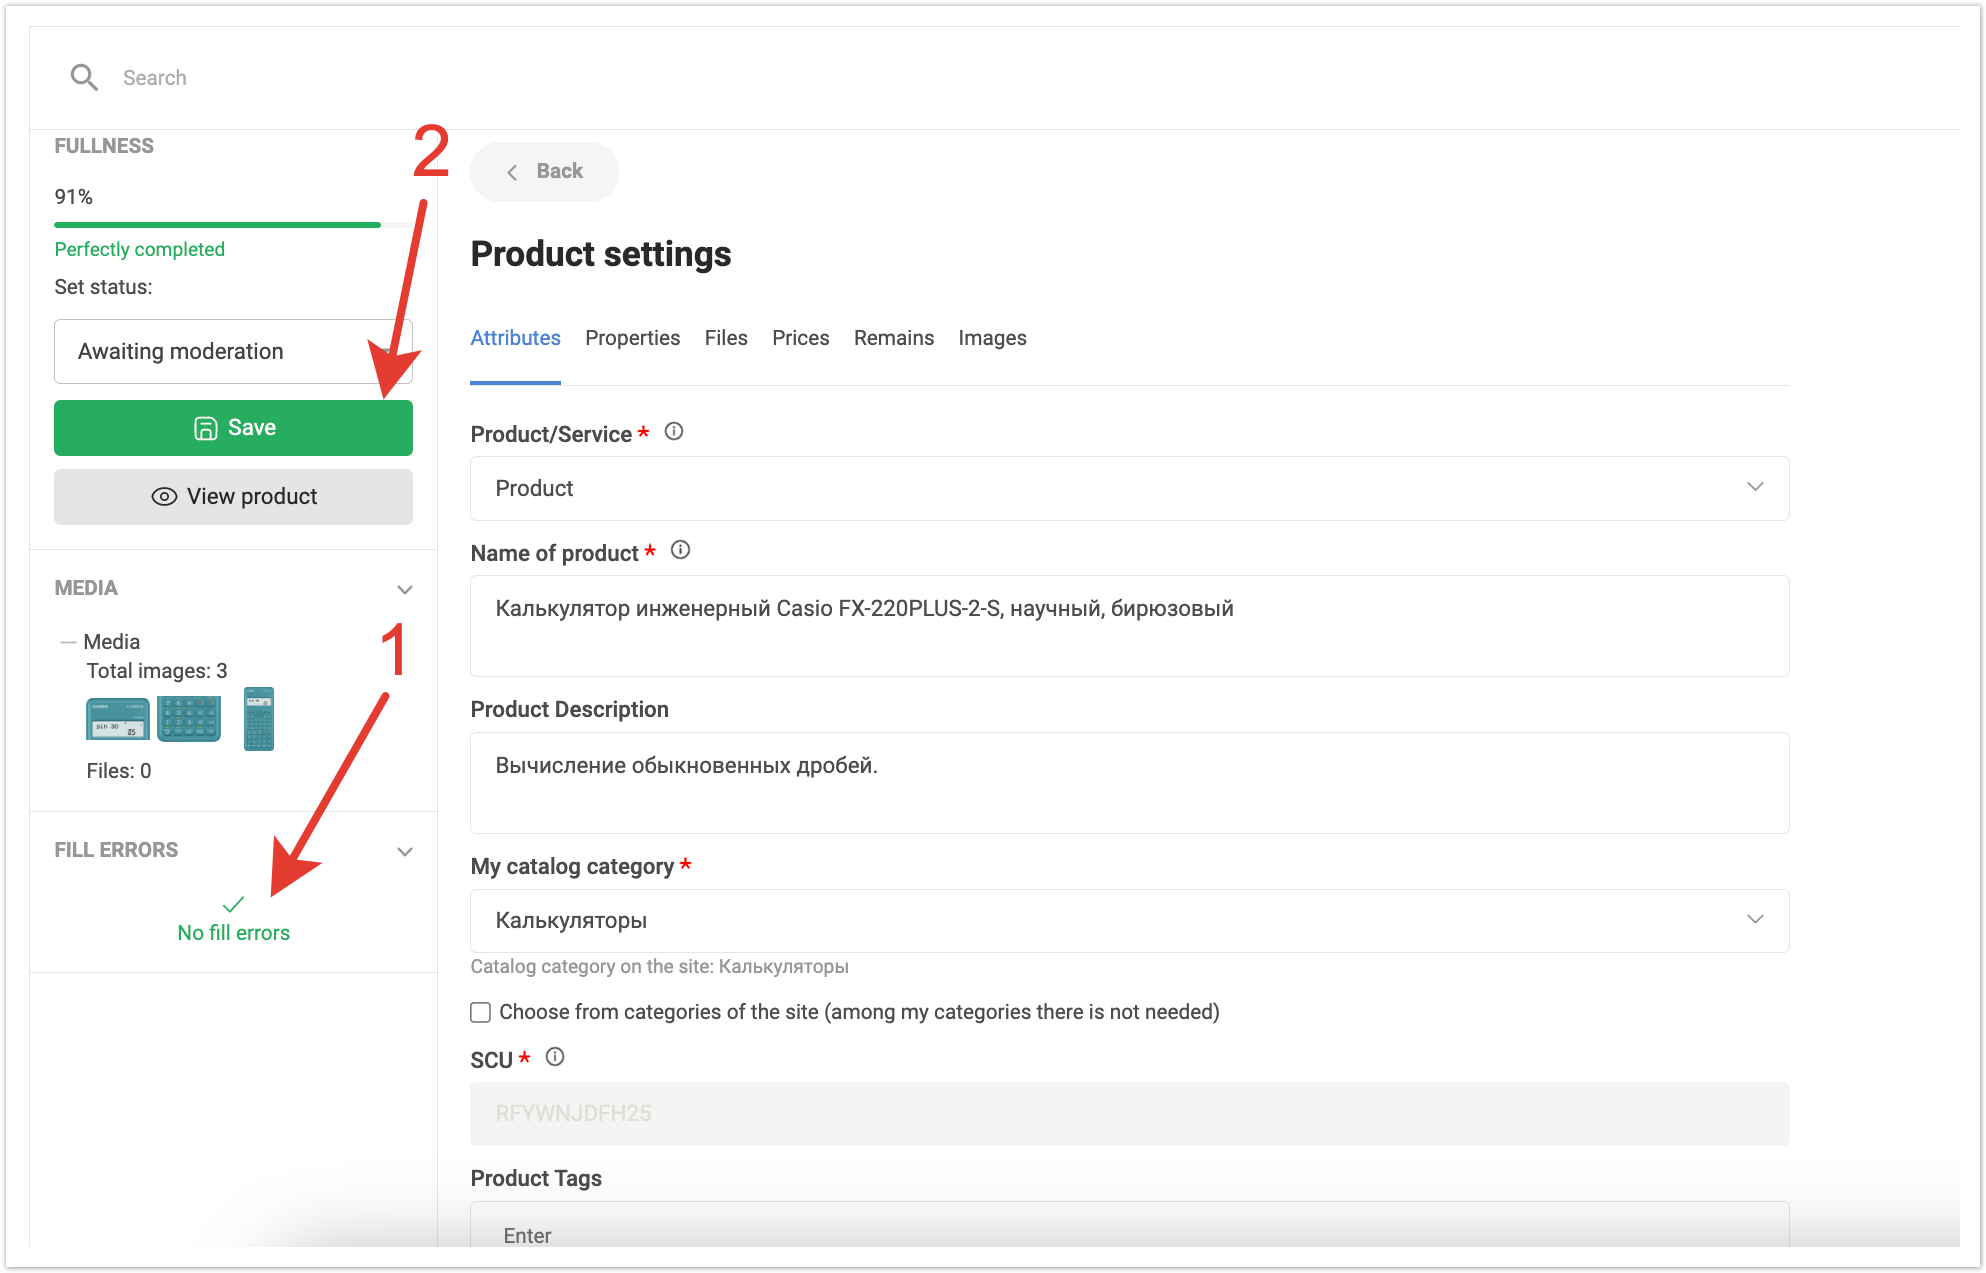
In order to change the status for an item manually, you need to switch to edit mode.
Product editingManual editing of a productProduct editing mode allows the brand manager to make corrections to the product, if necessary, as well as change the moderation status. To do this, click on the edit button.
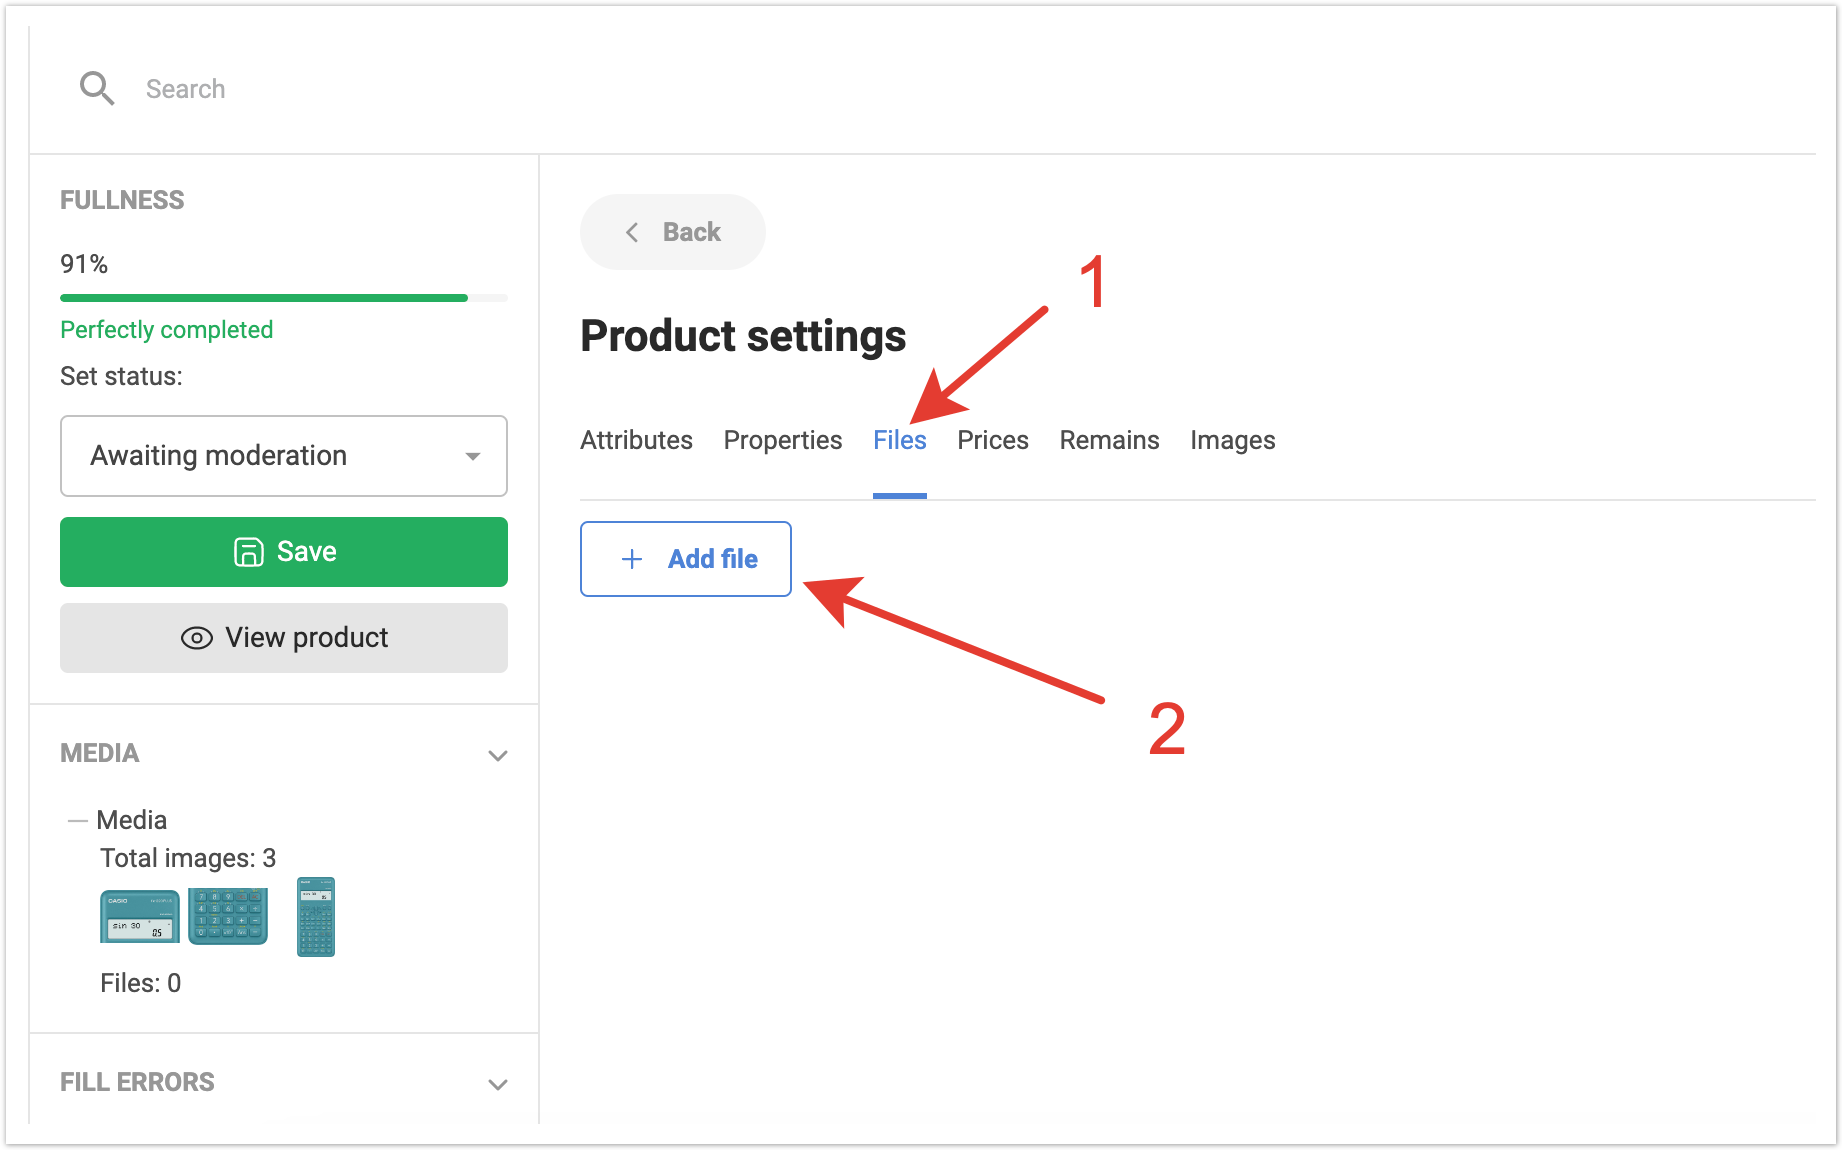
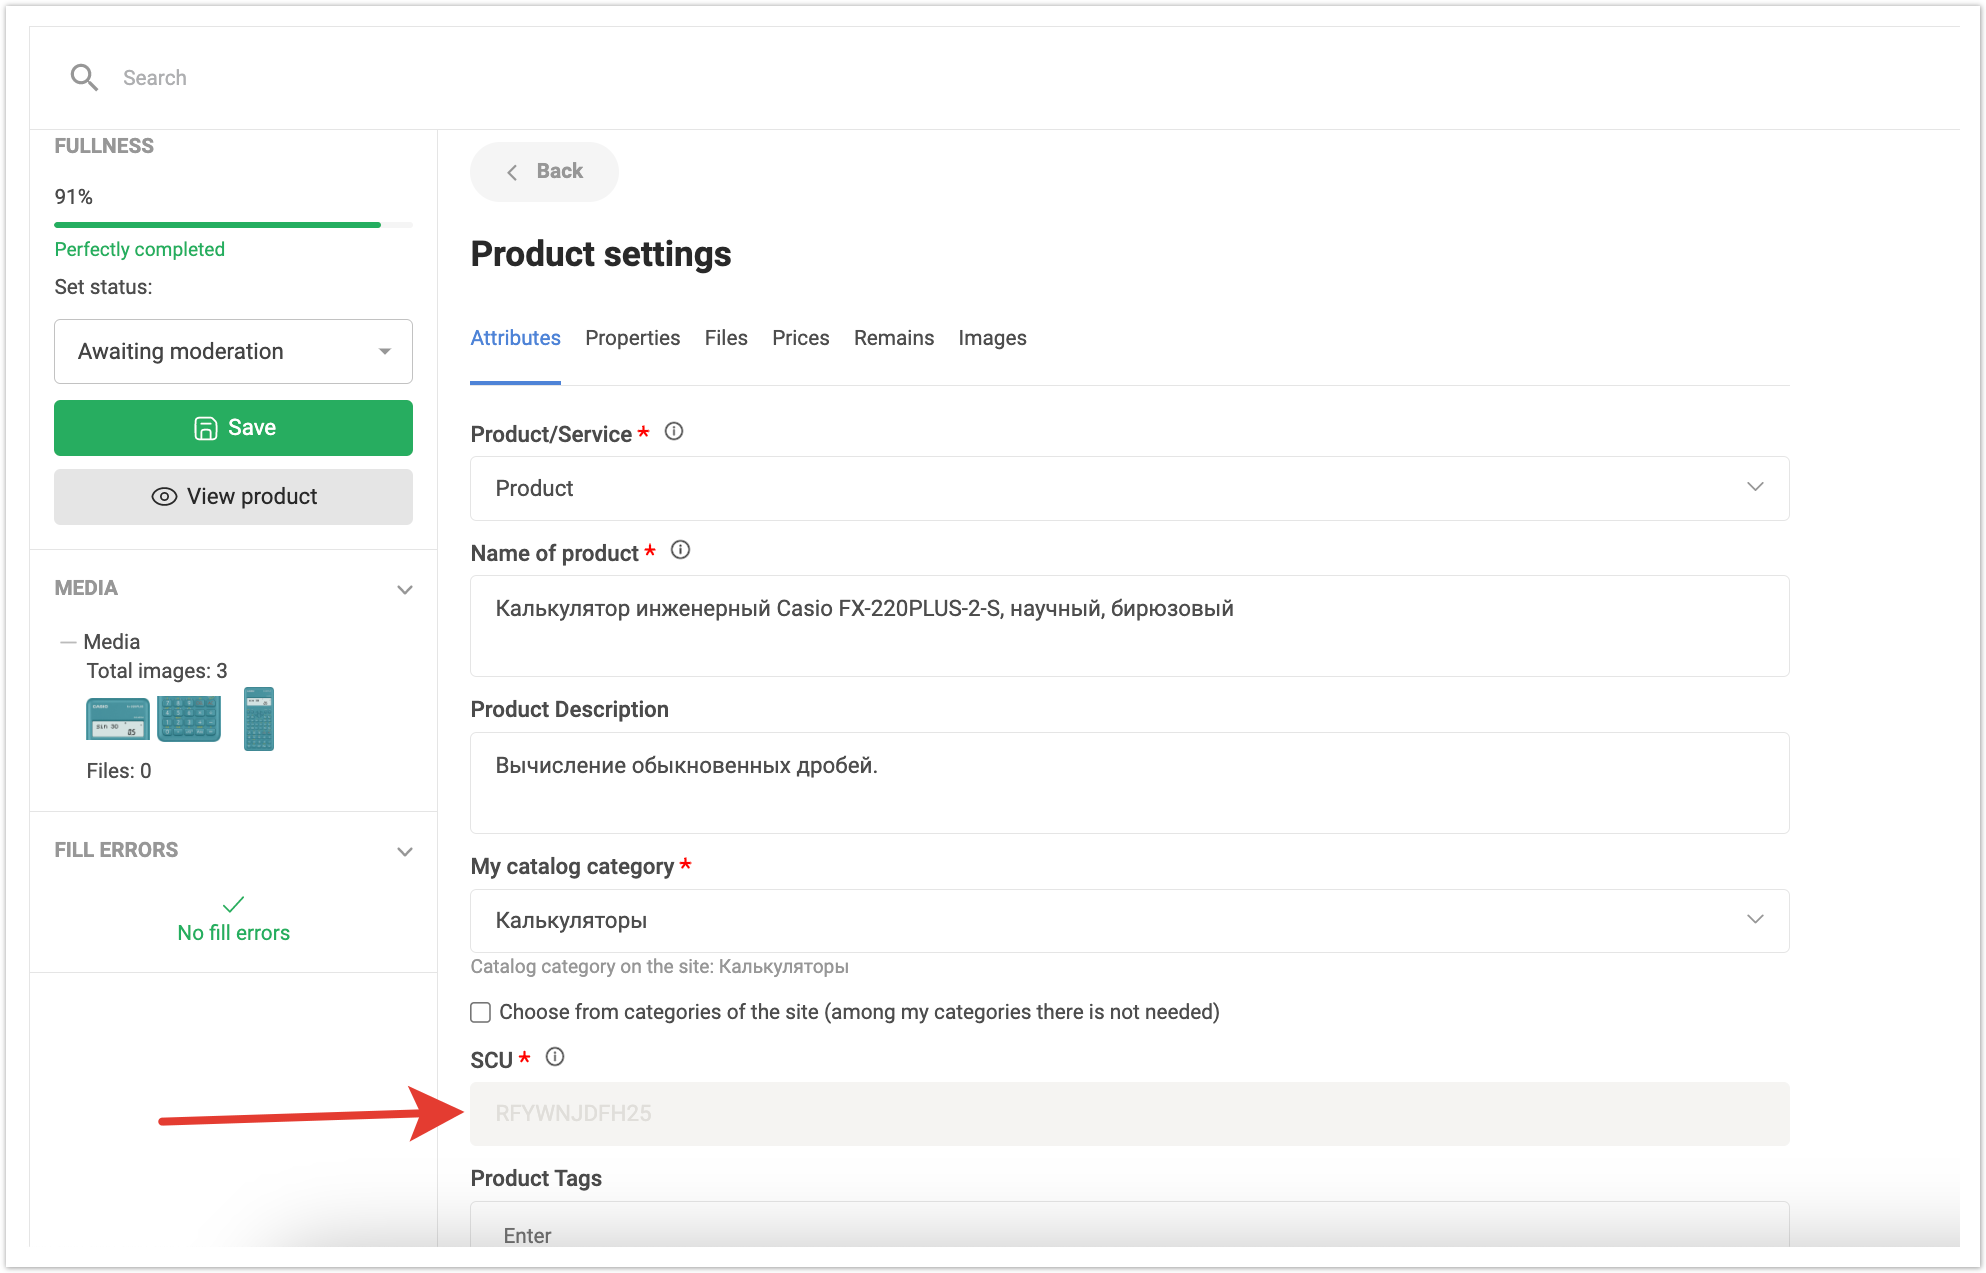
A product card will open, where the percentage of fullness will be visible and it will be possible to correct the necessary data. The data is on several tabs: Attributes, Properties, Files, Prices, Remains, Images.
The Attributes tab contains the following data:
The Properties tab contains all imported properties for a product, as well as their values. In this section, the Brand Manager can change the property of the product or its value using the drop-down list. He can also remove redundant properties if necessary, or add a new property using the Add Property button.
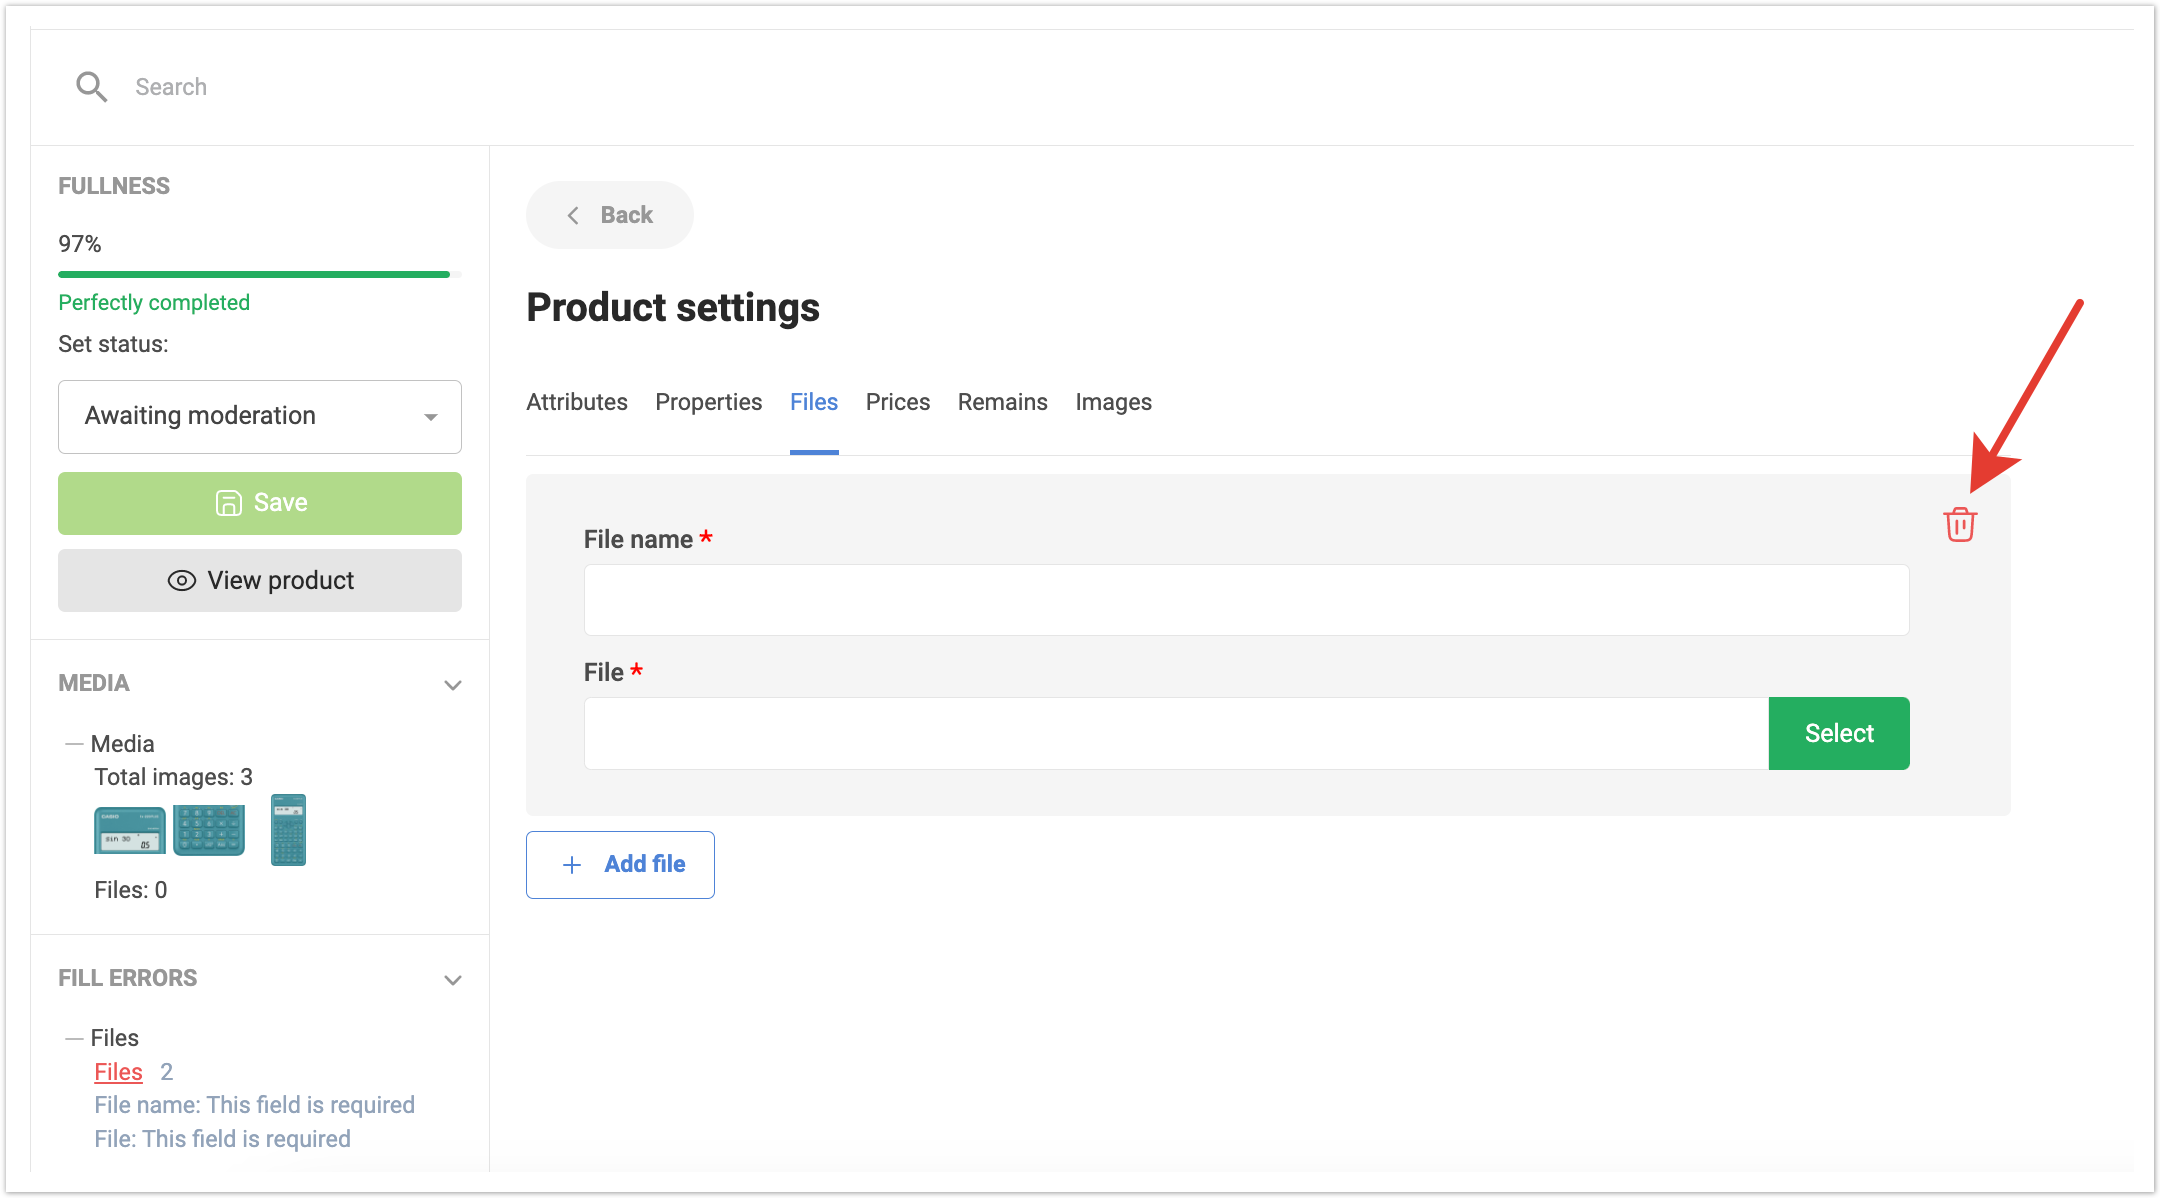
You can also delete a previously uploaded file if it is no longer relevant.
On the Prices tab, you can change the price value for a product. You can also add another price type and its value by clicking the Add price button.
On the Remains tab, you can edit the remnants of goods in a particular warehouse or delete them completely. At the bottom of the page there is also an Add remainder button, which allows you to add the remainder in the new warehouse.
The Images tab contains a list of imported images for the product, and also provides the ability to upload images or delete outdated ones.
If a product has several images, it will be possible to set the order in which images are displayed in the product card using the drag-n-drop functionality.
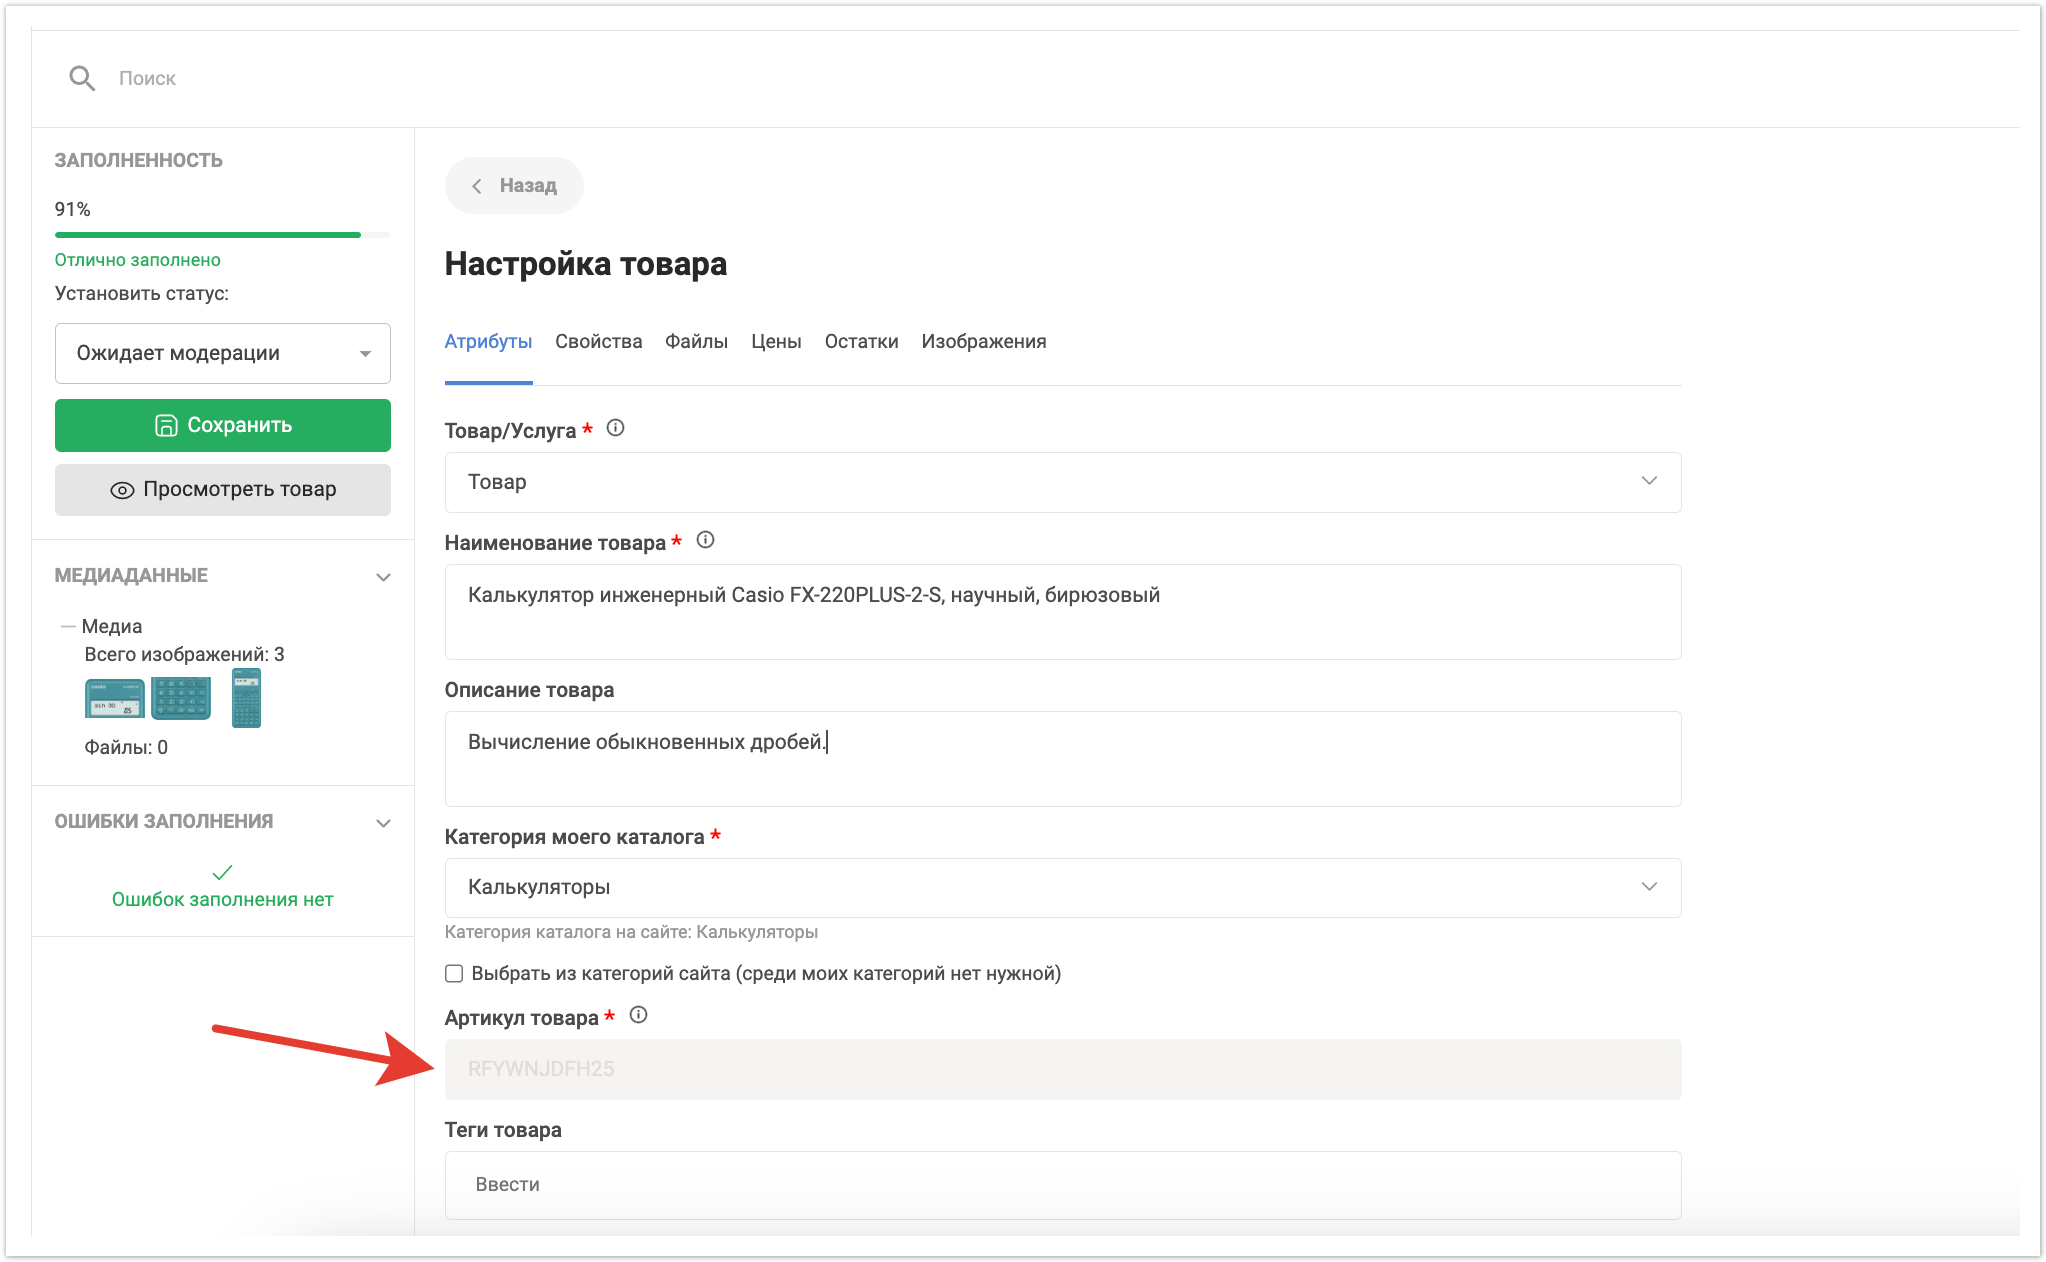
Required fields are marked with a red asterisk. If you do not specify data for them, then you will not be able to save the changes and an error will be indicated in the Fill errors area.
The master data that the Responsible manager noted when importing products cannot be edited.
Before saving changes, make sure that there are no filling errors for the product. After that, you can click on the Save button.
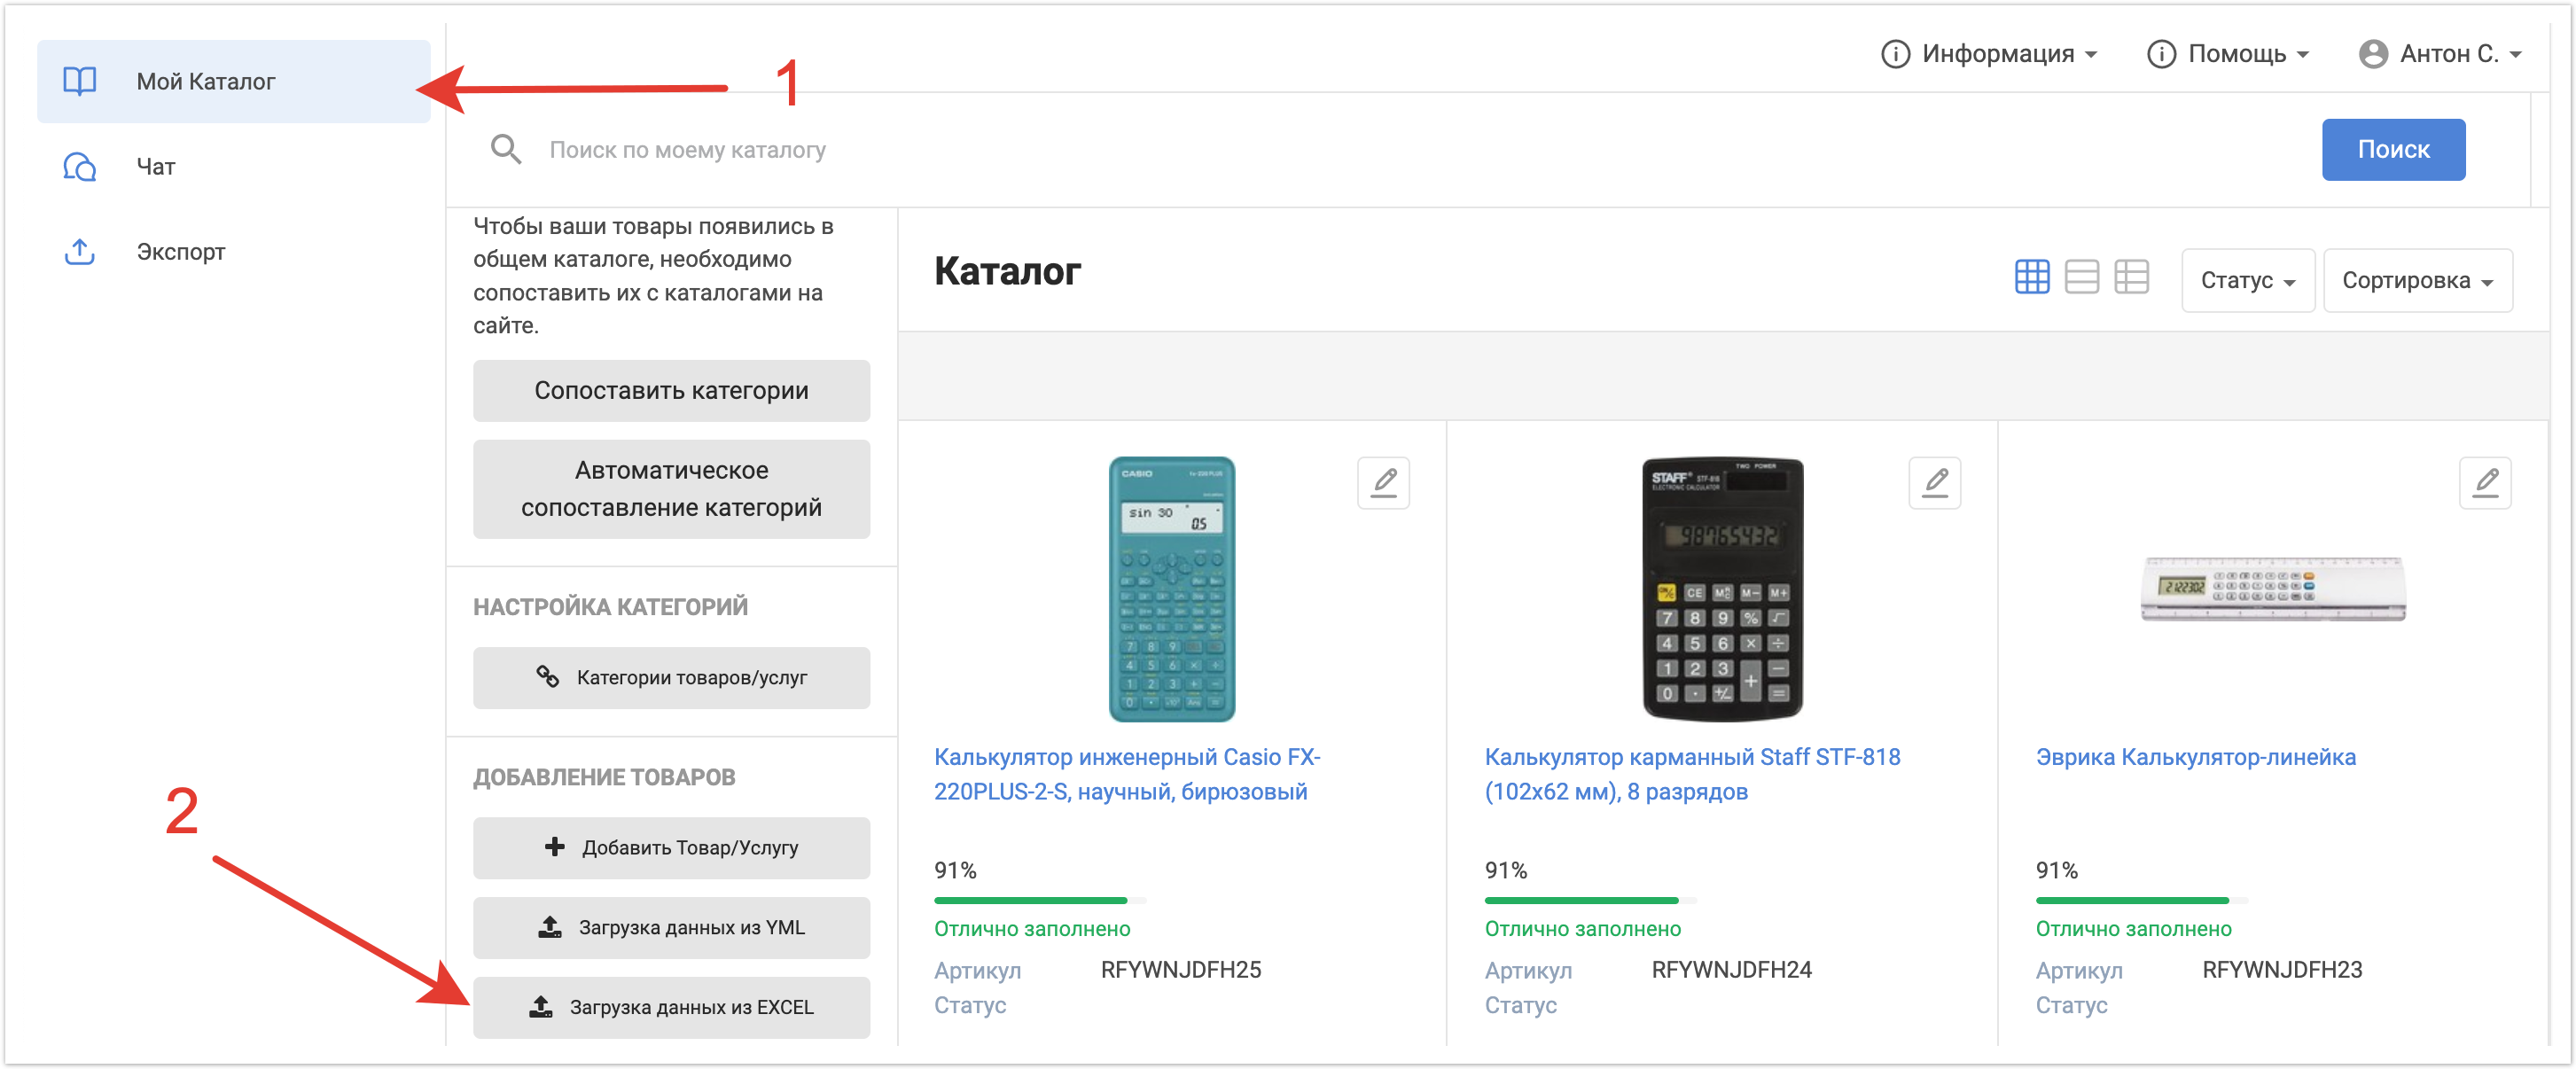
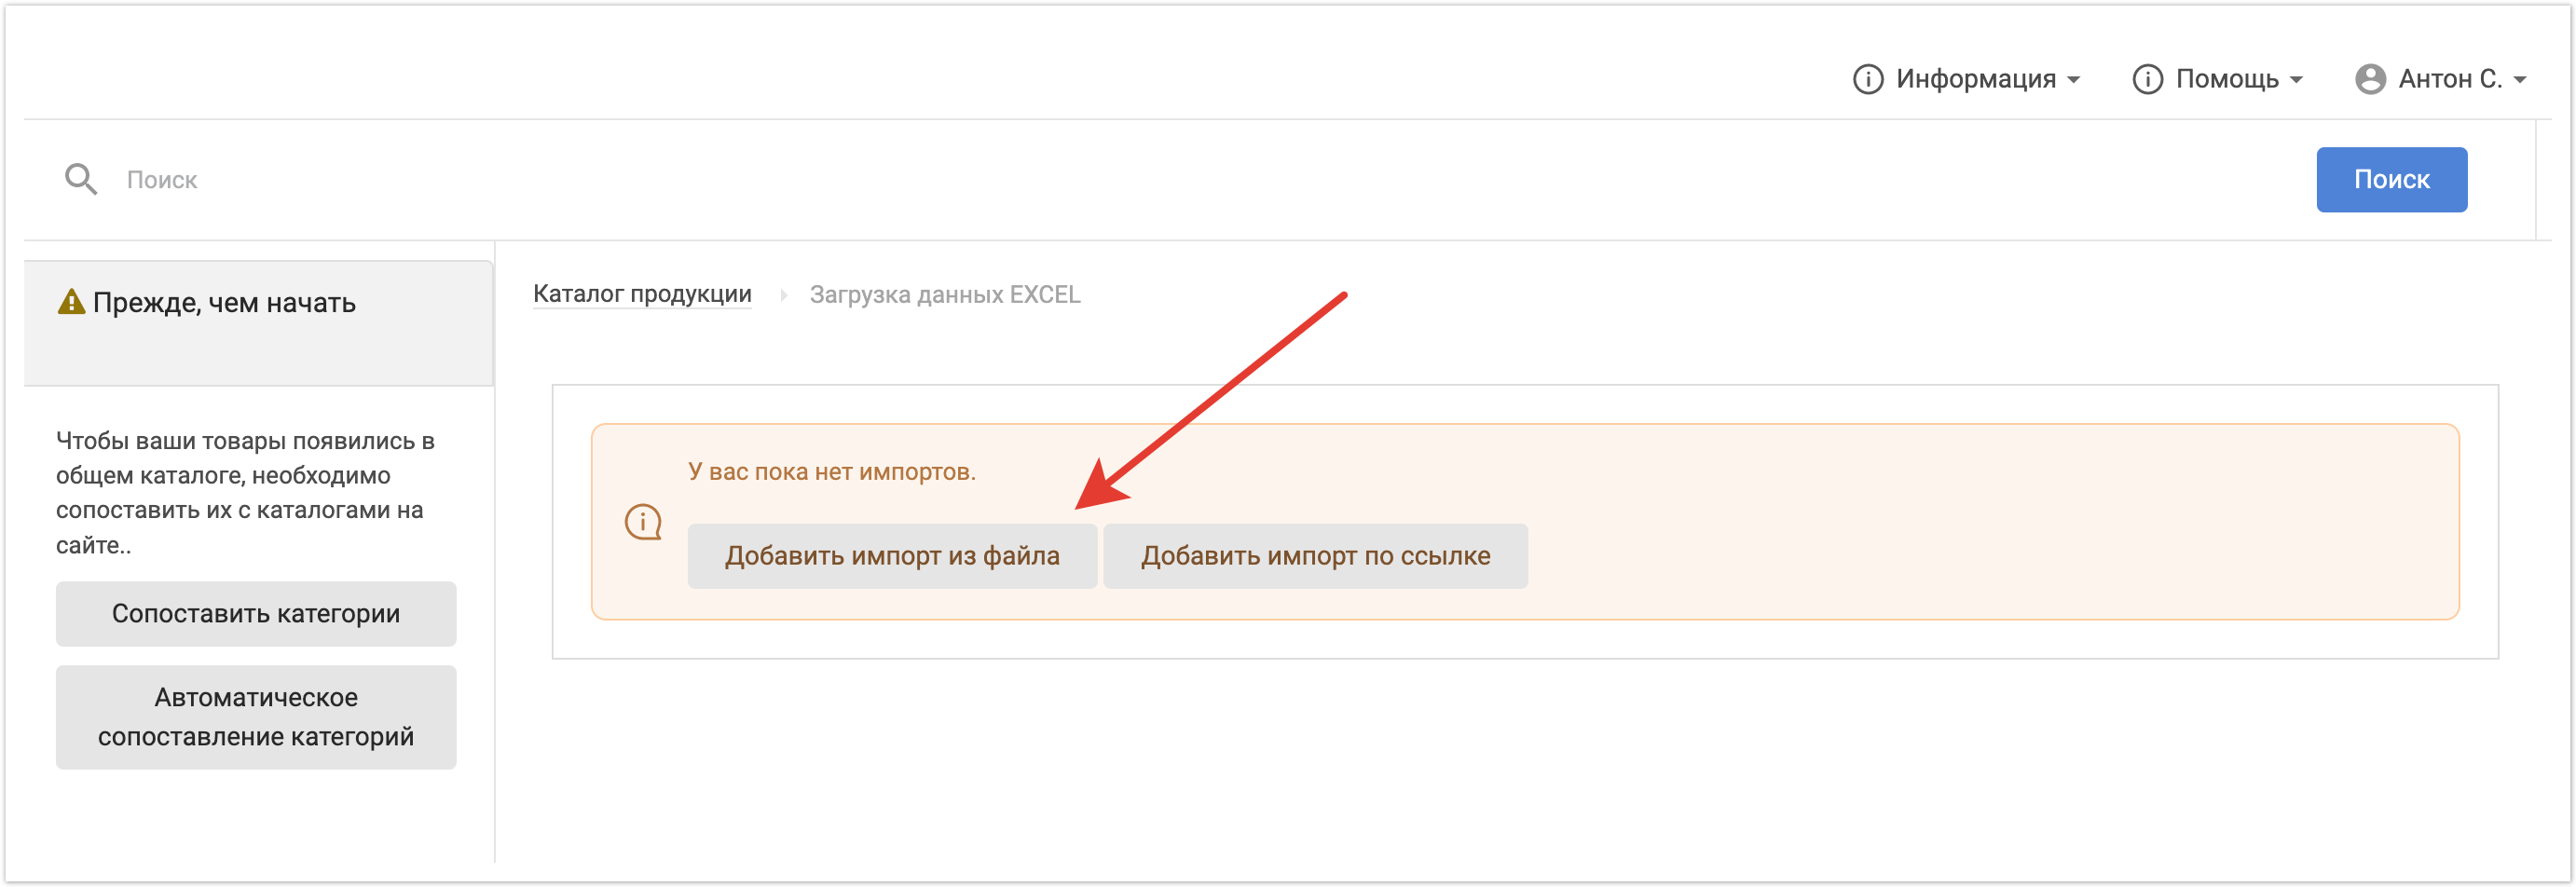
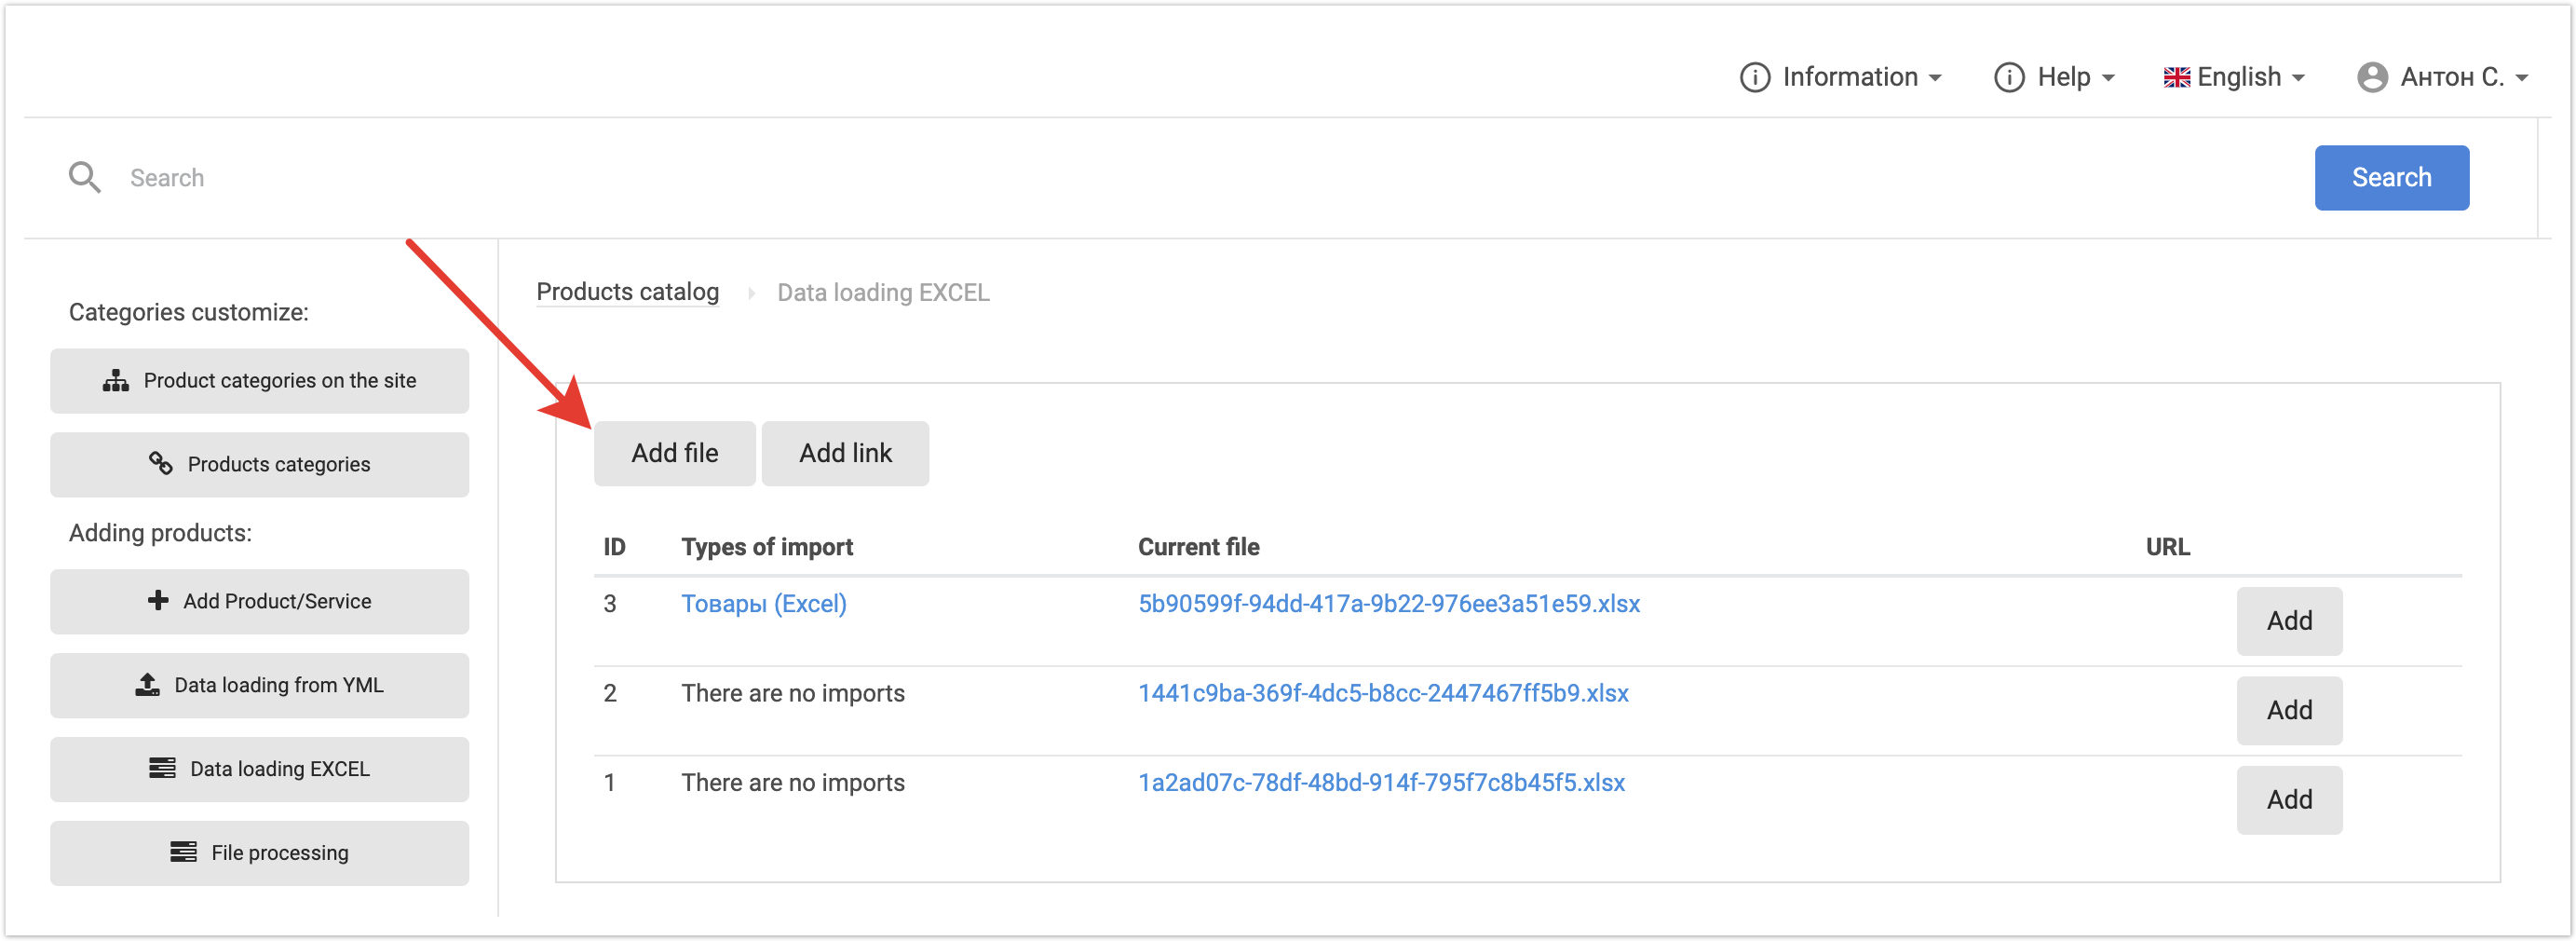
Editing a product by importing an xls fileIf a number of products have undergone massive changes, for example, a new feature has been added or images have been updated, you can upload an XLS file that contains the product ID and columns with updated values. Thus, the user does not need to edit each product manually, and changes can be made in bulk. To import an XLS file with changes, go to the My catalog section and click on the Data loading from EXCEL button. More details about downloading a file are described on the page.
The responsible manager can also moderate and edit products, for example, if one of his employees is on vacation. Data exportThe functionality for exporting products and media content allows users to upload a file with products that are displayed to them on the platform. Export is available to users with the following roles:
Each user can solve their own problems with the help of export. The responsible manager (leader) receives a report on the work of his employees (brand managers). The brand manager receives product information and can obtain files and images for each product for review. The buyer gets the opportunity to upload a file with goods for subsequent uploading to trading platforms, for example, if he buys from a supplier on the platform, and then sells it at retail. Unloading of text information on products is made in the form of an XLS-file. The file is a table with all the data that the product card contains. Unloading of media content is carried out in the form of an archive, which contains nested archives with media (images, files) for products. Each archive with the media content of a product has a name that matches the article, so you can conveniently find data on a particular product. Export of products for the brand managerTo export a file by products, the user needs to go to the My Catalog section. Next, select the desired products by marking them with checkboxes, and select Products export from the drop-down list.
You will be prompted to add products to an existing export list, if one has been created before, or to create a new list. Choose the option that suits you.
After saving, you need to go to the Export section and select the desired list of products.
Next, you need to choose what you want to upload: Download product list or Download product images and files. In the first case, only a table with products will be generated, and if you select the second setting, then archives with media content will also be added.
After selecting the desired settings, you must click on the Form button and file generation will start.
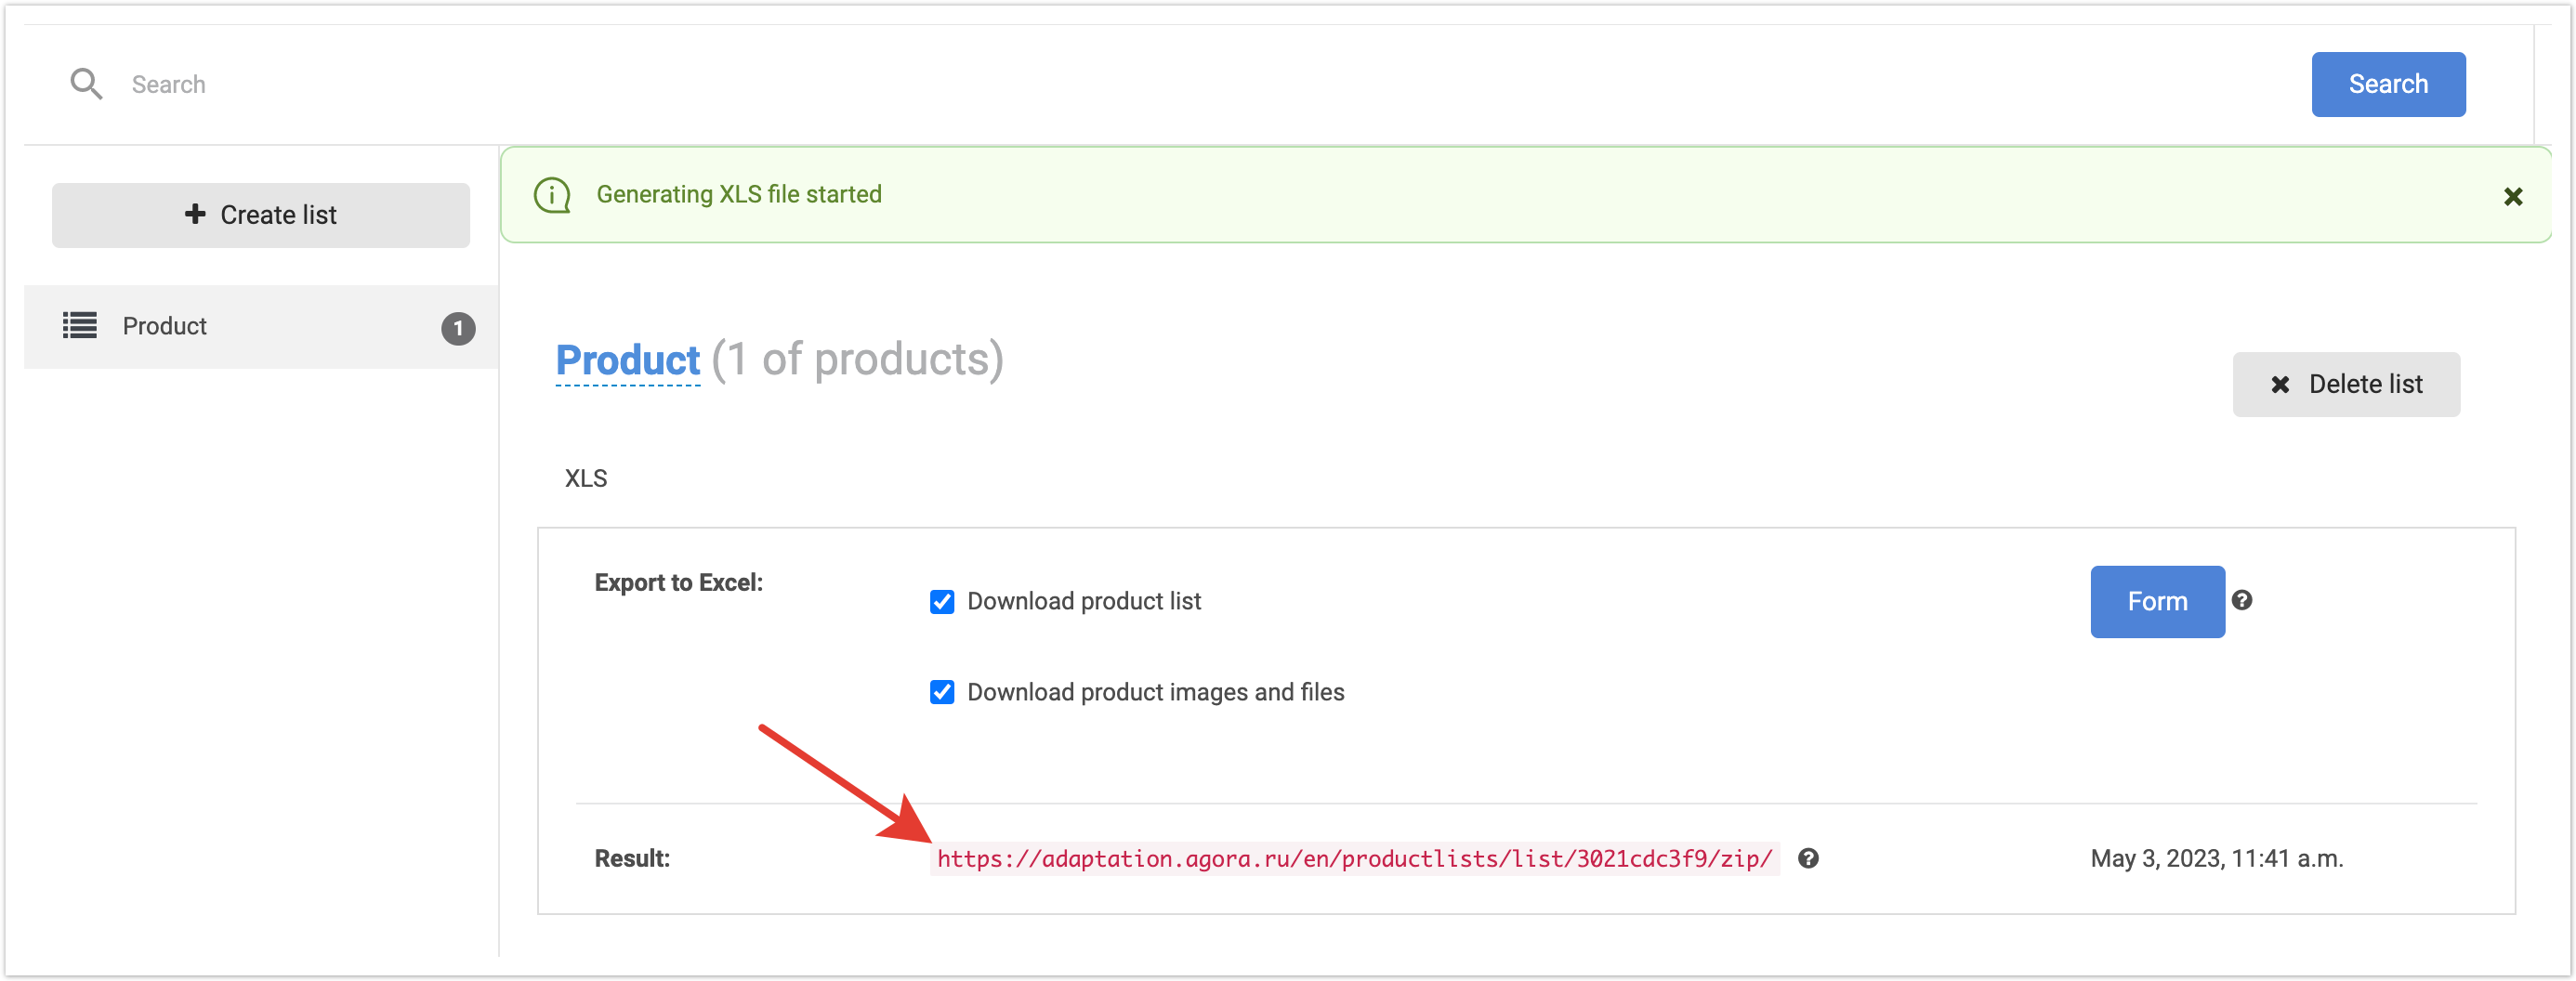
After the file generation process is completed, a link will appear where it can be downloaded.
When you click on the link, the archive will be saved to the local machine. After unpacking the file, the user will receive:
Export a brand manager performance reportThe responsible manager has the opportunity to upload a report on the quality of work of his subordinates (Brand Managers). To download the report, the Responsible Manager can log in to the personal account on the platform and go to the My Catalog section.
Further, using the search tools, he can form a list of products for which he wants to view the report. For example, you can filter products by their status Awaiting moderation.
With the help of the Select all checkbox and the Products export mass action, you can add products to an existing export list, if it was previously created, or create a new list.
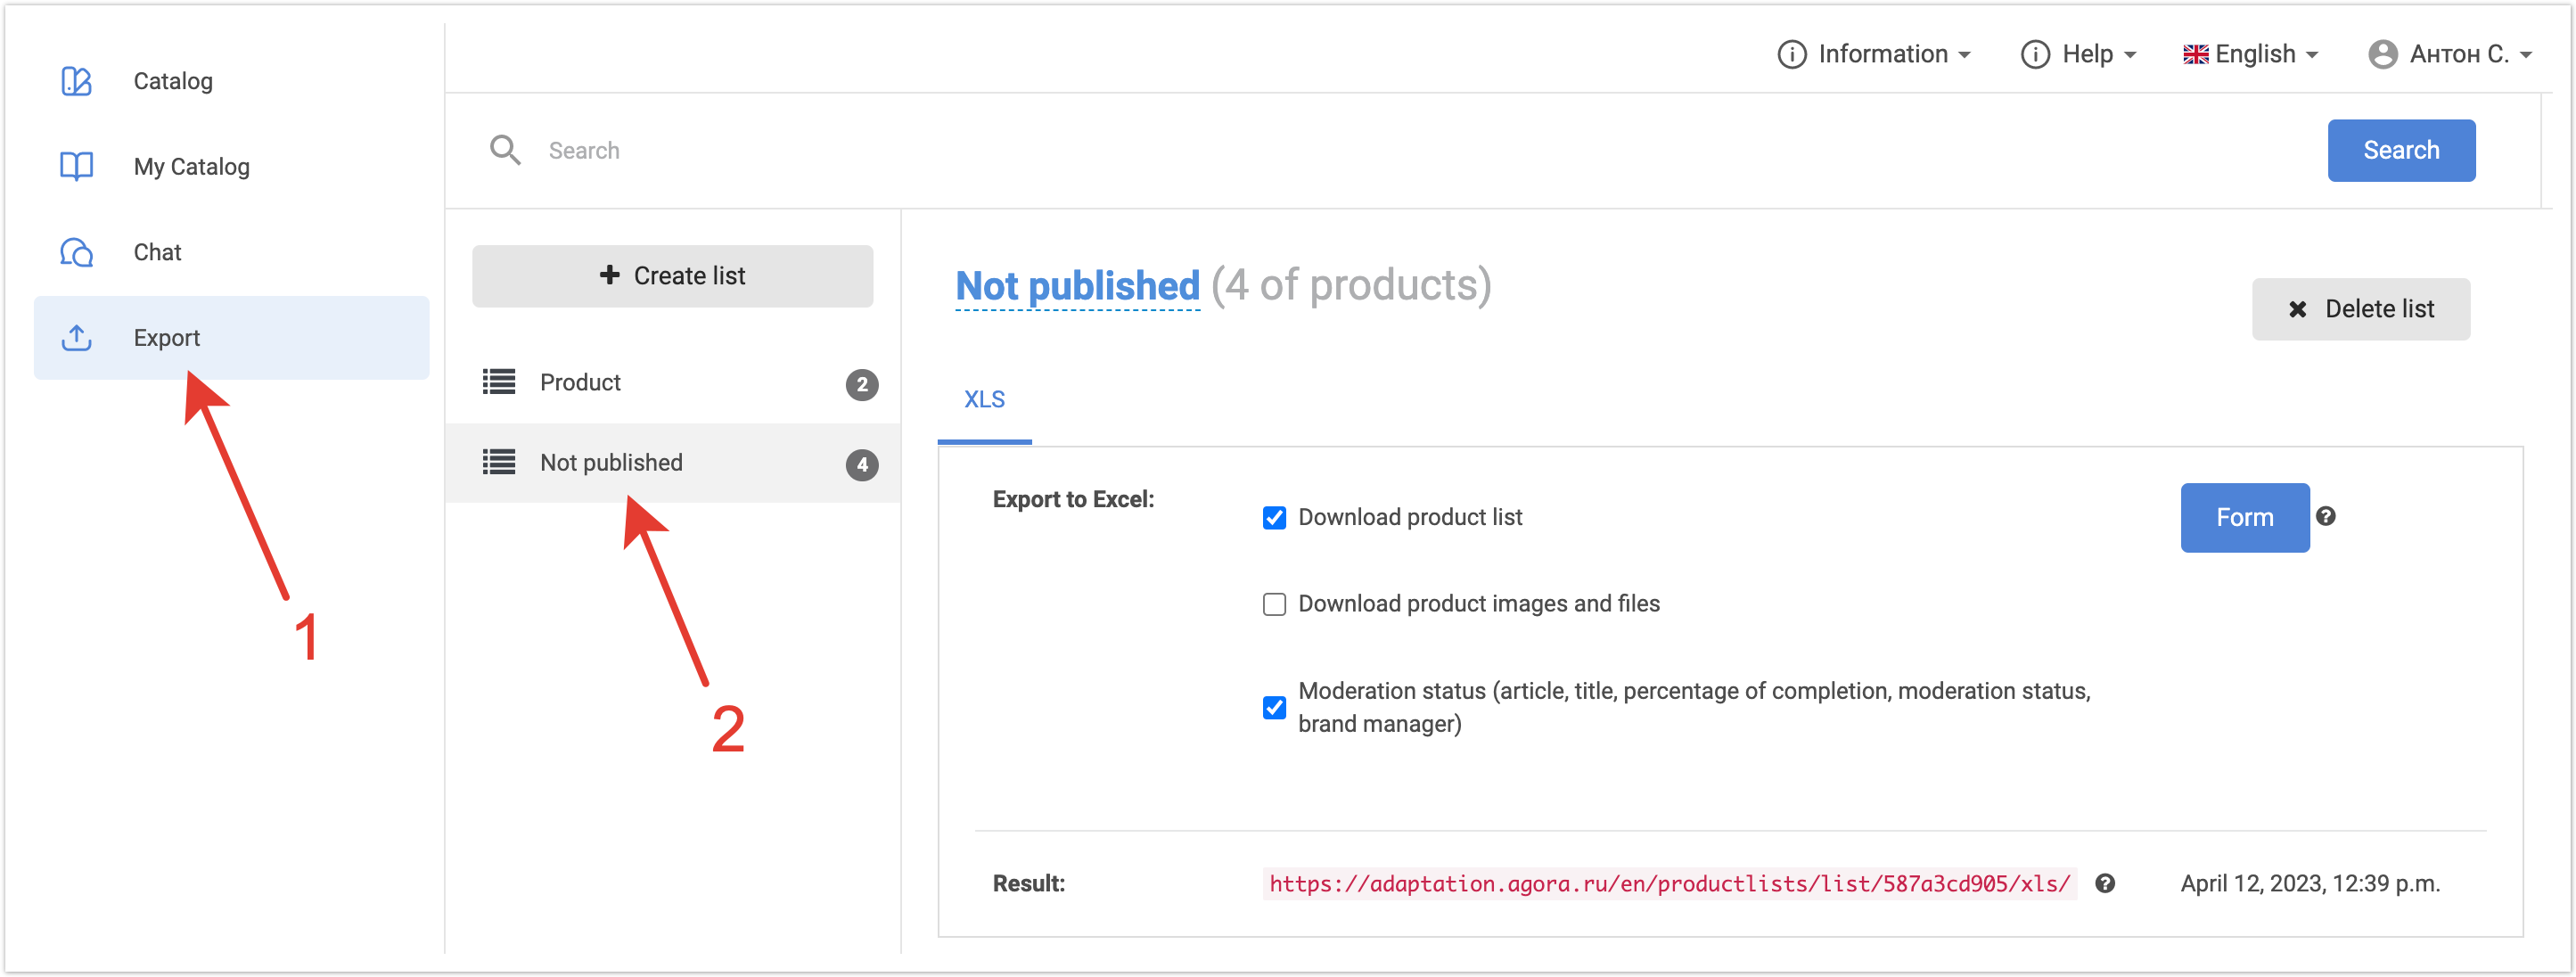
Next, you need to go to the Export section and select the desired list.
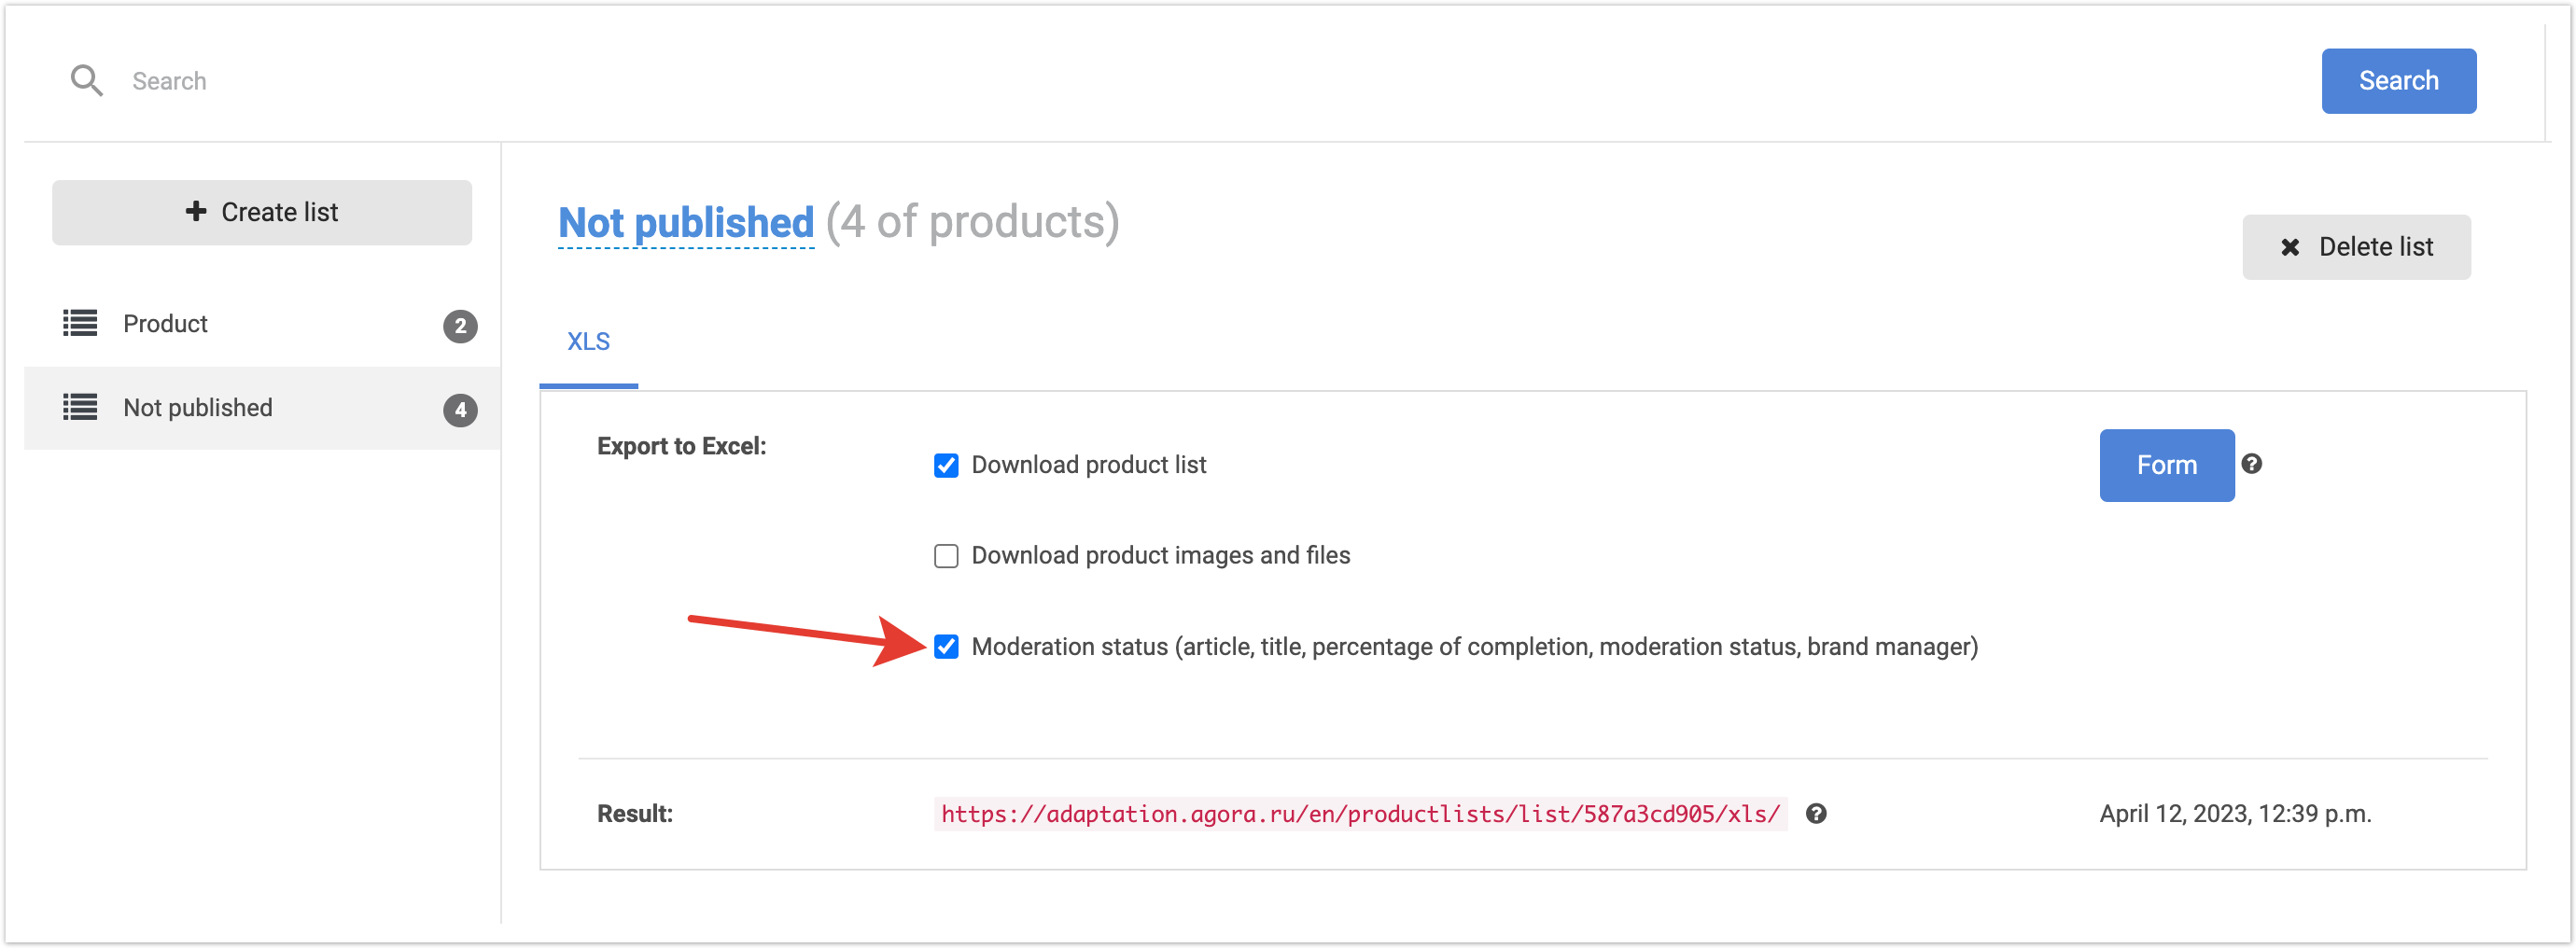
On the page that opens, an additional setting Moderation status will be available. When it is enabled, the manager will receive information in the file about the article, name, percentage of completion, moderation status of the product and the brand manager responsible for this product.
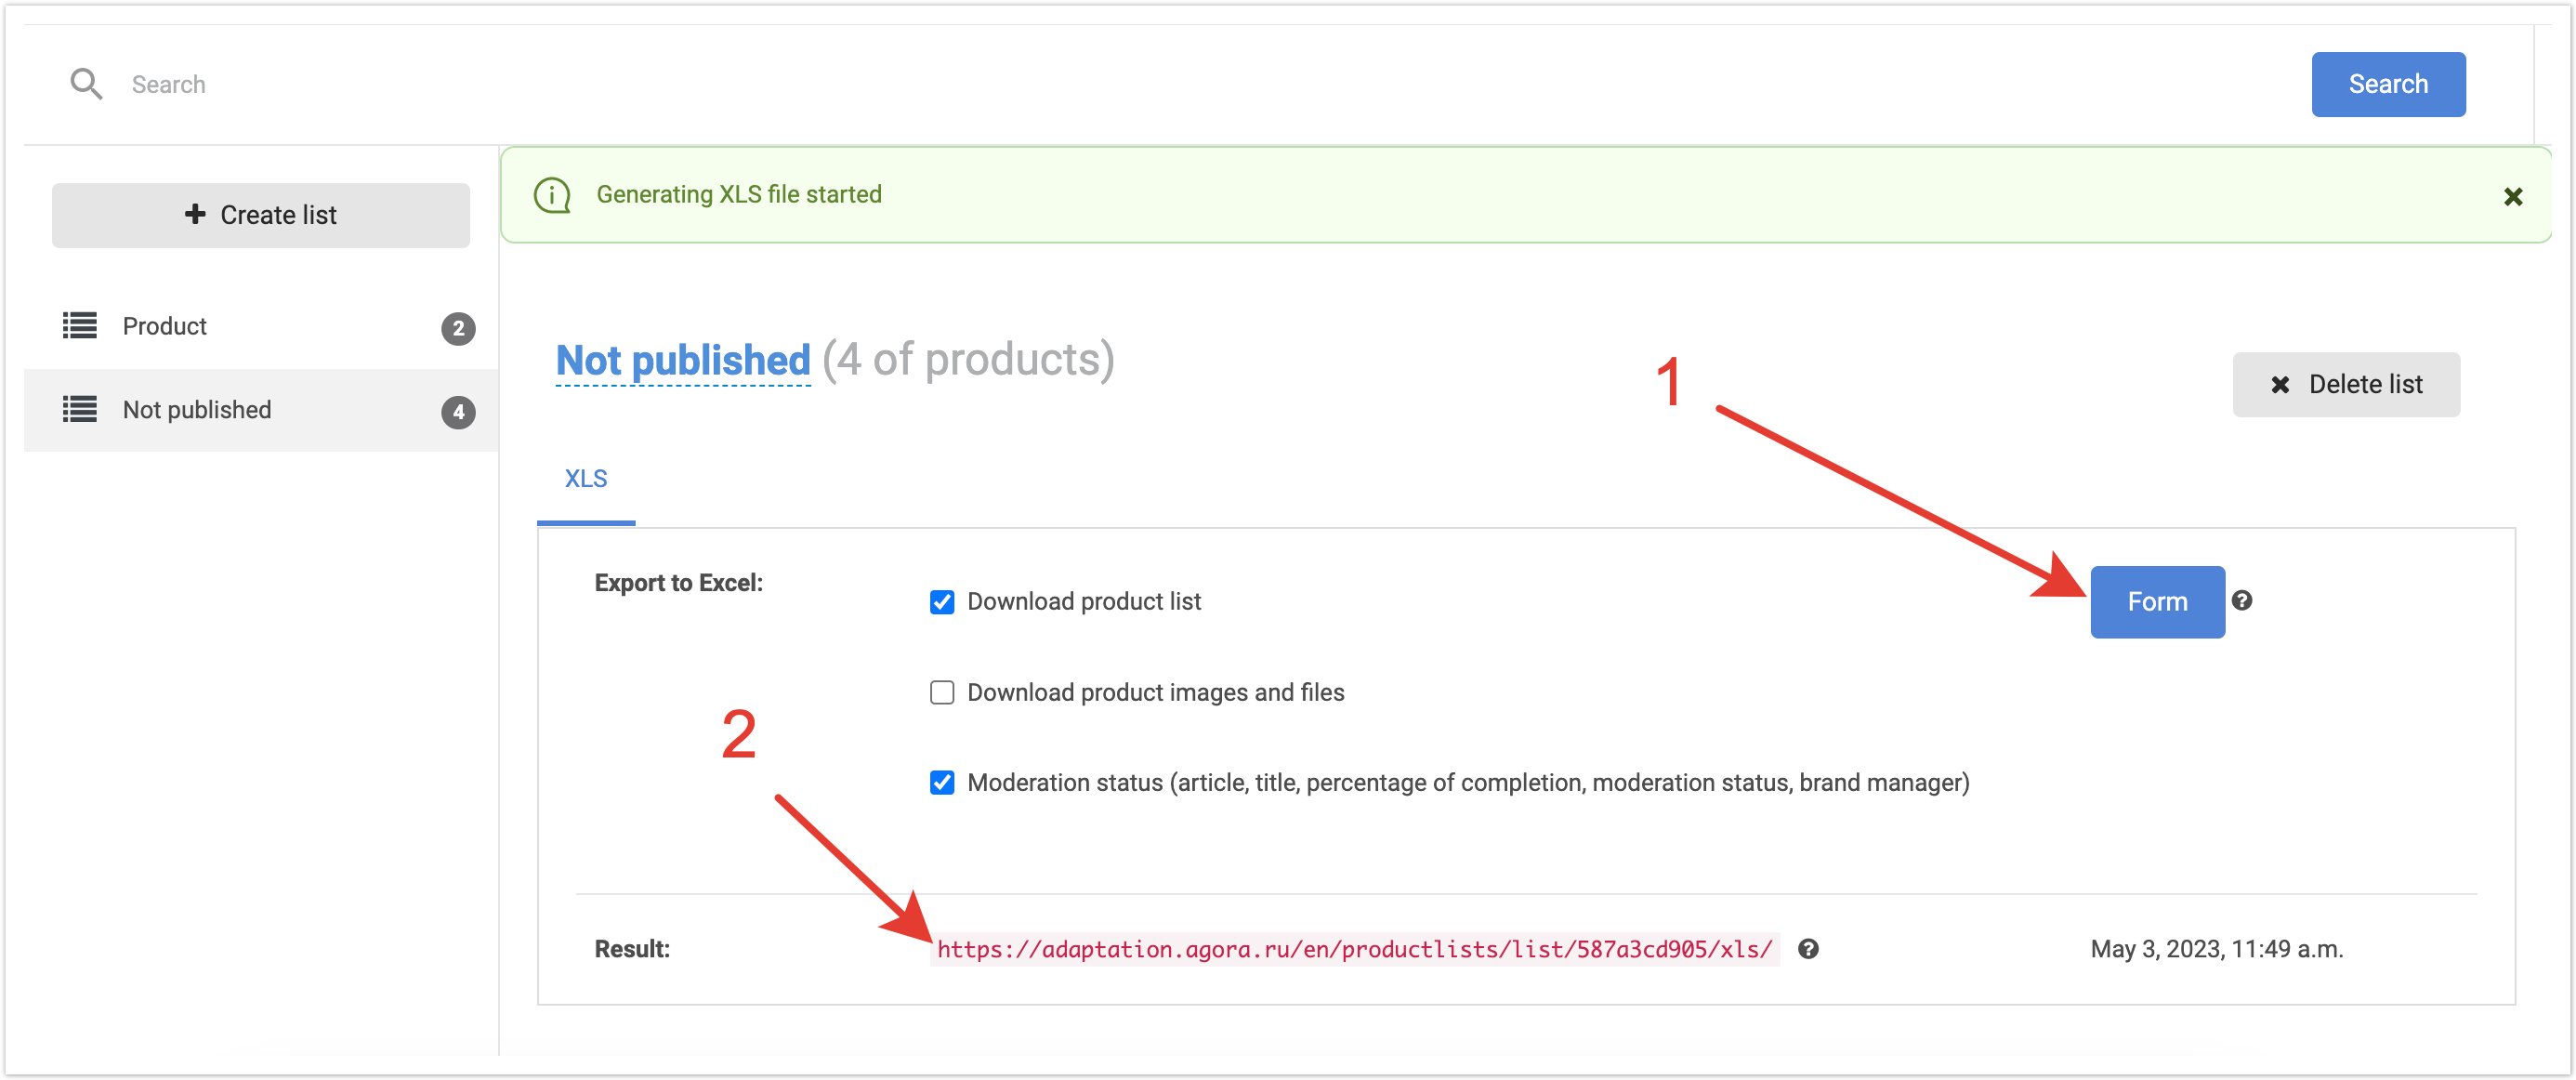
To generate an export file, click the Form button. Next, the system will start generating the file, and after the completion of its formation, a link for downloading the archive with data will be available. Thus, the Responsible Manager can at any convenient time check the quality of work of his subordinates by generating a report in his personal account.
|


| Sv translation | |||||||||||||||||||||||||||||||||||
|---|---|---|---|---|---|---|---|---|---|---|---|---|---|---|---|---|---|---|---|---|---|---|---|---|---|---|---|---|---|---|---|---|---|---|---|
| |||||||||||||||||||||||||||||||||||
A funcionalidade de moderação de mercadorias é ativada através das Configurações do Portal no painel de administração.
Você precisa encontrar a configuração Ativar moderação de produtos no portal e ativá-la. Em seguida, na configuração Campo no produto, você precisa selecionar os campos ao alterar quais o produto será enviado para nova moderação. Para selecionar vários campos, mantenha pressionada a tecla CTRL (ou Command no Mac). A remoderação é uma nova verificação de um produto publicado anteriormente no catálogo quando dados importantes sobre ele são alterados. Salve as alterações para que as configurações entrem em vigor.
Modelo a seguir dos utilizadores que participam na moderação das mercadoriasA plataforma tem várias funções de usuário envolvidas no sistema PIM. Considere os recursos de cada uma das funções e quais tarefas elas resolvem. Um administrador de plataforma é um usuário client_amin que tem acesso ao painel de administração da plataforma. Este usuário pode administrar o modelo de status de moderação de mercadorias, ajustar as opções de classificação de catálogo disponíveis, definir o peso dos campos de produto, bem como alterar quaisquer outras configurações definidas através do painel de administração. Um gerente responsável (Marketer) é um usuário para o chefe do departamento de conteúdo. Tem os seguintes direitos:
Um gerente de marca é uma função para um funcionário do departamento de conteúdo que realiza verificação direta e enriquecimento do cartão de produto com os dados necessários para publicação no catálogo dos compradores. Um usuário com essa função tem os seguintes direitos:
Estabelecimento e configuração de novos usuários do sistemaAs funções descritas acima são criadas automaticamente na plataforma. Mas para trabalhar com eles, você precisa criar um usuário. Para fazer isso, no painel administrativo, clique no botão Adicionar na seção Usuários.
Ou vá para a seção Usuários e, em seguida, clique no botão Adicionar Usuário.
Uma página será aberta onde você precisa preencher os campos obrigatórios. Para se registrar, basta definir um nome de usuário e senha, bem como colocar uma caixa de seleção de verificação, se for usada no projeto. É melhor usar um endereço de e-mail como seu nome de usuário.
Conclua o registro usando o botão Salvar.
Em seguida, você precisa dar ao usuário um conjunto de direitos para sua função. Para fazer isso, vá para Grupos.
Em seguida, selecione o grupo que você deseja usar. Vamos considerar o exemplo do Gerente Responsável. Para um Gerente de Marca, o algoritmo de ações será semelhante.
Na página que é aberta, no campo Usuários, você precisa localizar o usuário criado anteriormente que deve receber essa função. Use a seta para a direita para movê-lo para a coluna Usuários Selecionados.
Em seguida, você precisa salvar as alterações.
Depois disso, você precisa associar o gerente ao fornecedor. Para fazer isso, vá para a seção Usuários. Em seguida, clique no login do usuário que estamos configurando.
Na página que é aberta, no campo Fornecedor, você deve definir o Fornecedor de Plataforma e selecionar Salvar Alterações.
Depois disso, o usuário terá botões para ir ao perfil do fornecedor e ao perfil do profissional de marketing ou gerente de marca. Clique no botão Perfil do Gerente Responsável.
Em seguida, na caixa Fornecedores com um catálogo disponível, mova o fornecedor para a coluna da direita usando a seta para a direita. A configuração do Gerente de Marca termina aí. Depois de salvar as alterações, ele pode começar a trabalhar na plataforma.
Após o preenchimento, clique no botão Salvar.
Agora, o administrador da plataforma pode fornecer ao funcionário as informações de sua conta e o usuário poderá trabalhar na plataforma. Por razões de segurança, o gerente pode definir sua própria senha para sua conta, para isso você pode usar o formulário de recuperação de senha. Importar mercadorias para a plataforma
Em seguida, você precisará configurar campos para importar produtos. Mais informações sobre como carregar um arquivo são descritas na página. Para uma importação correta, um identificador exclusivo, como um artigo, deve ser especificado e a Categoria do fornecedor, o nome, os preços e os saldos devem ser indicados. O nome do preço e do tipo de depósito é retirado da primeira linha do arquivo, que pressupõe cabeçalhos de coluna. Além das configurações padrão, o gerente responsável também pode especificar em quais colunas os Assistente de dados serão indicados. Os dados mestre são os dados que estarão inacessíveis para edição pelos gerentes de marca. Por exemplo, você pode selecionar um artigo e um nome de produto como dados mestre.
Depois de preencher todos os parâmetros de importação, você precisa definir a caixa de seleção Pular primeira linha para que a linha com cabeçalhos de coluna não seja processada. Em seguida, você pode iniciar o processo de processamento do arquivo. O status do processamento de arquivos pode ser visto na seção Processos. Se o arquivo foi processado com sucesso, os dados sobre as mercadorias serão registrados na plataforma. Depois disso, eles estarão disponíveis para os gerentes de marca para edição e moderação.
Moderação de mercadoriasDefinir status de moderaçãoO produto PIM desenvolveu um modelo de status para o processo de moderação e publicação de mercadorias para o usuário final da plataforma. A configuração dos status de moderação do produto é feita na seção Os status da moderação do produto do painel administrativo.
A seção contém todos os status de moderação do produto, cujas configurações o administrador da plataforma pode gerenciar.
Aguardando moderação - as mercadorias são carregadas no local e caíram na zona de responsabilidade do gerente. Este produto não é exibido aos clientes porque ainda não foi verificado. Aguardando uma correção - esse status é atribuído ao produto caso o gerente de marca o tenha levado ao trabalho, mas não há dados suficientes para publicação. Por exemplo, um gerente de marca não tem imagens suficientes, e ele as solicita de outro funcionário da empresa, ou esclarece quaisquer detalhes sobre os valores das características ou detalhes da descrição. Nesse status, o produto não é publicado no catálogo aberto e não está disponível para os clientes. Produto rejeitado - o produto foi carregado na plataforma, mas sob nenhuma circunstância pode ser verificado e publicado em um catálogo aberto. Por exemplo, este é qualquer produto que não se encaixa no tema do site, ou um produto carregado erroneamente. Nesse caso, ele pode receber esse status. O produto será salvo no banco de dados, mas não estará disponível no catálogo dos compradores. O produto passou pela moderação - esse status é atribuído ao produto quando o funcionário responsável verificou e editou o cartão do produto e se certificou de que todos os parâmetros do item e do conteúdo atendam aos requisitos da empresa. Nesse caso, o produto recebe esse status e fica disponível para os compradores. O comprador pode encontrar o produto no catálogo usando as ferramentas de pesquisa, visualizar o cartão do produto, compará-lo, adicioná-lo aos favoritos, comprar e adicioná-lo ao arquivo de exportação para carregar conteúdo. O produto passou por moderação - publicação diferida - este status é usado se for necessário adiar a publicação das mercadorias por um determinado dia e hora. Por exemplo, uma empresa introduz um novo produto no mercado. Neste caso, as mercadorias podem ser importadas para o local e verificadas com antecedência. Para o produto, a data e a hora em que ele deve ser publicado no catálogo de compradores é selecionada e o produto é publicado automaticamente na data e hora especificadas. Para alterar as configurações de status, clique em seu nome.
Na página que se abre, as configurações atuais serão indicadas.
Você pode alterar o nome em russo e outros idiomas se eles estiverem conectados. E você também pode alterar a cor do status usando a paleta ou especificando um código de cores de seis dígitos.
Salve as alterações para que as alterações entrem em vigor.
Se você quiser retornar as configurações originais dos status de moderação das mercadorias, será necessário selecionar Classificação de mercadorias por padrão no painel de operações em massa. Não há necessidade de destacar status individuais com caixas de seleção.
Configurar pesos de campo de commoditiesPara ver claramente a porcentagem de preenchimento do cartão do produto, você precisa configurar os Pesos dos campos de commodities. A configuração é executada na seção homônima do painel de administração.
Na página que se abre, haverá uma lista de campos de produto para os quais você pode definir o peso ao calcular a porcentagem de preenchimento do cartão de produto.
O nome da tarifa - coeficiente de peso do nome do produto no cálculo da porcentagem de ocupação. Descrição - o coeficiente de peso da presença da descrição completa das mercadorias no cálculo da percentagem de ocupação. A presença de uma imagem é o coeficiente de peso da presença de uma imagem da mercadoria ao calcular a porcentagem de ocupação. Disponibilidade de arquivos - o fator de peso da presença do arquivo (bloco Arquivos) ao calcular a porcentagem de ocupação. A presença de uma tag é o coeficiente de peso da presença de uma tag no produto ao calcular a porcentagem de ocupação. A presença de um imóvel é o coeficiente de peso da presença de um imóvel (características) dos bens ao calcular a percentagem de ocupação. A disponibilidade de resíduos - o coeficiente de peso da presença de resíduos nas mercadorias ao calcular a porcentagem de ocupação. A disponibilidade de preços é o coeficiente de peso ponderado da disponibilidade de preços para bens no cálculo da porcentagem de ocupação.
Depois que todos os cálculos são feitos e os dados sobre os pesos são preenchidos para todos os campos, então você precisa salvar as alterações.
Configurar classificações disponíveis no catálogoO administrador da plataforma também pode configurar os tipos de tipos que estarão disponíveis para os usuários em seu diretório.
Para fazer isso, vá para a seção Configurações do Portal.
Role para baixo até a seção Produtos. No campo Tipos de classificações, use as caixas de seleção para selecionar aquelas que você deseja que estejam disponíveis para os usuários da plataforma. Depois de fazer as alterações, você precisa salvá-las.
Configurar colunas disponíveis no catálogoOs usuários da plataforma podem configurar pessoalmente as colunas que serão exibidas em seu catálogo.
Com a ajuda de caixas de seleção, eles podem habilitar ou desabilitar a saída de determinadas colunas no catálogo.
Além disso, com a ajuda da funcionalidade arrastar e soltar, você pode alterar a ordem das colunas exibidas. Para fazer isso, passe o mouse sobre um símbolo quadrado com pontos e arraste a coluna para o local desejado.
Por parte do administrador da plataforma, você pode configurar quais colunas estarão disponíveis para os usuários da plataforma selecionarem. Para configurá-los, você precisa ir para a seção Configurações do Portal no painel de administração.
Em seguida, role pela página até o bloco Catálogo. No campo Colunas disponíveis no catálogo (tabela) você pode selecionar quais colunas estarão disponíveis para o usuário selecionar ao visualizar o catálogo da Tabela. No campo Colunas habilitadas padrão no catálogo (tabela), você pode selecionar quais colunas serão exibidas para o usuário por padrão quando o diretório Tabela for exibido. Depois de fazer as alterações, você precisa salvá-las.
Moderação de mercadorias pelo gerente de marcaDepois que o Gerente Responsável tiver importado as mercadorias para a plataforma, o Gerente de Marca poderá proceder à sua moderação. Ele faz login em sua conta pessoal e vai para a guia Meu Catálogo. O gerente de marca vê apenas a lista de produtos que foi atribuída a ele no estágio de configuração do usuário. Os produtos carregados recebem automaticamente o Status de Aguardando moderação. Você pode filtrar por esse status e, assim, ver uma lista de produtos baixados recentemente que estão aguardando verificação. Se necessário, você pode encontrar o produto desejado por meio de uma pesquisa de catálogo ou filtragem por propriedades.
Você pode moderar um produto e alterar seu status usando ações em massa ou manualmente para cada produto. Para fazer isso por meio de ações em massa, você precisa selecionar as mercadorias usando as caixas de recebimento e, em seguida, na lista suspensa, selecione Alterar status. Uma janela será aberta onde você precisará selecionar o status dos produtos selecionados. Por exemplo, dessa forma, você pode rejeitar massivamente produtos se eles foram baixados erroneamente.
Para alterar o status do produto manualmente, você precisa ir para o modo de edição.
Edição de produtosEdição manual do produtoO modo de edição do produto permite que o gerente da marca faça correções no produto, se necessário, bem como altere o status de moderação. Para fazer isso, clique no botão para editar.
Um cartão de produto será aberto, onde a porcentagem de ocupação será visível e será possível ajustar os dados necessários. Os dados estão em várias guias: Atributos, Propriedades, Arquivos, Os preços, Sobras, Imagens.
A guia Atributos contém as seguintes informações:
A guia Propriedades contém todas as propriedades importadas para o produto, bem como seus valores. Nesta seção, o gerente de marca pode alterar a propriedade do produto ou seu valor usando a lista suspensa. Ele também pode remover propriedades desnecessárias, se necessário, ou adicionar uma nova propriedade clicando no botão Adicionar propriedade.
Você também pode excluir um arquivo baixado anteriormente se ele não for mais relevante.
Na guia Os preços, você pode alterar o valor do preço de um item. Você também pode adicionar outro tipo de preço e seu valor clicando no botão Adicionar Preço.
Na guia Saldos, você pode editar saldos de itens em um depósito específico ou excluí-los completamente. Na parte inferior da página há também um botão Adicionar Saldo, pelo qual você pode adicionar um saldo em um novo armazém.
A guia Imagens contém uma lista de imagens importadas para o produto e também oferece a oportunidade de carregar imagens ou excluir imagens não relevantes.
Se o produto tiver várias imagens, será possível definir a ordem de exibição das imagens no cartão do produto usando a funcionalidade de arrastar e soltar.
Os campos obrigatórios são marcados com um asterisco vermelho. Se você não especificar dados sobre eles, você não poderá salvar as alterações e um erro será indicado na área Erros de preenchimento.
Os dados mestre que o Gerente Responsável observou ao importar mercadorias não podem ser editados.
Depois de fazer alterações, você pode especificar imediatamente o status desejado para o produto, por exemplo, se houver dados suficientes para publicação, então você pode definir imediatamente o status O produto passou pela moderação e ele será publicado no catálogo do cliente depois de salvar as alterações.
Antes de salvar as alterações, certifique-se de que não há erros de enchimento para o produto. Depois disso, você pode clicar no botão Salvar.
Edição de produto via importação de arquivo xlsSe vários produtos tiverem sofrido alterações maciças, como um novo recurso ou imagens atualizadas, você poderá carregar um arquivo XLS que contenha a ID do produto e colunas com valores atualizados. Assim, o usuário não precisa editar cada produto manualmente, e as alterações podem ser feitas em massa. Para importar um arquivo XLS com alterações, vá para a seção Meu Catálogo e clique no botão Carregar os dados de EXCEL. Mais informações sobre como carregar um arquivo são descritas na página.
Um gerente responsável também pode moderar e editar produtos, por exemplo, se um de seus funcionários estiver de férias. Exportar dadosA funcionalidade de exportação de mercadorias e conteúdo de mídia permite que os usuários carreguem um arquivo com mercadorias que são exibidas por eles na plataforma. A exportação está disponível para usuários com as seguintes funções:
Cada usuário pode resolver suas tarefas com a ajuda da exportação. O gerente responsável (gerente) recebe um relatório sobre o trabalho de seus funcionários (gerentes de marca). O gerente de marca recebe informações sobre os produtos e pode receber arquivos e imagens de cada um dos produtos para verificação. O comprador tem a oportunidade de fazer o upload de um arquivo com mercadorias para posterior upload-lo para plataformas de negociação, por exemplo, se ele comprar de um fornecedor na plataforma e, em seguida, vendê-lo no varejo. As informações de texto sobre mercadorias são carregadas na forma de um arquivo XLS. O arquivo é uma tabela com todos os dados que o cartão de produto contém. O descarregamento de conteúdo de mídia é realizado na forma de um arquivo, que contém arquivos anexados com mídia (imagens, arquivos) para mercadorias. Cada arquivo com o conteúdo de mídia do produto tem um nome que coincide com o artigo, para que você possa encontrar convenientemente dados sobre um determinado produto. Exportação de mercadorias para o gerente da marcaPara exportar um arquivo por produto, o usuário precisa ir para a seção Meu Catálogo. Em seguida, selecione as mercadorias necessárias, marcando-as com caixas de seleção e, na lista suspensa, selecione Exportação de produtos.
Você será solicitado a adicionar produtos a uma lista de exportação existente, se tiver criado uma anteriormente, ou a criar uma nova lista. Escolha a opção que mais lhe convier.
Depois de salvar, vá para a seção Exportação e selecione a lista desejada de produtos.
Em seguida, você precisa escolher o que deseja carregar: Carregar uma lista de produtos ou Carregar imagens e arquivos de produtos. No primeiro caso, apenas uma tabela com produtos será formada e, se você selecionar a segunda configuração também, os arquivos com conteúdo de mídia também serão adicionados.
Depois de selecionar as configurações necessárias, você precisa clicar no botão Formar e a formação do arquivo será iniciada.
Após a conclusão do processo de geração de arquivos, um link aparecerá onde ele poderá ser baixado.
Quando você clica no link, o arquivo será salvo no seu computador. Depois de descompactar o arquivo, o usuário obterá:
Exportar um relatório de desempenho do gerente de marcaO gestor responsável tem a oportunidade de fazer o upload de um relatório sobre a qualidade do trabalho de seus subordinados (Brand Managers). Para carregar o relatório, o Gerente Responsável pode fazer login em sua conta pessoal na plataforma e ir para a seção Meu Catálogo.
Além disso, usando as ferramentas de pesquisa, ele pode formar uma lista de produtos para os quais deseja visualizar o relatório. Por exemplo, você pode filtrar produtos pelo status Aguardando moderação.
Usando a caixa de seleção Escolha tudo e a ação em massa Exportação de Produtos, você pode adicionar produtos a uma lista de exportação existente, se tiver criado uma anteriormente ou criar uma nova lista.
Em seguida, vá para a seção Exportação e selecione a lista desejada.
Na página que se abre, uma configuração adicional Status da moderação estará disponível. Quando estiver habilitado, o gerente receberá informações no arquivo sobre o artigo, nome, porcentagem de ocupação, status de moderação das mercadorias e o gerente de marca responsável por este produto.
Para gerar um arquivo de exportação, clique no botão Formar. Em seguida, o sistema iniciará a formação do arquivo e, após a conclusão de sua formação, um link estará disponível para baixar o arquivo com os dados. Assim, o Gerente Responsável pode verificar a qualidade do trabalho de seus subordinados a qualquer momento conveniente, gerando um relatório em sua conta pessoal.
|


