Дерево страниц

Сравнение версий

Ключ

  • Эта строка добавлена.
  • Эта строка удалена.
  • Изменено форматирование.
Sv translation
languageru_RU

Для настройки интеграции с системой, содержащей информацию о товарах и их свойствах, необходимо выполнить следующие действия: 

  1. Скачать файл конфигурации, содержащий предустановленный шлюз обмена.
  2. Установить шлюз обмена в 1С.
  3. Настроить регламентные задания.обмен с порталом.
  4. Выполнить обмен с порталом

(информация)  Рассмотрим настройку шлюза обмена используя 1С.Управление торговлей 11.4.


Примечание

Шлюз предназначен для работы в типовых конфигурациях 1С, построенных на основе библиотеки стандартных подсистем.

Image Removed

Видео-инструкция по настройке интеграции с 1С 8.3 УТ 11.4

Коннектор виджета
width500
urlhttps://www.youtube.com/watch?v=Lzf7DU3ly_U

Информация
titleДополнительные возможности

Возможность установки шлюза Агора через расширение доступно для следующих версий 1С:
УТ 11,4, ЕРП 2,4 , КА 2.
При установке расширения конфигурация НЕ СНИМАЕТСЯ С ПОДДЕРЖКИ.
Установка производится разработчиком, так как с большой вероятностью потребуется донастройка расширения под конкретную конфигурацию в случае возникновения конфликтов по метаданным.
Для установки необходимо:
1) Зайти в конфигуратор.
2) Далее открыть раздел Конфигурация - Расширения.
3) Добавить новое расширение.
4) Загрузить в него расширение шлюза.

Файл с расширением расположен в разделе  1. Загрузка комплекта поставки


Image Added

height300

Видео-инструкция по настройке интеграции с 1С 8.3 УТ 11.4

Коннектор виджета
width500
urlhttps://www.youtube.com/watch?v=Lzf7DU3ly_U
height300

Видео-инструкция по настройке интеграции с 1С 8.3 УТ 10. 10.3

Коннектор виджета
width500
urlhttps://www.youtube.com/watch?v=4elEvLrmEEM&feature=youtu.be
height300


Якорь
1
1
1. Загрузка комплекта поставки 

Первое, что необходимо сделать - скачать комплект поставки Agora, соответствующей используемой редакции 1С, который включает  файл конфигурации с предустановленным шлюзом (файл формата .cf).

Для загрузки нажмите на наименование необходимого комплекта поставки:


Информация

Если вы не нашли версию используемой вами редакции 1С, напишите письмо по адресу help@agora.ru или оставьте заявку https://www.agora.ru/help/  в техническую поддержку и мы предоставим комплект поставки для иных редакций, к примеру, ERP 2.0

После загрузки комплекта поставки можно переходить к этапу настройки загруженного шлюза в 1С.

    
Якорь
2
2
 
2. Установка шлюза обмена

(информация) Перед установкой программного продукта Agora сохраните резервной копии базы, чтобы "откатить" 1С до первоначального состояния в случае неудачной настройки.

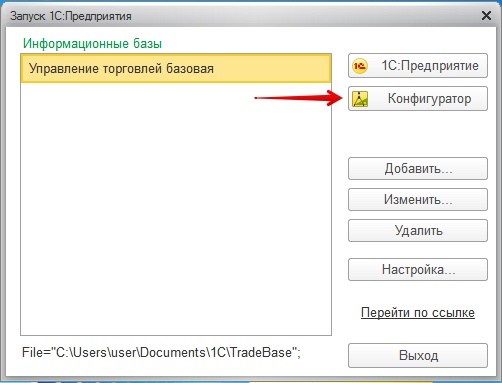
Для этого откройте конфигуратор 1С:

В открывшемся окне откройте вкладку Администрирование и перейдите в раздел Выгрузить информационную базу:

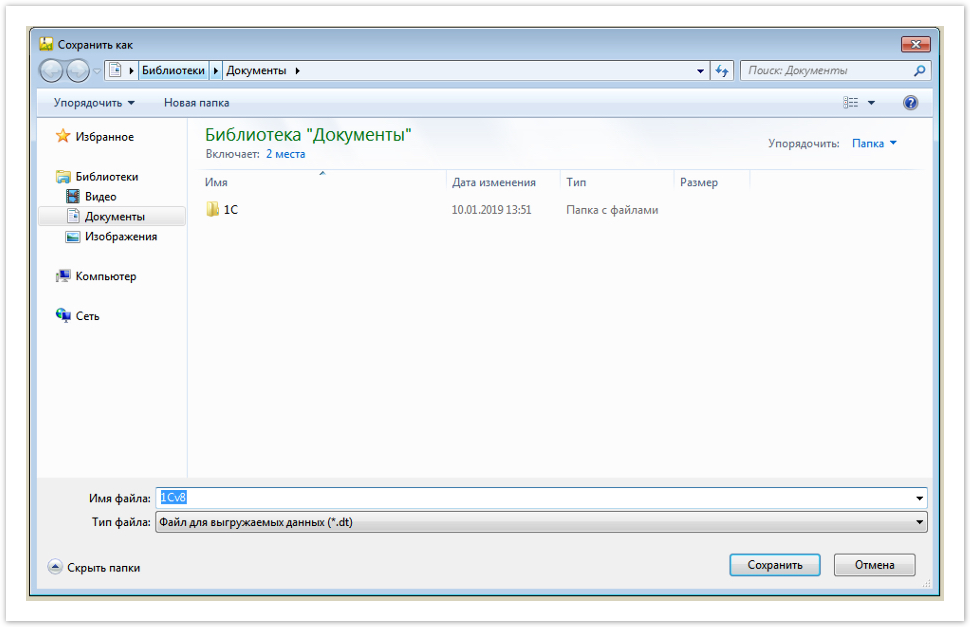
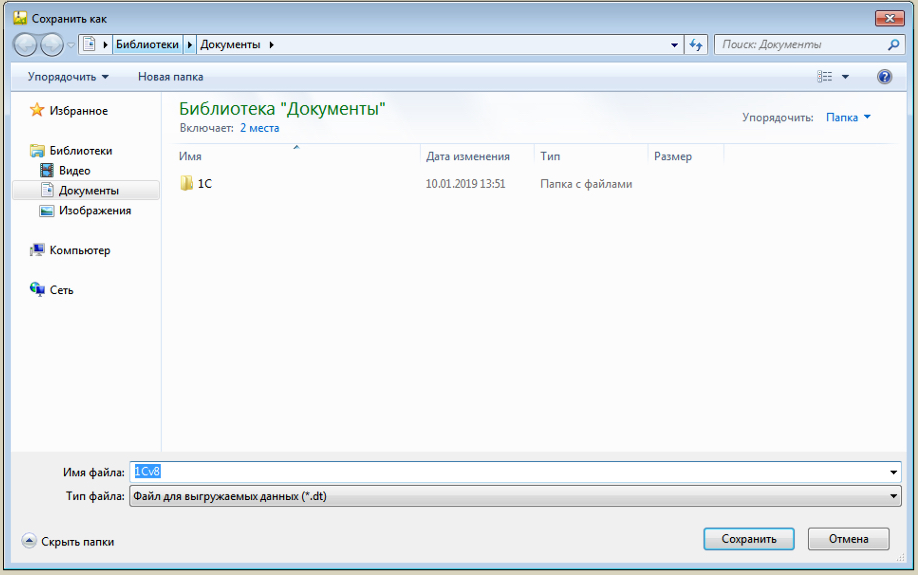
В открывшемся окне укажите путь для сохранения информационной базы:

(информация) Сохранение информационной базы может занять продолжительное время, если операция выполняется на "слабом" компьютере.

В случае успешного сохранения, будут отображено следующее уведомление: 

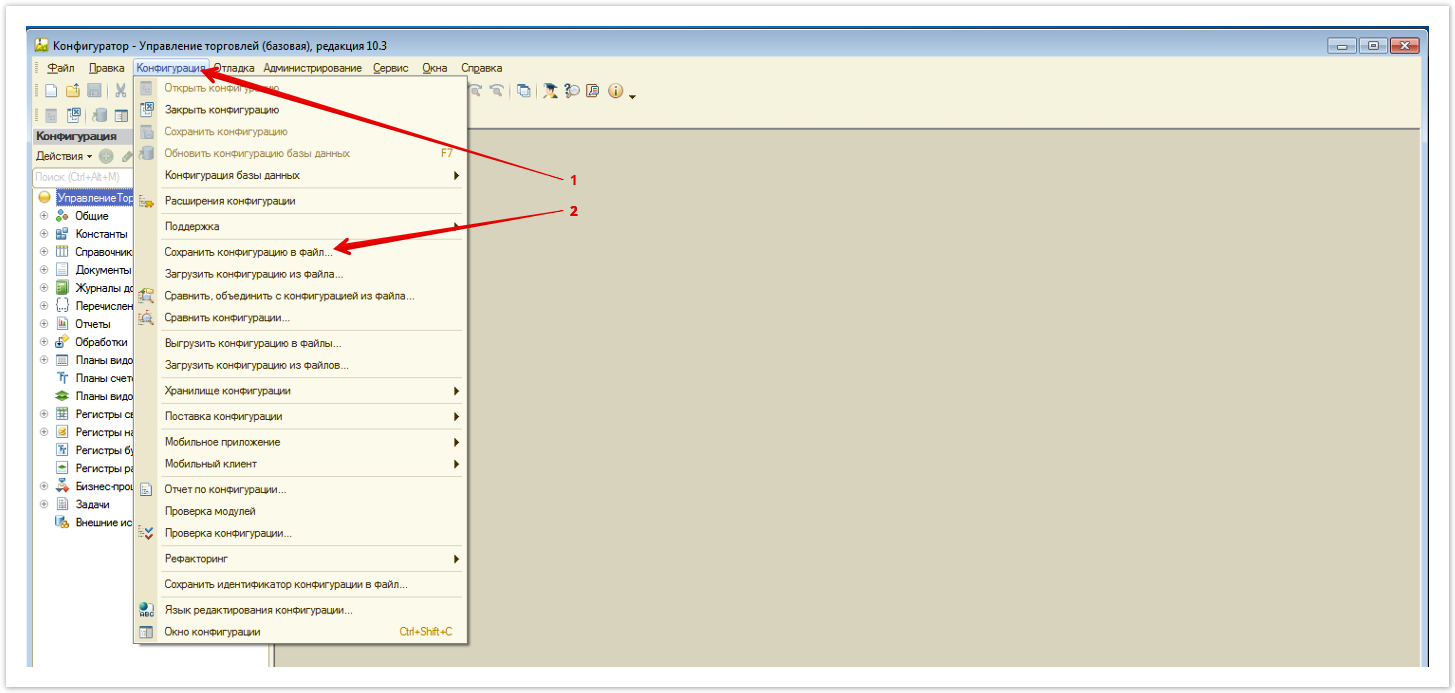
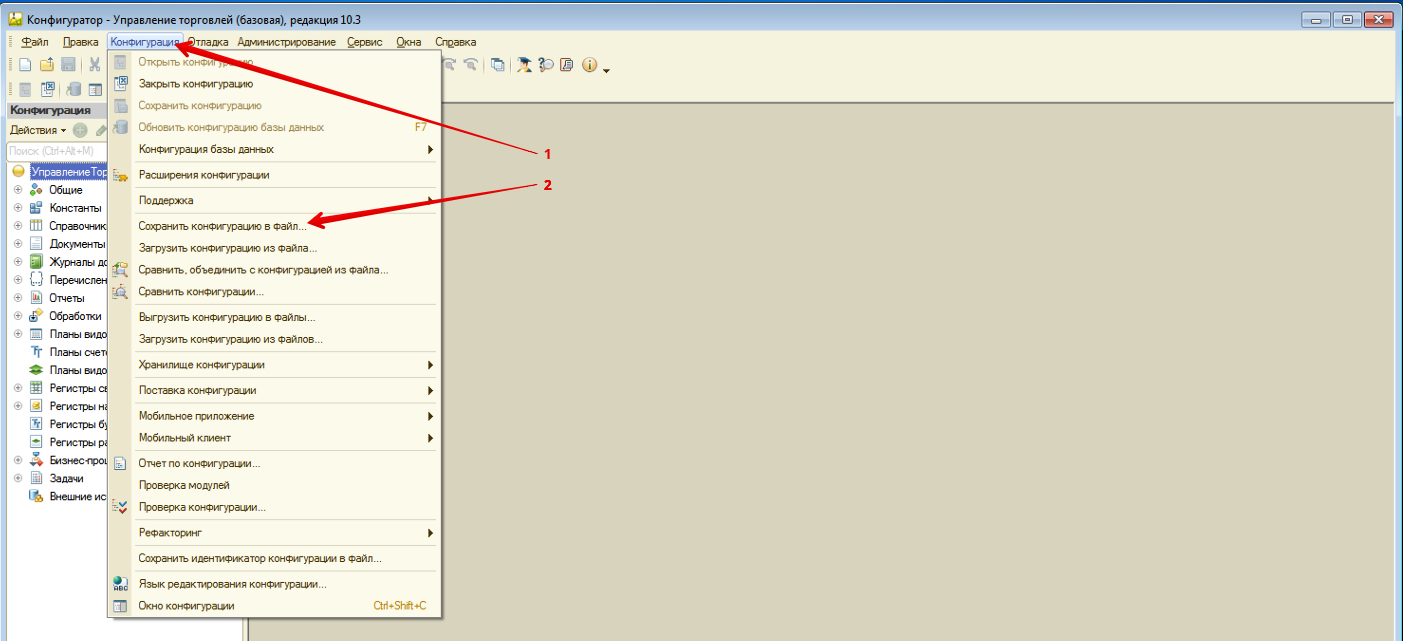
Следующий этапом настройки выгрузка копии конфигурации базы 1С. Для этого откройте вкладку Конфигурация и перейдите в раздел Сохранить конфигурацию в файл:


В открывшемся окне укажите путь для сохранения копии конфигурации 1С:

В случае успешного сохранения, будет отображено уведомление вида: 

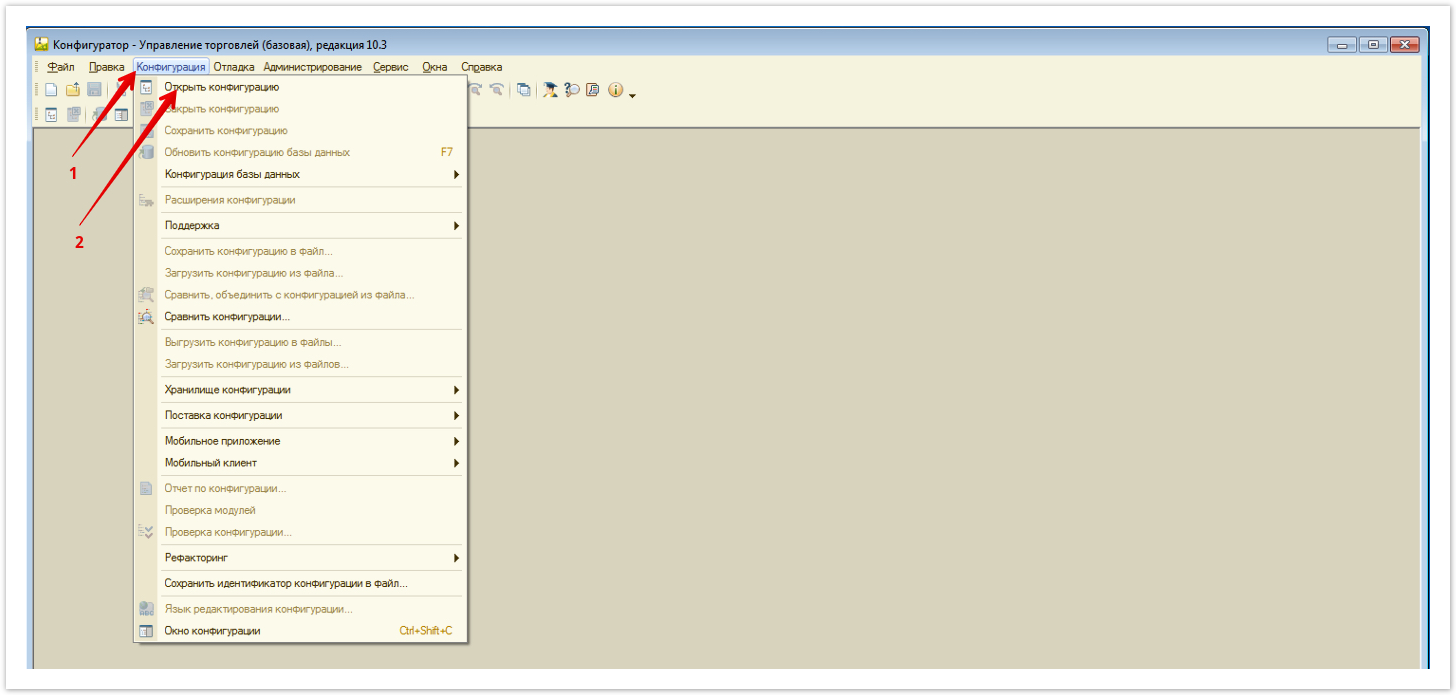
(информация) Если кнопка Сохранить конфигурацию в файл не активна (отображается серым цветом и на нее невозможно нажать), значит конфигурация, которая должна быть сохранена не выбрана.

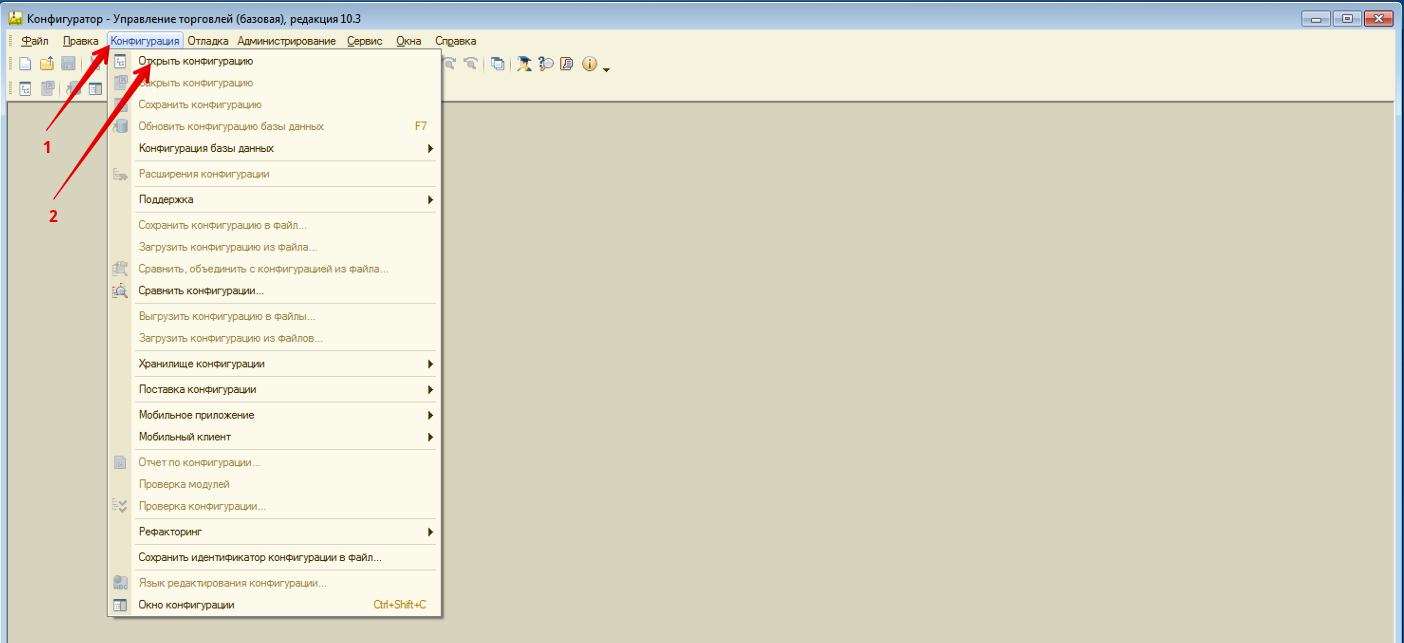
Для выбора конфигурации откройте раздел Конфигурация и выберите вкладку Открыть конфигурацию:

После сохранения информационной базы можно переходить к этапу установки шлюза обмена.

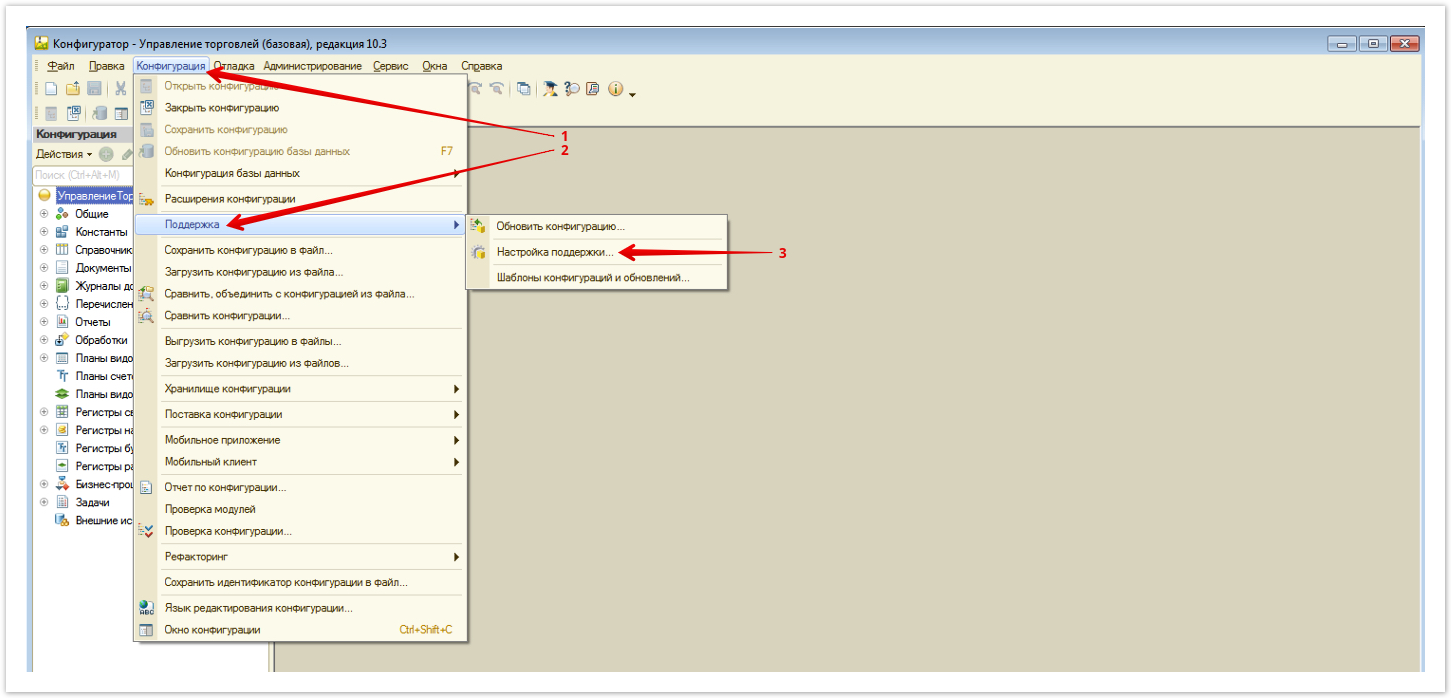
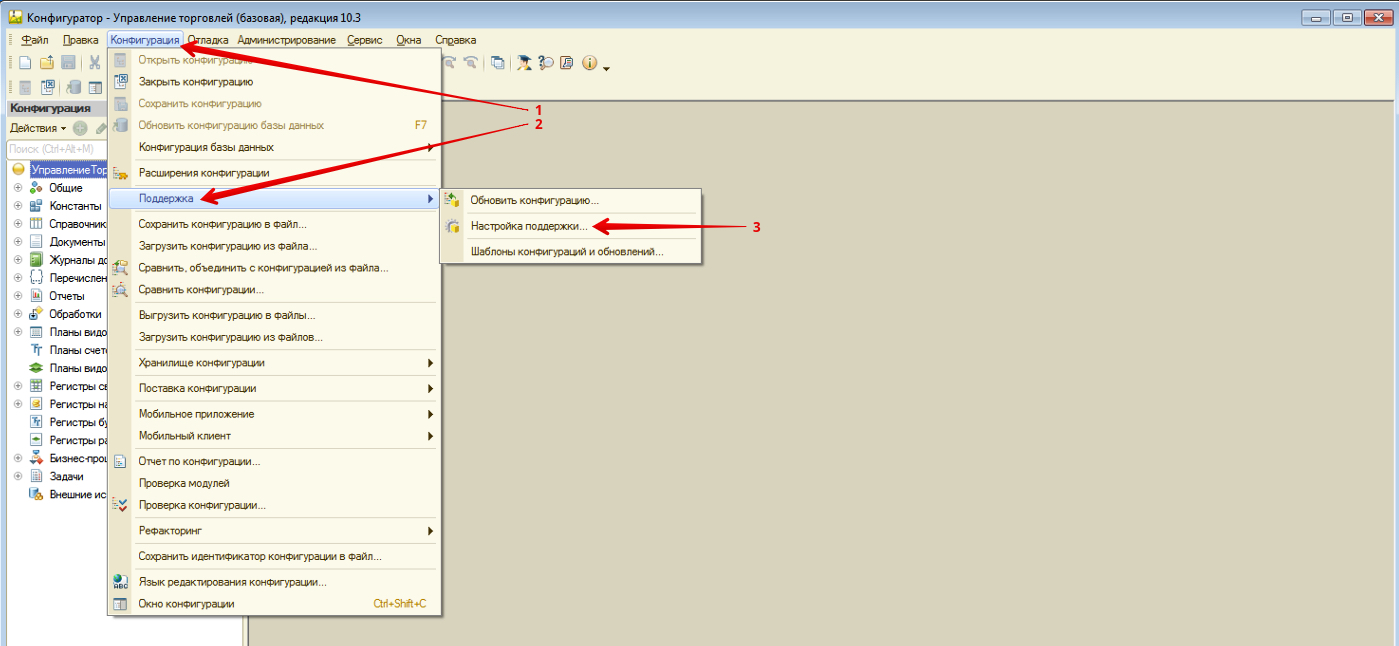
Для этого откройте Конфигуратор, перейдите на вкладку Конфигурация, далее Открыть конфигурацию. Затем перейдите :  Конфигурация → Поддержка → Настройка поддержки:

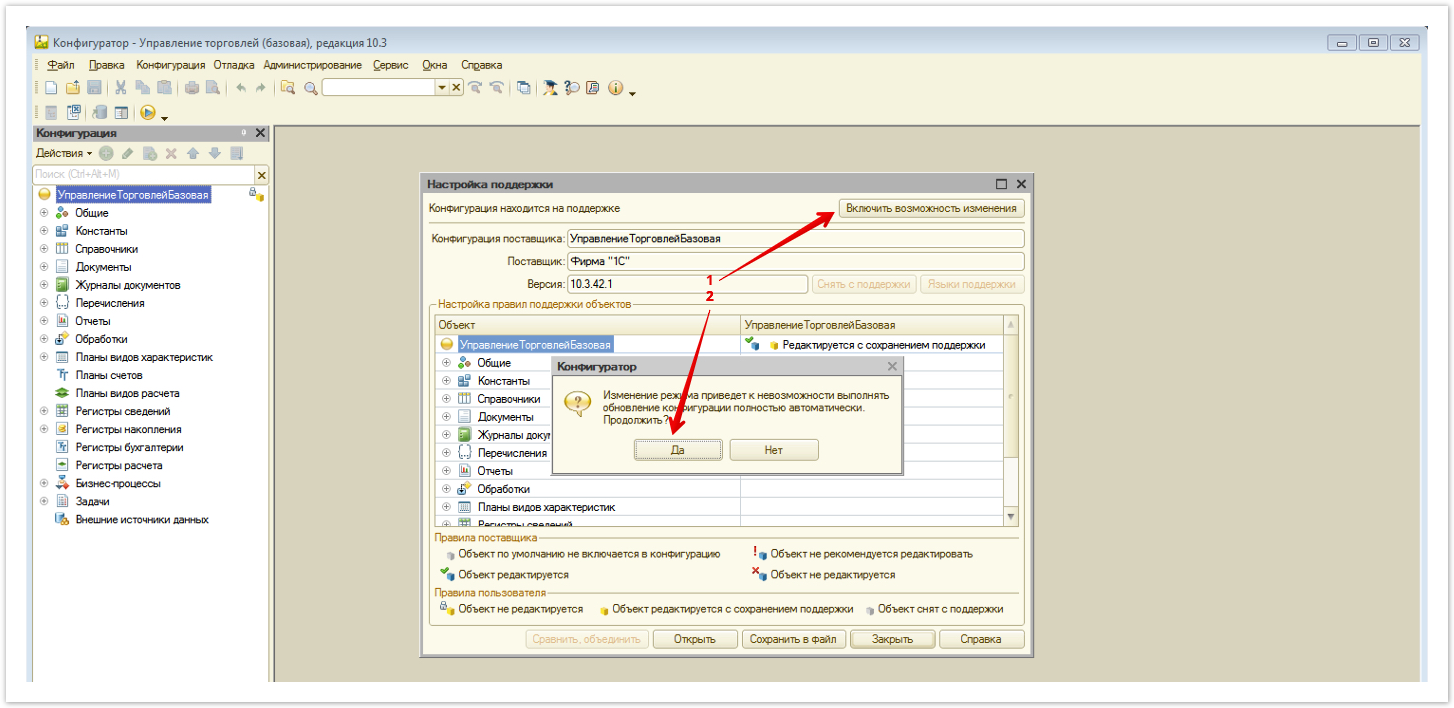
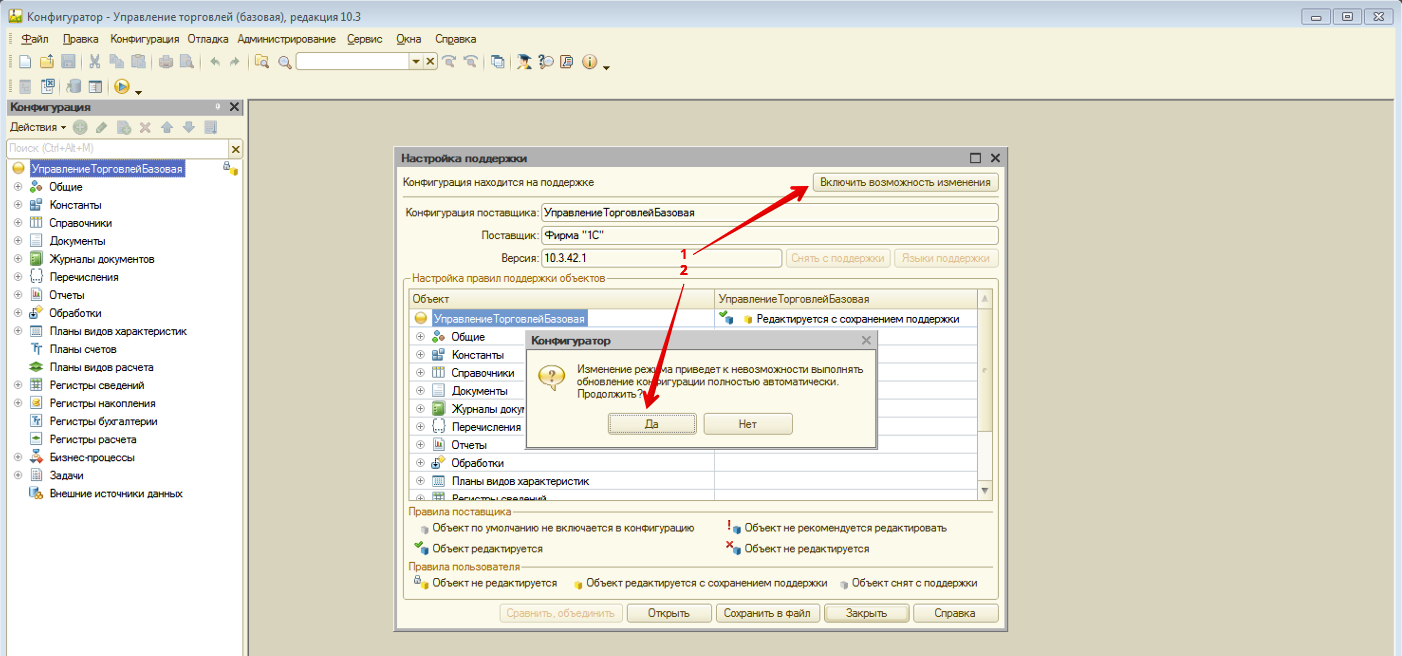
В открывшемся окне нажмите кнопку Включить возможность изменения. В окне запроса нажмите кнопку Да, чтобы дать согласие на включение возможности изменения:

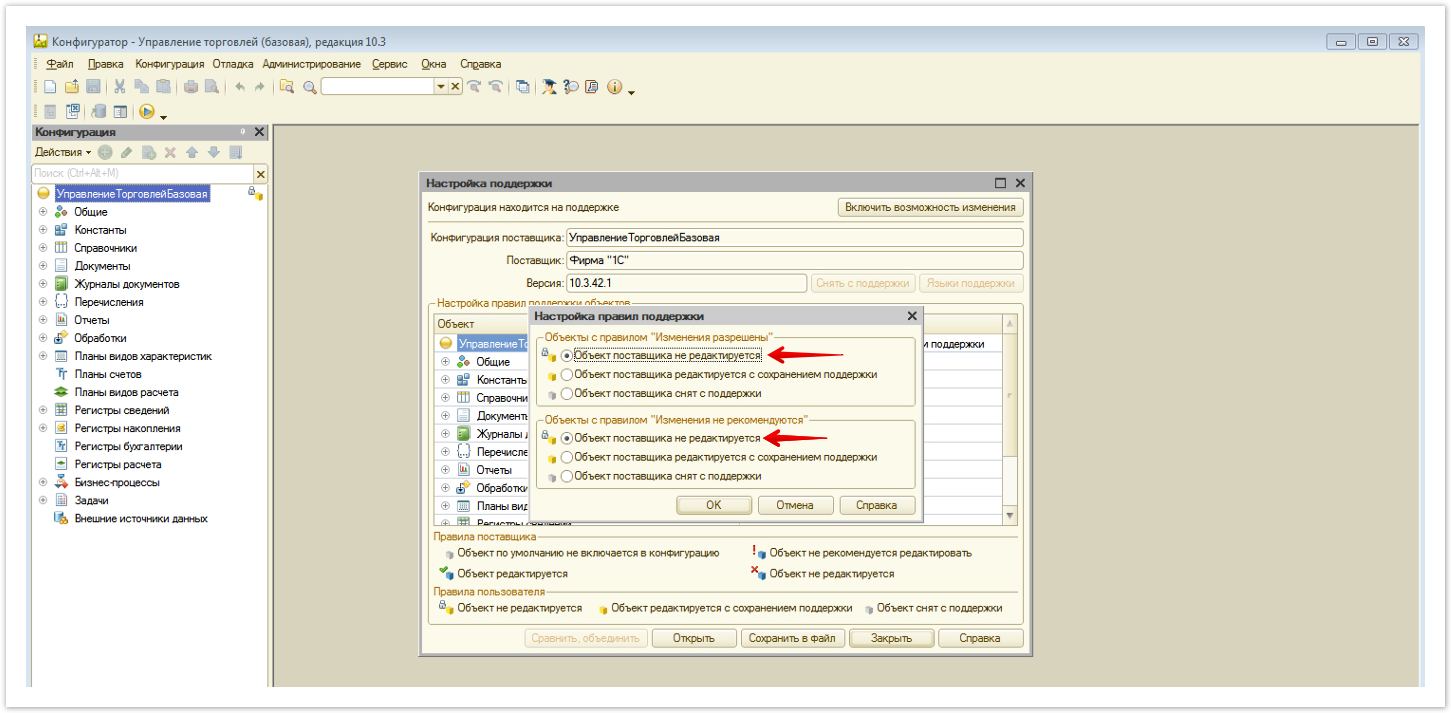
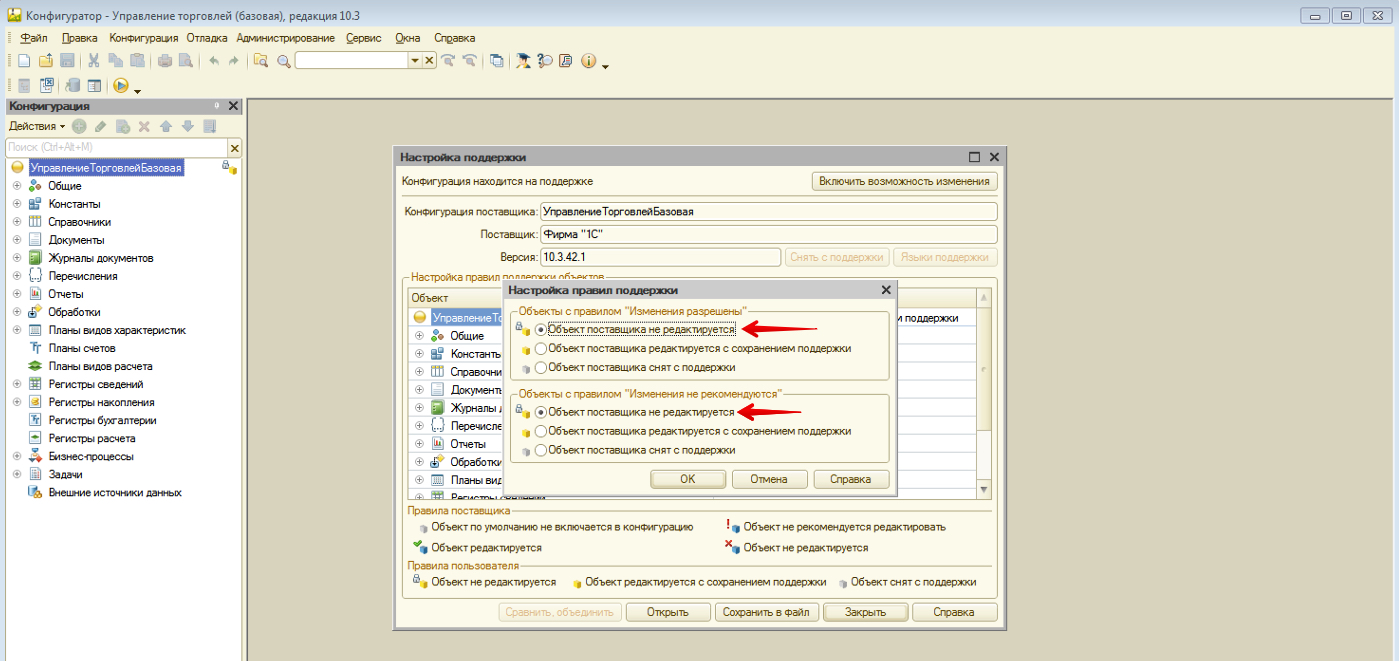
После нажатия на кнопку Да откроется окно настроек правил поддержки, где укажите следующие параметры и нажмите кнопку ОК

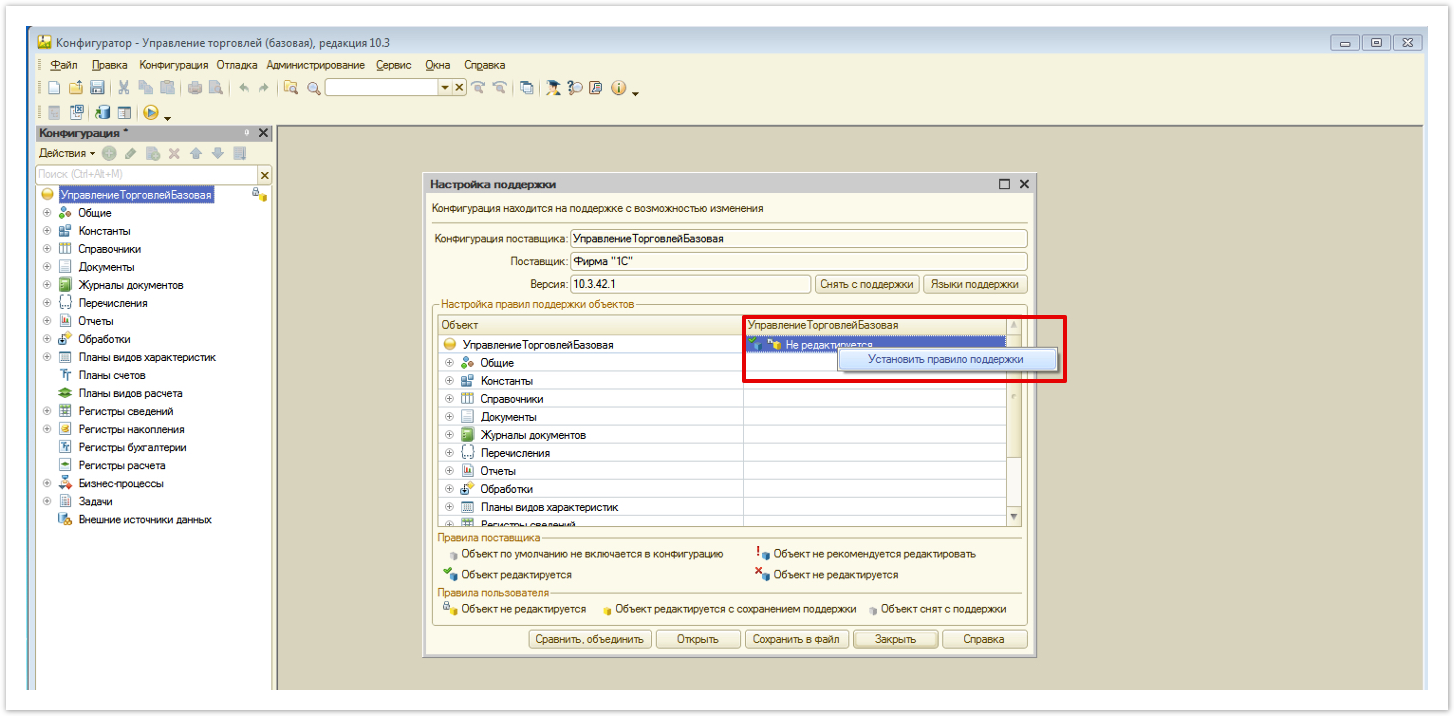
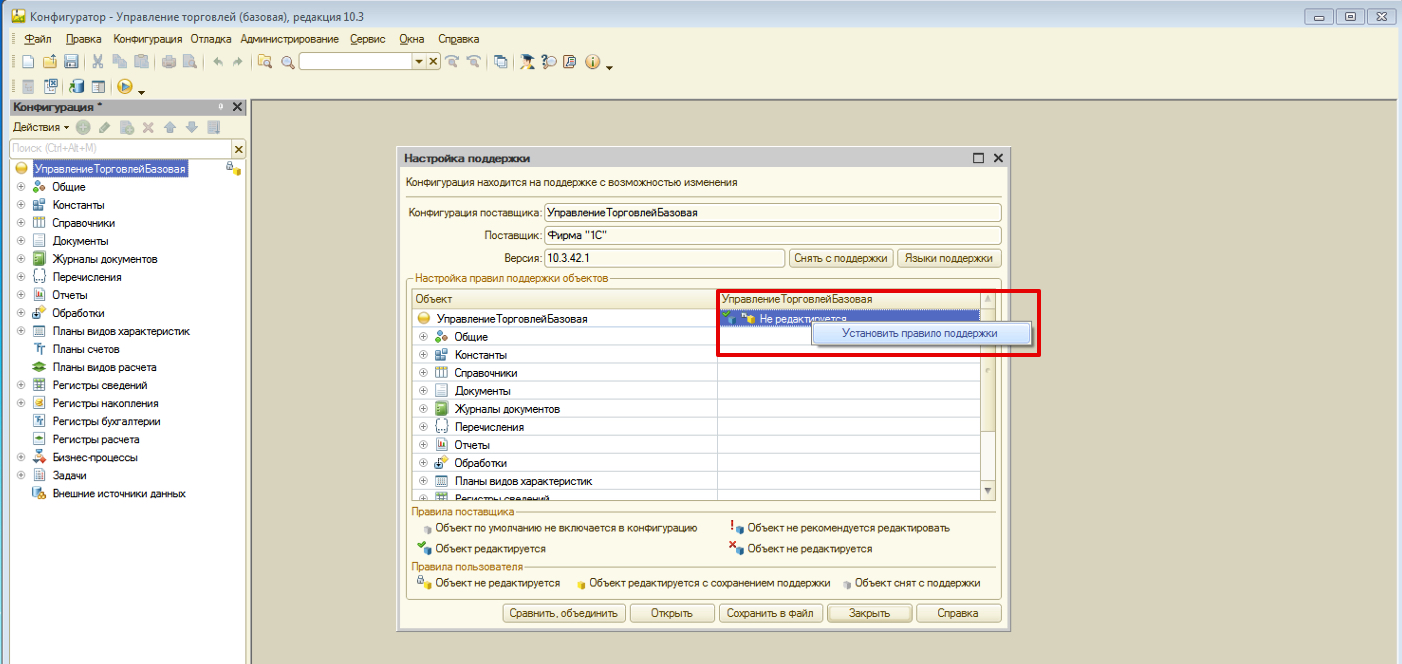
После настройки правил поддержки,  необходимо изменить правило поддержки для корня конфигурации. Для этого откройте меню изменений режима поддержки нажав правую кнопку мыши на кнопке Не редактируется и затем нажав кнопку Установить правило поддержки.

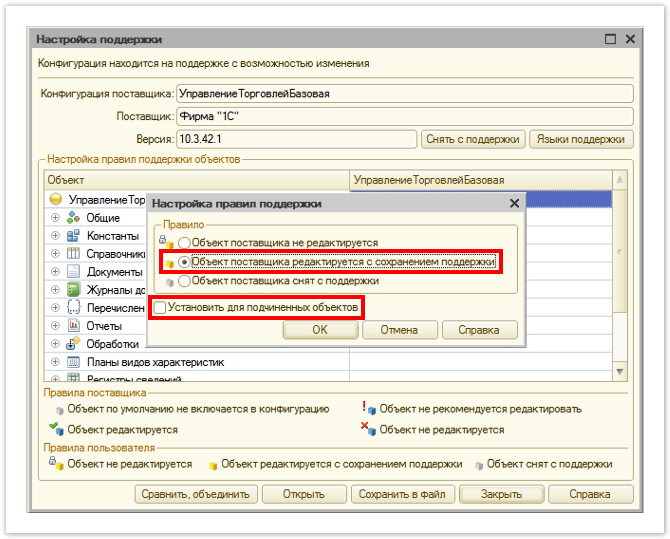
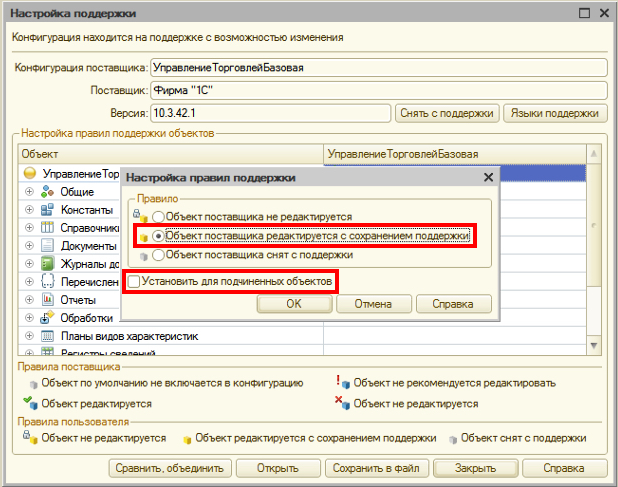
В открывшемся окне выберите Объекты поставщика редактируются с сохранением поддержки. Оставить не выделенным Установить для подчиненных объектов и нажмите кнопку ОК:

После  этого можно закрыть окно Настройка поддержки, нажав кнопку Закрыть. 

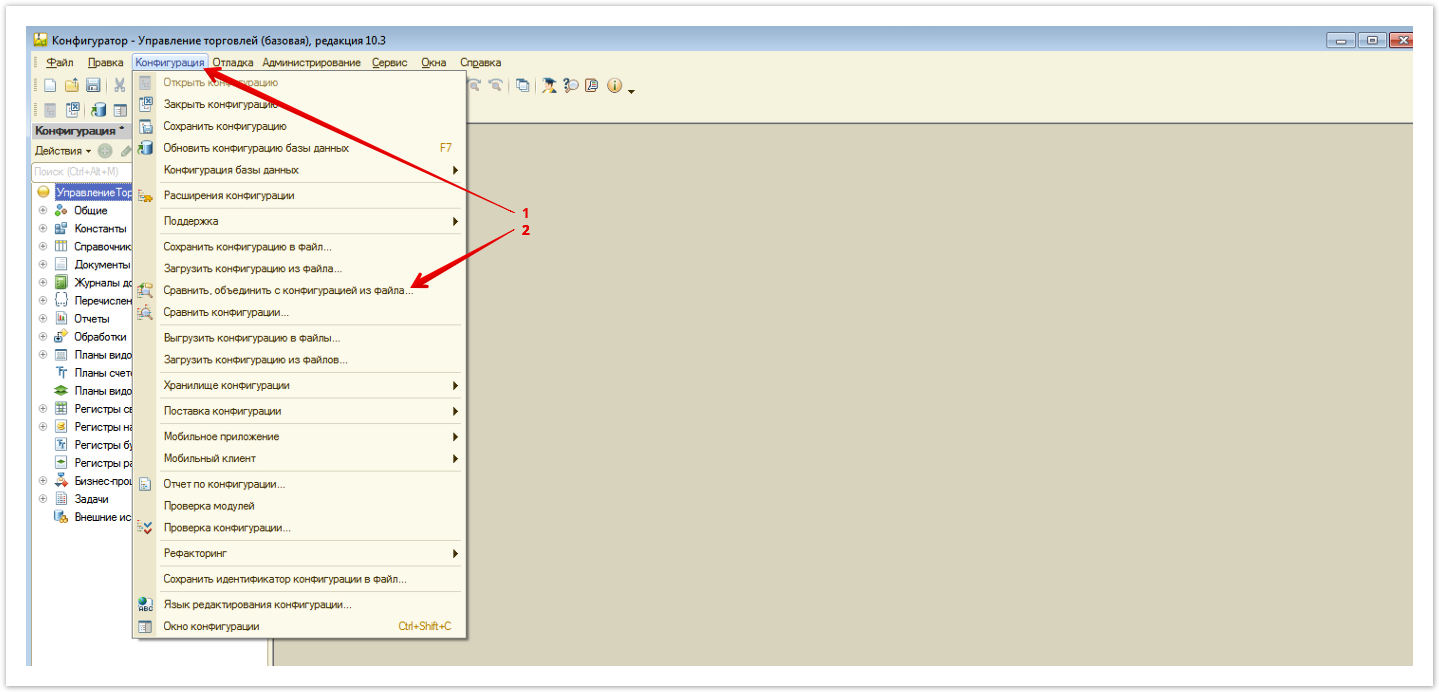
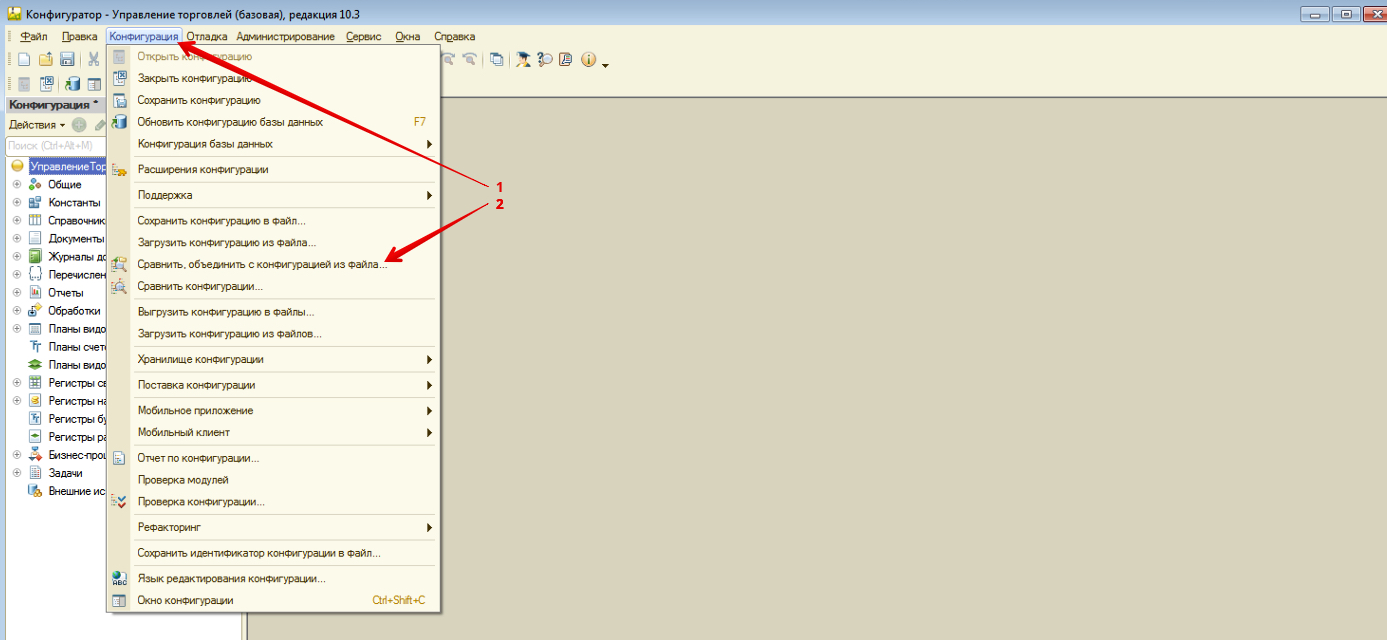
Следующим этапом настройки будет объединение загруженного файла конфигурации с ранее используемым. Для этого откройте вкладку Конфигурация и выберите пункт Сравнить, объединить с конфигурацией из файла:

(информация) В открывшемся окне укажите путь к файлу в формате .cf, который был загружен на первом этапе настройки на основании комплекта поставки.

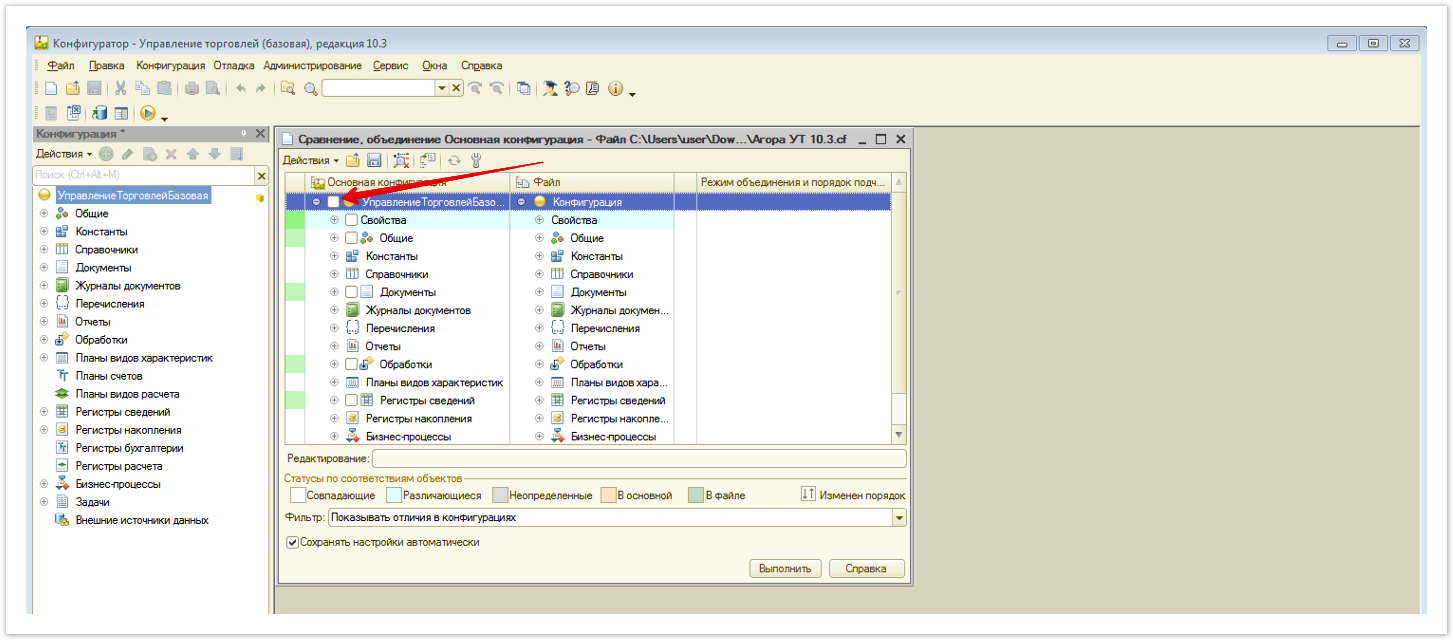
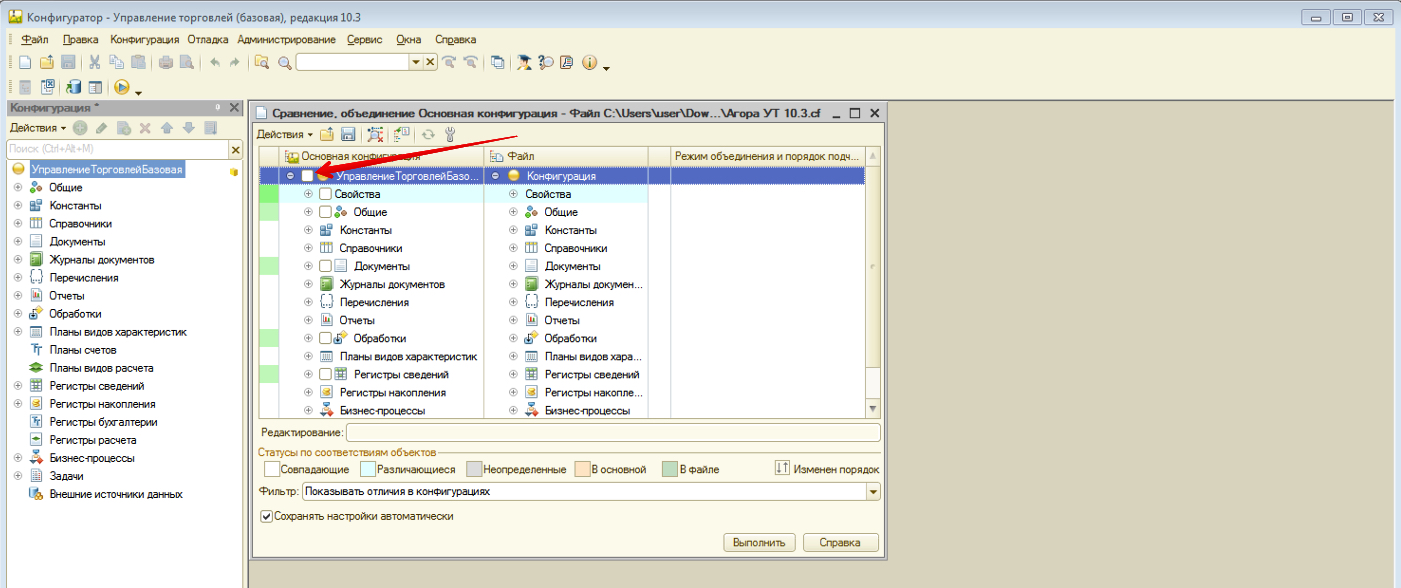
После успешной загрузки доработанного для интеграции файла конфигурации снимите отметки всех чекбоксов сравнения-объединения:

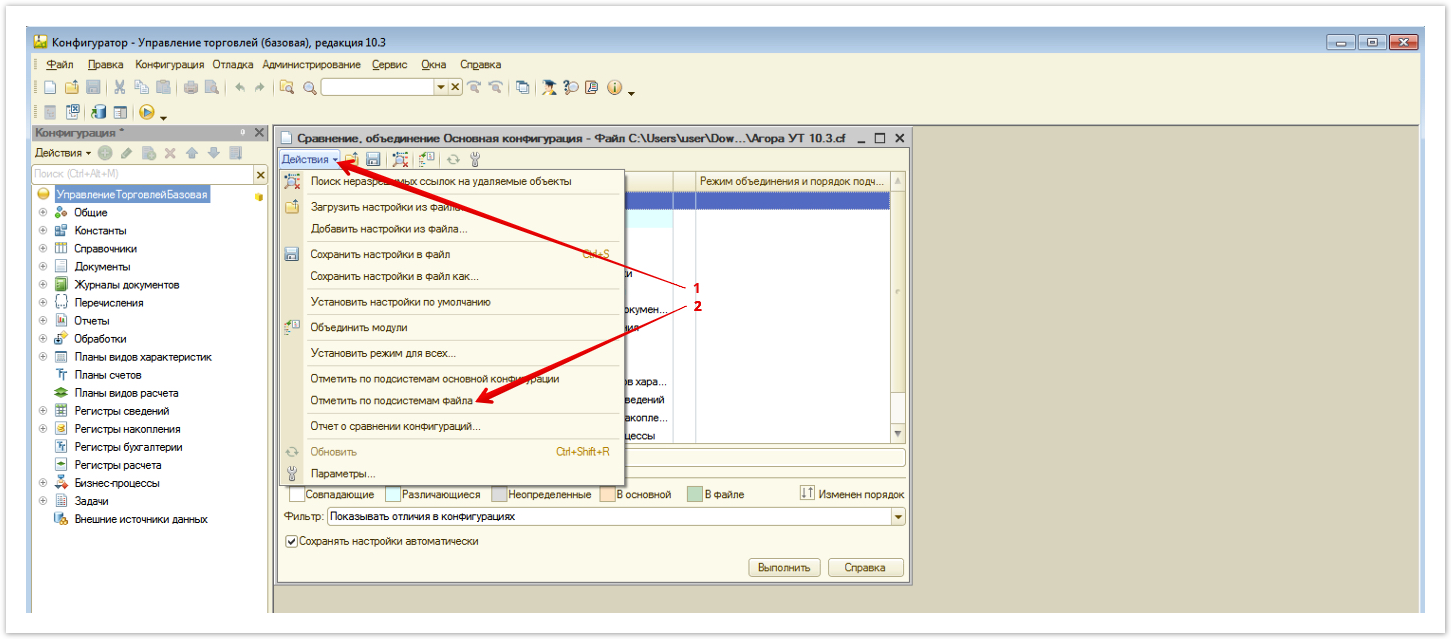
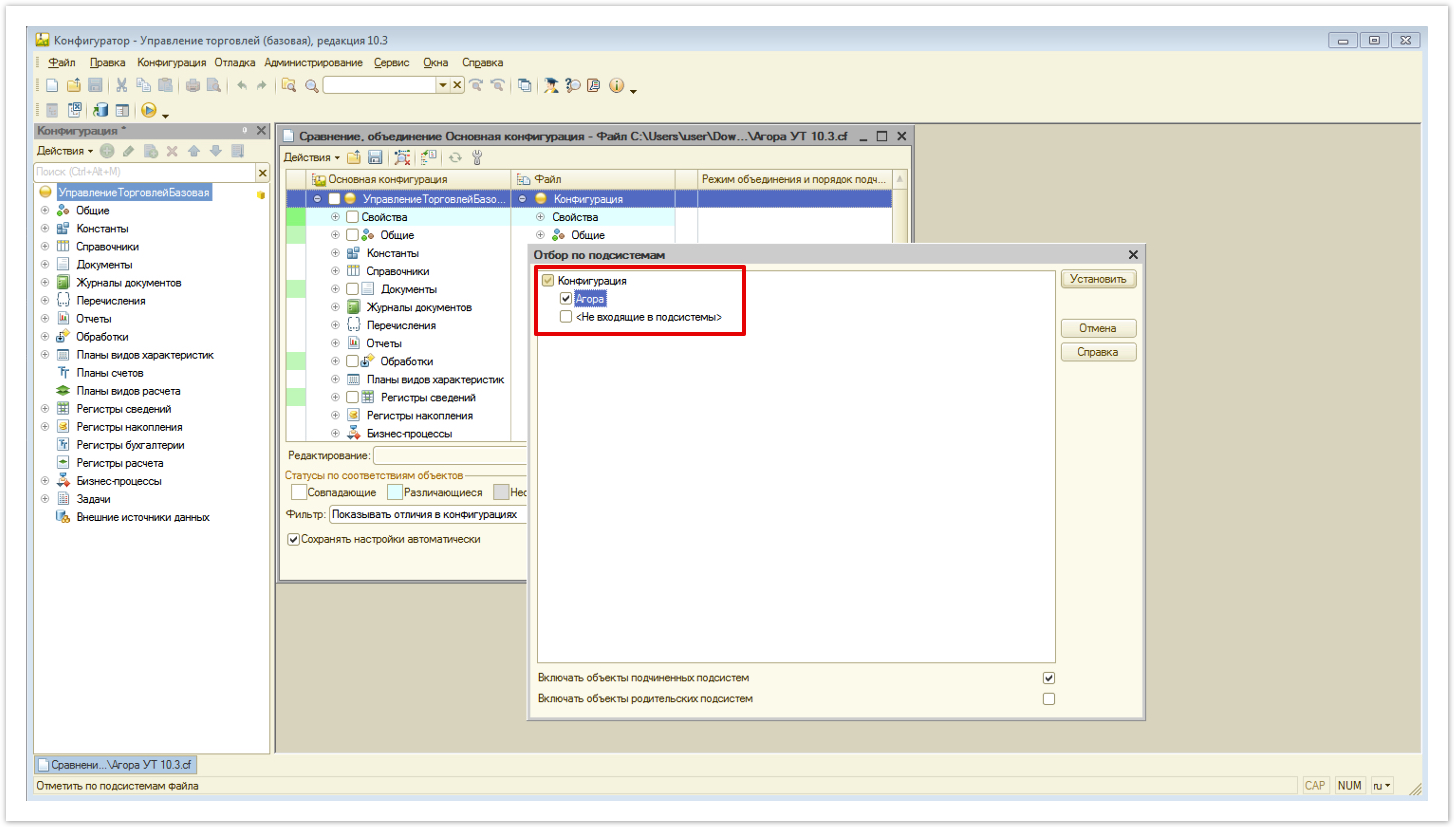
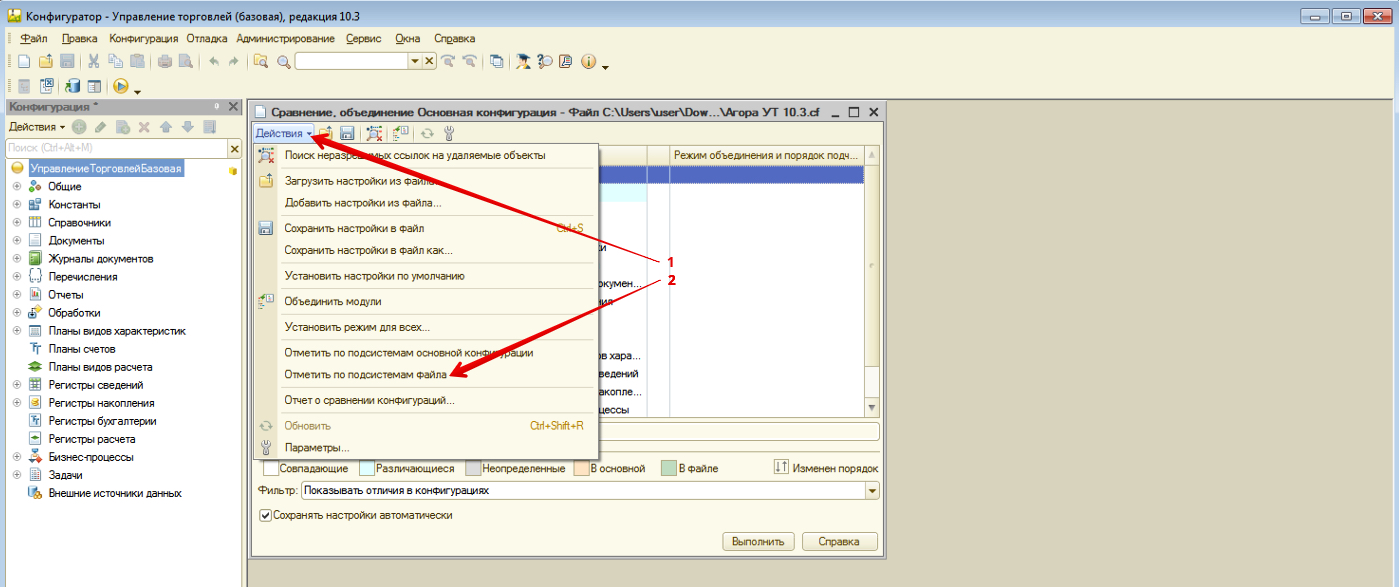
После этого отметьте Agora в качестве подсистемы. Нажмите кнопку Действия и перейдите в раздел Отметить по подсистемам файла:

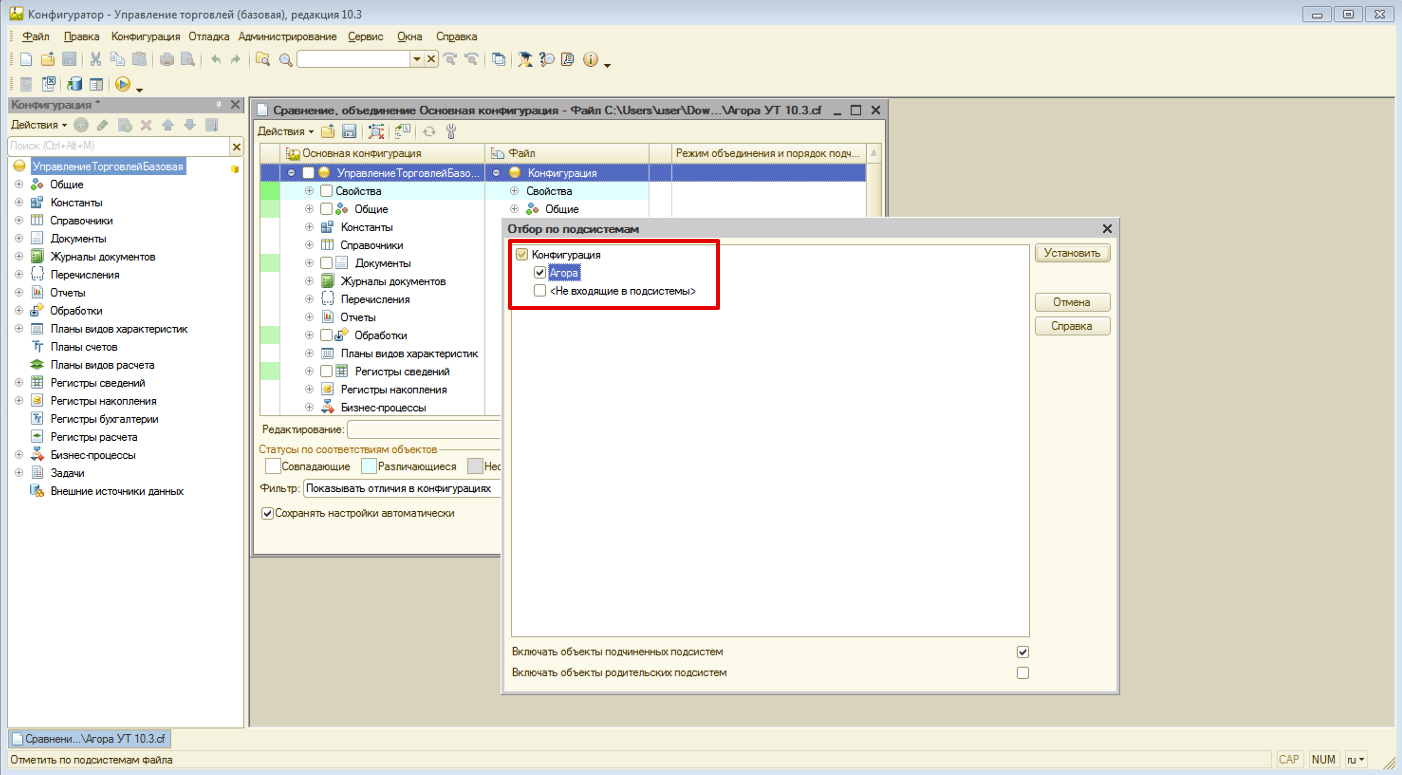
В открывшемся окне оставьте выделенной только подсистему Агора и нажмите кнопку Установить:

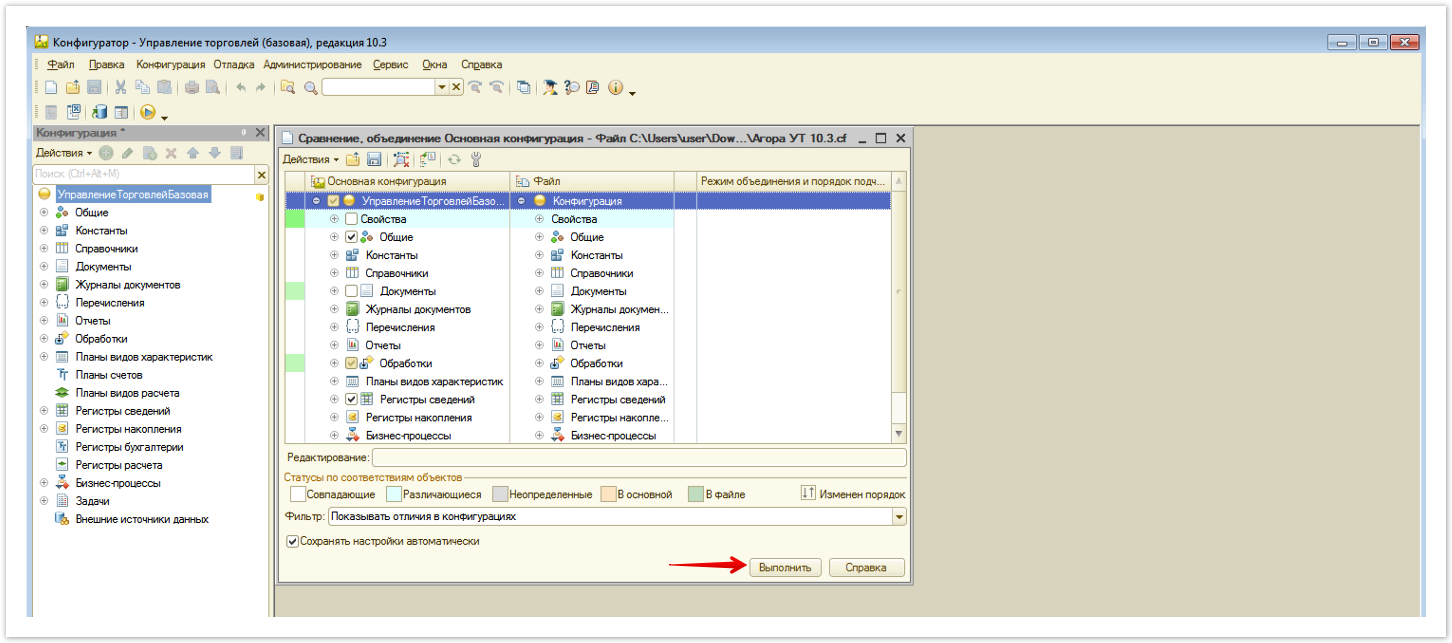
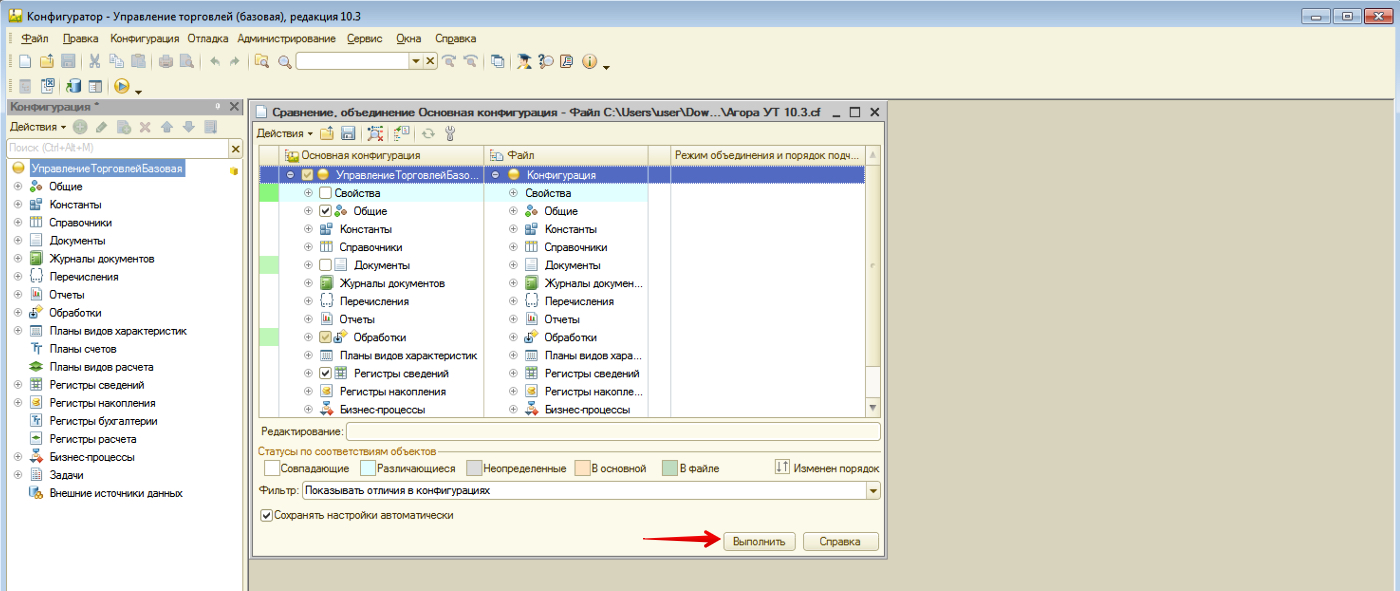
Затем выполните объединение кода, нажав кнопку Выполнить:


Нажать на кнопку Продолжить

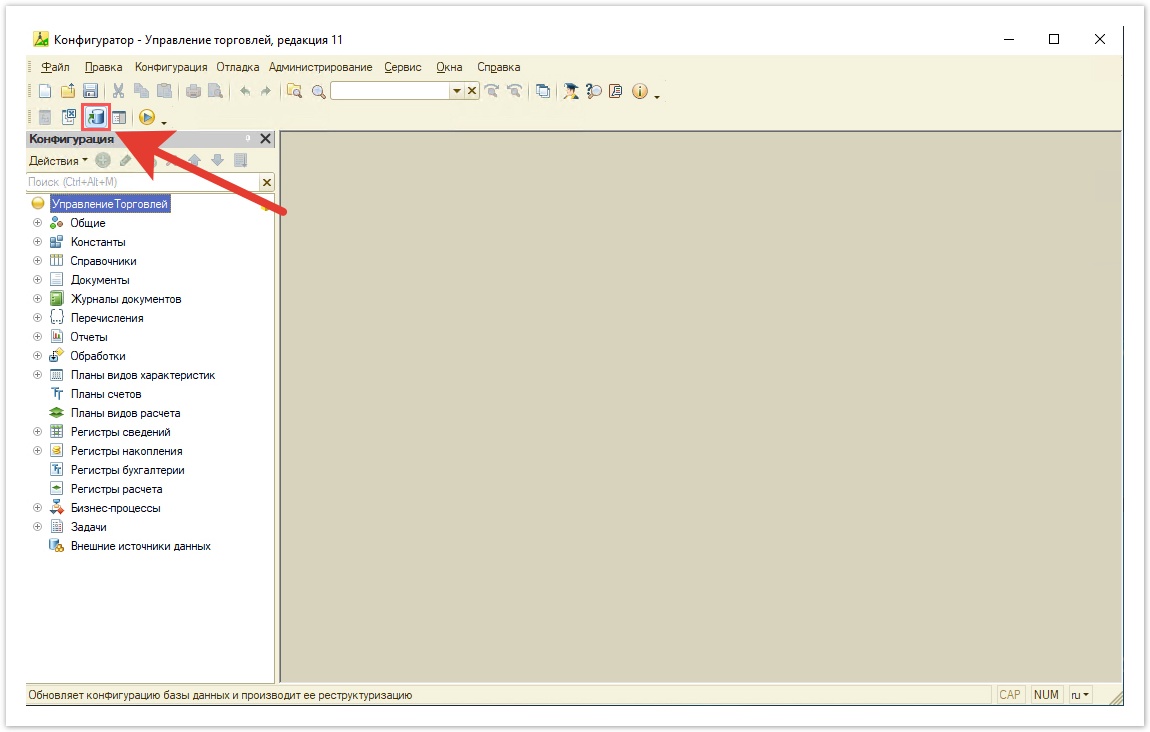
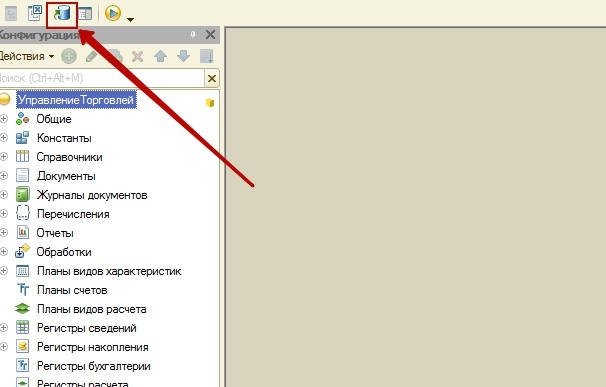
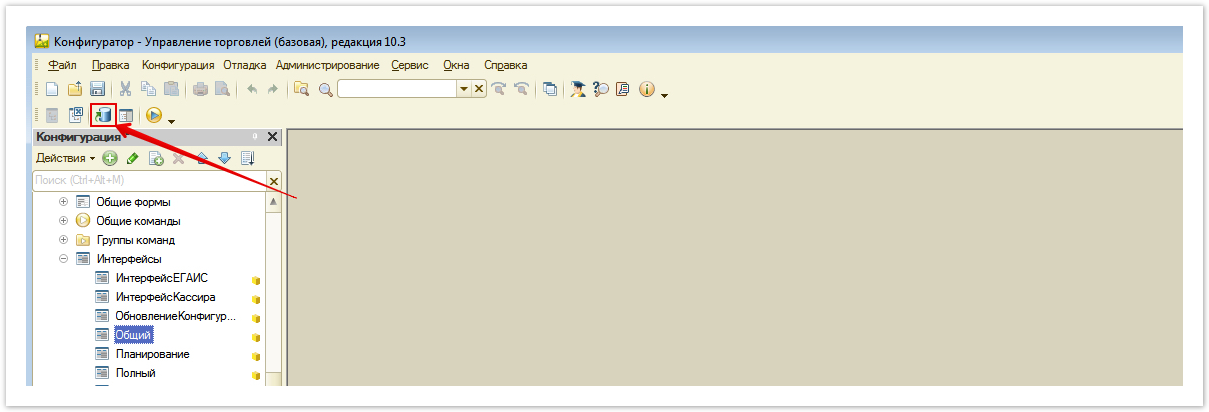
Далее нужно обновить конфигурацию, нажав на кнопку обновления.

Image Added

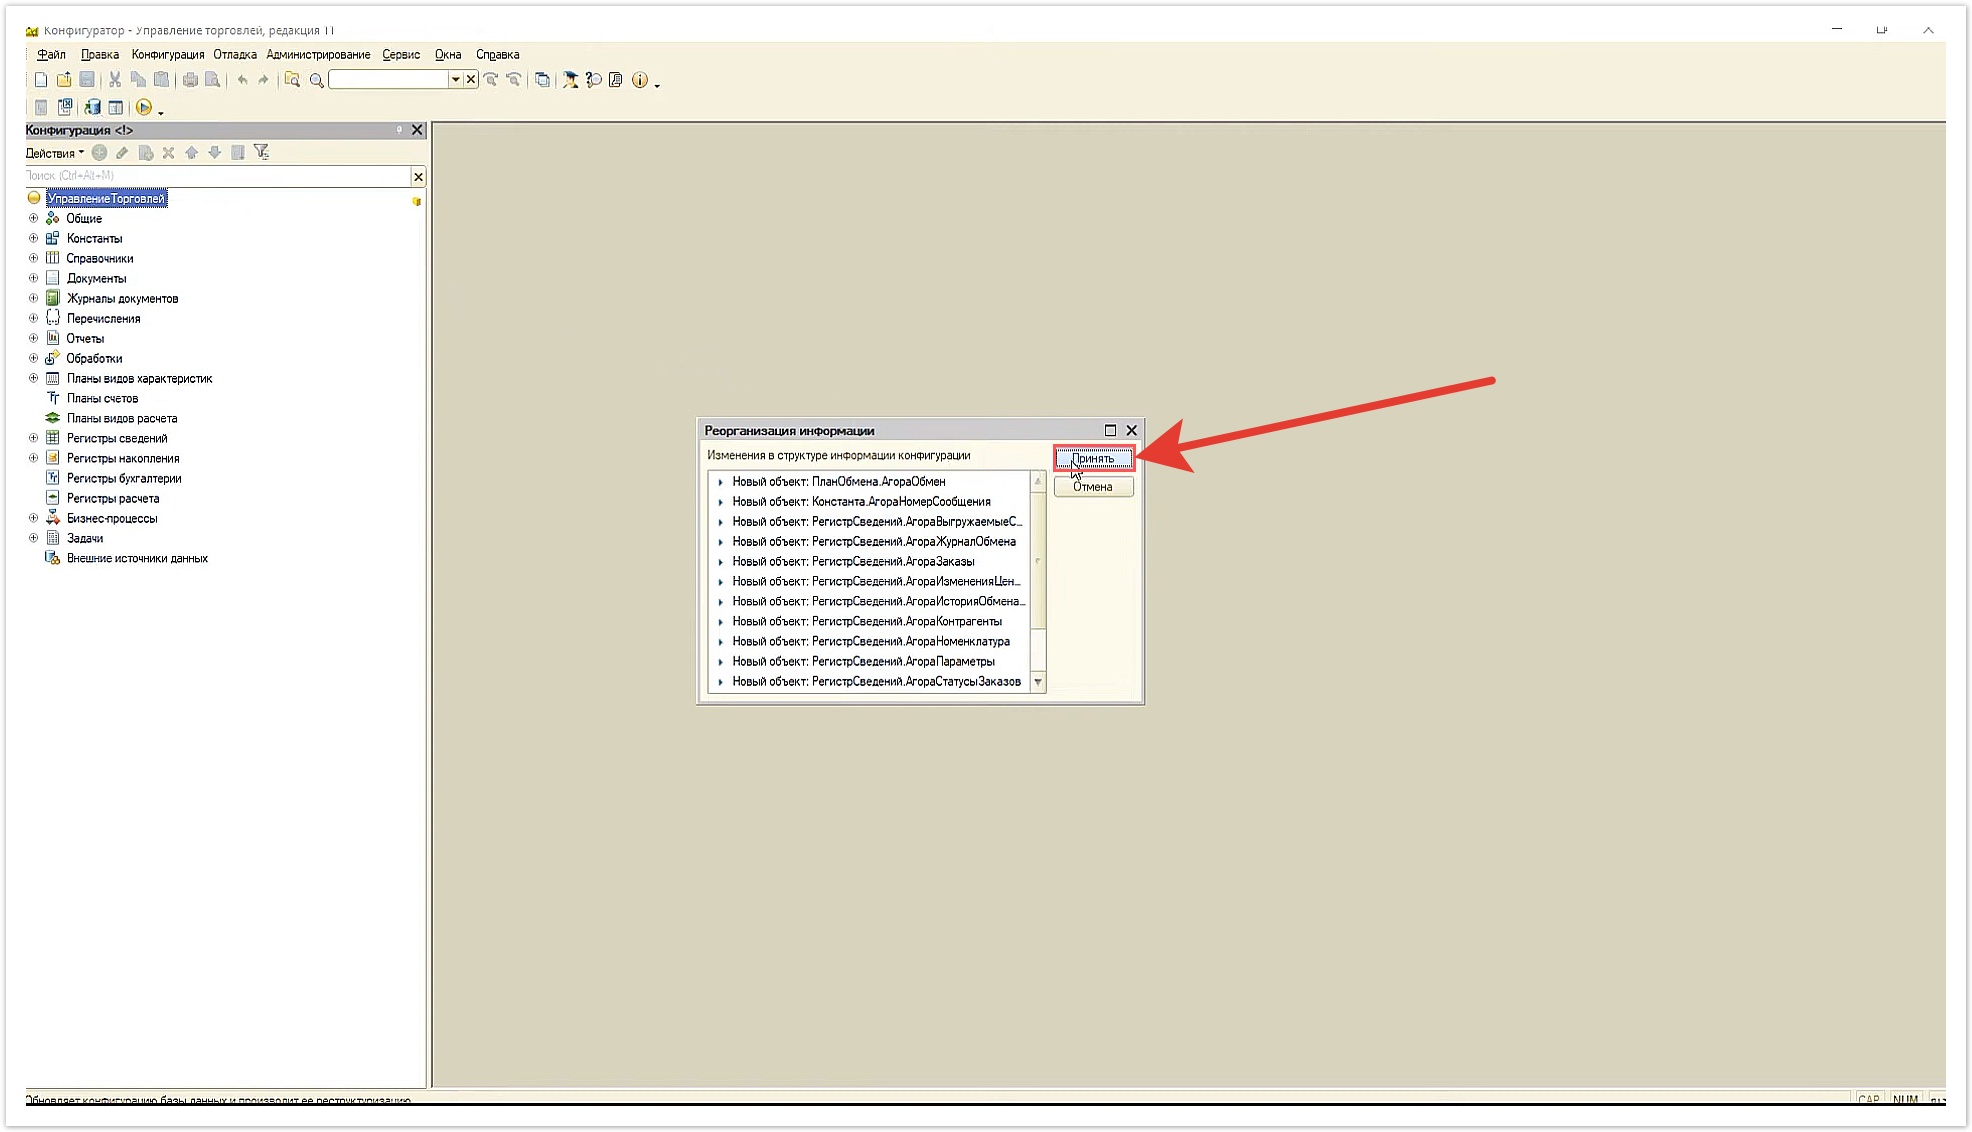
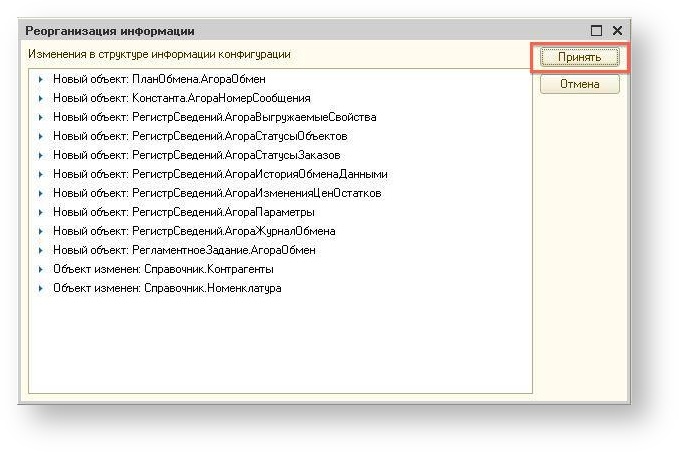
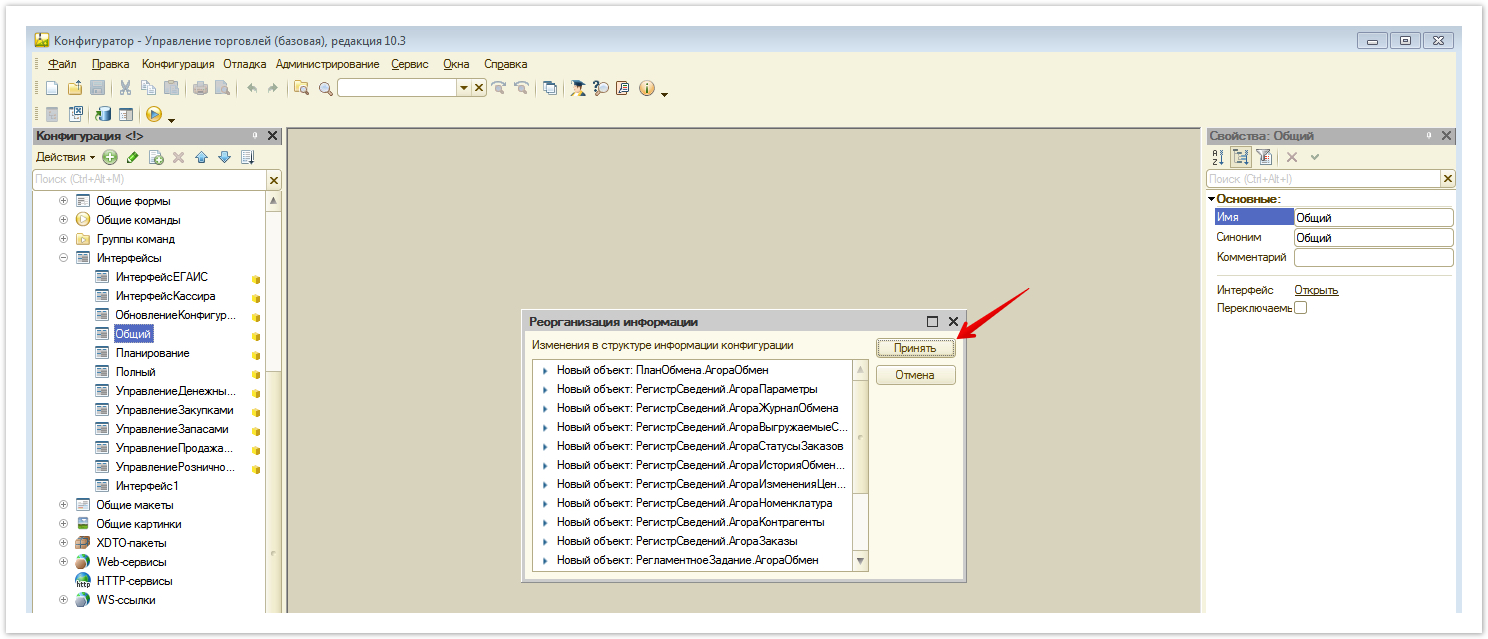
В открывшемся окне нажимаем Принять.

Image Added

Для корректной работы механизмов регистрации изменений и обмена необходимо либо внести изменения в типовые модули конфигурации, либо воспользоваться расширением. Расширение входит в состав шлюза в виде общего макета.

Расширение будет установлено автоматически из режима Предприятия. Общие модули включены в состав плана обмена и содержат только изменяемые функции.

После того, как текущий этап настройки будет завершен, необходимо сделать полную выгрузку. 

(информация) О том, как сделать полную выгрузку с настроенным шлюзом Agora, описано в этом разделе.

    
Якорь

2

4

2

4

2

3. Настройка обмена с порталом

После обновления конфигурации необходимо запустить 1С: Предприятие.

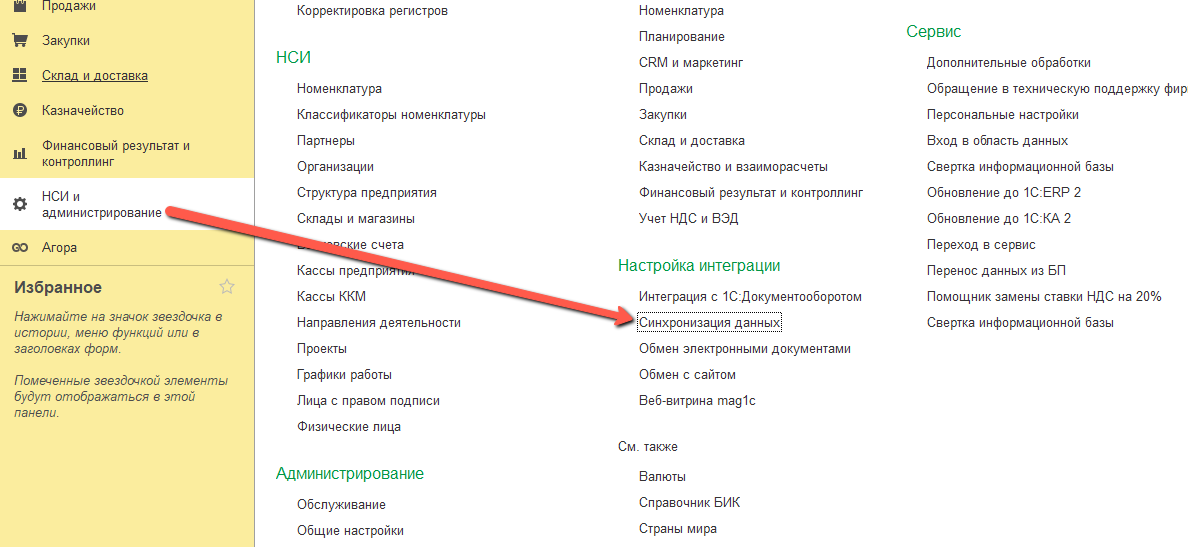
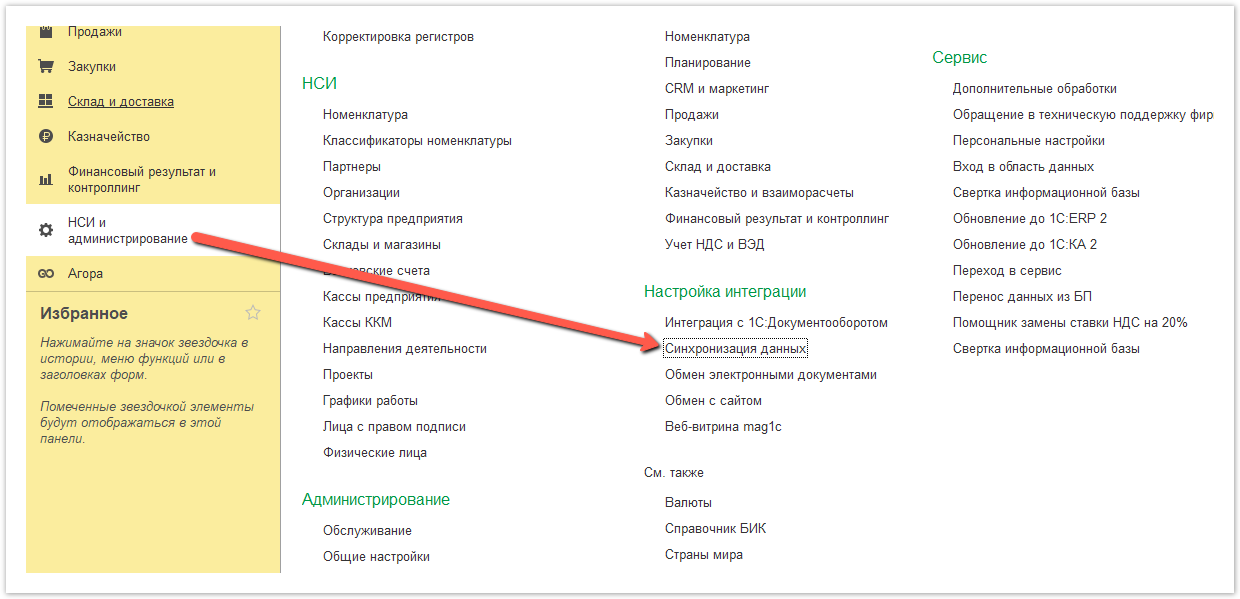
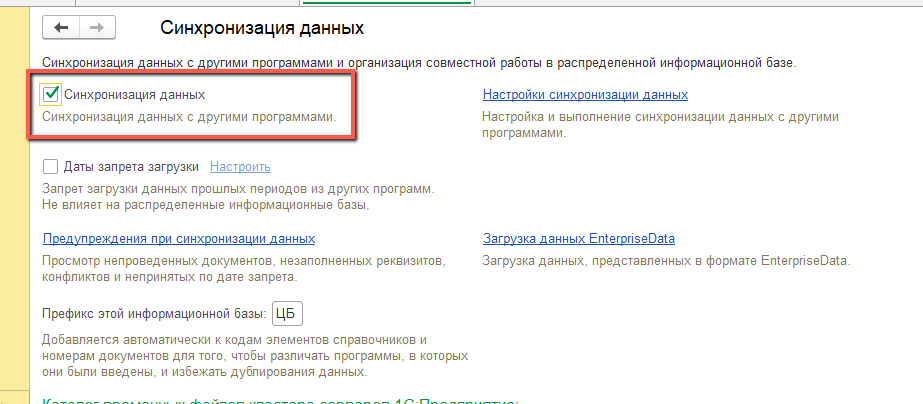
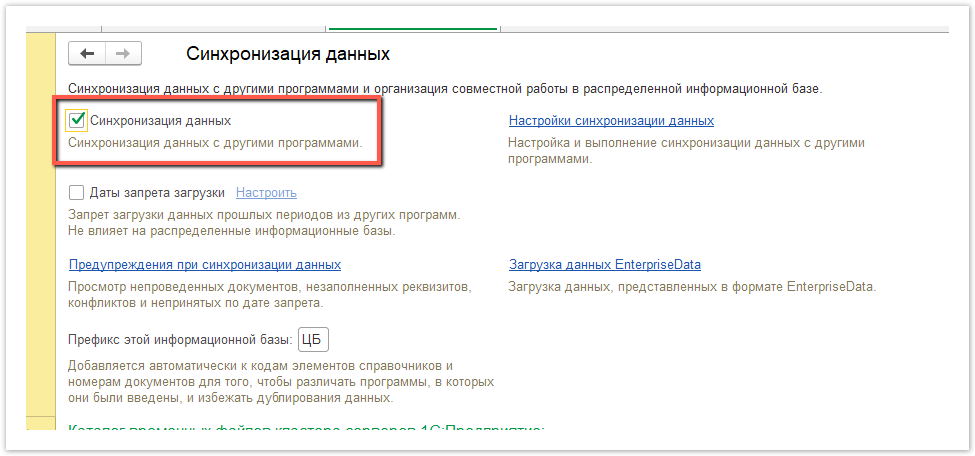
В нформационной информационной базе должен бы включен механизм синхронизации данных. Если синхронизация не использовалась ранее, необходимо установить флаг в настройках системы:

Image RemovedImage Added

Image RemovedImage Added

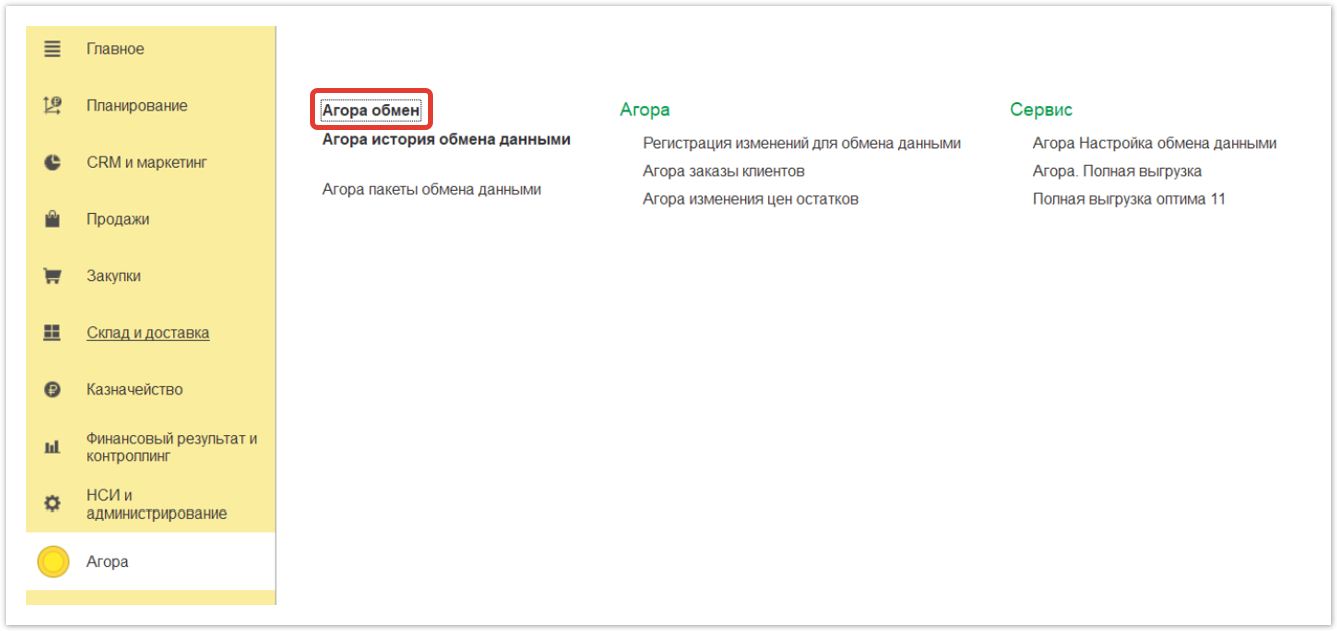
Далее необходимо перейти в план обмена "Агора обмен":

Image RemovedImage Added

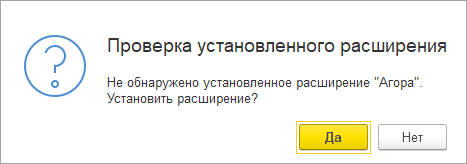
Если в общие модули не были внесены изменения, то будет предложено установить расширение:

Работа шлюза без установленного расширения или изменений в общих модулях невозможна.

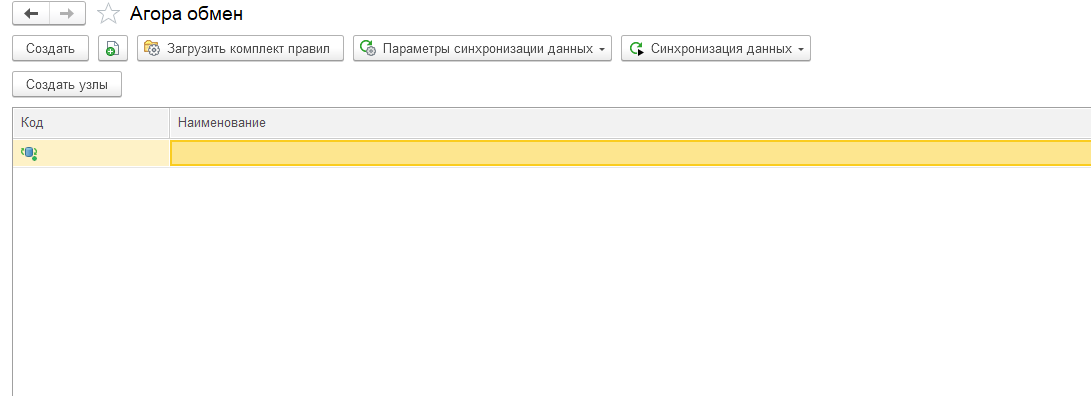
После установки расширения необходимо выполнить перезапуск 1С и повторно открыть форму списка плана обмена:

Image RemovedImage Added

Для инициализации узлов можно вопользоваться воспользоваться кнопкой "Создать узлы". Будет создан новый узел плана обмена и открыта его форма.

Фильтры регистрации изменений

Image RemovedImage Added

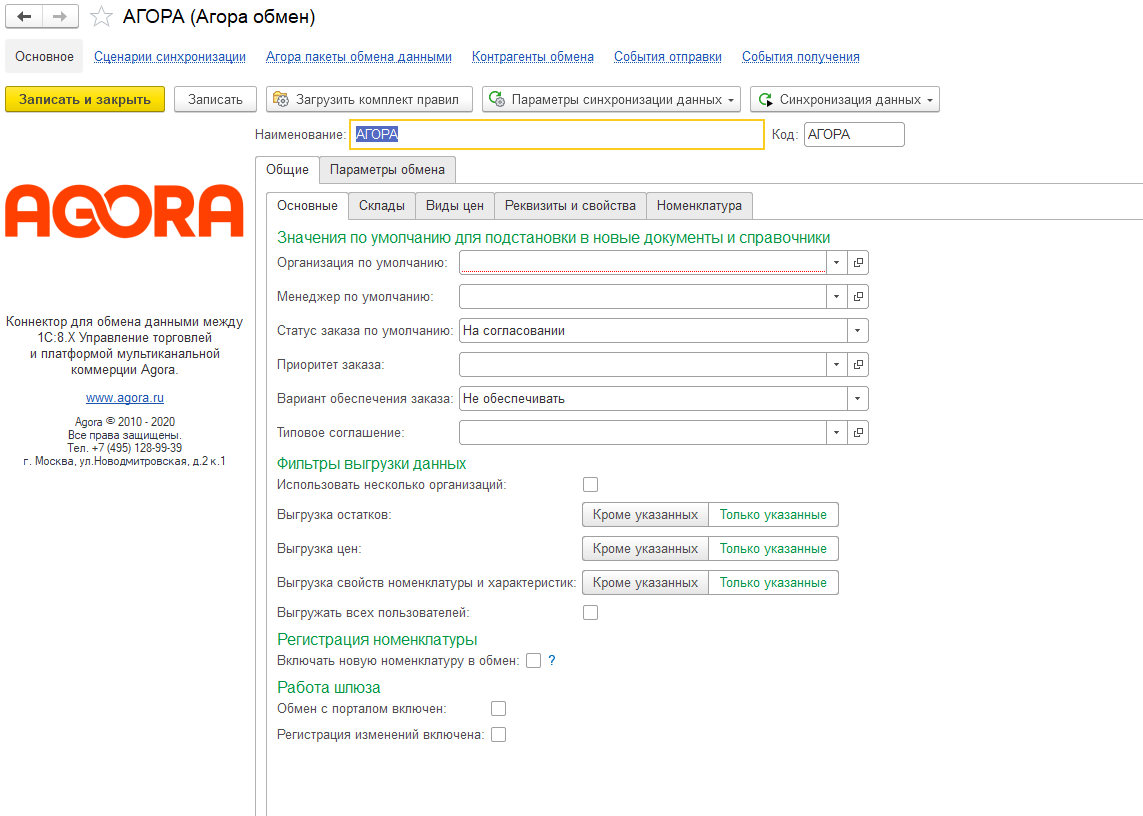
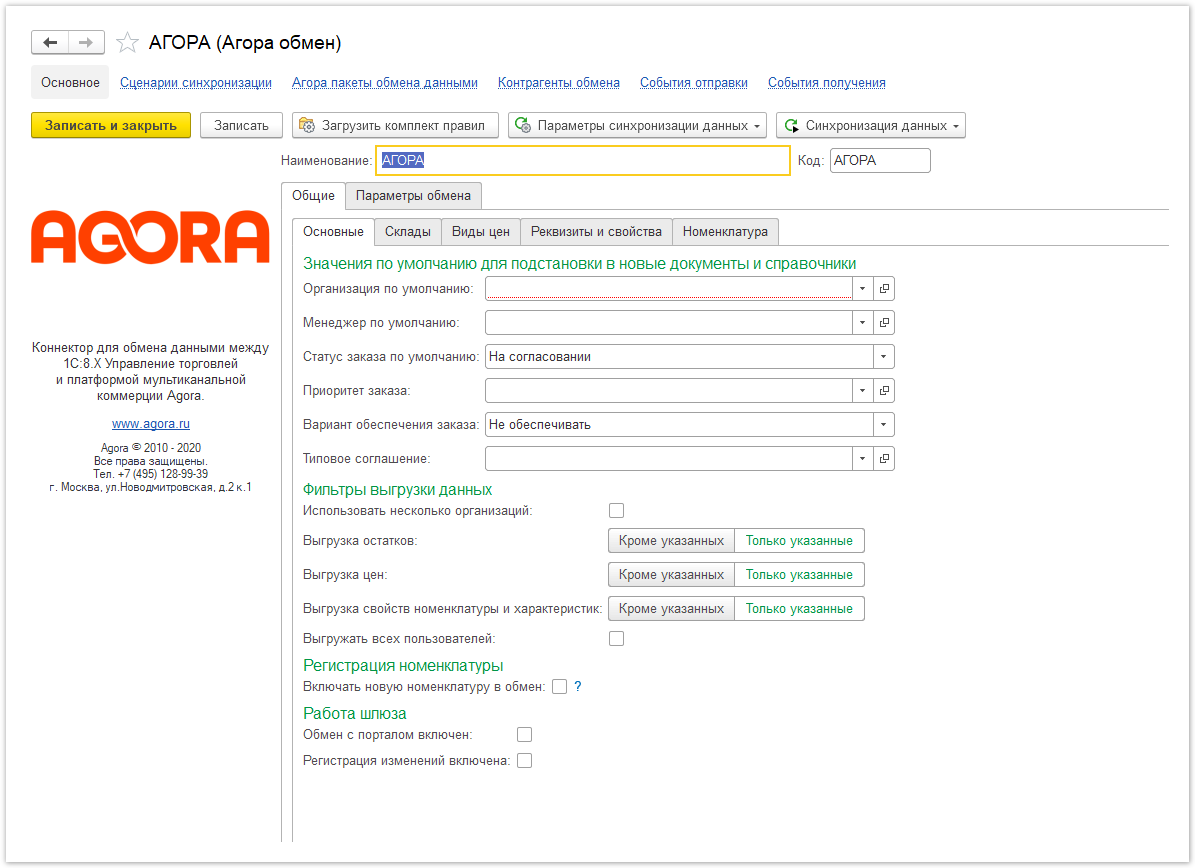
В форме плана обмена необходимо указать организацию по умолчанию, если на портал будут выгружаться данные по нескольким организациям, то необходимо установить флаг "Использовать несколько организаций" и указать все организации для обмена.

Менеджер по умолчанию - будет устанавливаться у новых партнеров.

Статус заказа, приоритет заказа, вариант обеспечения - значения по умолчанию для новых заказов.

Типовое соглашение - соглашение-образец для создания новых соглашений контрагентов, загружаемых с портала.

Виды цен, склады, реквизиты номенклатуры и свойства номенклатуры и характеристик имеют 2 варианта настройки - выгружаются либо только указанные элементы, либо все, кроме указанных.

Если не установлен флаг "Регистрация изменений включена", то регистрация производиться не будет.

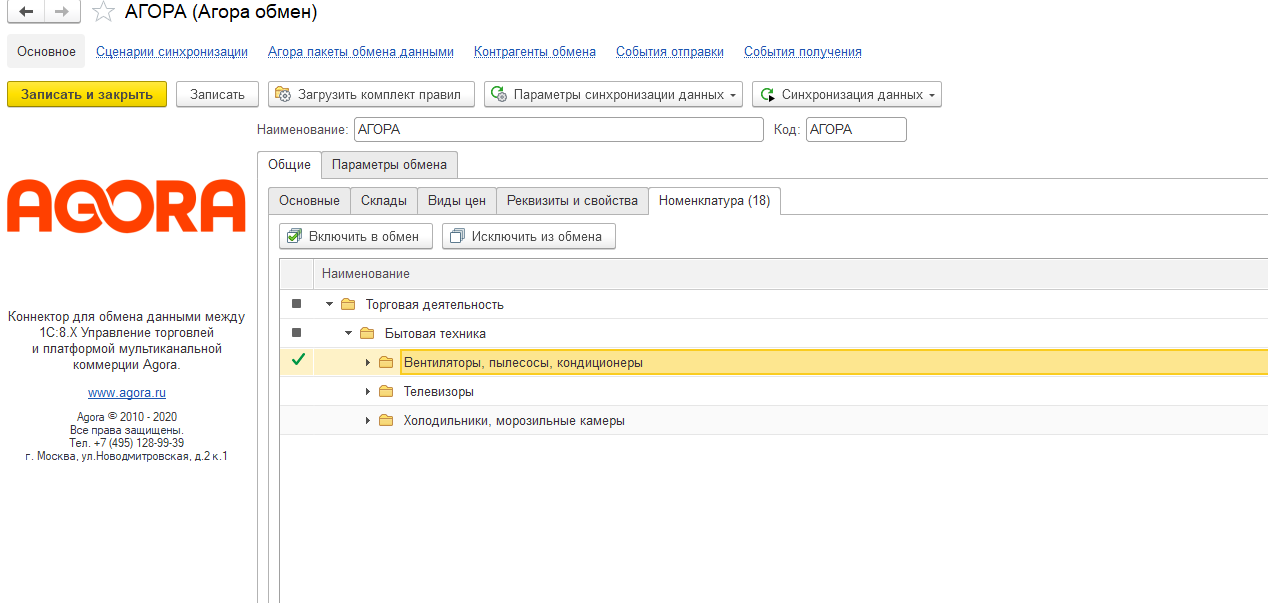
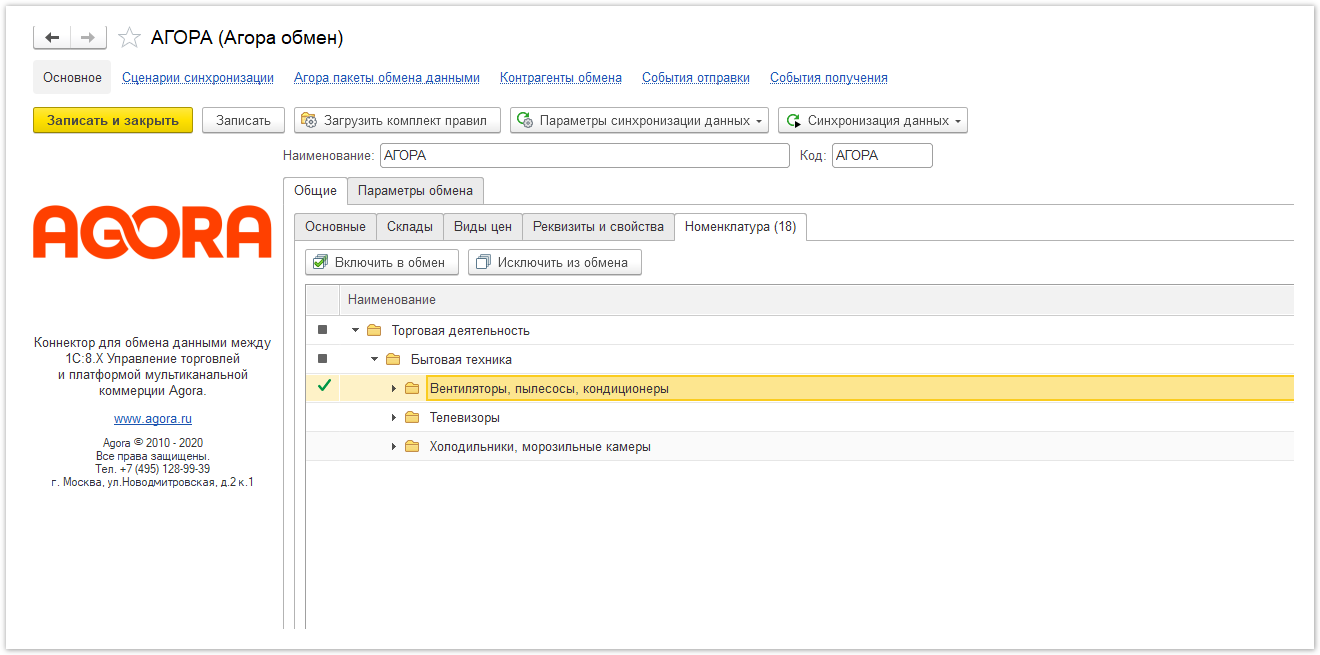
На странице "Номенклатура" указываются группы номенклатуры, включенные в обмен с порталом:

Image RemovedImage Added

Кнопка "Включить в обмен" включает выделенные позиции в обмен, "Исключить из обмена" - исключает. Если установлен флаг "Включать новую номенклатуру в обмен", то при создании или переносе товаров в группу, включенную в обмен, позиции будут включаться в обмен автоматически.

Параметры обмена с порталом

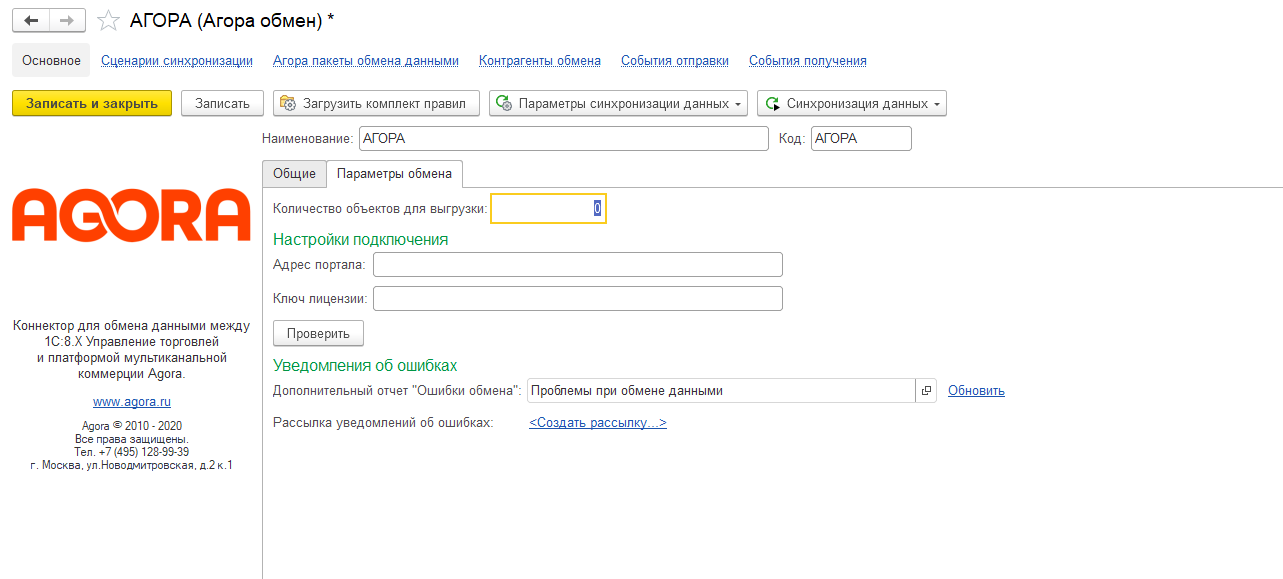
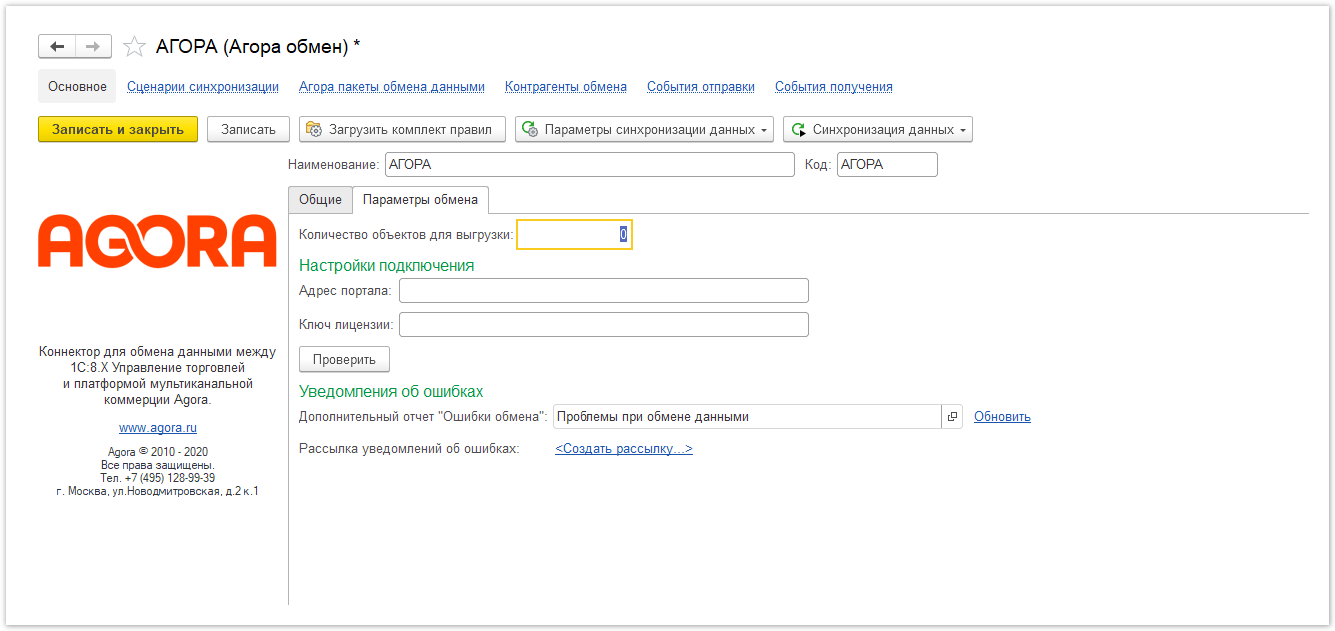
Image RemovedImage Added

Если установлено количество объектов для выгрузки, то в пакет обмена будет записываться ограниченное количество объектов.

Адрес портала указывается полностью, в виде http(s)://<имя сервера>/gateways/1c

Ключ лицензии указывается одинаковый в 1С и на платформе. Он предоставляется службой поддержки. В случае возникновения вопросов, отправьте запрос по адресу: help@agora.ru

Для рассылки уведомлений об ошибках должно быть включено использование дополнительных отчетов и обработок, отчет по ошибкам обмена добавляется в справочник дополнительных отчетов и обработок при создании узлов или по кнопке "Обновить" формы узла (см. скриншот). Если создана рассылка для данного узла, то на форме будет выведена ссылка на рассылку, иначе по ссылке откроется окно создания новой рассылки.

После записи узла обмен готов к использованию.

Правила регистрации объектов поставлются поставляются с планом обмена. При необходимости их можно выгрузить и отредактировать в конфигурации "Конвертация данных" через команду "Загрузить комплект правил"

Якорь
3
3

3

4. Выполнение обмена с порталом

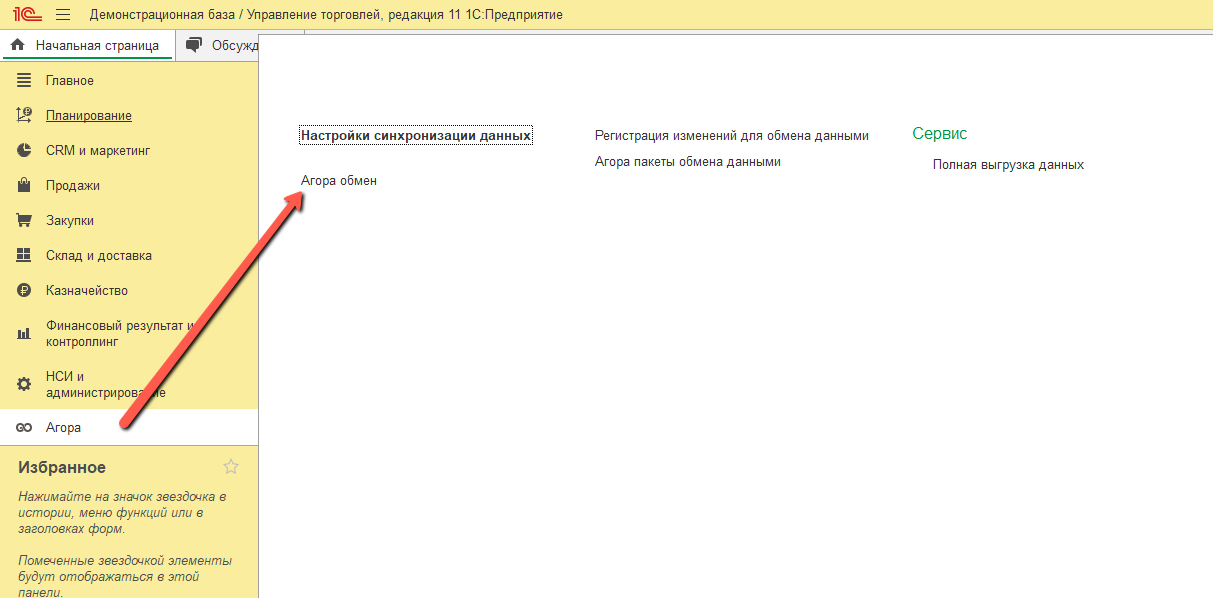
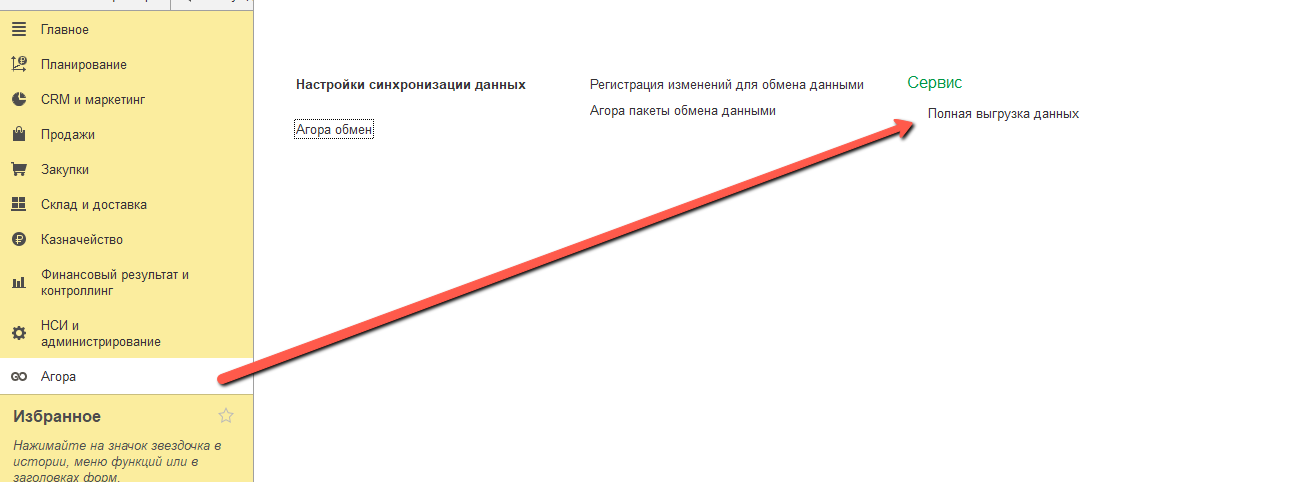
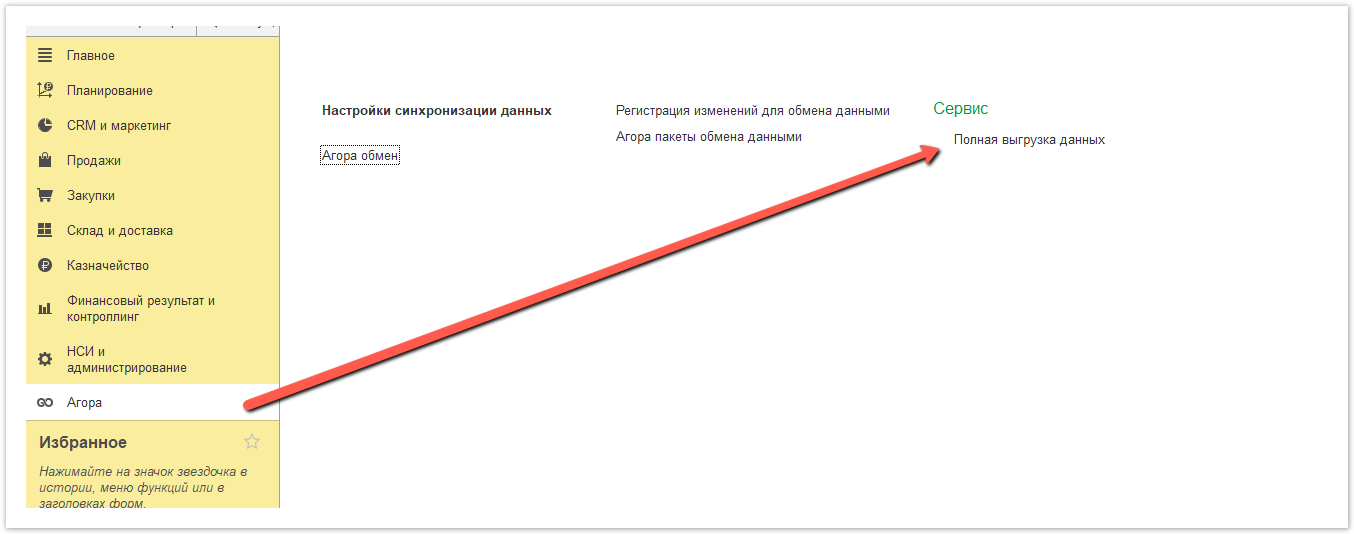
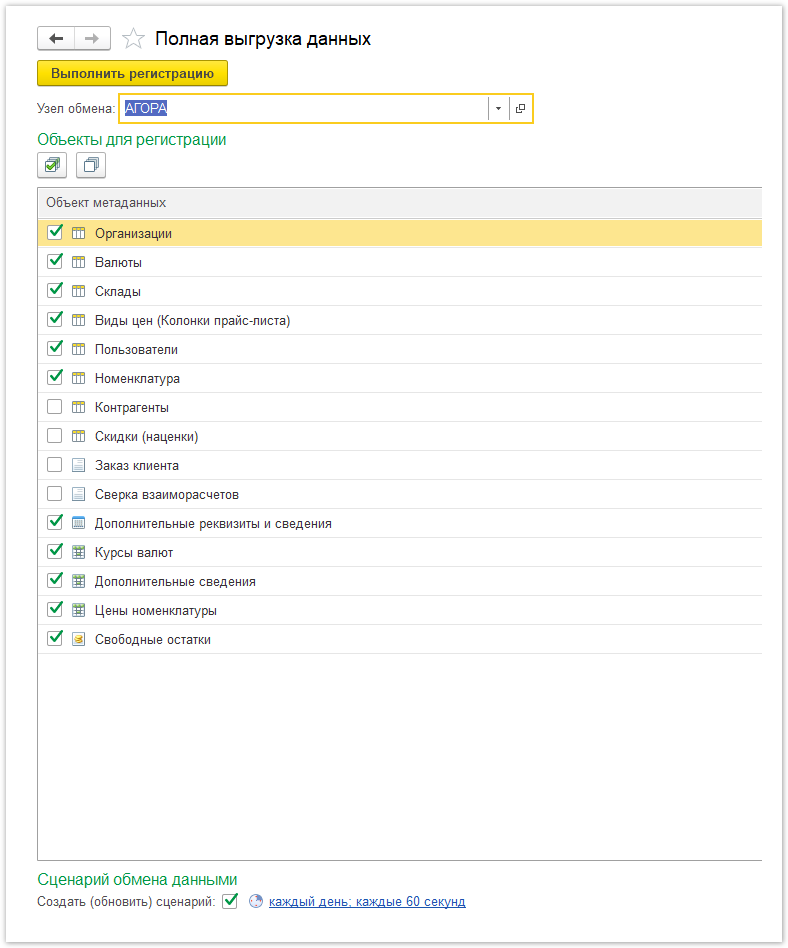
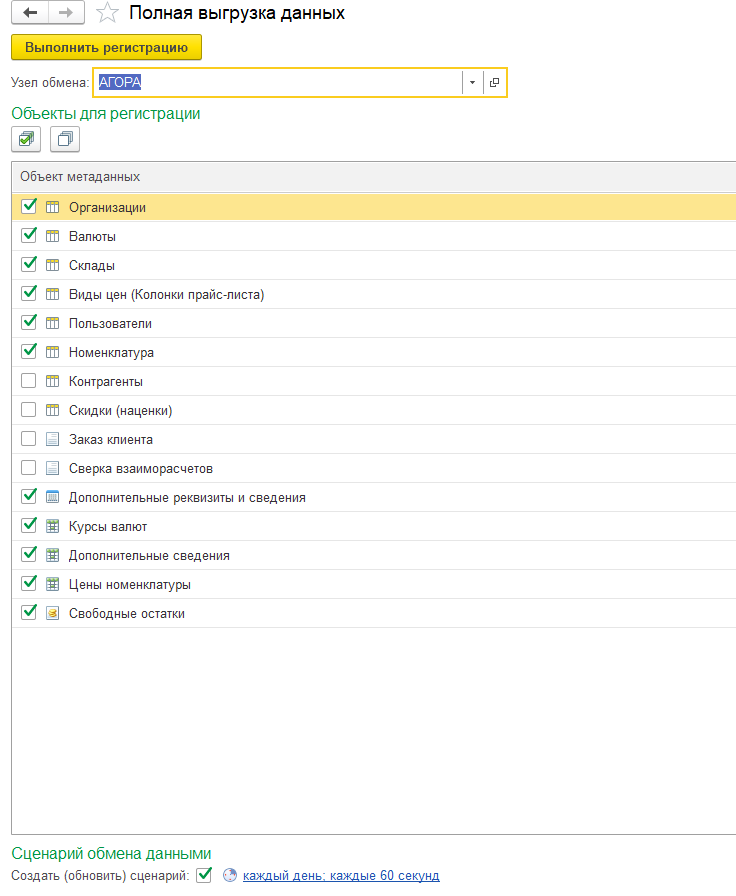
Первоначальная регистрация осуществляется либо через типовую обработку "Регистрация изменений для обмена", либо через обработку "Полная выгрузка данных":
Image RemovedImage Added

Внешний вид обработки:

Image RemovedImage Added

При нажатии кнопки "Выполнить регистрацию" все отмеченные объекты данных, удовлетворяющие условиям выгрузки, будут зарегистрированы для обмена, после чего будет создан или обновлен сценарий синхронизации для выбранного узла, если установлен соответствющий флаг. Также будет обновлено расписание регламентного задания синхронизации.

Проверить состояние синхронизации можно в типовой форме "Настройки синхронизации данных":

Image RemovedImage Added

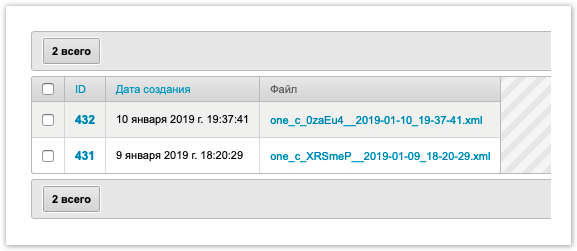
После окончания обмена с порталом, в административной панели проекта, доступной по адресу: адрес_проекта.agora.ru/admin в разделе Пакеты обмена Импорта будет отображаться массив данных, загружаемый из 1С, доступный при нажатии на имя xml-файла в колонке Файл:

Обратите внимание, после полной выгрузки должно пройти какое-то время для актуализации данных на портале. Как правило, время ожидания не превышает 15 минут. 

(информация) Пример формата выгружаемых данных из 1С доступен в этом разделе. 

Если данные не выгружены, проверьте журнал регистрации ошибок в 1С, доступный следующим образом: 

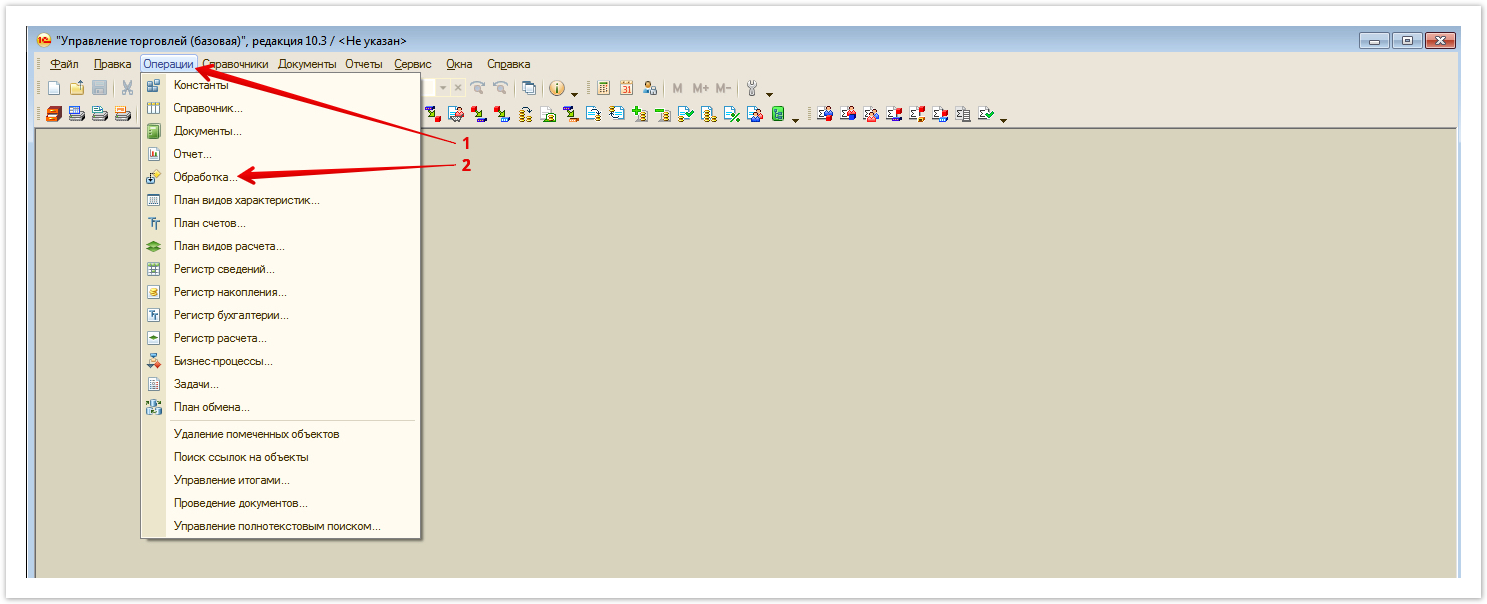
  • В выпадающем меню Все функции (1С версии 11) или Операции (1С версии 10.3).
  • Перейдите в Обработки и выберите Журнал регистрации.

В данном разделе будут отображаться данные о возникающих ошибках при работы механизма интеграции. 

 Наглядный пример оформления заказа на портале и его обработка в 1С доступен в разделе Оформление заказа

Более подробная информация по работе со шлюзом обмена на стороне 1С рассказана в видео:

Коннектор виджета
width800
urlhttps://www.youtube.com/watch?v=s8_e65whBW0
height400

Информация

Если у вас возникли трудности или вопросы в ходе настройки интеграции, вы всегда можете написать в нашу техническую поддержку: help@agora.ru и вам обязательно помогут. 

Sv translation
languageen

To configure integration with a system containing information about products and their properties, you must perform the following steps:

  1. Download a configuration file containing a predefined exchange gateway.

  2. Install the exchange gateway in 1C

  3. Set up scheduled tasks.

(информация) Consider setting up an exchange gateway using 1C. Trade management 10.3.

Примечание
The difference between the used version 1C and UT 10.3 will not affect the setup sequence. 
Regardless of the version used and the 1C edition, you can configure the integration, guided by this instruction.
Информация
titleAdditional features
The ability to install the Agora gateway through the extension is available for the following versions of 1C:
UT 11.4, ERP 2.4, KA 2.
When installing an extension, the configuration is NOT REMOVED FROM SUPPORT.
Installation is carried out by the developer, since it is highly likely that the extension will need to be adjusted for a specific configuration in case of metadata conflicts.
To install you need:
1) go to the configurator.
2) Next, open the Configuration - Extensions section.
3) Add a new extension.
4) Load the gateway extension into it.

The file with the extension is located just below in section 1. Download packageThe difference between the used version 1C and UT 10.3 will not affect the setup sequence. 
Regardless of the version used and the 1C edition, you can configure the integration, guided by this instruction.


Video instructions for setting up integration with 1C 8.3 UT 11.4

Коннектор виджета
width700
urlhttps://www.youtube.com/watch?v=Lzf7DU3ly_U
height350

Video instructions for setting up integration with 1C 8.3 UT 10.3

Коннектор виджета
width700
urlhttps://www.youtube.com/watch?v=4elEvLrmEEM
height350

Якорь
1
1
1. Download package

The first thing to do is download the Agora delivery kit corresponding to the 1C edition used, which includes 1 file:
  • A configuration file with a pre-installed gateway (.cf file).

(информация)A list of turnkey integration solutions is available in this section.

To download, click on the name of the required package.

Информация

If you did not find the version of the 1C edition you are using, write a letter to help@agora.ru or leave a request https://www.agora.ru/help/ for technical support and we will provide a delivery kit for other editions, for example, ERP 2.0

After downloading the package, you can proceed to the step of setting up a loaded gateway in 1C.

Якорь
2
2
2. Installation of the exchange gateway

(информация) Before installing the Agora software product, save a backup copy of the database in order to "roll back" 1C to its original state in the event of a configuration failure.

To do this, open the 1C configurator:

2019-01-11 10-56-09.jpg

In the window that opens, open the Administration tab and go to the Unload infobase section:

In the window that opens, specify the path to save the infobase:

(информация) Saving a database can take a long time if the operation is performed on a “weak” computer.


If saved successfully, the following notification will be displayed:

The next step in the configuration is to unload a copy of the 1C database configuration.
To do this, open the Configuration tab and go to the Save configuration to file section:

In the window that opens, specify the path to save a copy of the 1C configuration:

In the case of a successful save, a notification of the form:

(информация) If the Save configuration to file button is not active (is displayed in gray and cannot be pressed), then the configuration to be saved is not selected.

To select a configuration, open the Configuration section and select the Open configuration tab:

After saving the infobase, you can proceed to the stage of installing the exchange gateway.

To do this, open the Configurator, go to the Configuration tab, then Open configuration. Then go to: Configuration → Support → Configure Support:

In the window that opens, click the Enable change option button. In the request window, click Yes to agree to enable the possibility of changes:

After clicking on the Yes button, the support rule settings window opens, where specify the following parameters and click OK:

After setting up support rules, you need to change the support rule for the configuration root. To do this, open the support mode change menu by right-clicking on the Not edited button and then clicking the Set support rule button:

In the window that opens, select Provider objects are edited while maintaining support. Leave unselected Set for subordinate objects and click OK:

After that, you can close the Support Settings window by clicking the Close button.


The next configuration step will be combining the downloaded configuration file with the previously used one. To do this, open the Configuration tab and select Compare, merge with configuration from file:

(информация) In the window that opens, specify the path to the file in the .cf format, which was downloaded at the first stage of configuration based on the delivery kit.

After successfully loading the configuration file that was modified for integration, uncheck all the comparison-union checkboxes:

After that, mark Agora as a subsystem. Click the Actions button and go to the Mark by file subsystems section:

In the window that opens, leave only the Agora subsystem selected and click Install:

Then merge the code by clicking the Run button:

Click the Continue button

Информация

The following setup steps differ depending on your 1C configuration. If your version is 1C UT 10.3 (Old version 2015), UT 11.1 (Old version 2015) or Alfa-Auto, then open the instructions for your version of 1C and follow the steps below. If the 1C edition you are using is missing from the listed list, write to our technical support help@agora.ru and you will definitely be helped.

Раскрыть
title1C - UT 10.3 (Old version 2015)

To port the code from the configuration file, follow these steps:     

  • Open the configuration file with a pre-installed gateway (.cf file), which is included in the package.     
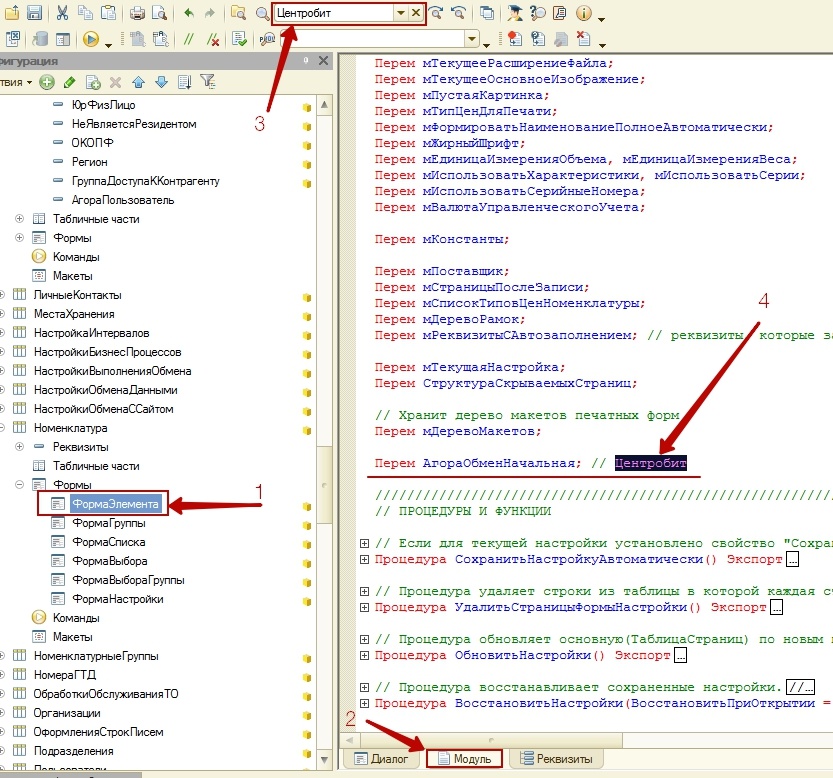
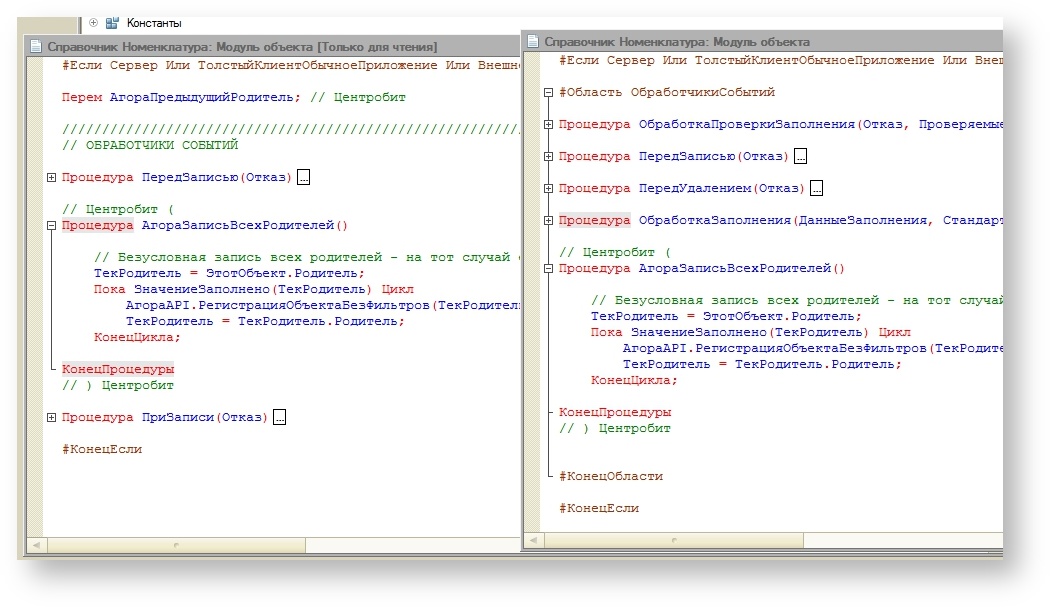
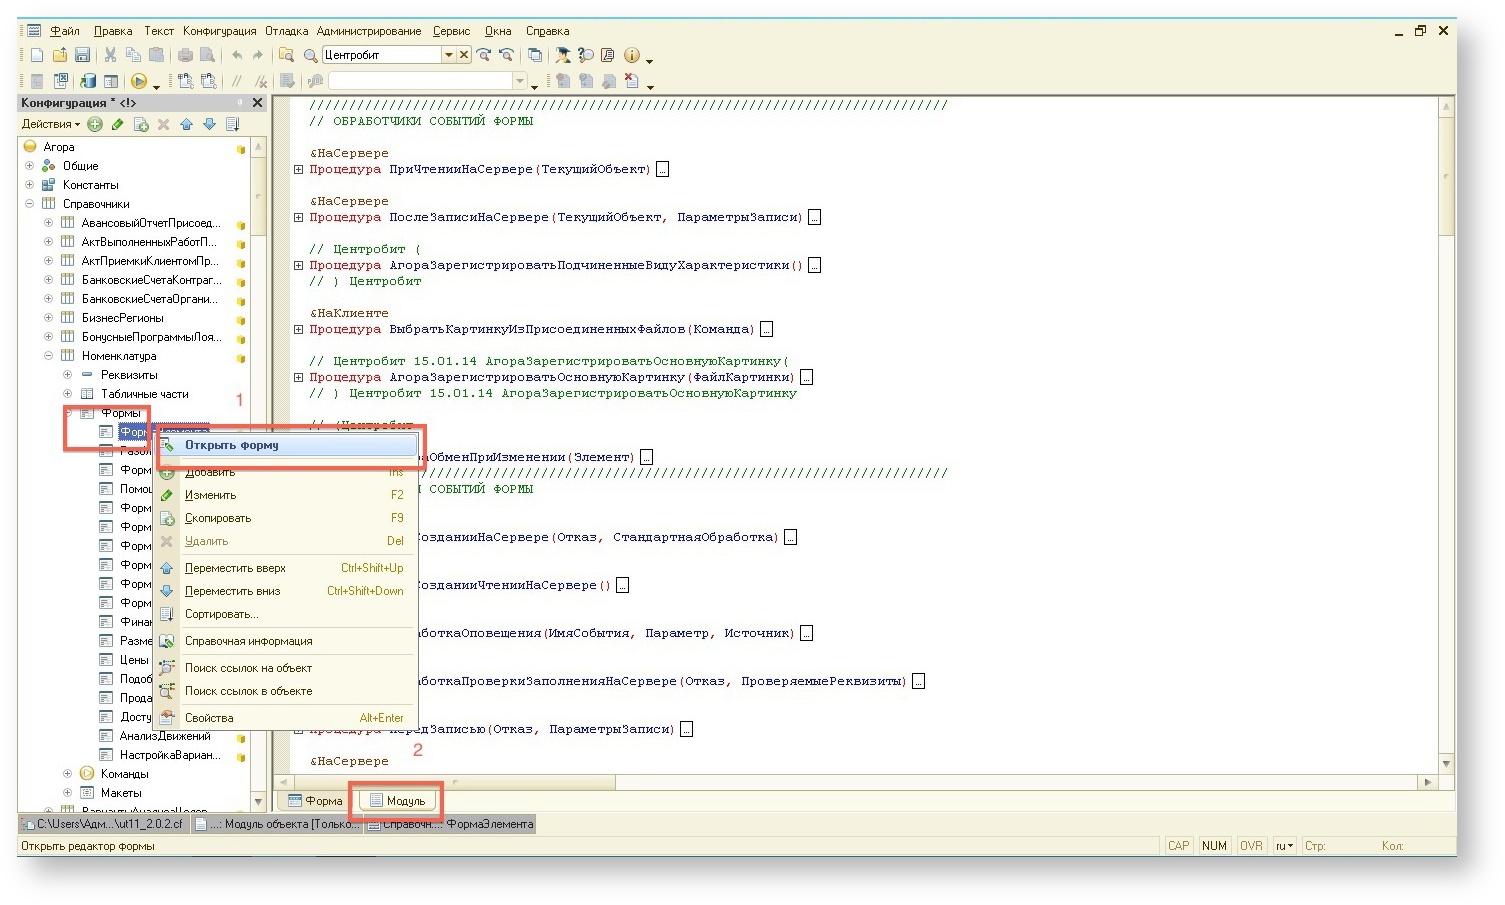
  • In the configuration panel and in the configuration file, select Directories → Nomenclature → Forms → Element shape (pic. 14, A.1) and go to the Module tab (pic. 14, A.2). In the search bar, enter Centrobit (pic. 14, A.3), find and transfer all sections of code from the configuration file to the configuration of the supplier database in the appropriate procedures (pic. 14, A.4).

Pic. 14 - Module tab, code transfer

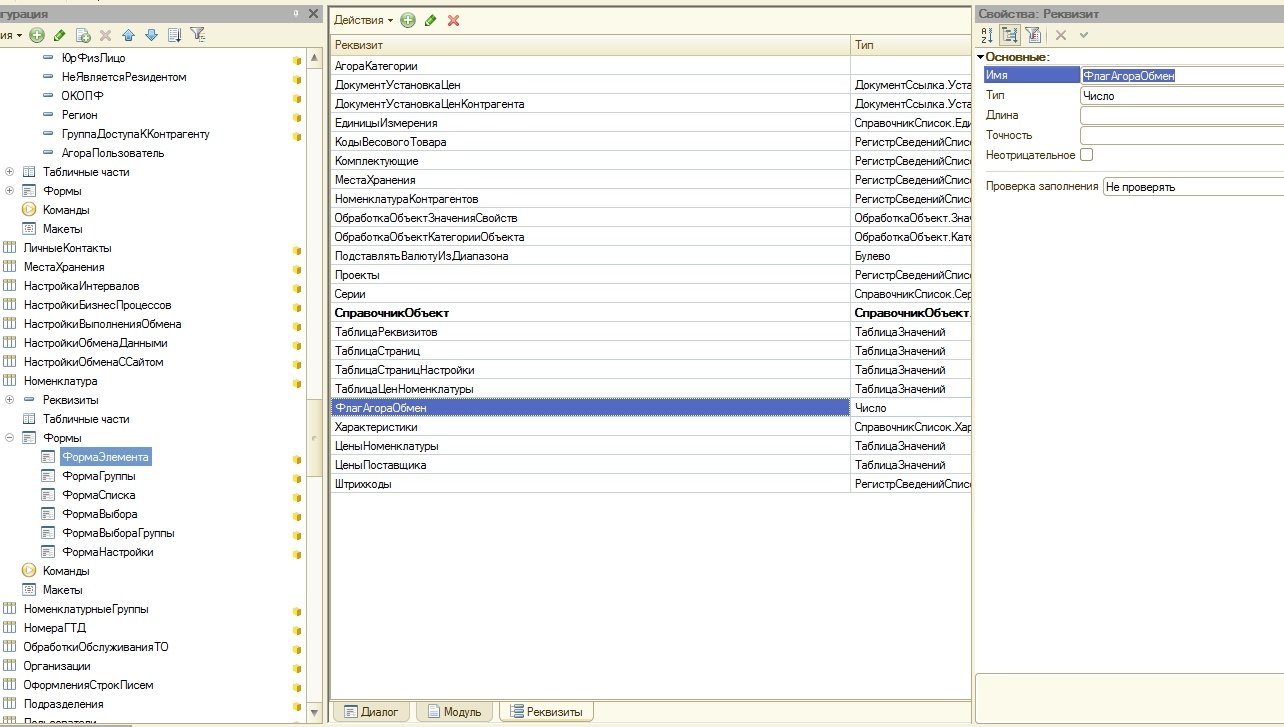
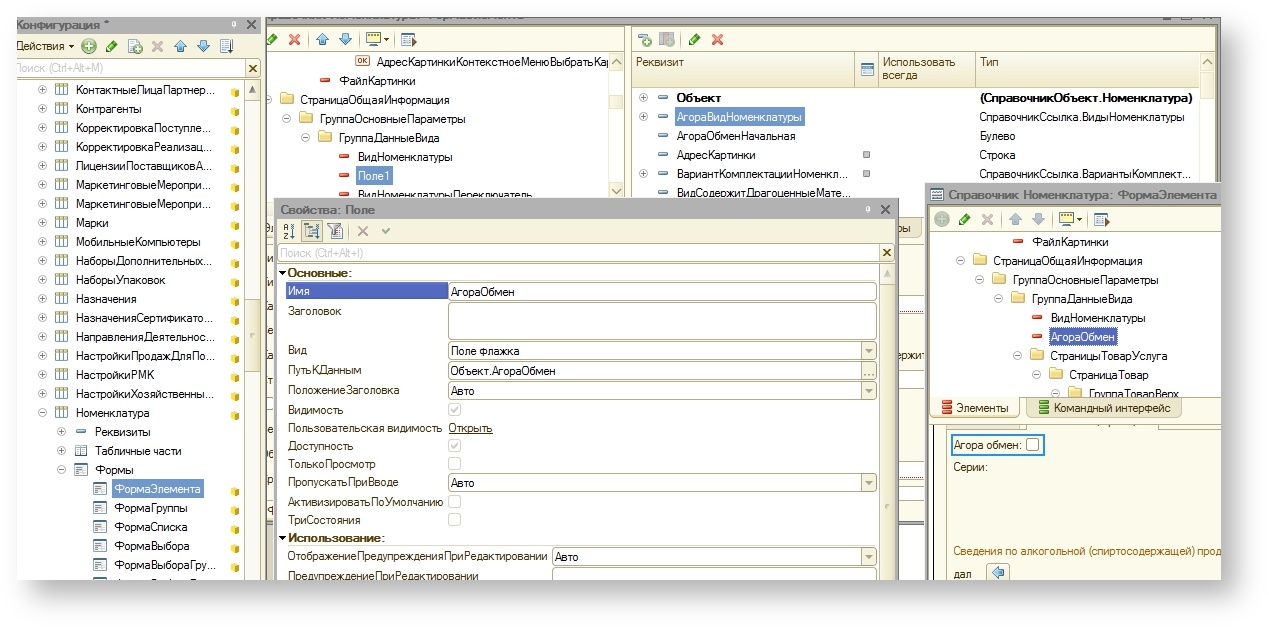
  • Go to the Details tab and create the FlagAgoraExchange as shown in the picture (pic. 15).


Примечание

After adding the Props, go back to the Module tab, using the search (as with the search for the Centrobit string) find matches for the query "FlagAgoraExchange"

If you find a flag type FlagAgoraExchange.Key in the code, click on the cancel button in the main menu of the configurator, and this code will disappear.

This is an automatic insertion of the 1C code when adding props, we do not use it, therefore we cancel it.

Pic. 15 - Creating a FlagAgoreExchange.

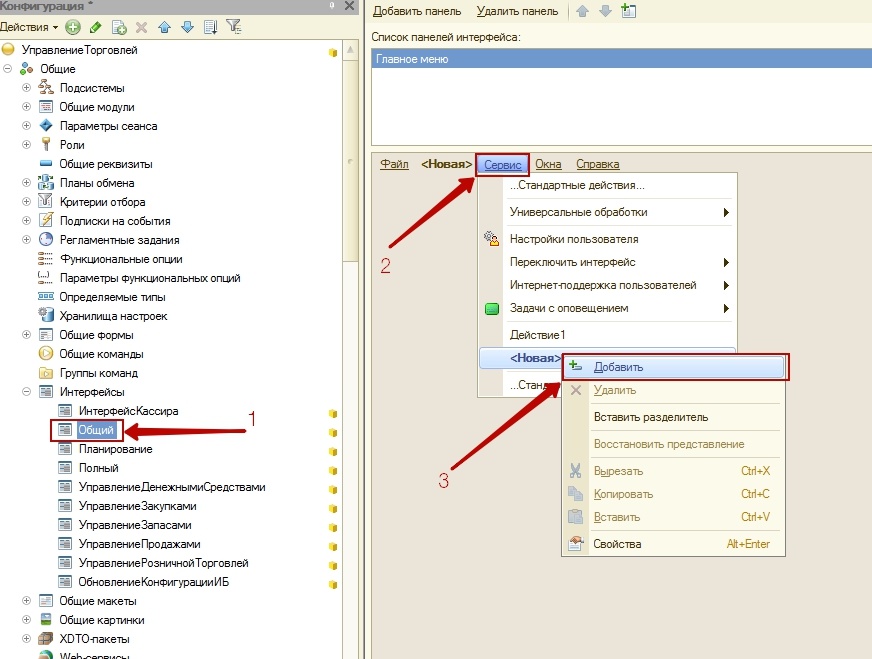
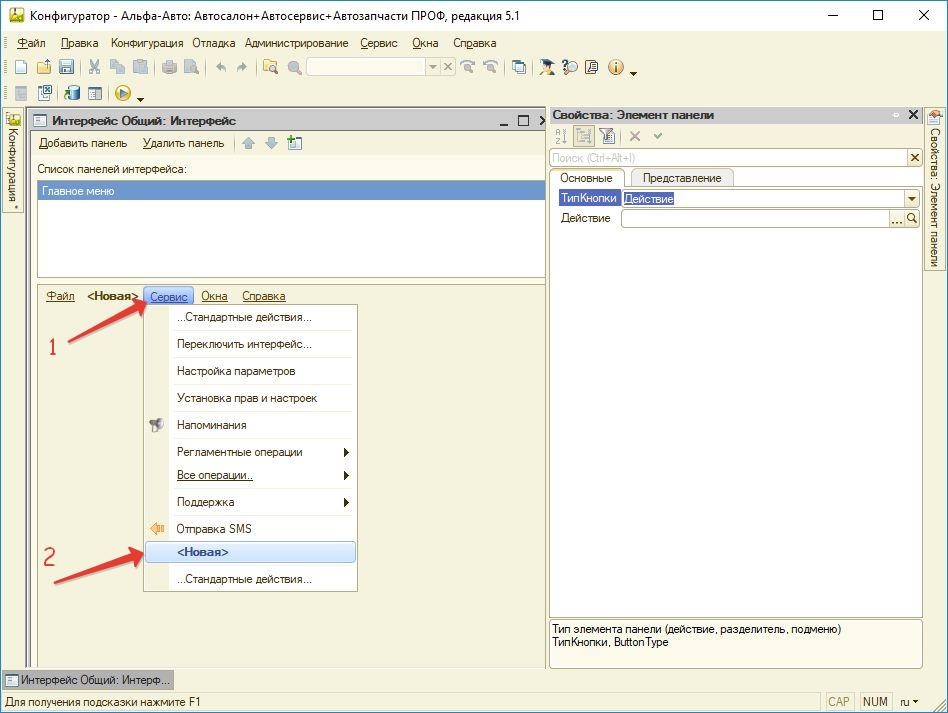
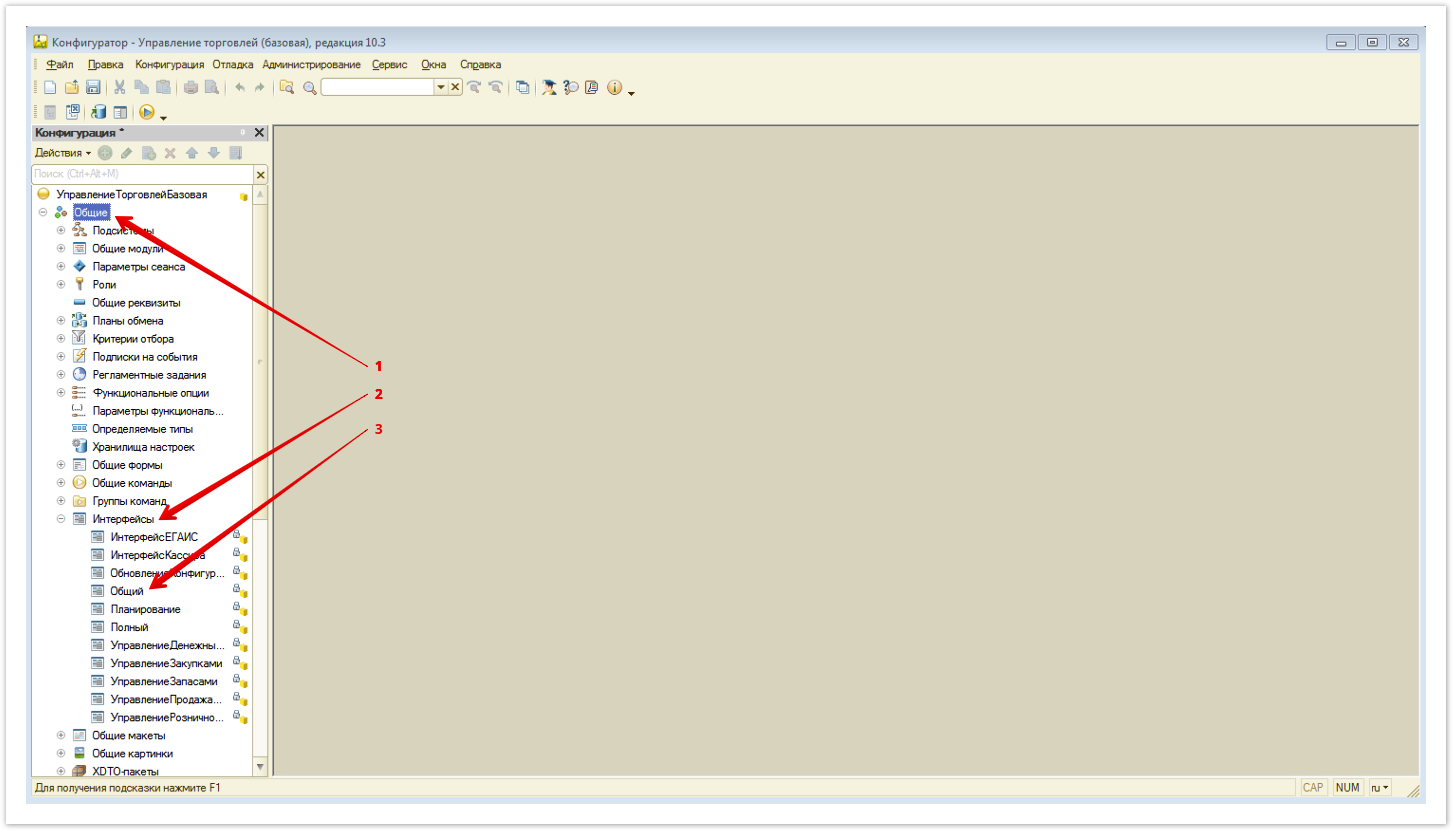
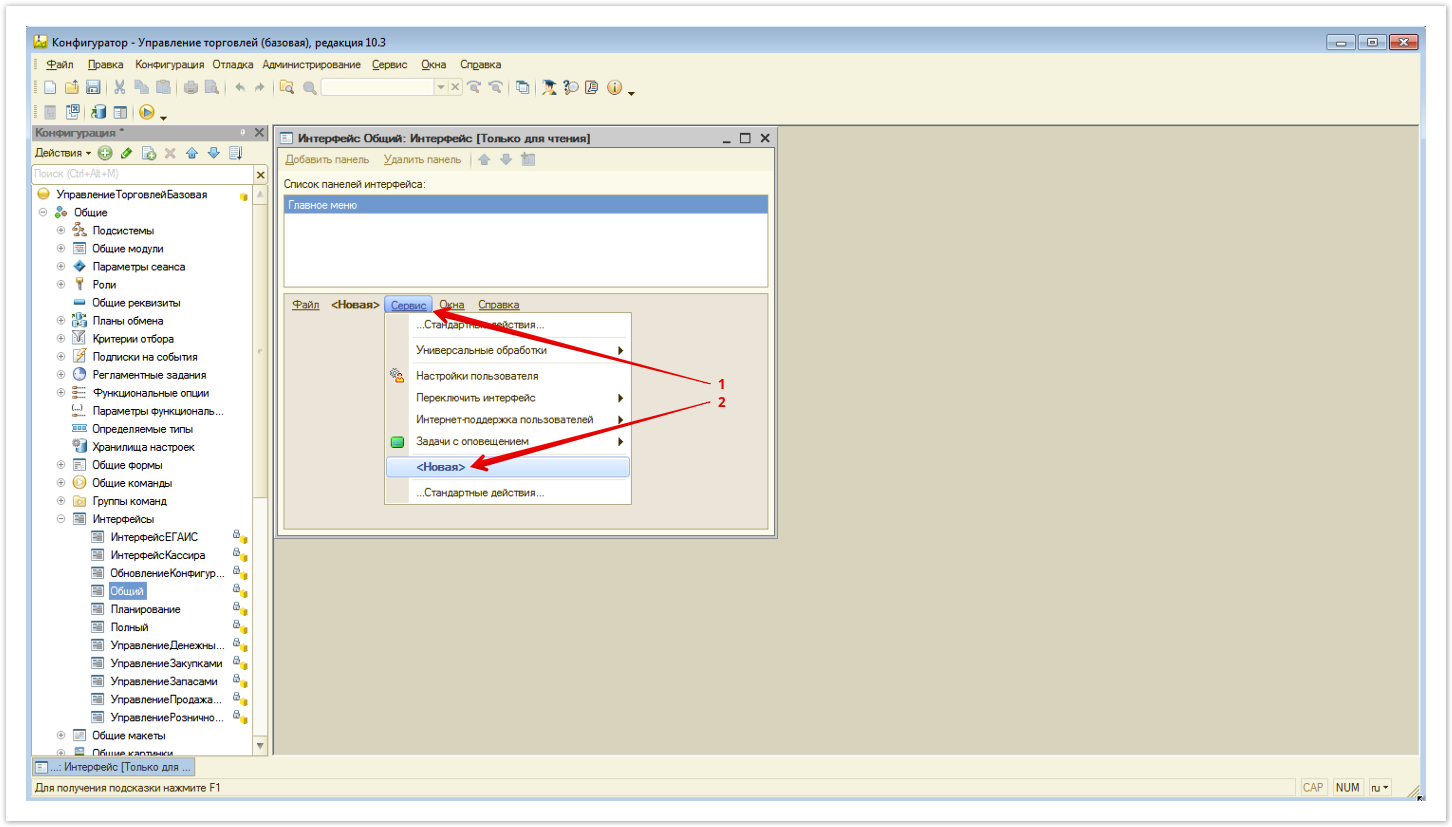
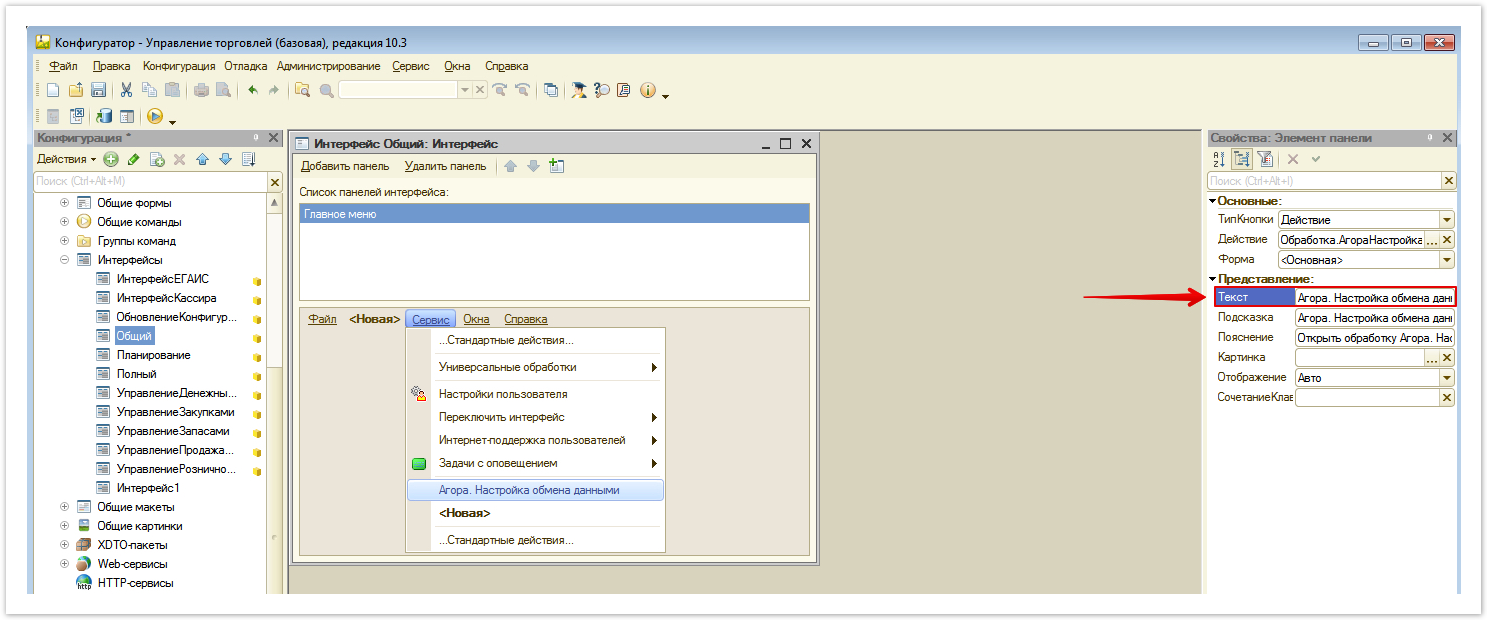
  • In the configuration panel, open General -> Interfaces -> General (Pic. 16, A.1), go to the "Service" tab (Pic. 16, A.2) and, right-clicking, add a new button (Pic. 16, A.3) and then enter the properties of the created button.

Pic. 16 - Adding a button to the menu.

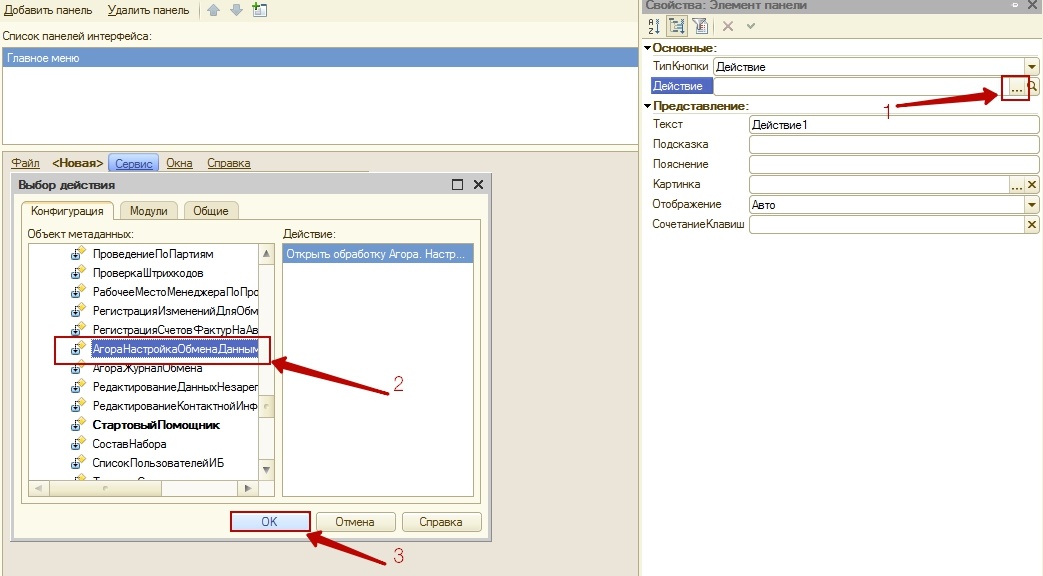
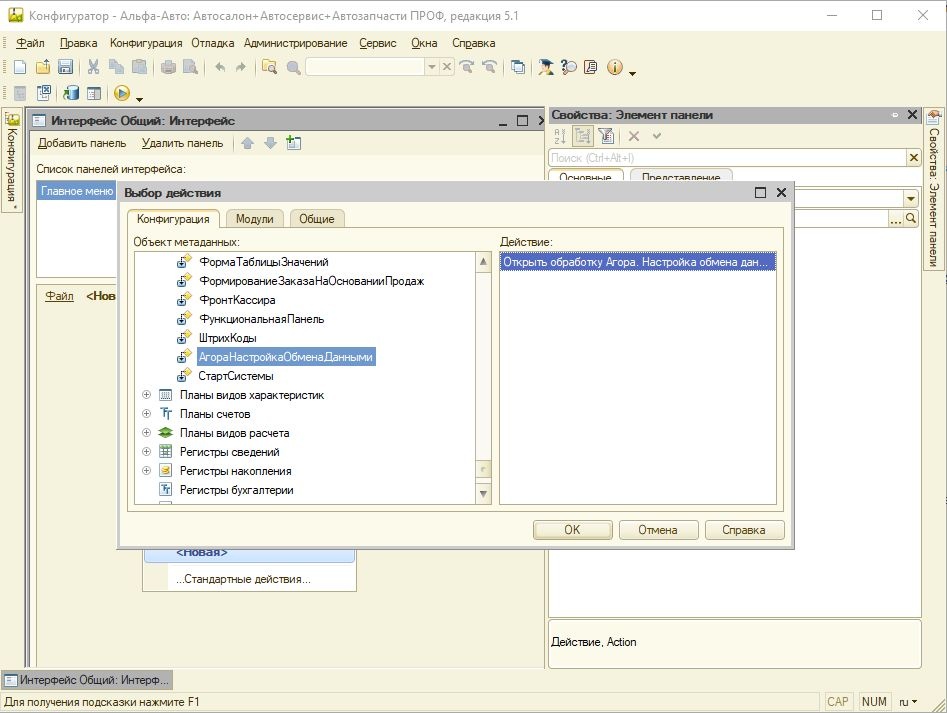
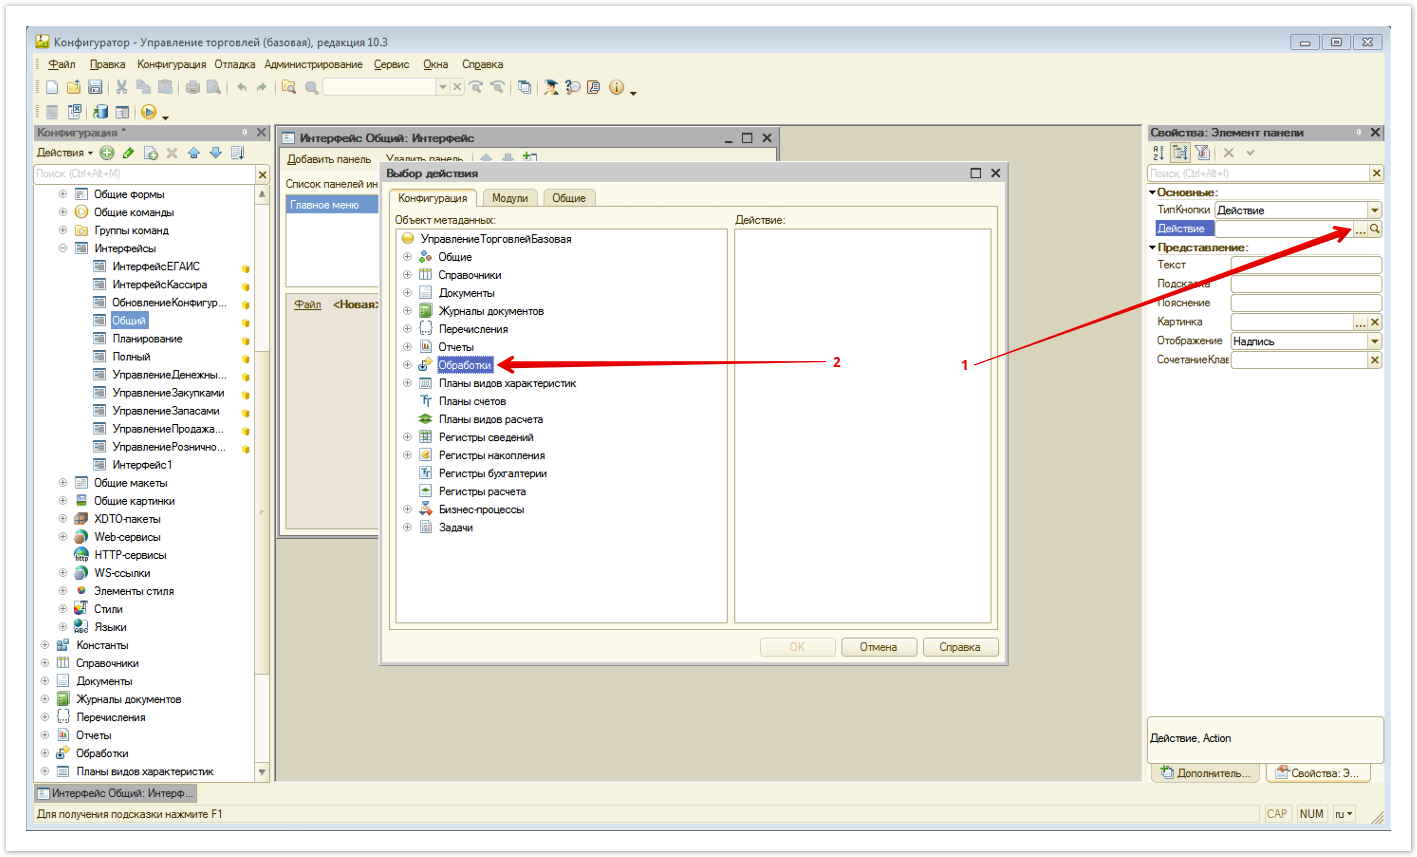
  • In the Properties window that opens, click on the selection of the action (Pic. 17, A.1),
    then in the window that appears, search for AgoraSettingsDataExchange (Fig. 17, A.2) and click OK (Fig. 17, A.2).

Рic. 17 - Setting the menu button.

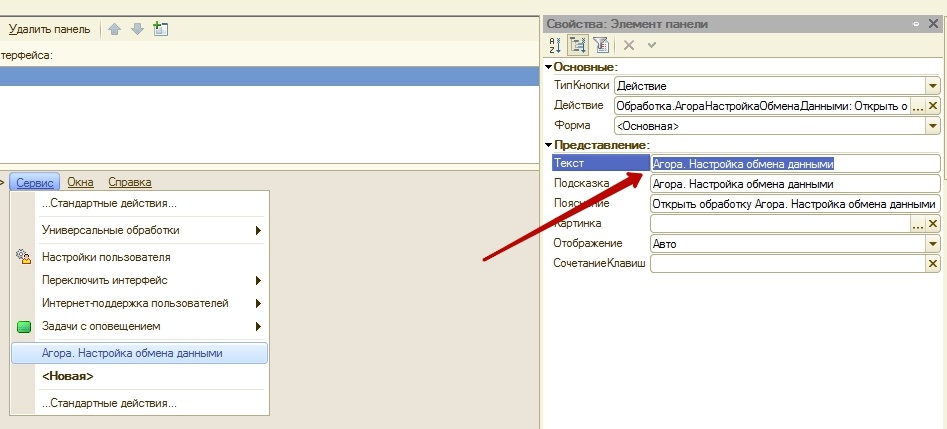
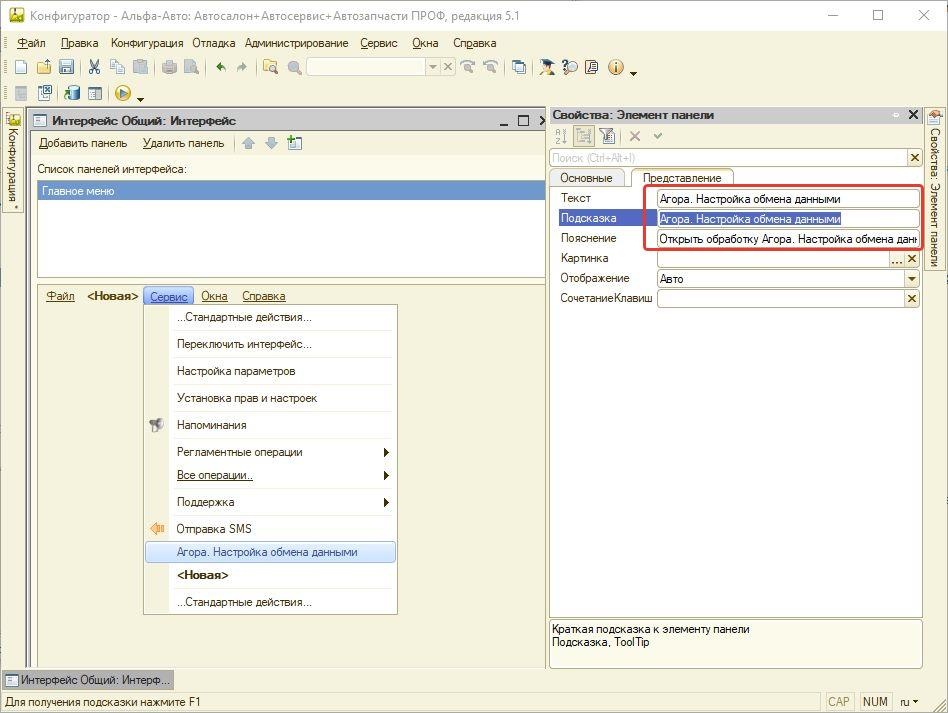
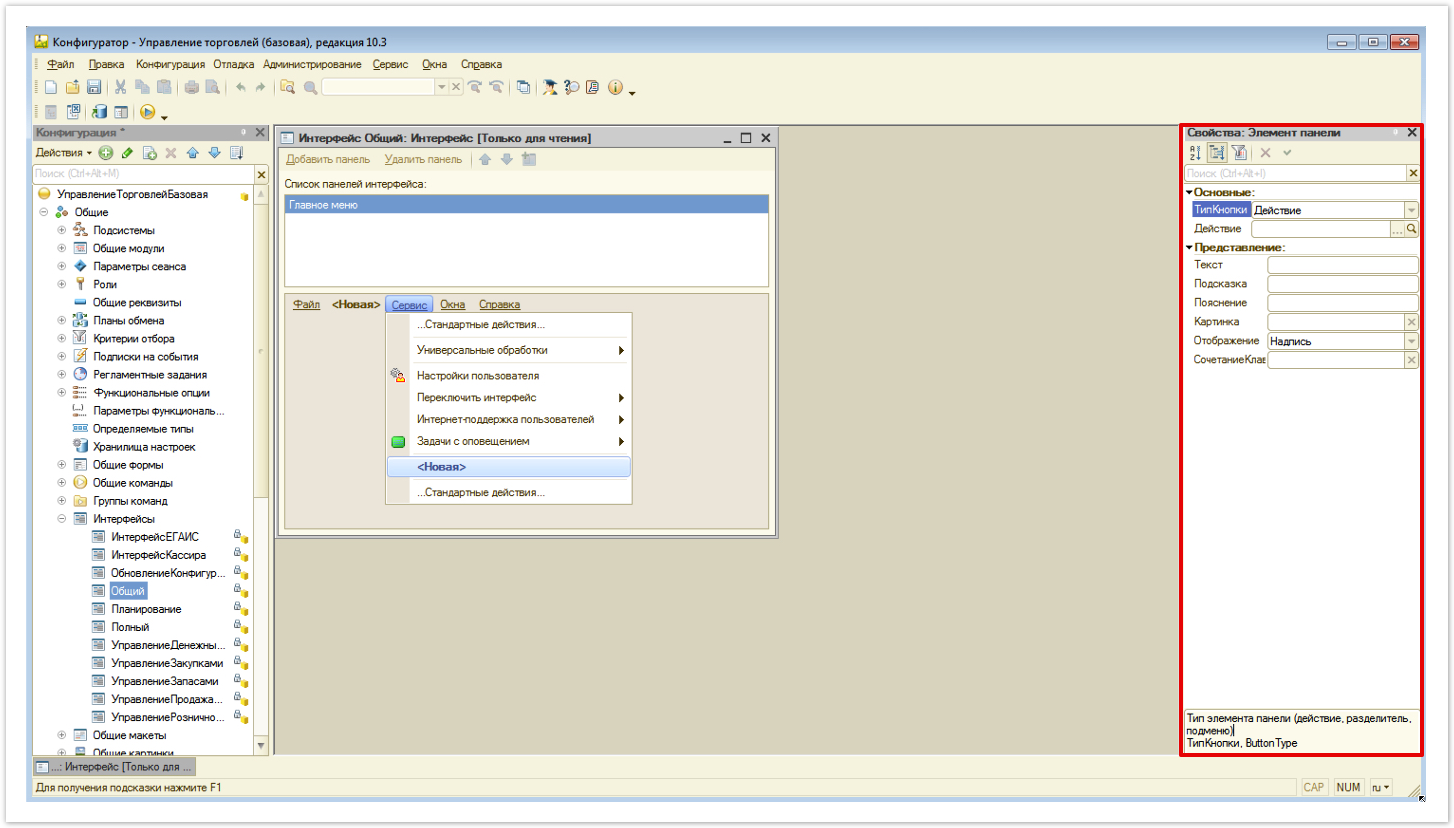
  • Be sure to set the friendly name for the created button (Pic. 18).

Pic. 18 - Setting the name for the button.

  • Update the database configuration by clicking on the icon  on the control panel (Fig. 19).

Pic. 19 - Update configuration button

  • Accept changes in the structure of configuration information (Pic. 20).

Pic. 20 - Changes in the structure of information and configuration

  • Log in to the information base 1C: Enterprise "Trade Management".
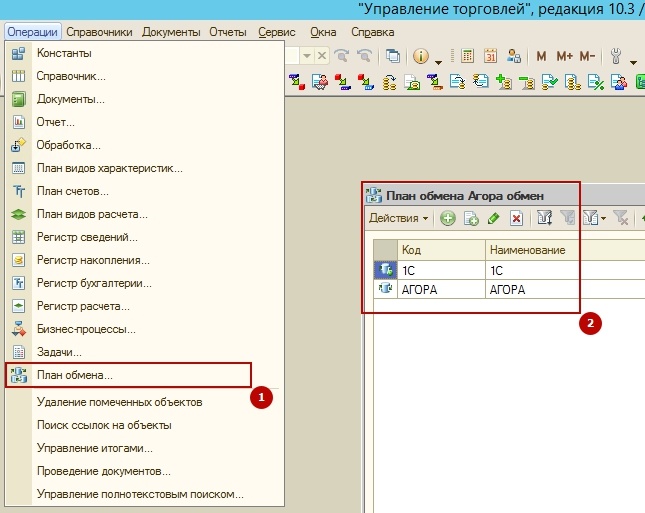
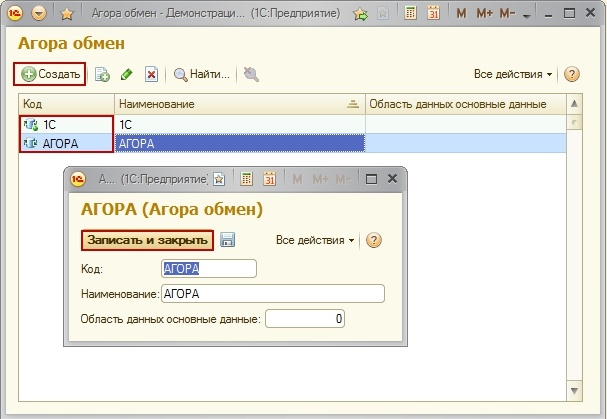
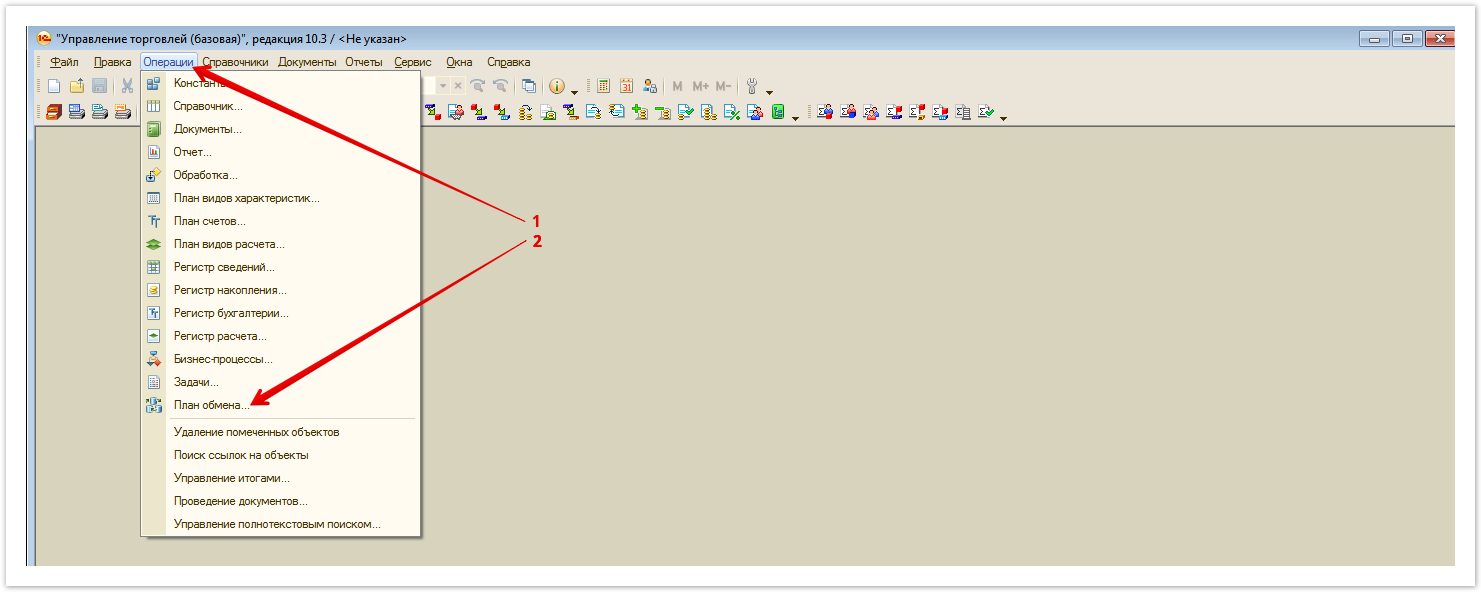
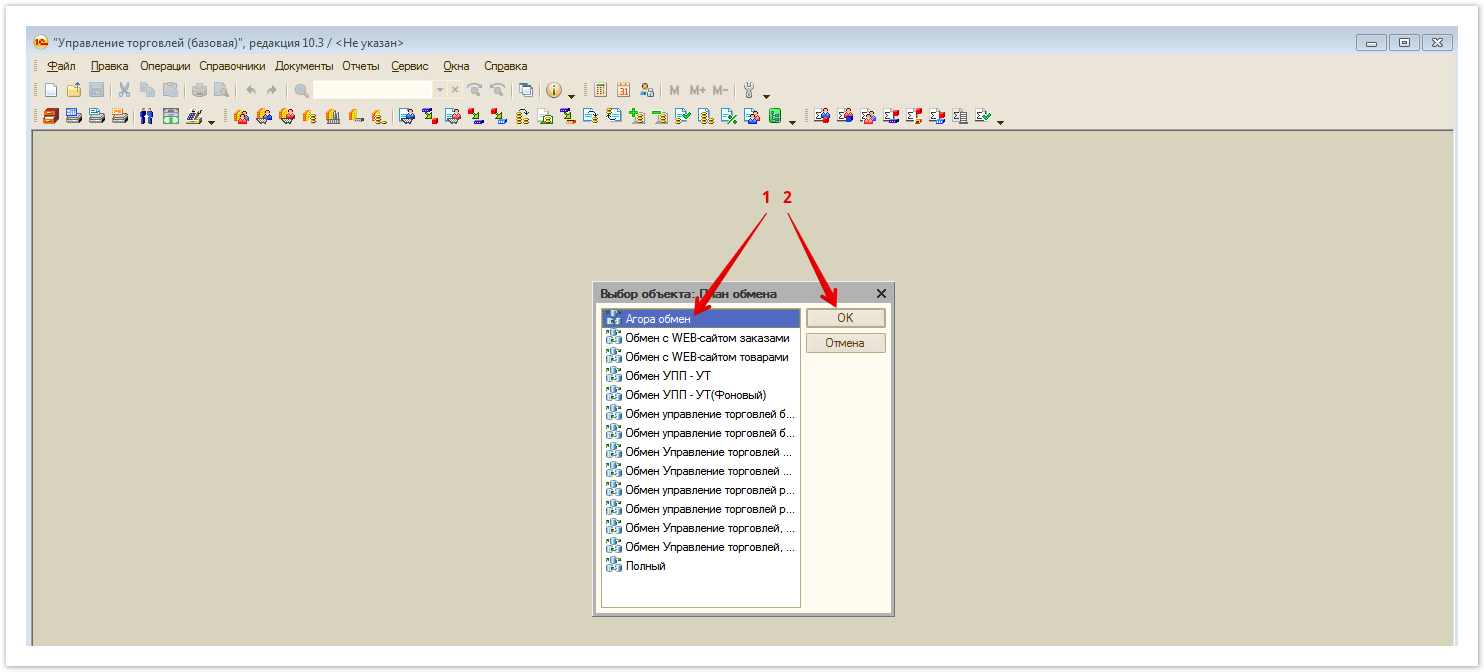
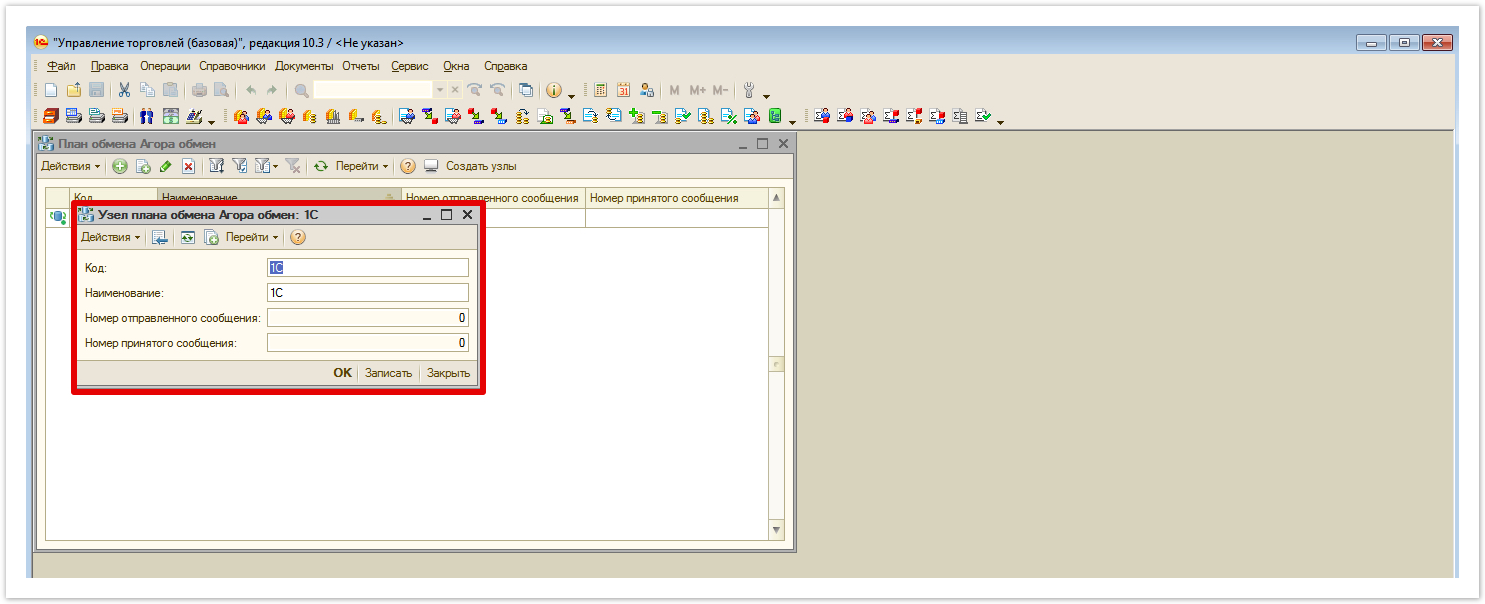
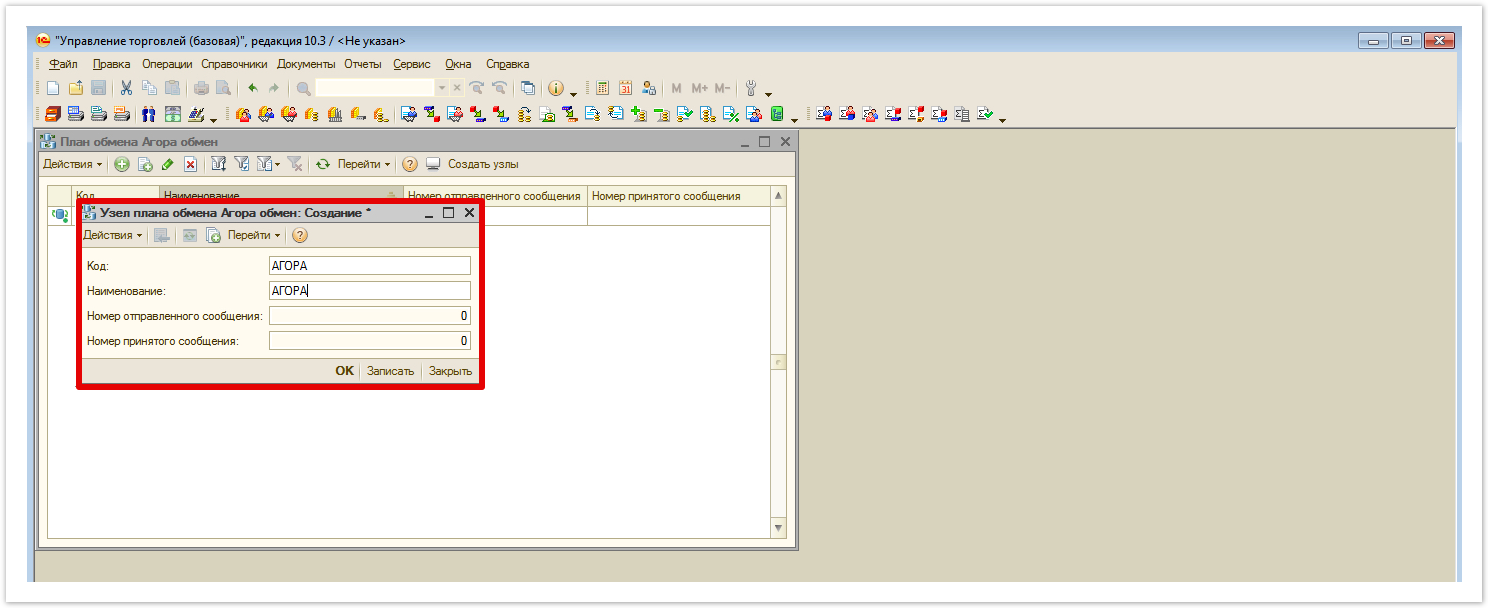
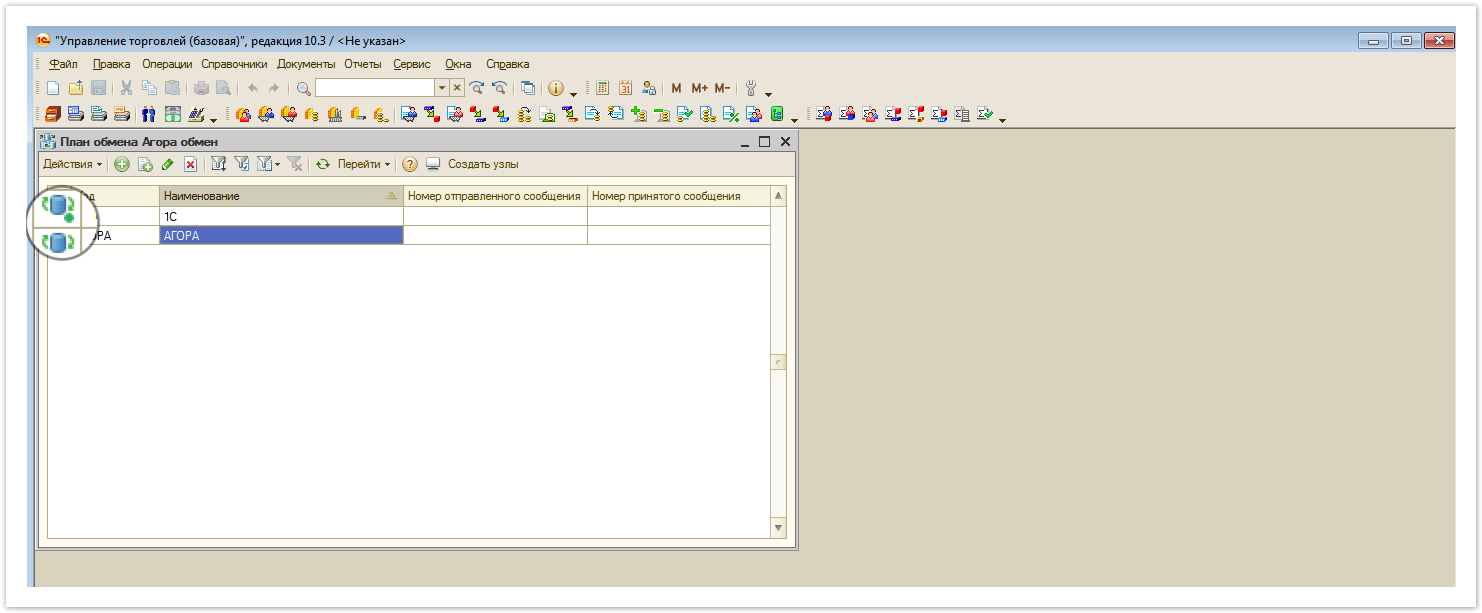
  • Open the Operations menu in the navigation panel. In the menu window that opens, select the Exchange Plan (pic. 21, Cl.1), then in the window that appears select Agora exchange and create new elements of the 1C and AGORA list (it is necessary to store changes in the data on the item list, it is necessary to start in order: 1C, then AGORA). To do this, click on the Add button, fill out the form as shown in the picture (Pic. 21, A.2), only the code and name. Please note that the plan in the 1C icon has a green dot, and the AGORA has a simple display.


Информация
This step must be performed to store changes to item data.

Pic. 21 - Form for creating a new list item

Раскрыть
title1C - UT 11.1 (Old version 2015)

To port the code from the configuration file, follow these steps:     

  • Open the configuration file with a pre-installed gateway (.cf file), which is included in the package.    
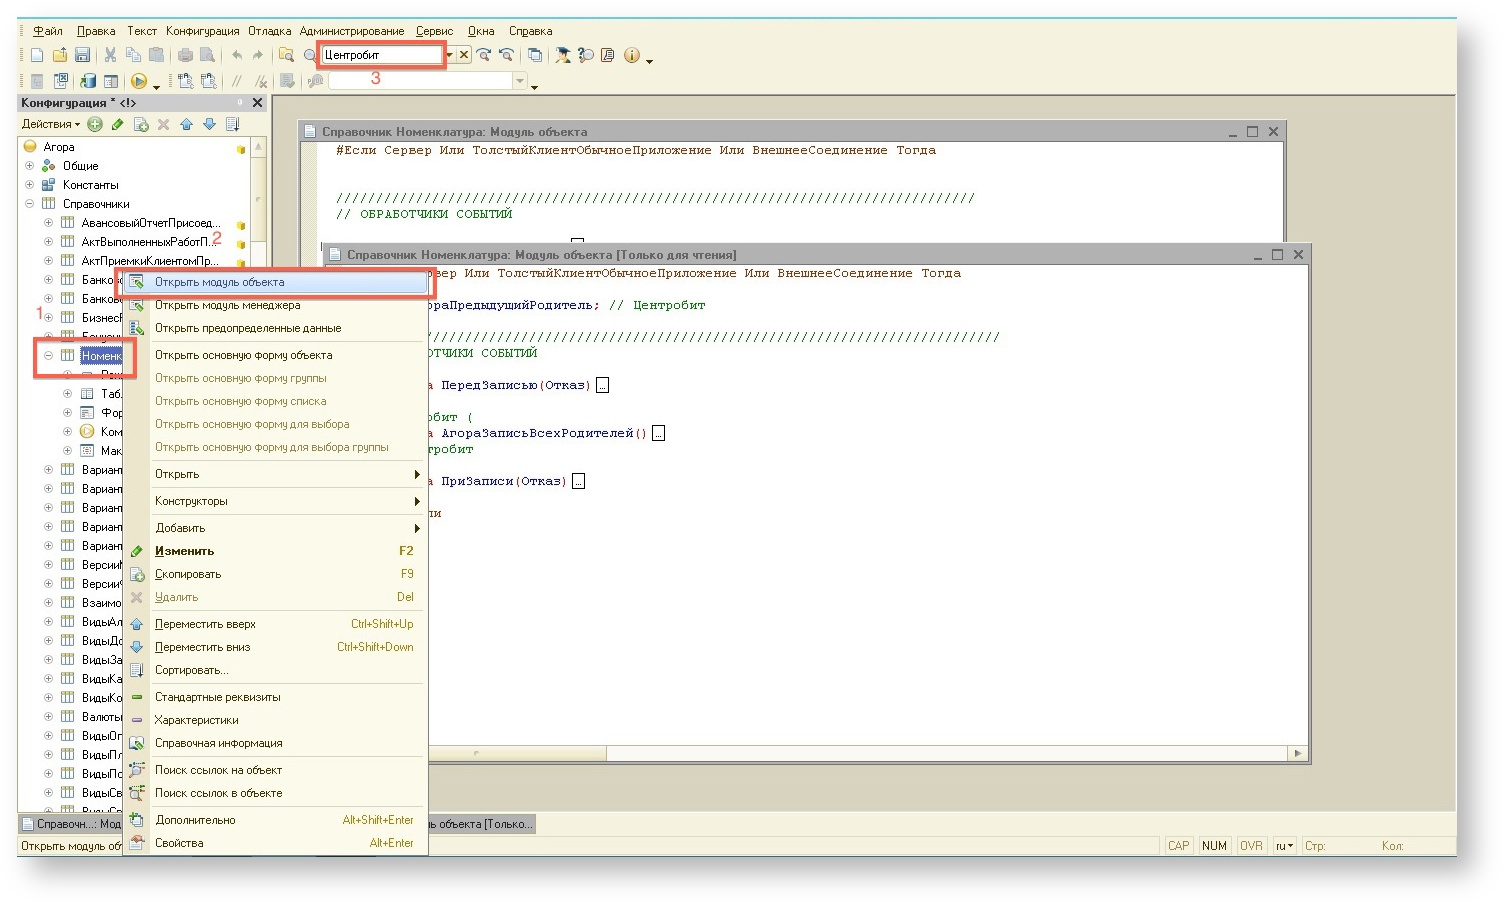
  • In the configuration panel and in the configuration file, select DirectoriesNomenclature (Pic. 14, A.1) and open the object module (Pic. 14, A.2). In the search bar, enter Centrobit (Pic. 14, A.3), find and transfer all sections of code from the configuration file to the configuration of the vendor database in the appropriate procedures (Pic. 15)

Pic. 14 - Object module selection

Pic. 15 - Code transfer

  • In the configuration panel and in the configuration file, select DirectoriesNomenclatureFormsElement shape (Pic. 16, A.1) and go to the Module tab (Pic. 16, A.2). In the search bar, enter Centrobit, find and transfer all portions of the code from the configuration file to the configuration of the provider database in the appropriate procedures.

Pic. 16 - Module tab, code transfer

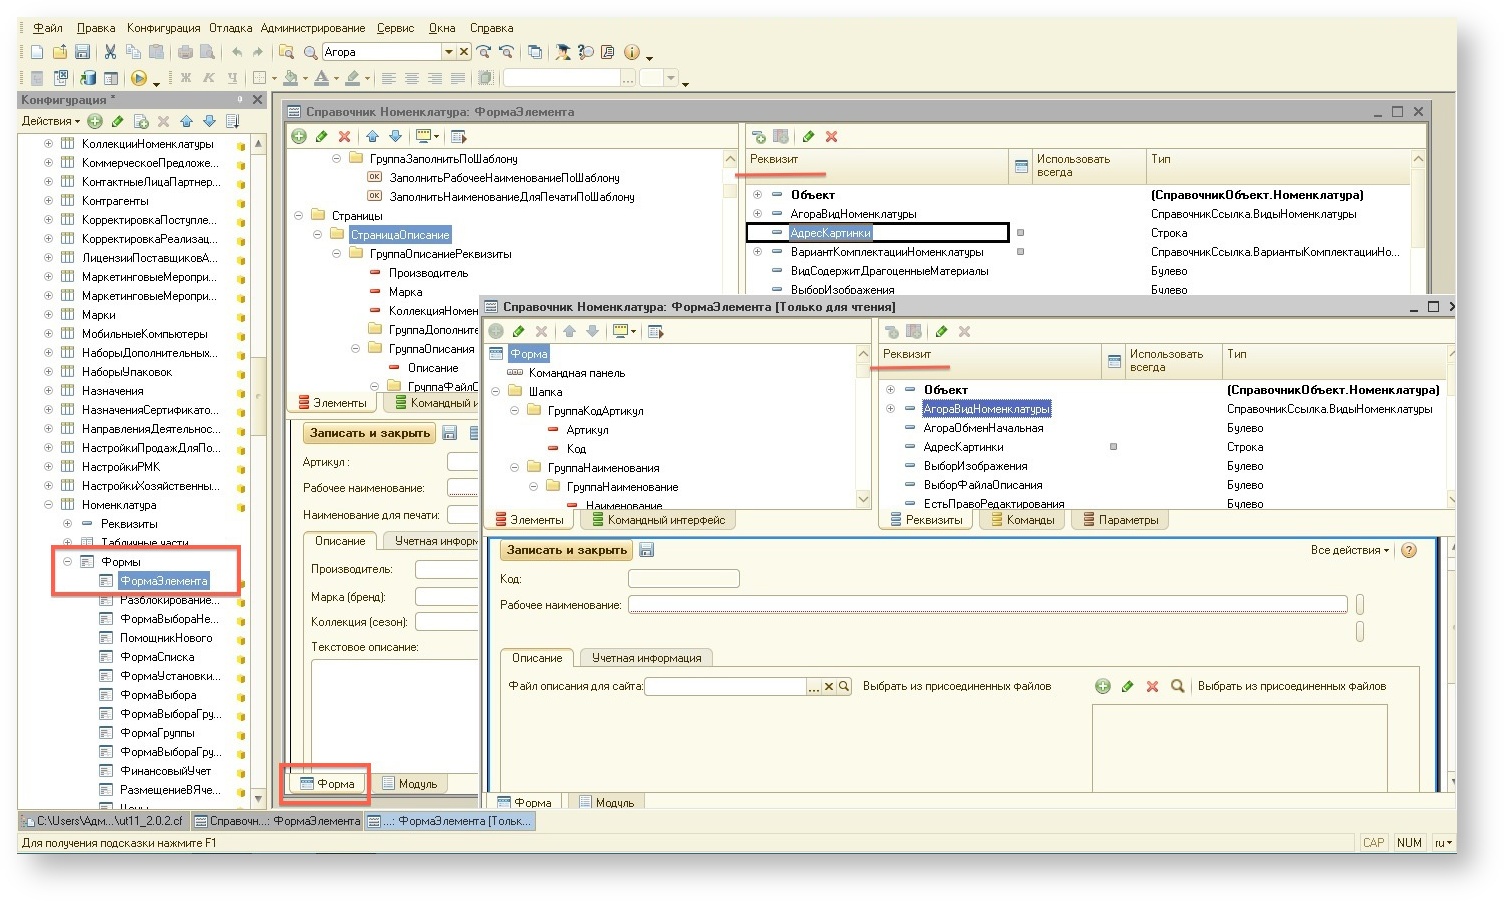
  • In the configuration panel and in the configuration file, select Directories → Nomenclature → Forms → Element form → Open a form (Pic. 17) and go to the Form tab. Transfer the details of the form of the element of the catalog reference book AgoraFormNomenclature and AgoraExchangeStart from the configuration file to the configuration of the supplier base.

Pic. 17 - Form tab, transfer of details

  • On the Elements tab, in the FormDataGroup folder, add the AgoraExchange object from the configuration file. Verify that in the Fields Properties window, in the Form line, the value is the Flag field (Pic. 18).


Примечание

For UT 11.2: On the Elements tab, in the CollapsibleGroupMainParametersAccount folder add the AgoraExchange object from the configuration file.

Check that in the Fields Properties window, in the View line, the value is Flag field.

Pic. 18 - Adding an Agora Exchange object


  • Update the database configuration by clicking on the icon  on the control panel (Pic. 19).

Pic. 19 - Update configuration button

  • Принять изменения в структуре информации конфигурации (Рис.20).

Image Modified

Pic. 20 - Changes in the structure of information and configuration

  • Log in to the information base 1C: Enterprise "Trade Management".
  • In the navigation panel, open the context menu and go to All functions. In the window that opens, select Exchange plans → Agora exchange and create new elements of the 1C and AGORA list (it is necessary to store changes in the data on the nomenclature, you need to start in order: 1C, then AGORA). To do this, click on the Create button, fill out the form as shown in the picture (Pic. 22) and click on the Save and Close button (Pic. 22). Please note that the plan in the 1C icon has a green dot, and the AGORA has a simple display.


Информация

This step must be performed to store changes to item data.

Примечание

If you do not have the "All functions" item in the menu, then its display must be enabled by going to the "Tools" menu and to "Parameters".

Pic.21 - All functions in the menu bar.

Pic. 22 - Form for creating a new list item

Раскрыть
title1C Alpha-auto

In the configuration panel, open General -> Interfaces -> General (Pic. 14, A.1), go to the "Service" tab (Pic. 14, A.2) and, right-clicking, add a new button (Pic. 14, A.3) and then enter the properties of the created button.

Pic. 14 - Adding a button to the menu.

In the Properties window that opens, click on the selection of the action (Pic. 15, A.1), then in the window that appears, find the AgoraSettingsDataExchange (Pic. 15, A.2) among the processors and click OK (Pic. 15, A.2).

Pic. 15 - Setting the menu button.

  • Be sure to set the friendly name for the created button (Pic. 16).

Pic. 16 - Setting the name for the button.

  • Open the module of the StartSystem processing object.
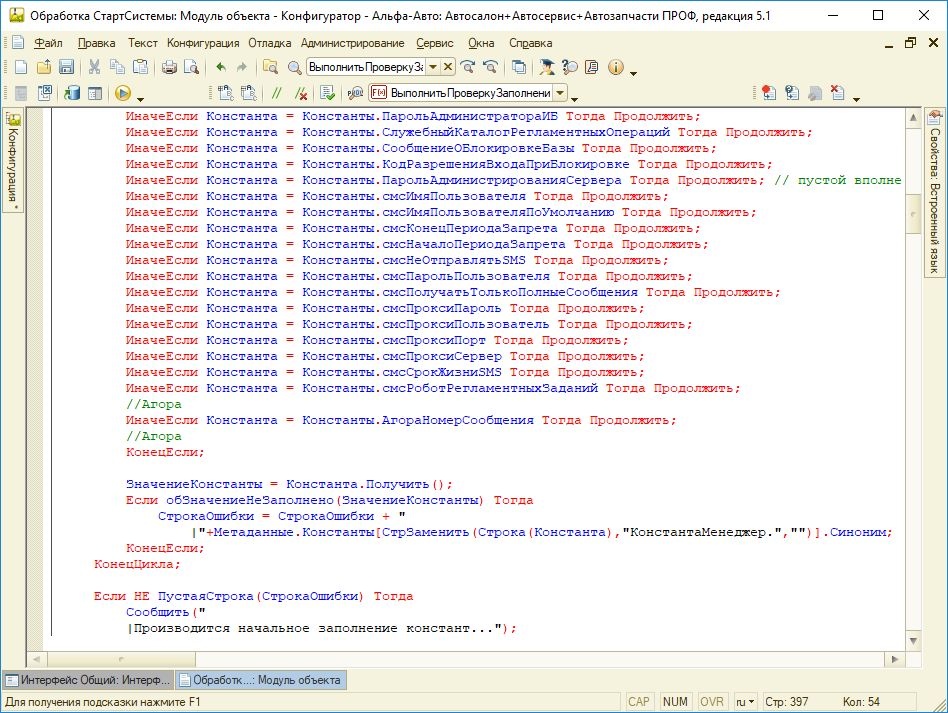
  • Transfer changes to the processing code for Agora, taking them from the configuration file: to the procedure RunCheckFillConstants add the code that ignore AgoraNumberOfMessage constant filling check (Pic. 16.1)

Pic. 16.1 - Code for ignoring a constant check

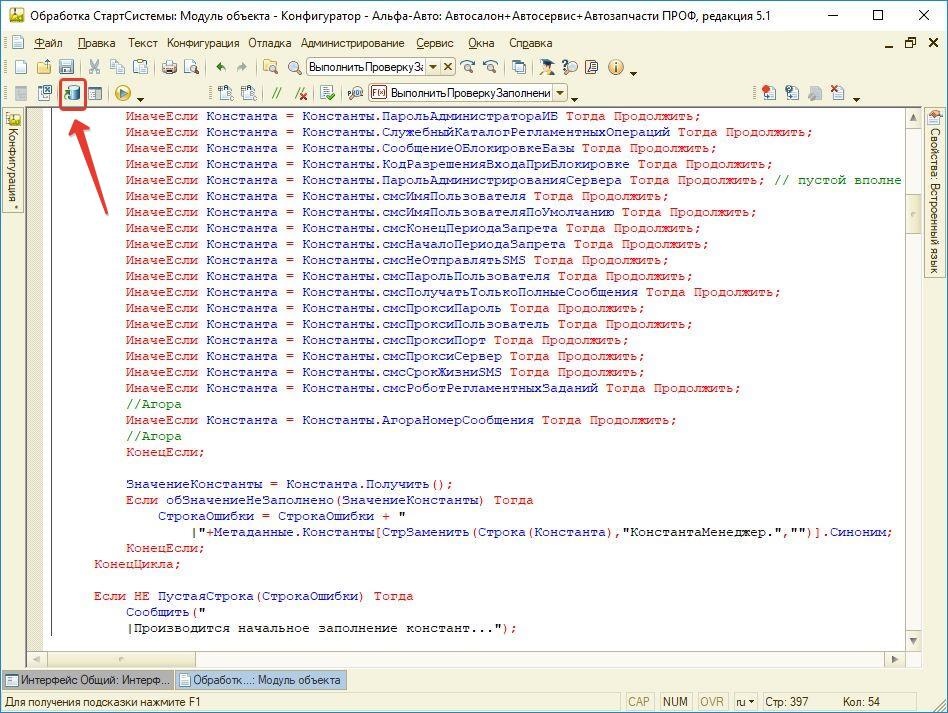
  • Update the database configuration by clicking on the  icon on the control panel (Pic. 17).

Pic. 17 - Update configuration button

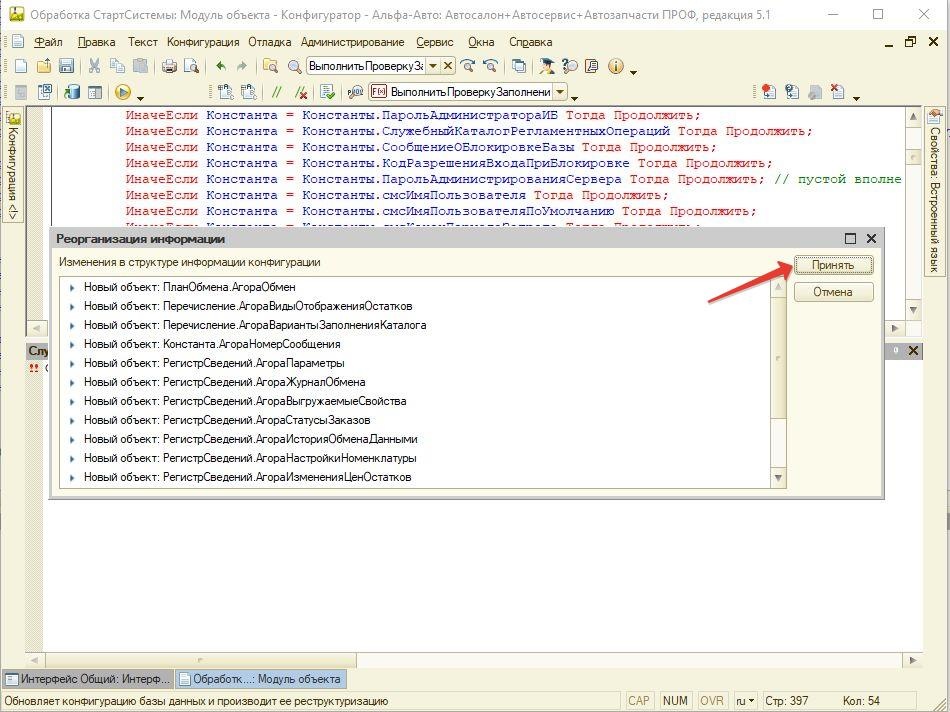
  • Accept the changes in the structure of the configuration information (Pic. 18).

Pic. 18 - Changes in the structure of information and configuration

  • Log in to the information base 1C: Enterprise "Trade Management".
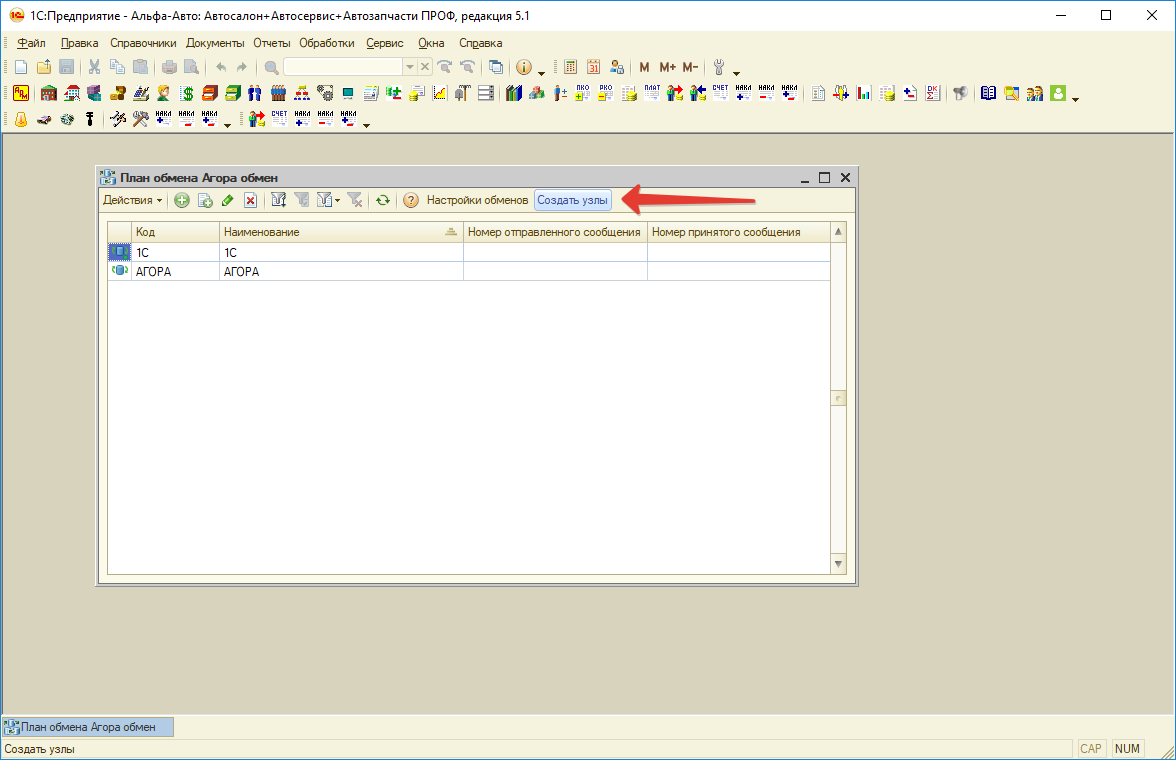
  • In the navigation panel open the menu Tools -> All operations. In the menu window that opens, select the Exchange plan (Pic.19, Cl.1), then click on the "Create nodes" button. Please note that the plan in the 1C icon has a green dot, and the AGORA has a simple display.


Информация

This step must be performed to store changes to item data.

Pic. 19 - Form for creating a new list item


For users with versions 1C UT 10.3 (Old version 2015), UT 11.1 (Old version 2015) or Alfa-Auto setup is completed. If your version is different from those listed, follow these steps.

Next, in the configuration panel, go to: General -> Interfaces -> General:

In the window that opens, click the Tools button, and the <New> button in the drop-down menu:

After that, the item properties panel opens:

In the properties that opens, click on the Select action (sign ...), then in the window that appears, find the Processing section, open it and select AgoraSetupDataExchange:

After that, specify the name of the added element in its properties. We recommend indicating a friendly name, for example, Agora. Data exchange setup:

To update the database configuration, click the  button located on the control panel:

After that, a window opens with a description of the changes in the configuration structure, in which click the Accept button:

(информация)At the final stage, go to the interface of the information base 1C: Enterprise "Trade Management".

In the interface that opens, open the Operations tab and select the Exchange plan section:

In the window that opens, select Agora exchange and click OK:

In the window that opens, create new exchange nodes 1C and AGORA (necessary to store changes to the item data)

(информация) The sequence of creating exchange nodes should be as follows: first 1C, then AGORA.

To do this, in the window that opens, click on the displayed exchange plan line (for example, on the Code column) and fill in the Code and Name fields with the phrase 1C (in Russian) in the window that opens, click OK to save the changes.

After that, add the AGORA exchange node by clicking the add button  or by going to: ActionsAdd

In the window that opens, specify the Code and Name: AGORA (it is important that all letters are capitalized) and click OK to save the changes:

(информация)Please note that the plan in the 1C icon has a green dot, and AGORA is a simple display:

After the current setup phase is completed, you need to do a complete upload.

(информация) How to do a full upload with a configured Agora gateway is described in this section.

Якорь
3
3
3. Setting up scheduled tasks

The setting is responsible for the frequency of uploading data to the portal. At this stage, you can set the conditions for data exchange between 1C and Agora services.

Setup is carried out in the 1C: Enterprise interface on the tab:     

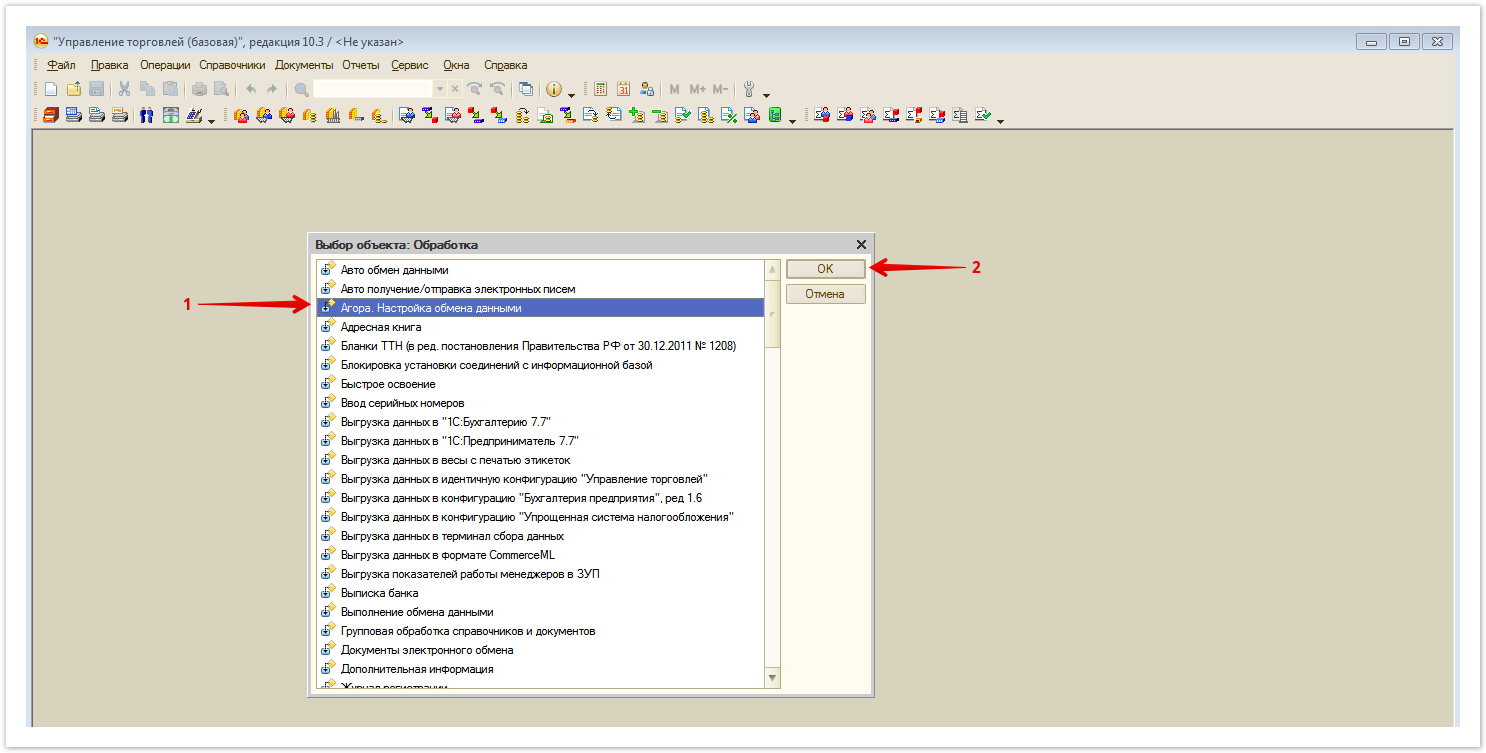
  • For UT10.3: Operations → Processing → Agora. Setting Data Exchange.     
  • For UT11.1 (2,3): Partition Panel → Agora.

In the window that opens, select Agora. Configure Data Exchange and click OK:

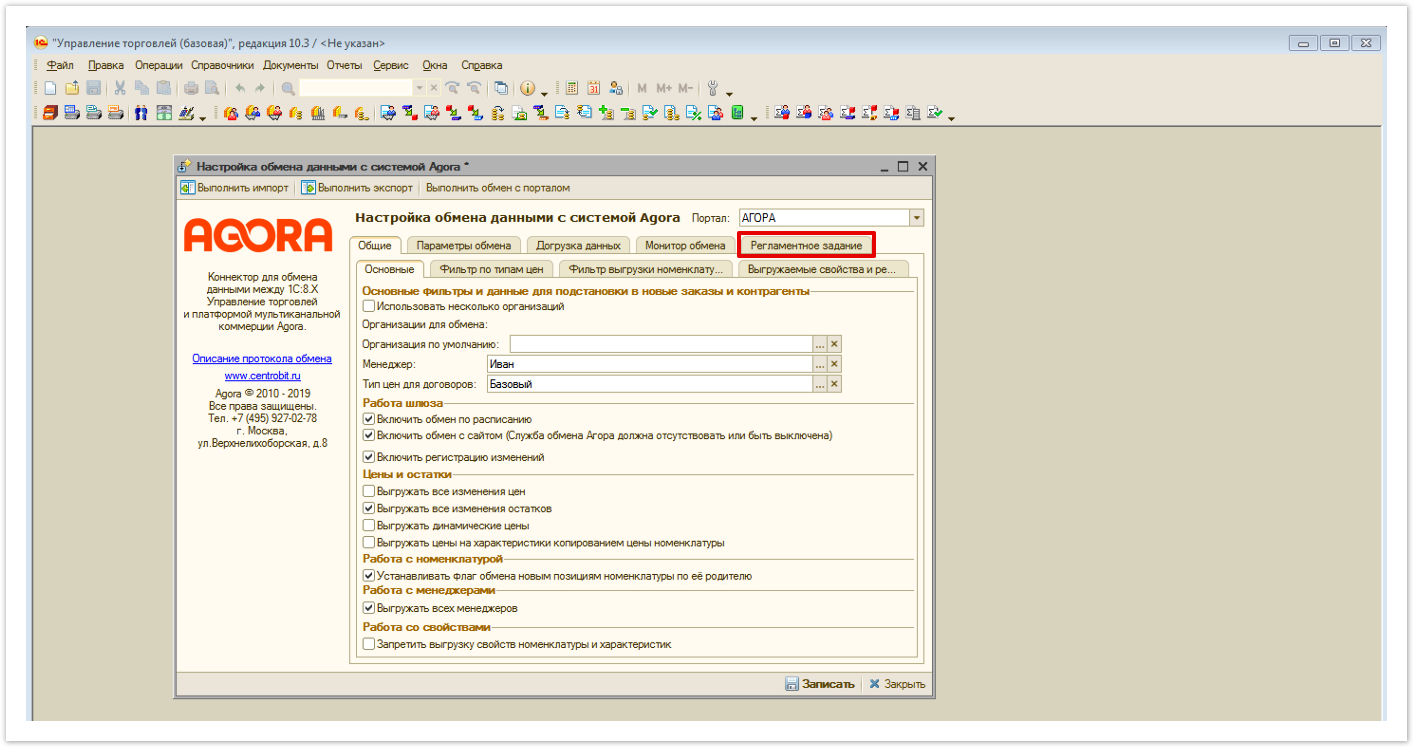
After opening the settings for exchanging data with the Agora system, go to the Scheduled Task tab:

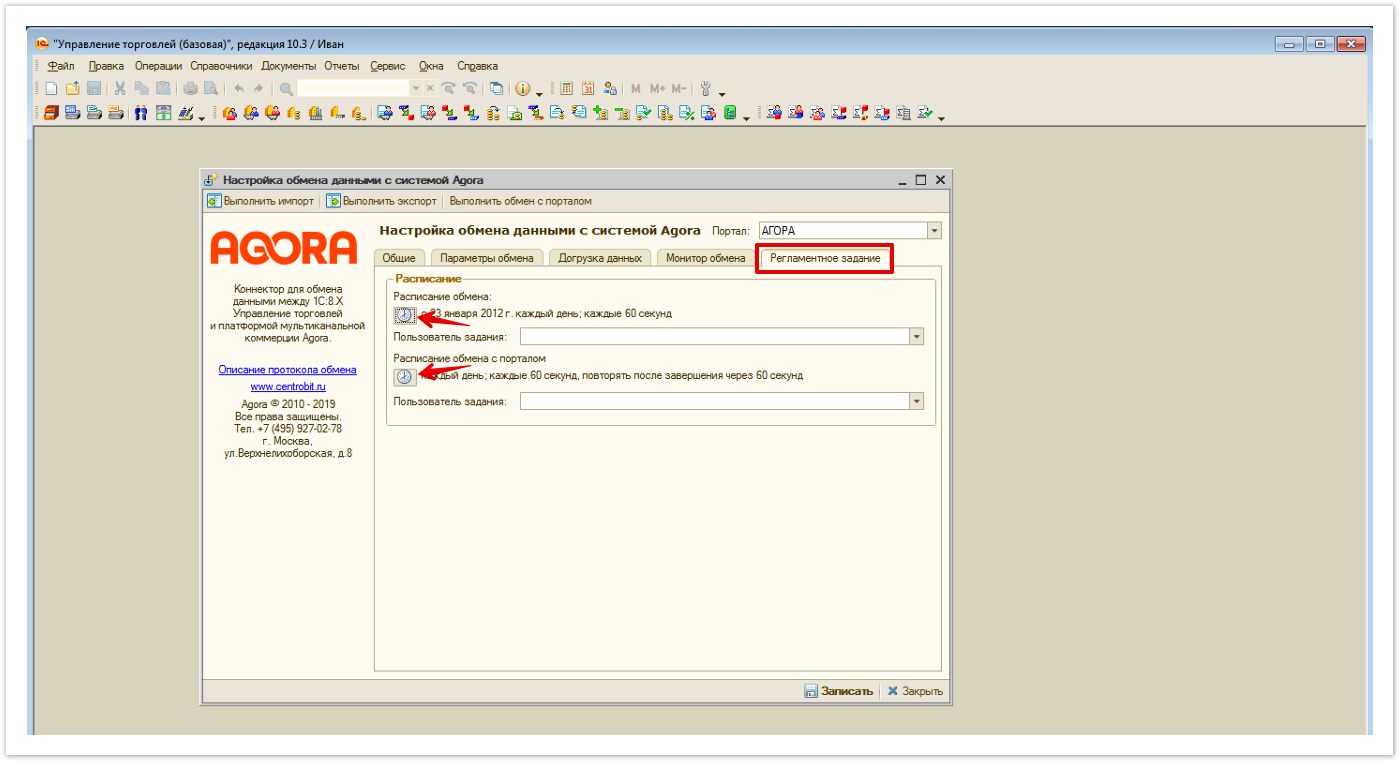
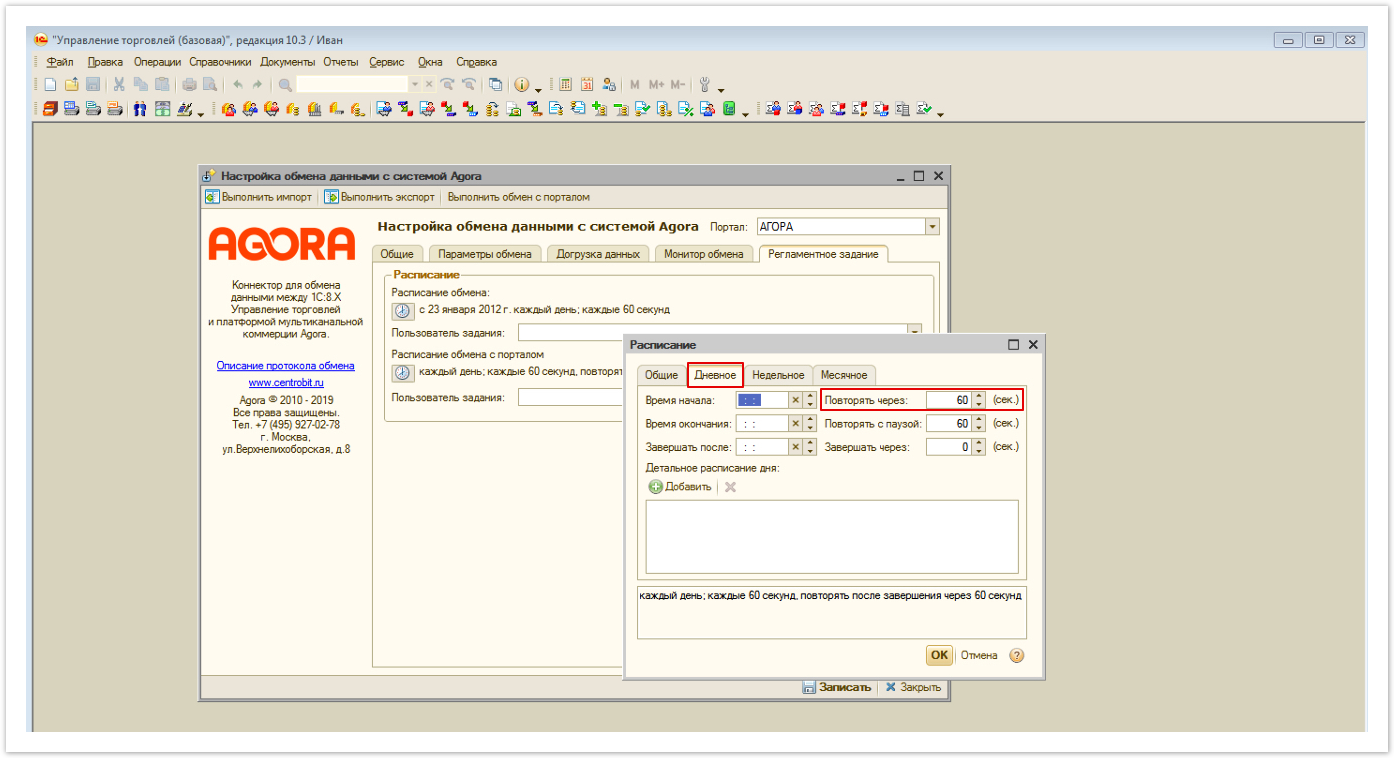
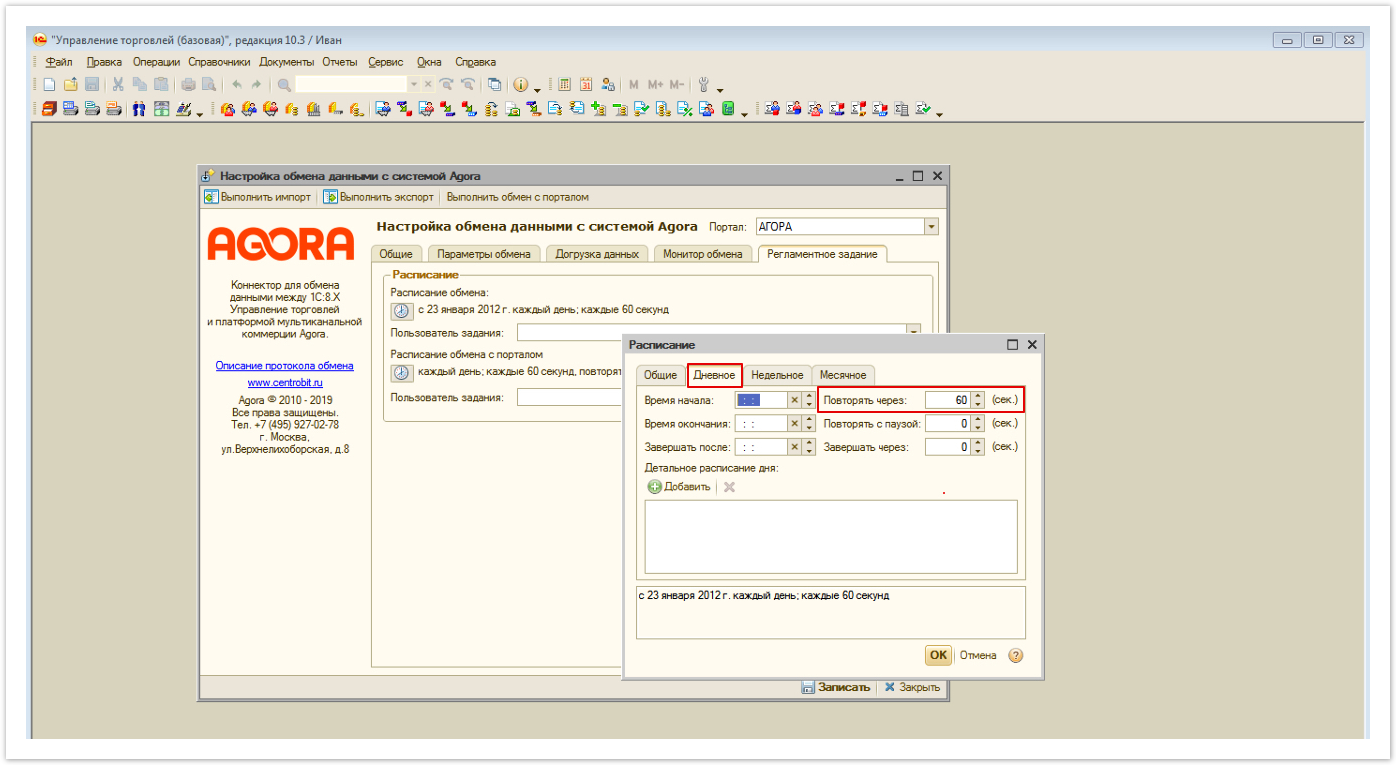
By default, the exchange interval is 1 minute; if necessary, you can change the exchange interval. To do this, click on the clock icon in the Scheduled Task section:

The exchange schedule is responsible for the frequency of uploading data from 1C to the File Storage folder.

Setting the download frequency is carried out on the Daily tab:

The exchange schedule with the portal is responsible for the frequency of uploading data from 1C to the portal.

The frequency setting is also carried out on the Daily tab:


Предупреждение
If you are using the server version 1C: Enterprise "Trade Management" in the administration settings of the server 1C: Enterprise "Trade Management", you need to make sure that the checkbox "Blocking scheduled tasks" is not 

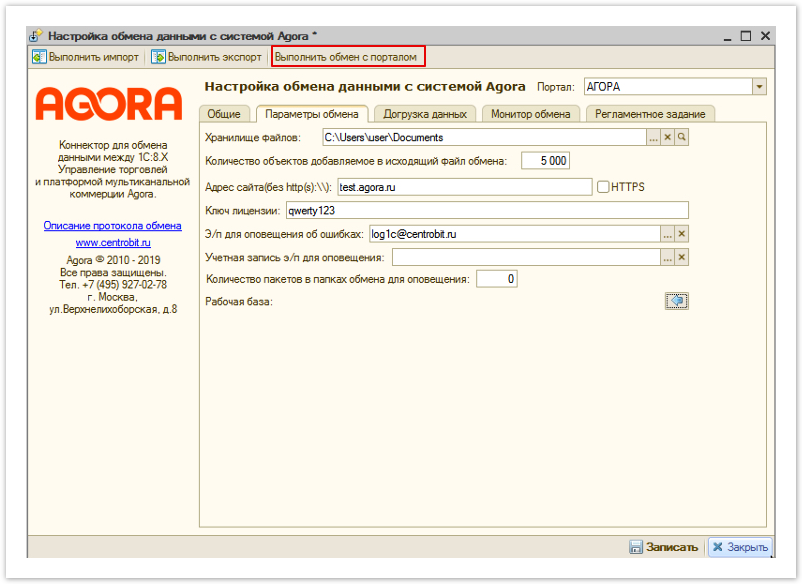
After completing the scheduled tasks settings, go to the Exchange Settings tab and fill in the following

  • Portal - select a configured exchange node (by default, there is no possibility to change the portal, so select the AGORA pre-installed portal).
  • File storage - create a folder and specify the path to it. All employees working with 1C should have access to the created folder.
  • The number of objects to add to the outgoing exchange file.
  • Website address (without http://) - provided by the support service. In case of questions, send a request to: help@agora.ru
  • License key - provided by customer support. In case of questions, send a request to: help@agora.ru

Credentials to receive notifications of exchange errors.

After setting, click the button to "link" the database used with the portal exchange service.

After starting the exchange with the portal:

The following folders will be created in the specified File Storage:

  • Complete - the archive folder where the files are moved after sending data to the site.
  • Export - the folder where data from the 1C: Enterprise Trade Management system is moved for subsequent sending to the site and moving files to the archive.
  • Img - the folder where data from the 1C: Enterprise "Trade Management" system (images) is moved for subsequent sending to the site and moving files to the archive.
  • Import - the folder where data from the site is moved to further move files to the 1C: Enterprise Trade Management system and archive.
  • Preexport is the system folder.

After the exchange with the portal is completed, in the project administrative panel, available at: project_address.agora.ru/admin, in the Import Exchange Packages section, an array of data loaded from 1C will be displayed, accessible by clicking on the name of the xml file in the File column:

Please note that after a complete upload, some time should pass for updating the data on the portal. Typically, the waiting time does not exceed 15 minutes.

(информация) An example of the format for uploading data from 1C is available in this section.

If the data is not uploaded, check the error log in 1C, available as follows:

  • In the drop-down menu All functions (1C version 11) or Operations (1C version 10.3)
  • Go to Processes and select the Log.

This section will display data on errors that occur during the operation of the integration mechanism.


(отметить) An example of ordering on the portal and its processing in 1C is available in the Checkout section

Информация

If you have any difficulties or questions during the integration setup, you can always write to our technical support: help@agora.ru and they will certainly help you.

...