| Sv translation | |||||||||||||||||||||||||||
|---|---|---|---|---|---|---|---|---|---|---|---|---|---|---|---|---|---|---|---|---|---|---|---|---|---|---|---|
| |||||||||||||||||||||||||||
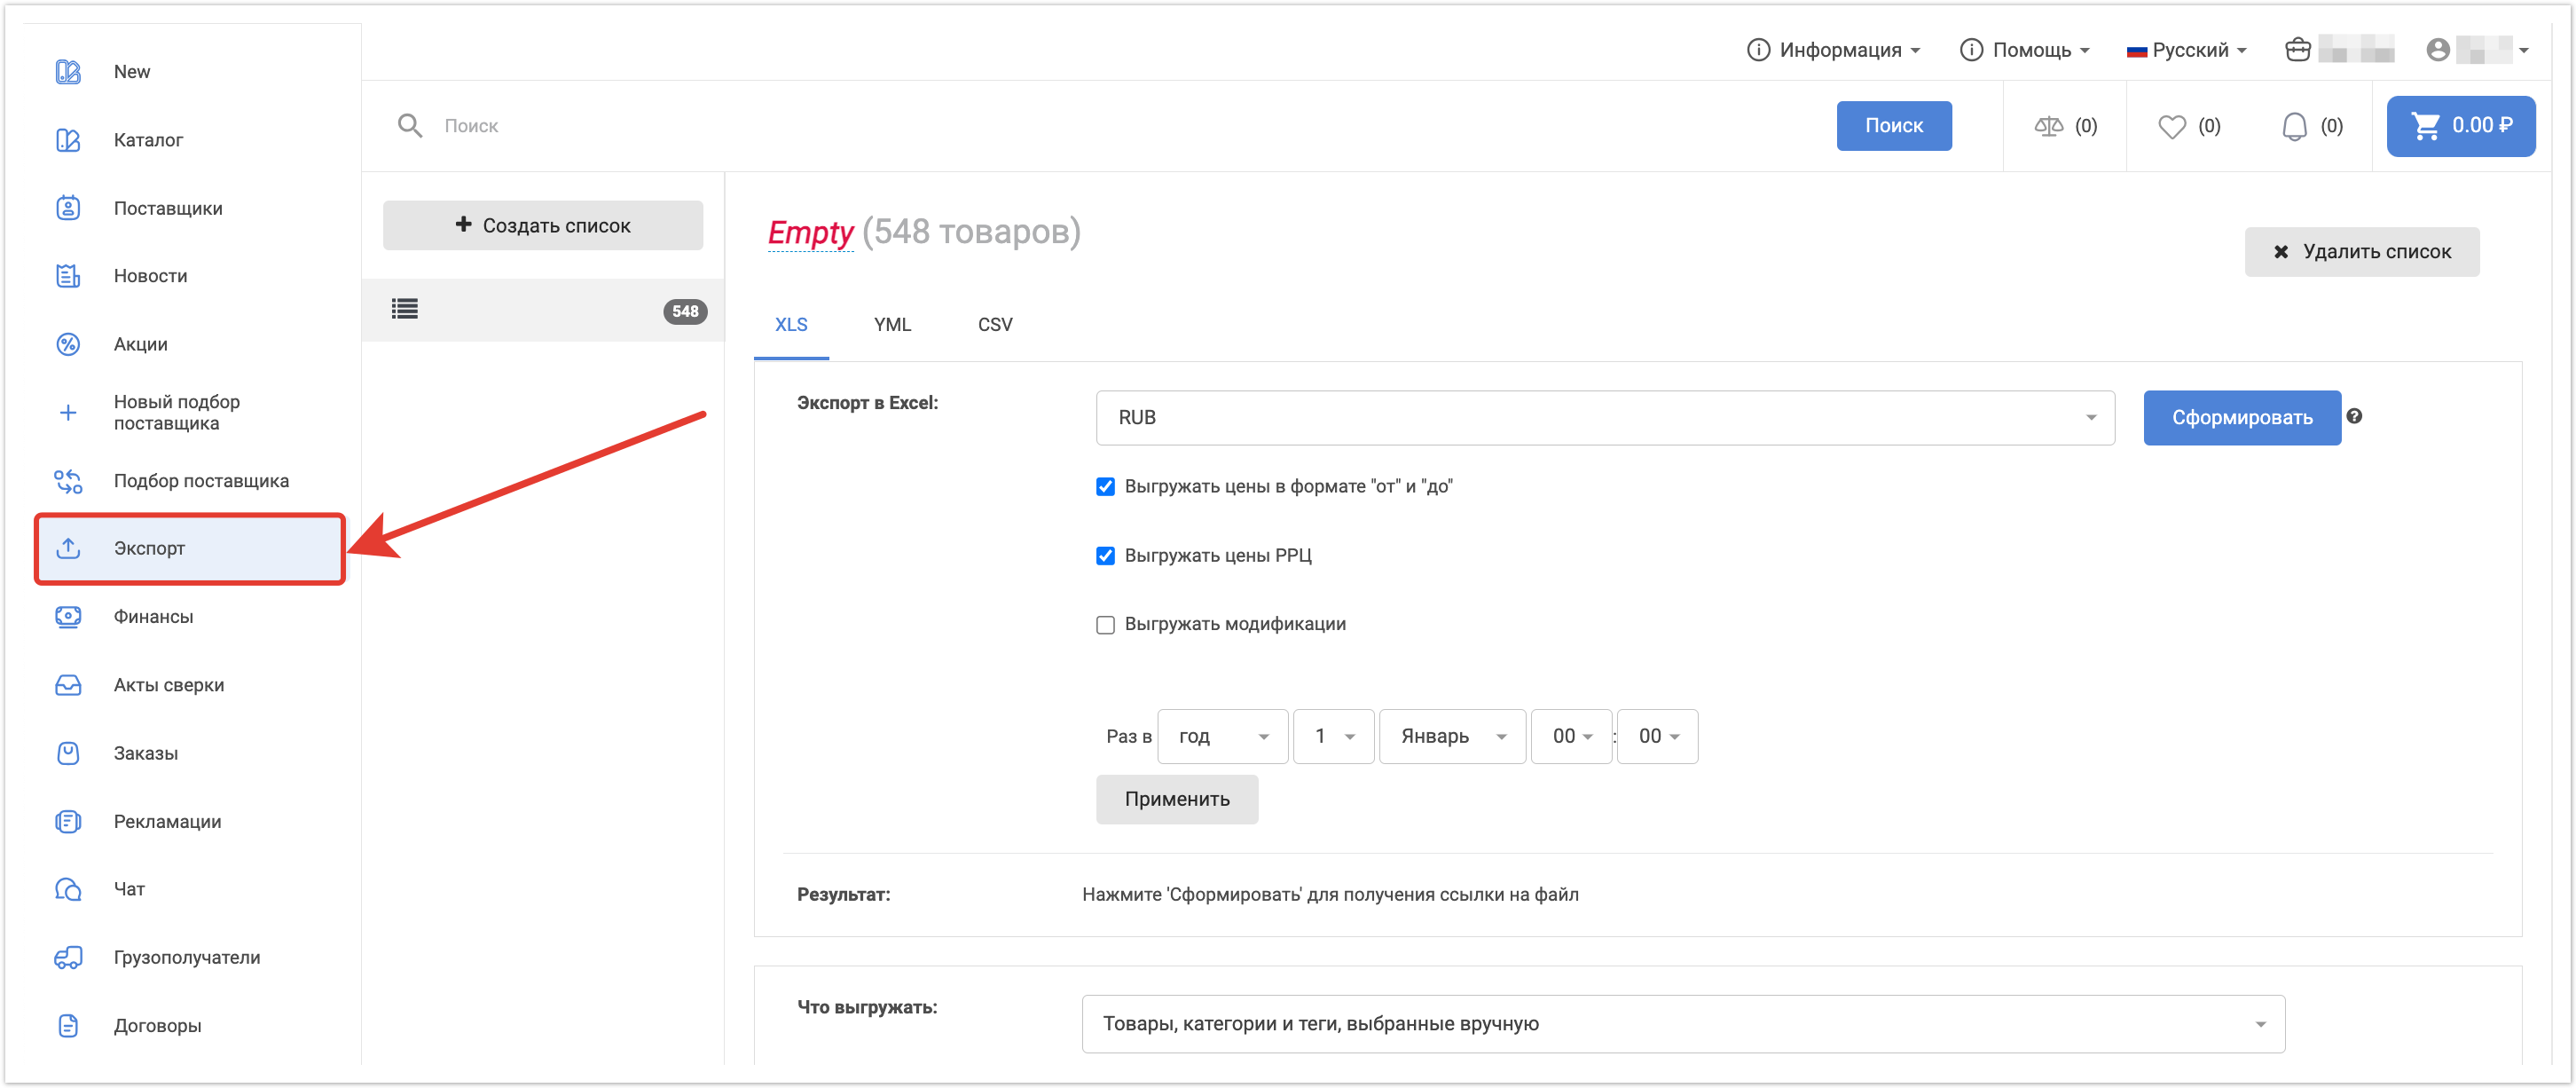
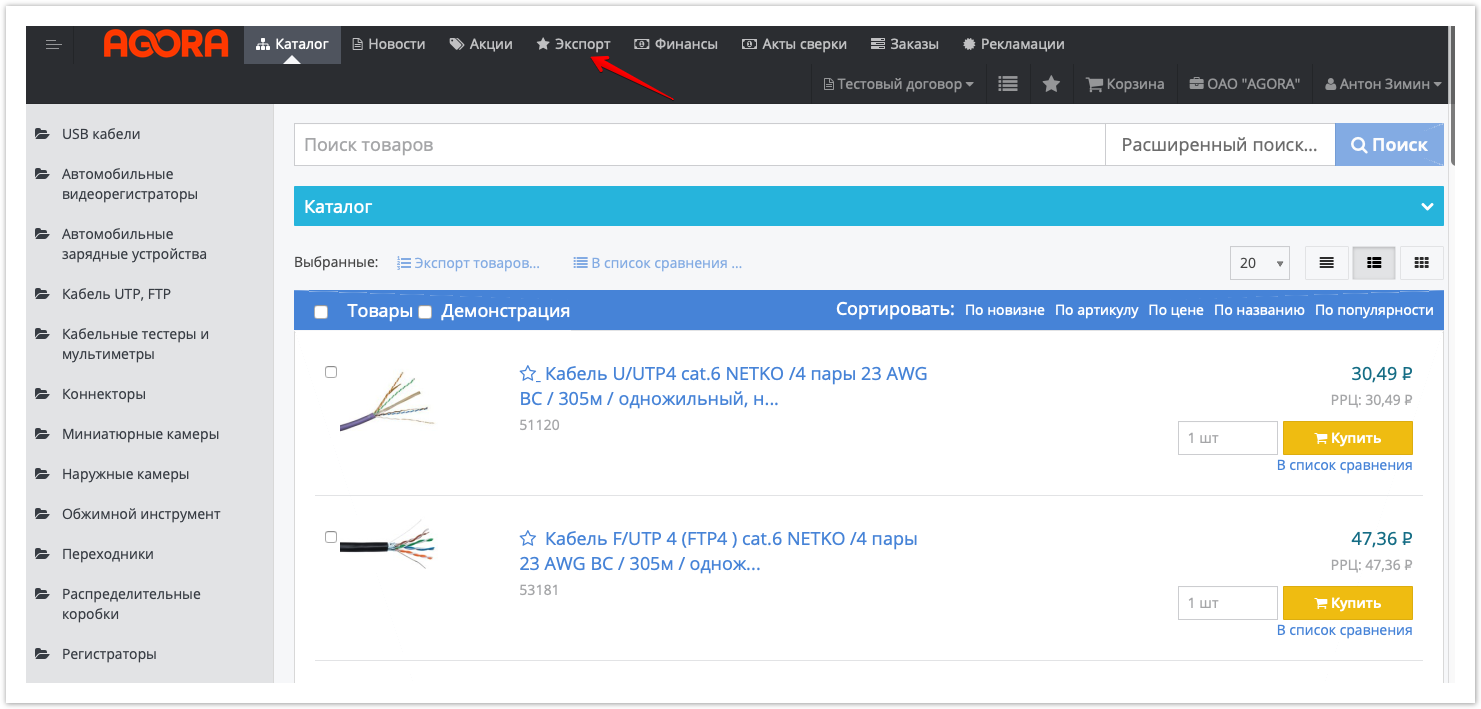
Поддерживается 3 способа экспорта списков товаров из системы в интернет-магазин. Для создания витрины товаров и обновления остатков можно использовать статические ссылки в форматах XLS, YML и СSV. . Доступность каждого формата выгрузки настраивается через панель администратора. Можно подключить как все форматы, так и только некоторые из них. 1. Подготовка списка товаров для экспортаДля экспорта товаров перейдите в раздел "Экспорт" в административной панели сайта. При этом откроется в личном кабинете нажмите кнопку
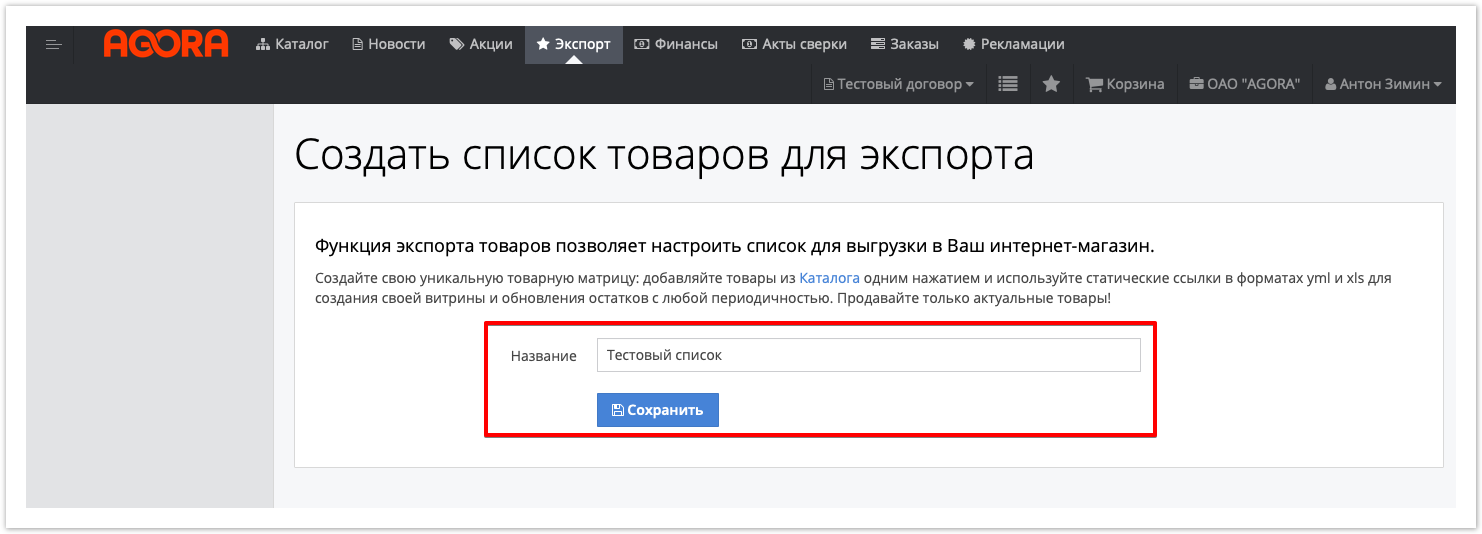
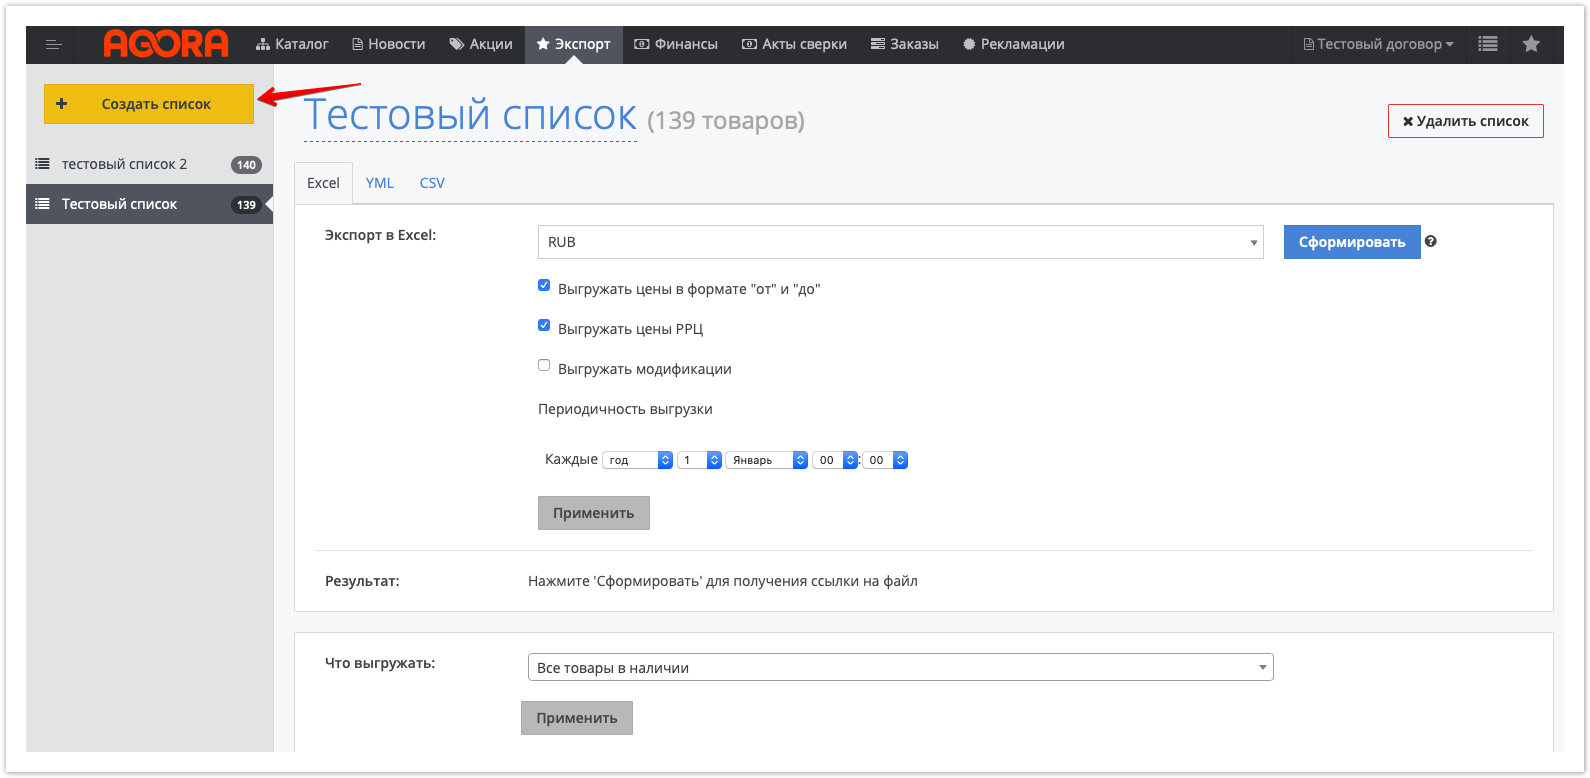
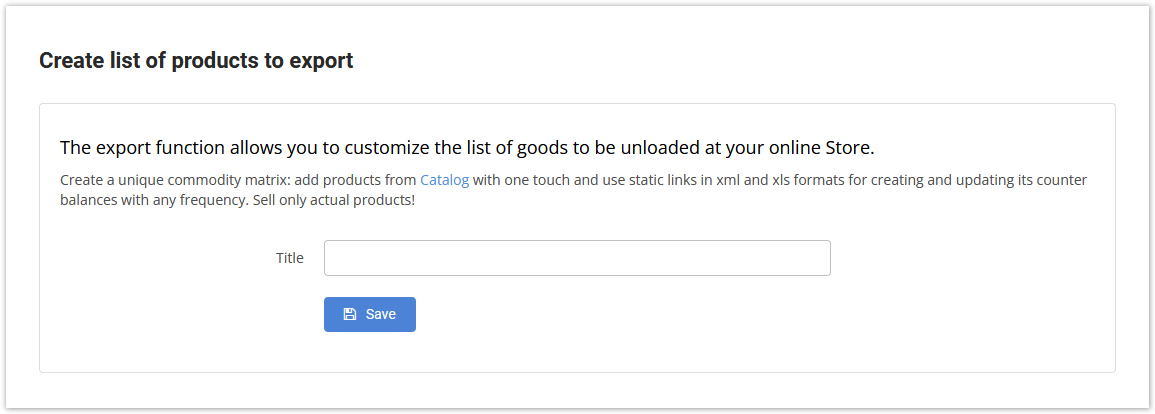
1.1. Создание списка товаров
Для создания списка товаров укажите его название и нажмите кнопку "Сохранить".
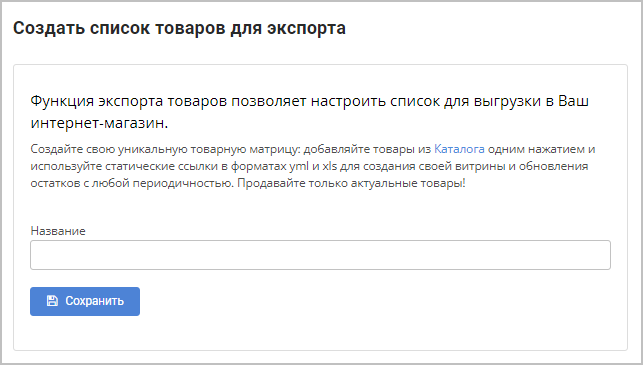
Если ранее списков экспорта не создавалось, то после нажатия кнопки
Введите название и нажмите Сохранить. Если список был уже создан, то после нажатия кнопки При необходимости добавить еще список нажмите кнопку Создать список, после чего введите название списка и нажмите Сохранить.
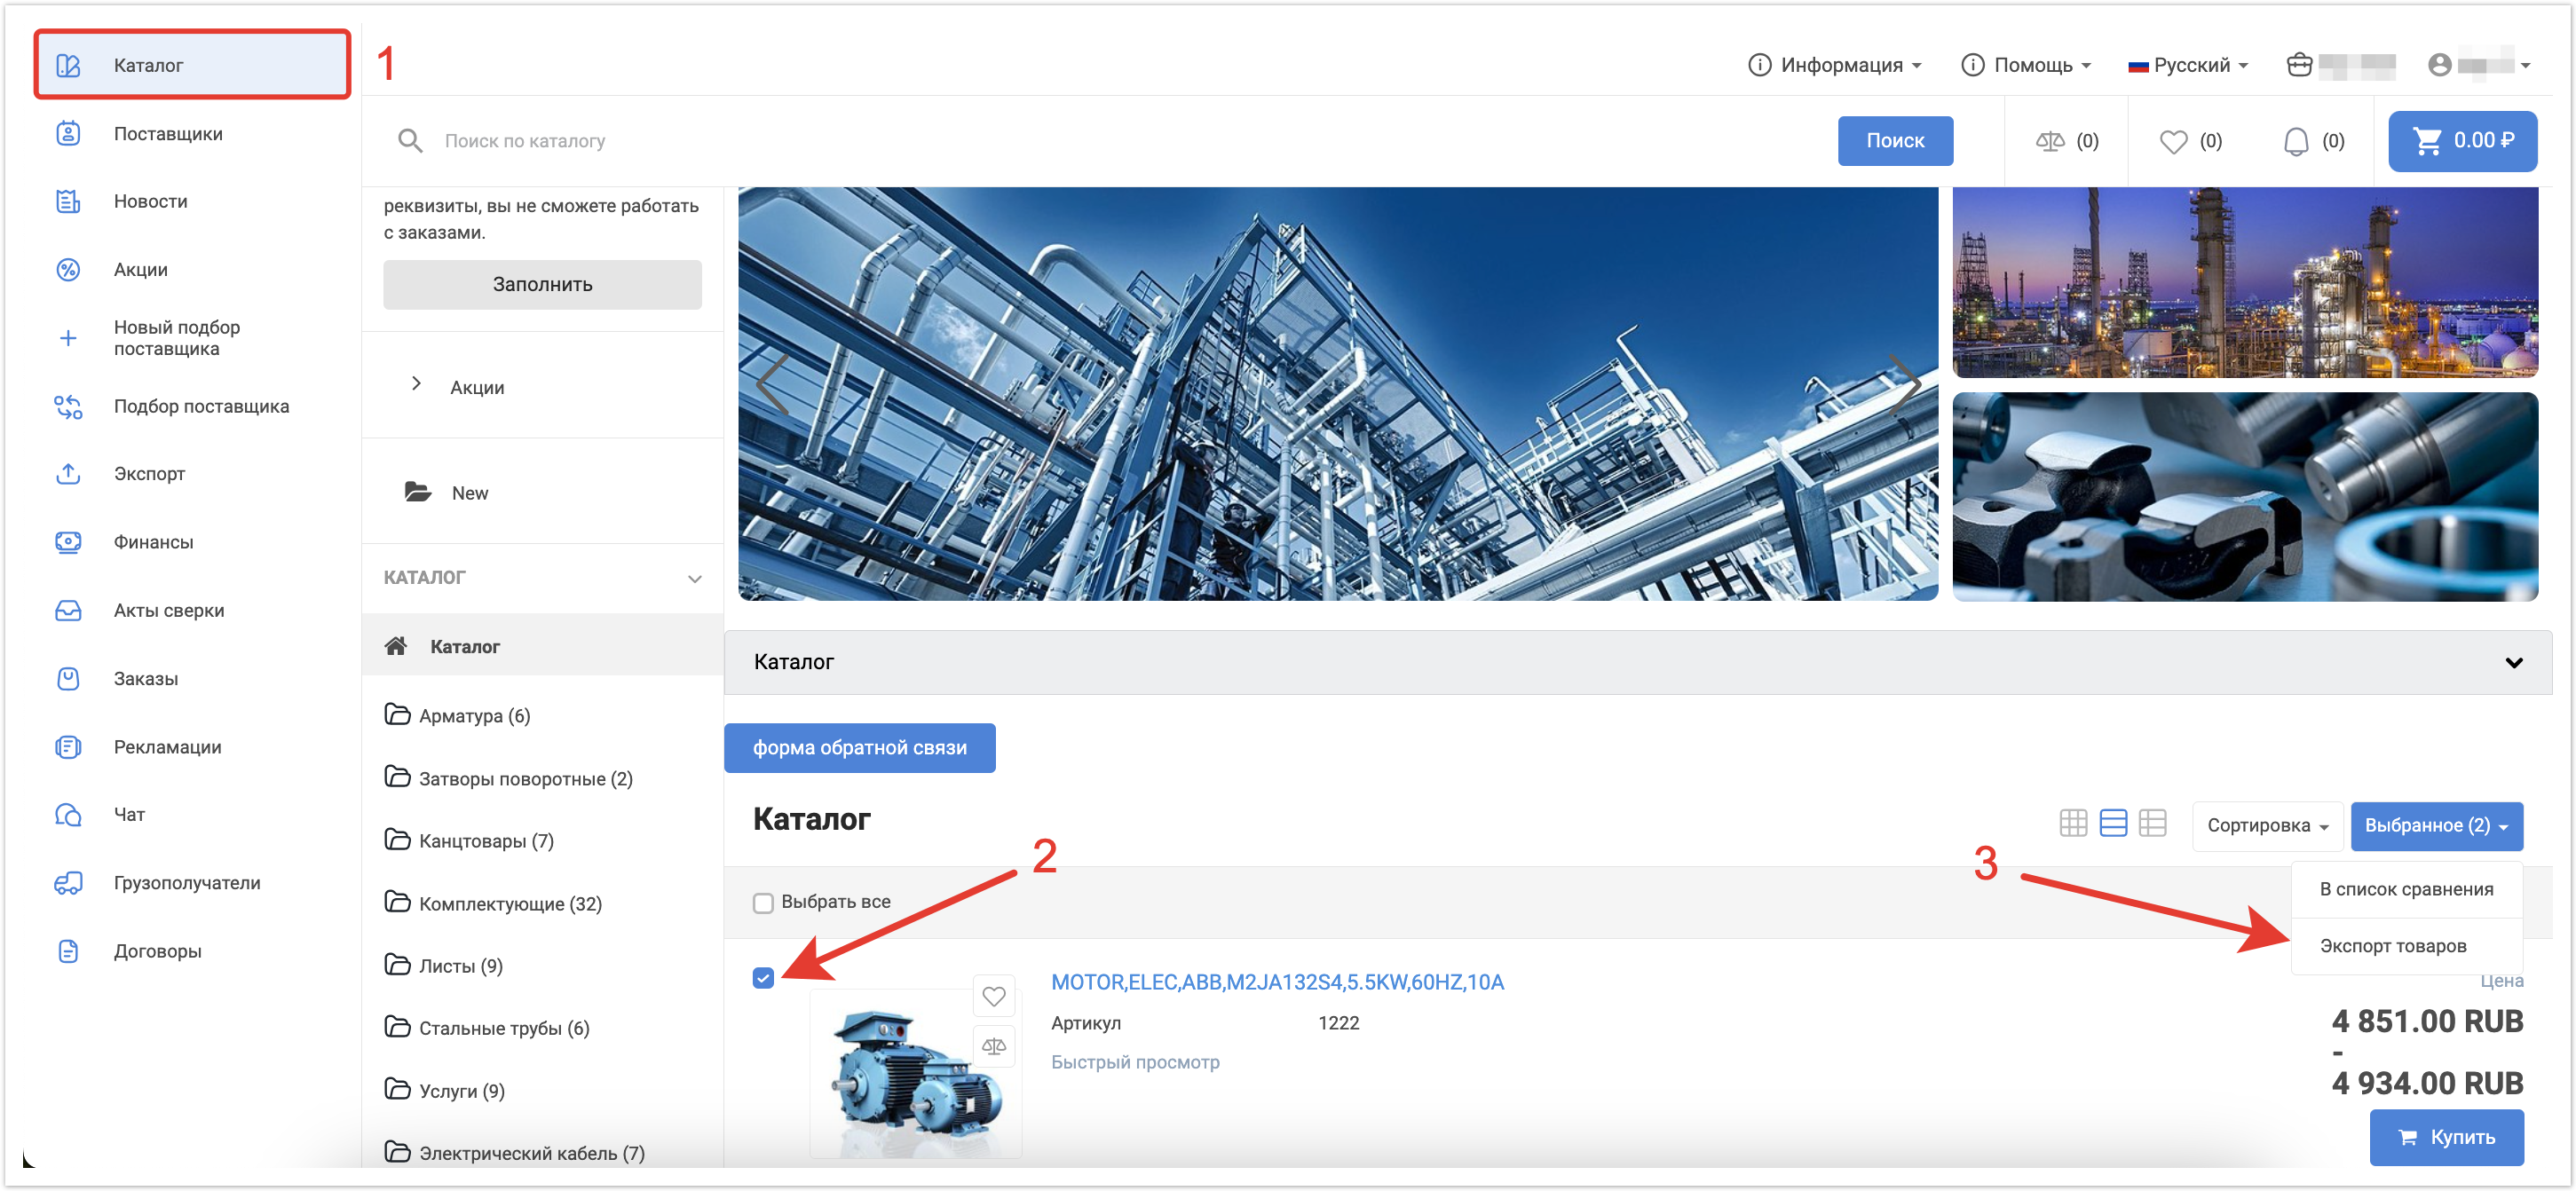
1.2. Добавление товаров в списокПосле создания списка товаров, необходимо добавить в него товары. Для этого есть несколько вариантов: Добавление товаров из каталога товаровОткройте каталог товаров, нажав кнопку 1.2.1. Добавление товаров из каталога товаровВ каталоге товаров можно отметить с помощью чекбоксов один илинесколько товаров и нажать «Экспорт товаров»кнопку Экспорт товаров. 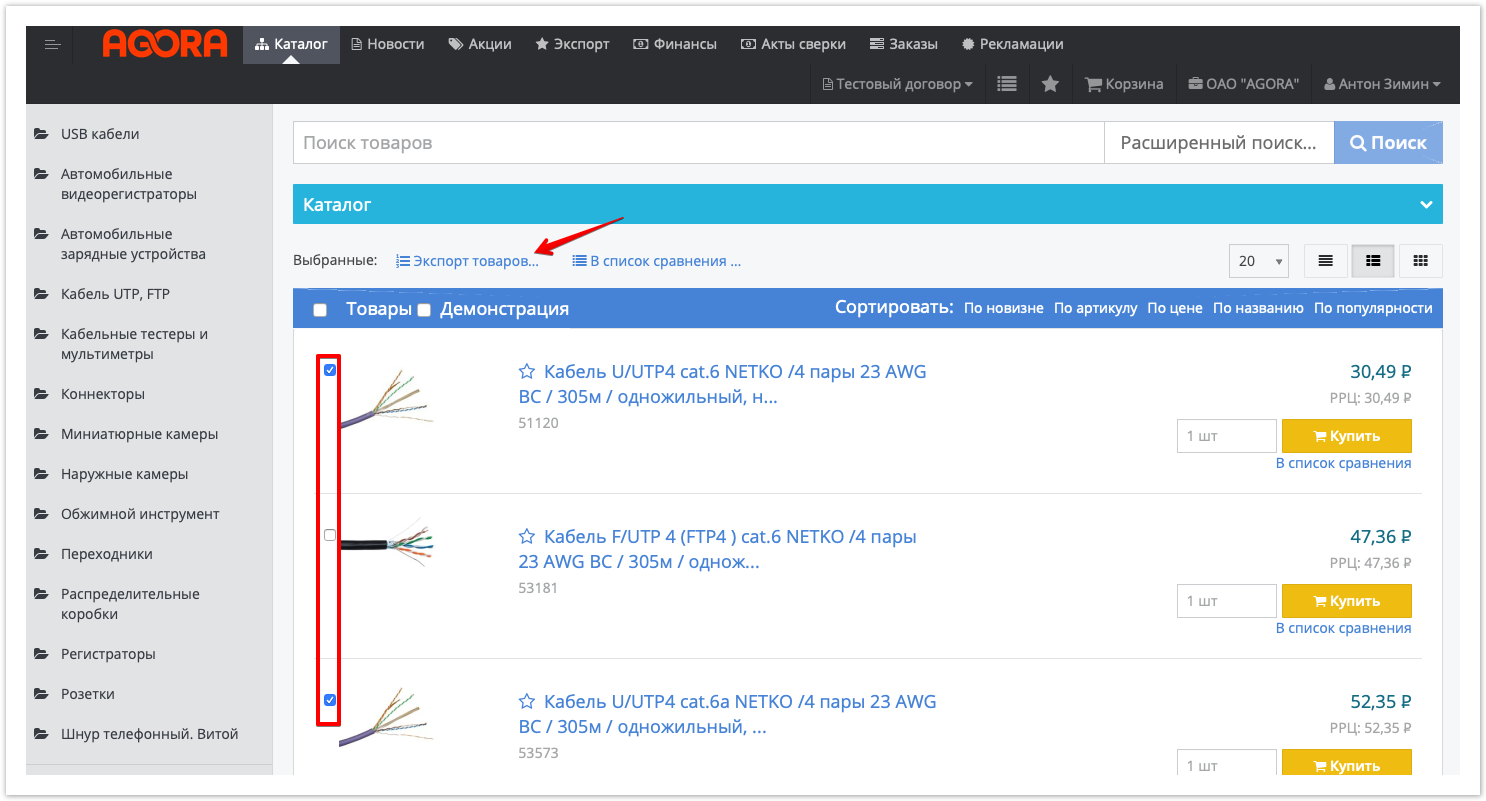
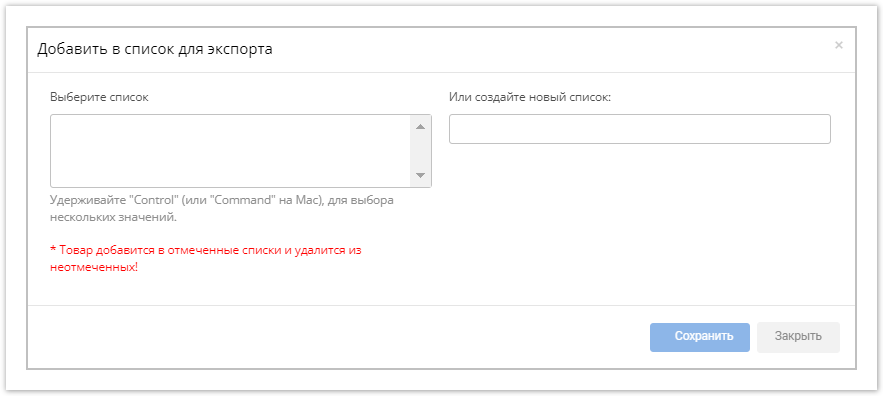
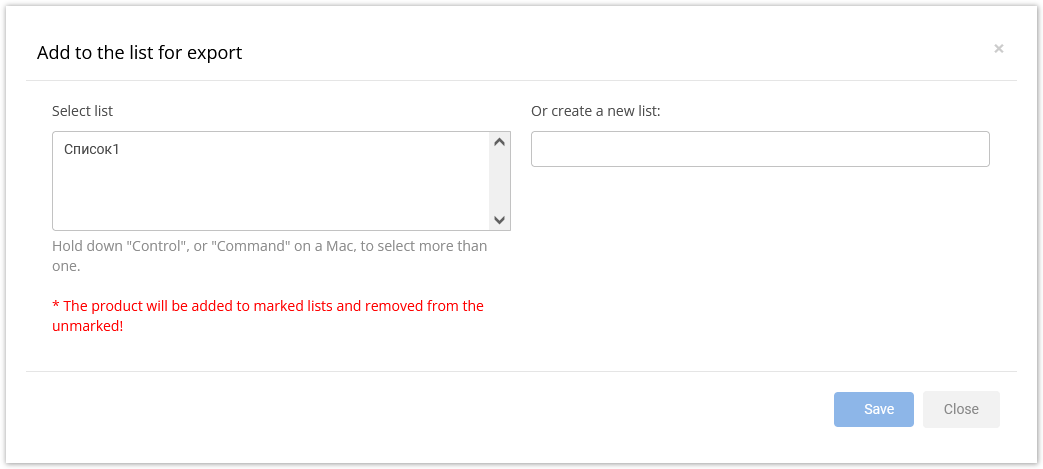
Далее будет предложено выбрать, в какой список для экспорта добавить данные товары — товары — можно выбрать уже существующий список (левое поле формы) или же создать новый список (правое поле формы) и нажать на кнопку "Сохранить". Все Все выбранные товары будут товары будут добавлены в список для экспорта.
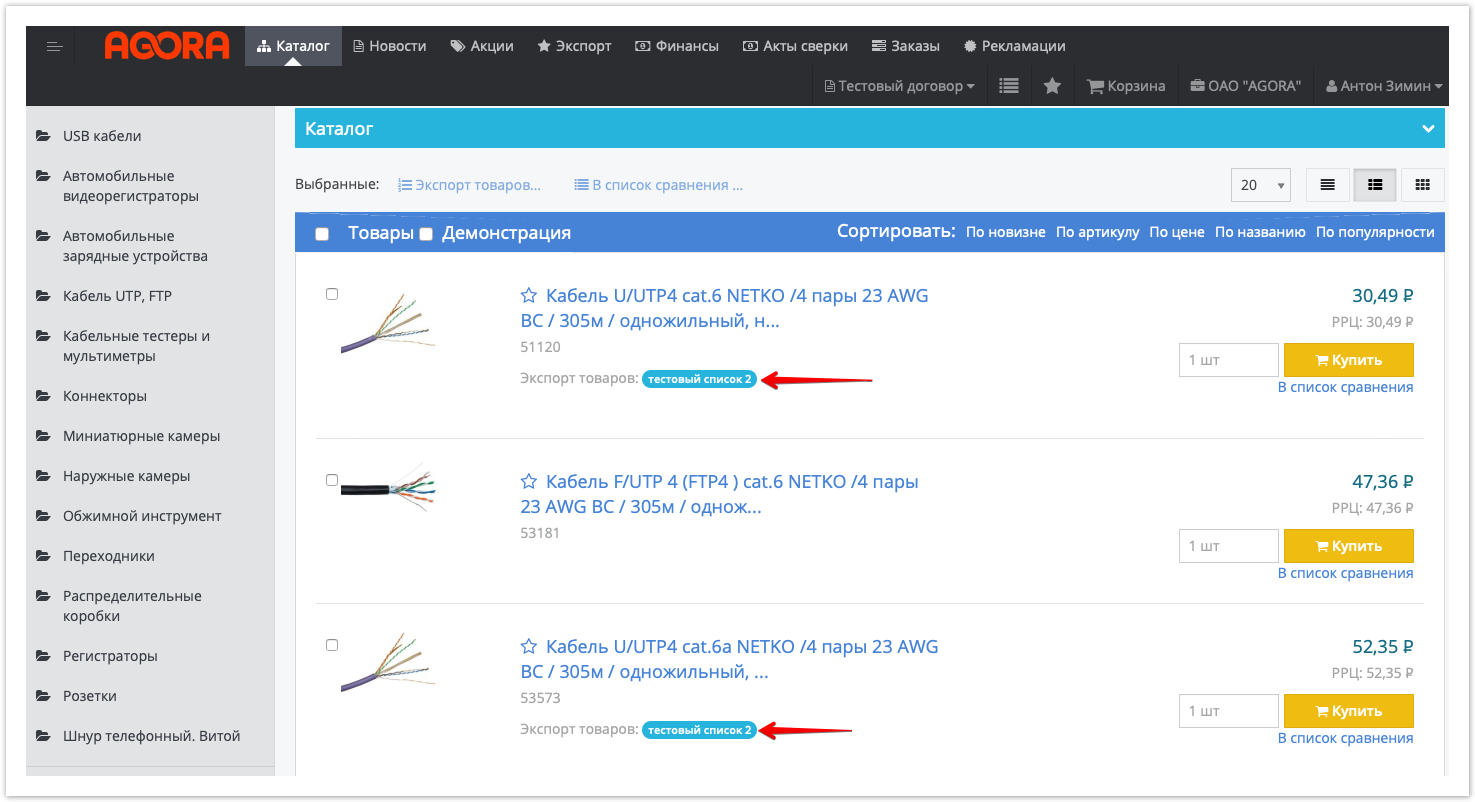
После того, как необходимые товары будут добавлены в список экспорта, в каталоге они будут отмечены "баннером" с указанием названия списка:
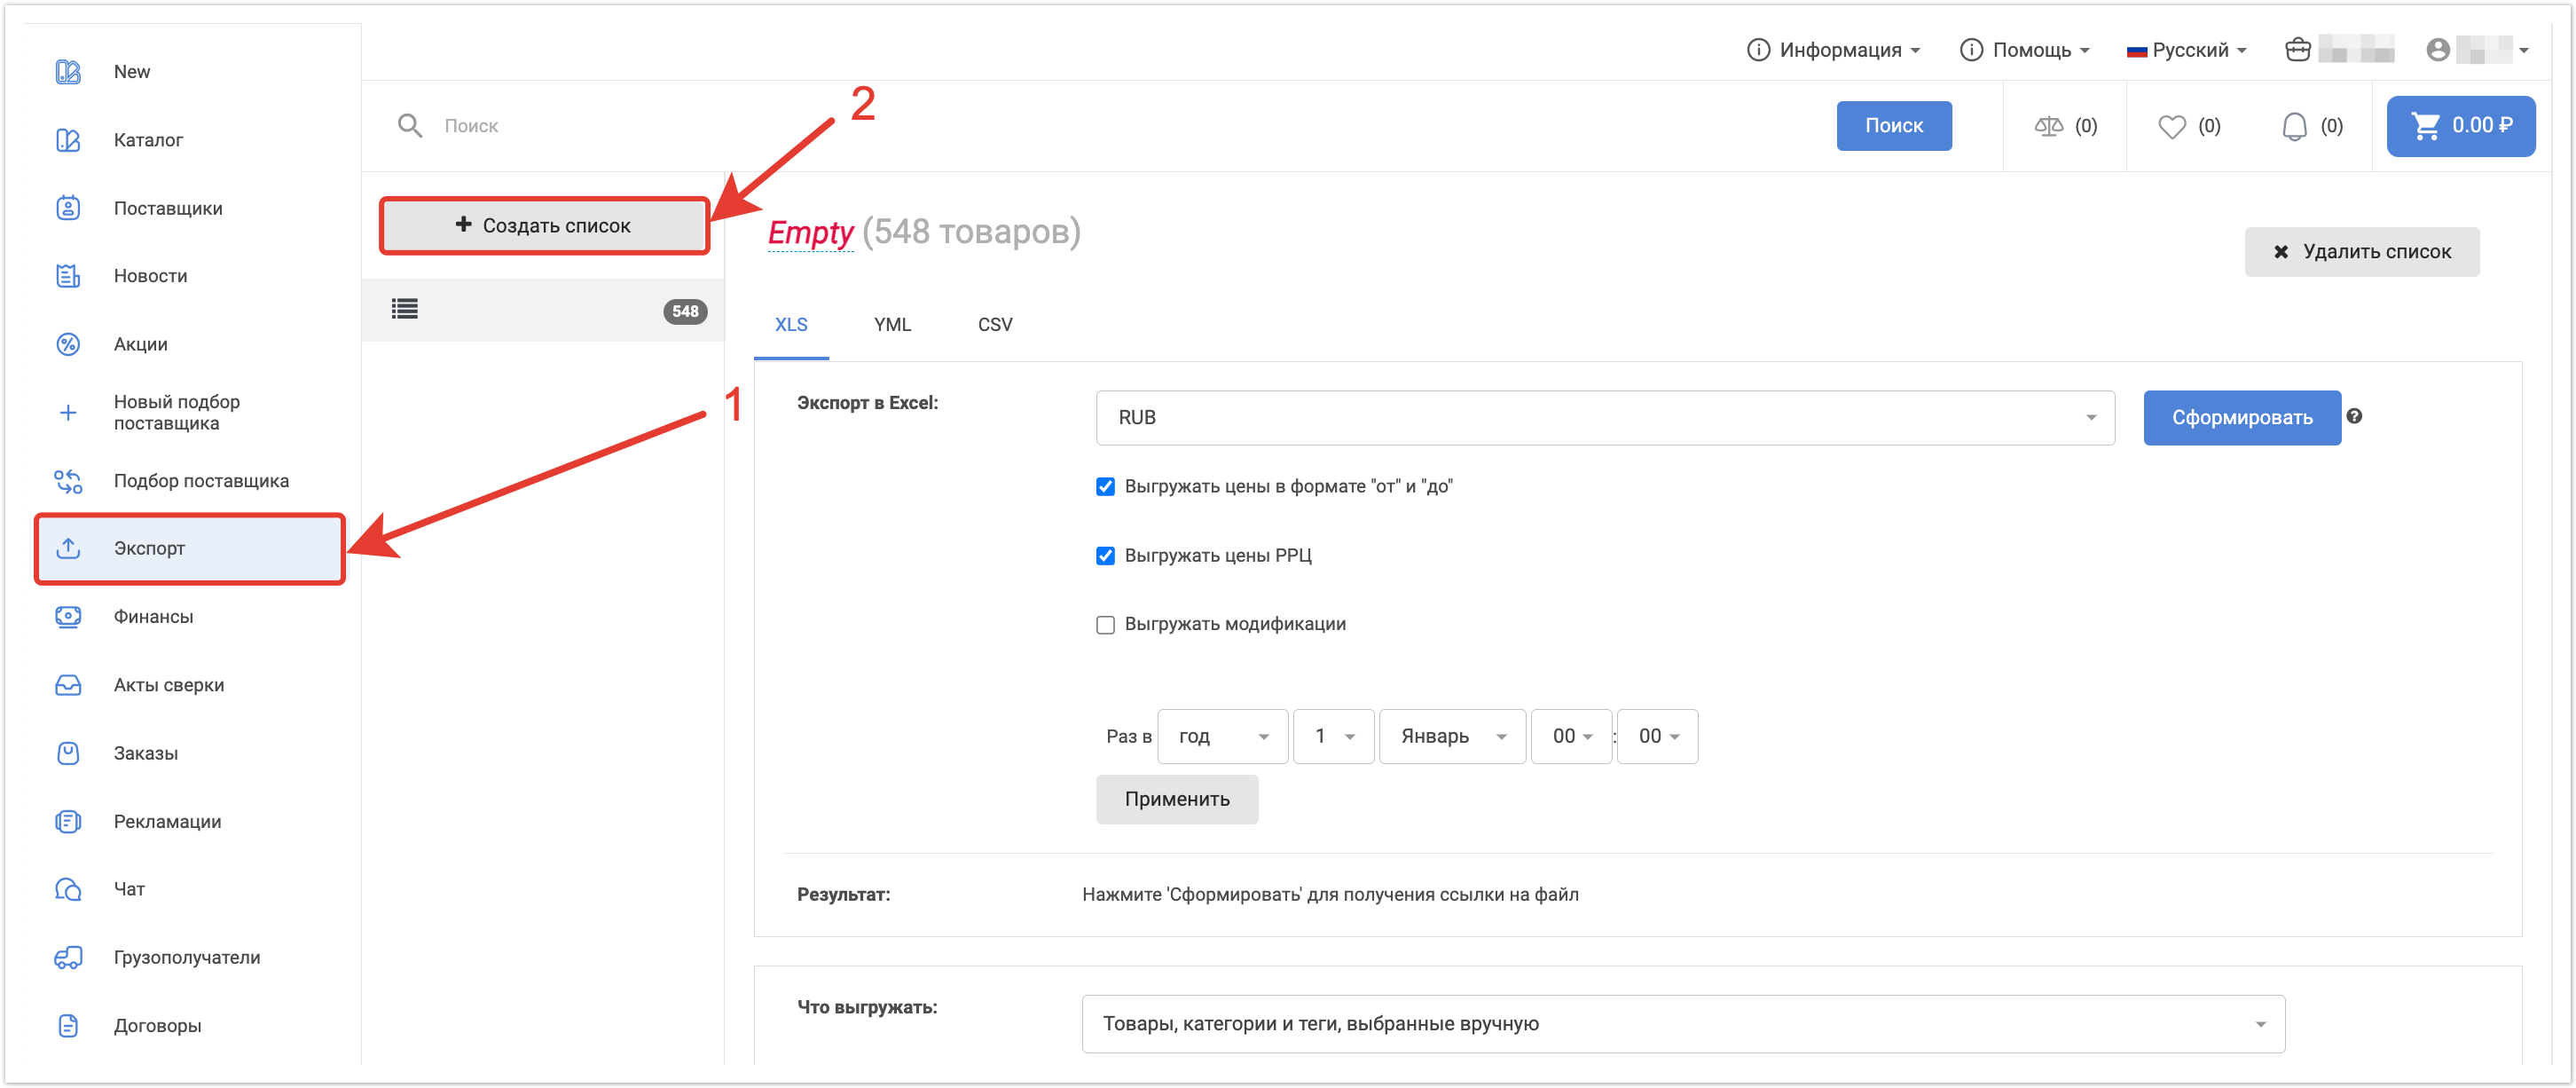
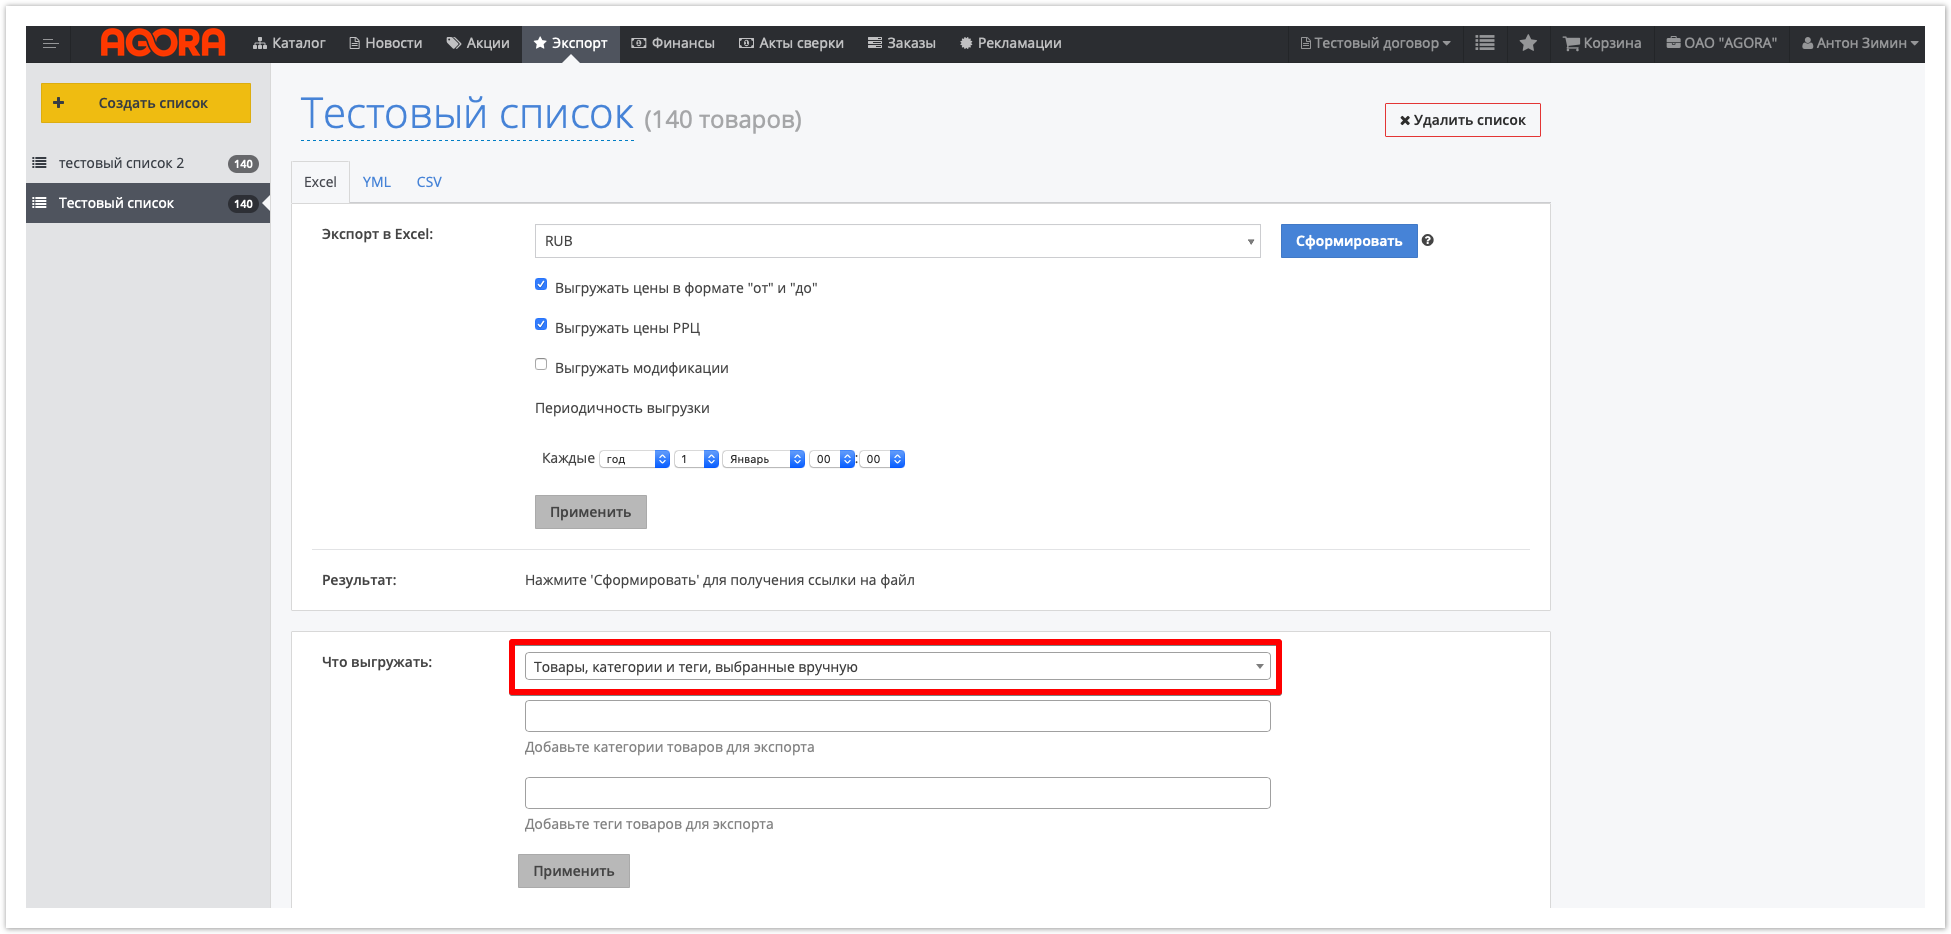
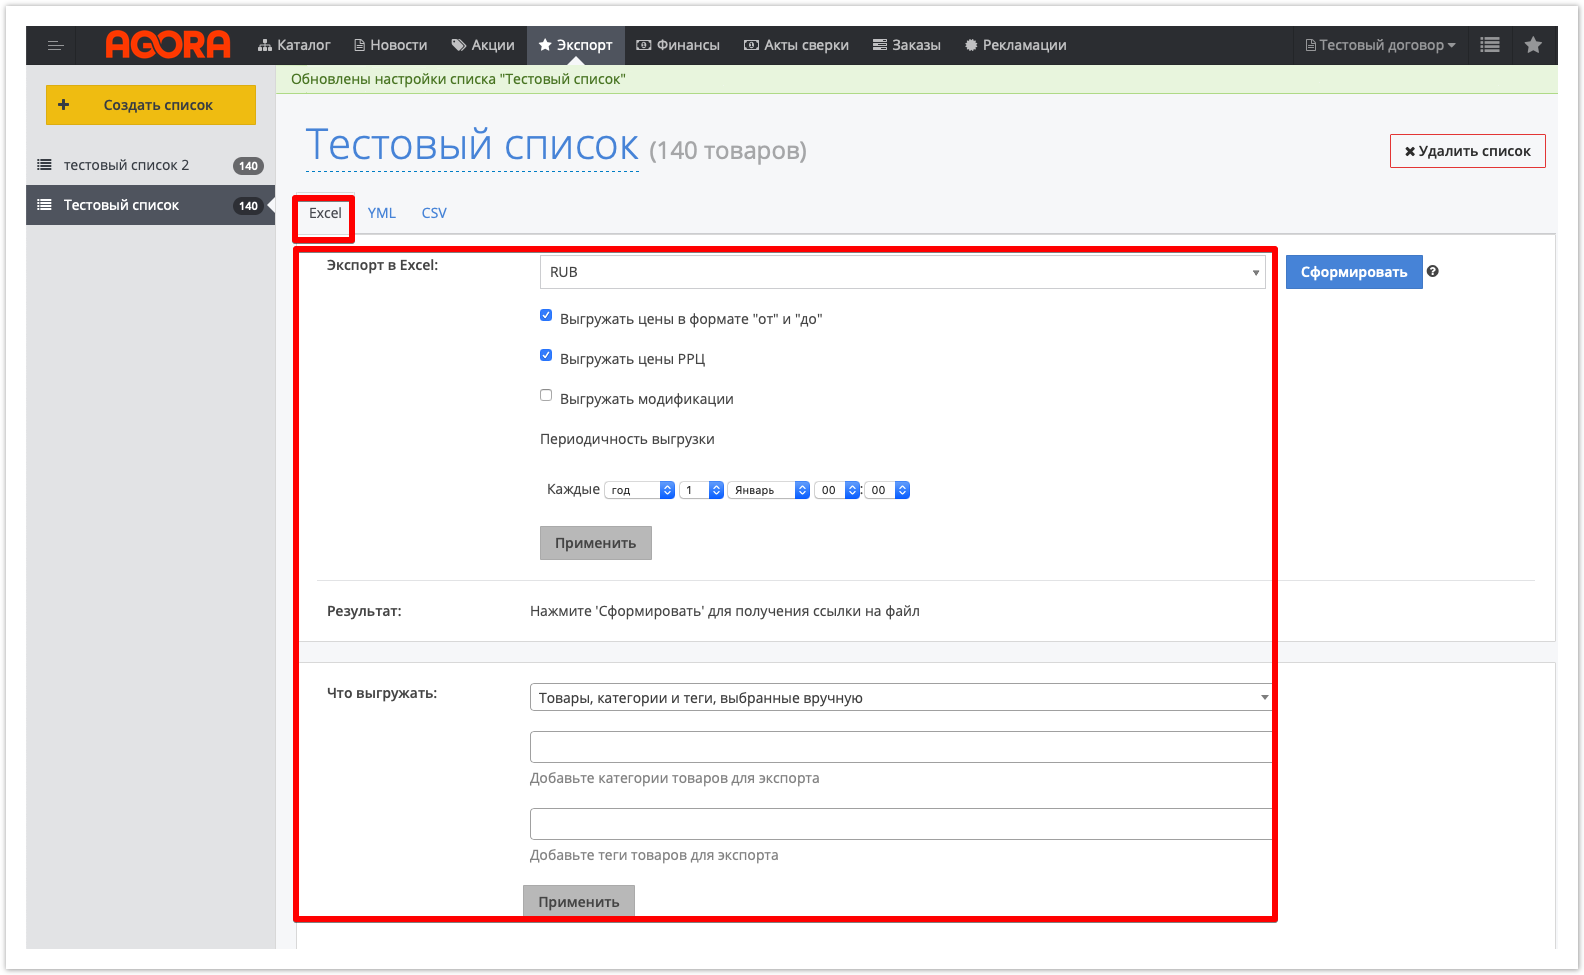
Экспорт в ExcelДля экспорта товаров в личном кабинете нажмите кнопку
Перед экспортом выполните следующие настройки:
Нажмите кнопку Применить. Если ее не нажать, то внесенные изменения не будут применены.
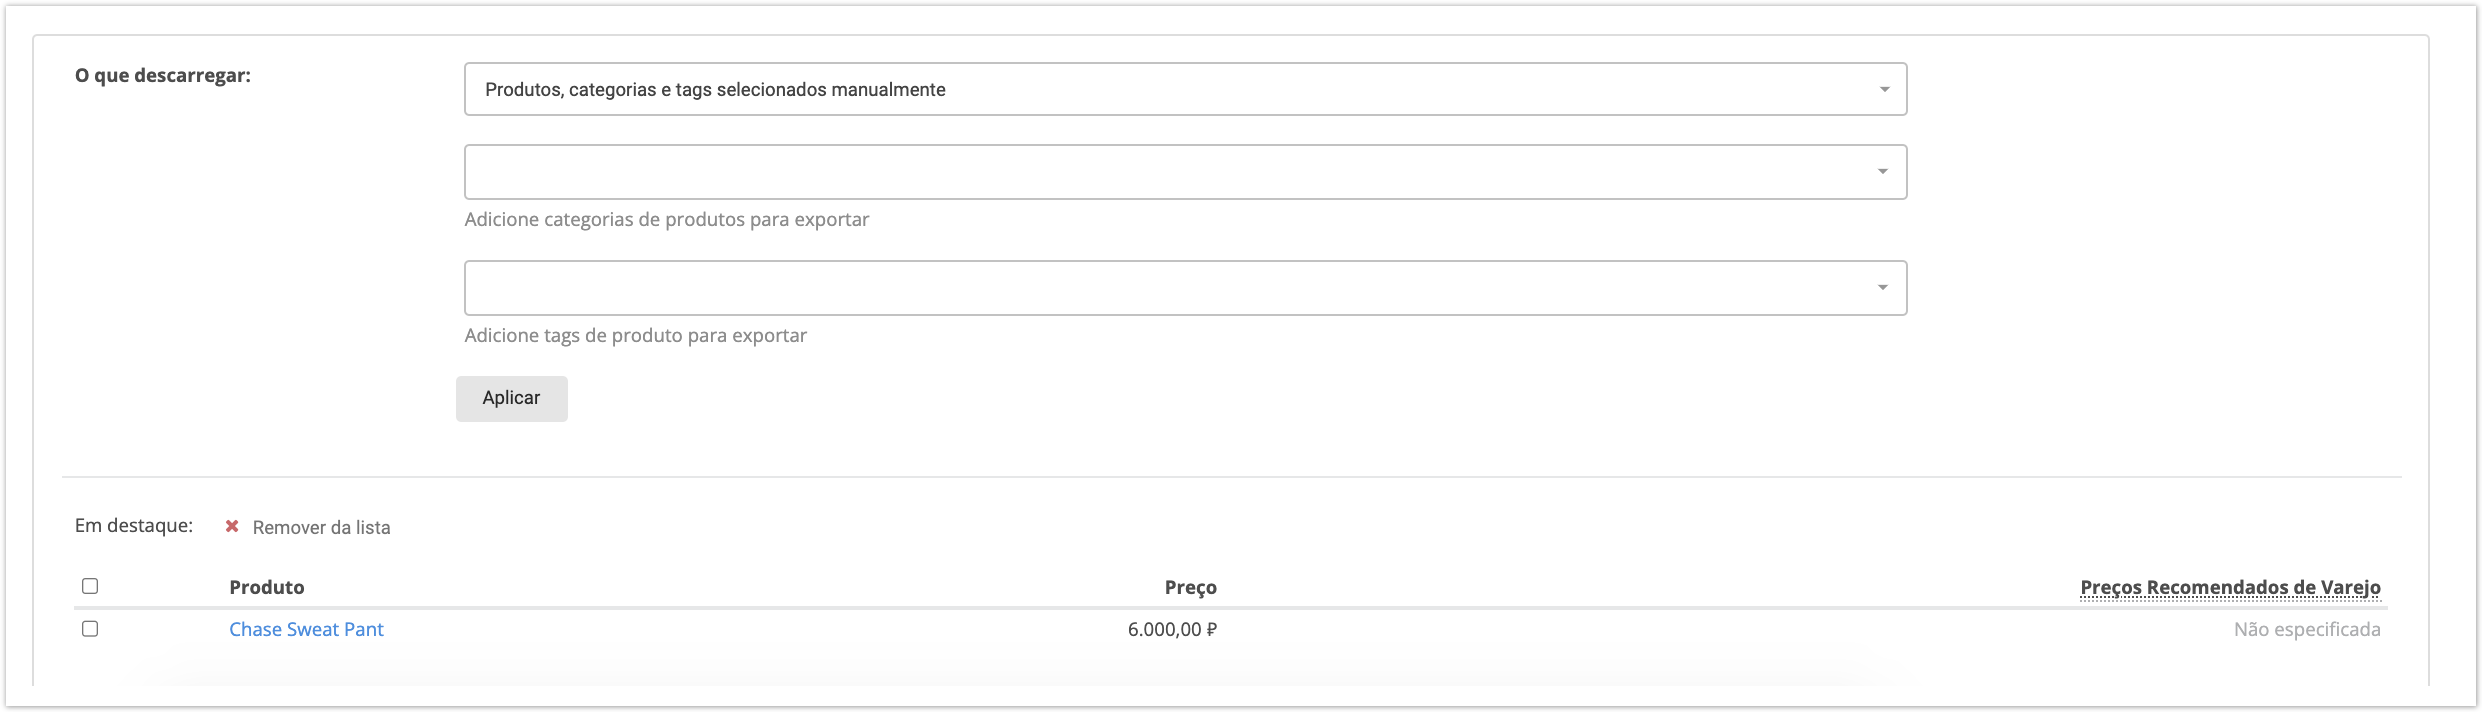
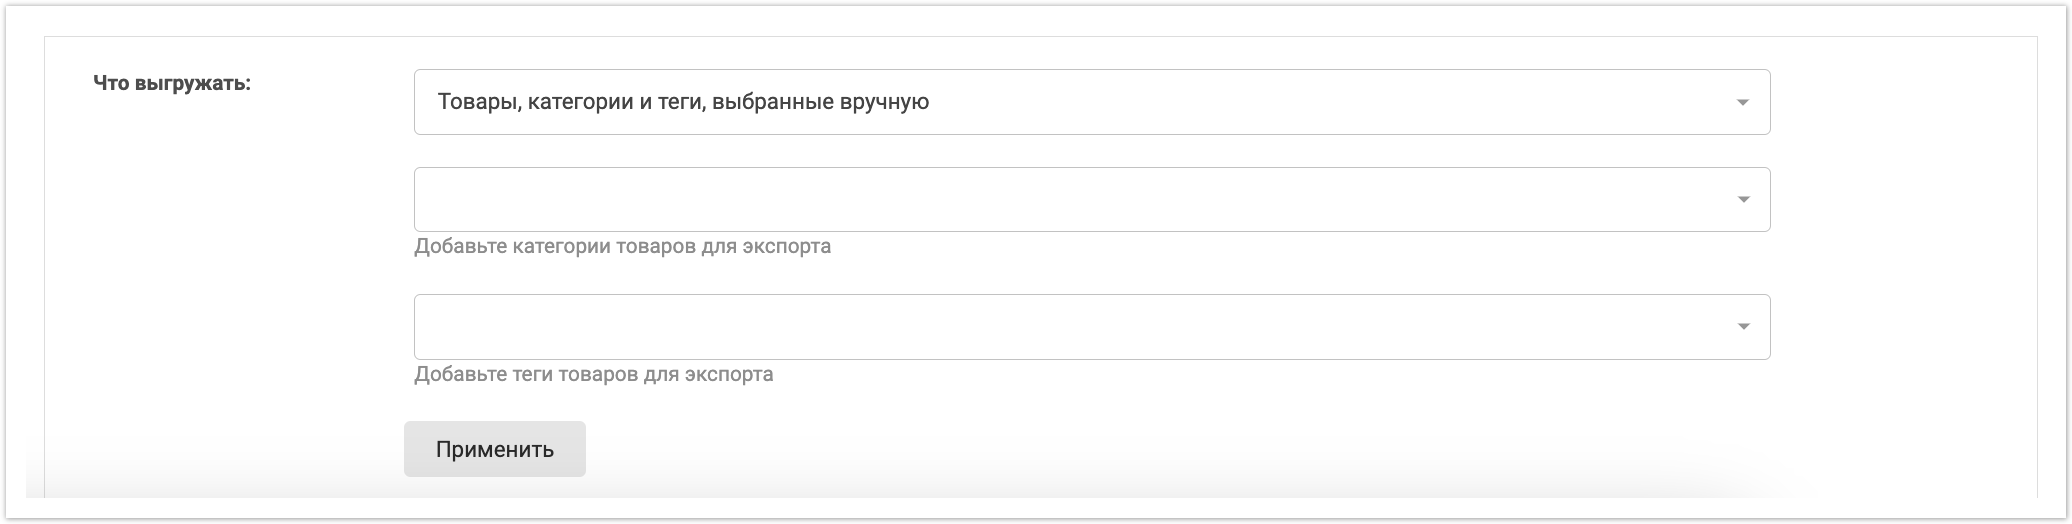
Далее в раскрывающемся списке Что выгружать выберите, какие товары необходимо выгрузить 1.2.2. Добавление товаров с помощью фильтровНа странице выбранного списка экспорта можно настроить фильтры для выбора товаров в блоке "Что выгружать". Можно выбрать:
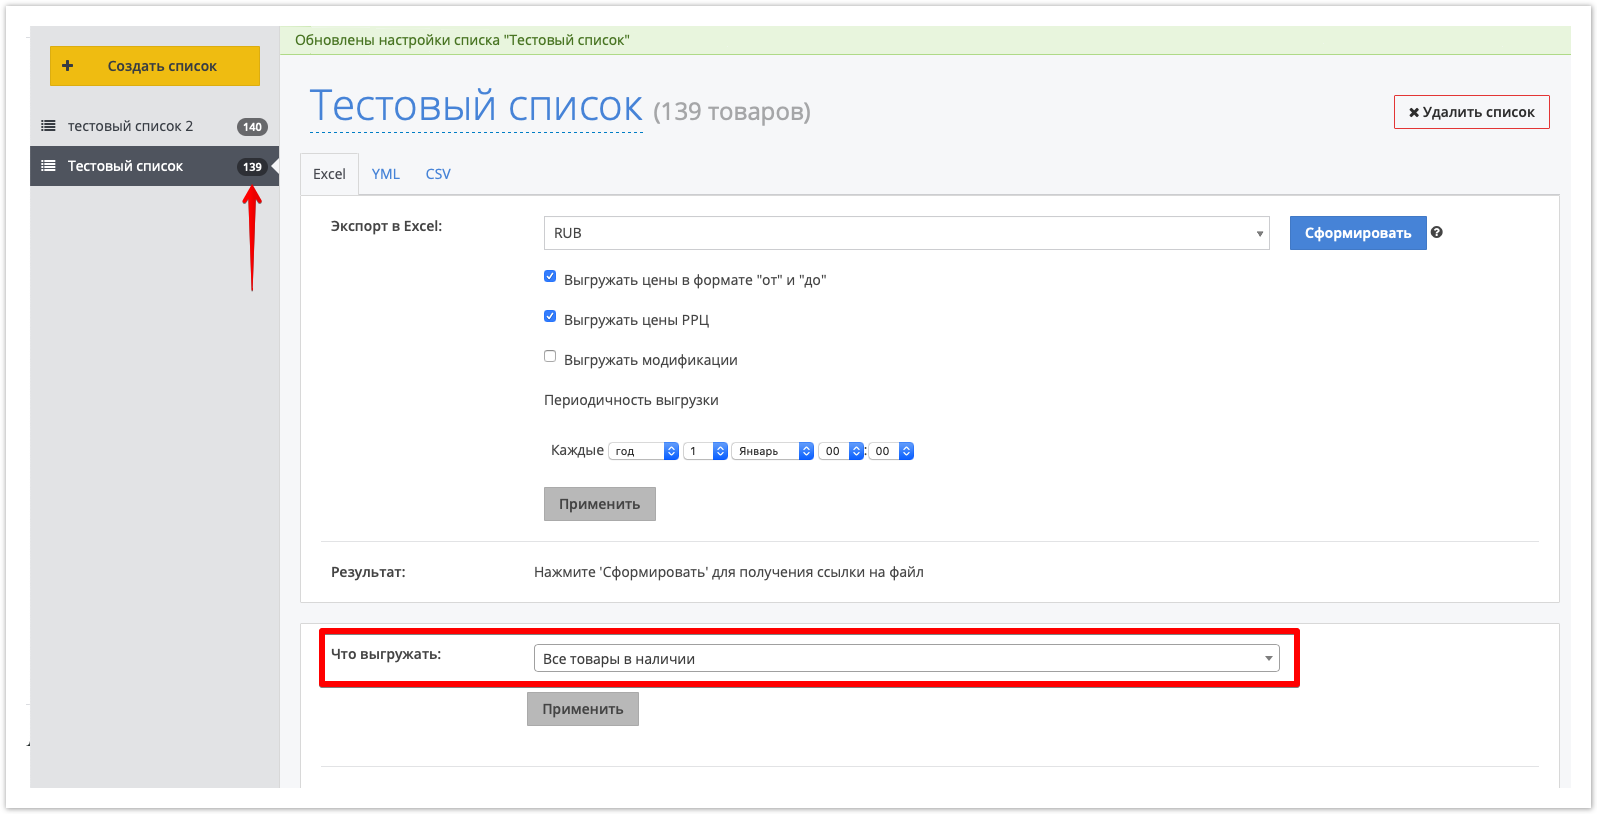
Нажмите кнопку Применить. После завершении настройки фильтра нажмите кнопку "Применить".
После этого в левом сайдбаре возле названия списка отобразится число отобранных товаров.
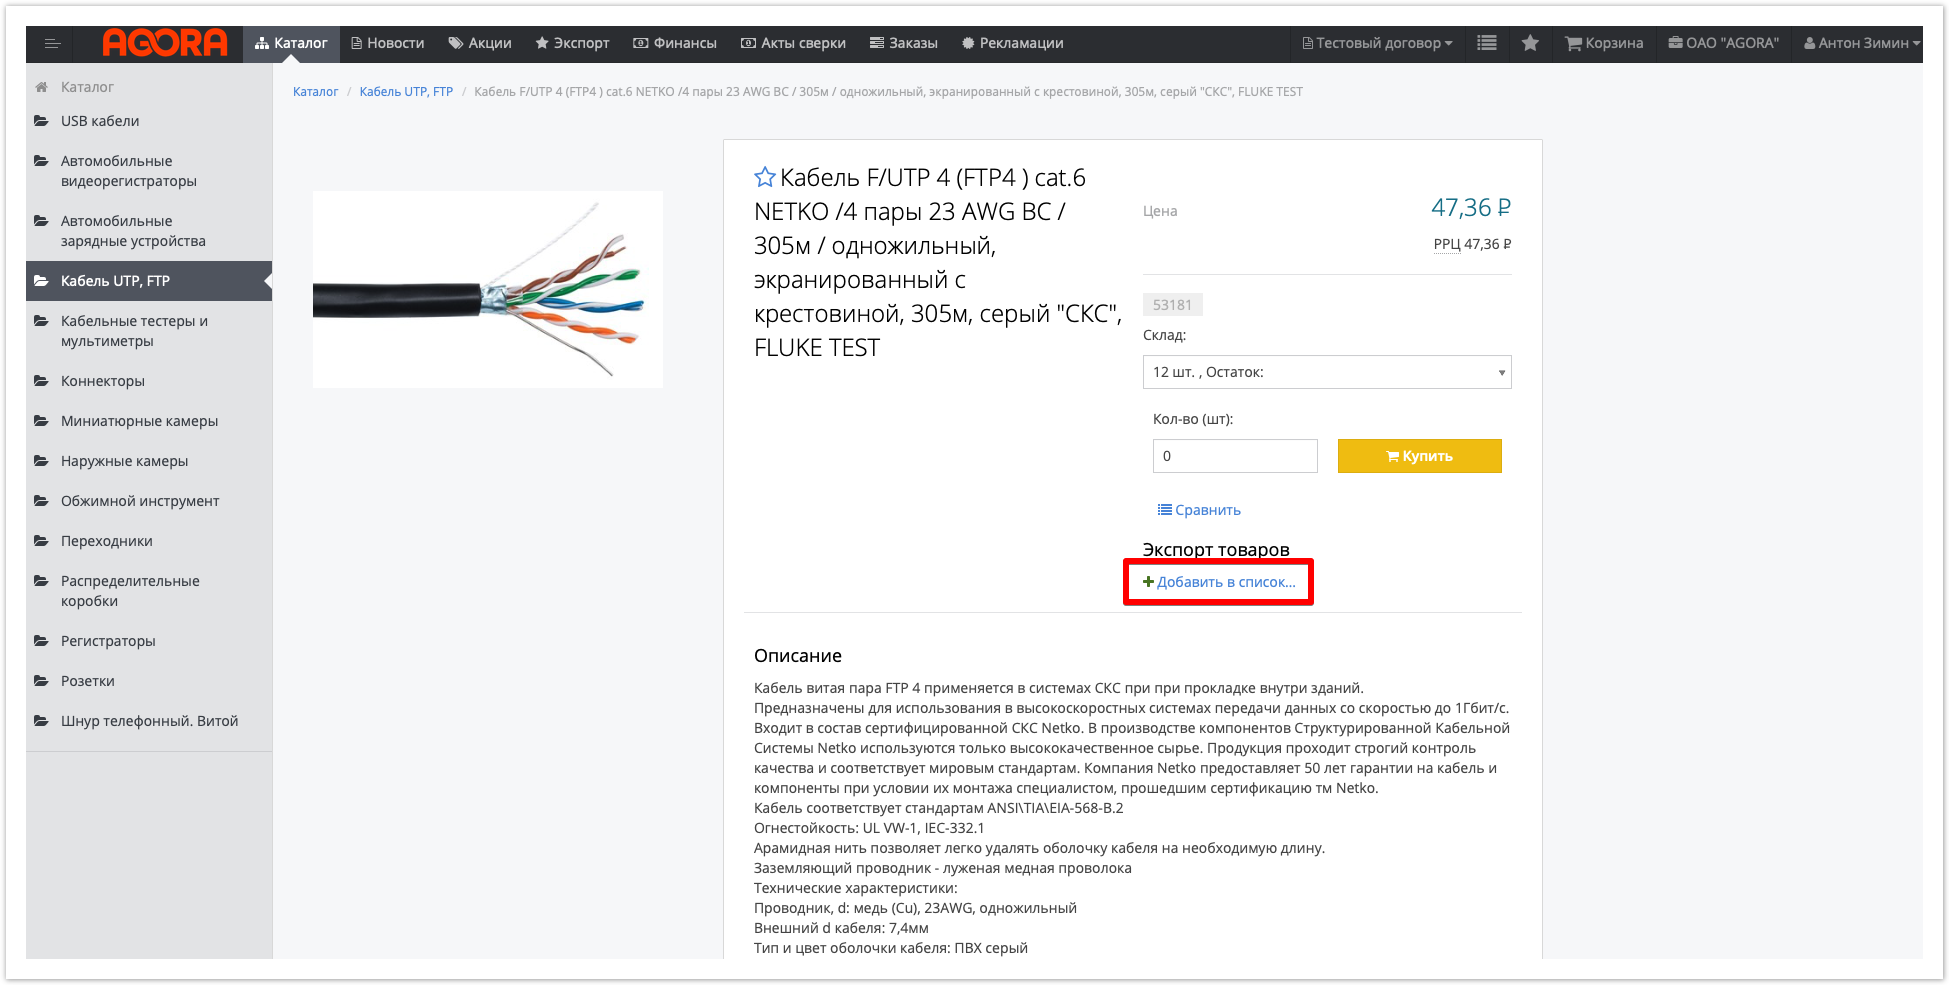
1.2.2. Добавление в список из карточки товараВ карточке товара можно нажать кнопку «Добавить в список...» в блоке "Экспорт товаров". Далее, как и в случае каталога товаров, будет предложено выбрать в какие списки следует добавить данный товар.
При необходимости можно создать новый список для экспорта, нажав на кнопку "Создать список". в разделе Экспорт:
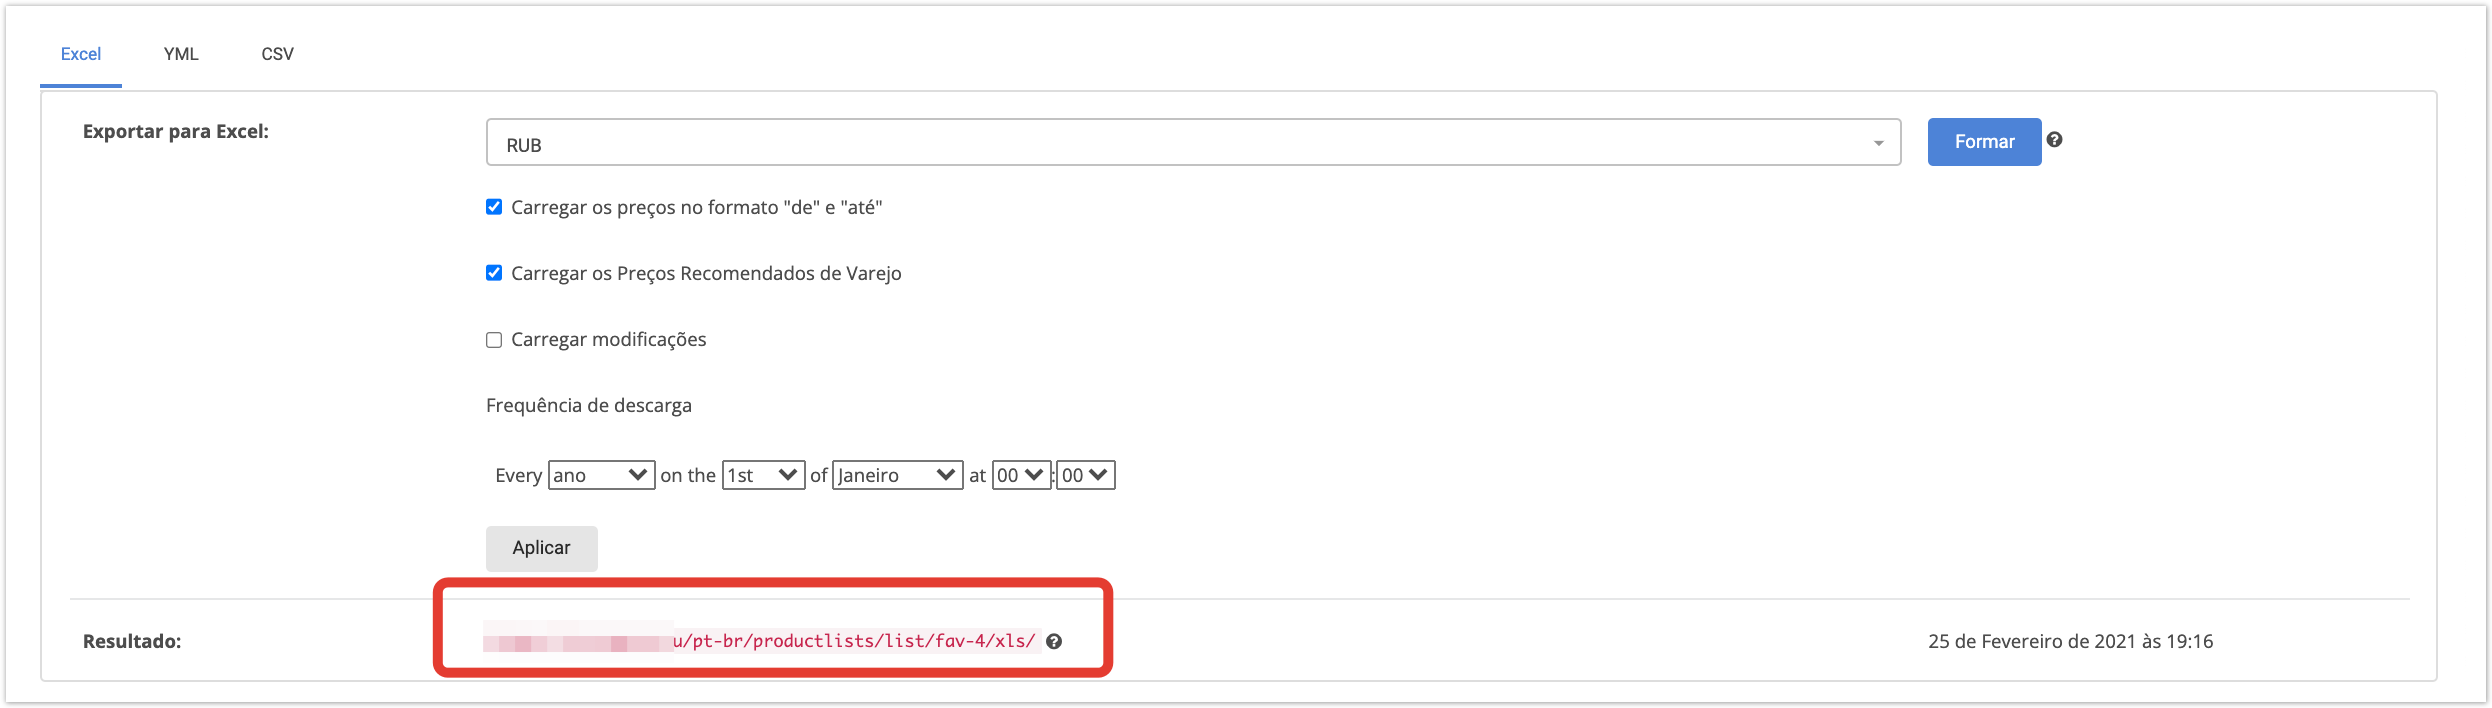
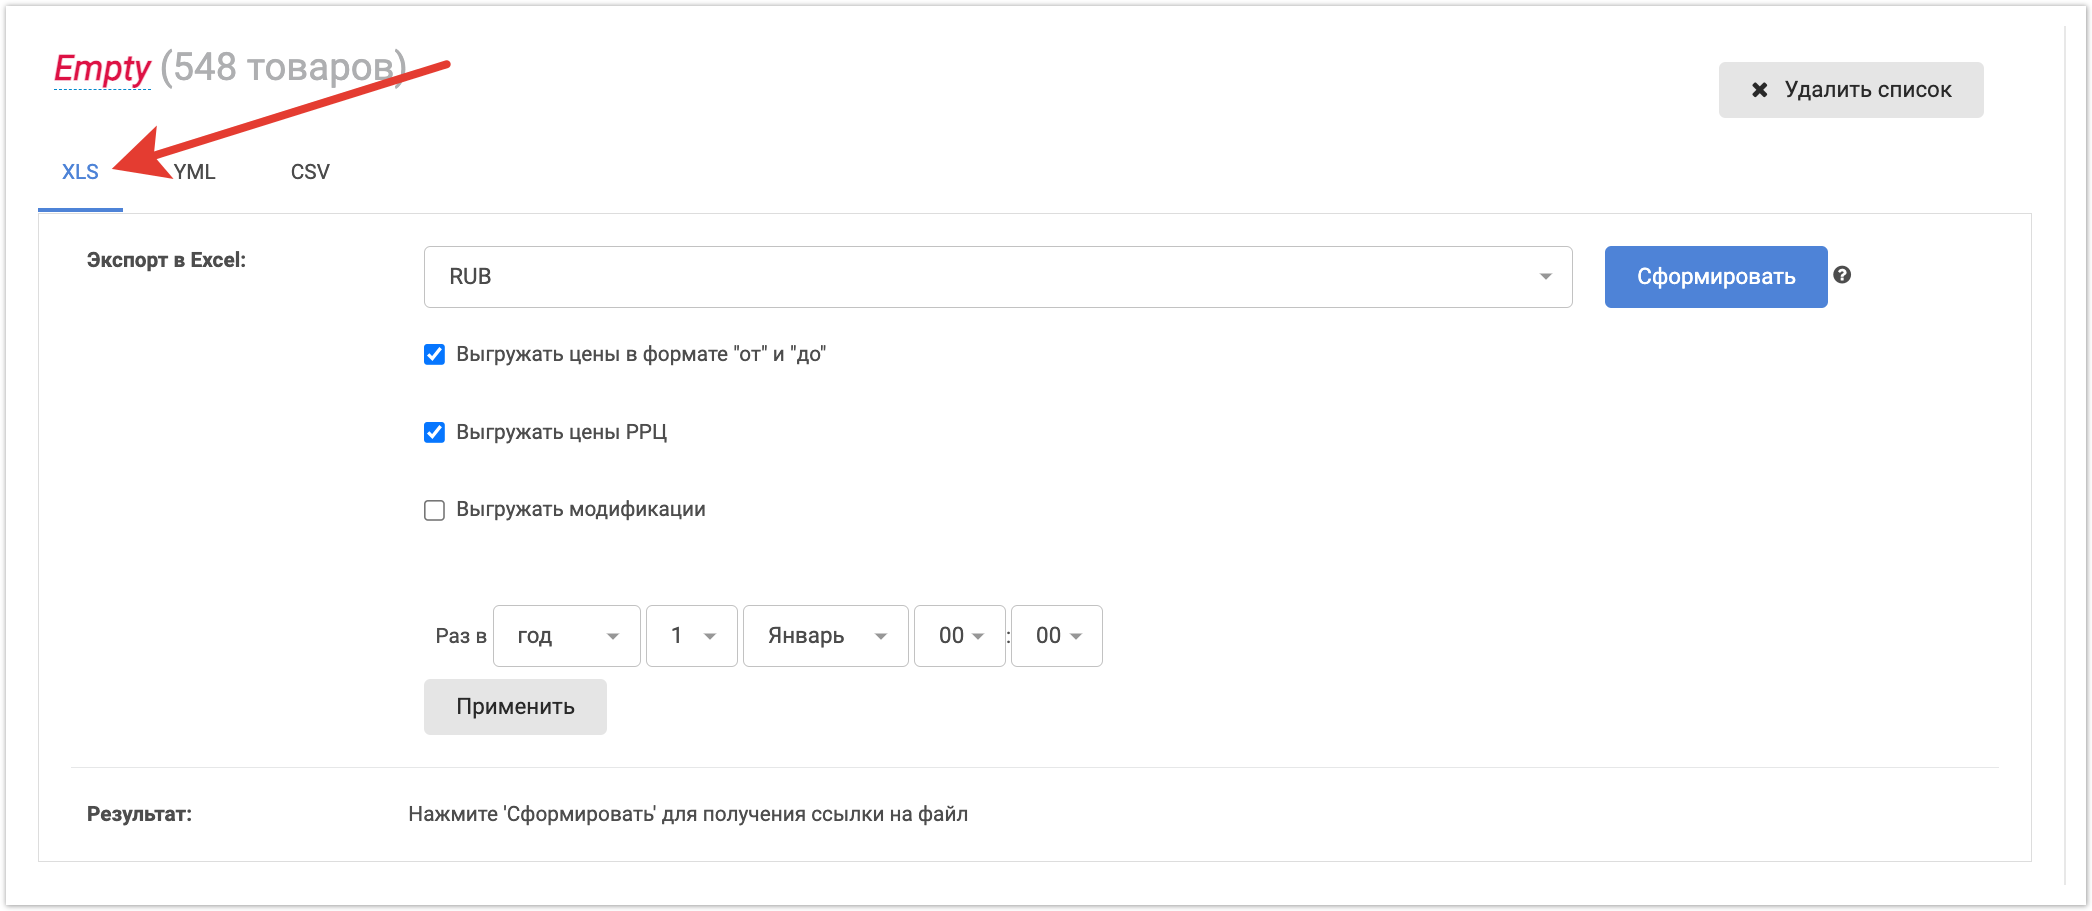
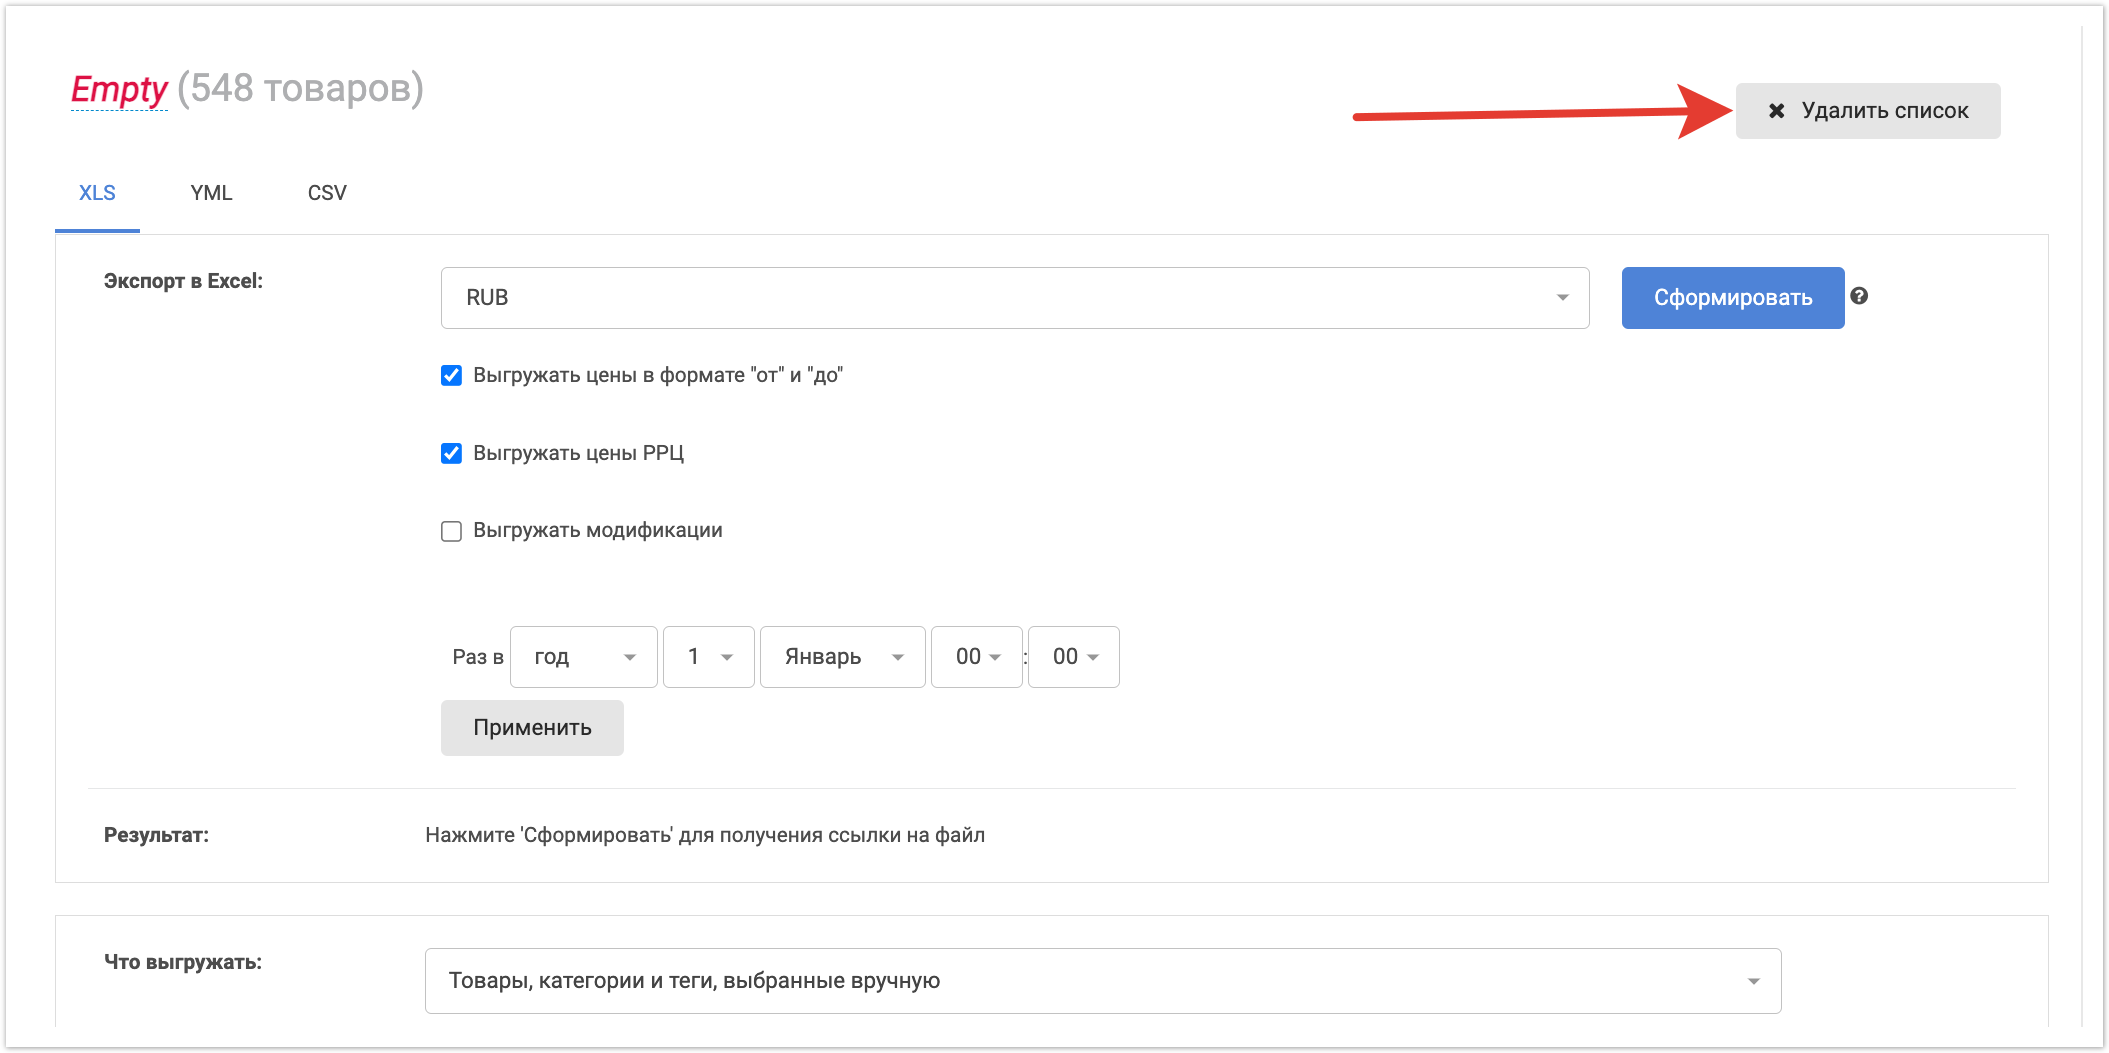
2. Настройка опций экспорта2.1. Экспорт в ExcelПеред экспортом выполните следующие настройки:
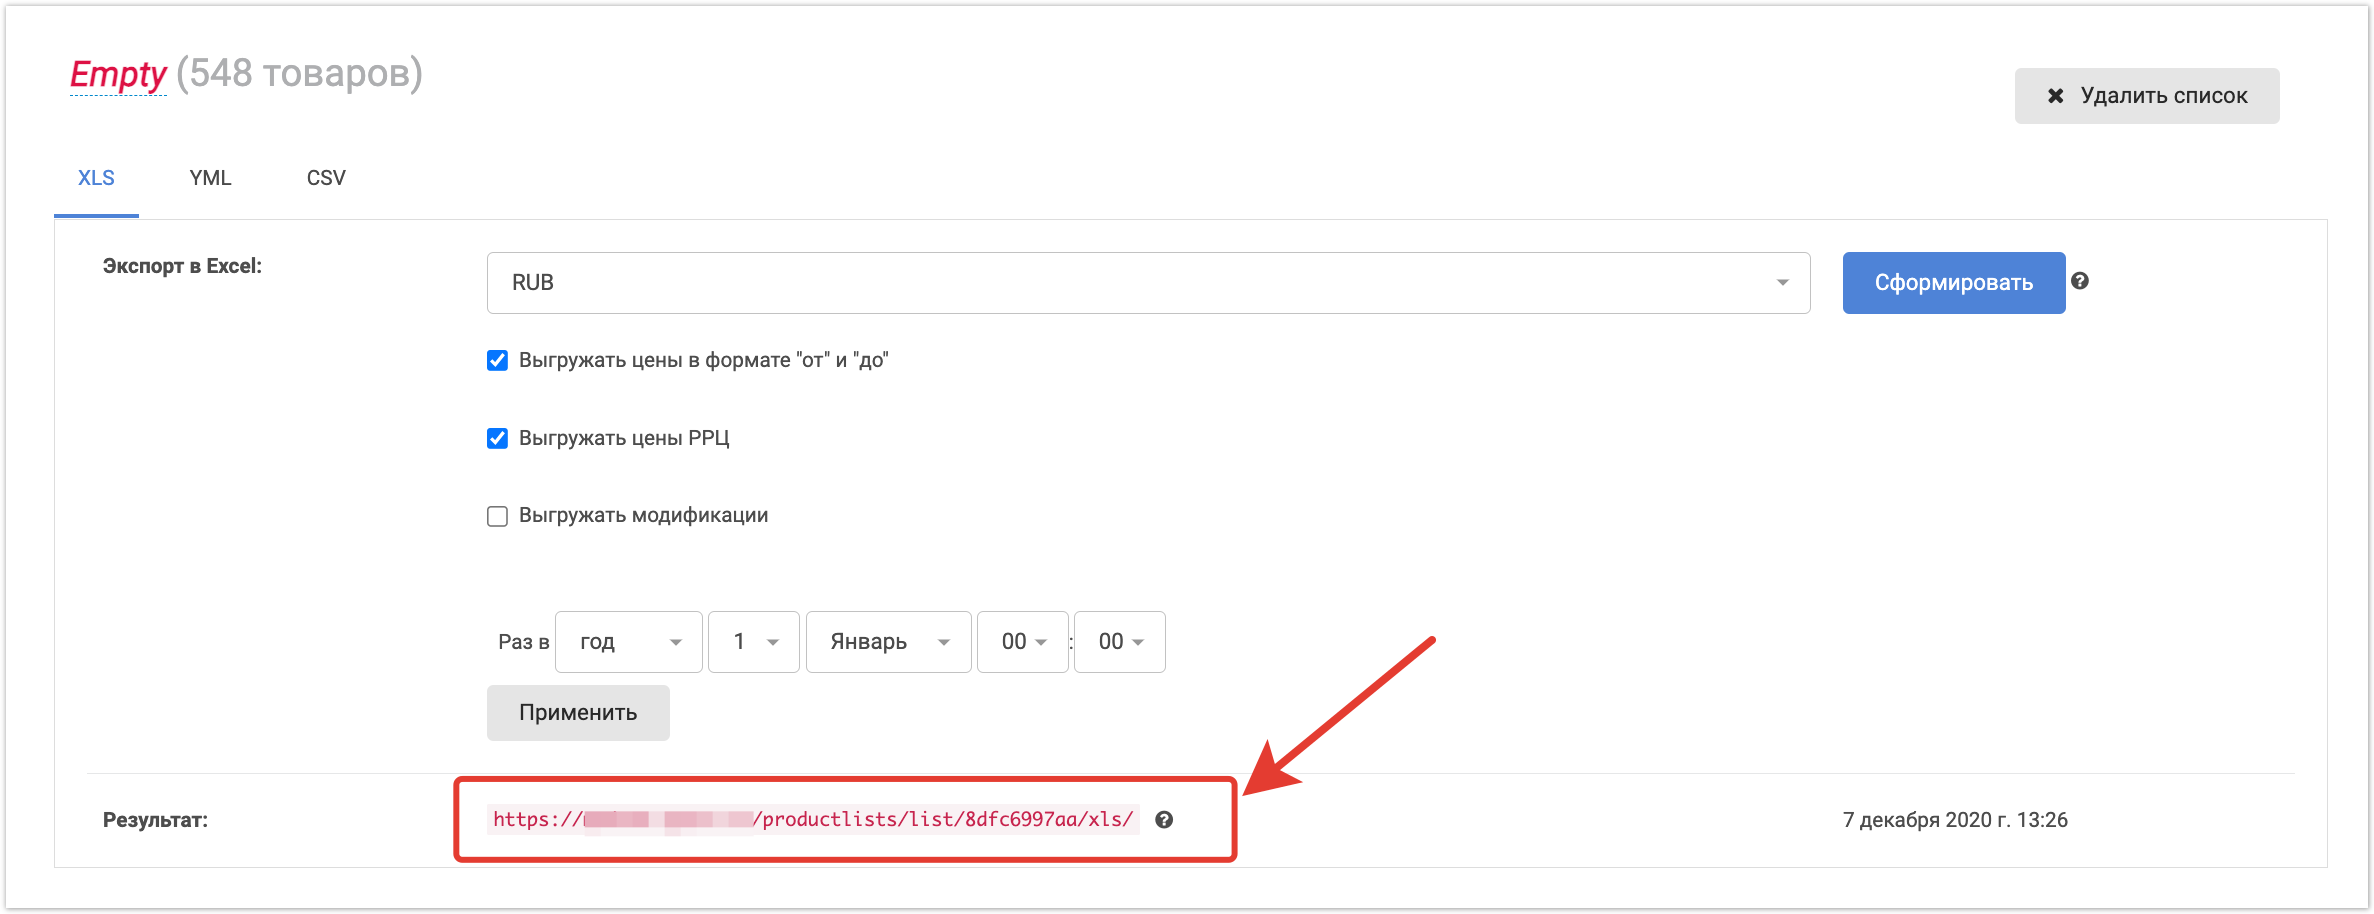
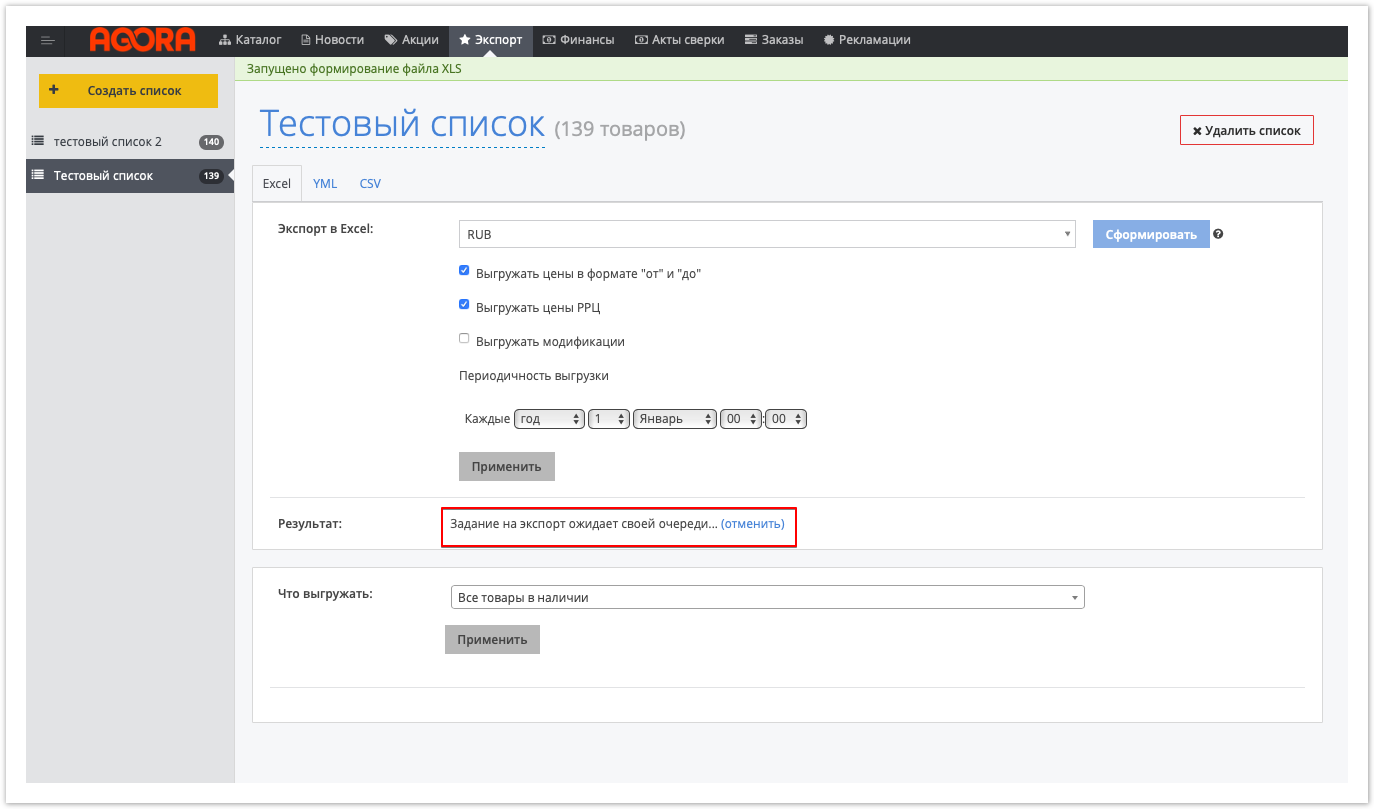
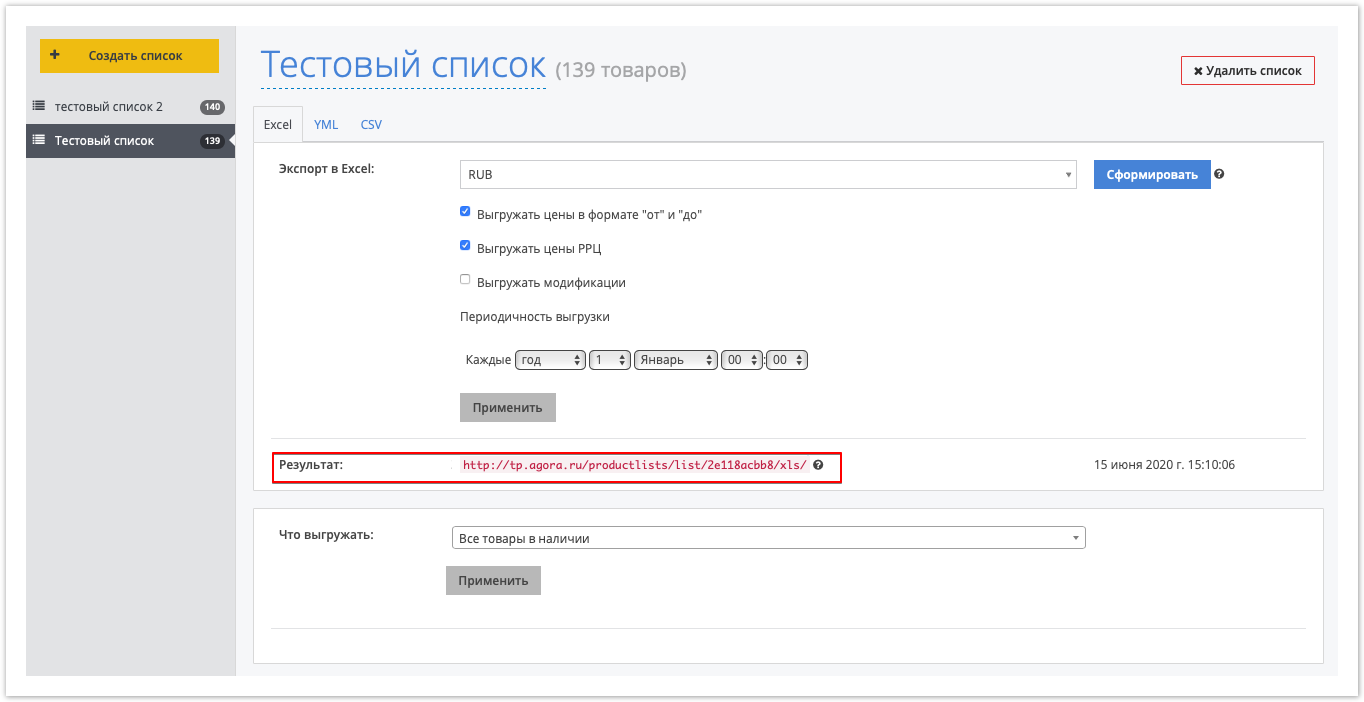
выбора товаров для выгрузки и настройки опций экспорта нажмите на кнопку Сформировать. После этого начнется процесс формирования файла, кнопка Сформировать станет неактивной, но появляется кнопка Отменить, которая позволяет отменить процесс, если была допущена ошибка при установке необходимых параметров. После окончания процесса экспорта в блоке Результат появится ссылка для скачивания файла с результатами экспорта списка товаров.
При установке периодичности выгрузки данные по ссылке будут обновляться в указанное время.
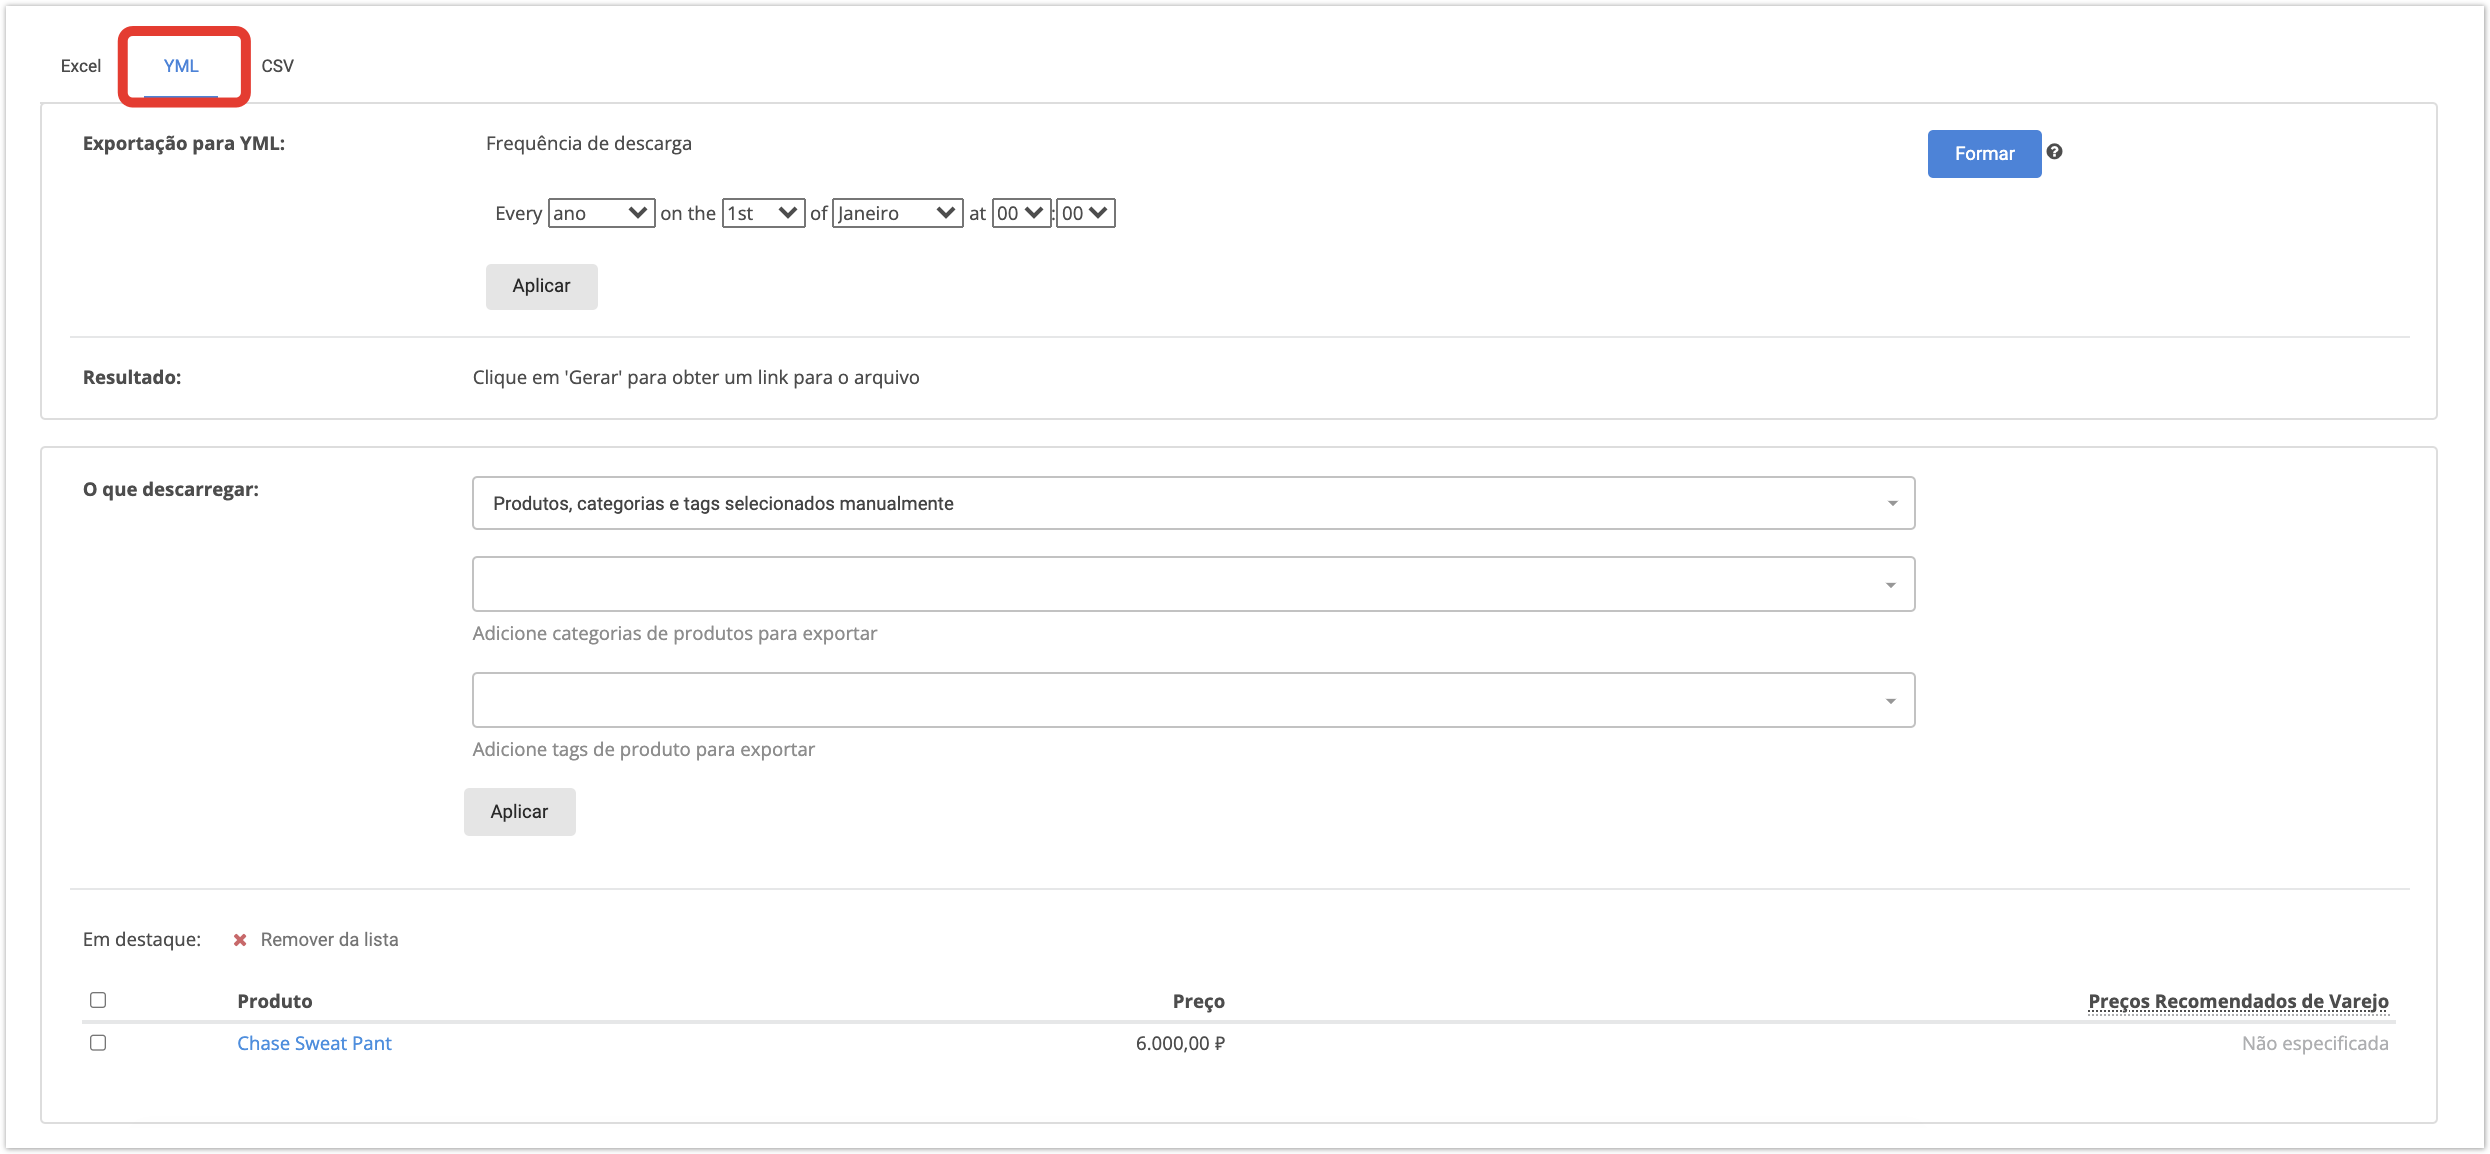
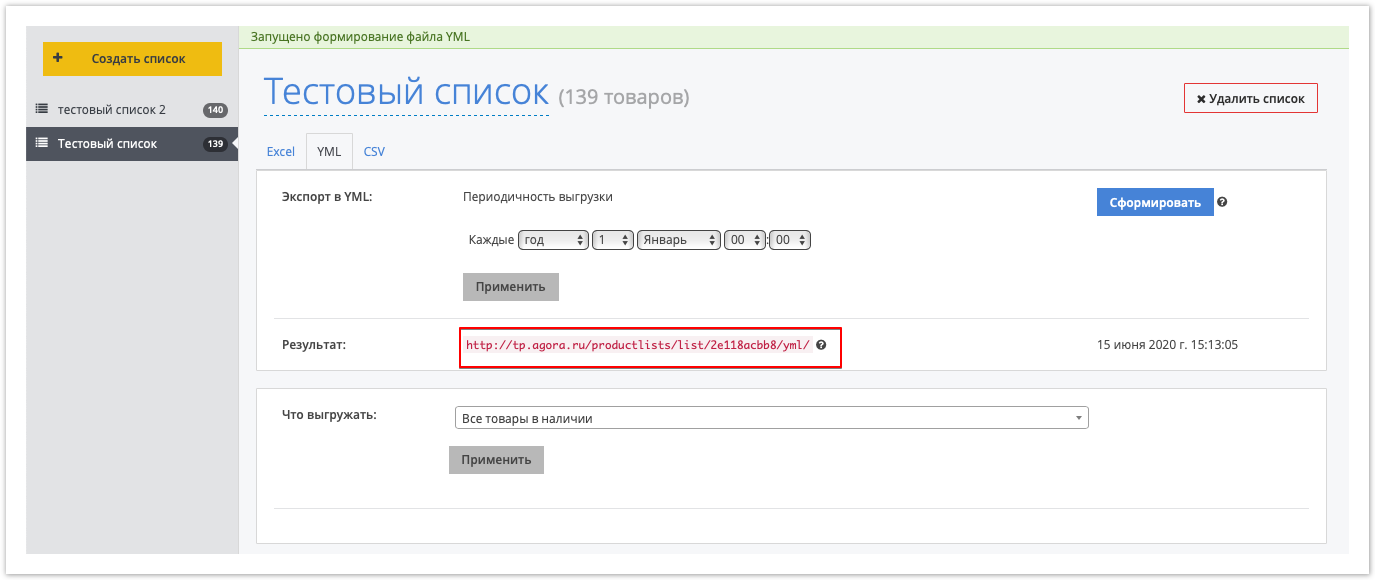
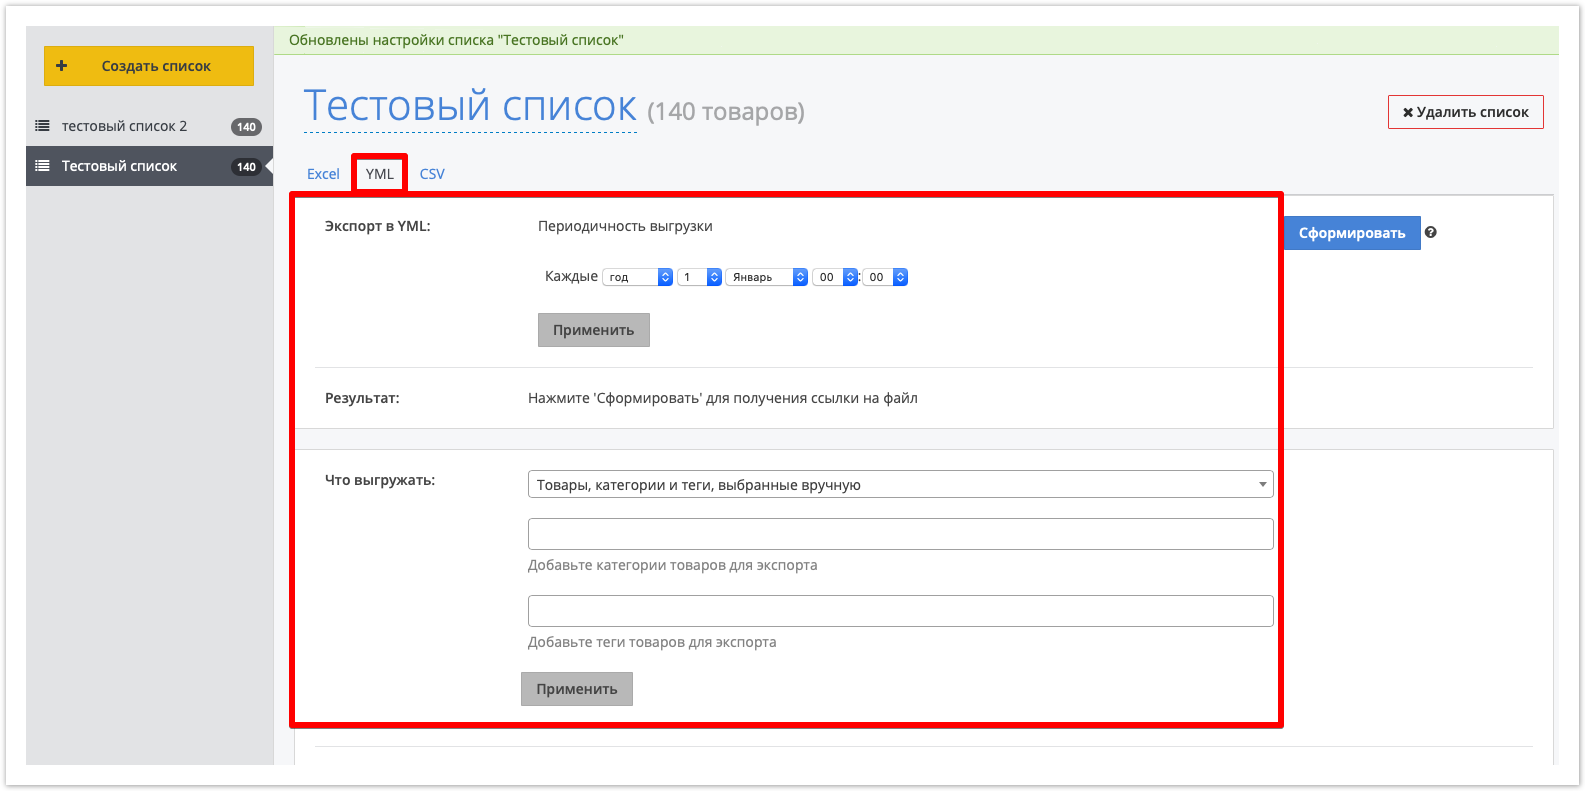
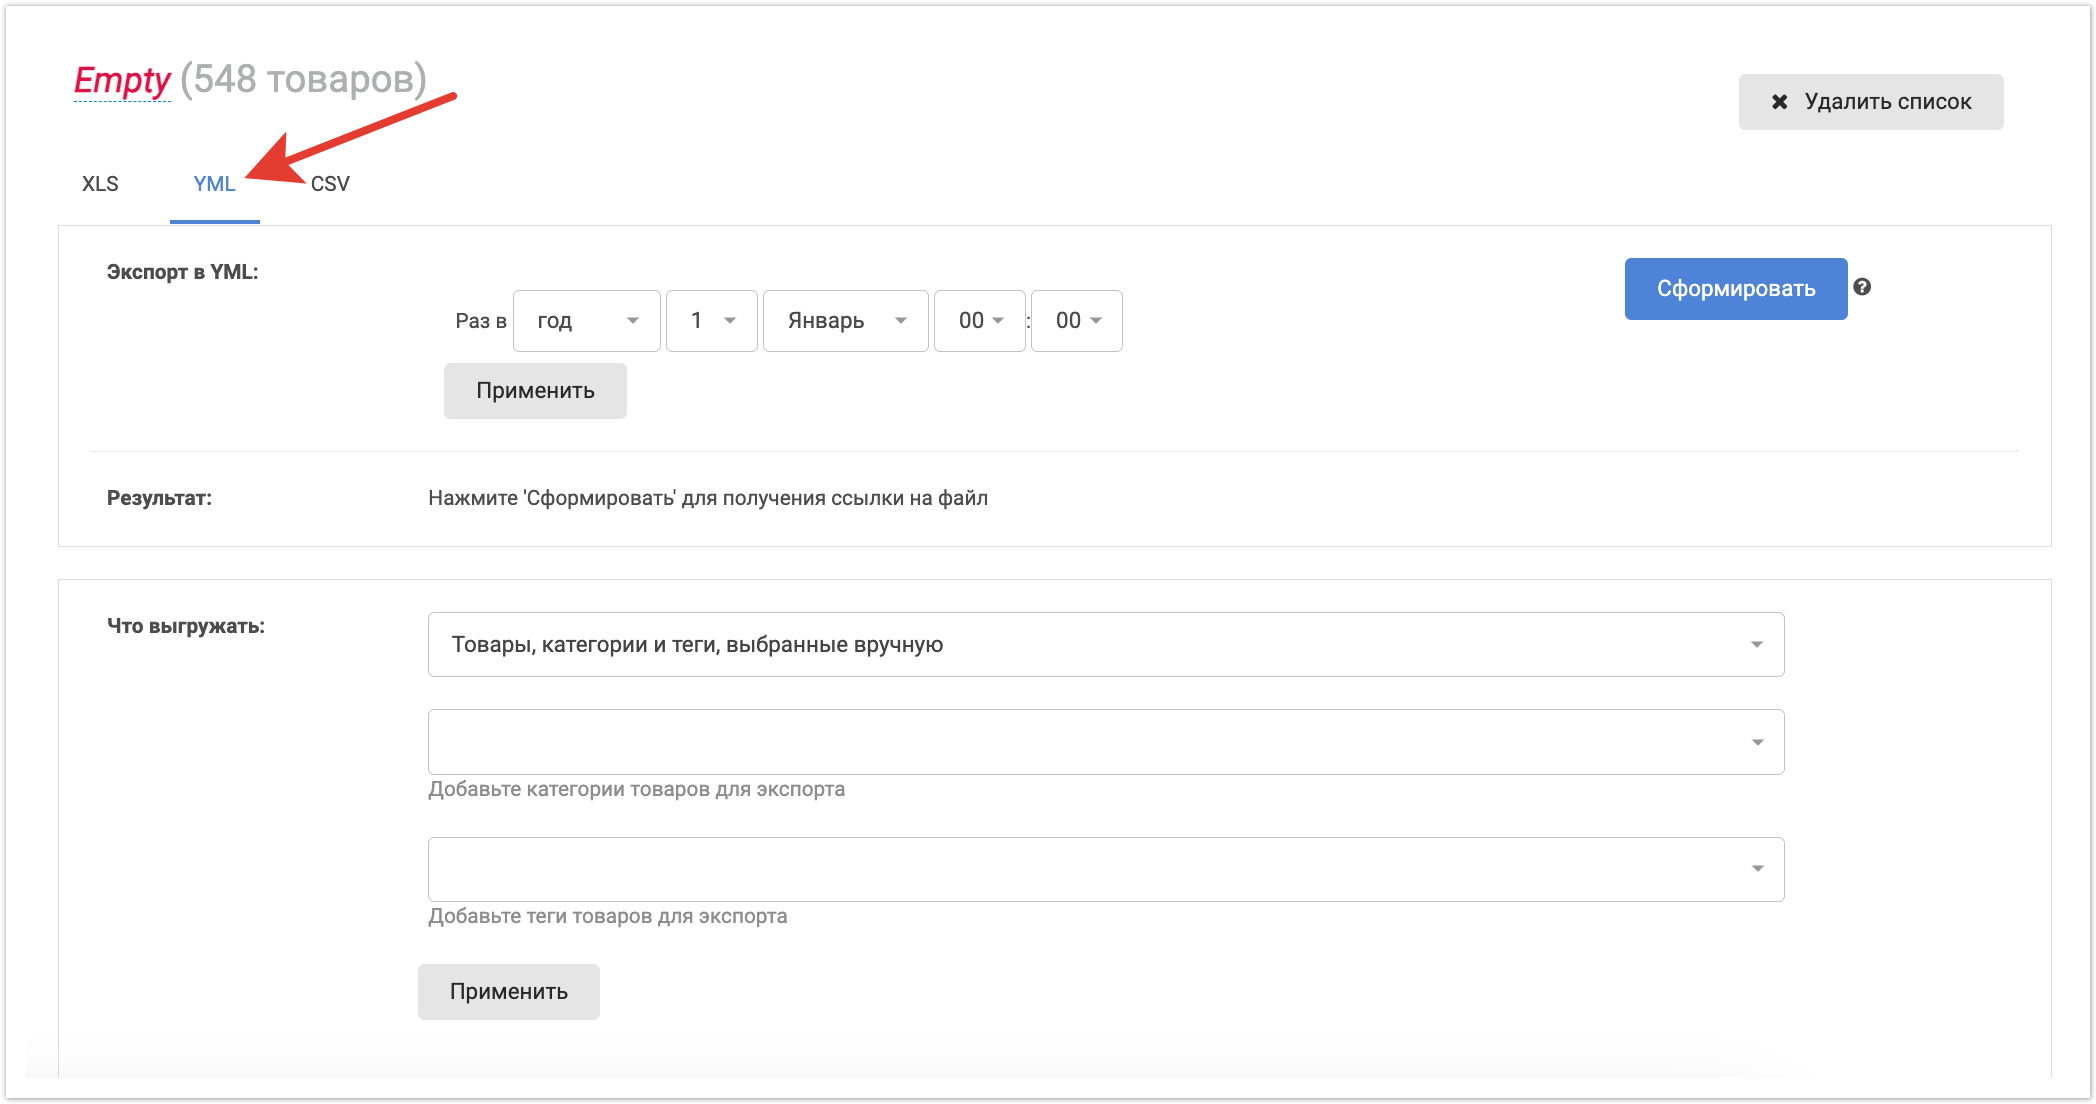
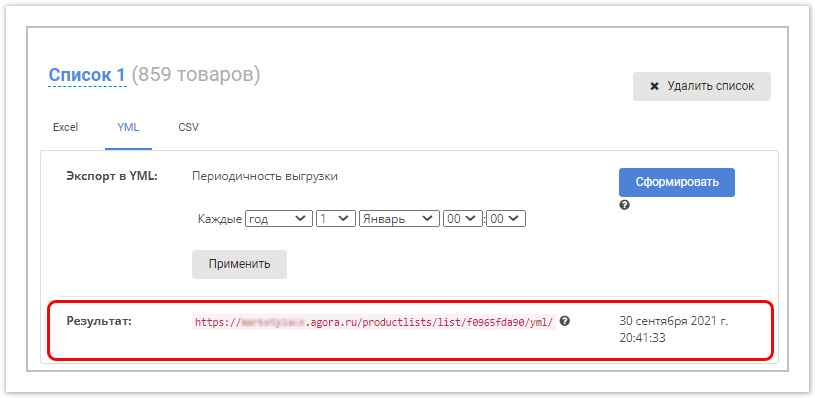
2.2. Экспорт в YML
В данном случае, возможен только выбор периодичности выгрузки, после чего также необходимо нажать кнопку "Применить".
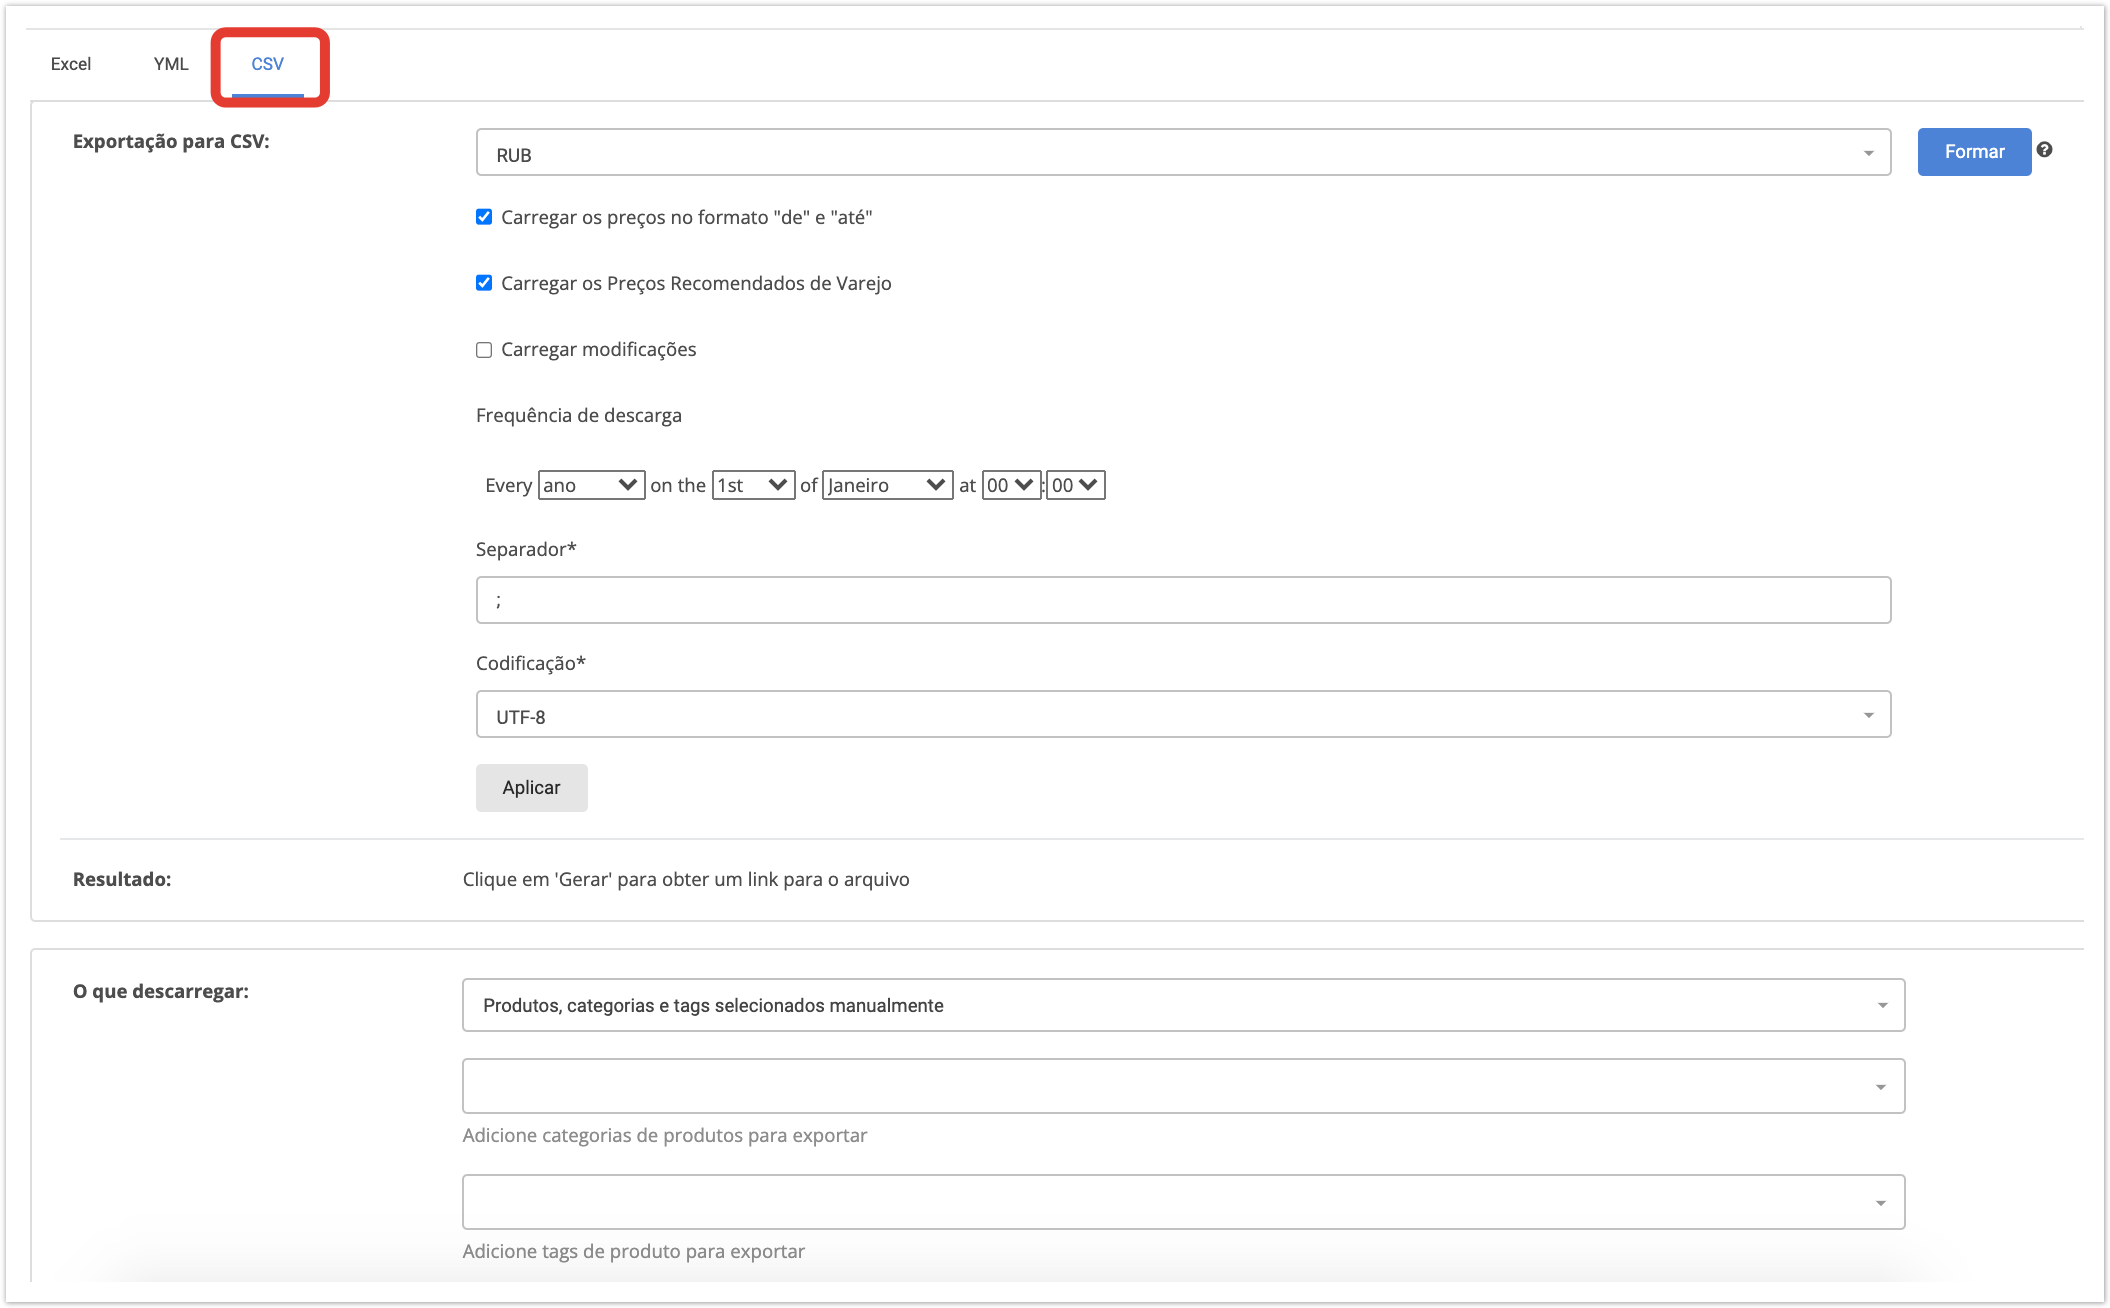
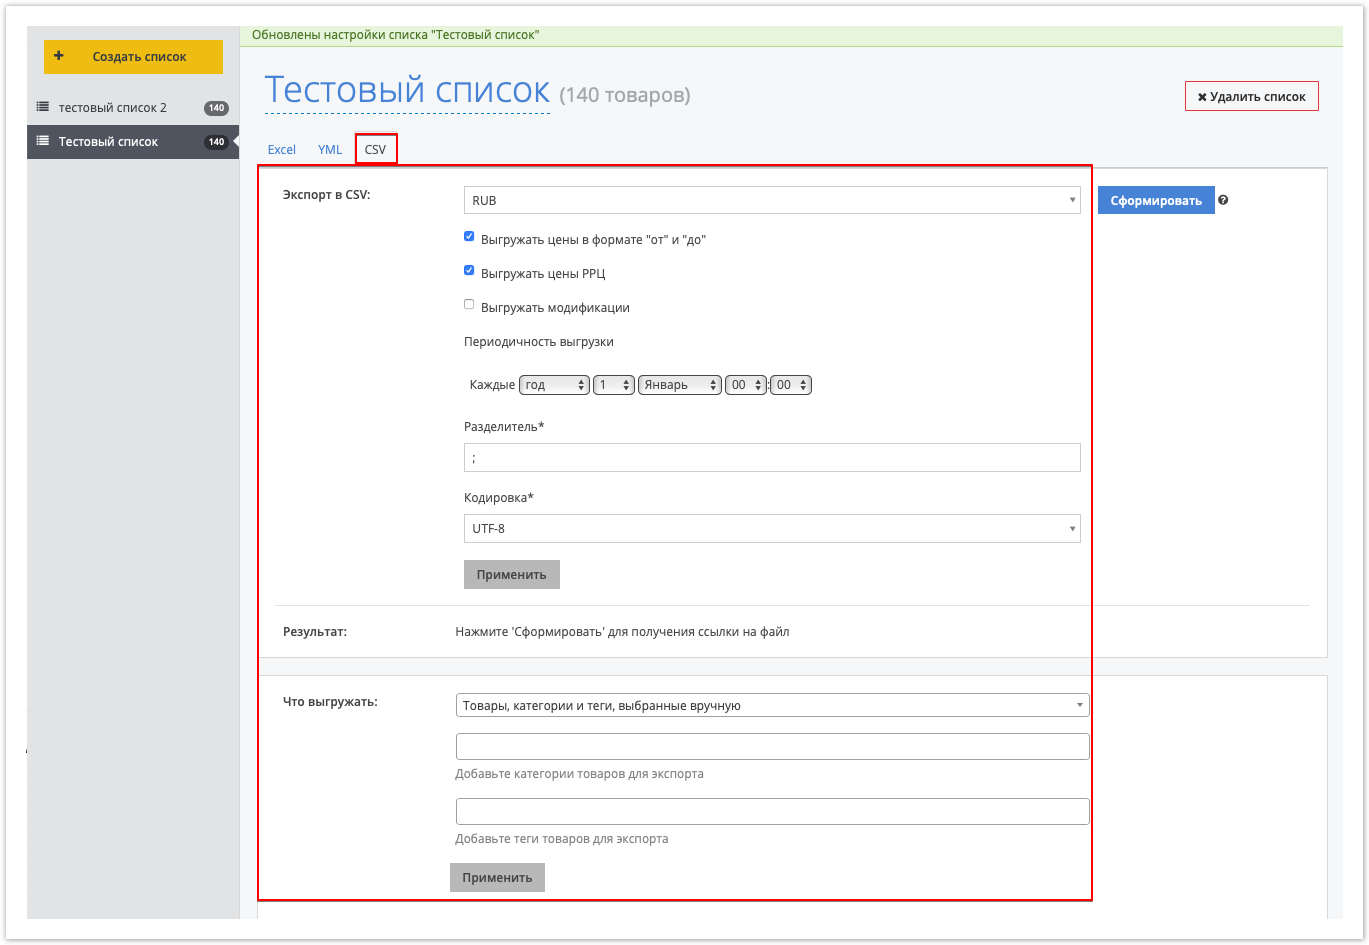
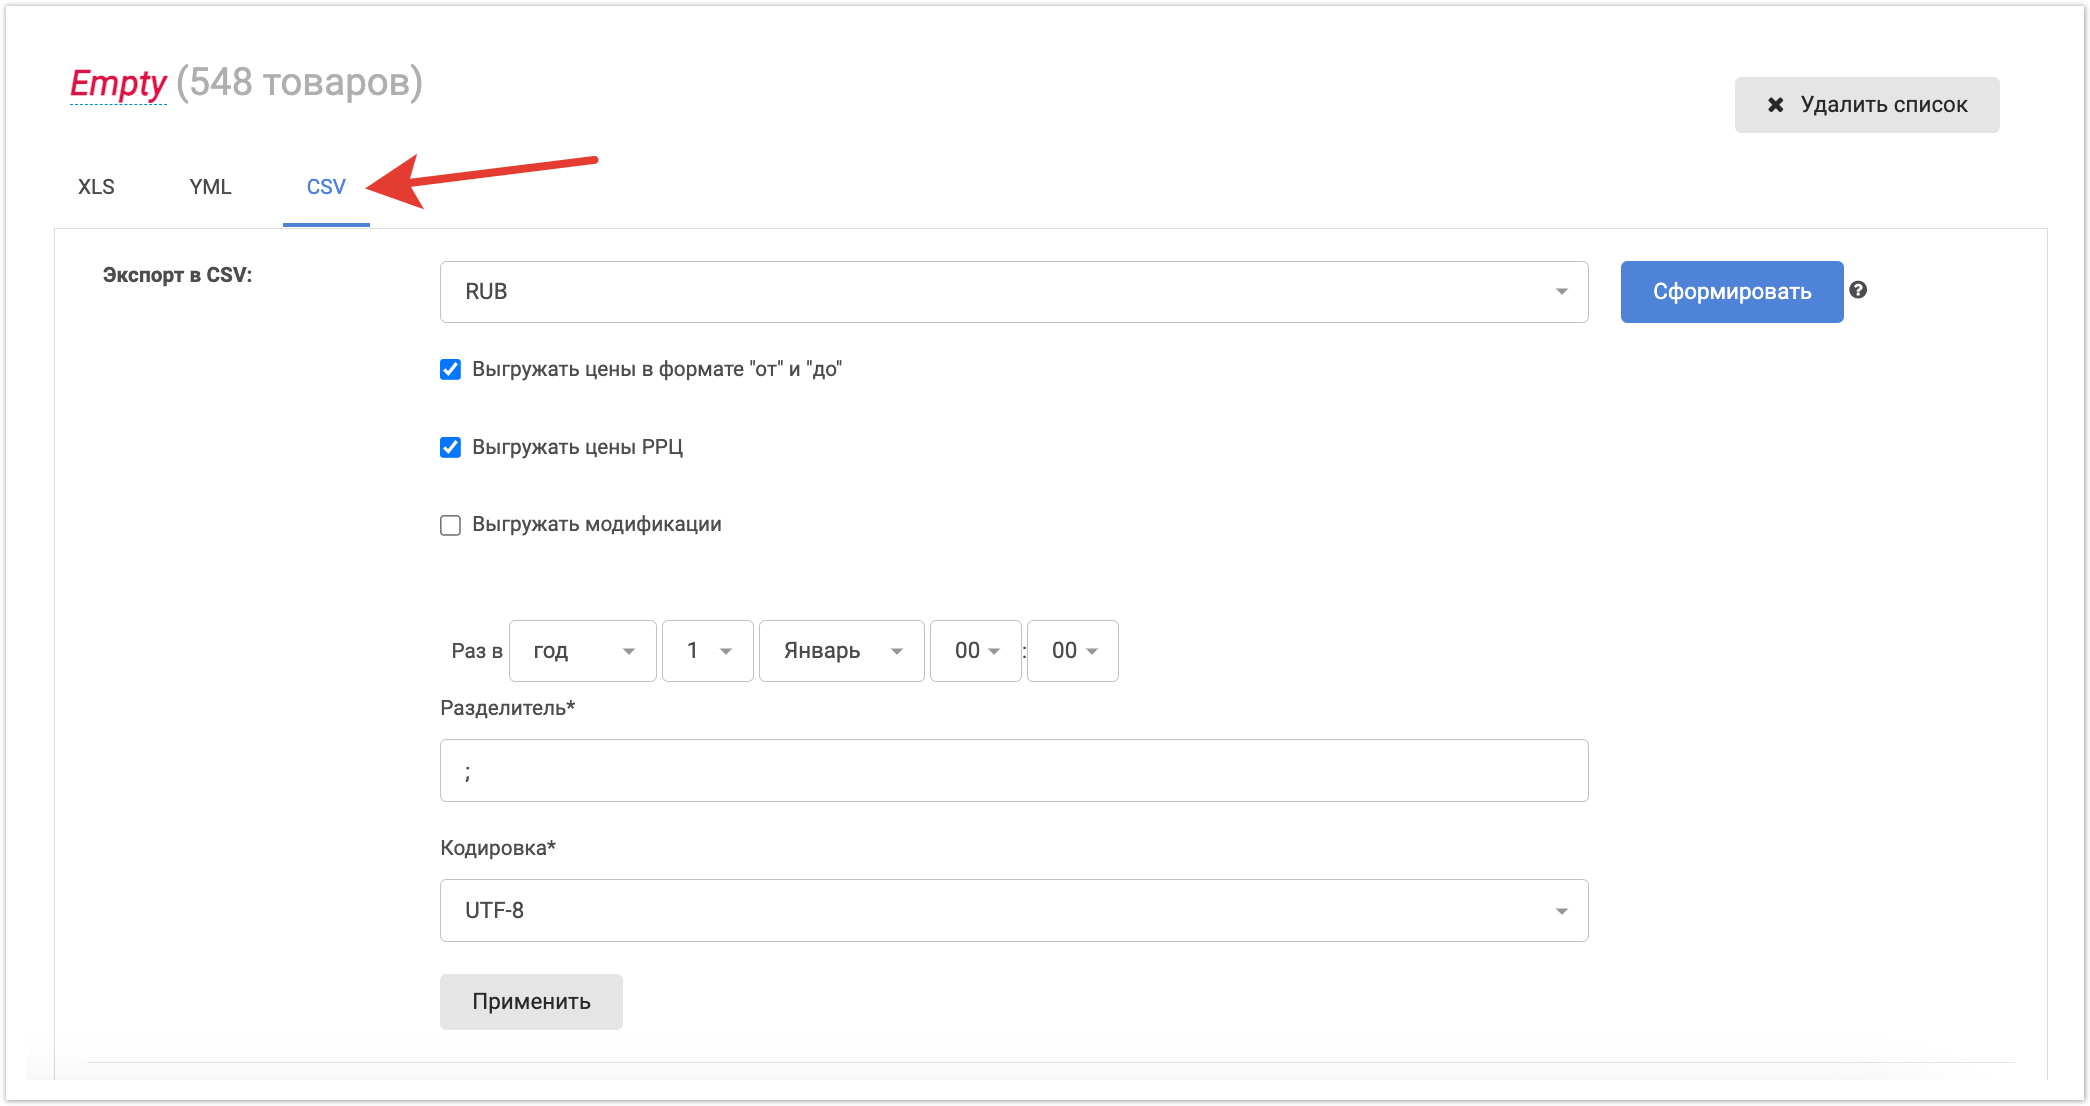
2.3. Экспорт CSVДанный вариант аналогичен Экспорту в Excel, за исключение необходимости указания разделителя в поле "Разделитель".
Для экспорта товаров в личном кабинете нажмите кнопку
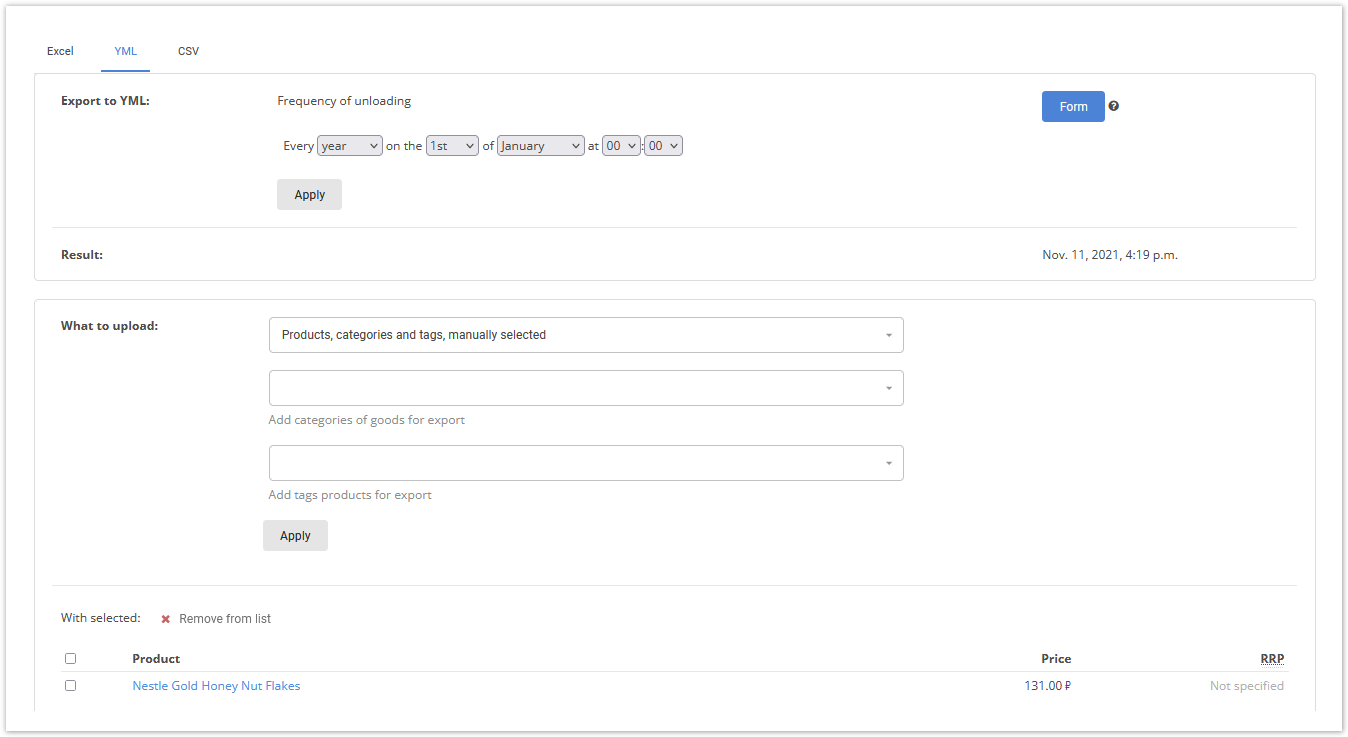
При экспорте в YML выберите периодичность выгрузки и нажмите кнопку Применить. Далее в раскрывающемся списке Что выгружать выберите, какие товары необходимо выгрузить:
Нажмите кнопку Применить. 3. Экспорт списка товаровПосле выбора товаров для выгрузки и настройки опций экспорта в необходимом формате, нажмите на кнопку "Сформировать"..
После этого начнется процесс формирования файла, кнопка "Сформировать" станет неактивной, но появляется кнопка "Отменить", которая которая позволяет отменить процесс, если была допущена ошибка при установке необходимых параметров. После окончания формирования, процесса экспорта в блоке "Результат" появится ссылка для скачивания файла с результатами экспорта списка товаров. При установке периодичности выгрузки , данная ссылка будет данные по ссылке будут обновляться в указанное время.
Экспорт CSVДля экспорта товаров в личном кабинете нажмите кнопку
Данный вариант аналогичен Экспорту в Excel, за исключение необходимости указания разделителя в поле Разделитель и Кодировку. Удаление списка экспортаПо кнопке Удалить список можно удалить ранее сформированный список экспорта.
 |

| Sv translation | |||||||||||||||||
|---|---|---|---|---|---|---|---|---|---|---|---|---|---|---|---|---|---|
| |||||||||||||||||
There are 3 ways to export product lists from the system to the online store. You can use static links in XLS, YML, and CSV formats to create product displays and balance updates. 1. Preparation of the list of goodsa list of goods. The availability of each upload format is configured through the admin panel. You can connect all formats, or only some of them. Preparing the list of products for exportTo export goods, go to the "Export" section in the admin panel of the site. This will open a page where you can unload the goodsclick On the page that appears, you can upload the product according to the already prepared list of goodsproducts. If the list of goods for unloadinguploading has not been previouslycreated before, ityou will be proposedprompted to create a new list. 1.1. Create Product ListTo create a list of products, indicate its name and click the "Save" button.
Creating Product ListIf you have not created export lists before, then after clicking the
Enter the name, and click Save. If the list has already been created, then after clicking the To add a new list, click Create list. Type the name of the list, and click Save.
Adding products to the listAfter creating a list of products, you must add products to it. There are several options for this: 1.2.1.Adding products from the product catalogIn the product catalog, you can mark :
Then products with the help of checkboxes and click “Export goods”. Next, you will be asked to choose which list to export these products to export to the list - you can select an existing list (left field of the form) or create a new list (right field of the form) and click on the "Save" button. All selected products will be added to the list for export.
After the necessary goods are added to the export list, they will be marked with a “banner” in the catalog with the name of the list:
1.2.2. Adding products using filtersOn the page of the selected export list, you can configure filters for selecting products in the "What to unload" section.
Export to ExcelTo export goods, click
Before exporting, make the following settings:
After completing the settings, click the Apply button.
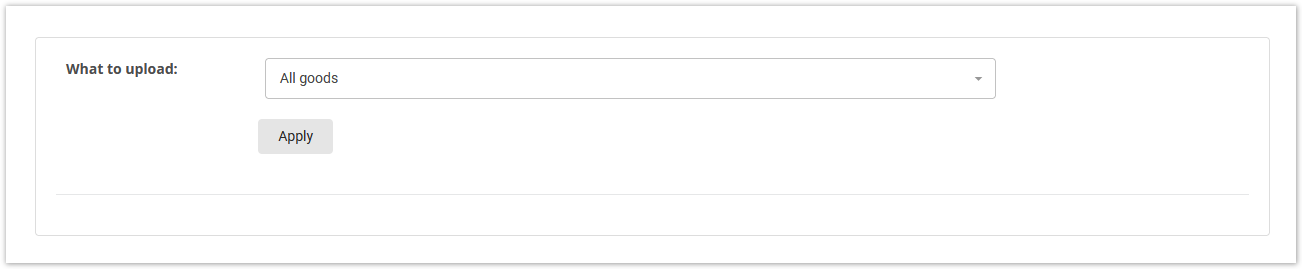
In the What to upload section specify the followingCan choose:
Click the Apply button. After selecting the goods for unloading and setting the export optionsAfter completing the filter settings, click the "Apply" Form button.
After that, the number process of selected products will be displayed in the left sidebar near the list name.
1.2.2. Adding to the list from the product cardIn the product card, you can click the "Add to list ..." button in the "Export products" block. Further, as in the case of the product catalog, it will be offered to choose in which lists this product should be added.
If necessary, you can create a new list for export by clicking on the "Create List" button. in the Export section:
2. Configure export options2.1. Export to ExcelBefore exporting, make the following settings:
In this case, you can only select the frequency of unloading, after which you also need to click the "Apply" button.
file formation will begin, the Form button will become inactive, the Cancel button appears, which allows you to cancel the process if an error occurs. When the export is finished, a link with the Excel file will appear in the Result area.
When you set the frequency of unloading, this link will be updated at the specified time.
Export to YML
To export goods, click
From the What to unload drop-down list, select the goods to be unloaded:
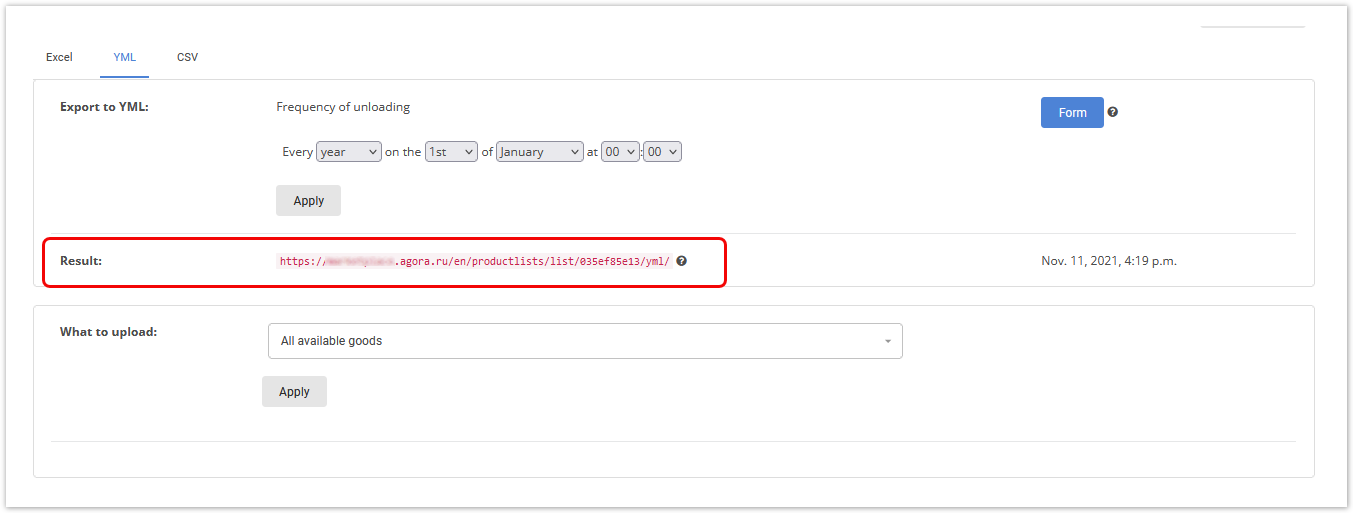
Click the Apply button. After selecting the goods for unloading and setting the export options, click the Form button. After the end of the export, a link will appear in the Result area. Click the link to download the YML file. When you set the time of export, this link will be updated at the specified time.
Export to CSV2.3. CSV ExportThis option is similar to Export to Excel , except for the need to specify a separator in the "Separator" fieldthe Separator field and Encoding.
3. Export the list of goodsAfter selecting the goods for unloading and setting up export options in the required format, click on the "Generate" button ..
After that, the process of forming the file will begin, the "Generate" button will become inactive, but the "Cancel" button will appear, which allows you to cancel the process if an error was made when setting the necessary parameters.
After the formation is completed, a link for downloading a file with the results of exporting the list of goods will appear in the "Result" block. When setting the frequency of unloading, this link will be updated at the specified time.
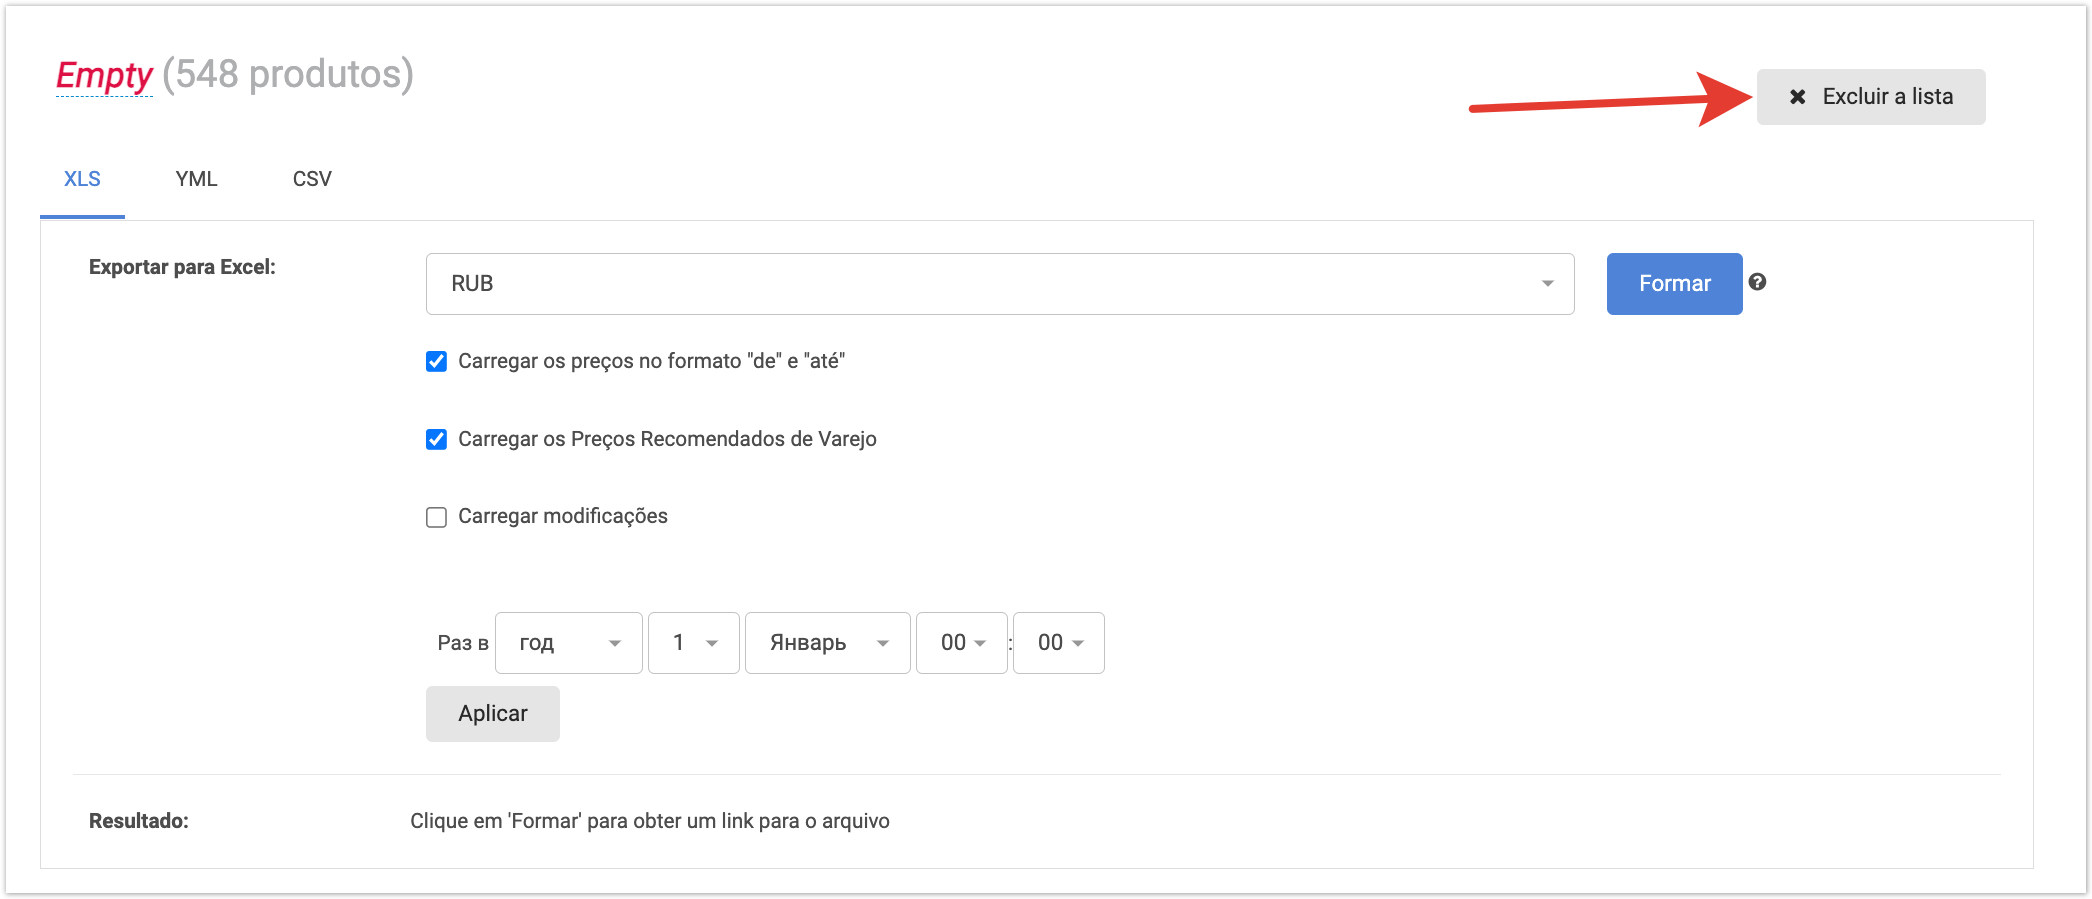
Deleting an export listBy clicking the Delete list button, you can delete a previously generated export list.
|


| Sv translation | ||||||||||||||||||
|---|---|---|---|---|---|---|---|---|---|---|---|---|---|---|---|---|---|---|
| ||||||||||||||||||
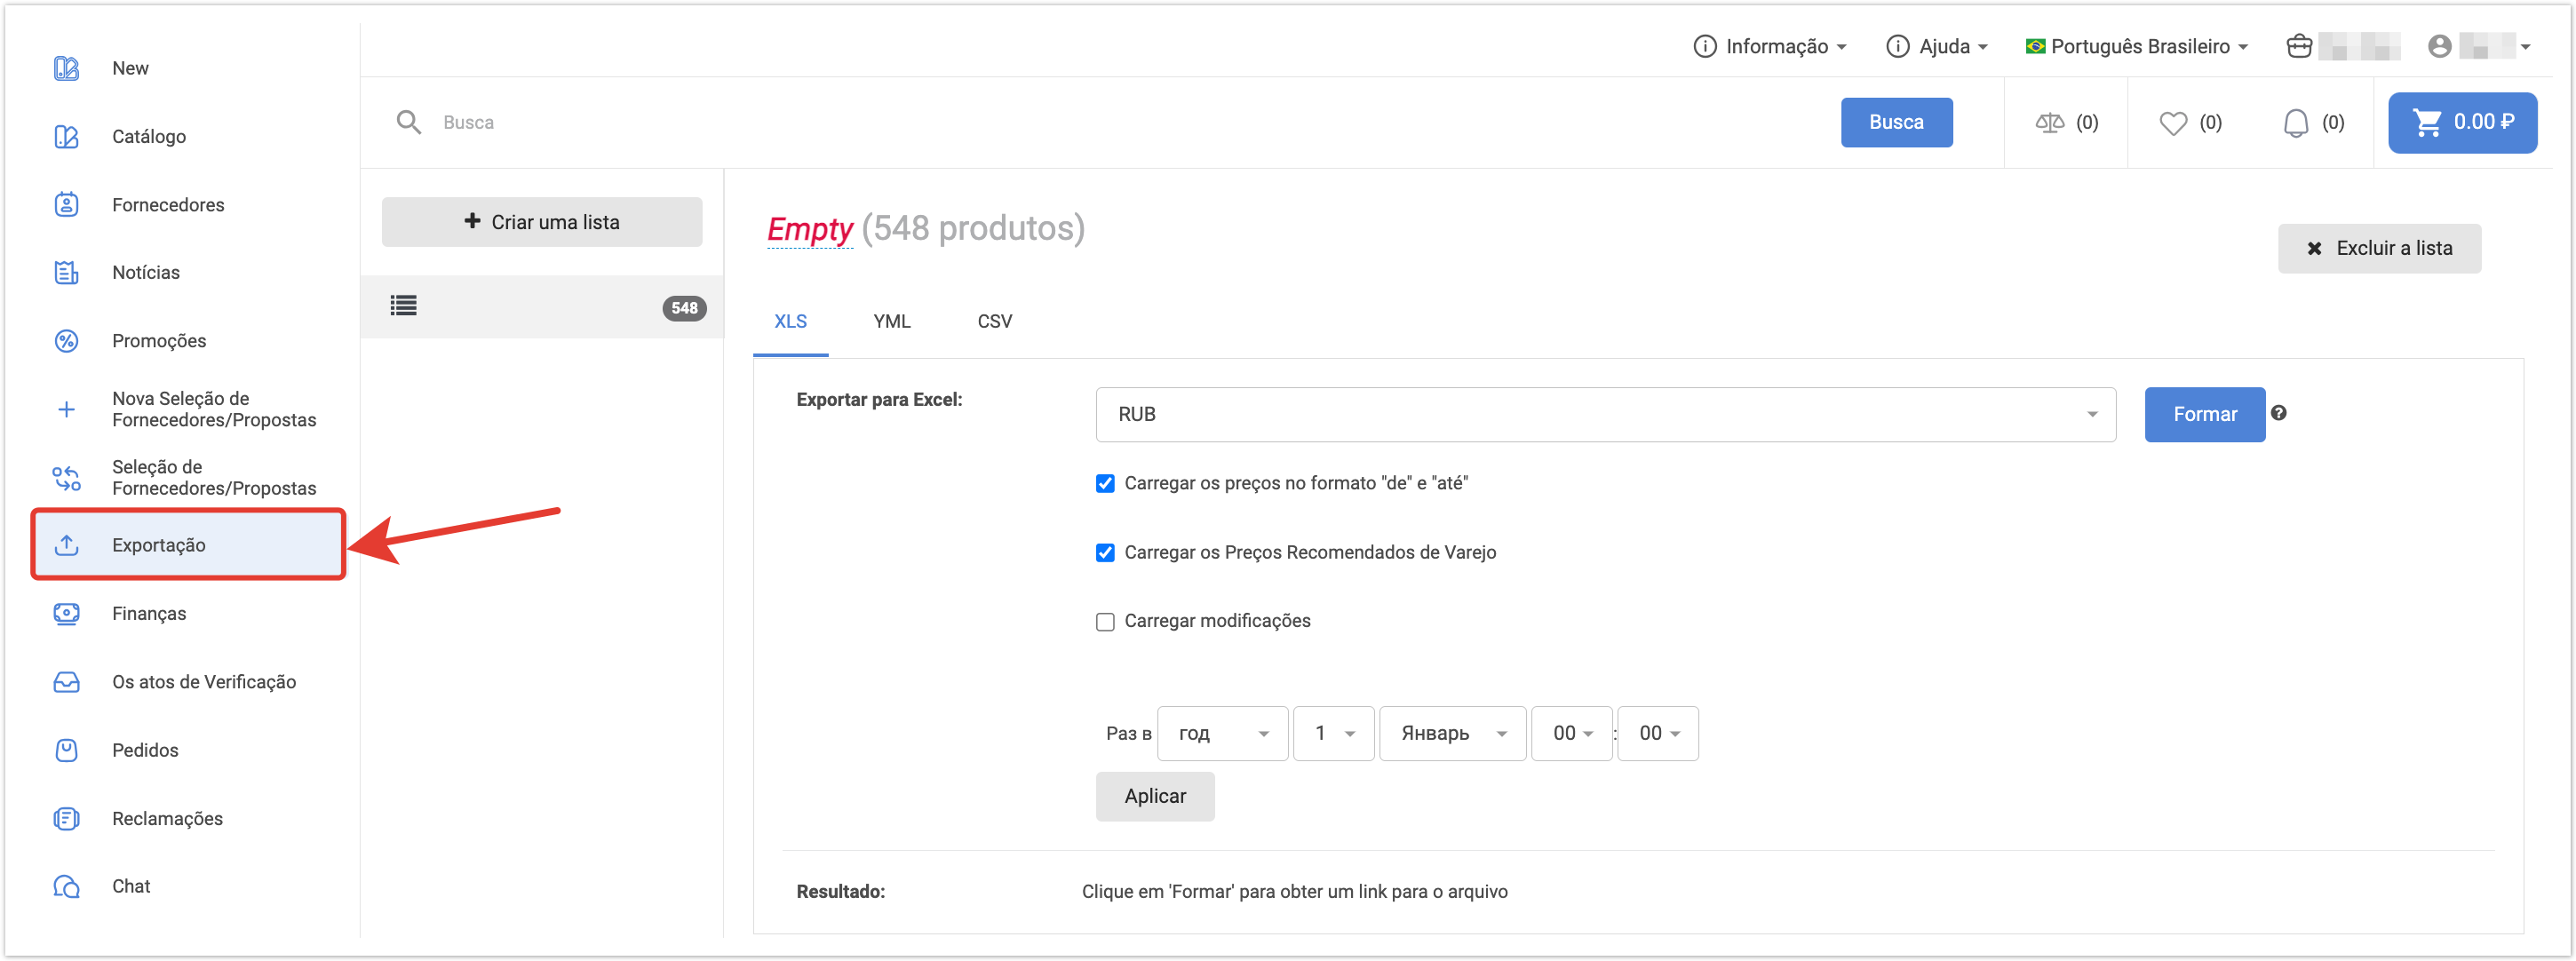
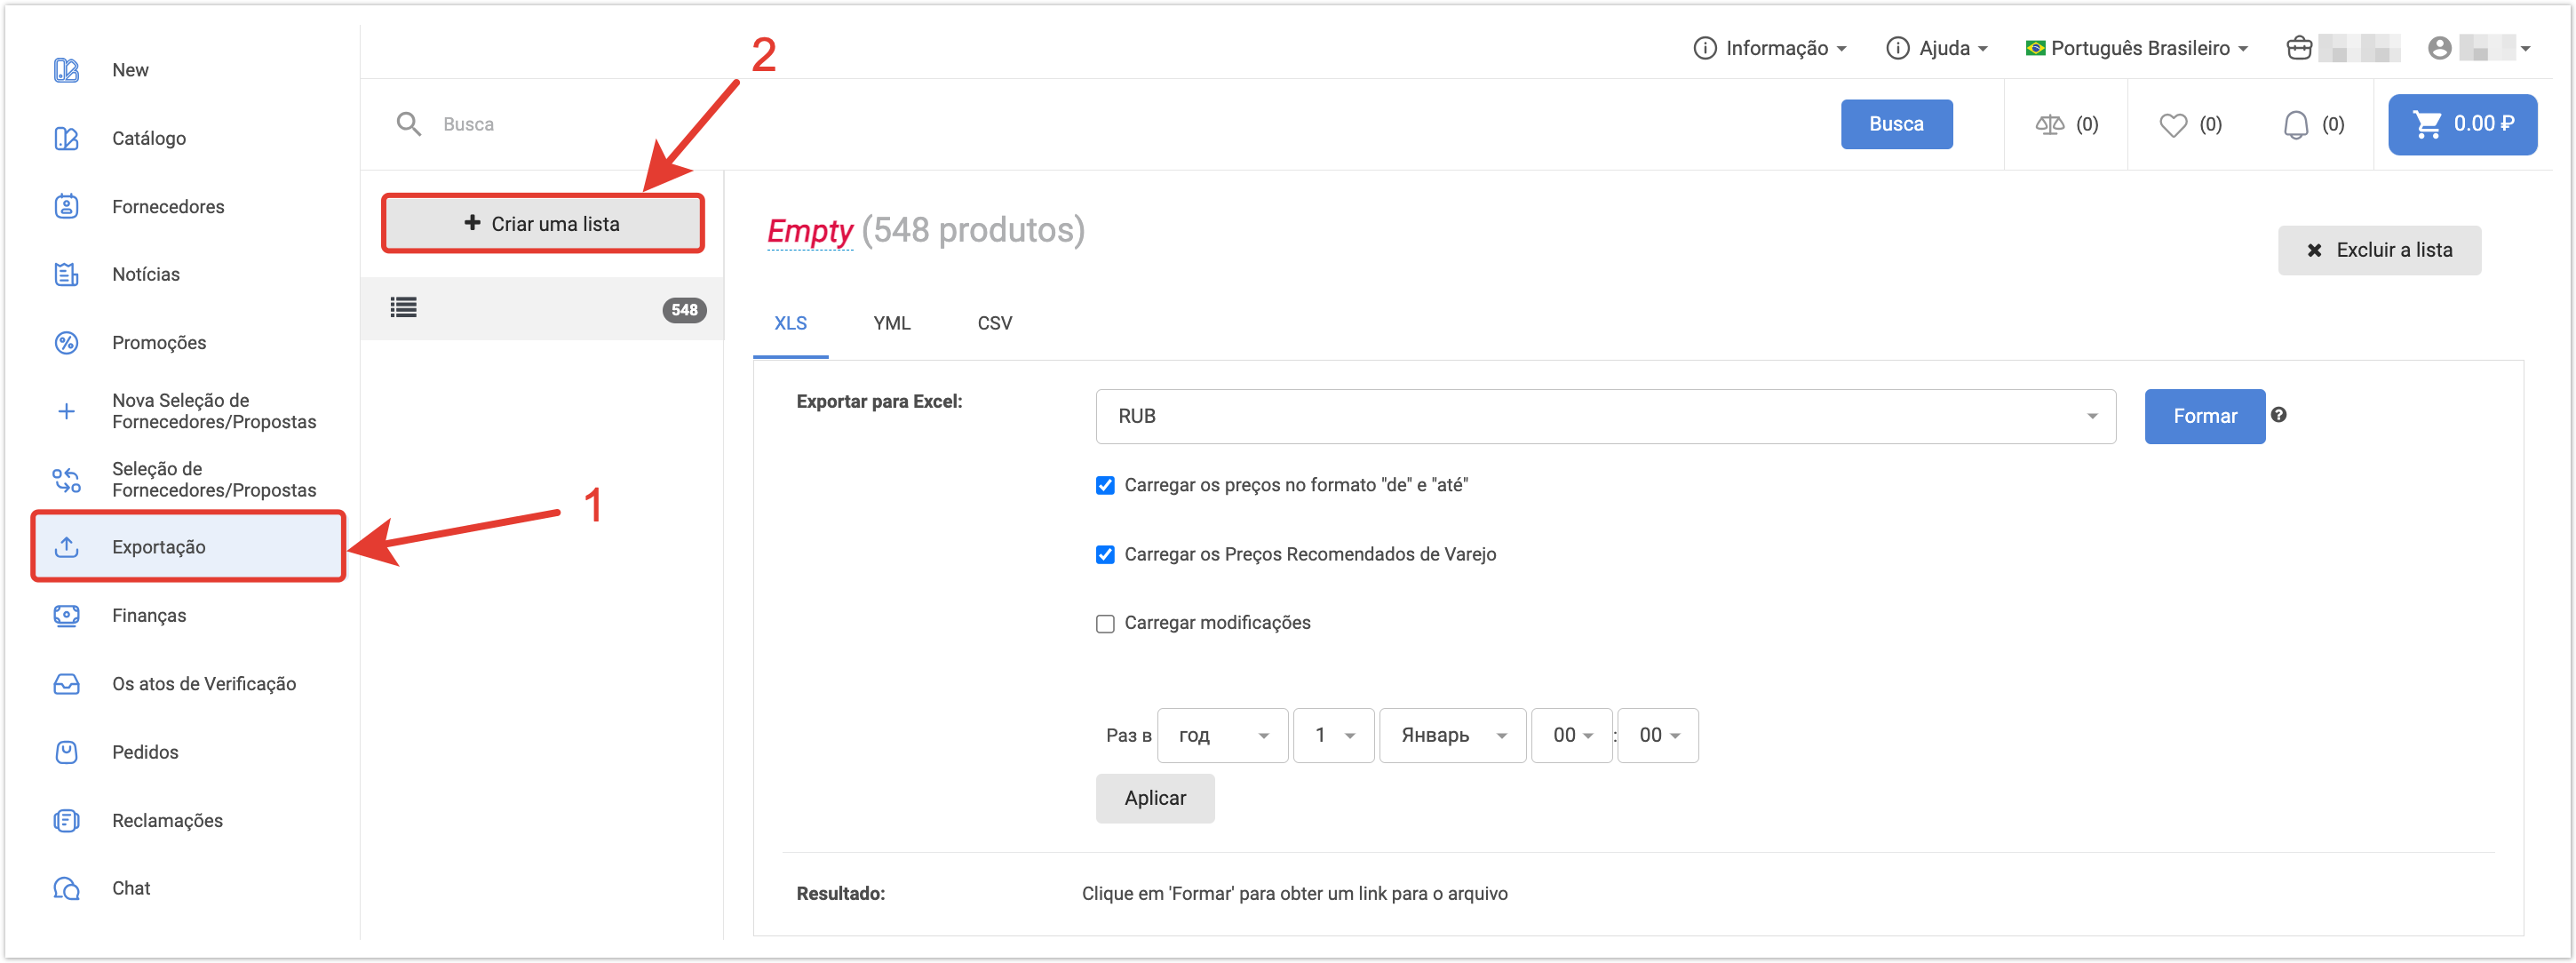
Existem 3 maneiras de exportar listas de produtos do sistema para a loja online. Para criar uma vitrine de mercadorias e atualizar os saldos, você pode usar links estáticos nos formatos XLS, YML e CSV. A disponibilidade de cada formato de upload é configurada através do painel de administração. Você pode conectar todos os formatos ou apenas alguns deles. Preparação da lista de mercadorias para exportaçãoPara exportar mercadorias, vá para a seção Exportar Isso abrirá uma página de onde você pode descarregar as mercadorias de acordo com a lista de mercadorias prontas. Se você ainda não criou uma lista de itens para carregar, você será solicitado a criar uma nova lista.
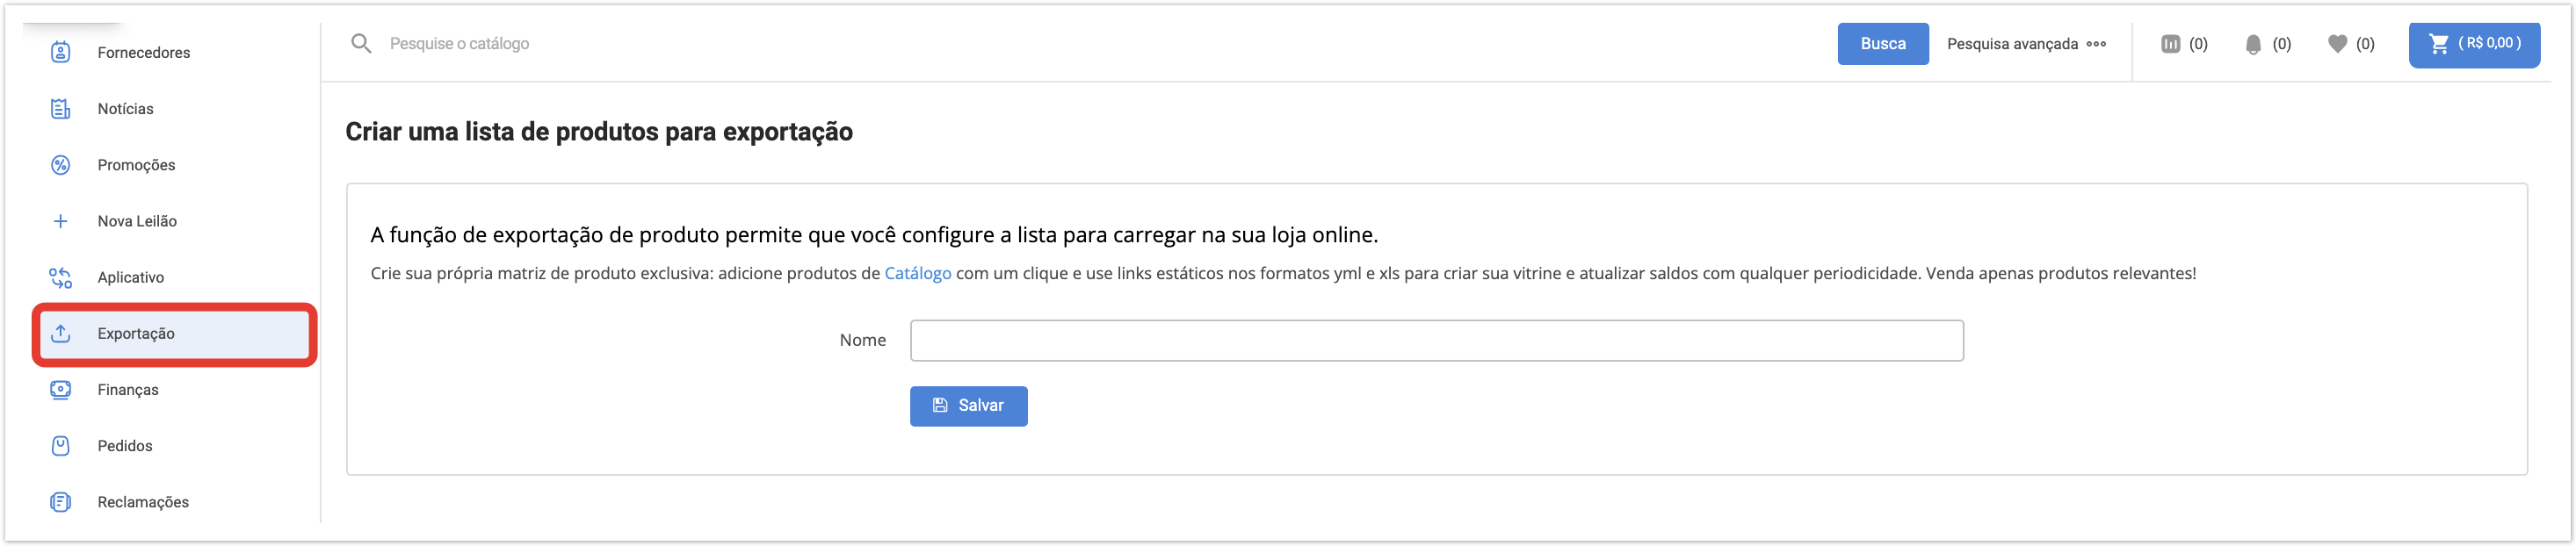
Criando uma lista de produtosSe você não tiver criado nenhuma lista de exportação antes, depois de clicar no botão
Para criar uma lista de produtos, especifique seu nome e clique no botão Salvar. Se a lista já tiver sido criada, depois de clicar no botão Se pretender adicionar mais lista, clique em Criar uma lista, introduza um nome para a lista e clique em Salvar.
Adicionar produtos à listaDepois de criar uma lista de produtos, você precisa adicionar produtos a ele. Para isso, existem várias opções: Adicionando produtos do catálogo do produtoClique
Em seguida, você será solicitado a escolher qual lista exportar para adicionar esses produtos - você pode selecionar uma lista existente (campo esquerdo do formulário) ou criar uma nova lista (campo direito do formulário) e clicar no botão Salvar. Todos os produtos selecionados serão adicionados à lista de exportação.
Exportar para ExcelPara exportar mercadorias em sua conta pessoal, clique no botão
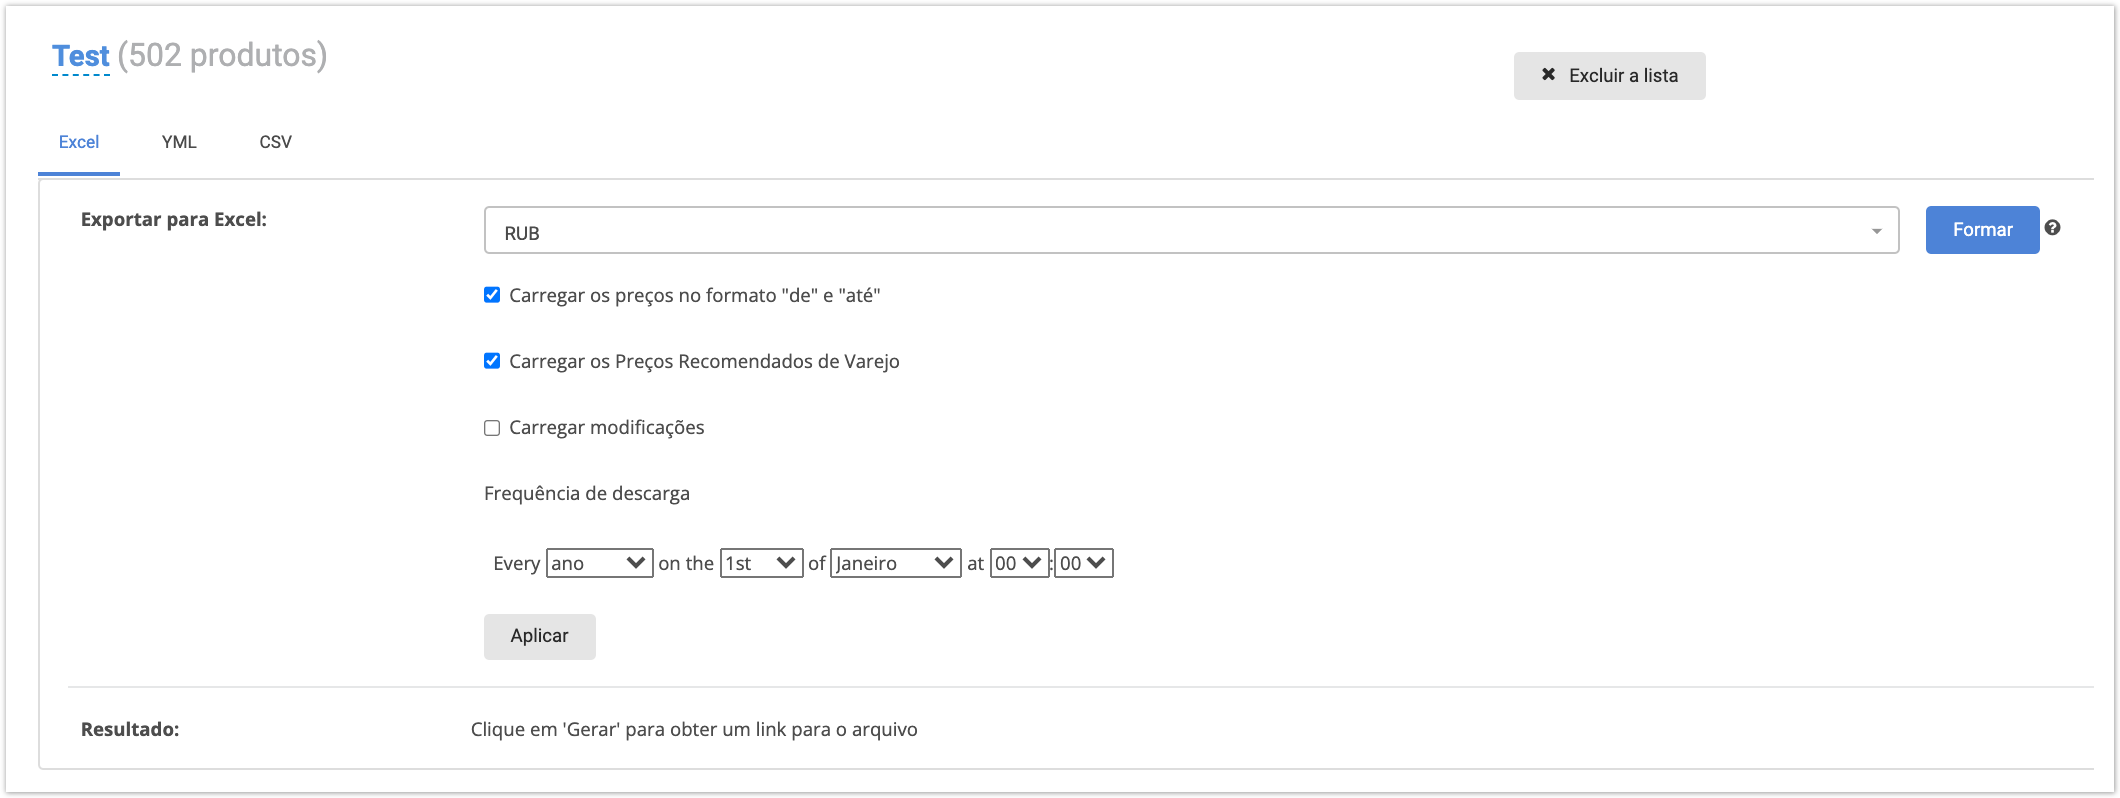
Antes de exportar, faça as seguintes configurações:
Clique em Aplicar.
Em seguida, na lista O que descarregar, selecione quais itens você deseja descarregar:
Clique em Aplicar. Depois de selecionar as mercadorias para carregar e configurar as opções de exportação, clique no botão Formar. Depois disso, o processo de geração do arquivo começará, o botão Gerar ficará inativo, mas o botão Cancelar será exibido, o que permite cancelar o processo se um erro foi cometido ao definir os parâmetros necessários. Após o término do processo de exportação, um link para baixar o arquivo com os resultados da exportação da lista de mercadorias aparecerá no bloco Resultados. Ao definir a frequência de descarga, este link será atualizado no momento especificado.
Exportar para YML
Para exportar mercadorias em sua conta pessoal, clique no botão
Se você estiver exportando para YML, selecione com que frequência deseja fazer upload e clique em Aplicar. Em seguida, na lista O que descarregar, selecione quais itens você deseja descarregar:
Clique em Aplicar. Depois de selecionar as mercadorias para carregar e configurar as opções de exportação, clique no botão Gerar. Depois disso, o processo de geração do arquivo começará, o botão Gerar ficará inativo, mas o botão Cancelar será exibido, o que permite cancelar o processo se um erro foi cometido ao definir os parâmetros necessários. Após o término do processo de exportação, um link para baixar o arquivo com os resultados da exportação da lista de mercadorias aparecerá no bloco Resultados. Ao definir a frequência de descarga, este link será atualizado no momento especificado.
Exportar CSVPara exportar mercadorias em sua conta pessoal, clique
Esta opção é semelhante à Exportação para Excel, exceto que você precisa especificar um separador na caixa Separador. Excluindo uma lista de exportaçãoAo clicar no botão Excluir a lista, você pode excluir uma lista de exportação gerada anteriormente.
|