| Sv translation | ||||||||
|---|---|---|---|---|---|---|---|---|
| ||||||||
Ручное добавление товаров на платформу рассмотрено в ролике, а также описано ниже.
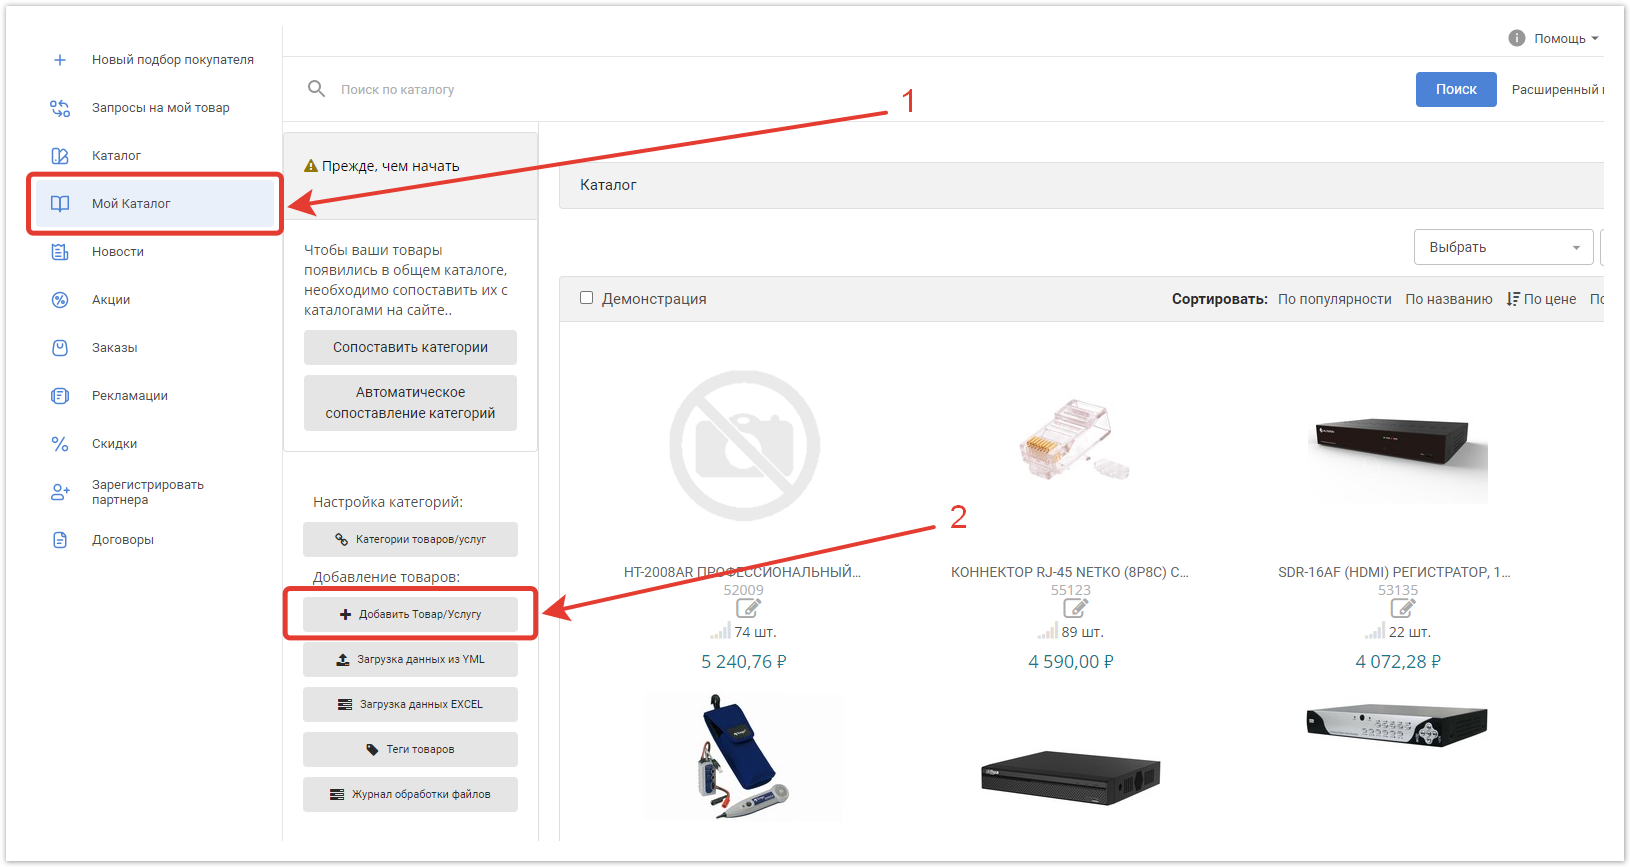
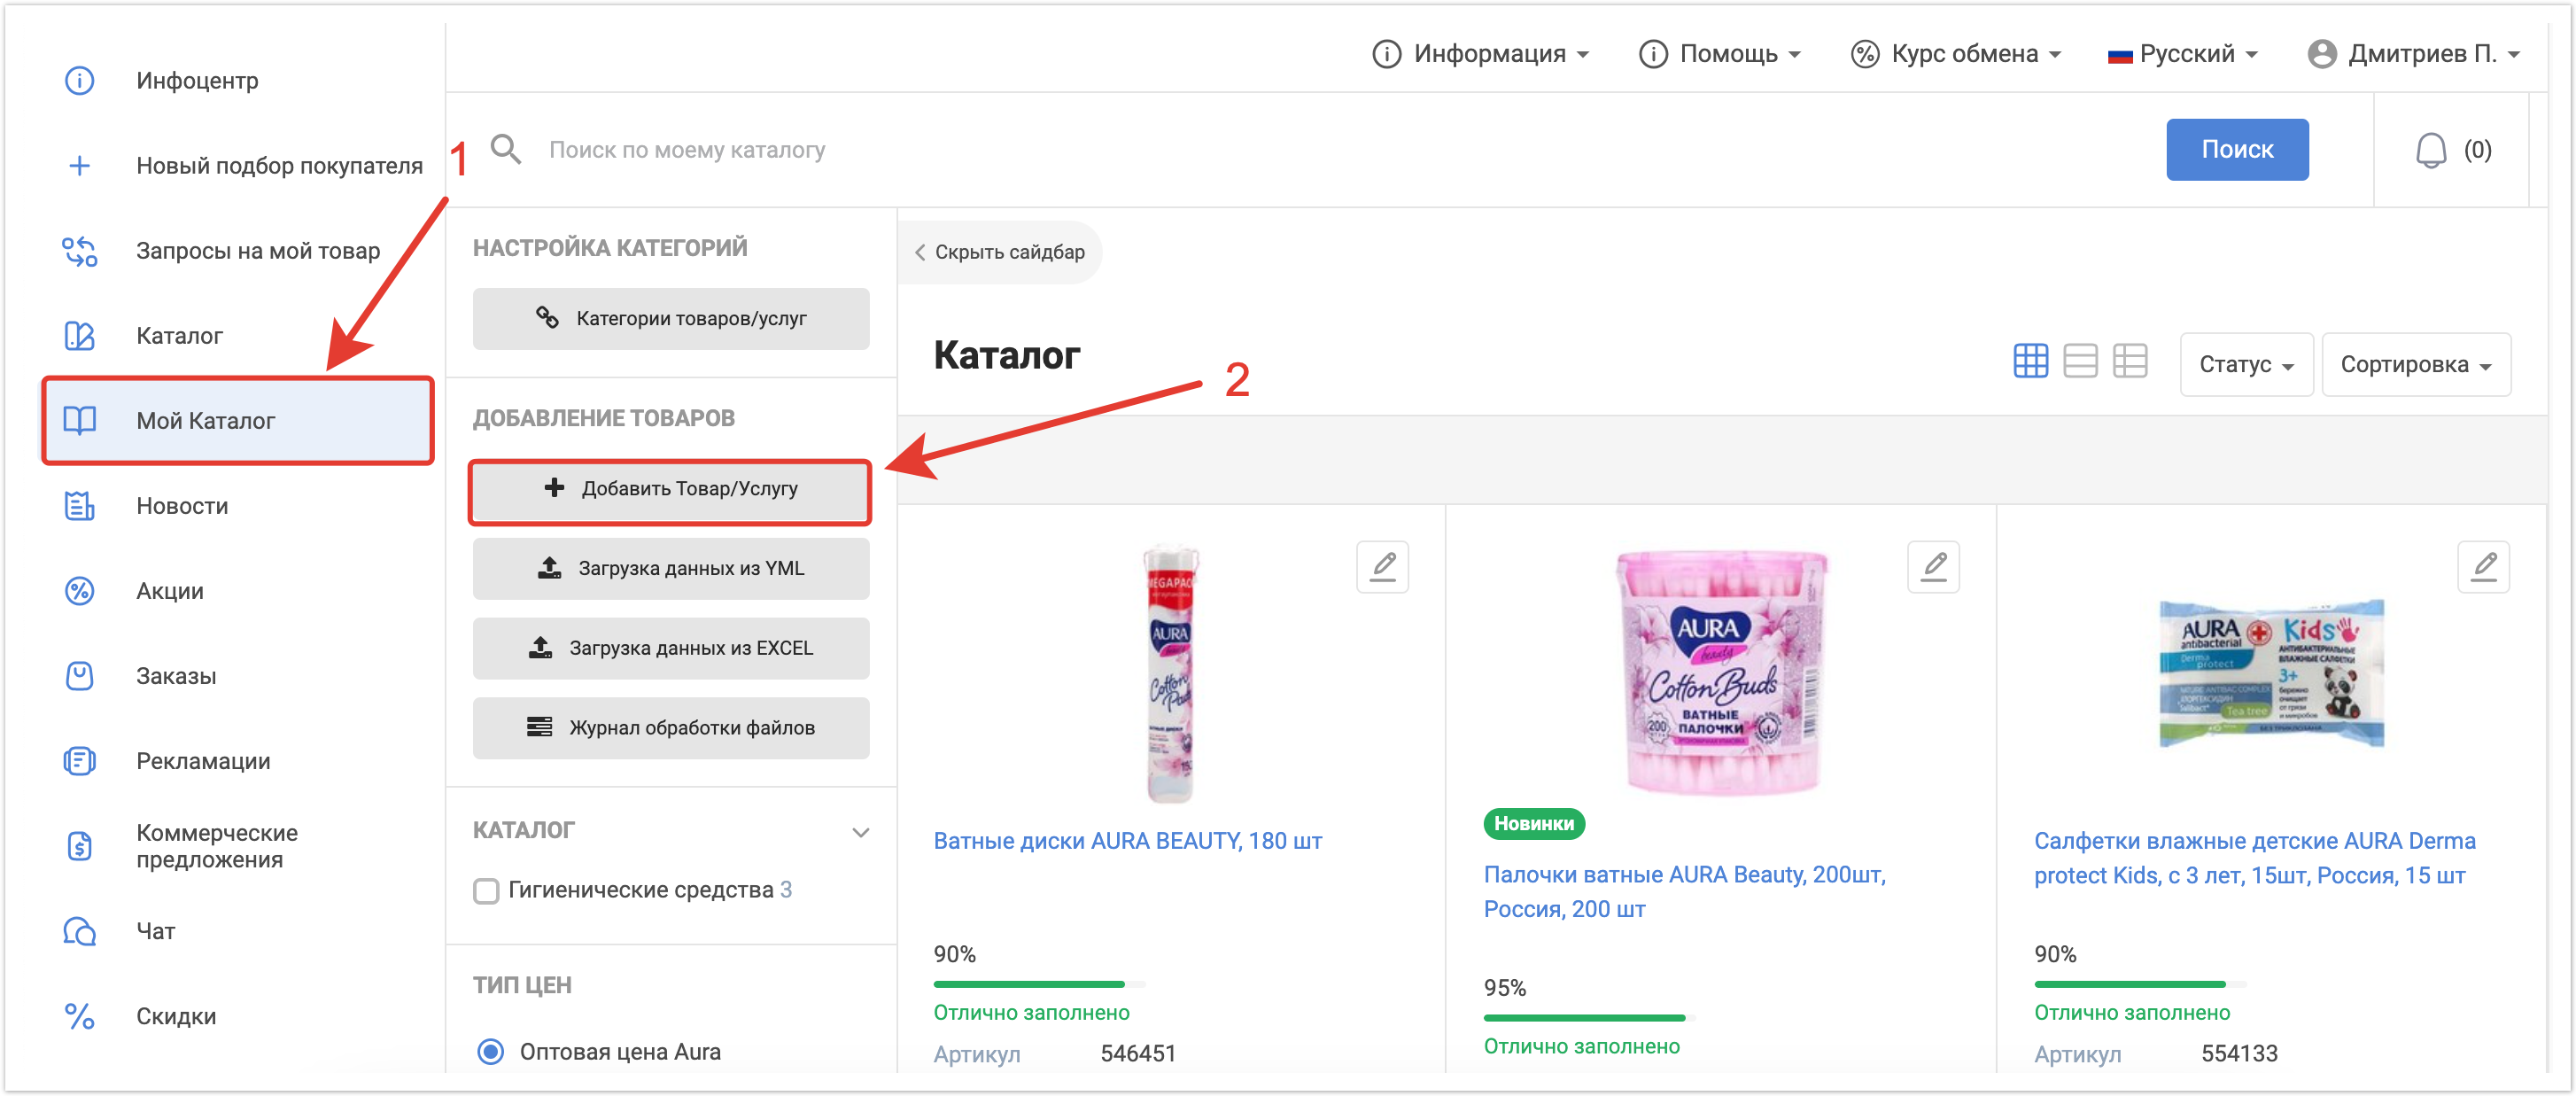
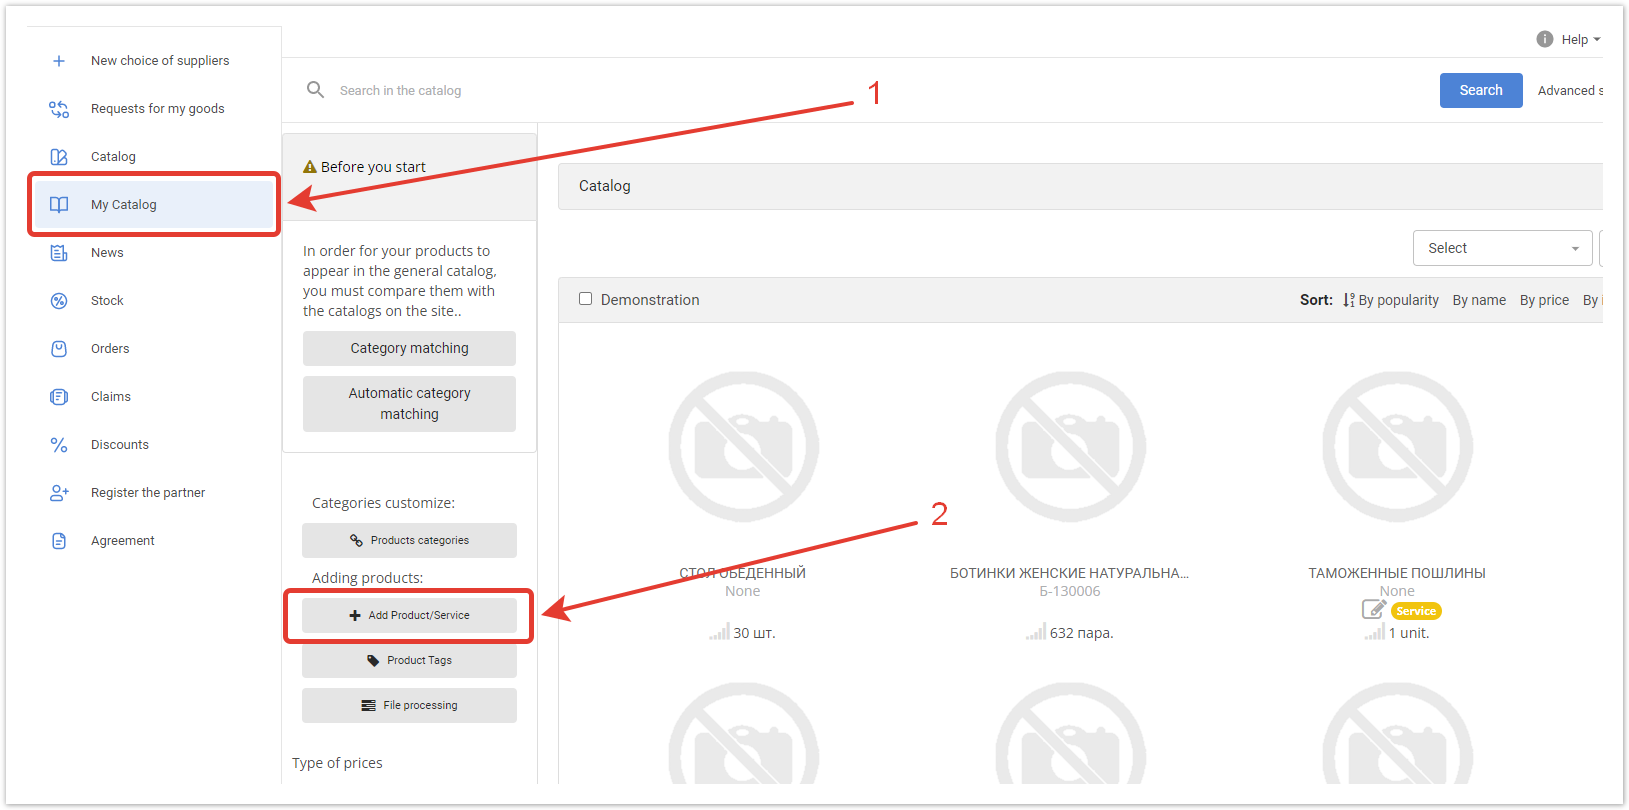
Чтобы создать карточку товара вручную, в личном кабинете поставщика нужно перейти перейдите в раздел раздел Мой каталог и нажать на нажмите кнопку Добавить Товар/Услугу.
Затем в открывшейся форме заполнить поля:
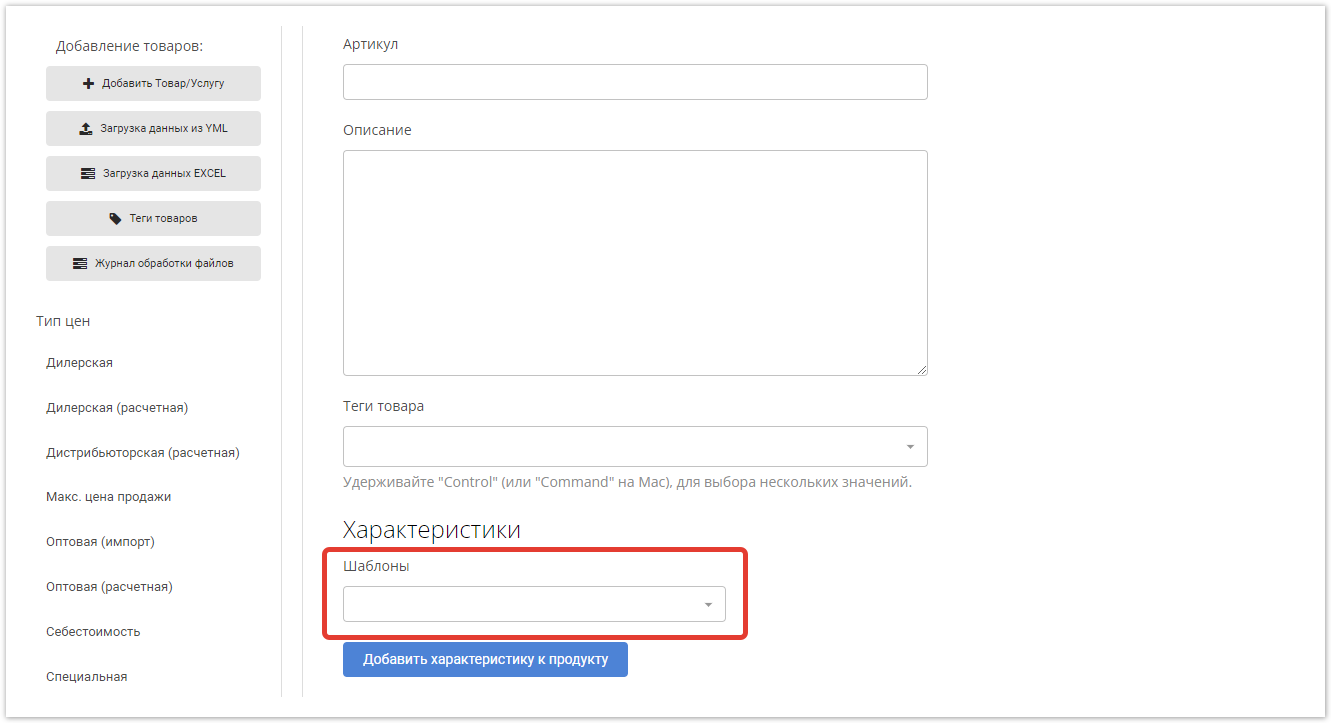
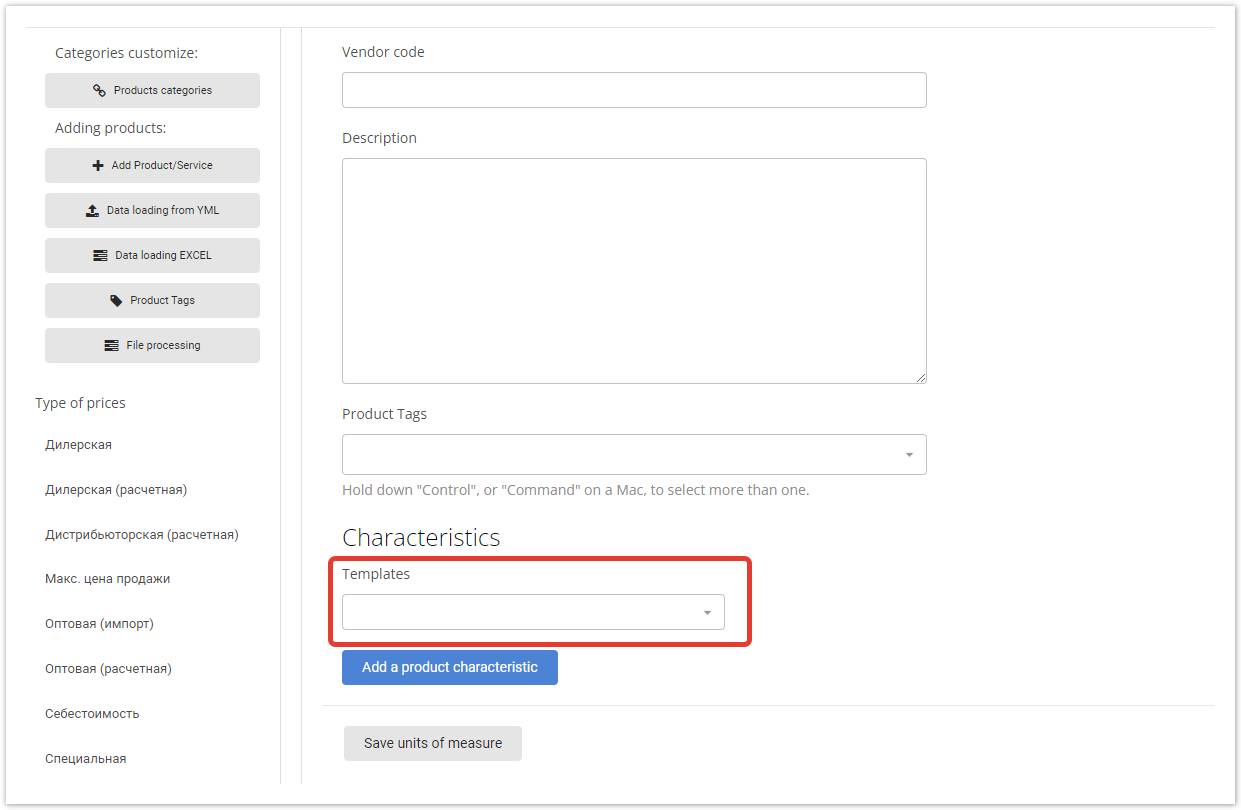
С помощью шаблонов можно присваивать готовый список свойств для выбранной категории товара. Шаблоны создаются заранее в административной панели.
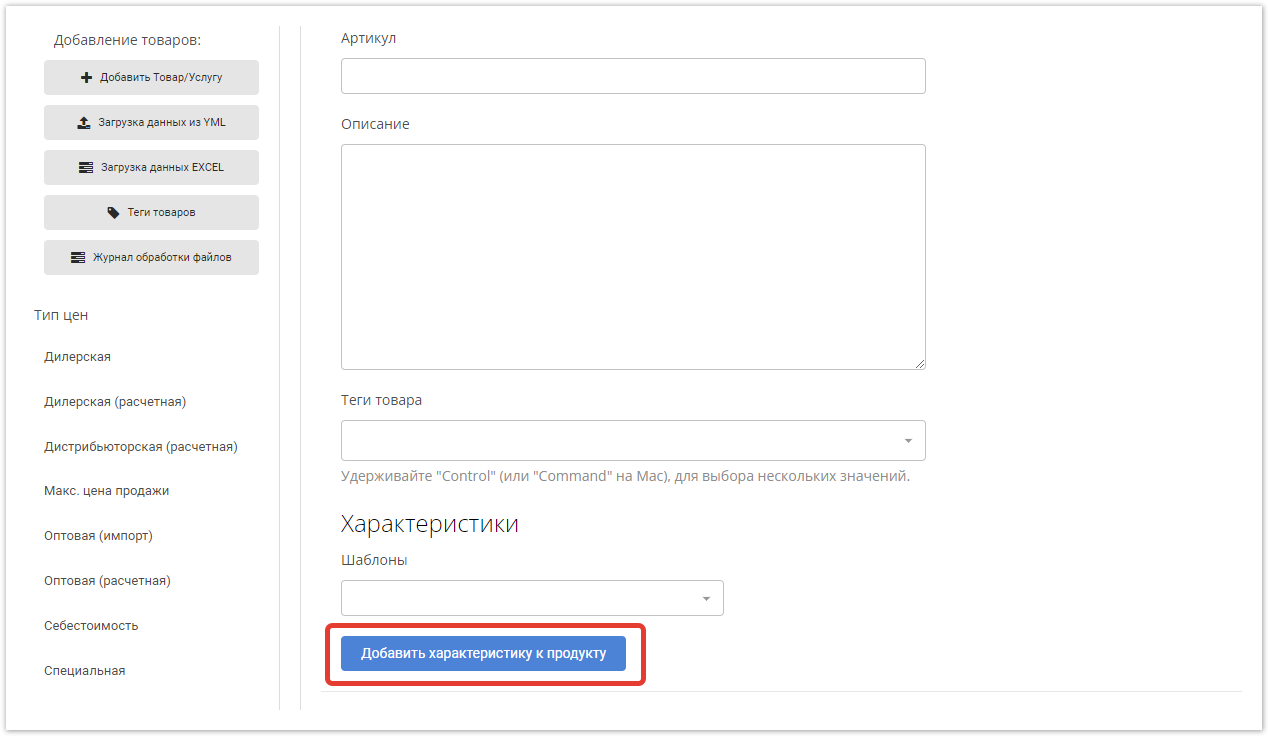
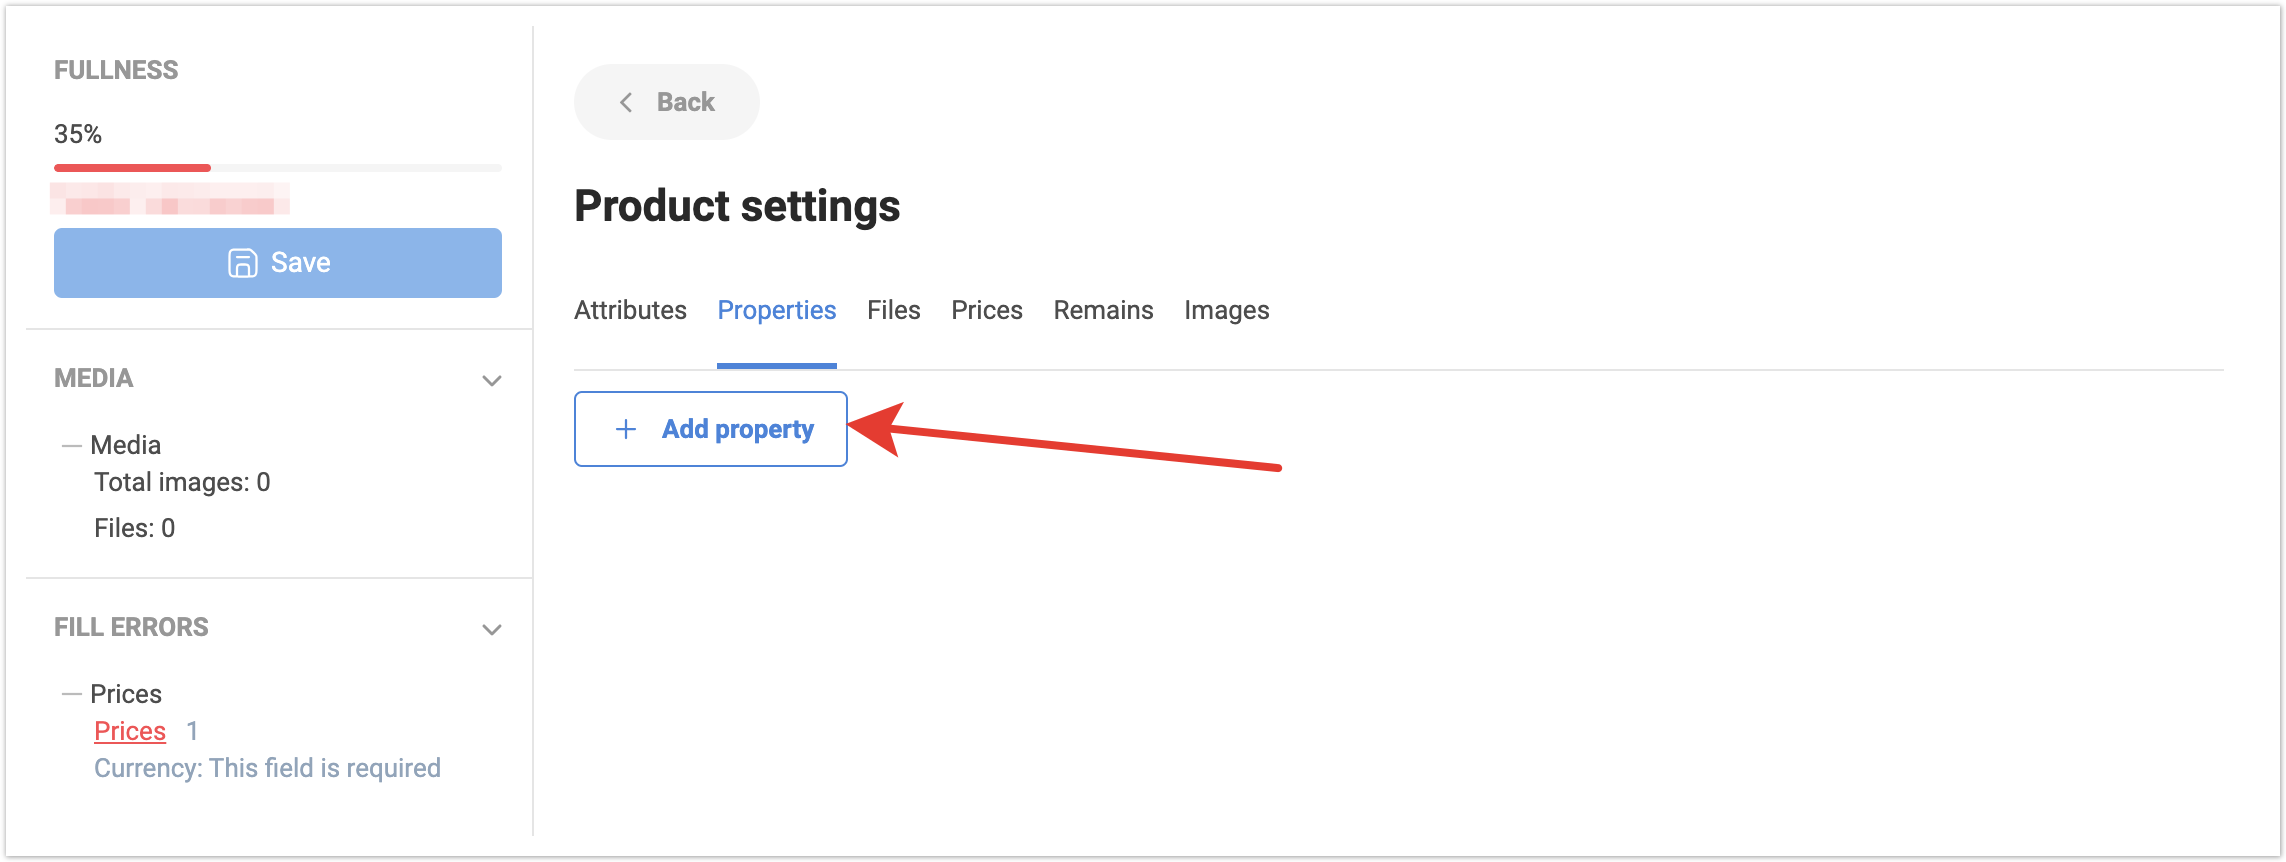
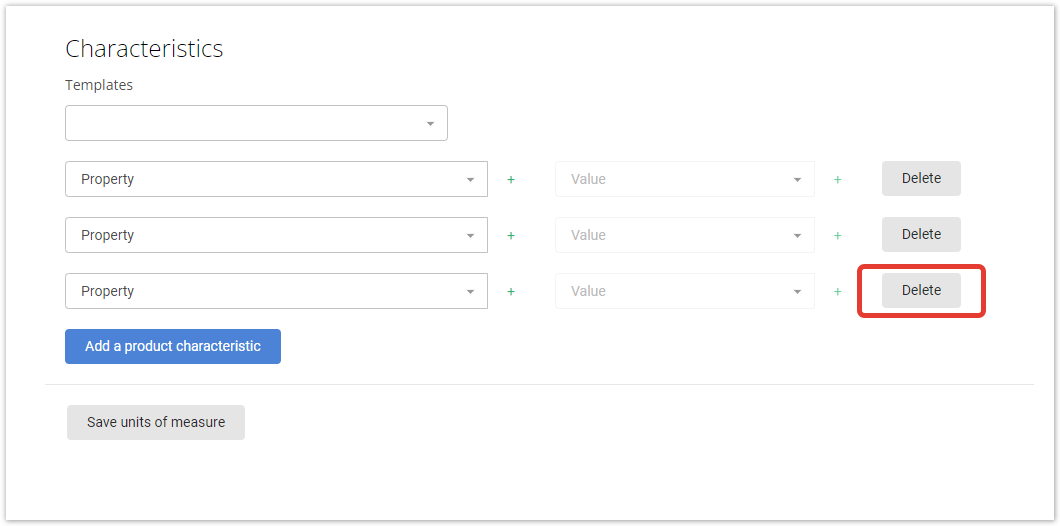
Также можно настроить свойства товаров и их значения. Для этого нужно нажать кнопку Добавить характеристику к продукту.
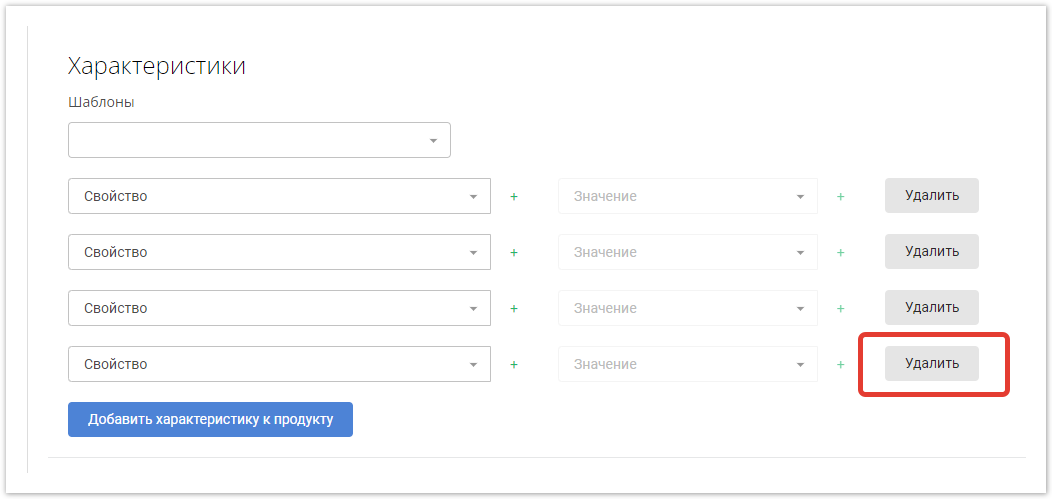
Есть возможность выбрать несколько характеристик товара или удалить их.
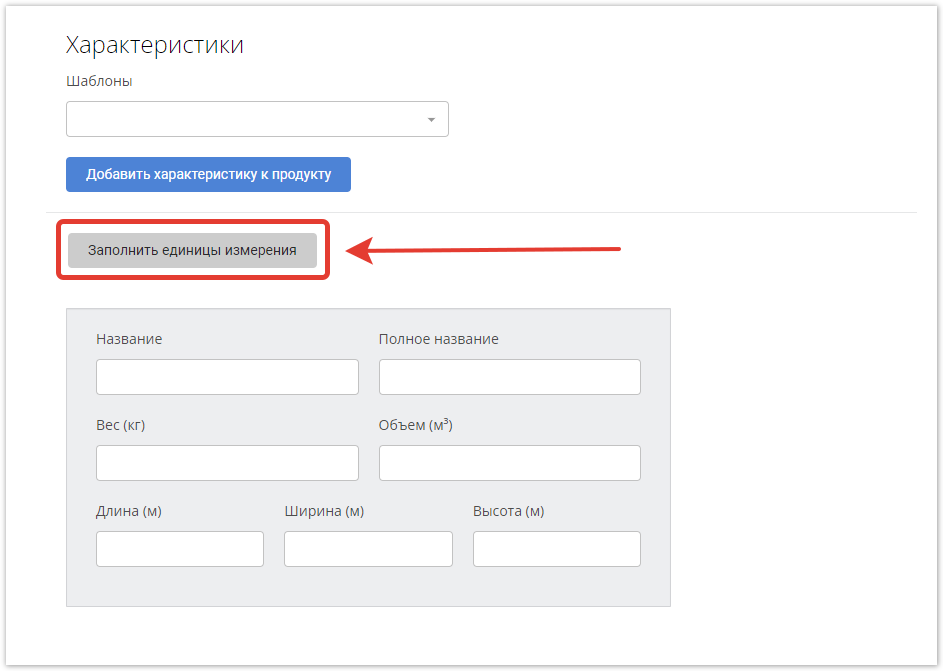
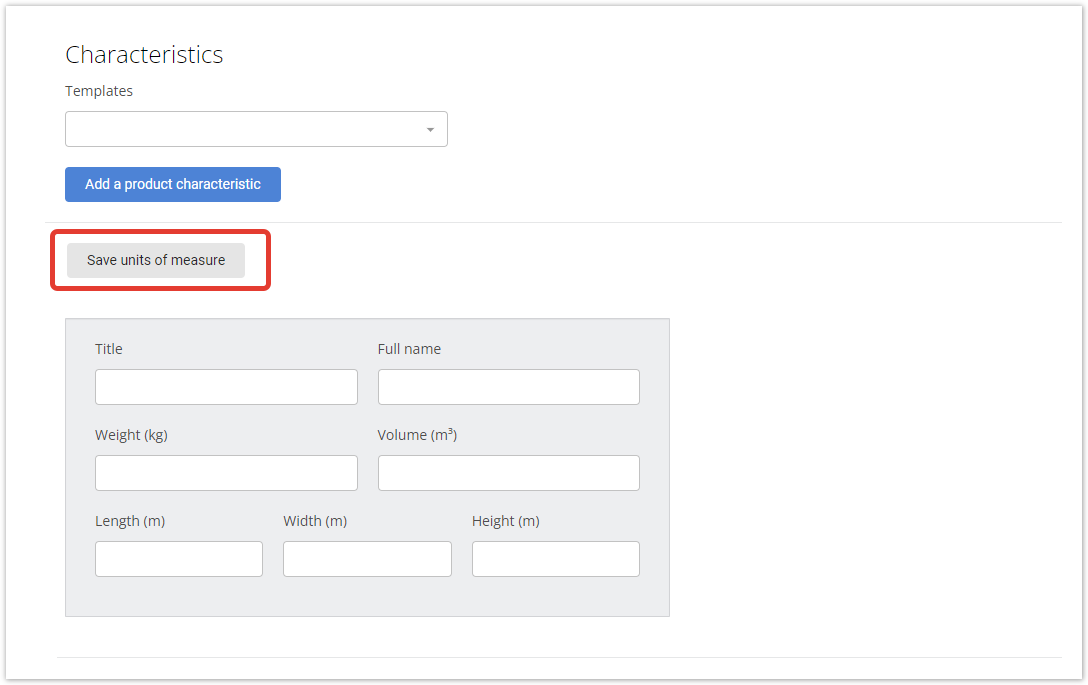
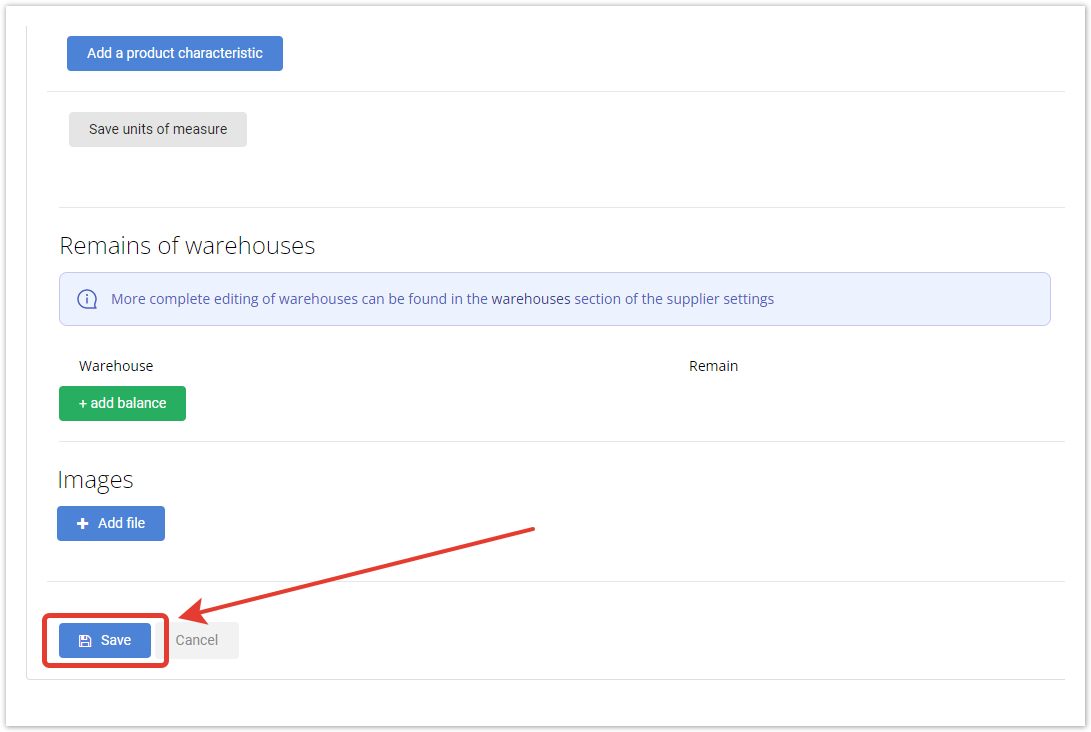
Чтобы заполнить единицы измерения товаров, нужно кликнуть по кнопке Заполнить единицы изменения. Единицами измерения могут служить: вес, объем, длина, ширина и высота.
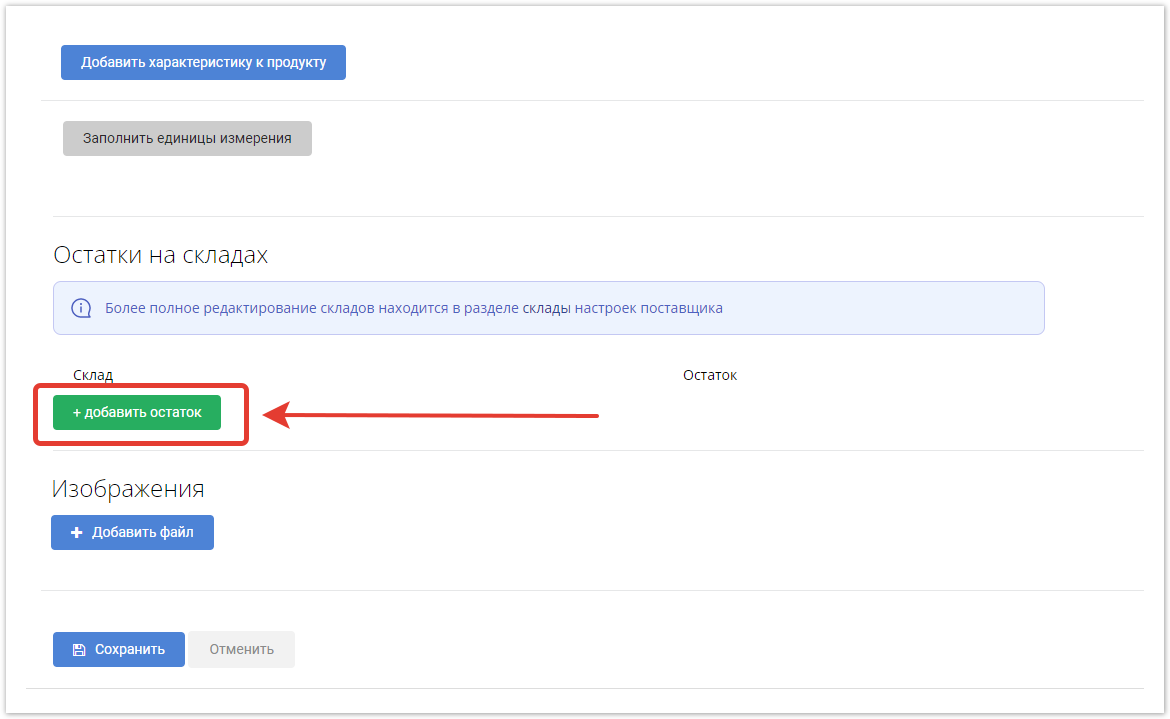
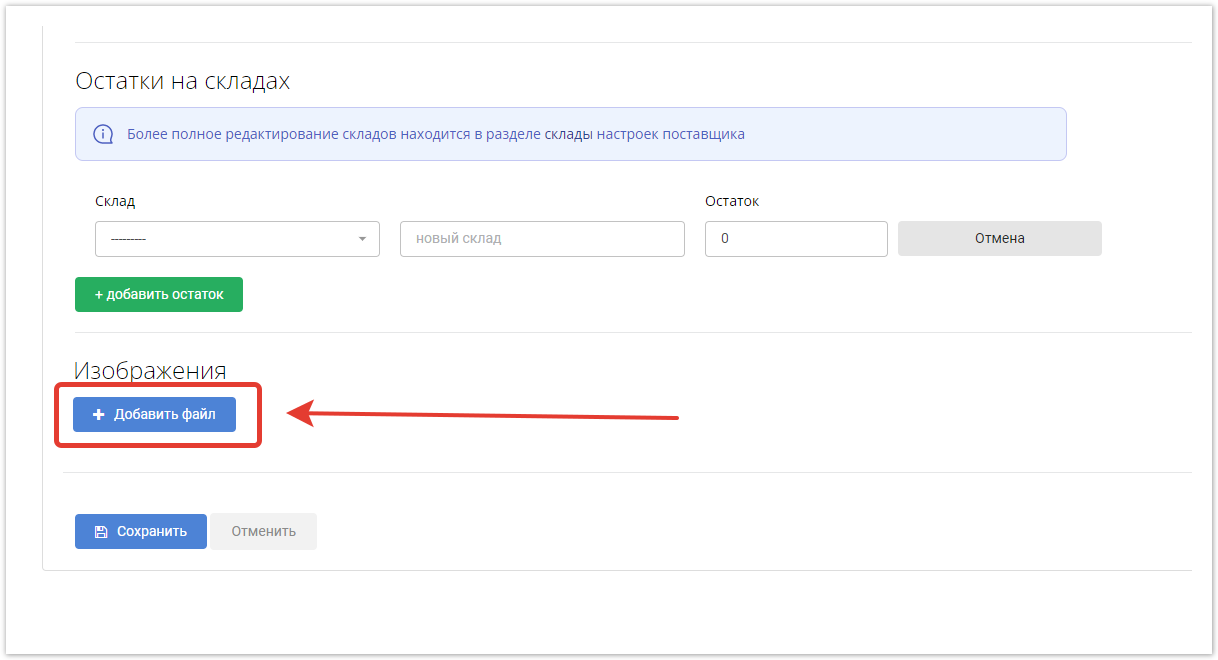
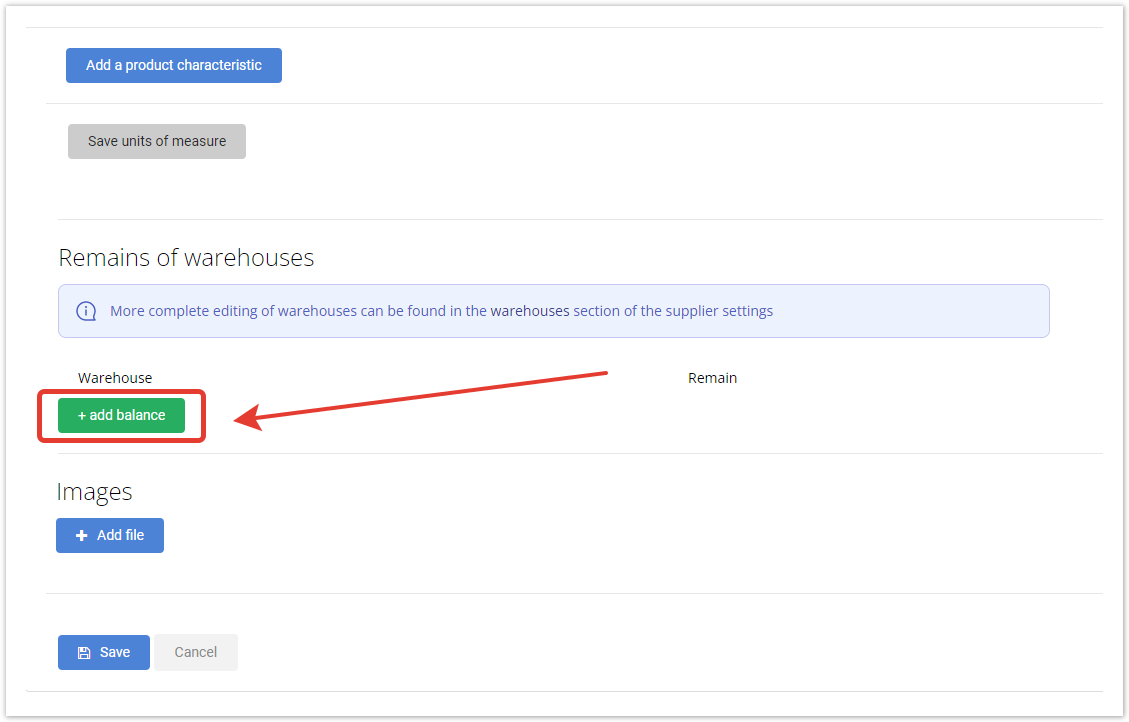
Чтобы указать количество товара на складах, необходимо нажать на кнопку Добавить остаток.
Затем нужно выбрать склад и ввести количество товара на нем. Если товар в наличии на нескольких складов, есть возможность добавить несколько складов.
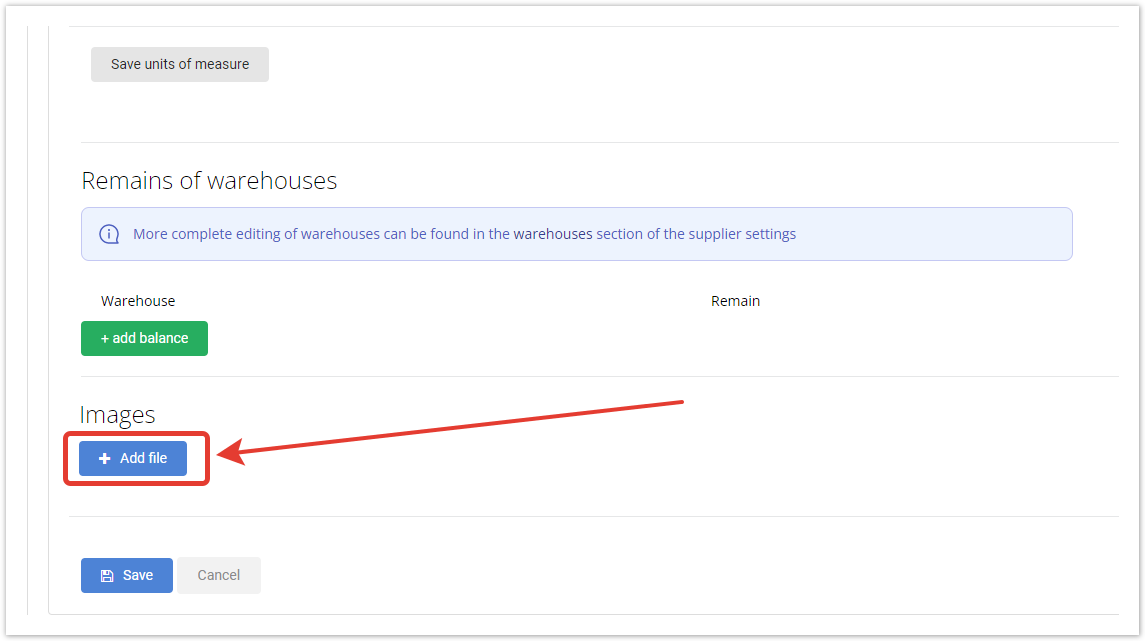
Есть возможность загрузить Изображение. Размер файла не должен превышать 15MB, форматы файлов - *png, *jpg, *tiff, *bmp, *jpeg, *gif. Фотографий может быть несколько, также доступно удаление.
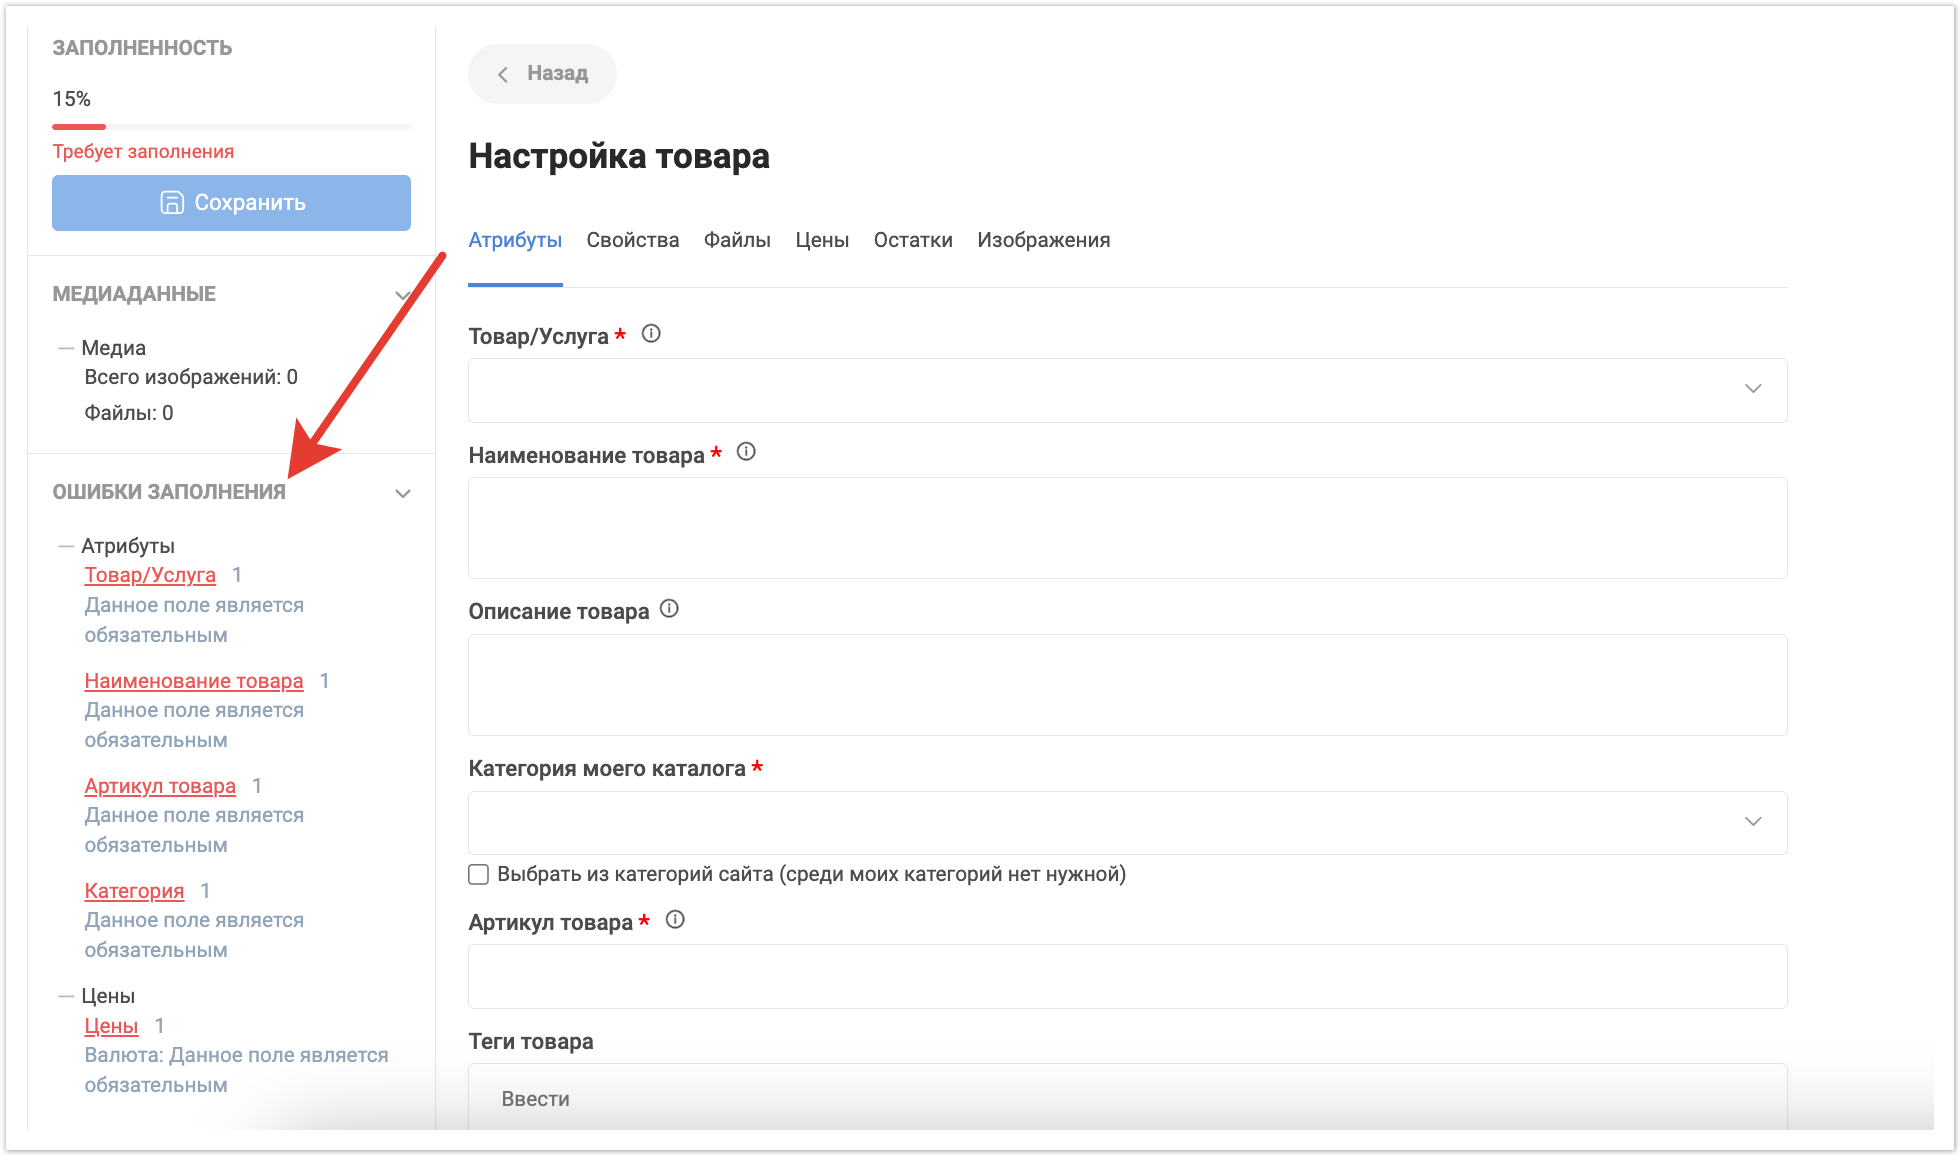
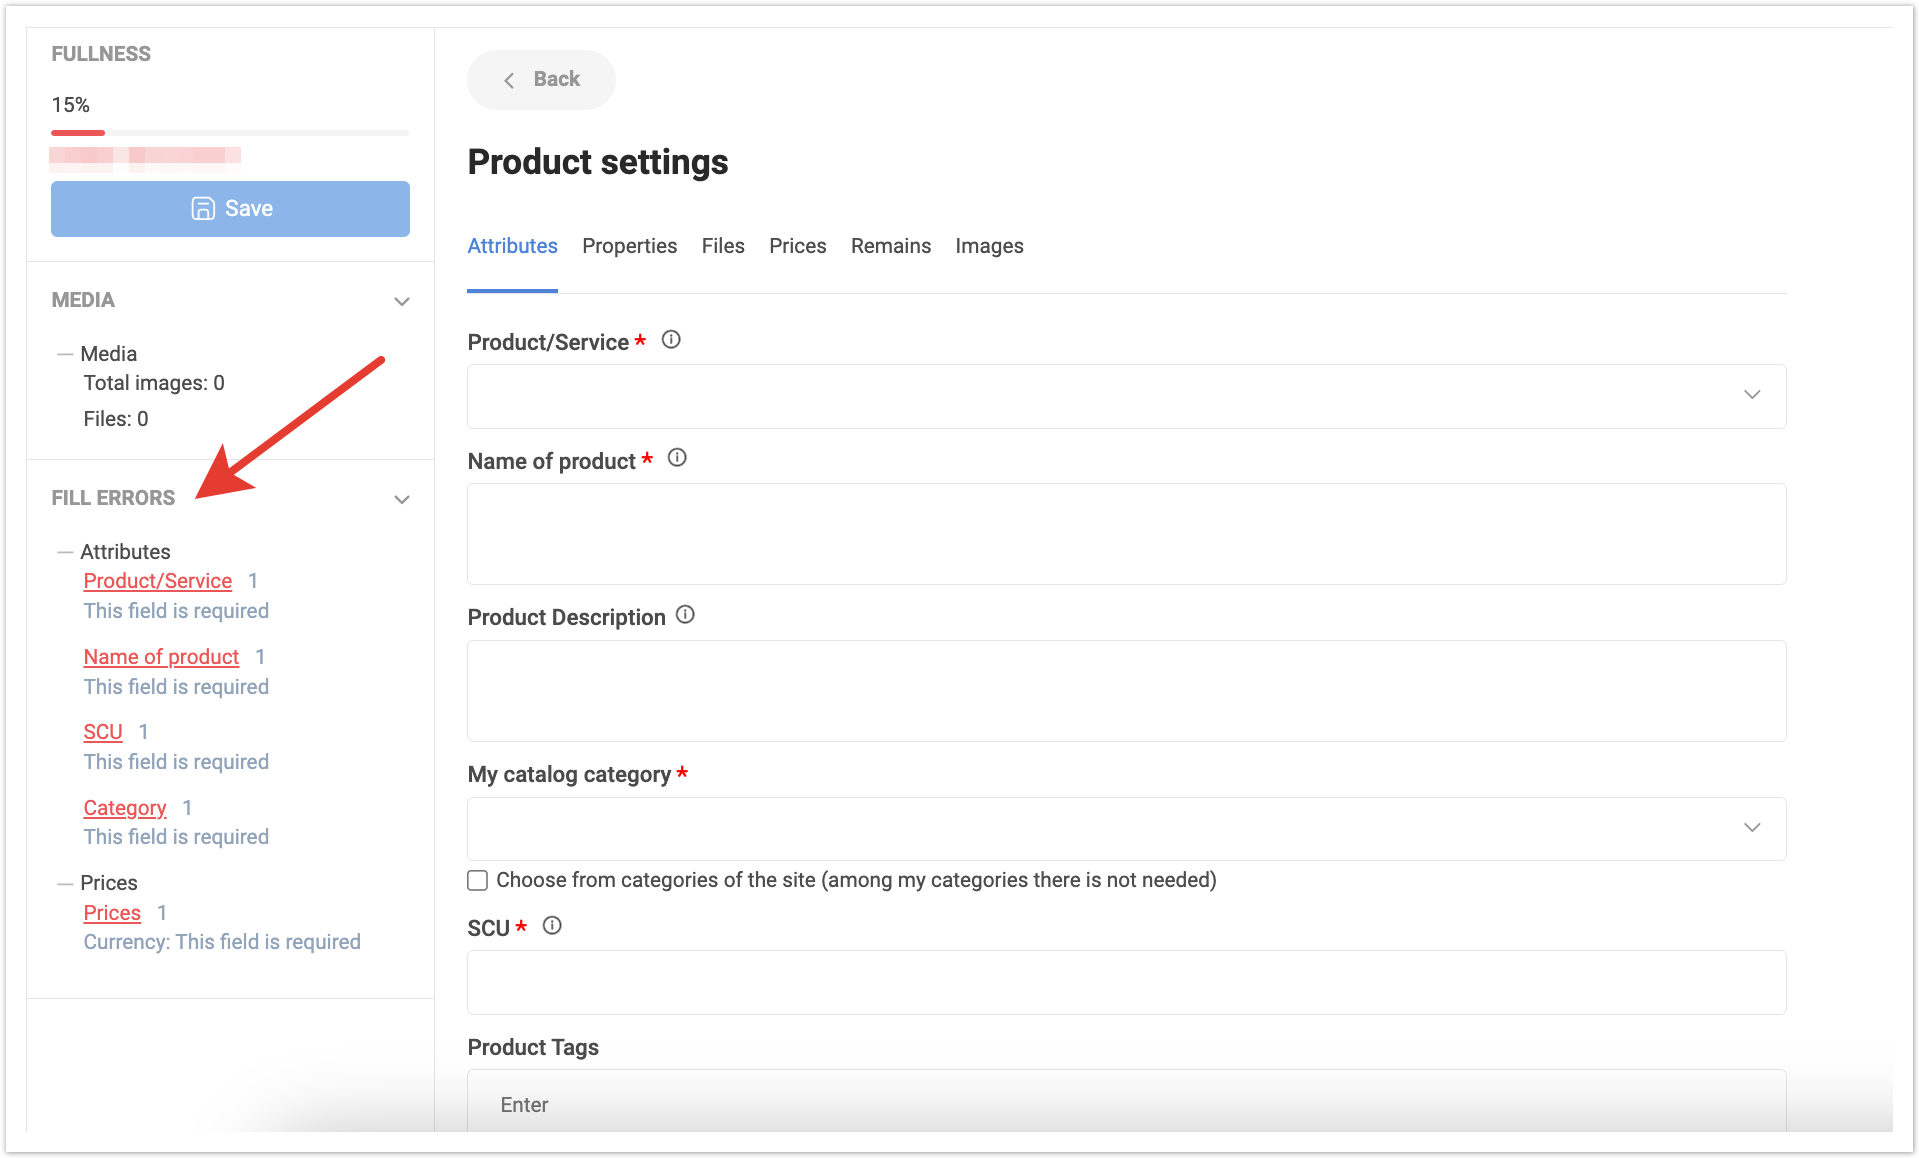
После этого откроется форма для добавления товара. В левой части окна будет указан процент заполнения карточки товара, а ниже информация по медиаданным, а также в блоке Ошибки заполнения можно увидеть, какие атрибуты обязательно нужно заполнить для добавления товара. Обязательные для заполнения поля отмечены красной звездочкой.
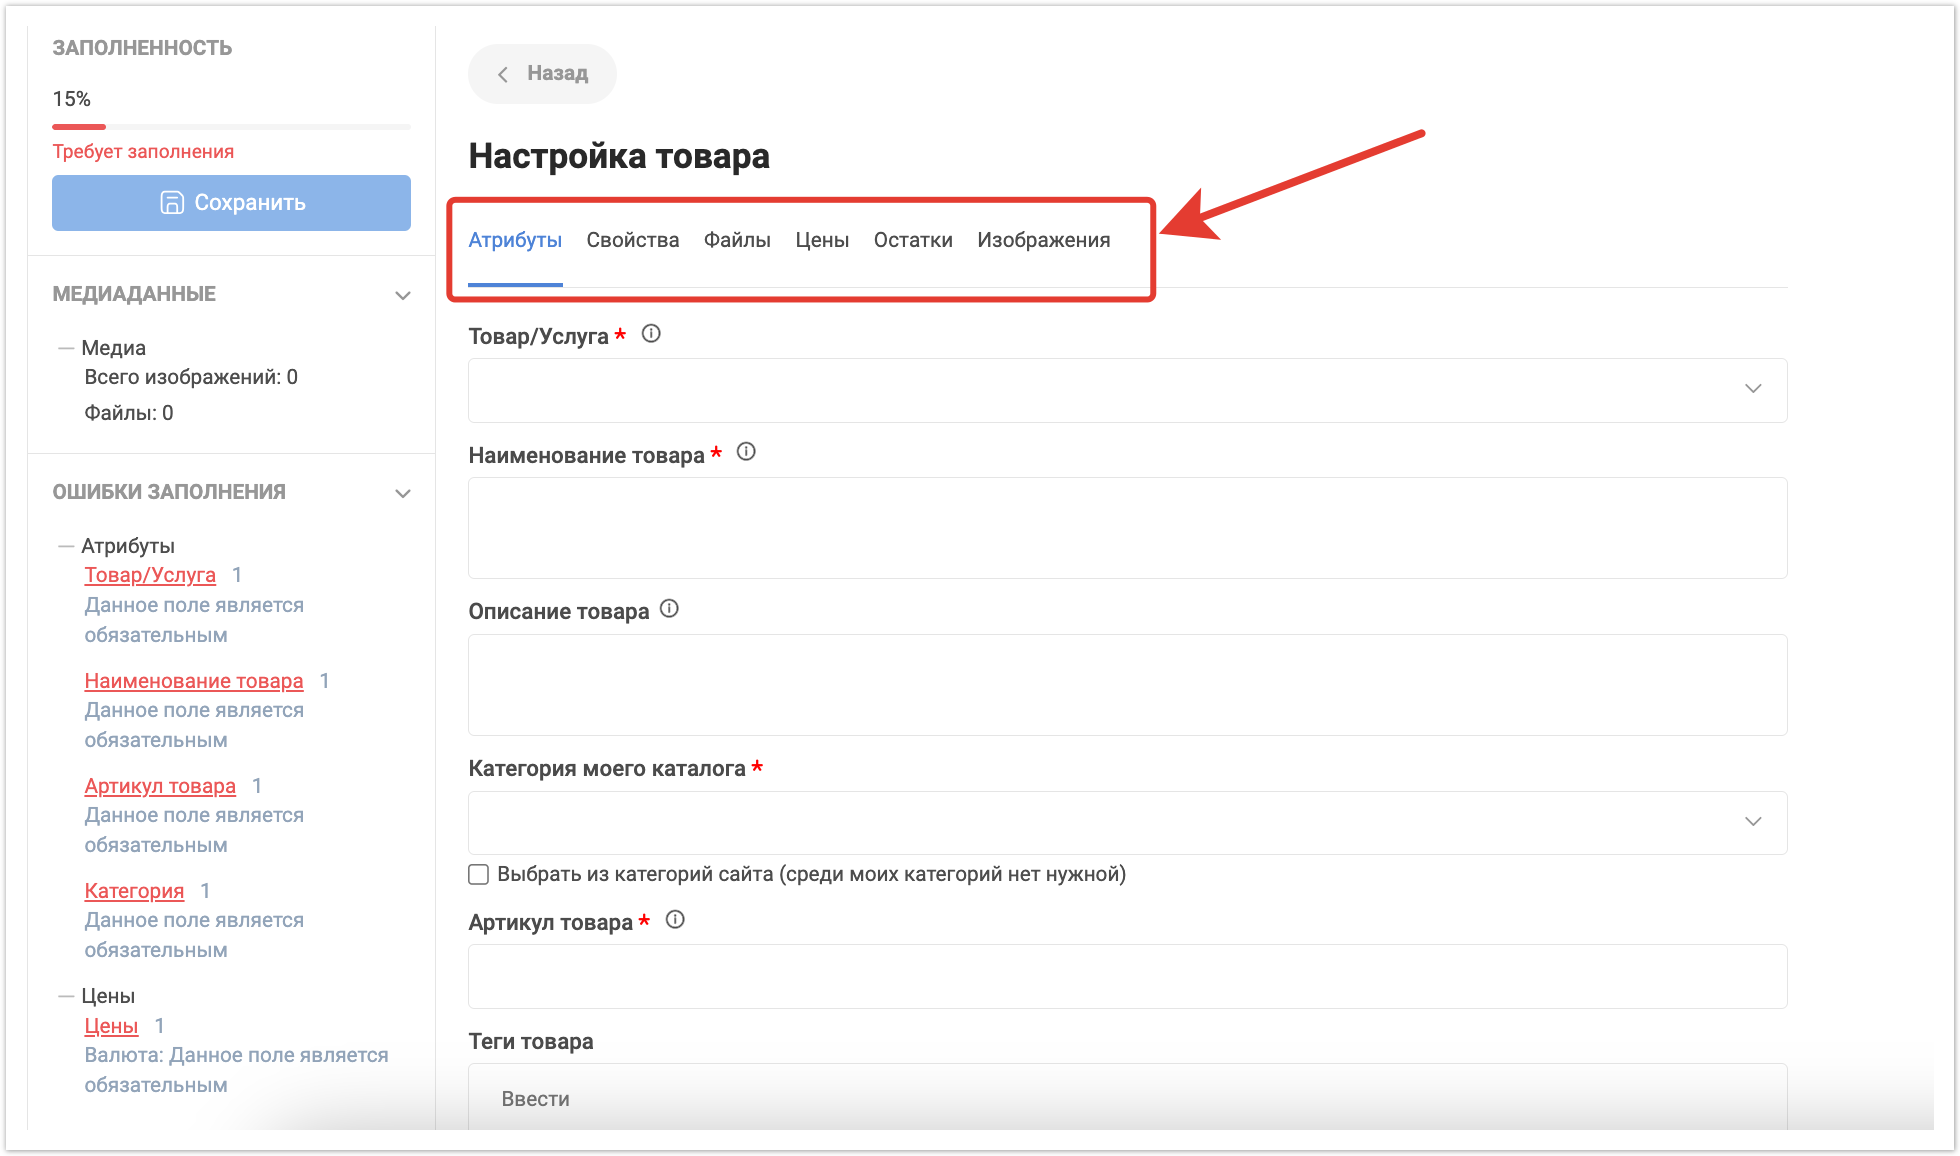
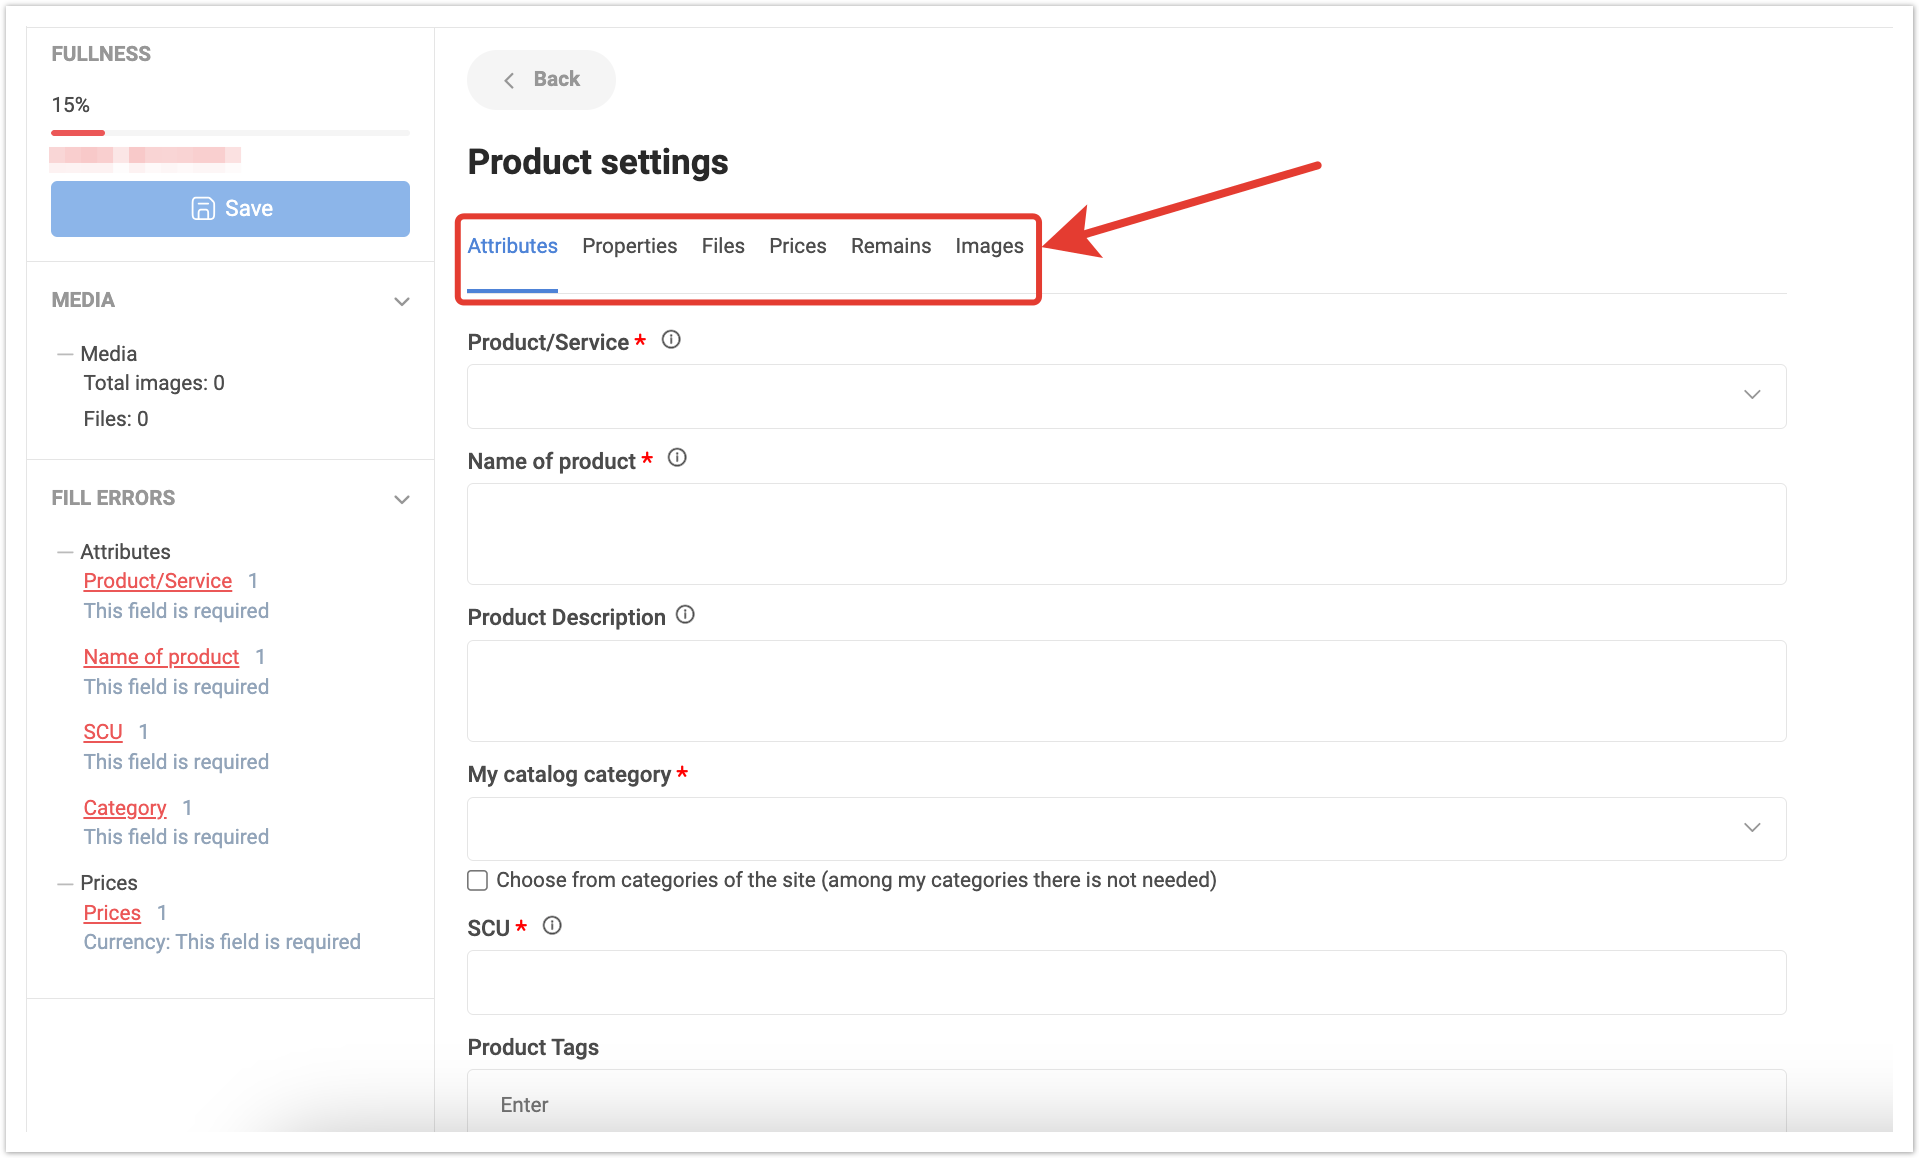
Данные по товару находятся на нескольких вкладках: Атрибуты, Свойства, Файлы, Цены, Остатки, Изображения.
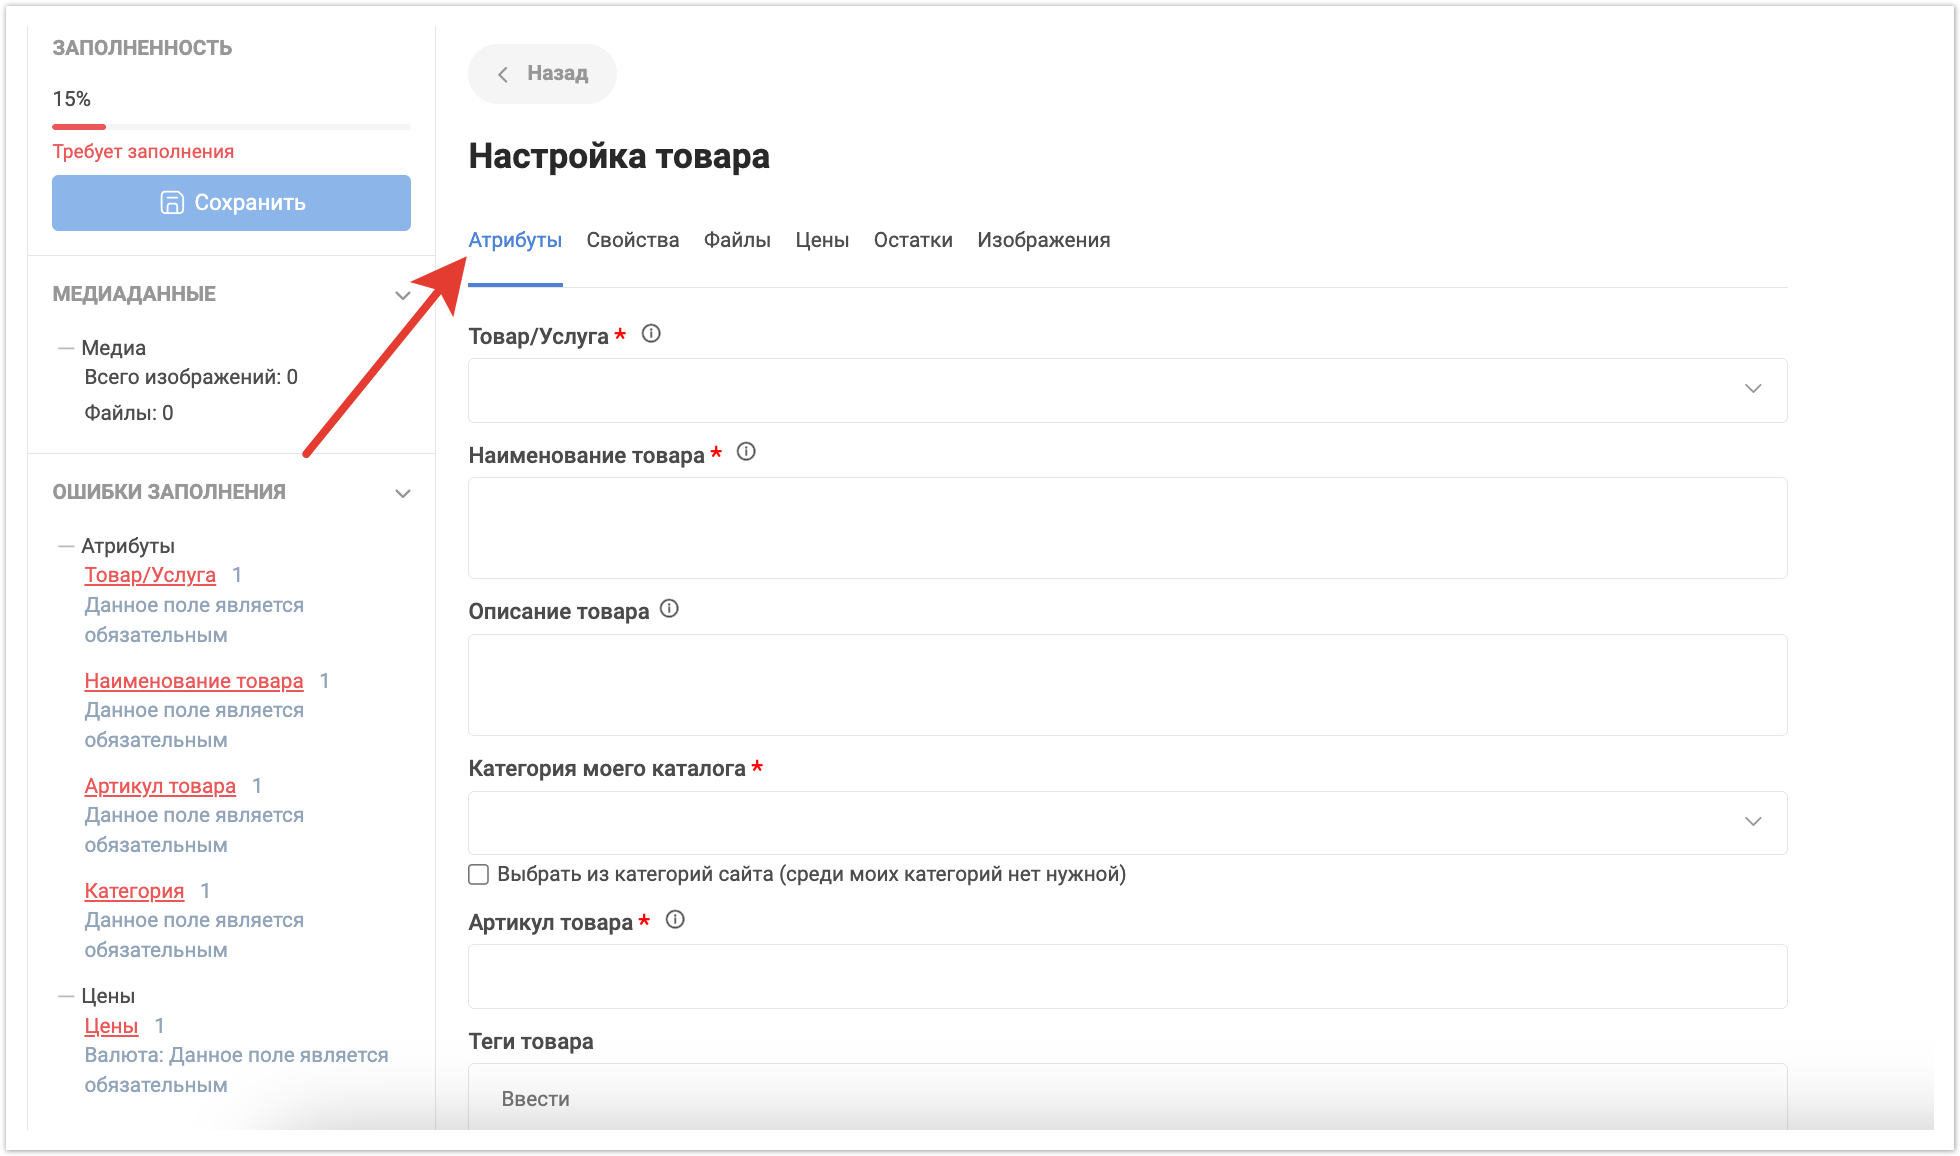
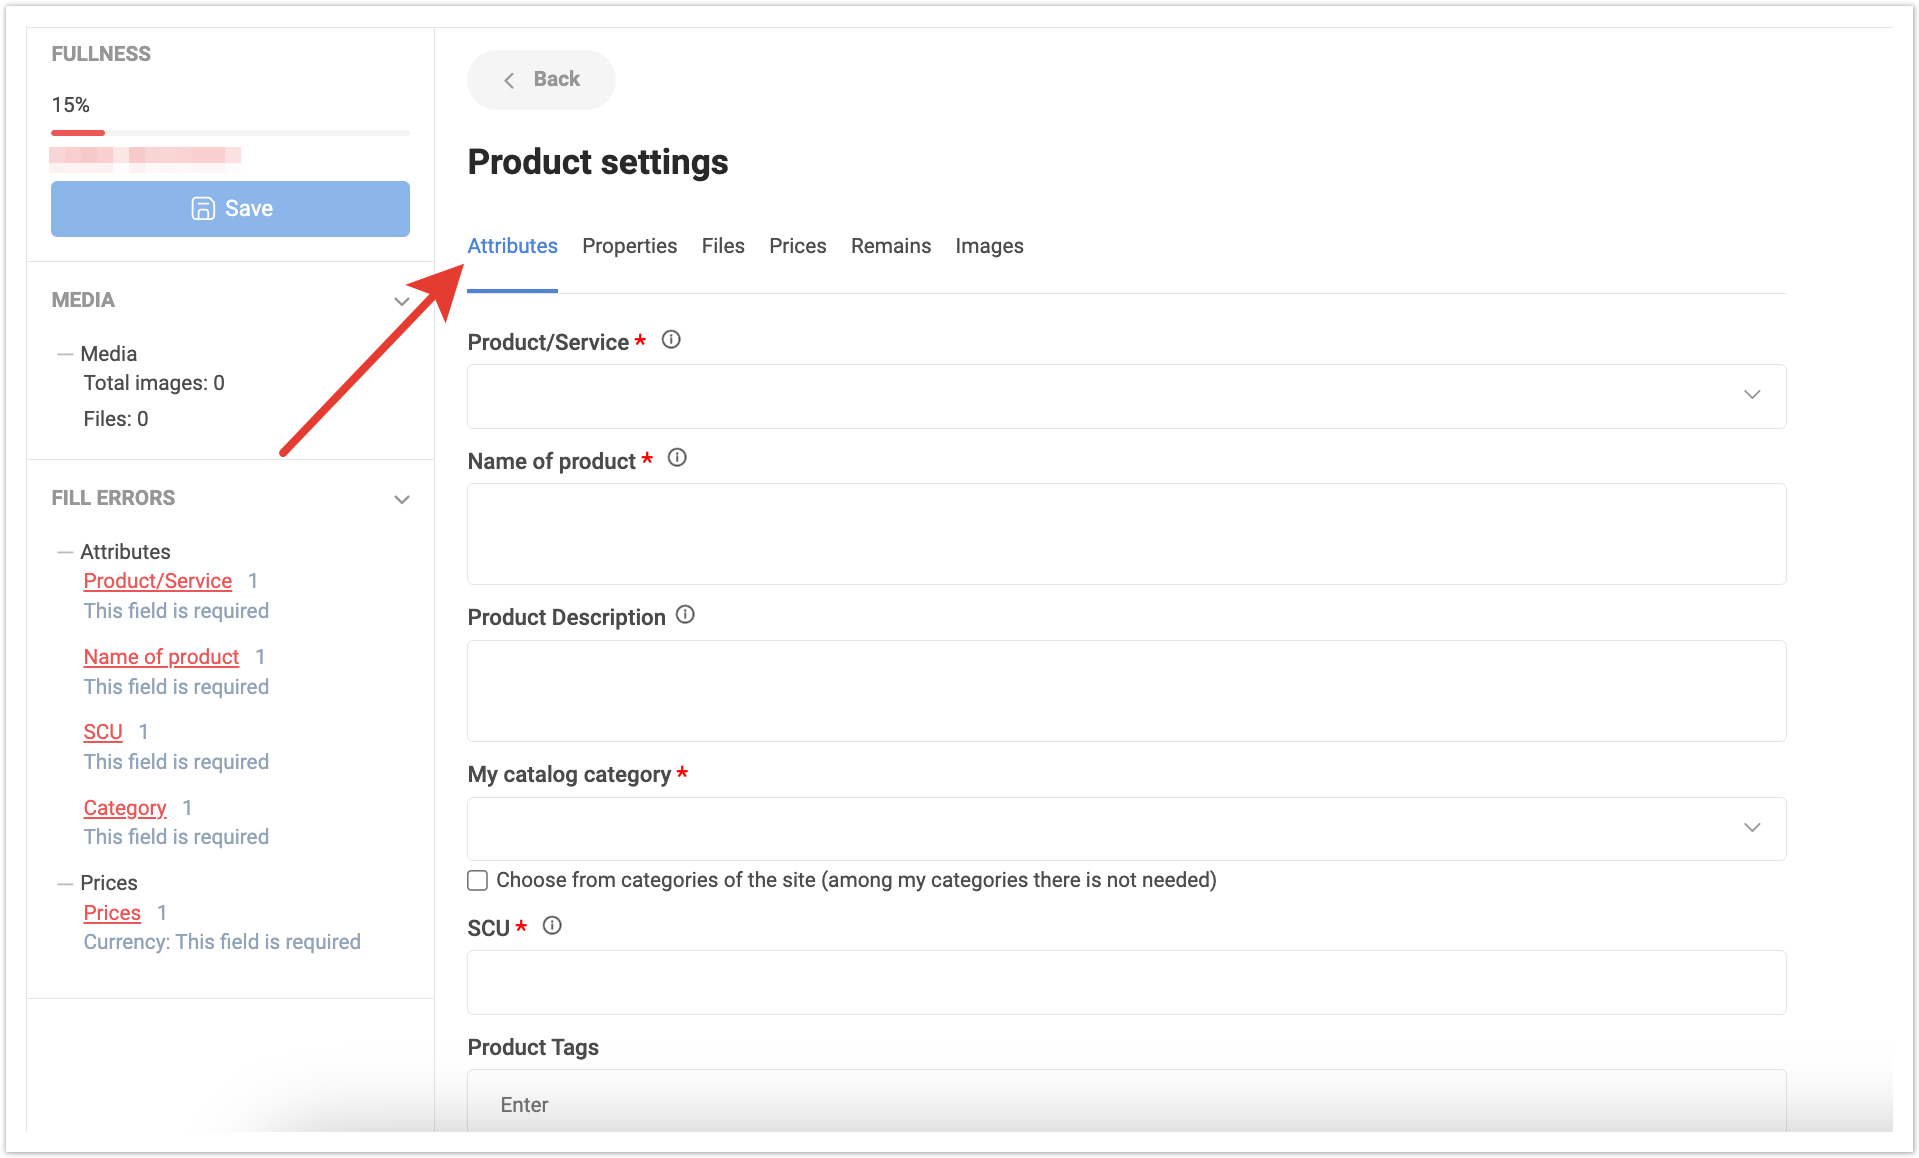
Вкладка Атрибуты содержит следующие данные:
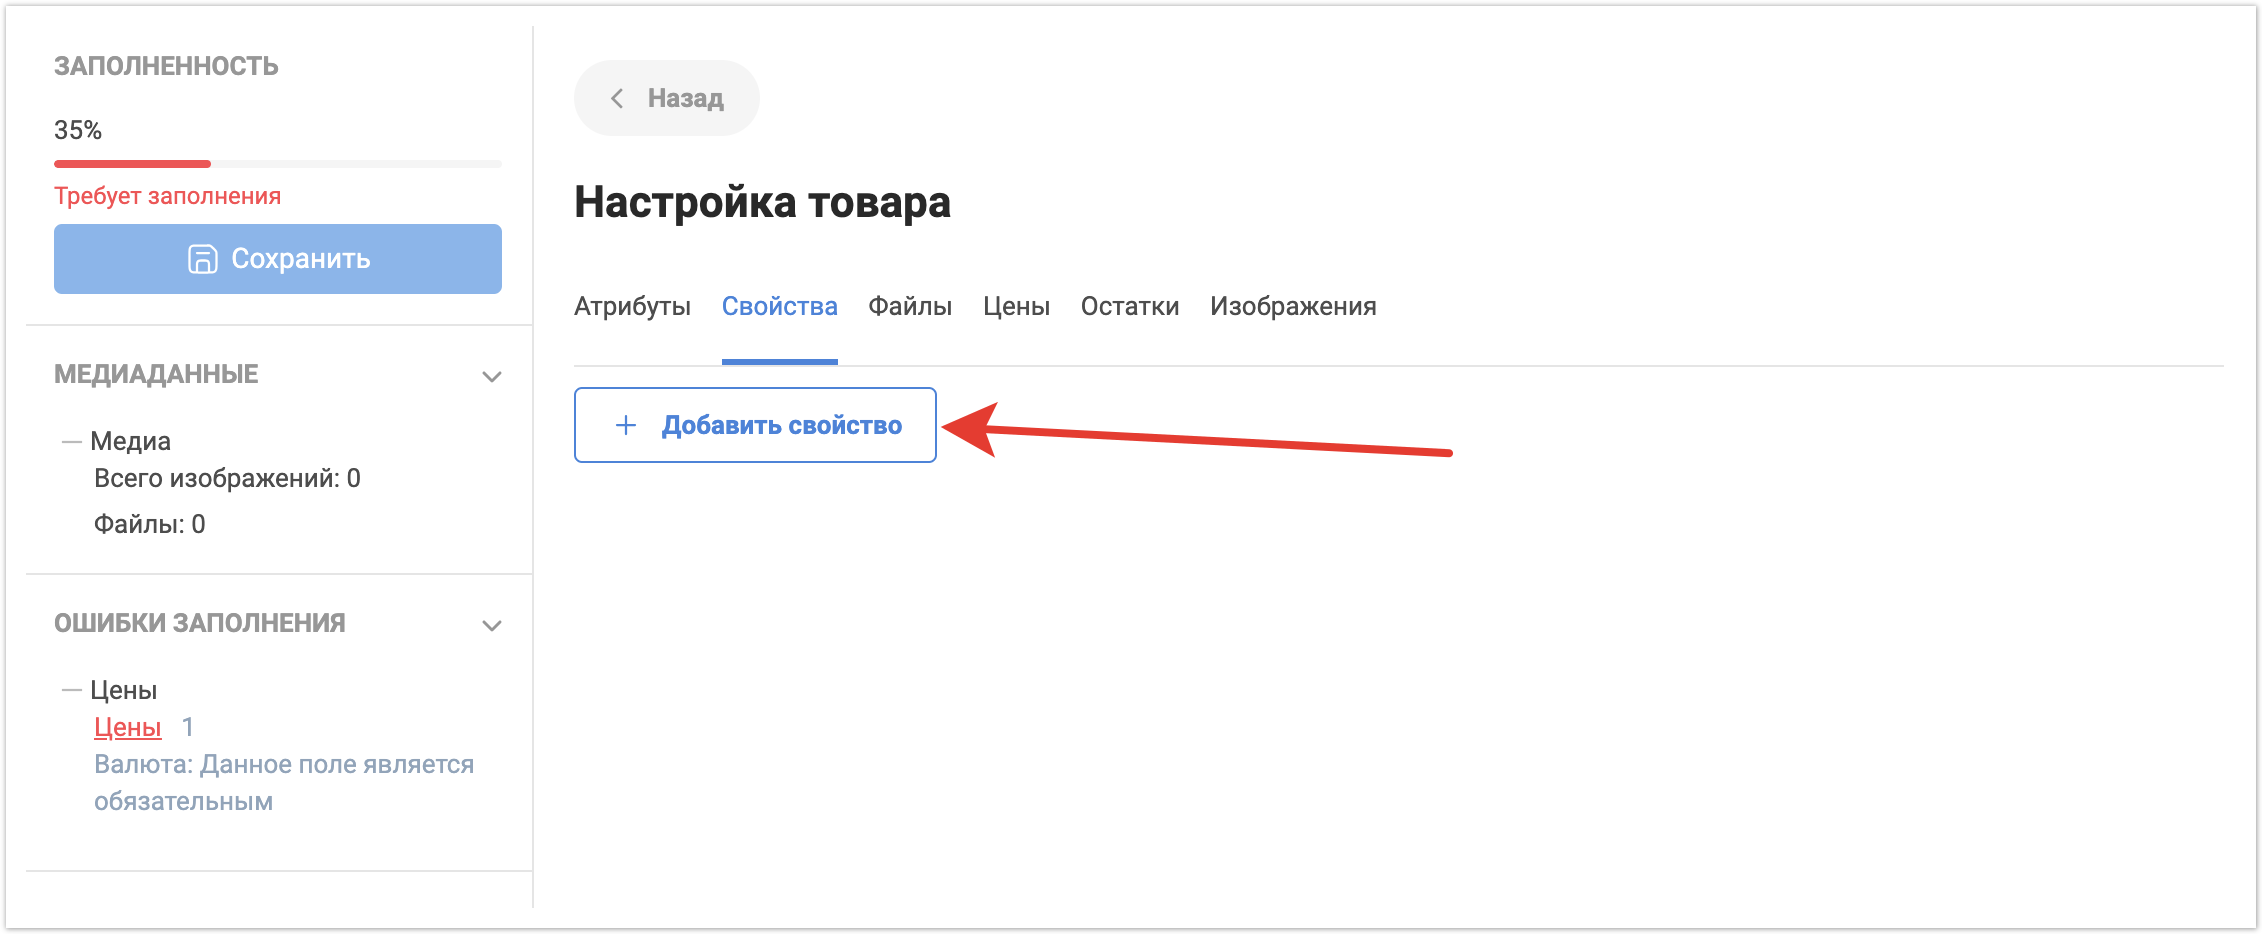
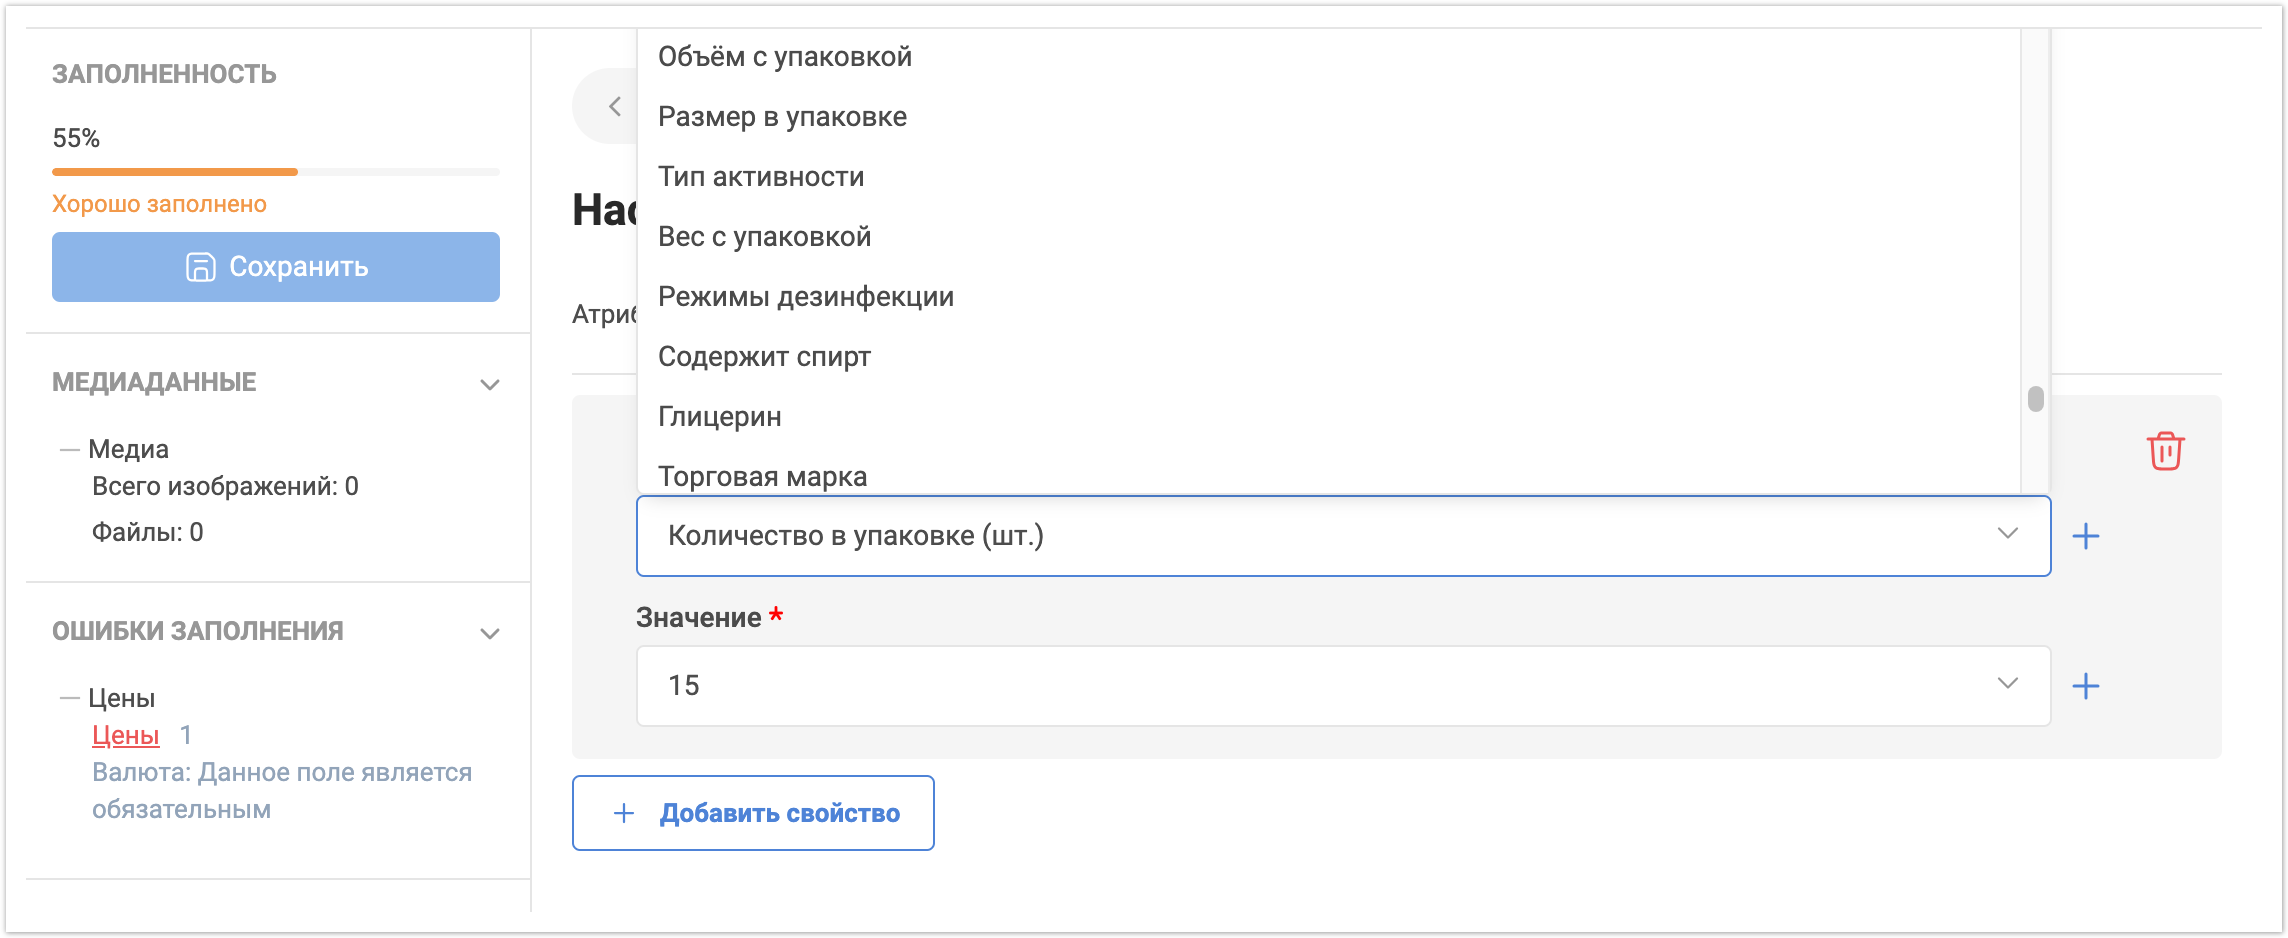
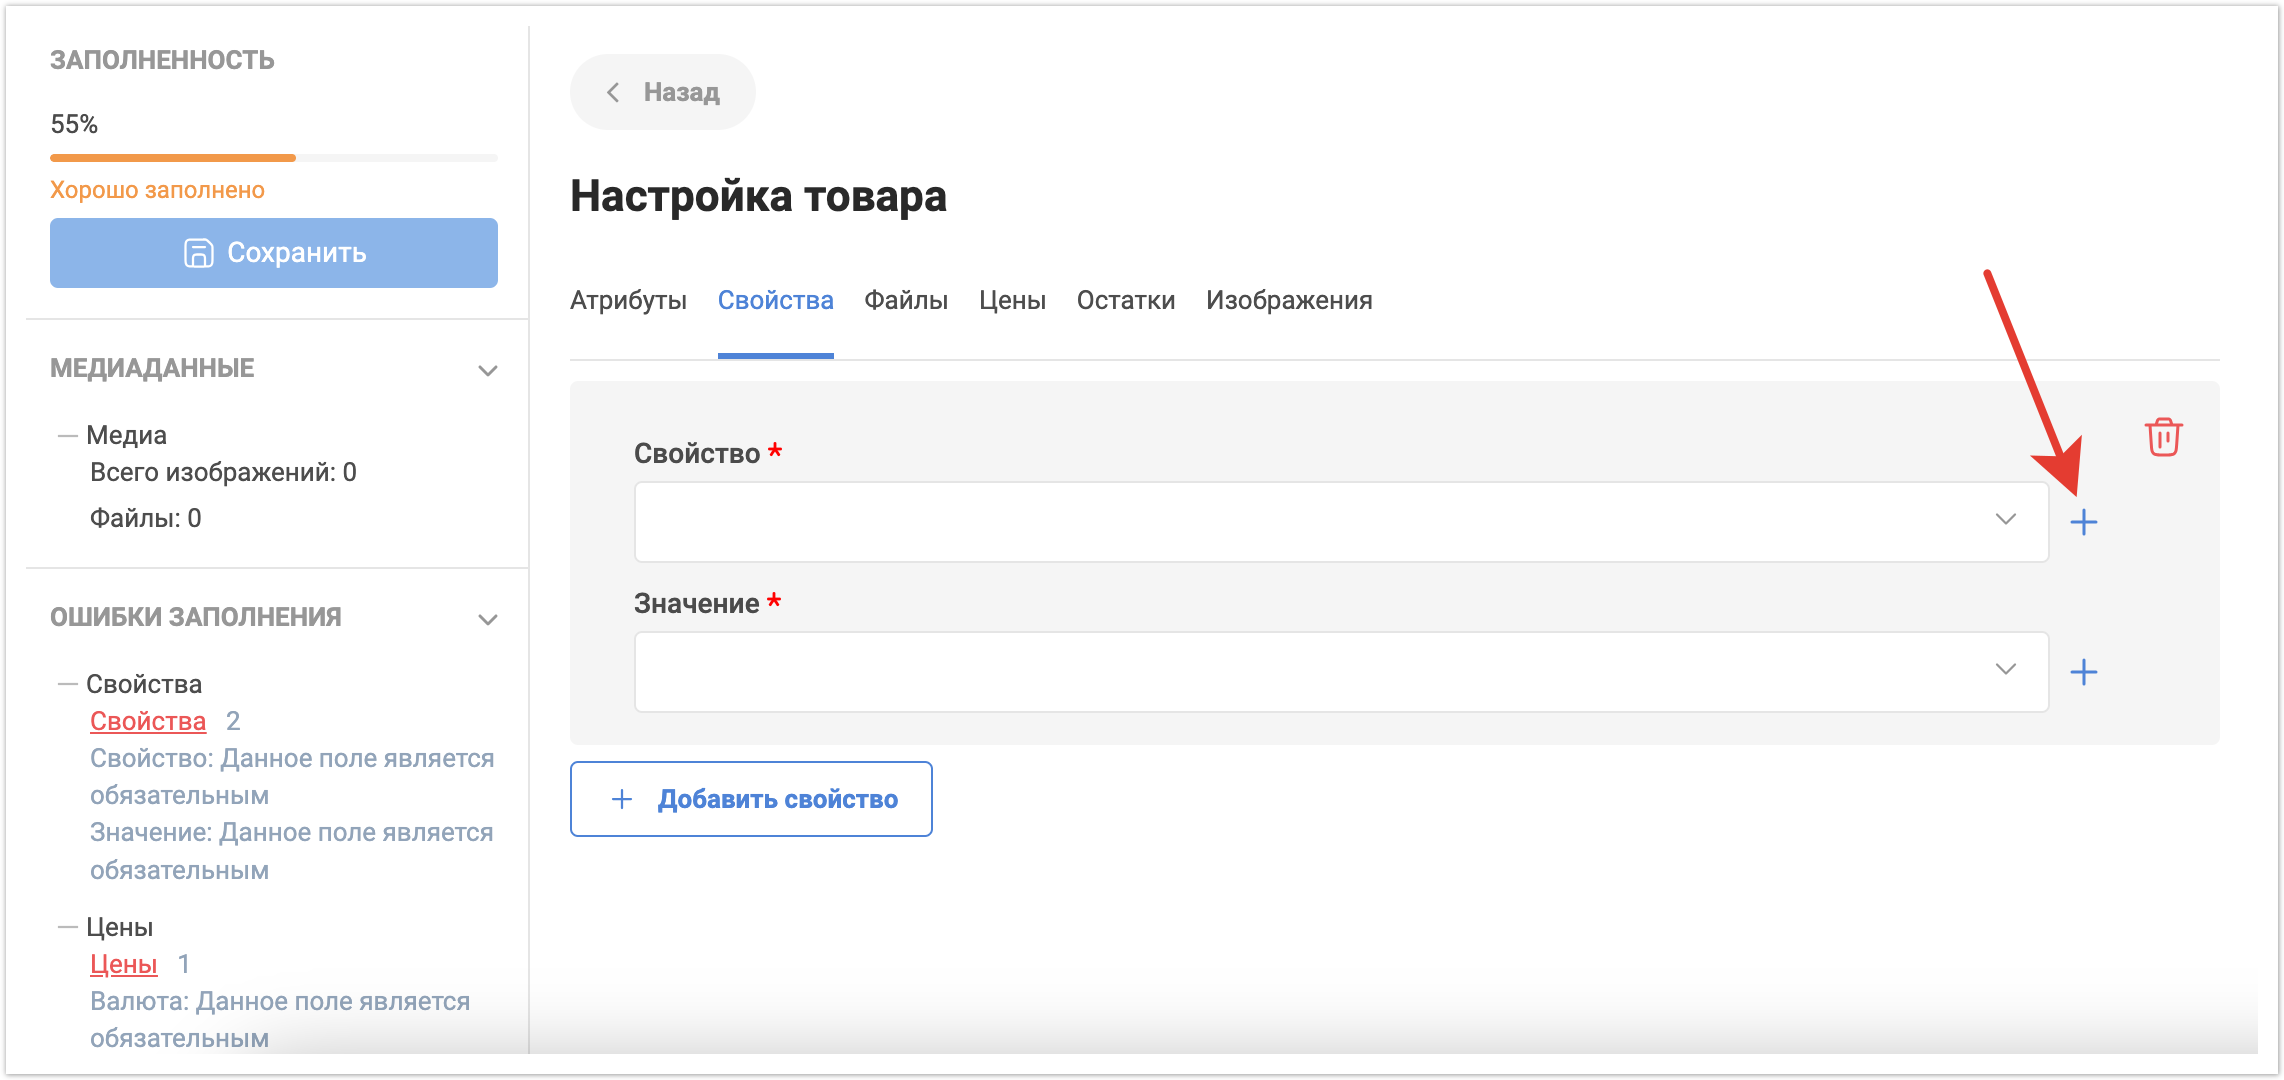
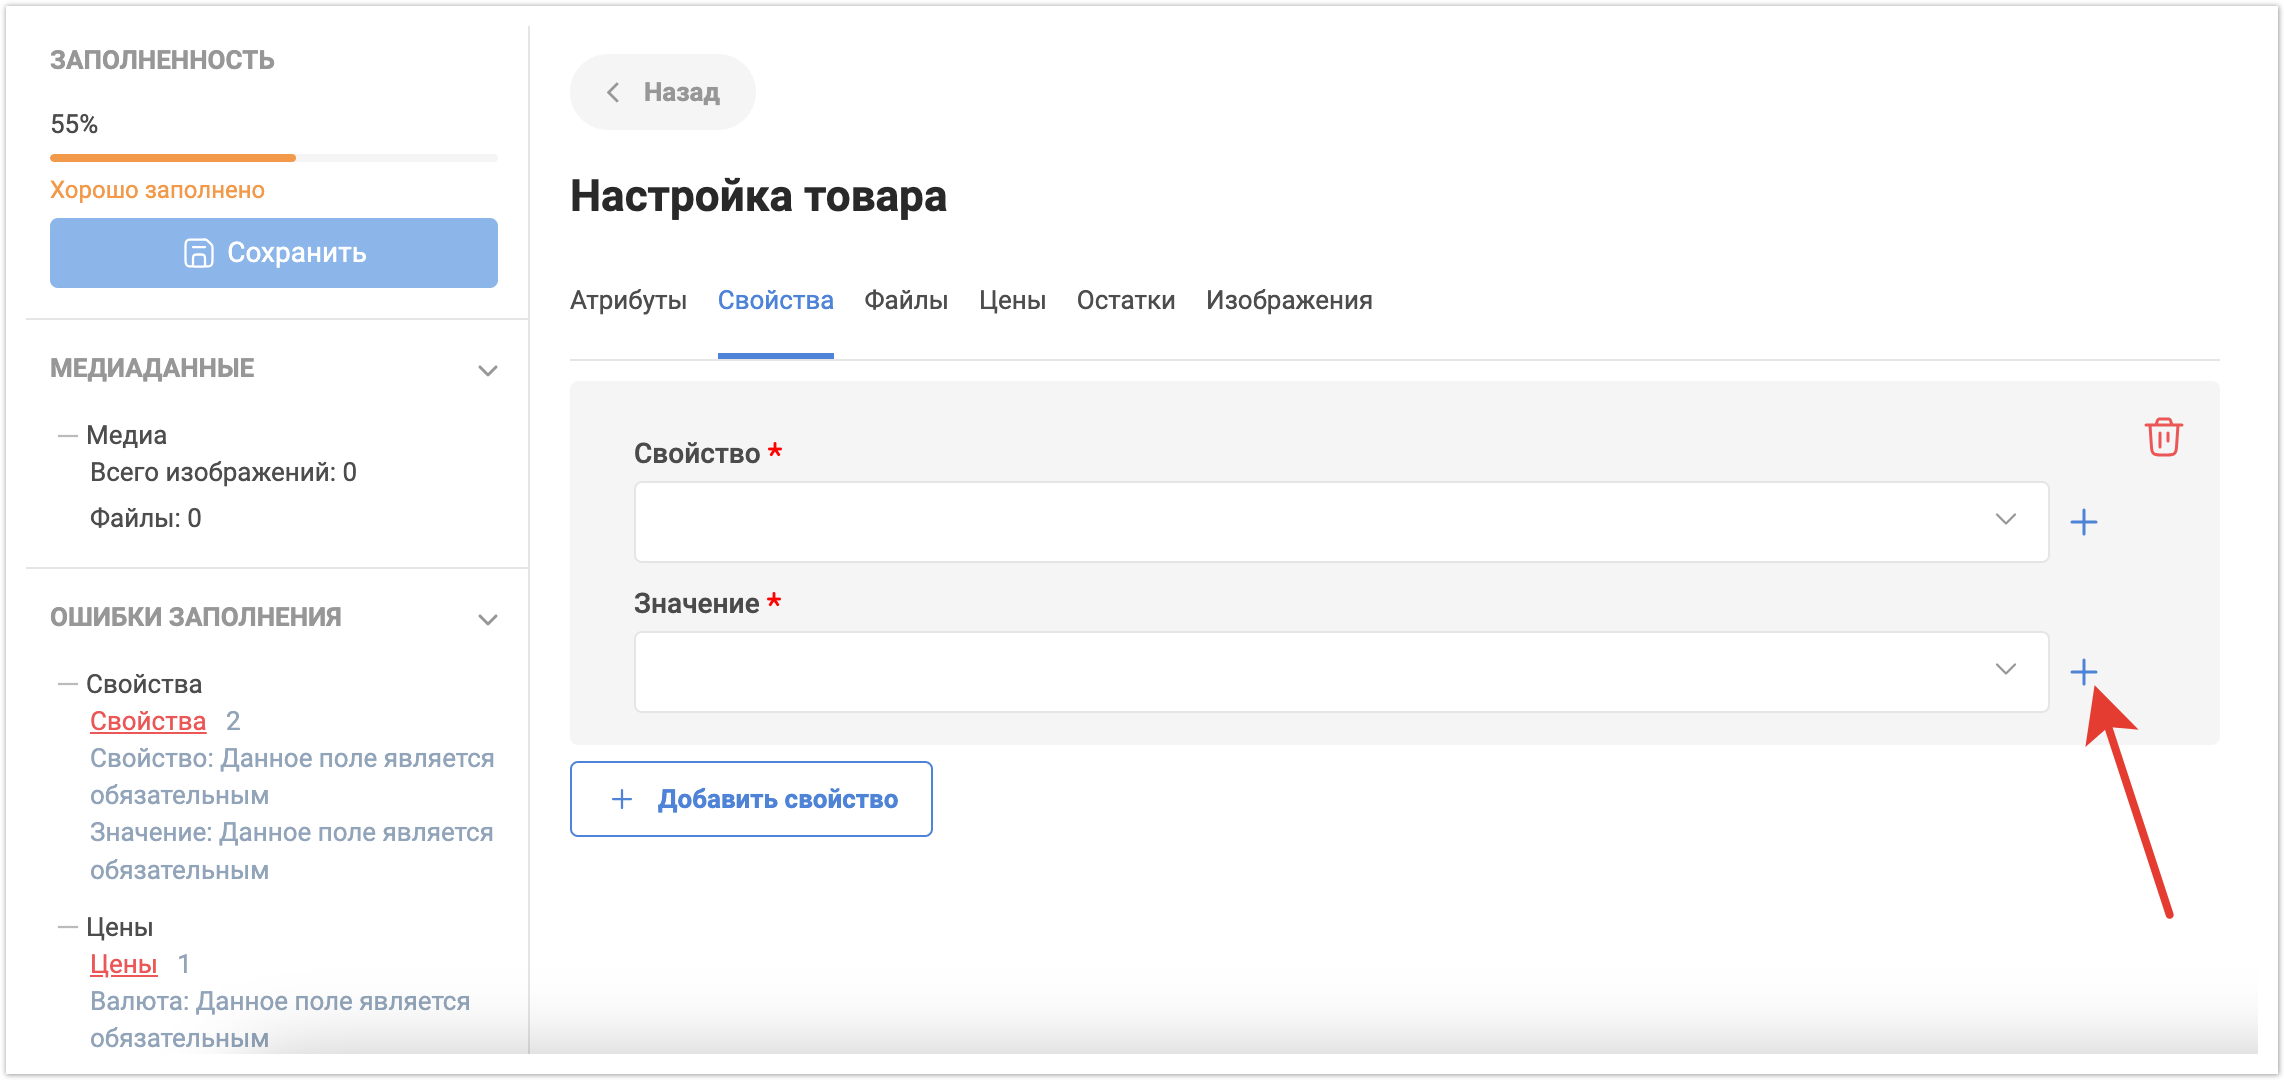
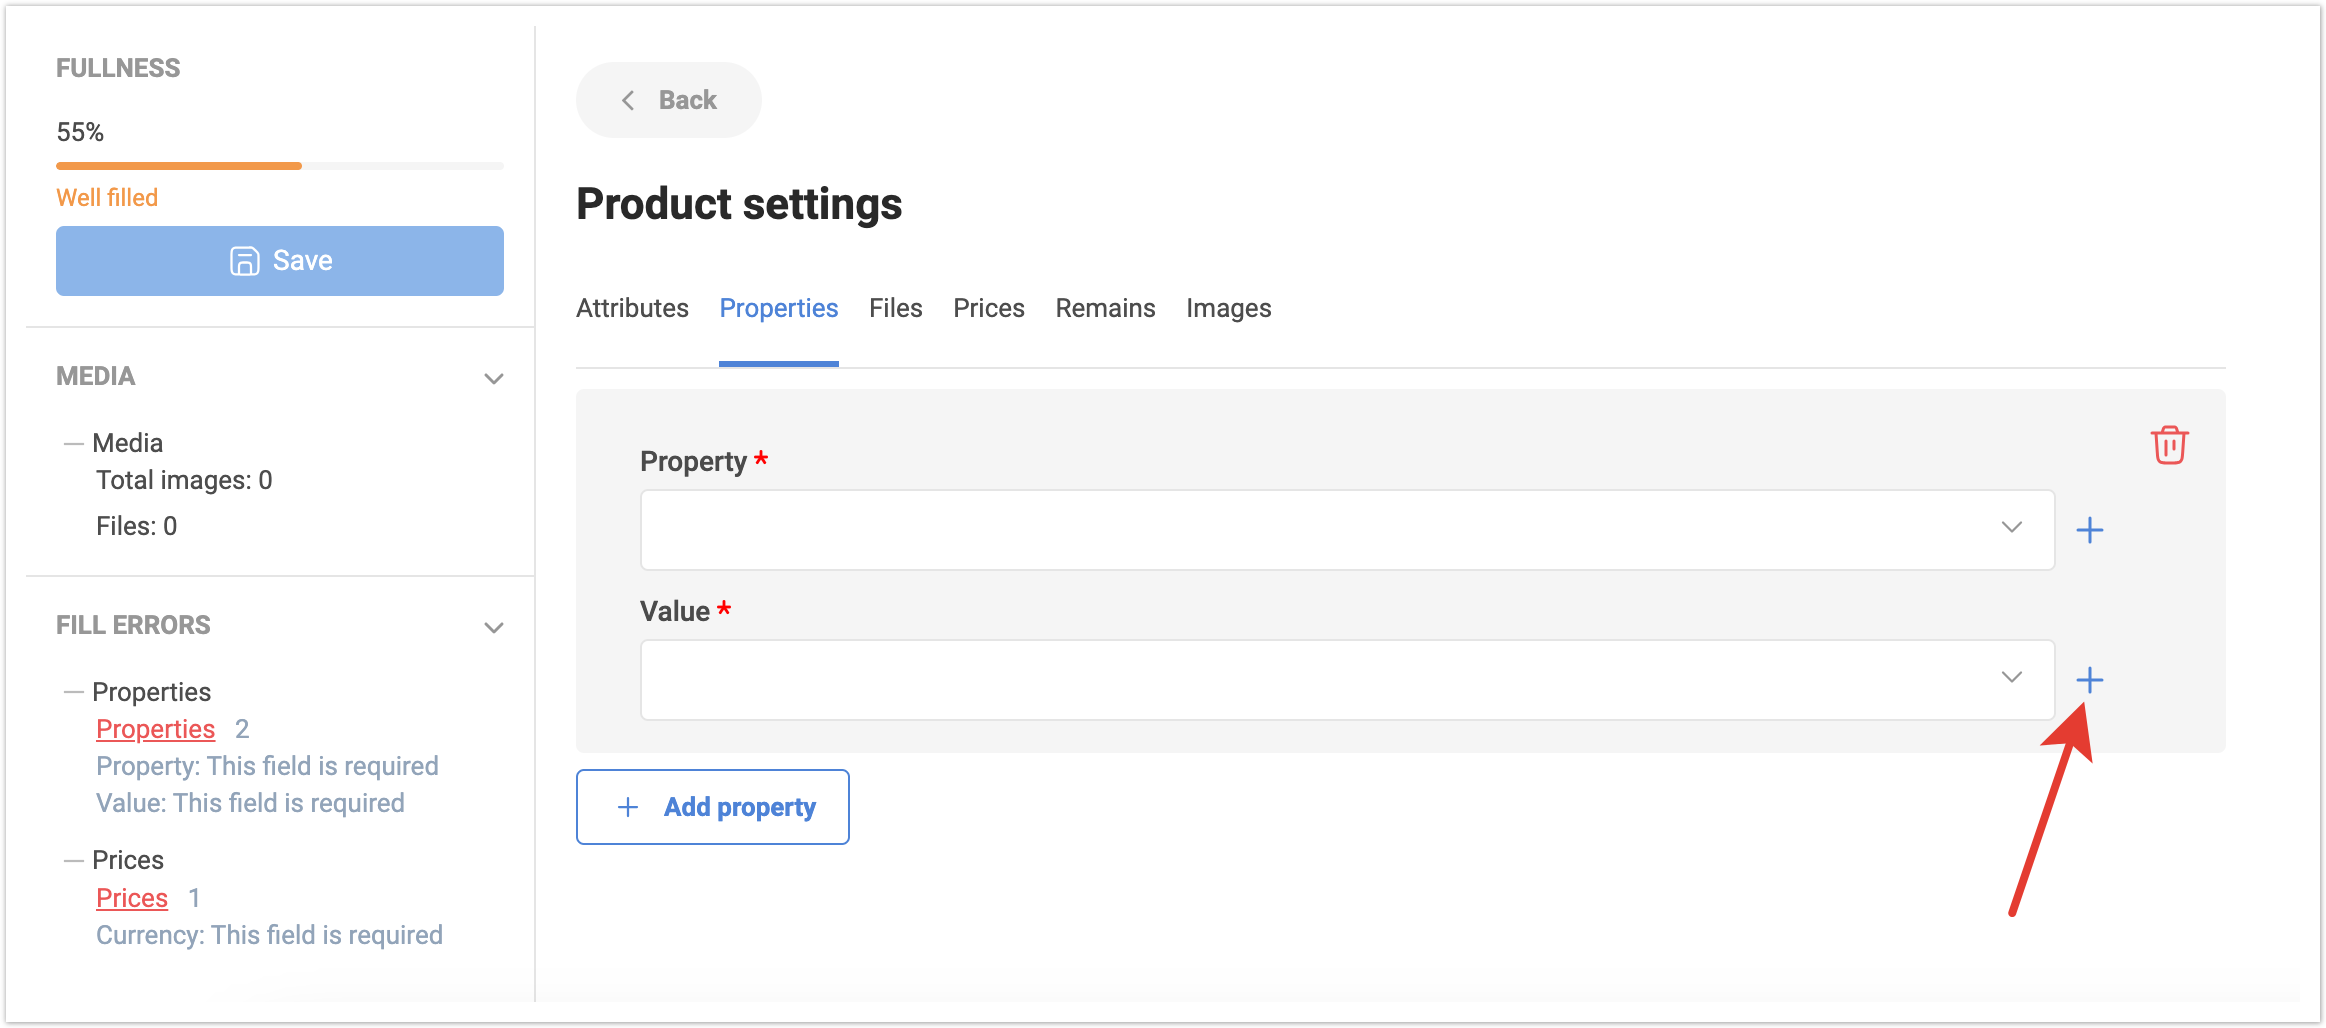
По мере заполнения обязательных полей Ошибки заполнения будут исчезать в списке. На вкладке Свойства можно добавить необходимые для товара свойства. Для этого нужно нажать на кнопку Добавить свойство.
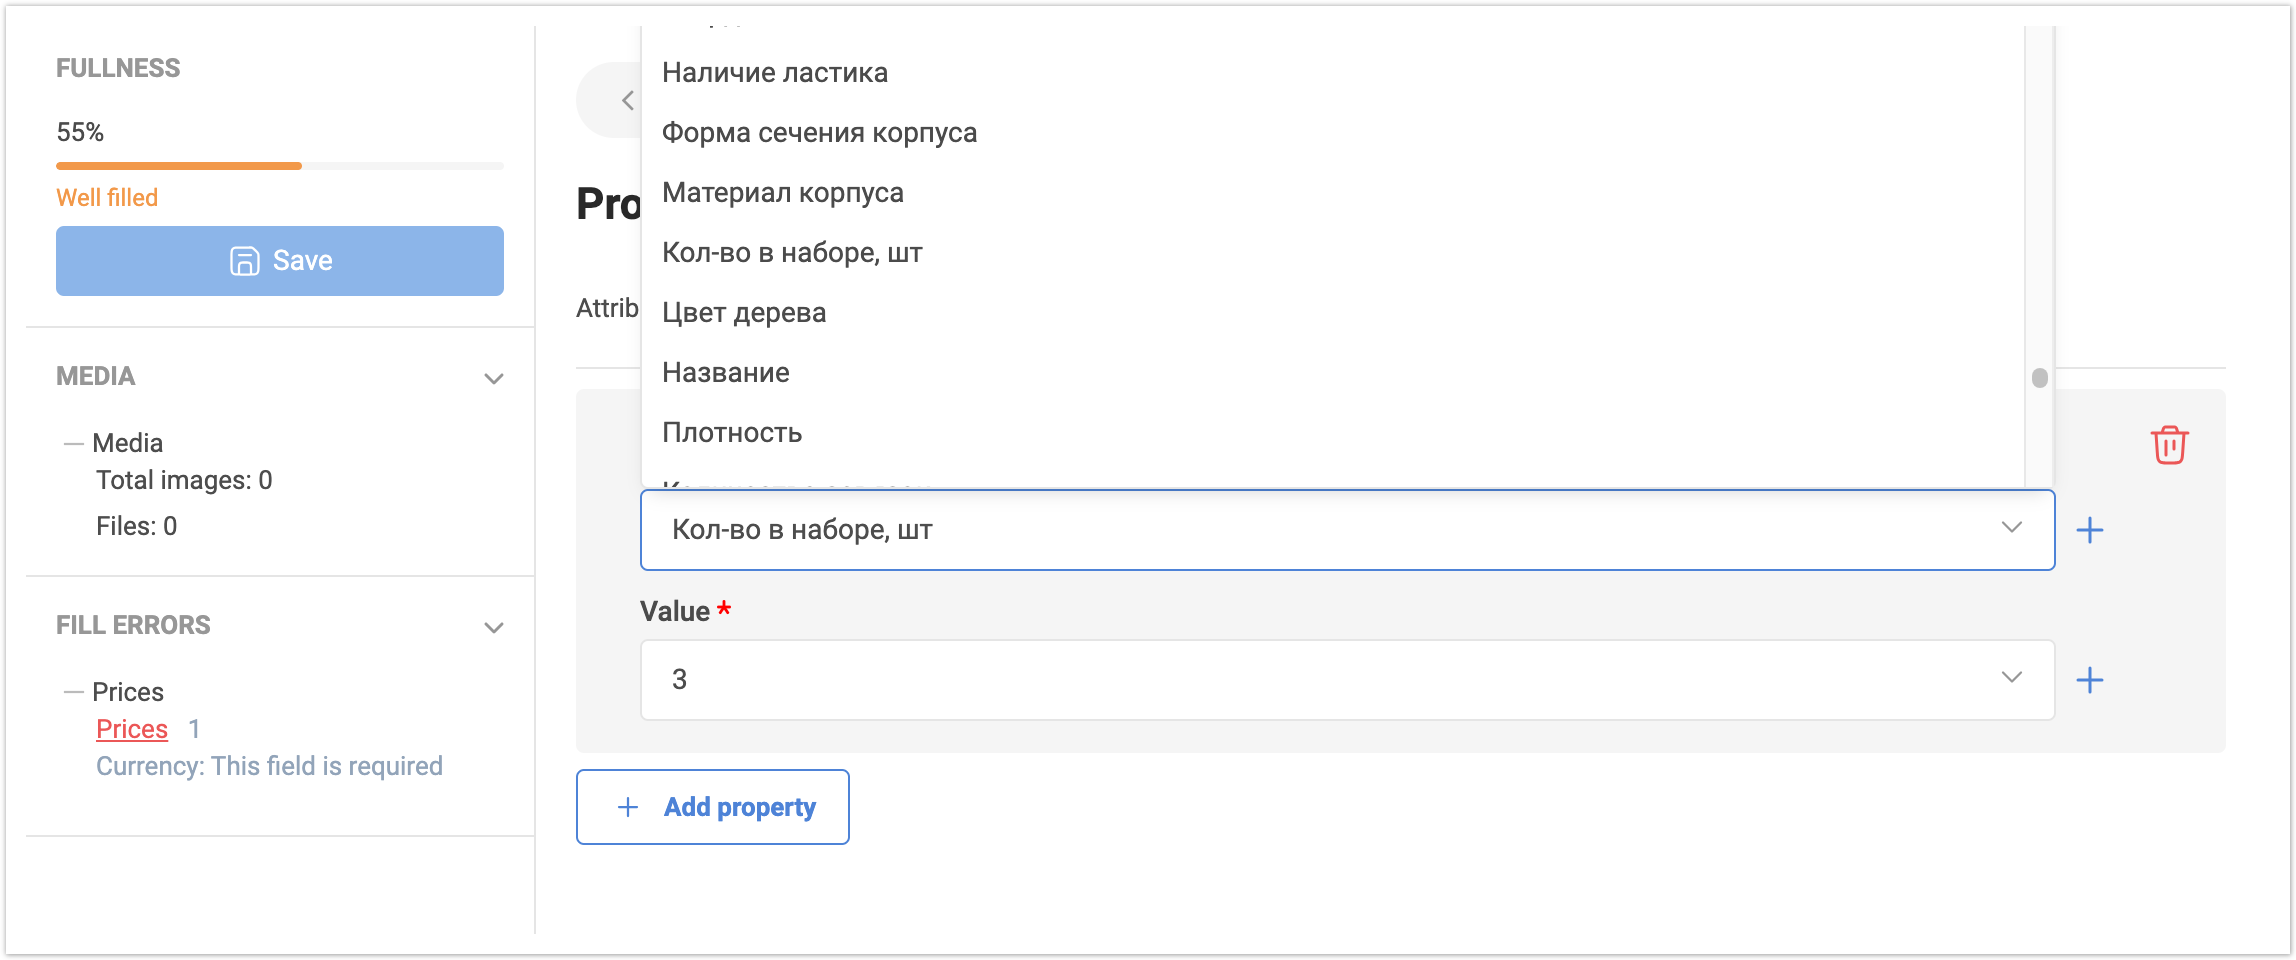
После этого нужно в списке свойств выбрать то, которое хотите добавить, а затем выбрать его значение из списка.
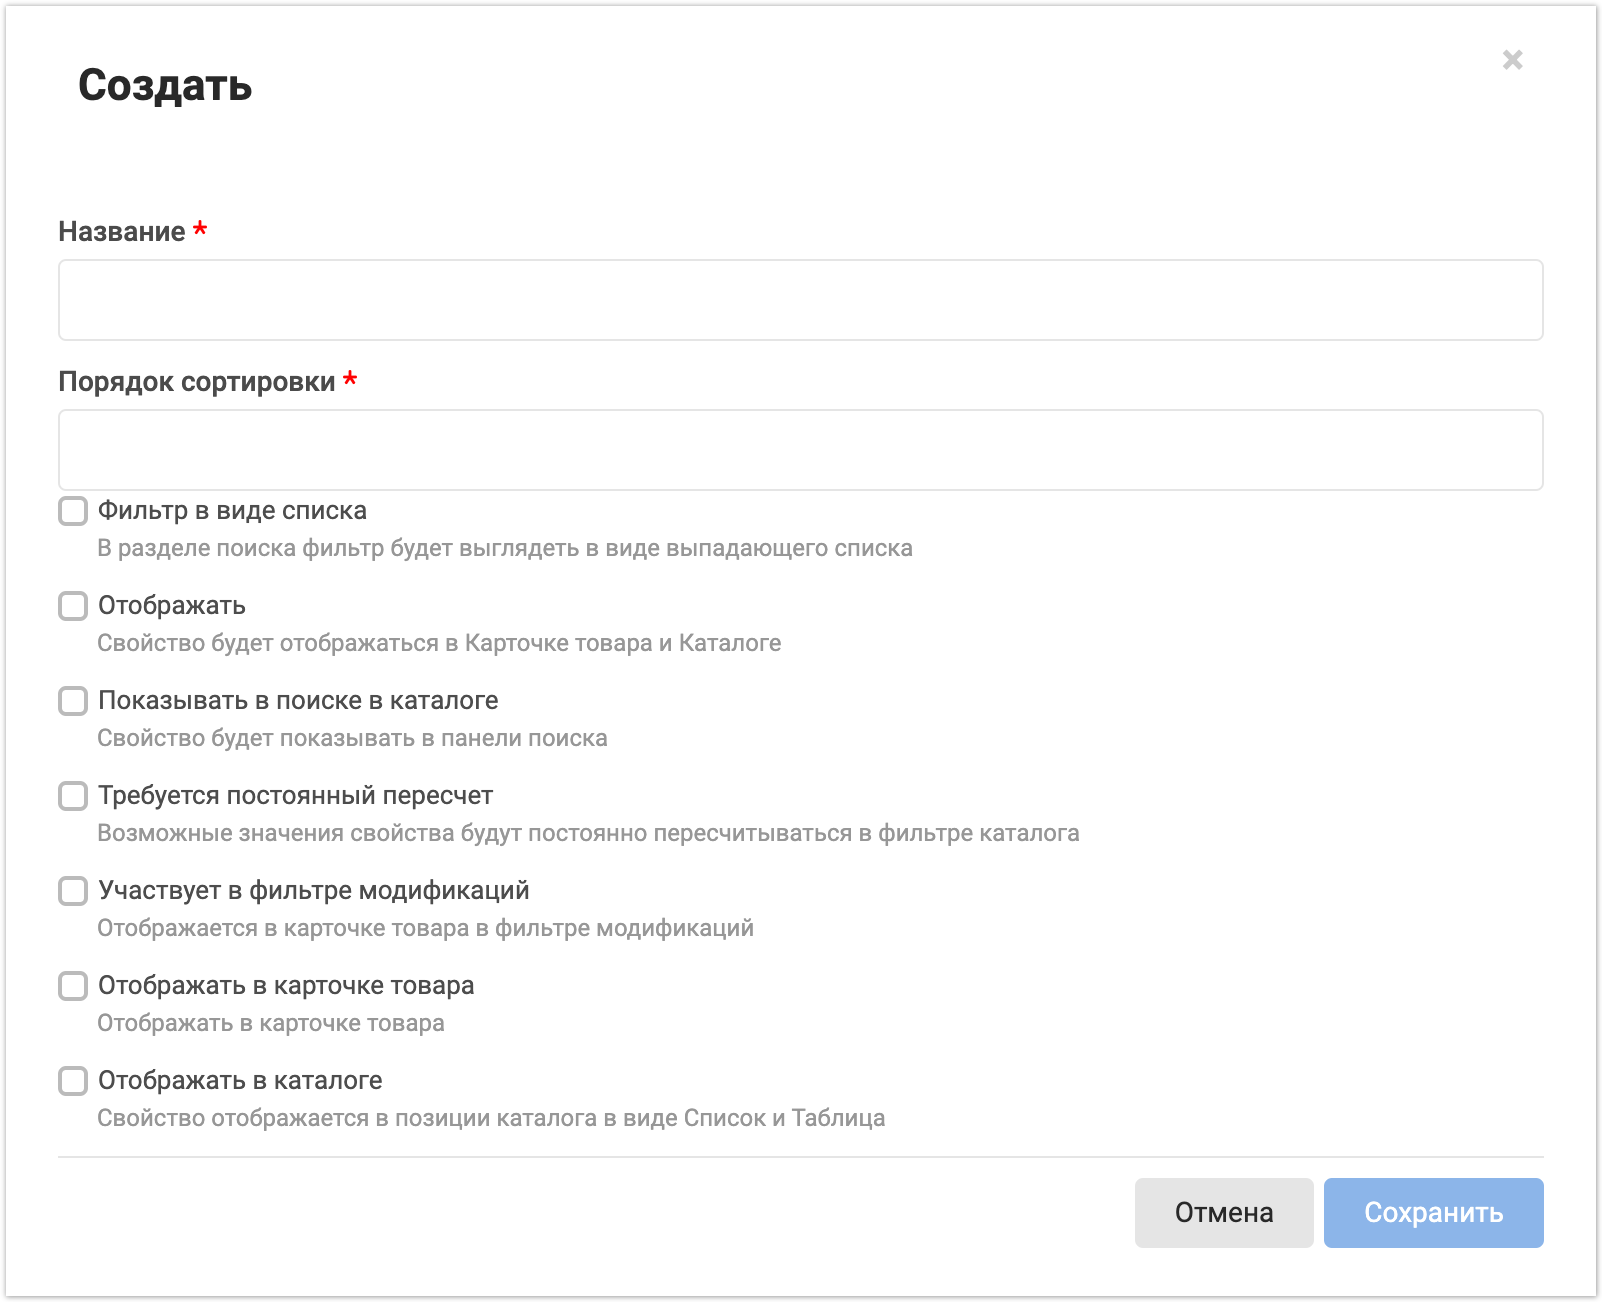
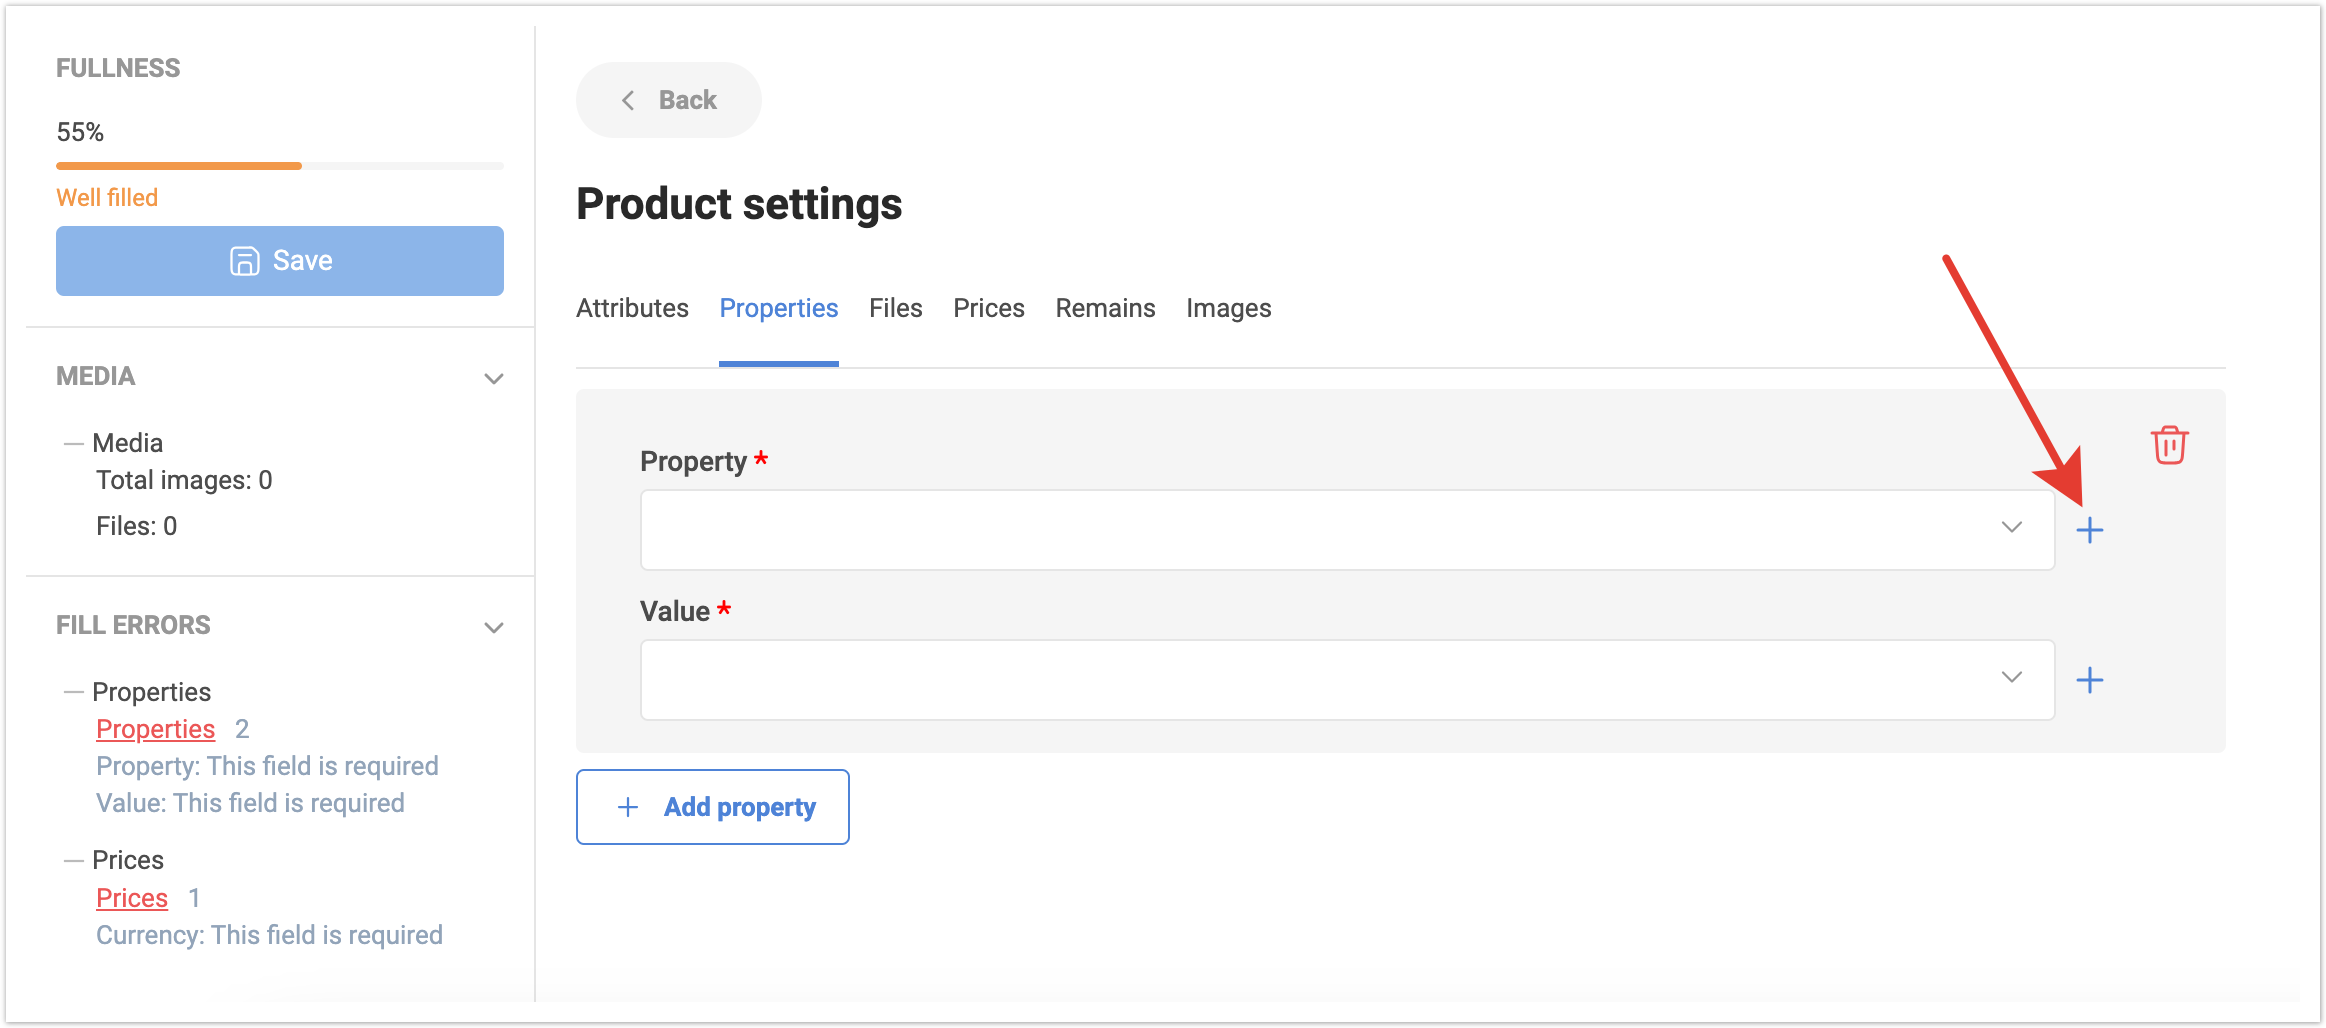
Если вы хотите добавить новое свойство, которое ранее не добавлялось, то нужно нажать на кнопку с символом “+”.
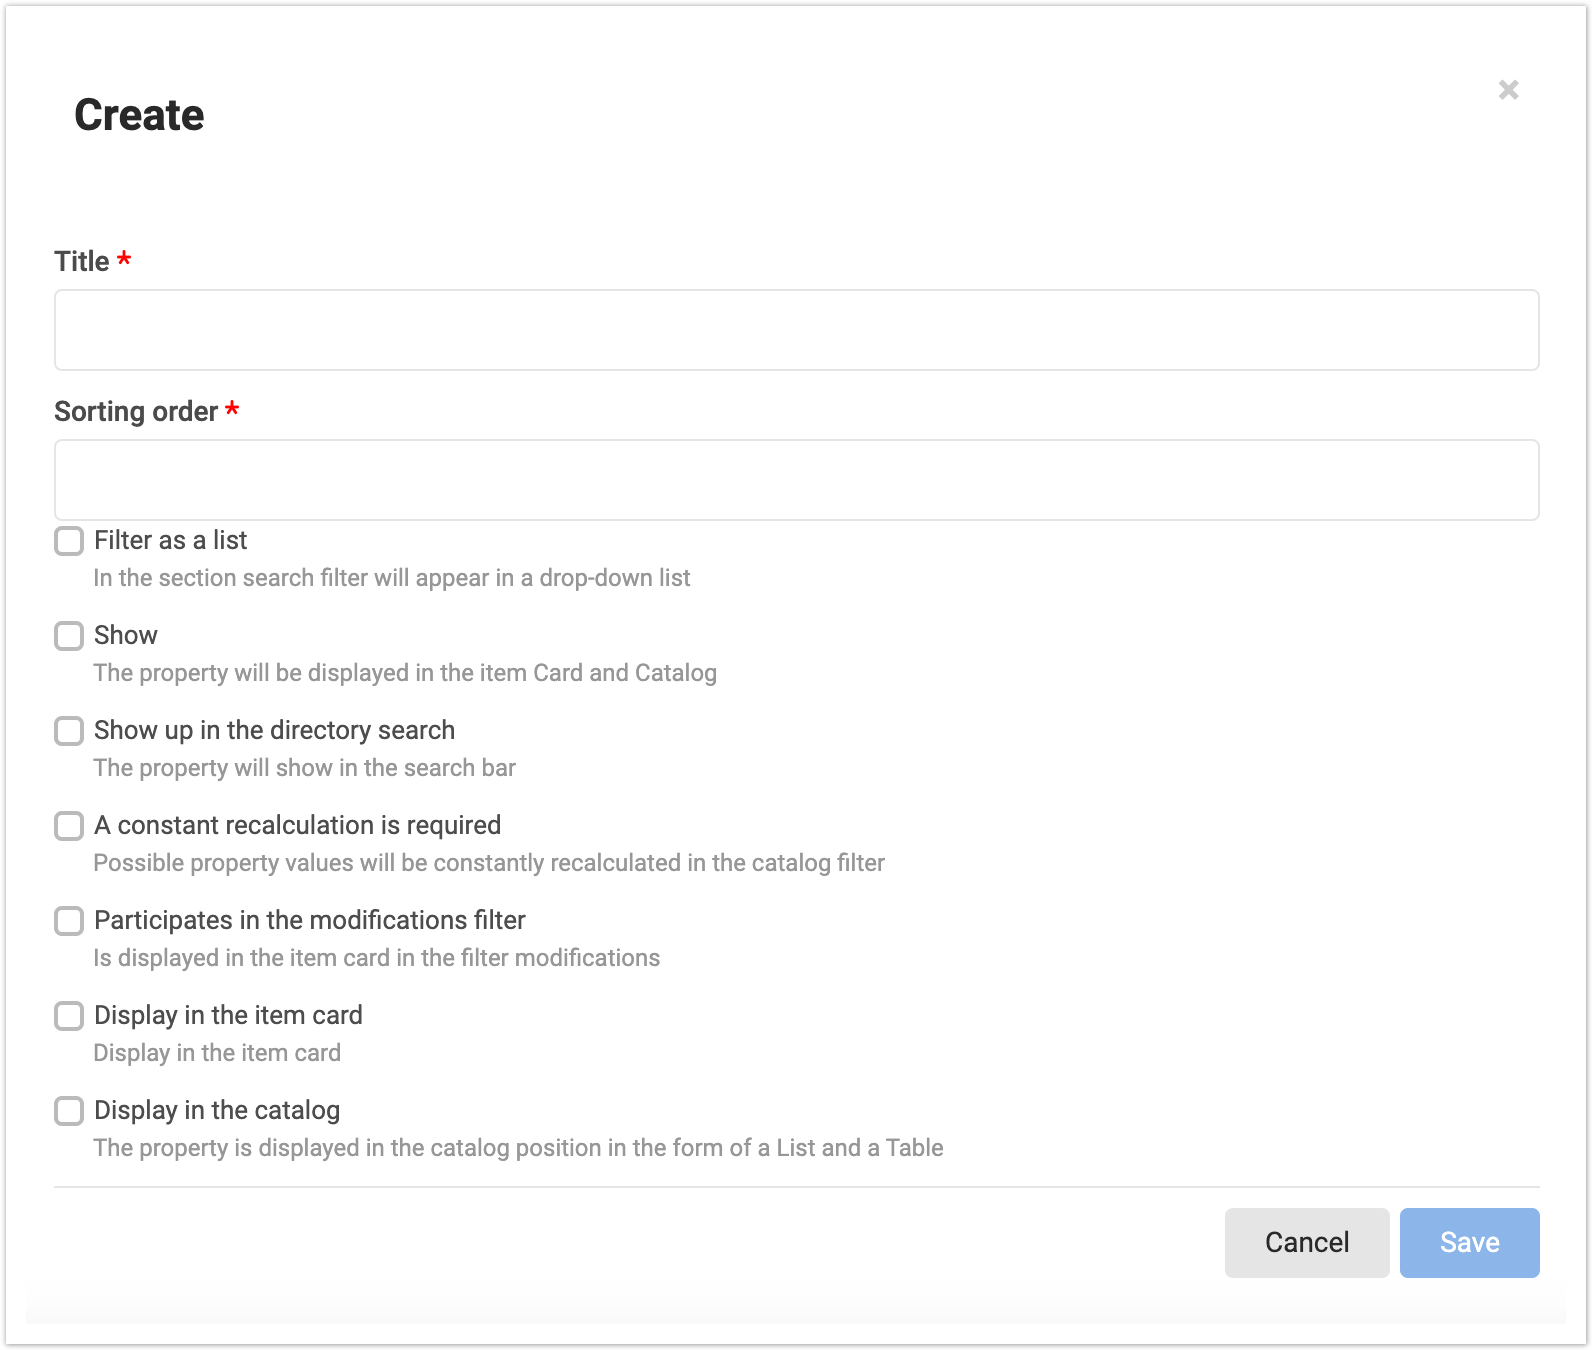
Откроется окно для добавления нового свойства. Здесь нужно будет указать Название и Порядок сортировки. А далее из списка настроек выбрать нужные для добавляемого свойства. Фильтр в виде списка — в расширенном поиске свойство будет отображаться в виде раскрывающегося списка, из которого можно выбрать значения свойства товара. Если настройка выключена, то значения свойства будут отображаться в виде чекбоксов, где надо выставить галочки. Отображать — эта настройка отвечает за отображение свойства в каталоге и карточке товара. Если свойство не должно выводится, то достаточно снять чекбокс. Показывать в поиске каталога — настройка регулирует отображение свойства в панели поиска. Требуется постоянный перерасчет — при выборе чекбокса значения свойства будут пересчитываться в фильтре каталога. Участвует в фильтре модификаций — при выборе чекбокса данное свойство можно будет выбрать из фильтра модификаций в карточке товара. Отображать в карточке товара — настройка регулирует будет ли свойство отображаться в карточке товара. Отображаться в каталоге — настройка регулирует будет ли свойство отображаться в каталоге товаров (если каталог отображается в виде списка или таблицы).
После заполнения полей нужно нажать кнопку Сохранить и свойство будет добавлено, далее аналогичным образом нажав на кнопку “+” добавляем значение для этого свойства.
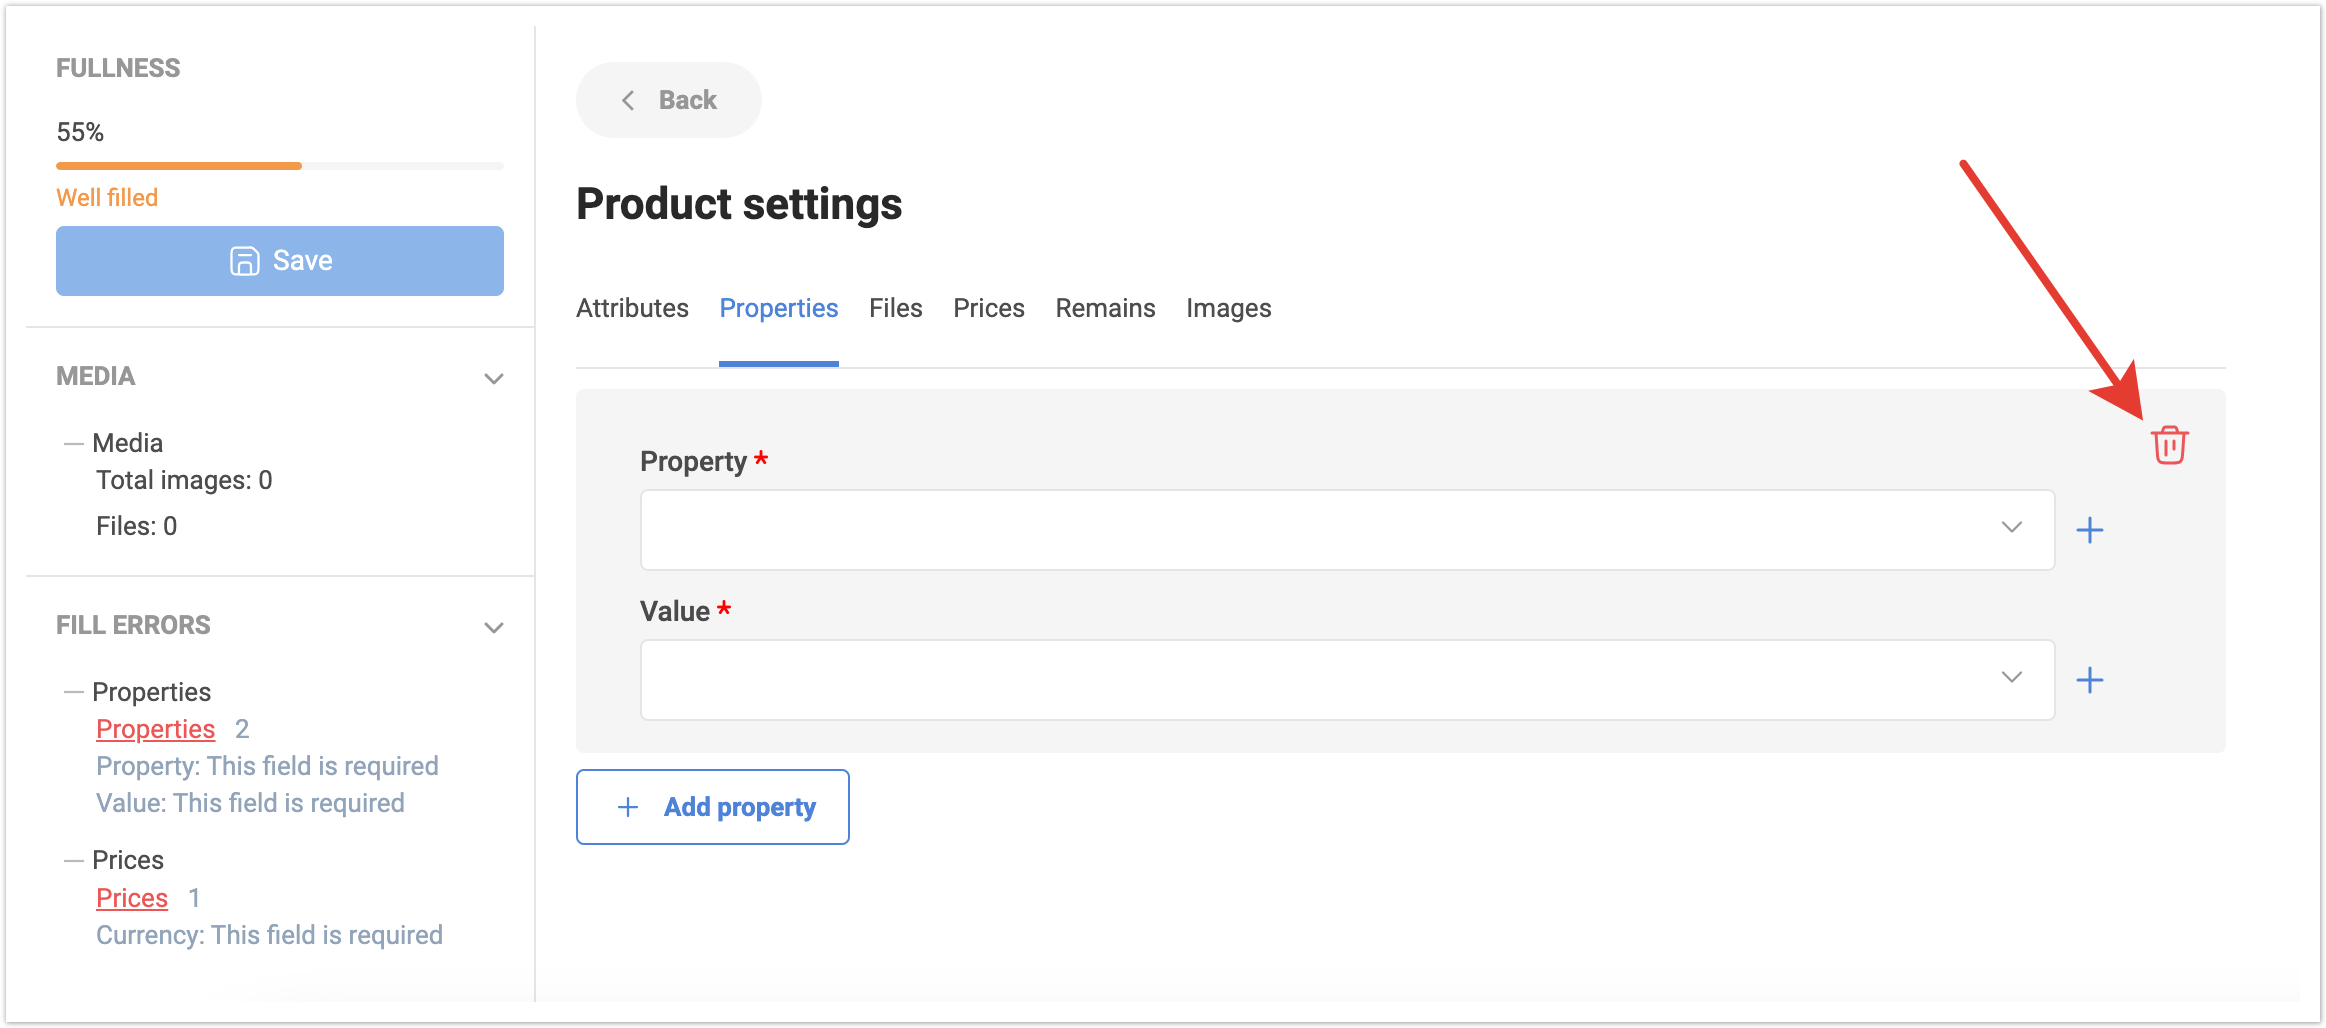
Если свойство было добавлено по ошибке, то можно его Удалить, нажав на символ корзины.
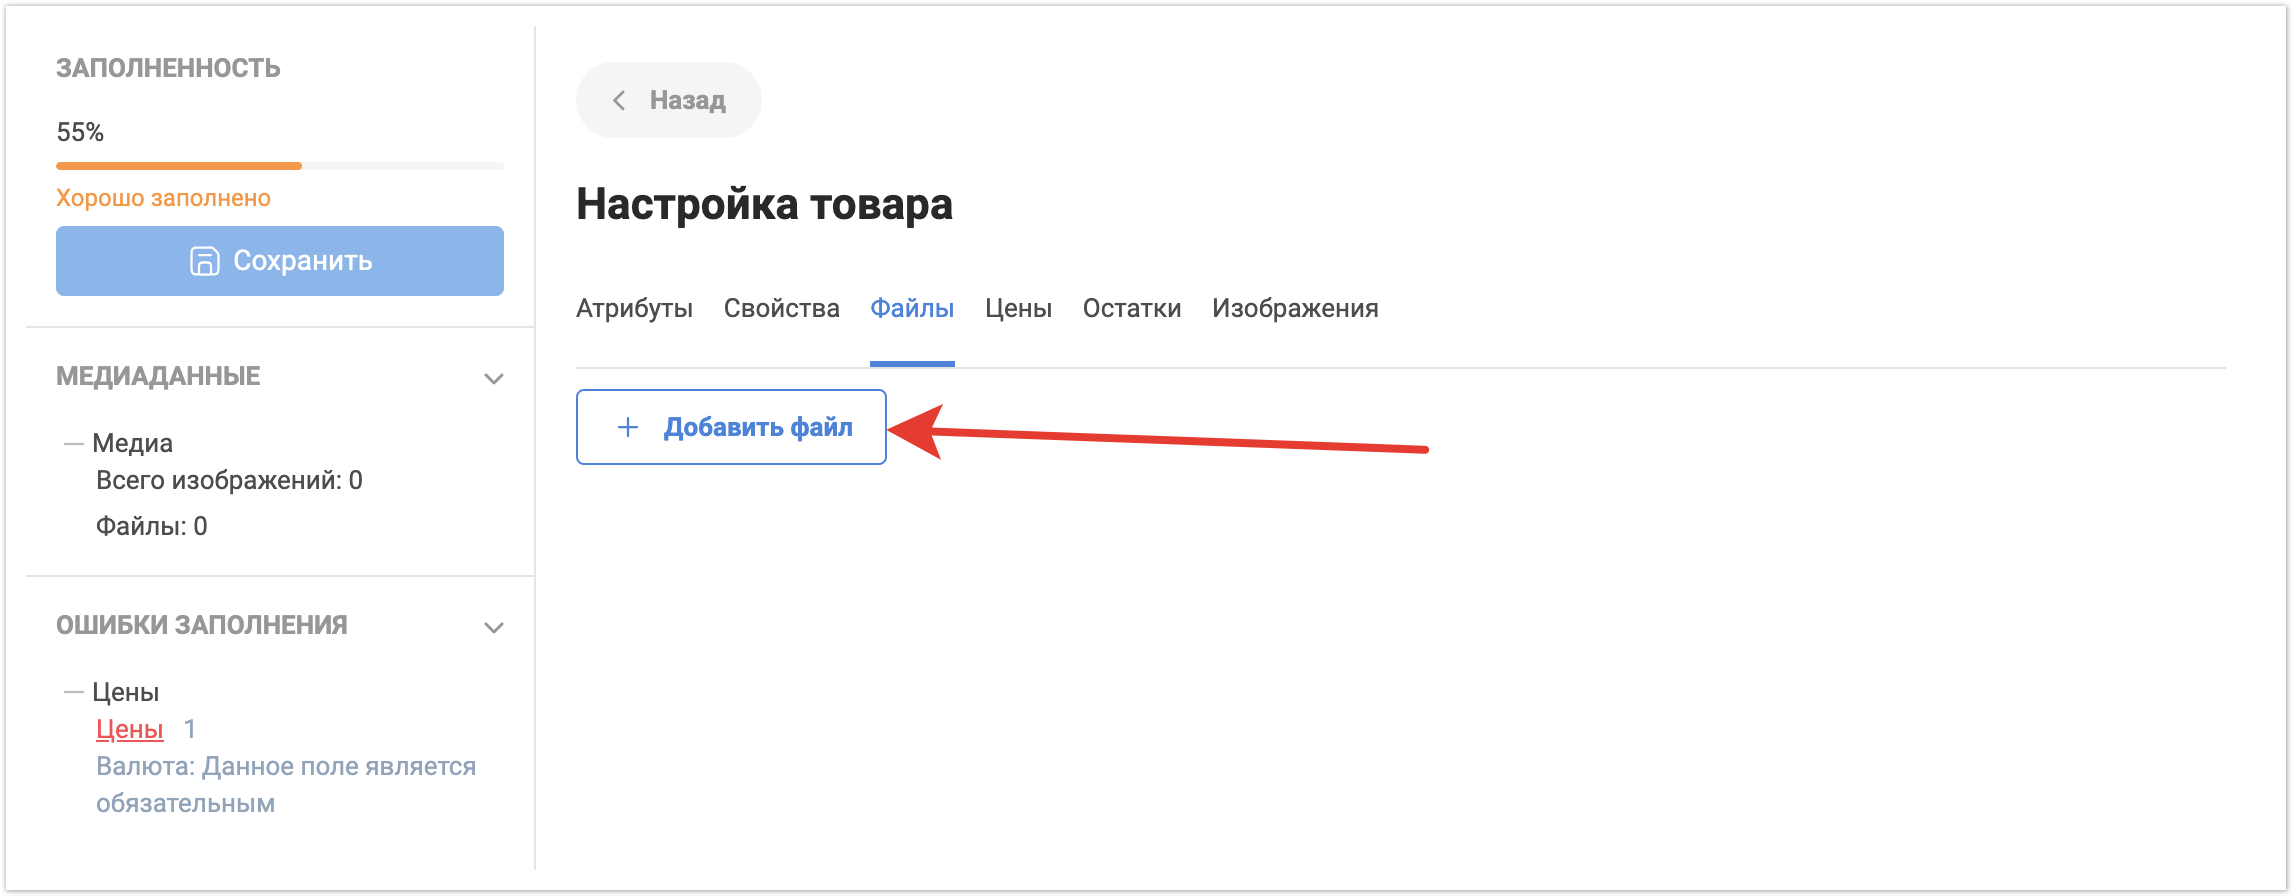
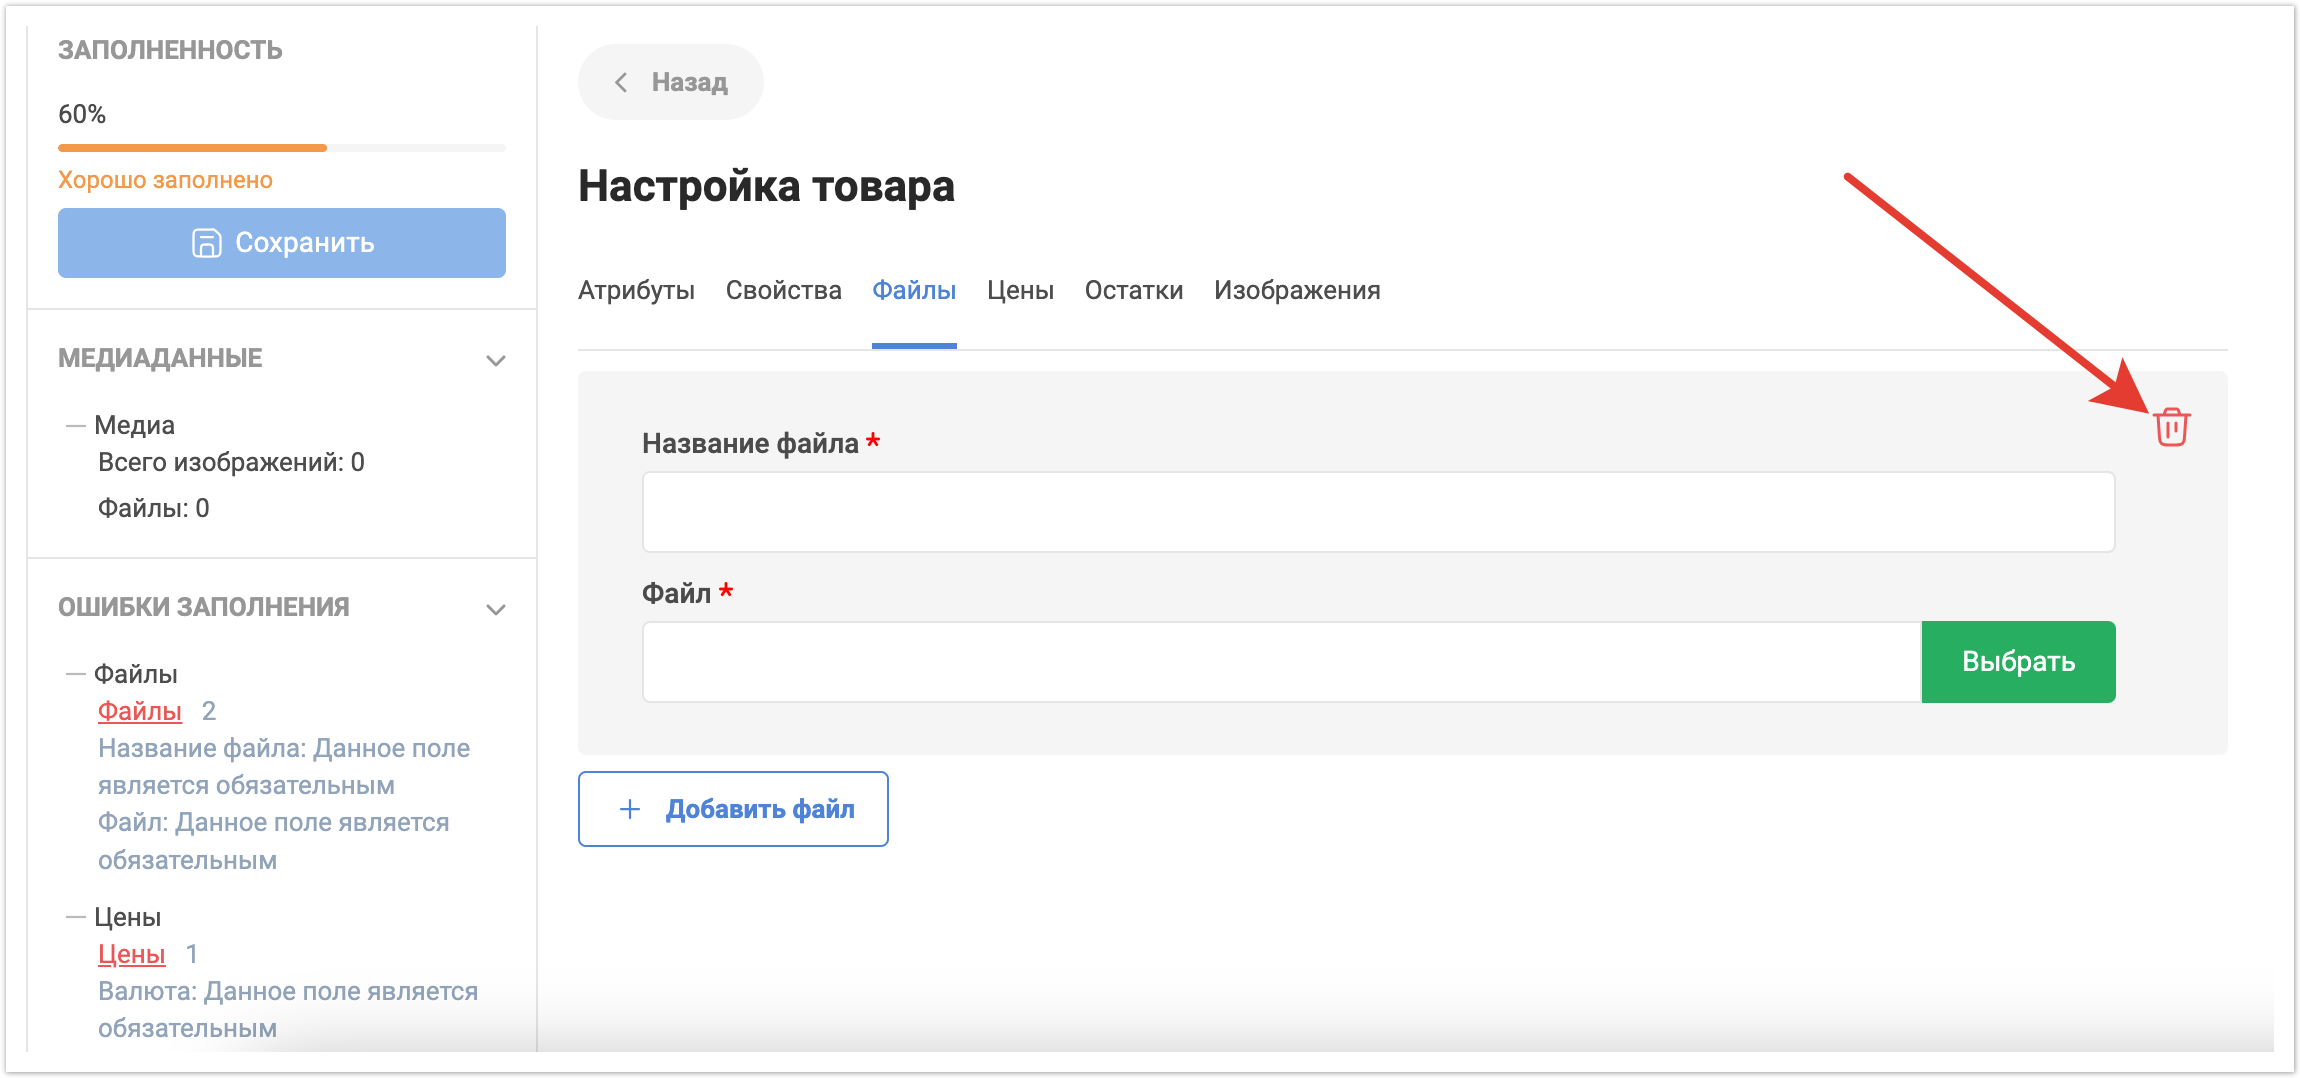
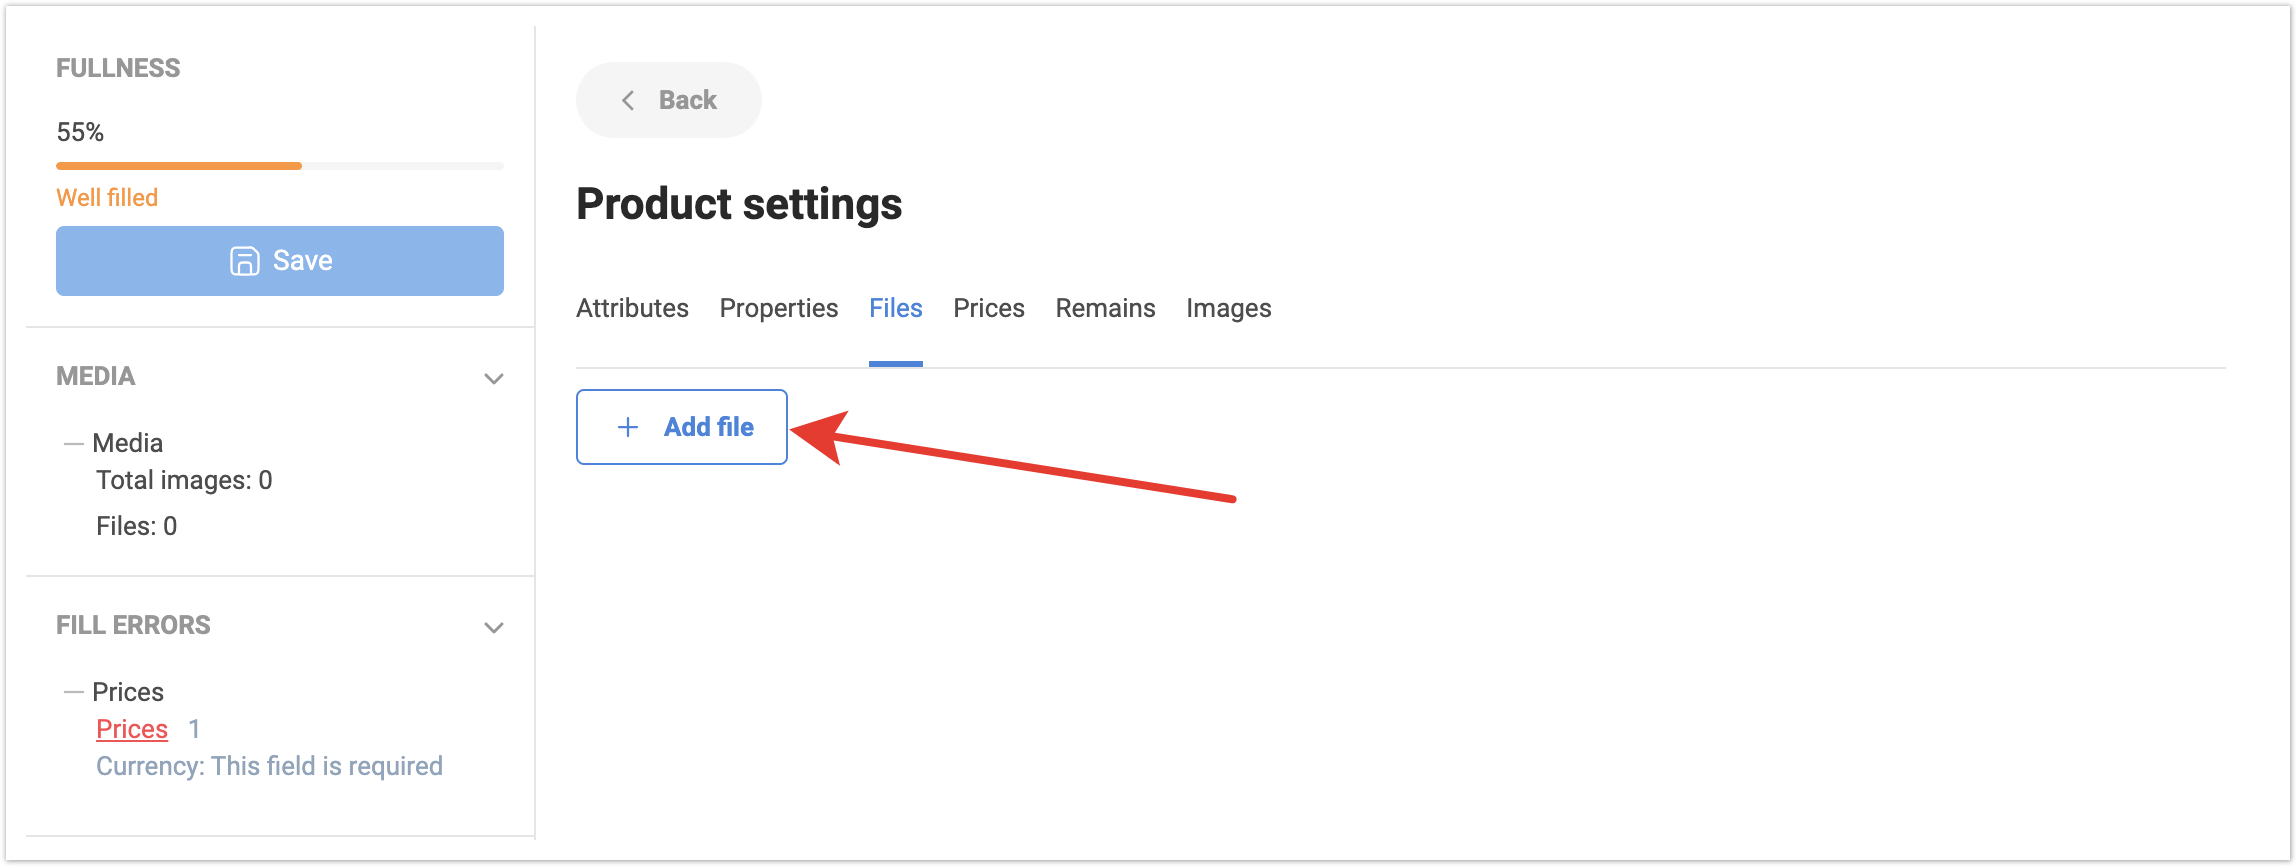
На вкладке Файлы существует возможность добавить дополнительные файлы, такие как Сертификаты, Спецификации, Инструкции и любые другие файлы, которые должны быть отображены конечному пользователю в продуктовой карточке. Для добавления файла нужно нажать на кнопку Добавить файл, а далее выбрать его на локальном компьютере.
Можно также удалить ранее загруженный файл, если он более не актуален.
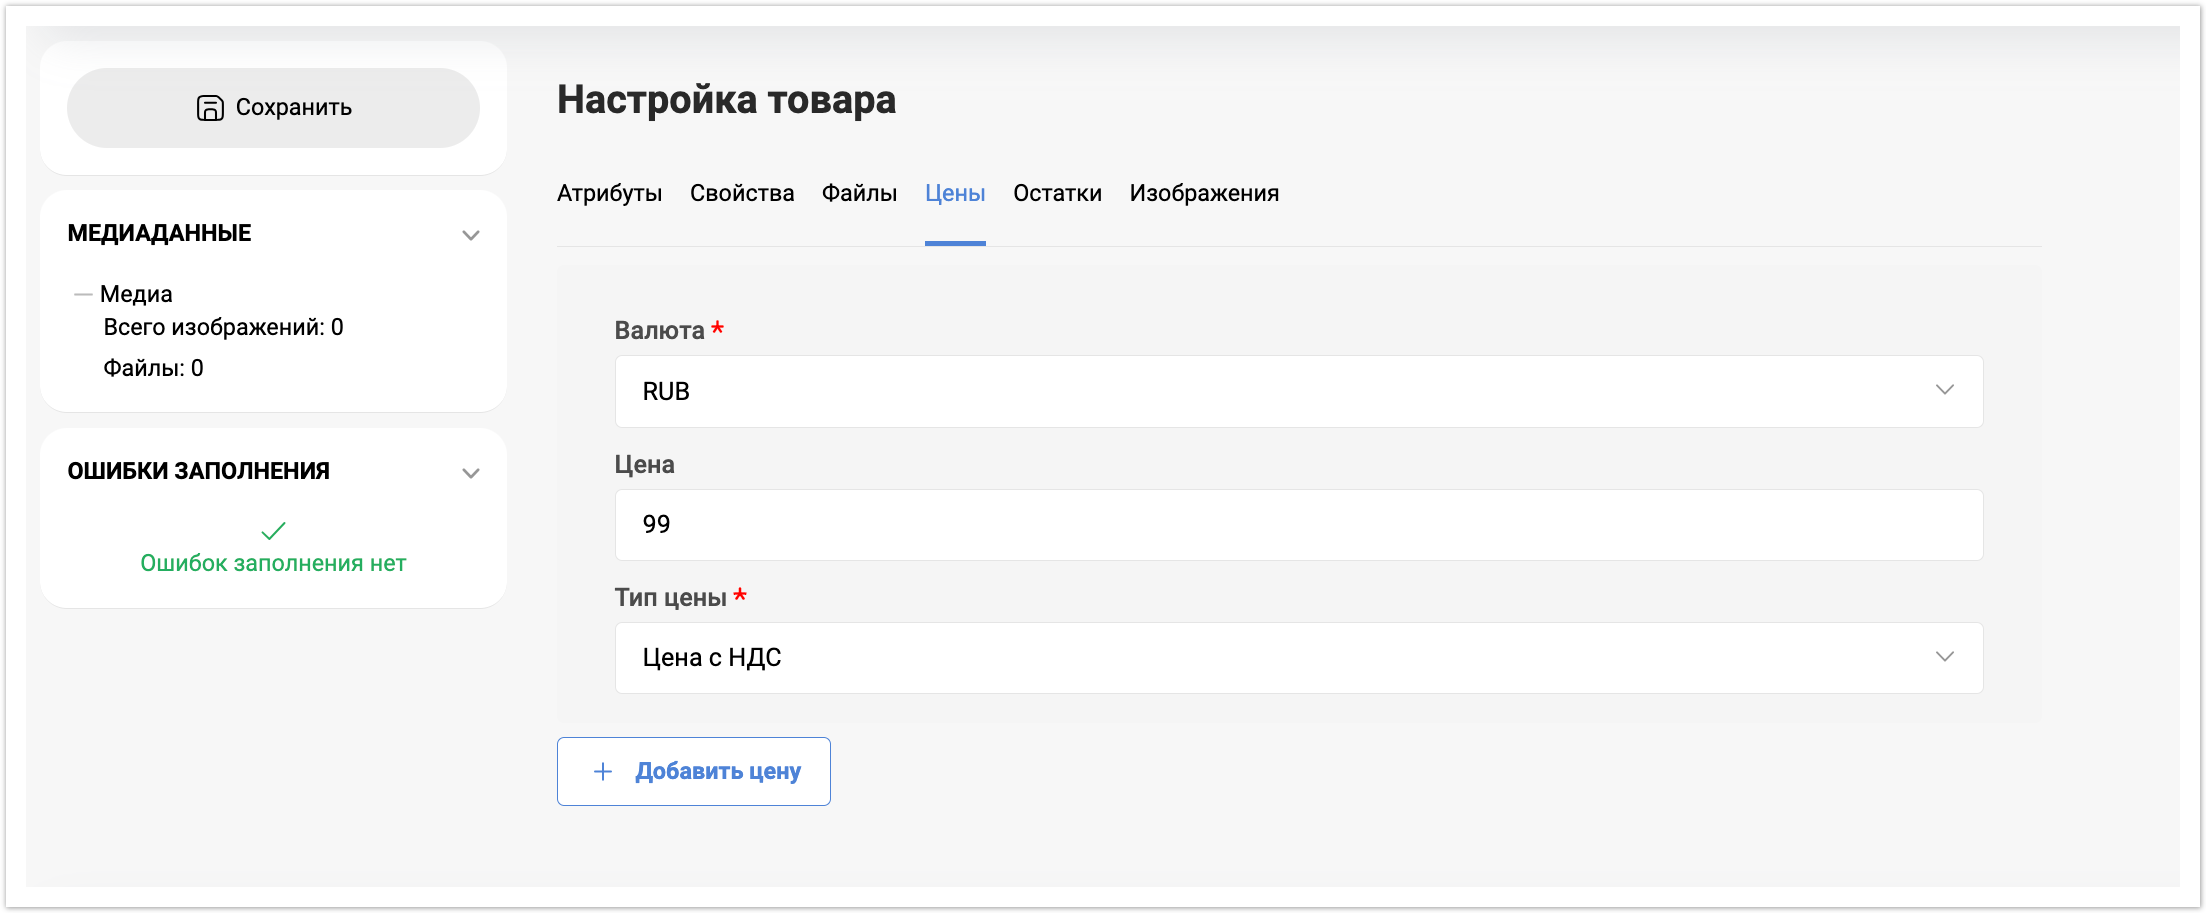
На вкладке Цены можно добавить для товара значение типа цены. Нужно указать Валюту - ее можно выбрать из списка с помощью поиска. В поле Цена укажите само значение цены по товару. В поле Тип цены выберите заведенный ранее тип цены. По кнопке Добавить цену можно добавить несколько значений для разных типов цен для товара. Таким образом, в зависимости от выбранного типа цены значение цены на товар будет отличаться.
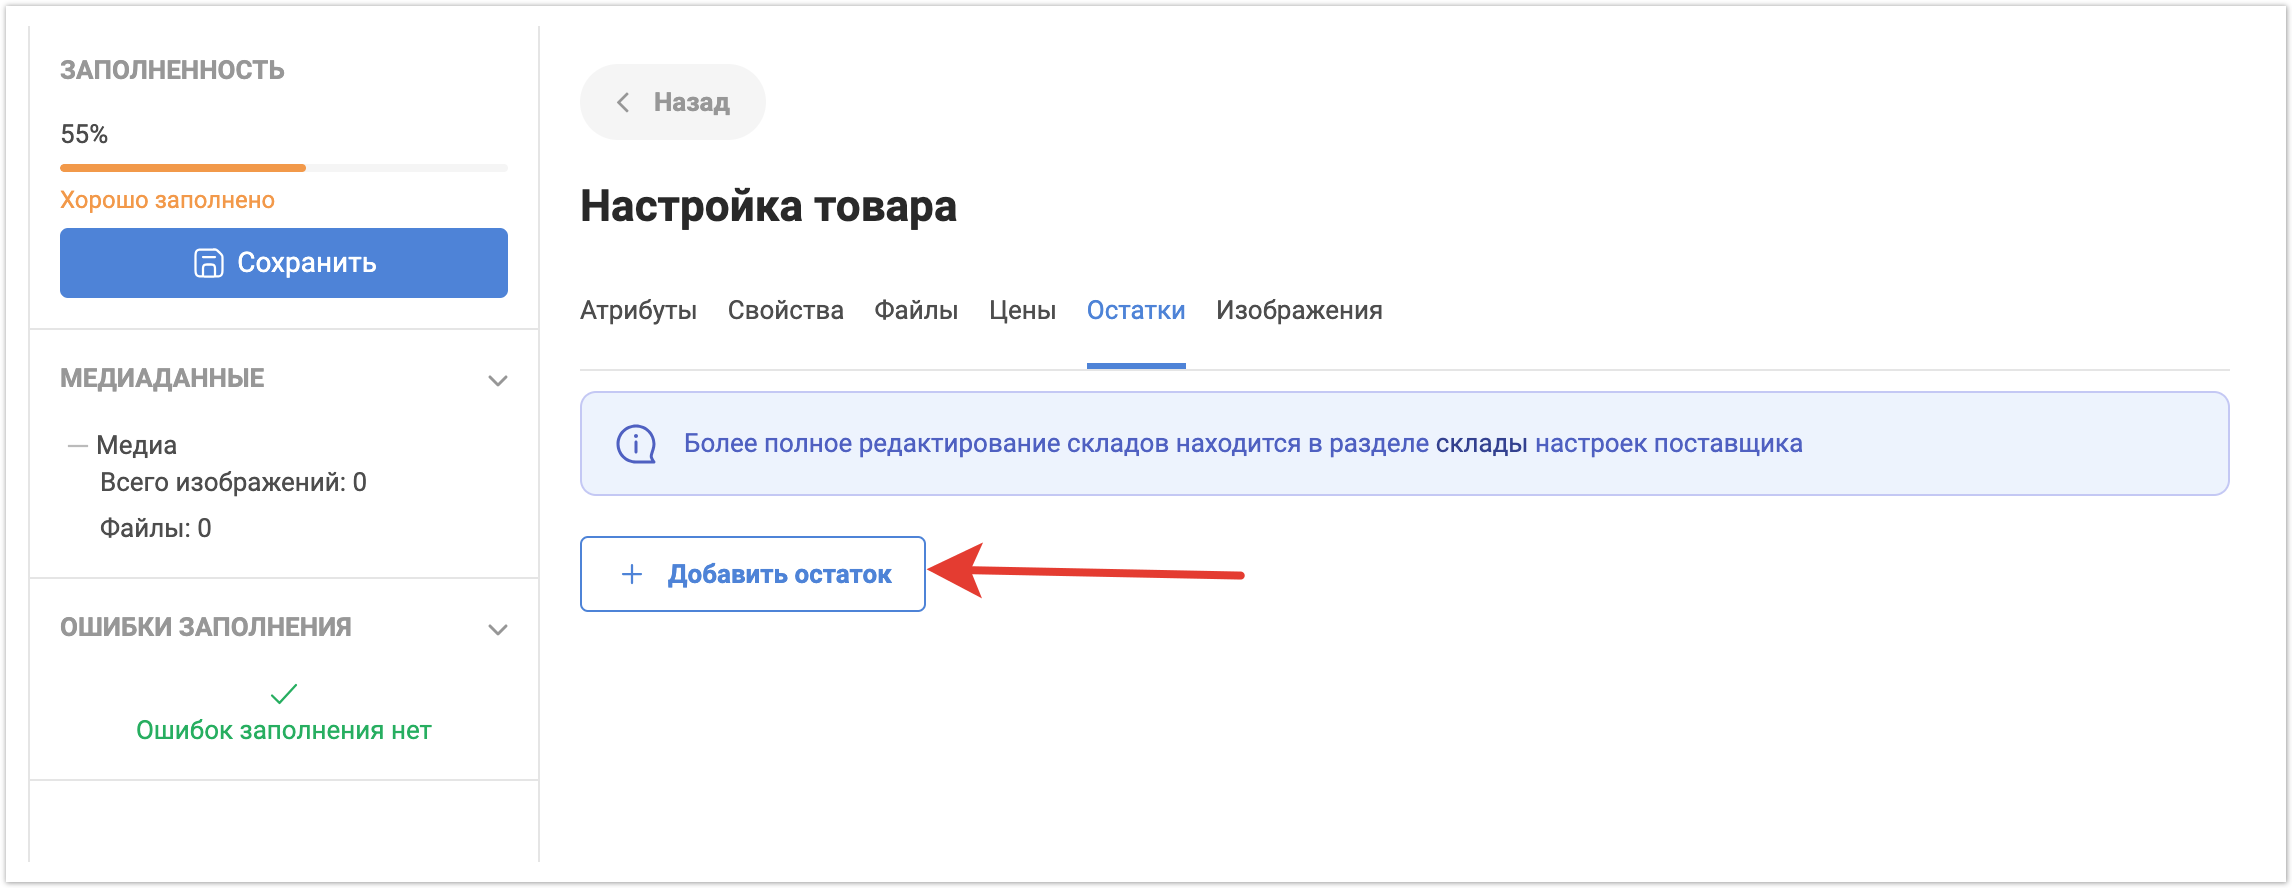
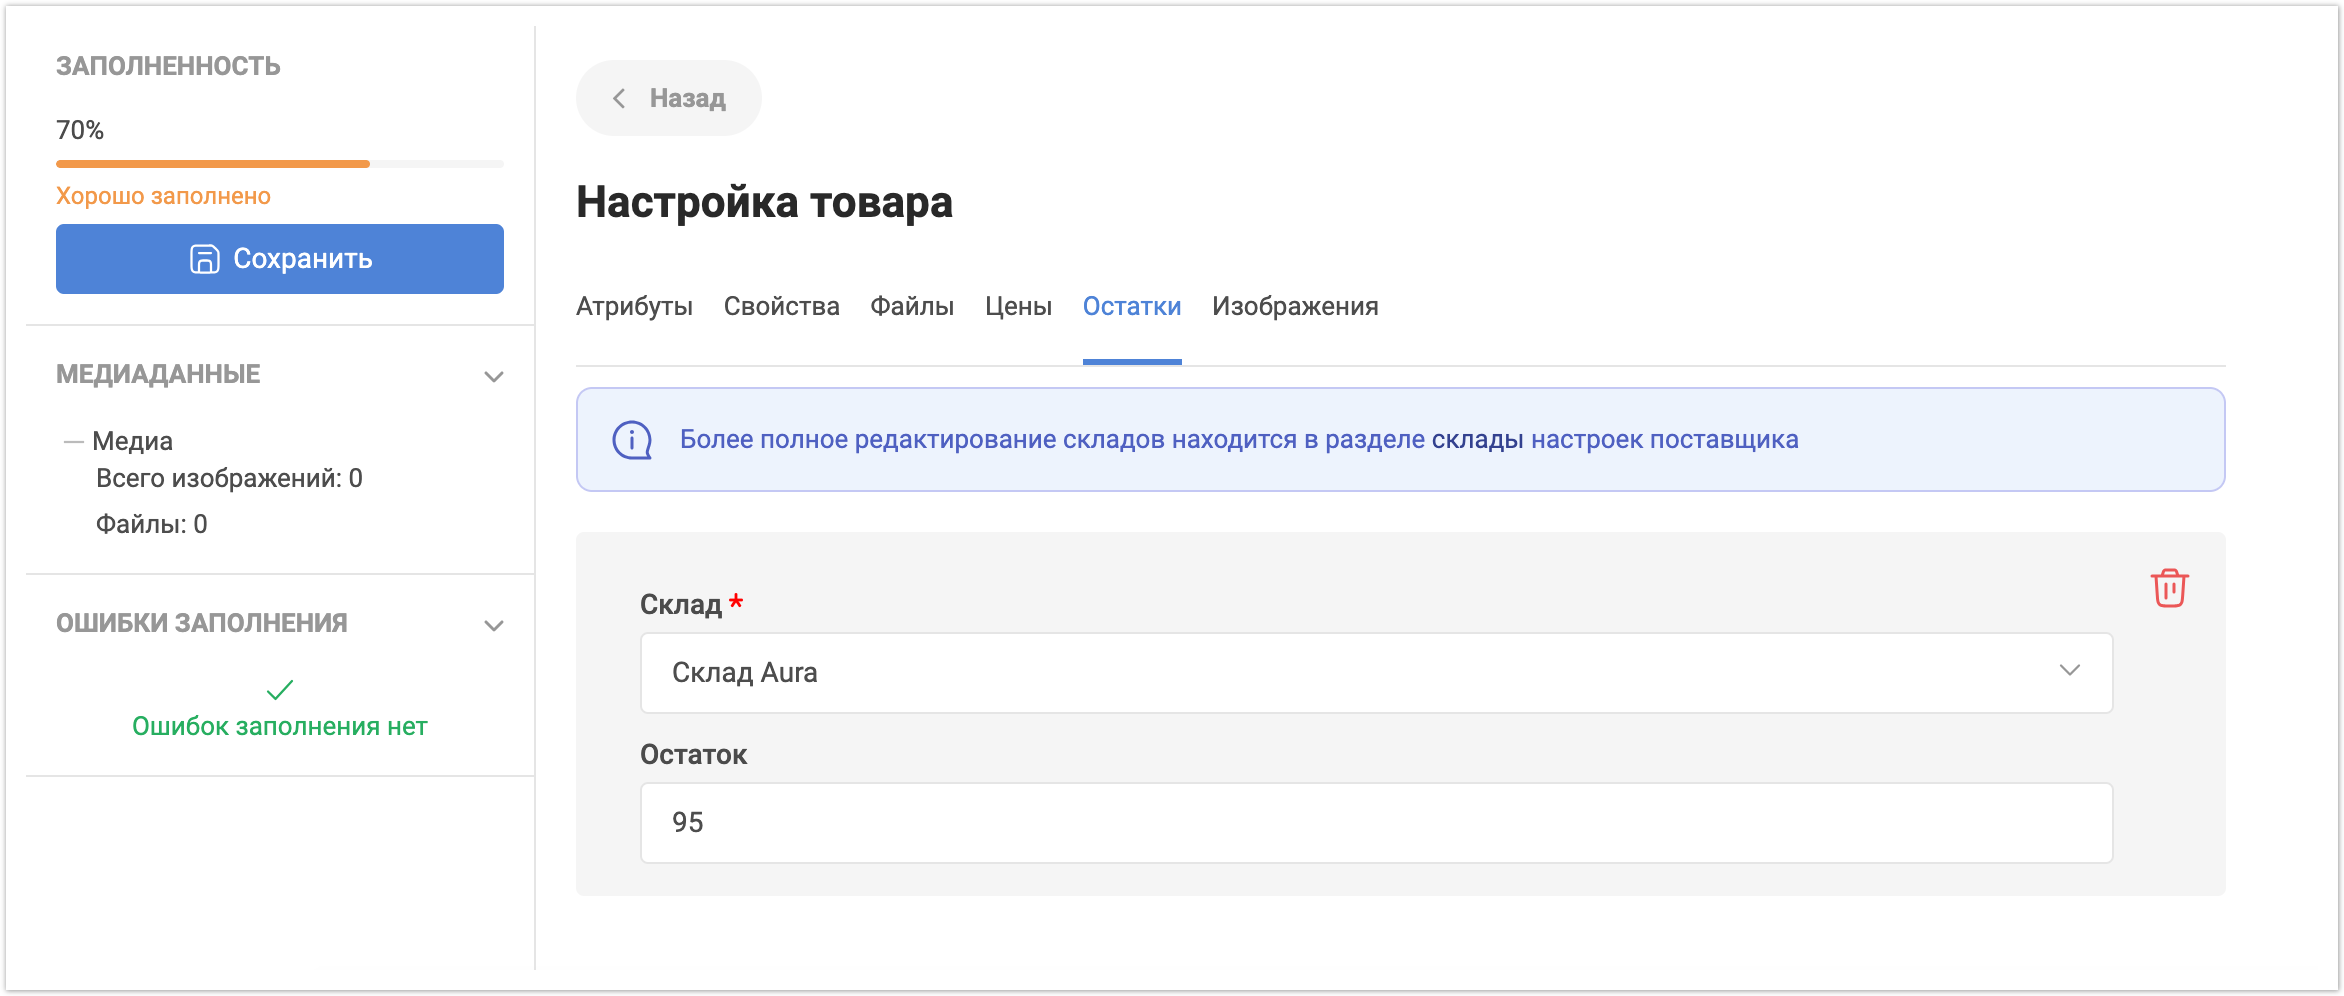
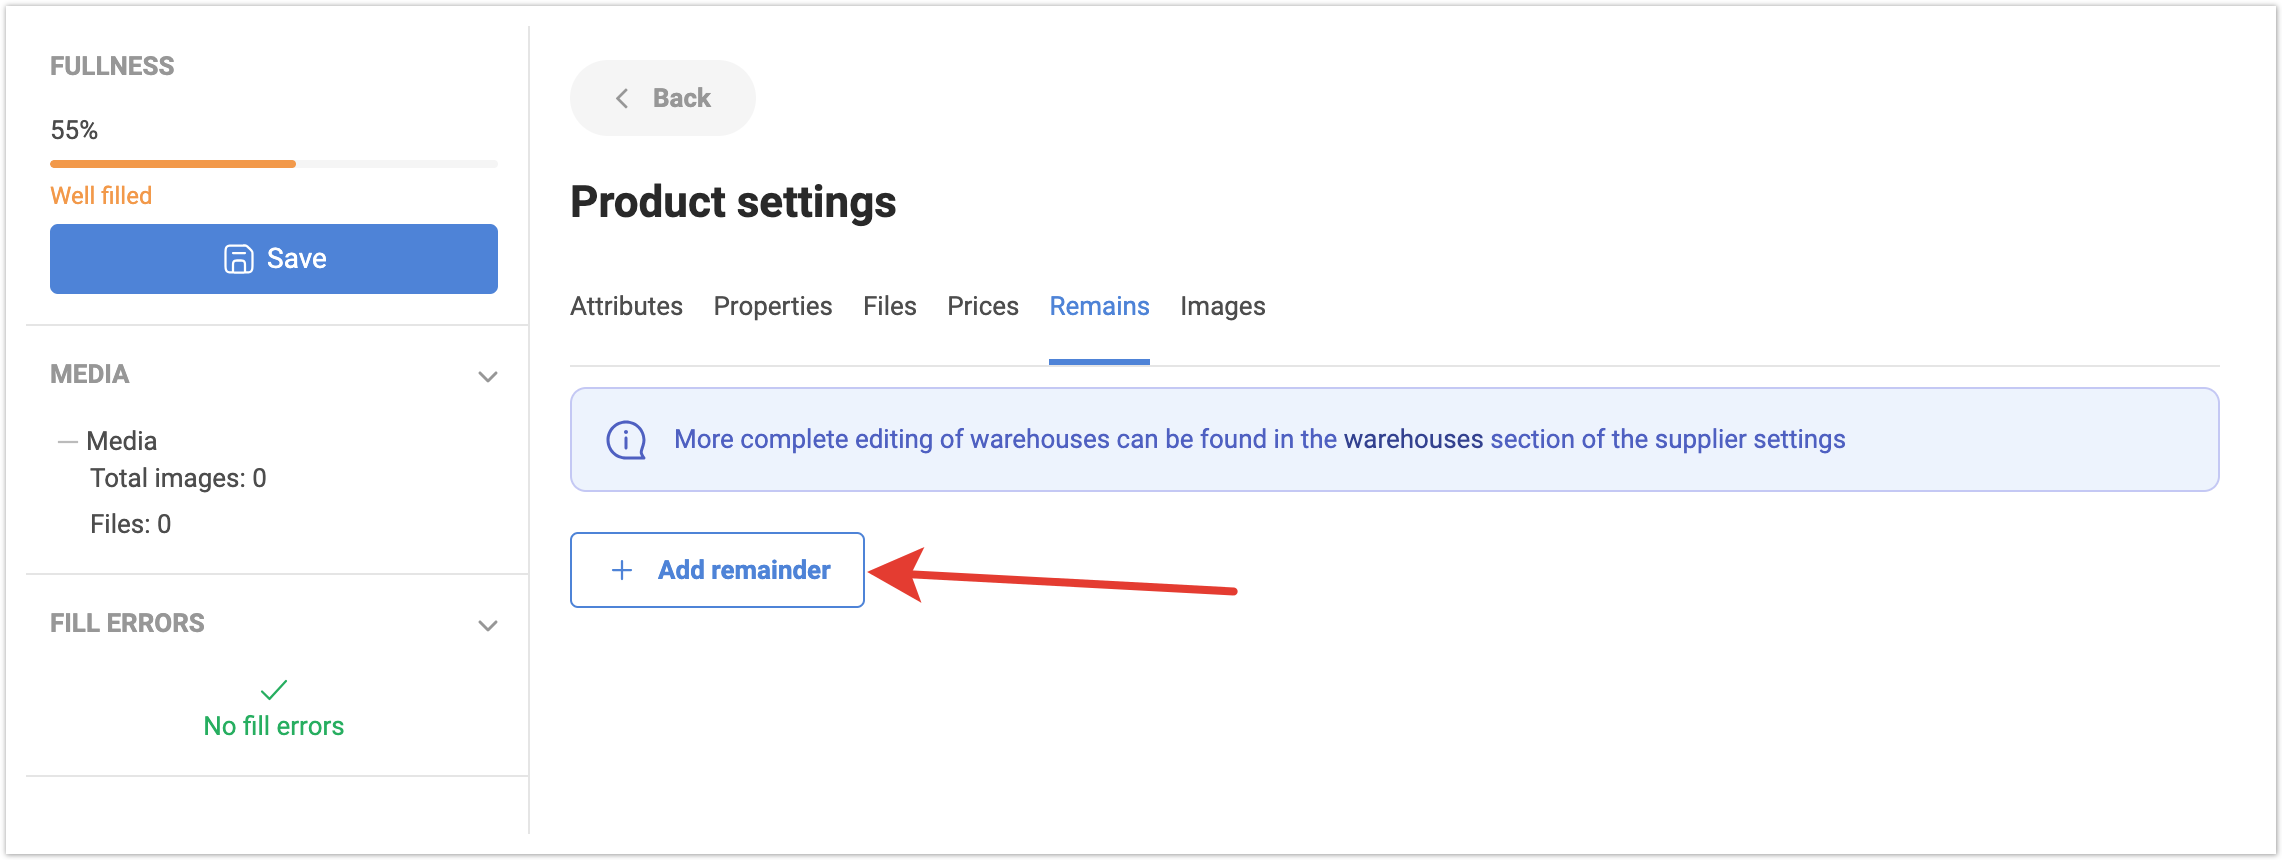
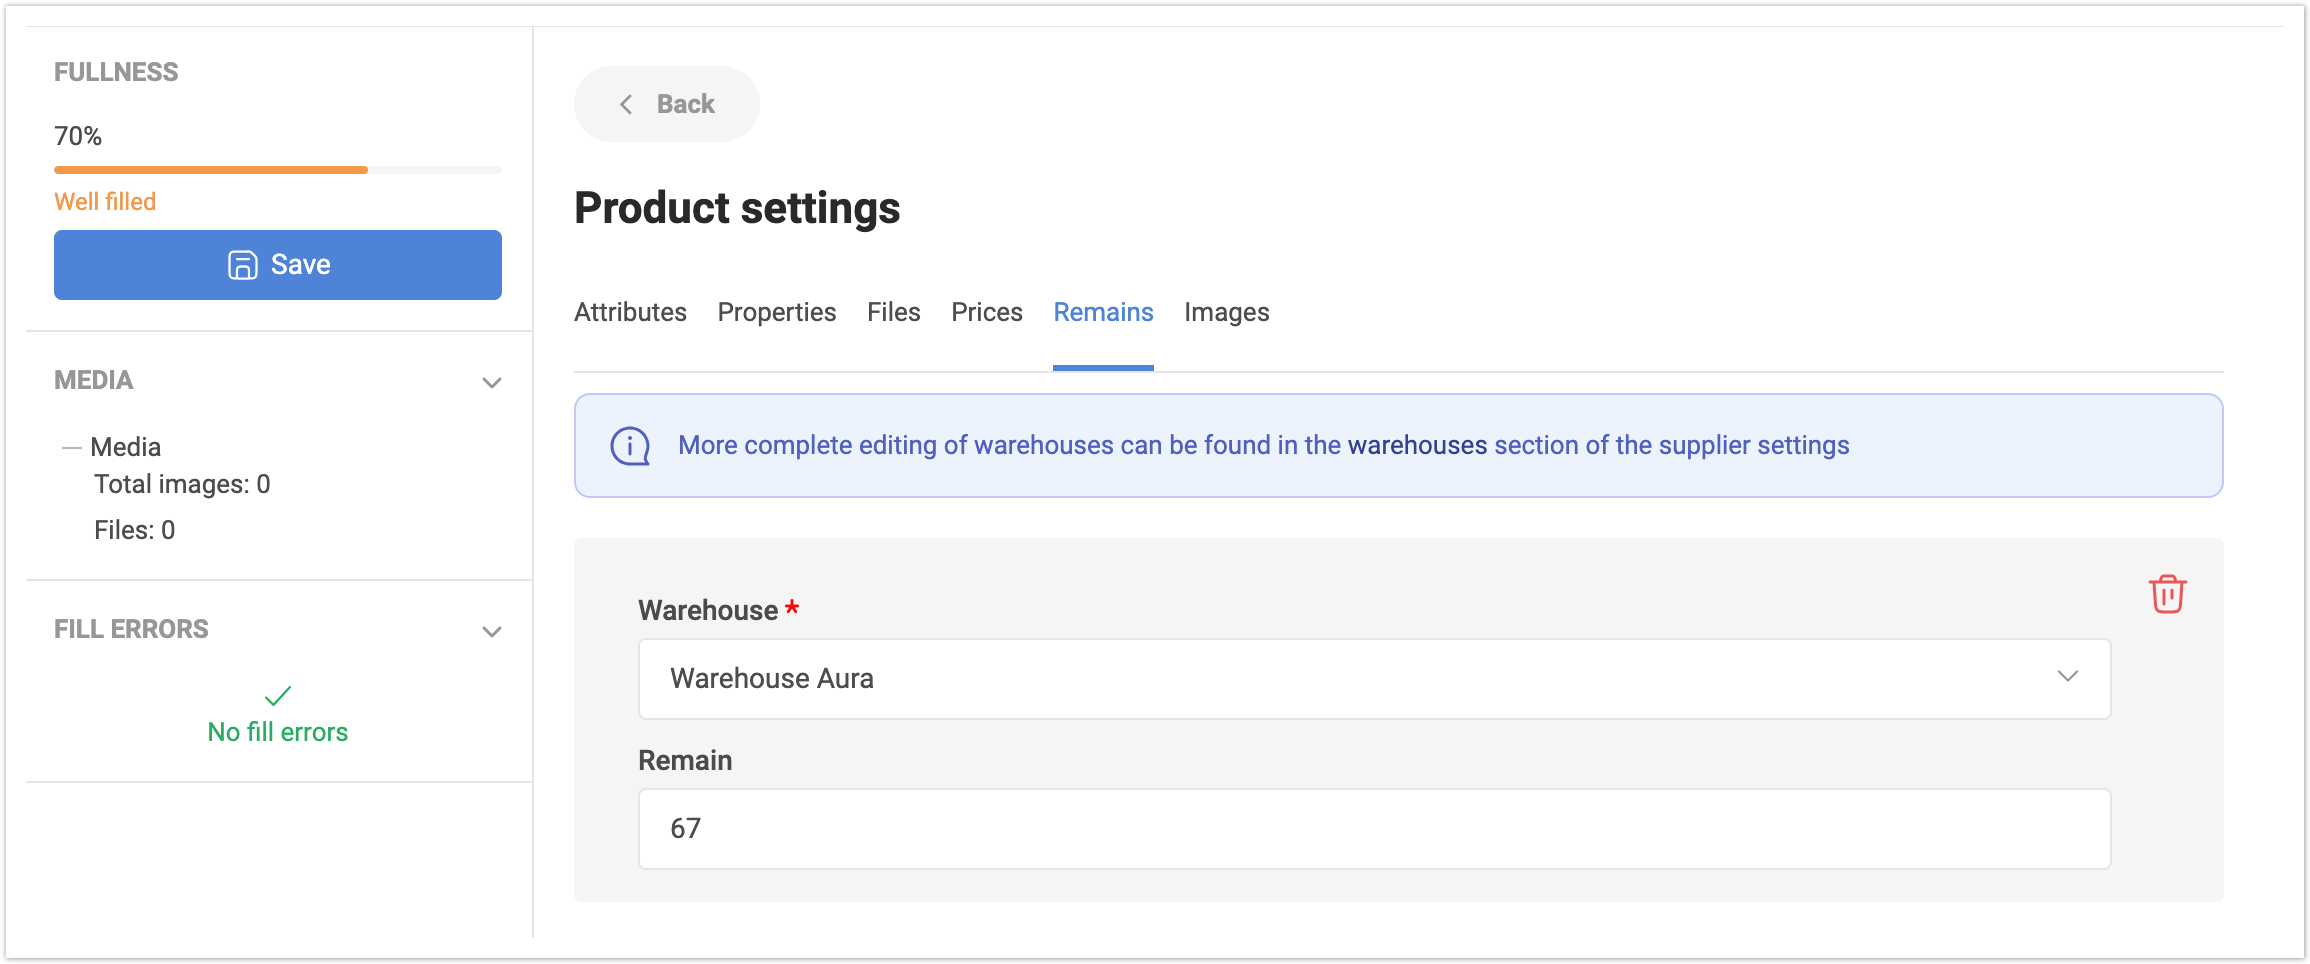
На вкладке Остатки можно указать остатки по товару на конкретных складах. Для этого нужно нажать на кнопку Добавить остаток.
После этого выберите склад из списка, который вы ранее создавали на этапе настроек профиля, и укажите остаток на этом складе. Если товар числится на нескольких складах, то по кнопке Добавить остаток можно указать остатки на других складах по этой позиции.
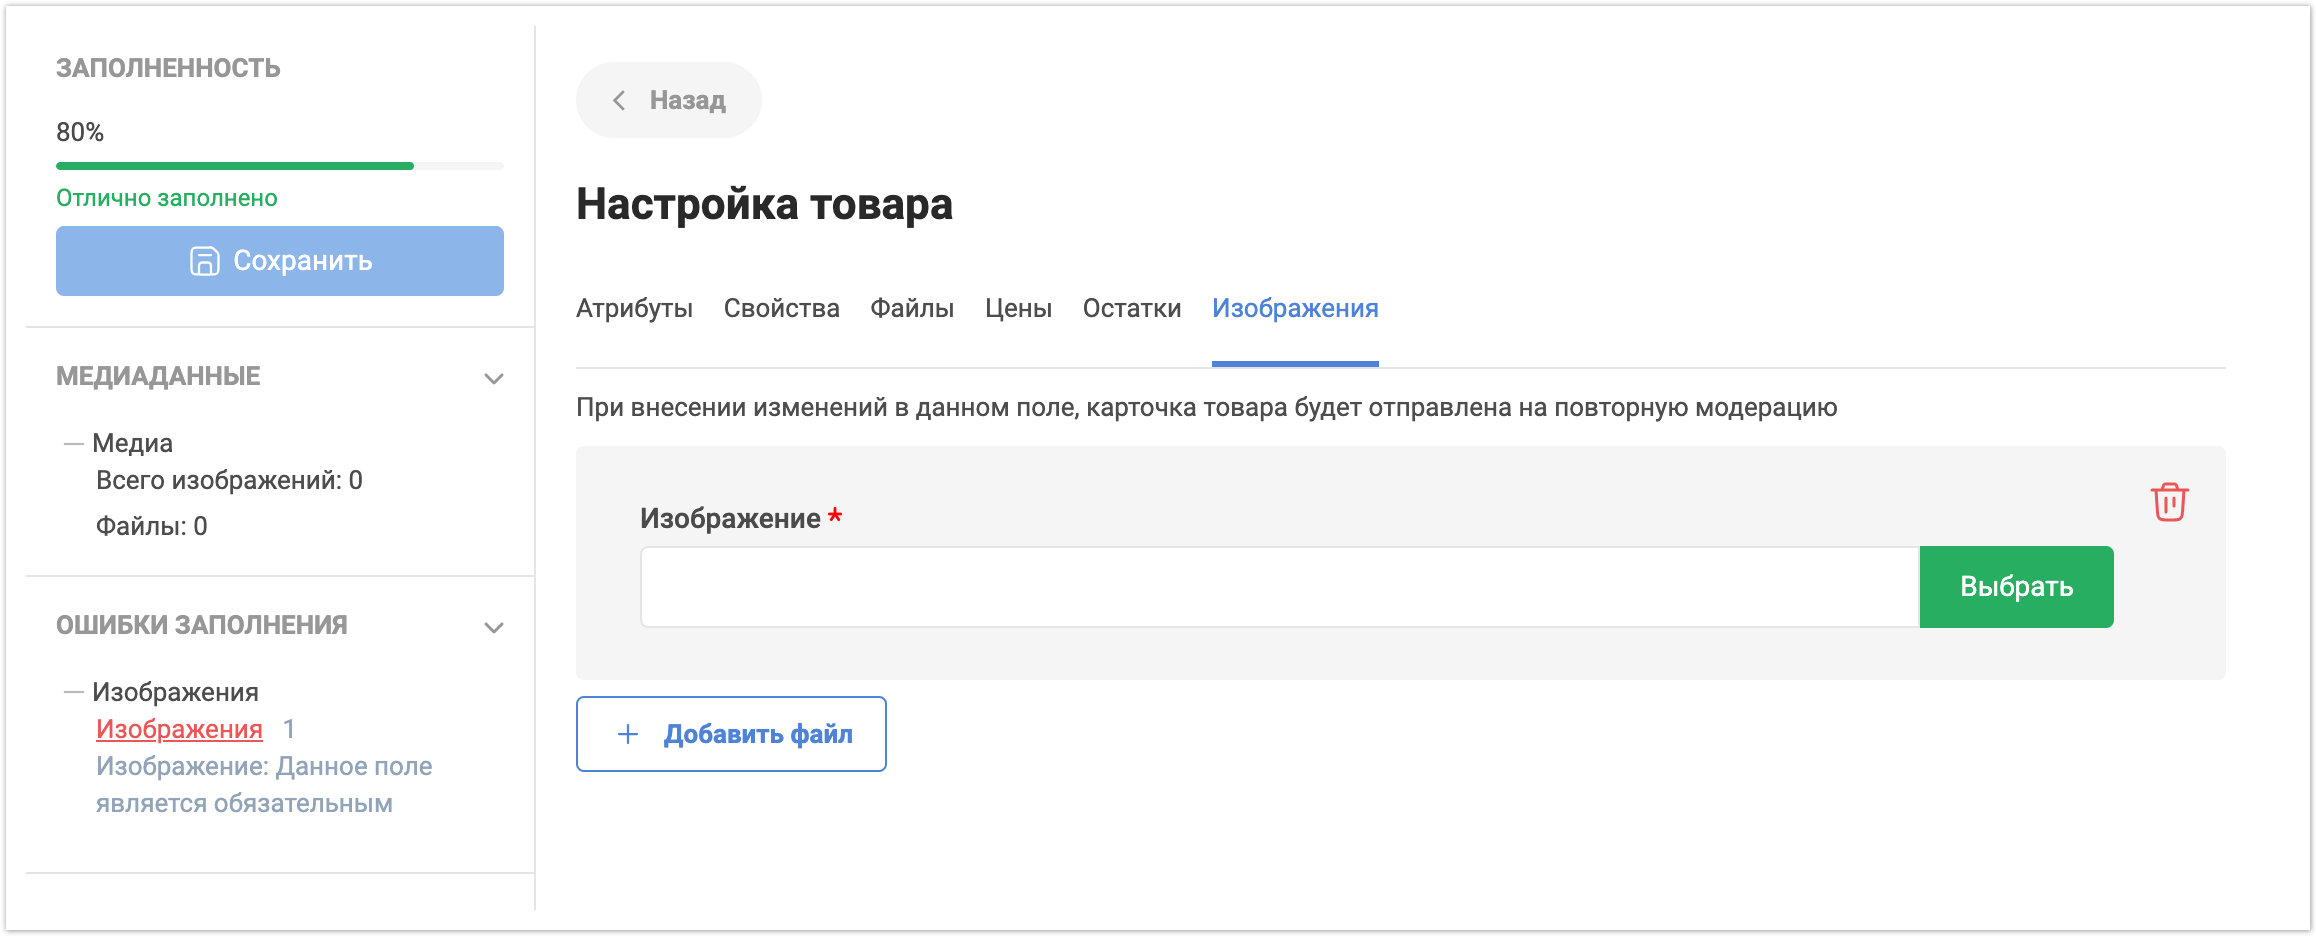
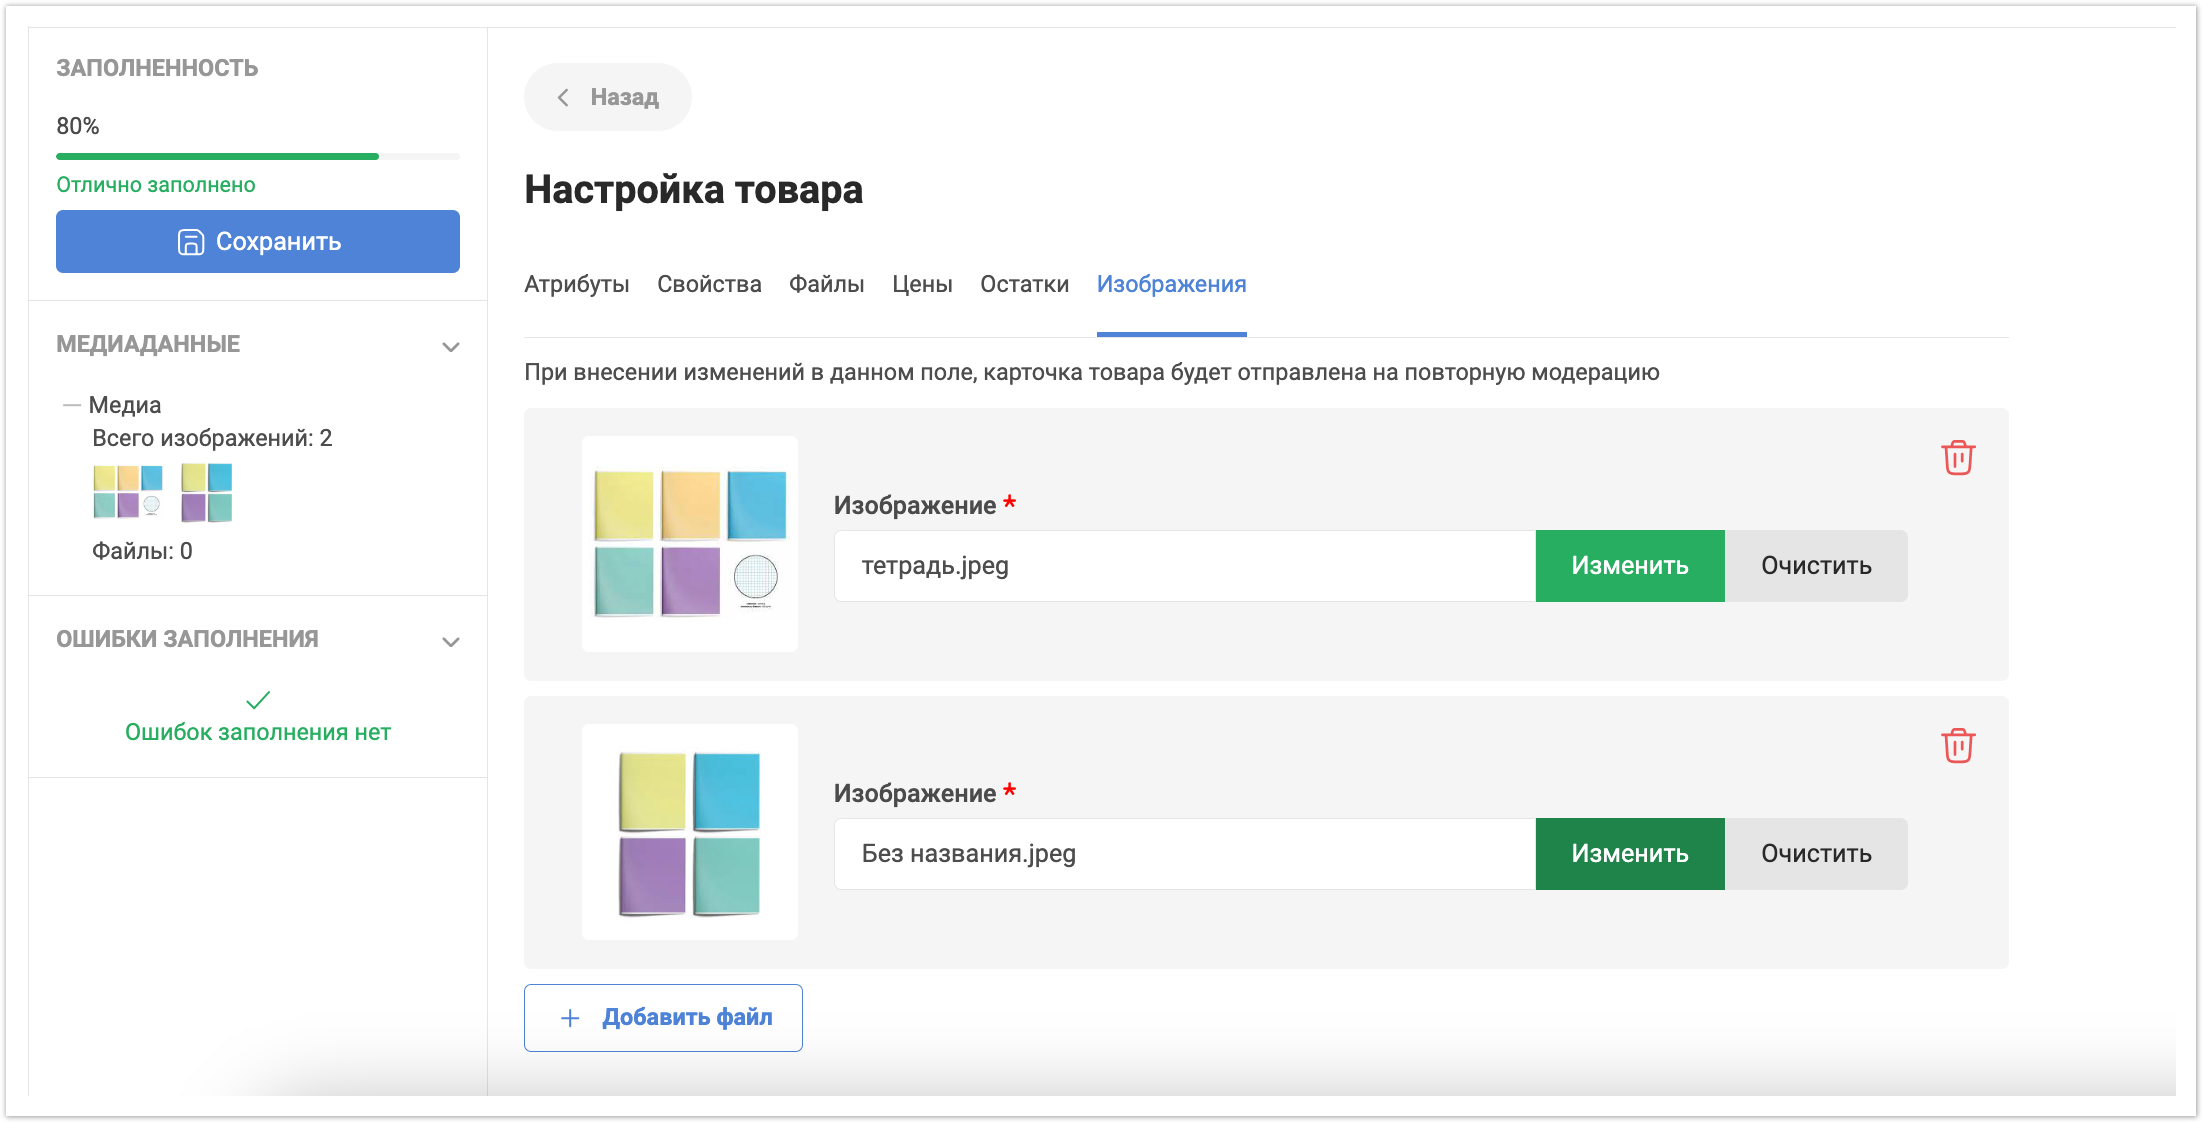
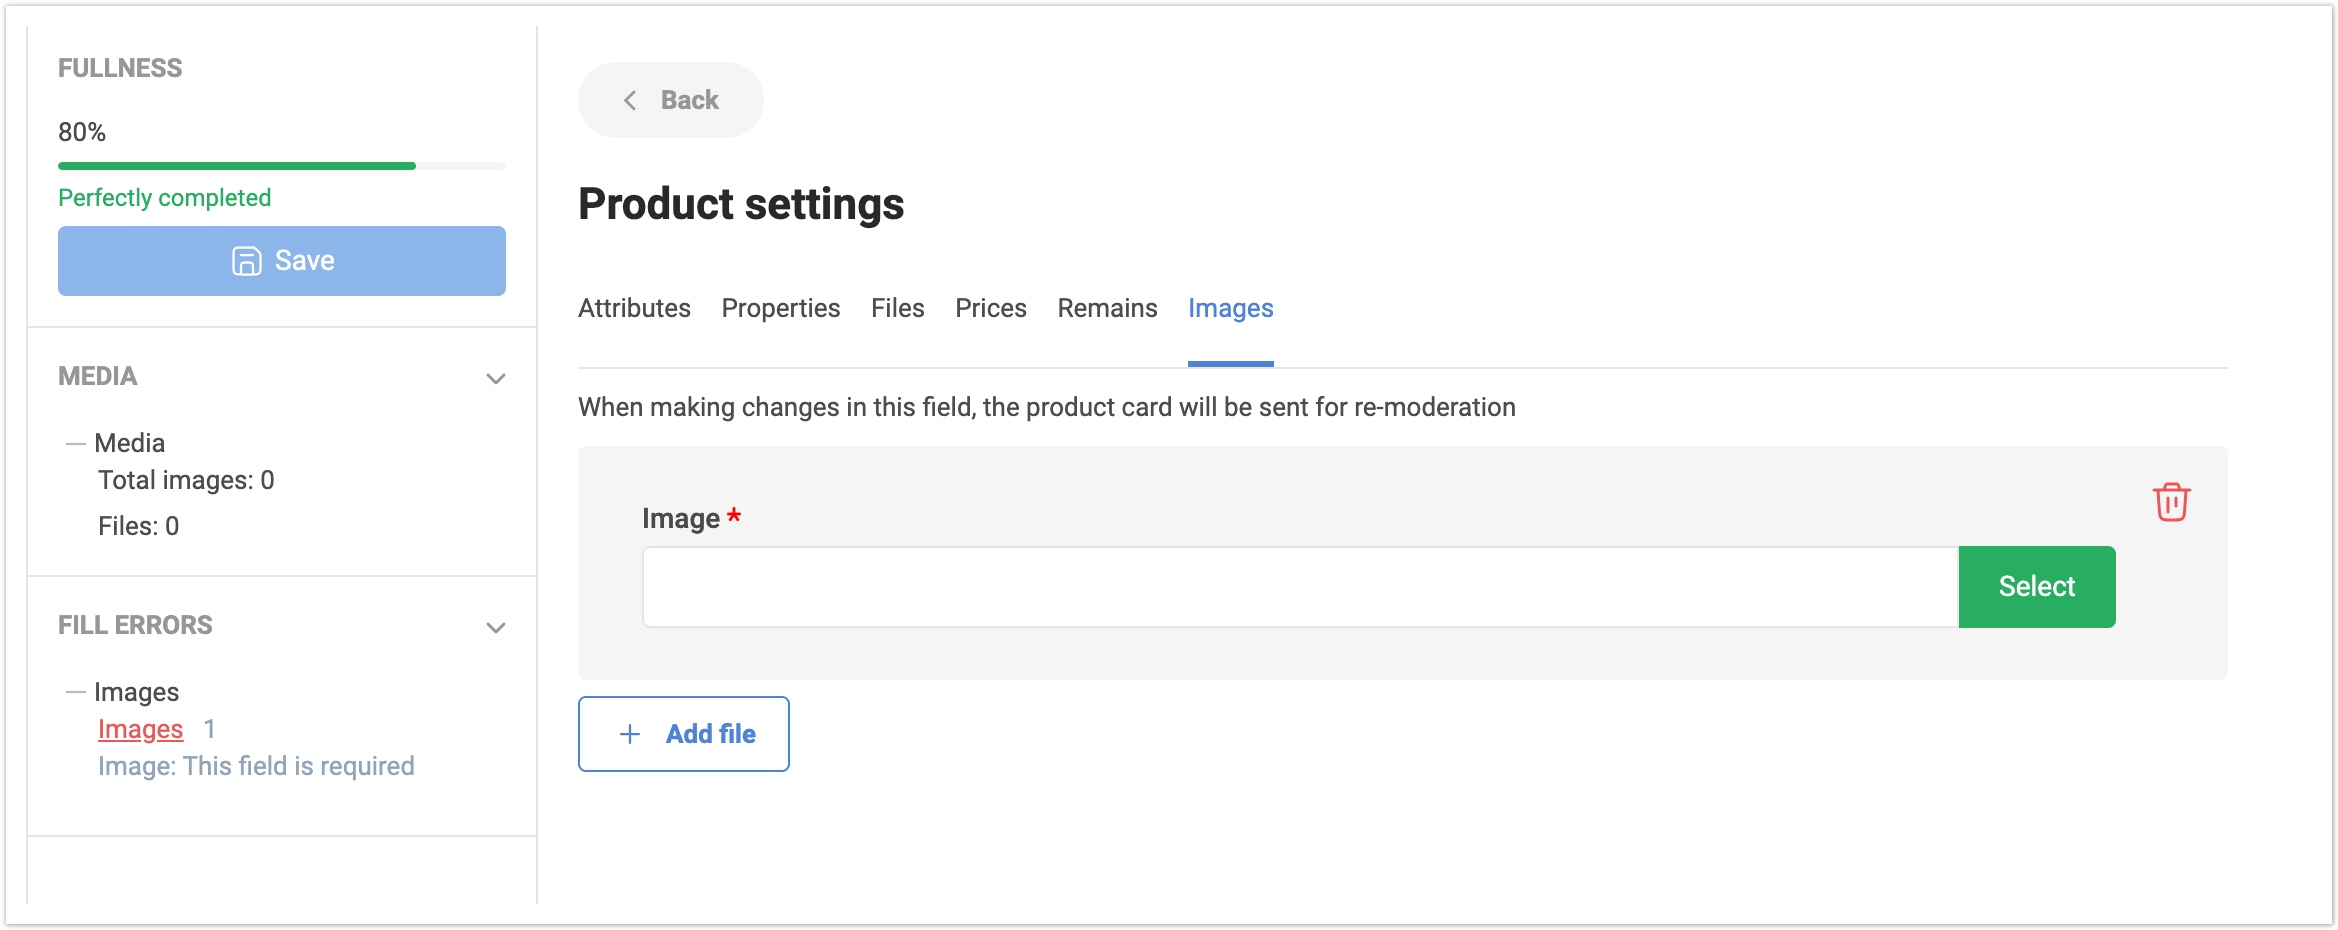
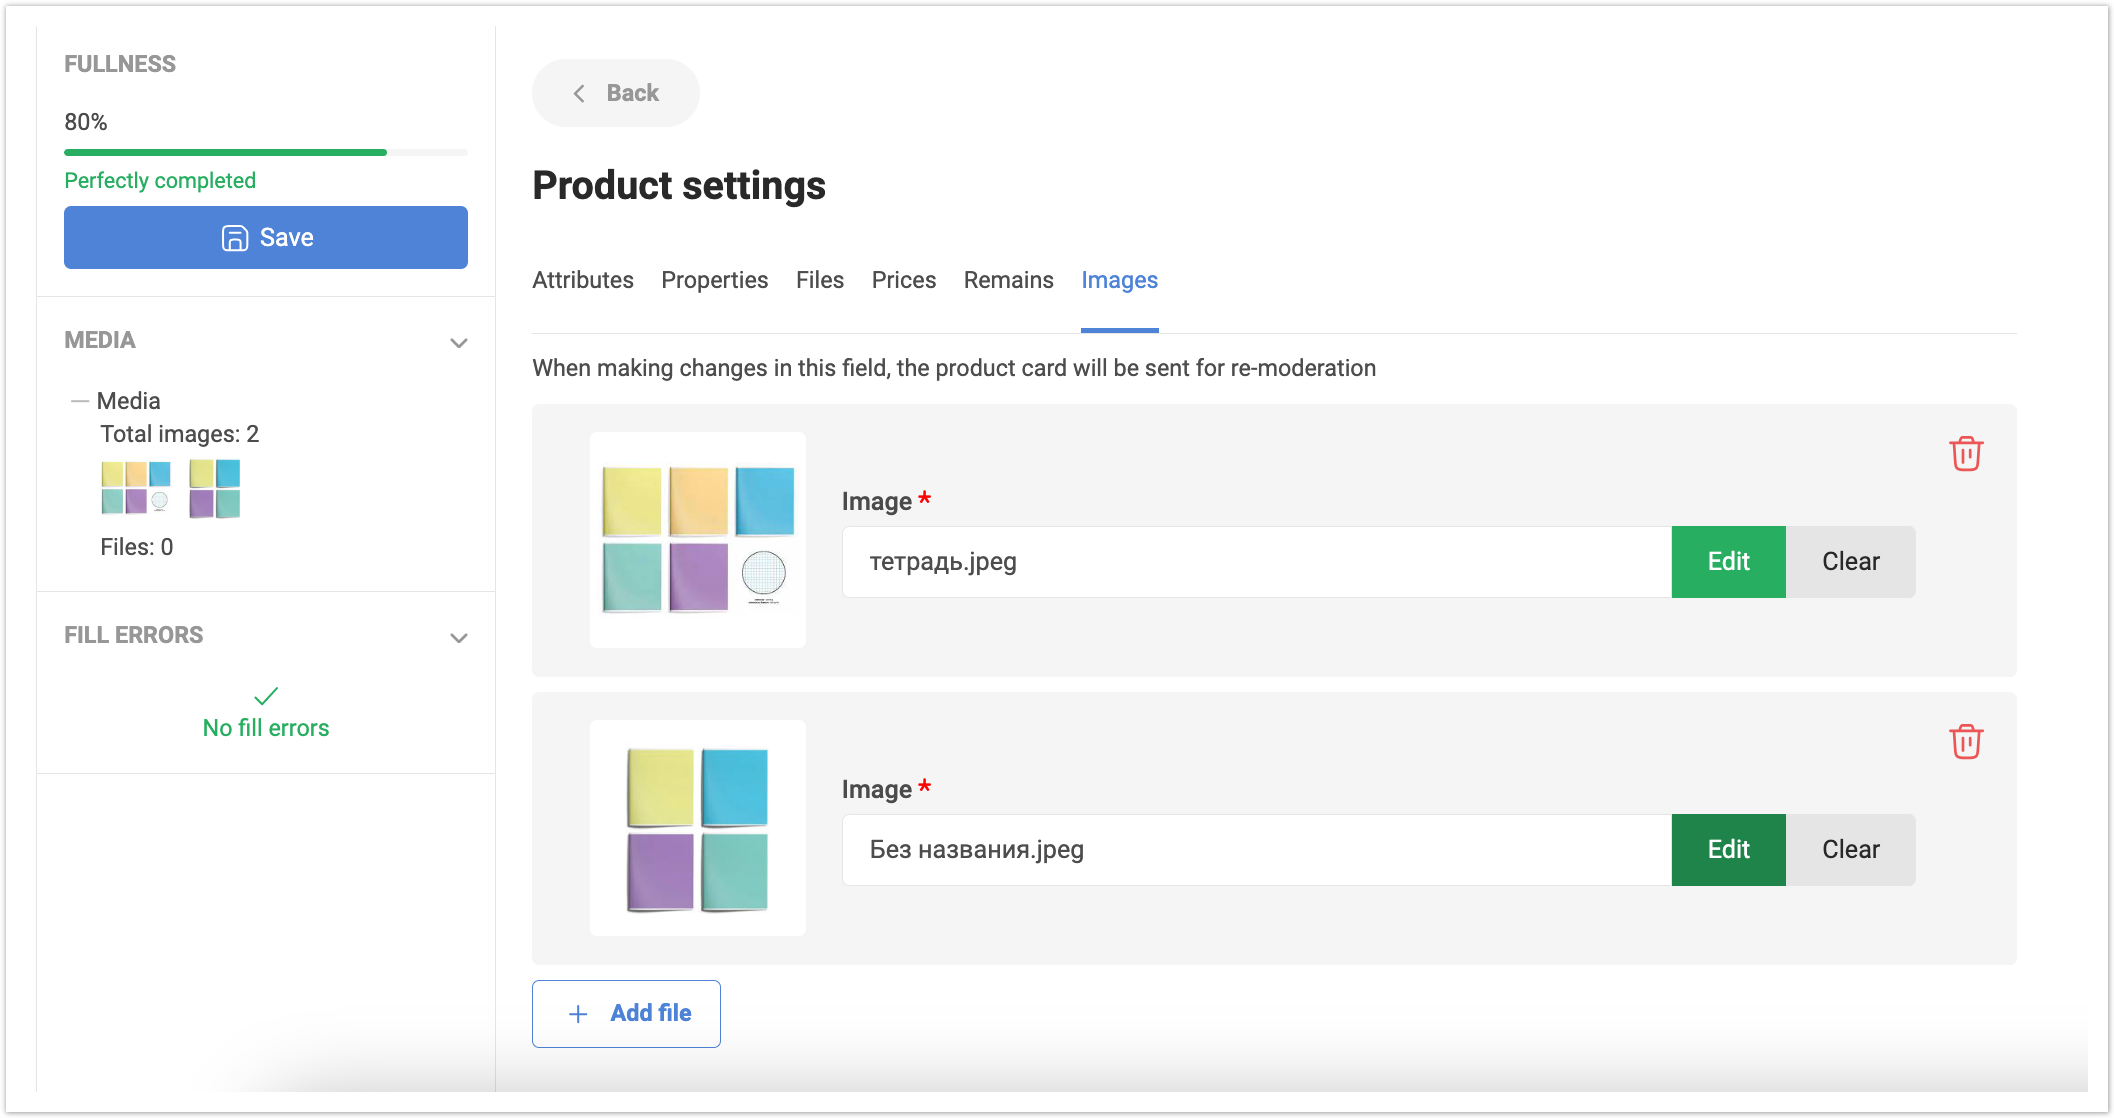
На вкладке Изображения можно загрузить изображения по товару. Для этого нужно нажать на кнопку Добавить файл, а затем по кнопке Выбрать добавить файл с локального компьютера.
Можно добавить несколько изображений, а также можно изменить или очистить ранее загруженную картинку. Если изображение загружено по ошибке, то его можно удалить.
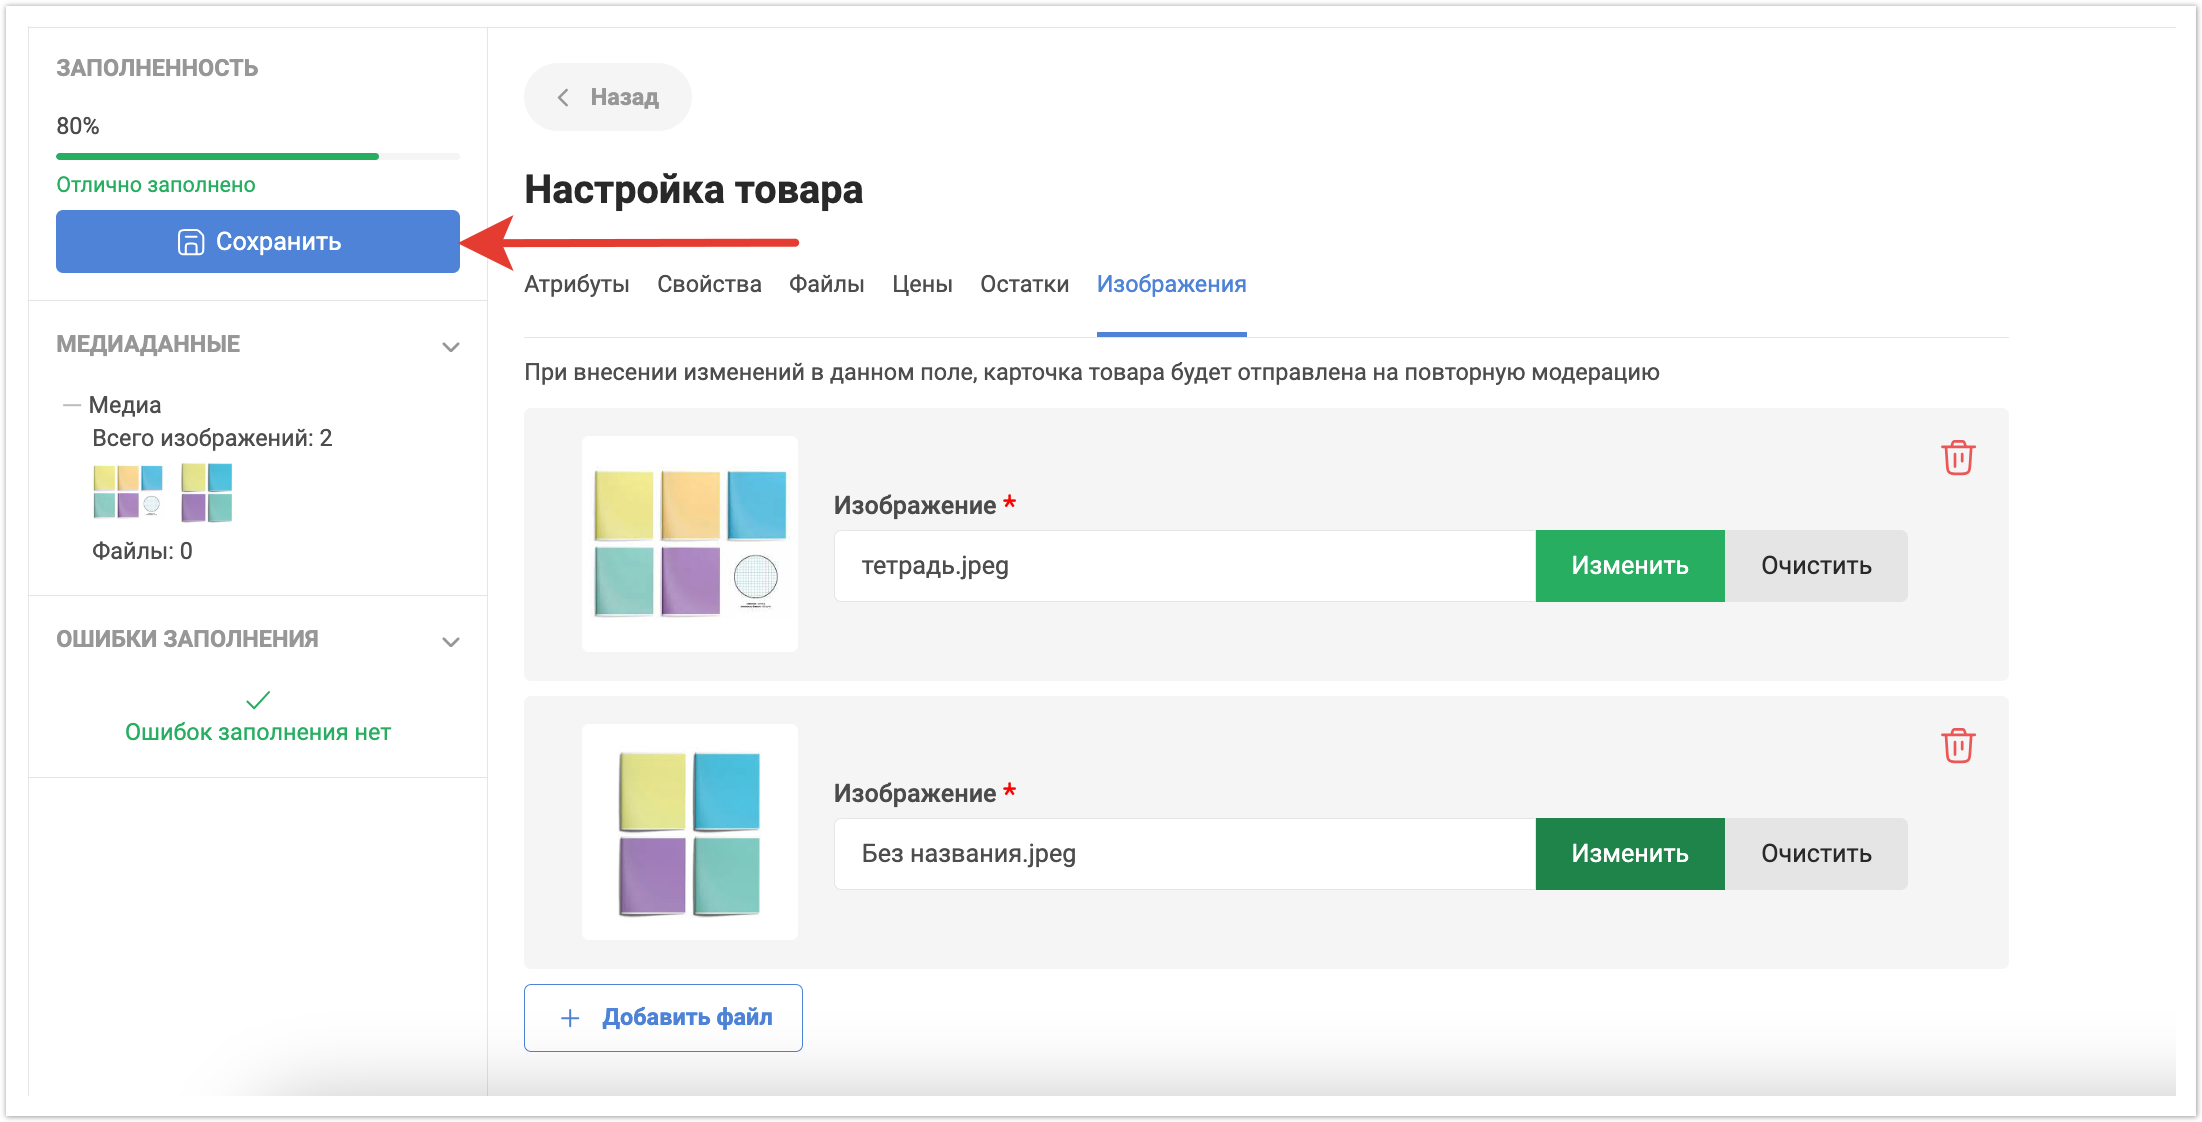
После заполнения всех необходимых полей нужно нажать кнопку Сохранить, чтобы товар был добавлен в каталог.
Впоследствии вы сможете вручную редактировать товар, если по нему произошли какие-либо изменения. После нажатия кнопки Сохранить товар будет размещен в каталоге.
|


| Sv translation | ||
|---|---|---|
| ||
To create a product card manually, in your supplier’s personal account, go to the My catalog section in a supplier's personal account Catalog section and click the Add Product/Service button.
Then fill in the fields in the opened form:
After this, a form for adding a product will open. On the left side of the window, the percentage of completion of the product card will be indicated, and below is information on media data, and in the Fill Errors block you can see which attributes must be filled in to add a product. Required fields are marked with a red asterisk.
Product data is located on several tabs: Attributes, Properties, Files, Prices, Remains, Images.
The Attributes tab contains the following data:
As you fill out the required fields, Fill errors will disappear from the list. On the Properties tab, you can add the properties required for the product. To do this, click on the Add property button.
After this, you need to select the one you want to add in the list of properties, and then select its value from the list.
If you want to add a new property that has not been added before, you need to click on the button with the “+” symbol.
A window will open to add a new property. Here you will need to specify the Name and Sort Order. And then from the list of settings, select the properties you need for the added property. Filter as a list - in advanced search, the property will be displayed as a drop-down list from which you can select product property values. If the setting is disabled, then the property values will be displayed in the form of checkboxes, where you need to check the boxes. Show - this setting is responsible for displaying the property in the catalog and product card. If the property should not be displayed, then simply uncheck the checkbox. Show up in the directory search - the setting controls the display of the property in the search bar. Constant recalculation is required - when you select a checkbox, the property values will be recalculated in the catalog filter. Participates in the modification filter - when you select a checkbox, this property can be selected from the modification filter in the product card. Display in product card - the setting controls whether the property Description — the text thatwill be displayed in the product card ;. Displayed in the catalog -the setting controls whether the property will be displayed in the product catalog (if the catalog is displayed as a list or table).
After filling in the fields, you need to click the Save button and the property will be added, then in the same way, click on the “+” button to add a value for this property.
If a property was added by mistake, you can delete it by clicking on the trash can symbol.
On the Files tab, there is an option to add additional files such as Certificates, Specifications, Instructions and any other files that need to be displayed to the end user on the product card. To add a file, you need to click on the Add file button, and then select it on your local computer.
You can also delete a previously downloaded file if it is no longer relevant.
On the Prices tab, you can add a price type value for a product. You need to specify the Currency - you can select it from the list using the search. In the Price field, specify the price value for the product. In the Price type field, select the previously entered price type. By clicking the Add price button, you can add several values for different types of prices for a product. Thus, depending on the selected price type, the price value for the product will differ.
On the Remains tab, you can specify product balances in specific warehouses. To do this, click on the Add remainder button.
After this, select a warehouse from the list that you previously created at the profile settings stage, and indicate the balance in this warehouse. If an item is listed in several warehouses, then using the Add remainder button you can specify the balances in other warehouses for this item.
On the Images tab, you can upload images by product. To do this, click on the Add file button, and then click on the Select button to add a file from the local computer.
You can add multiple images, and you can also change or clear a previously uploaded image. If an image was uploaded by mistake, you can delete it.
After filling in all the required fields, you need to click the Save button to add the product to the catalog.
Subsequently, you will be able to manually edit the product if any changes have occurred to it.
With templates you can assign a ready-made list of properties for the selected product category. Templates are created in advance in the administrative panel.
To specify the quantity of goods in warehouses, you must click on the Add balance button.
Then you need to select a warehouse and enter the quantity of goods in it. If the product is available in several warehouses, you can add additional warehouses.
|


| Sv translation | ||
|---|---|---|
| ||
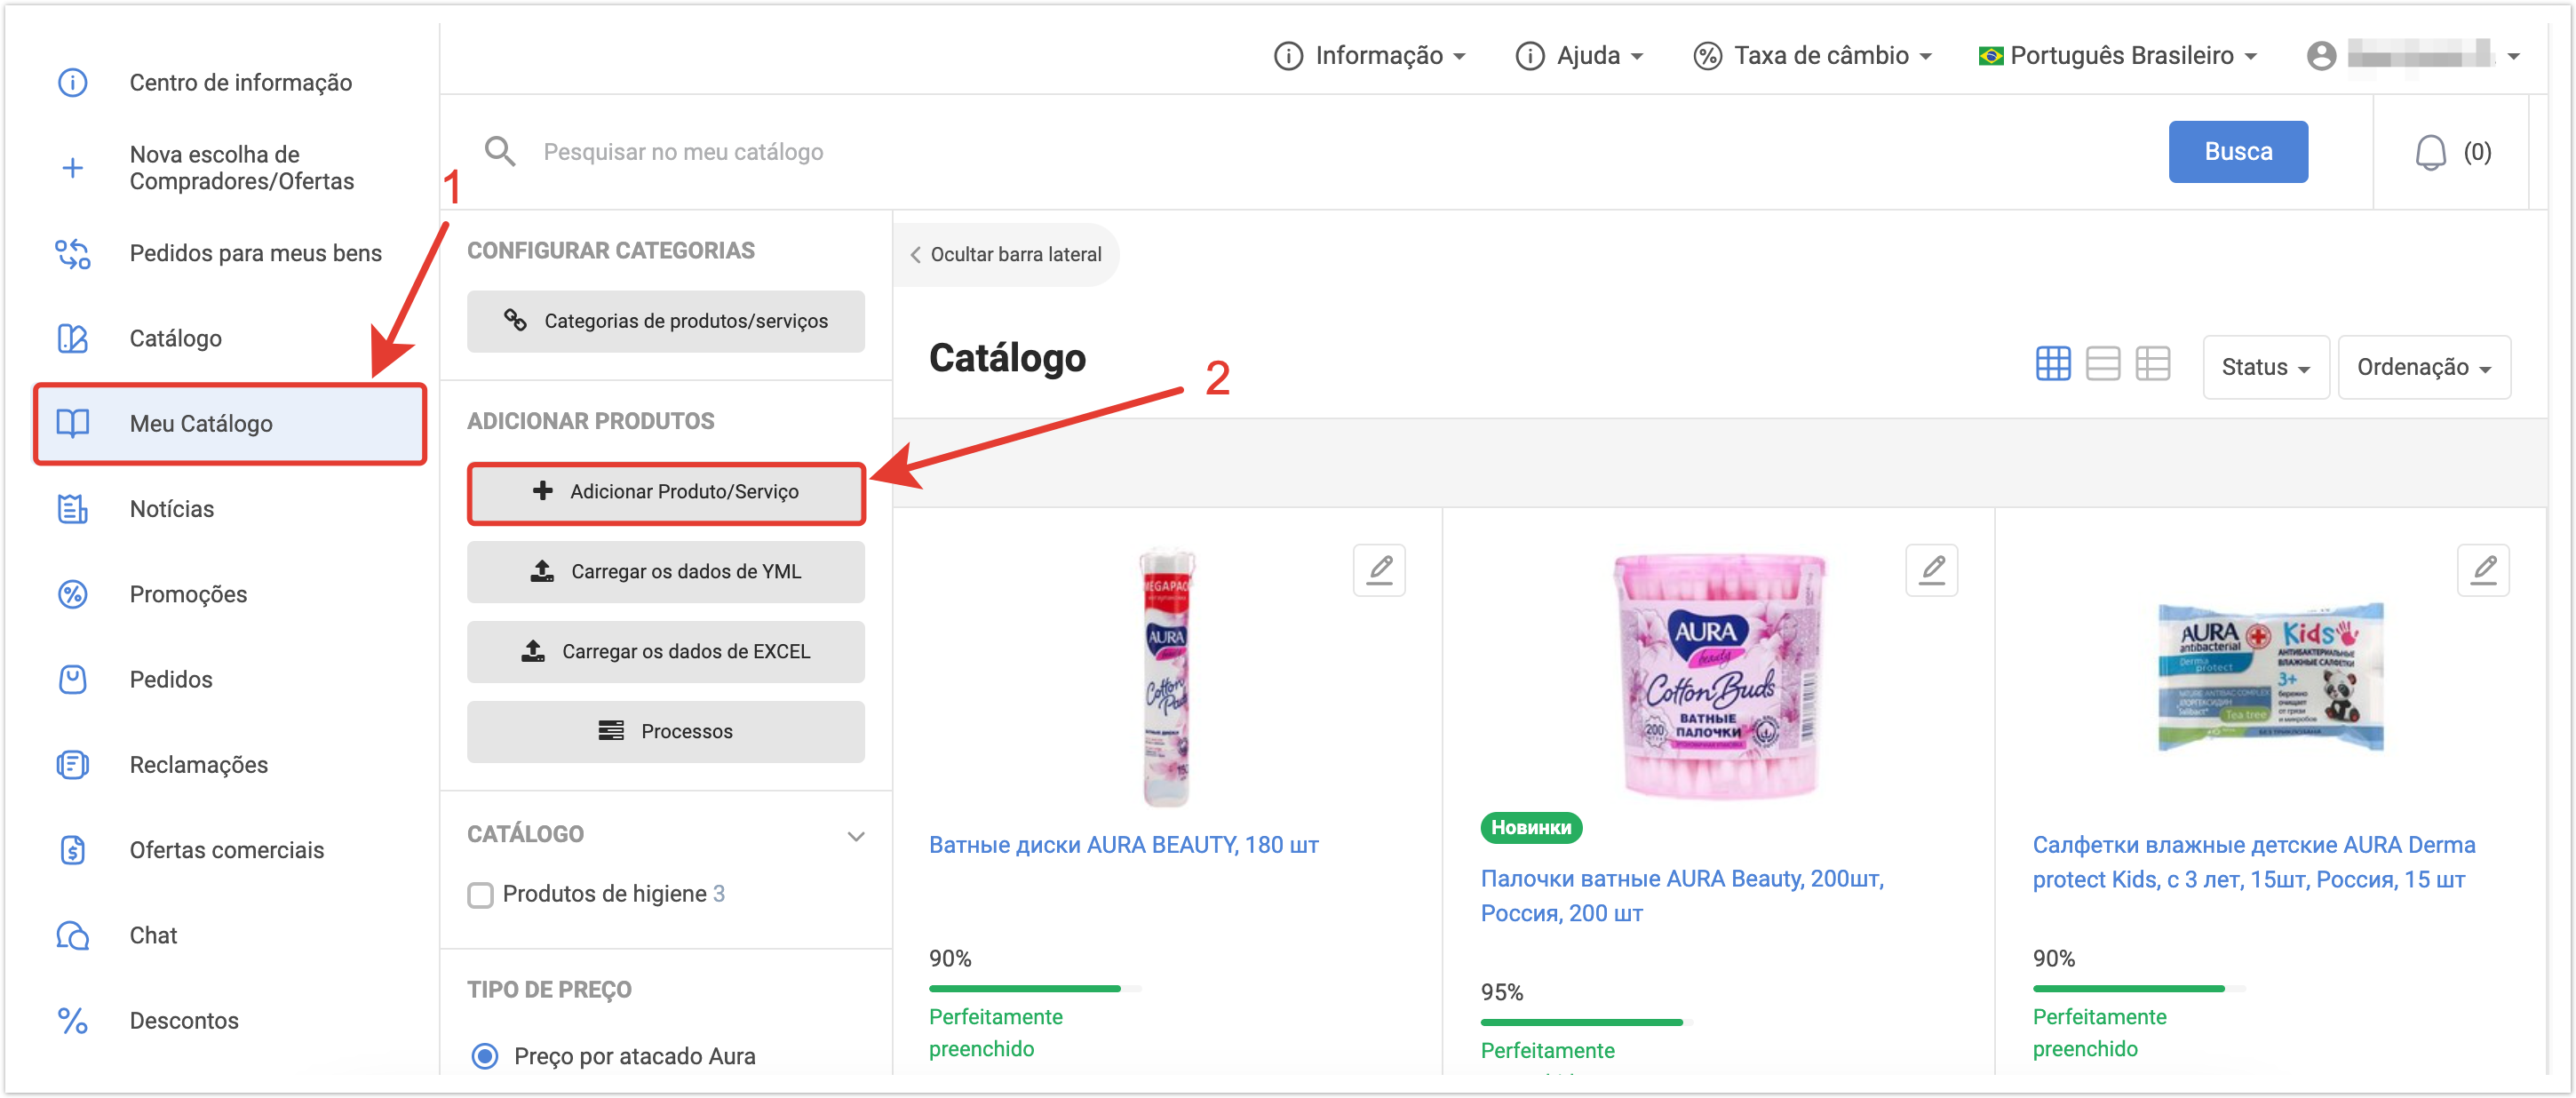
Para criar manualmente um cartão de produto manualmente, vá para a seção Meu catálogo na conta pessoal do fornecedor , tem de ir à secção My Catalog e clicar no botão Adicionar Produto/Serviçoe clique no botão Adicionar Produto/Serviço.
Depois disso, um formulário para adicionar um produto será aberto. No lado esquerdo da janela, você verá informações sobre dados de mídia e, na seção Erros de preenchimento, poderá ver quais atributos devem ser preenchidos para adicionar um produto. Os campos obrigatórios são marcados com um asterisco vermelho.
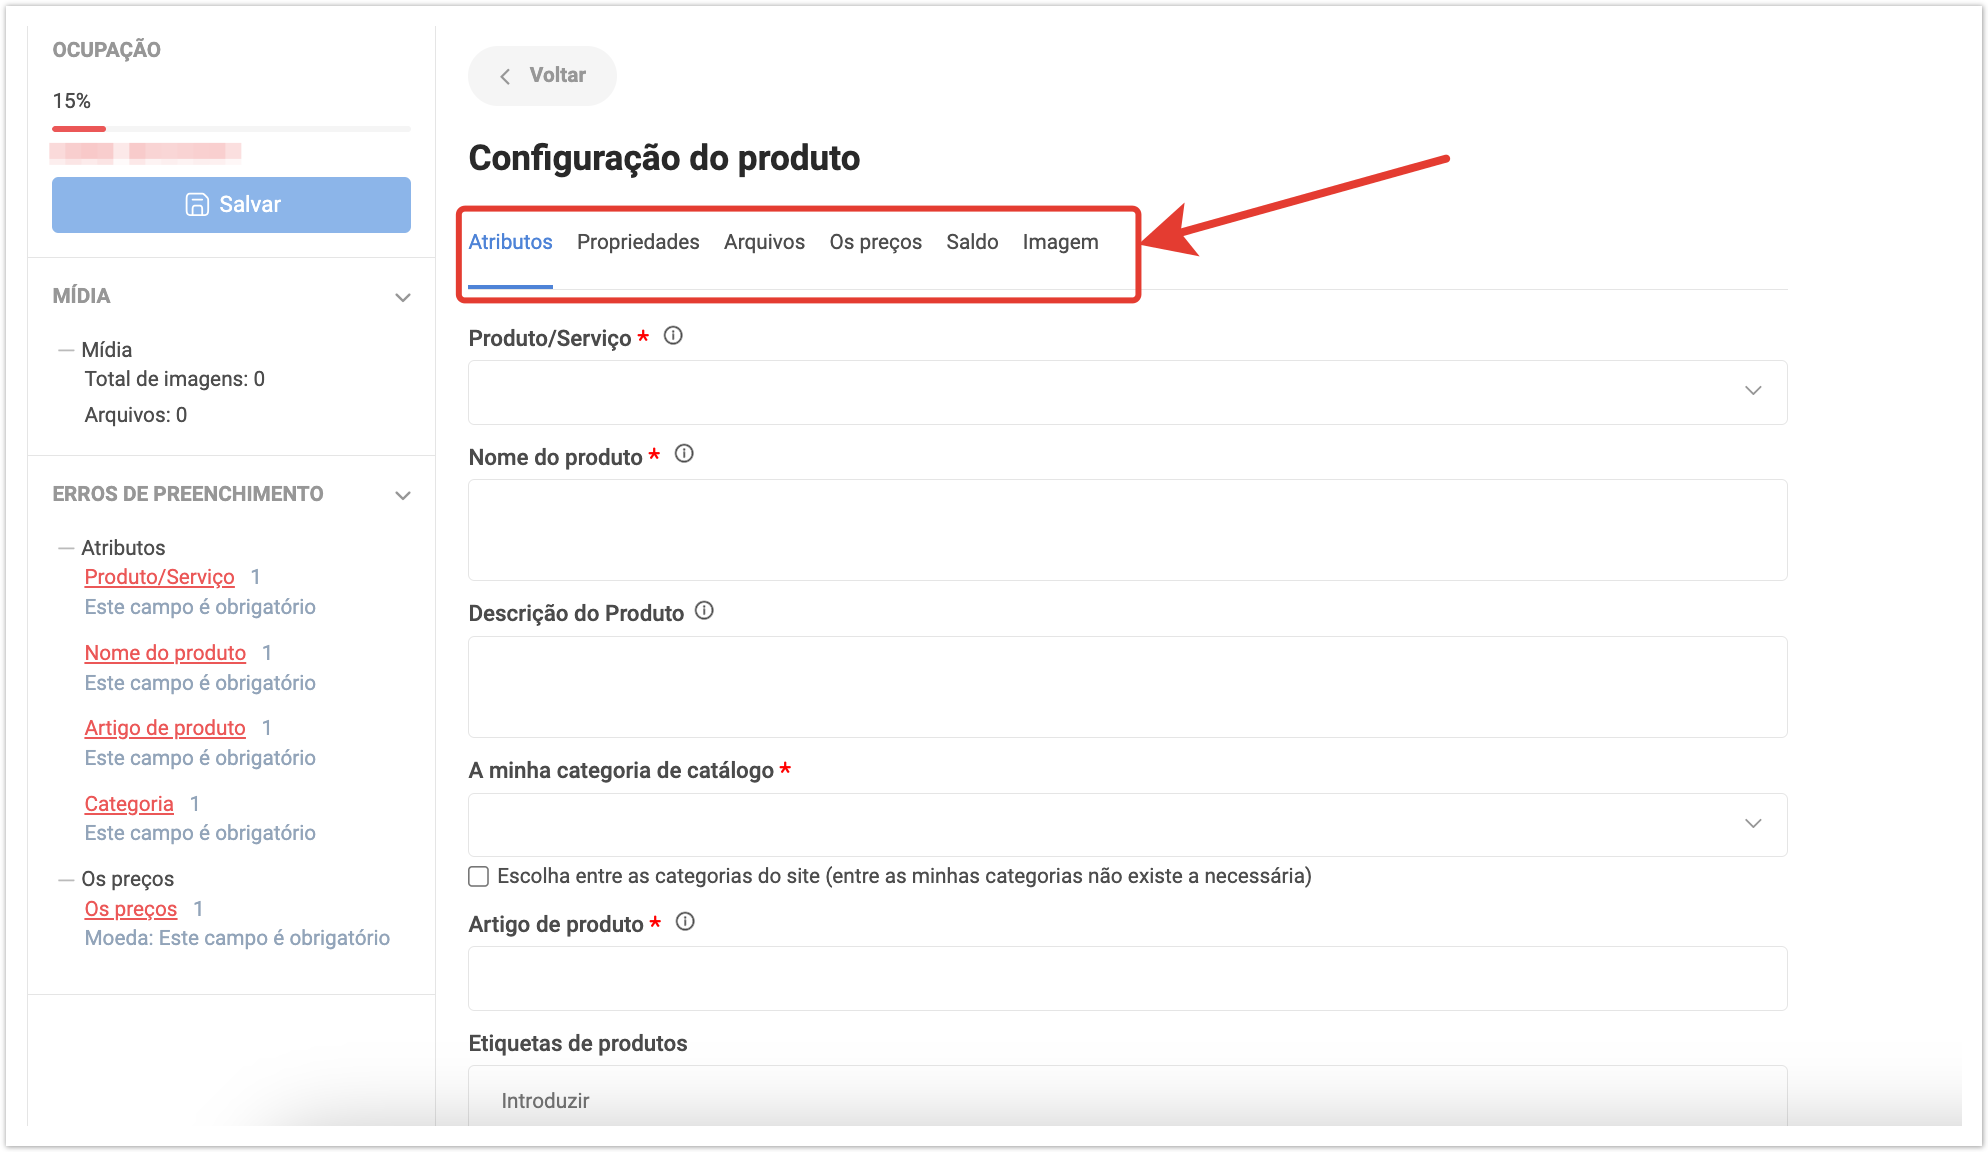
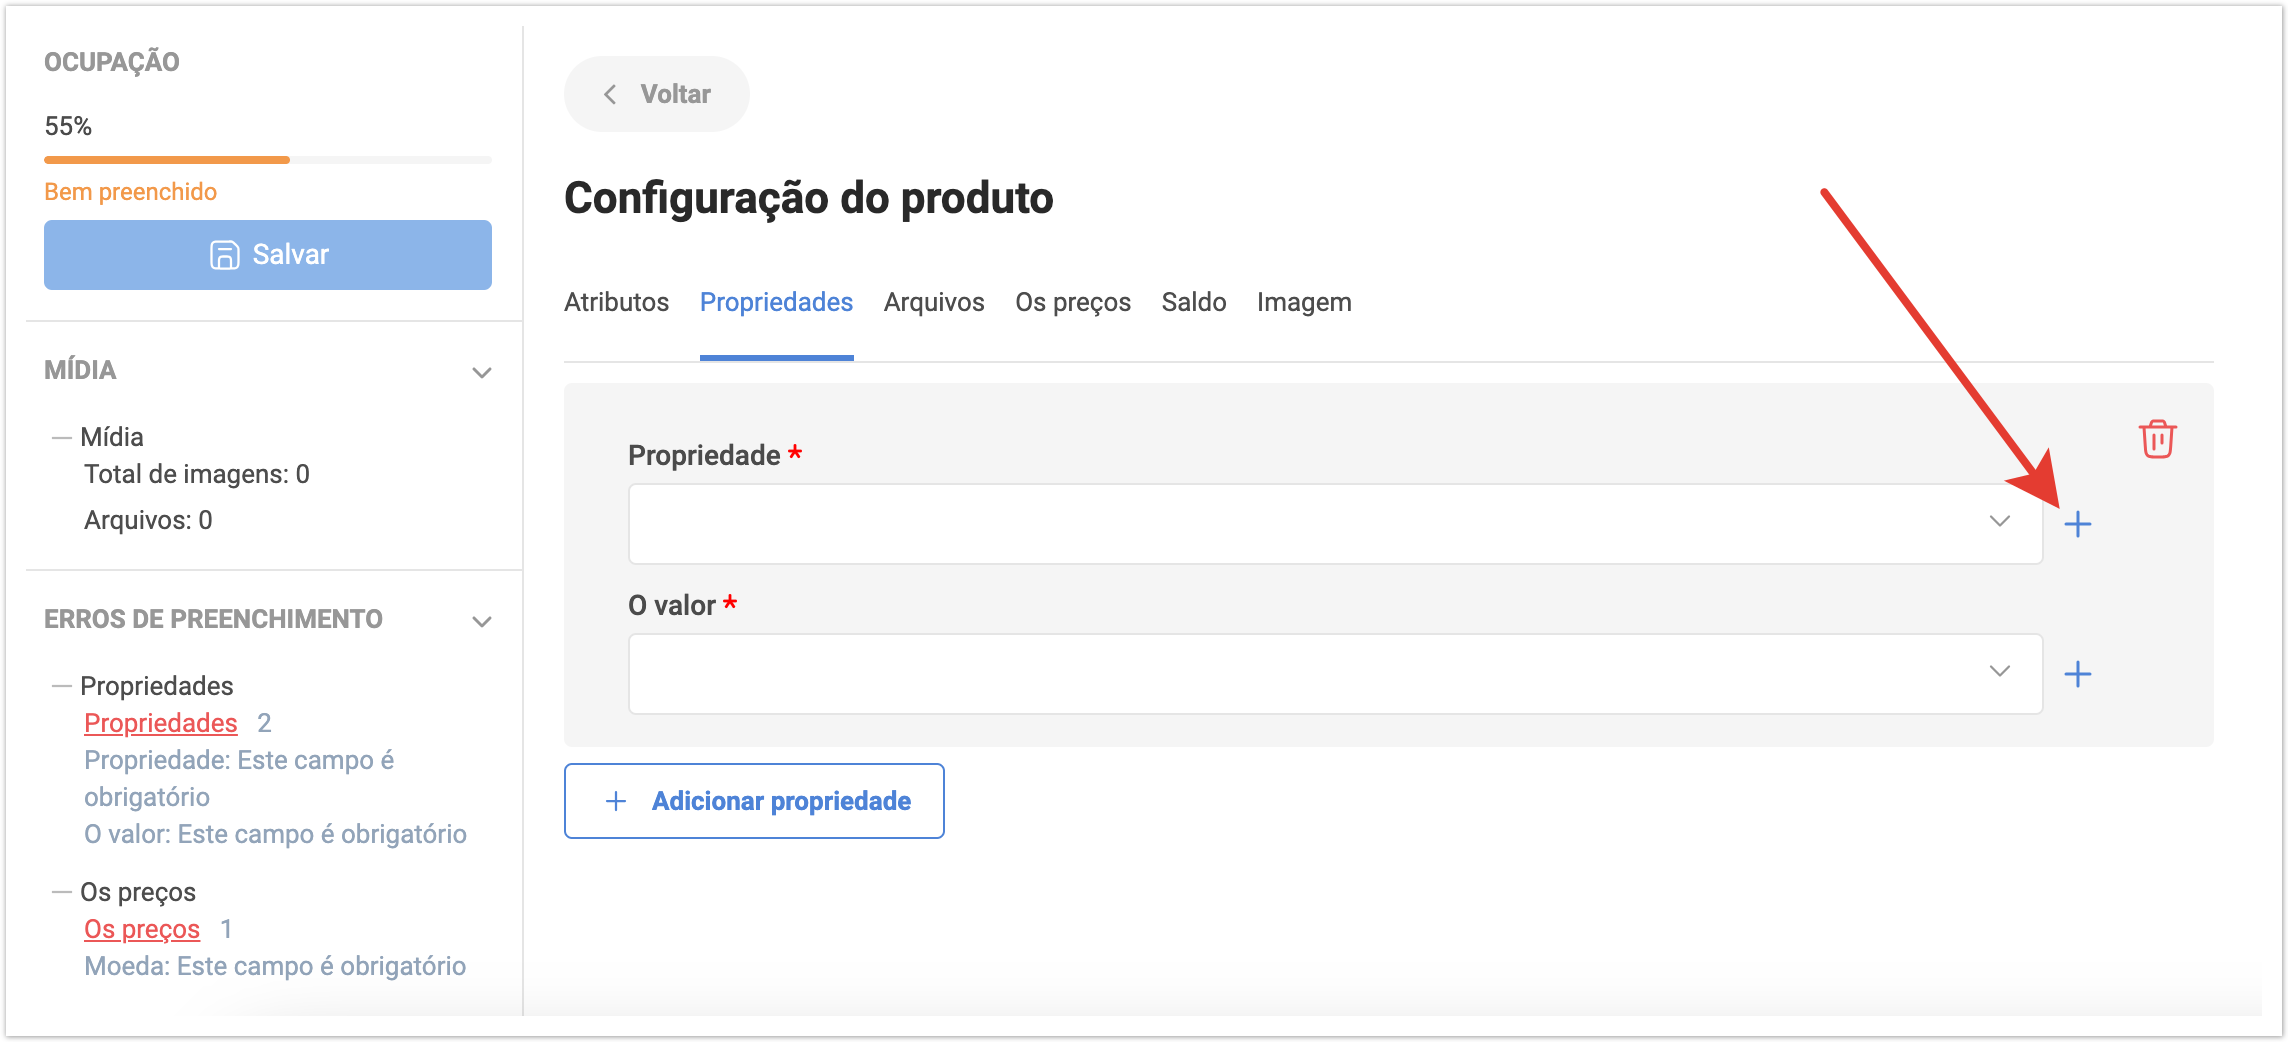
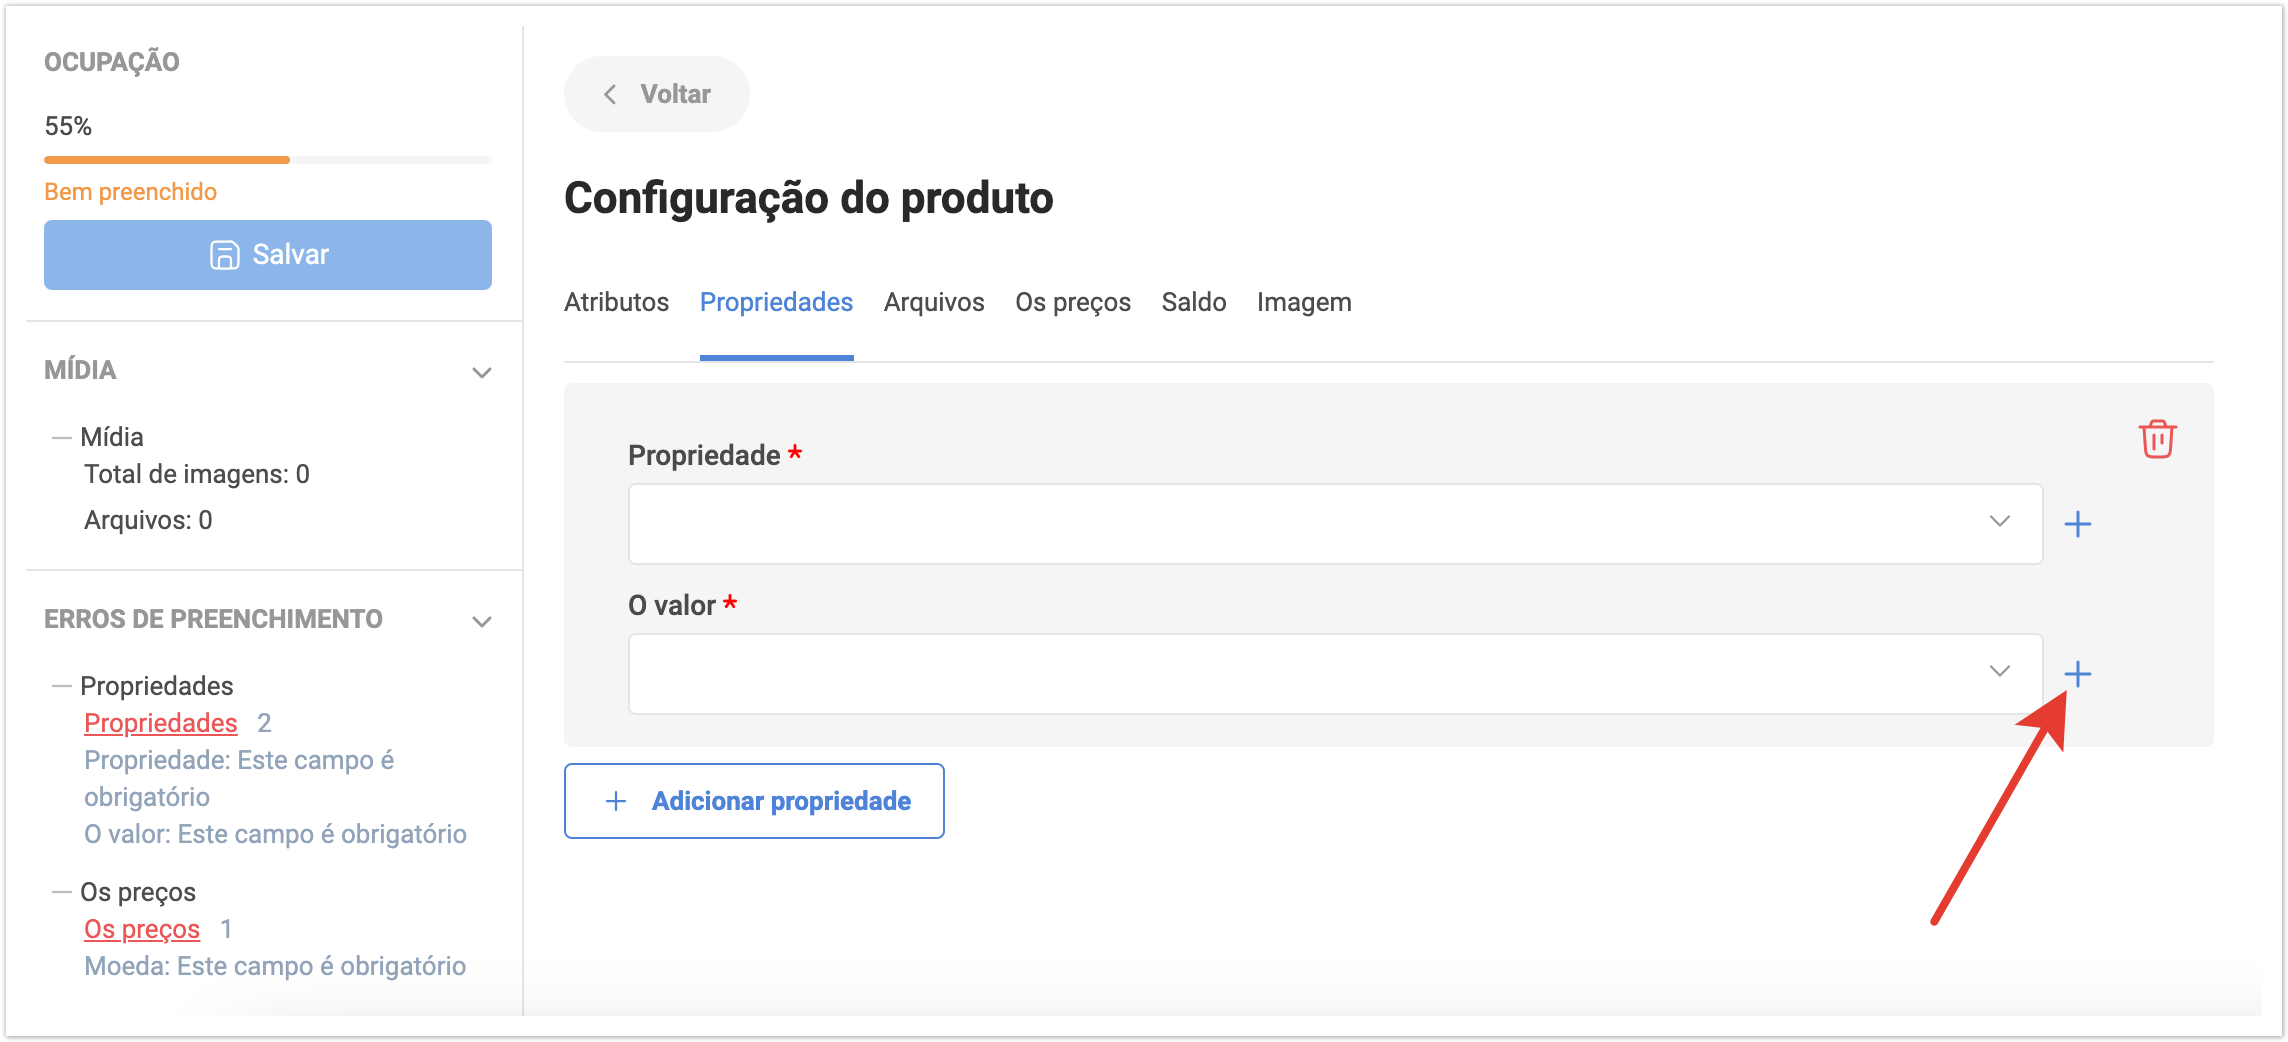
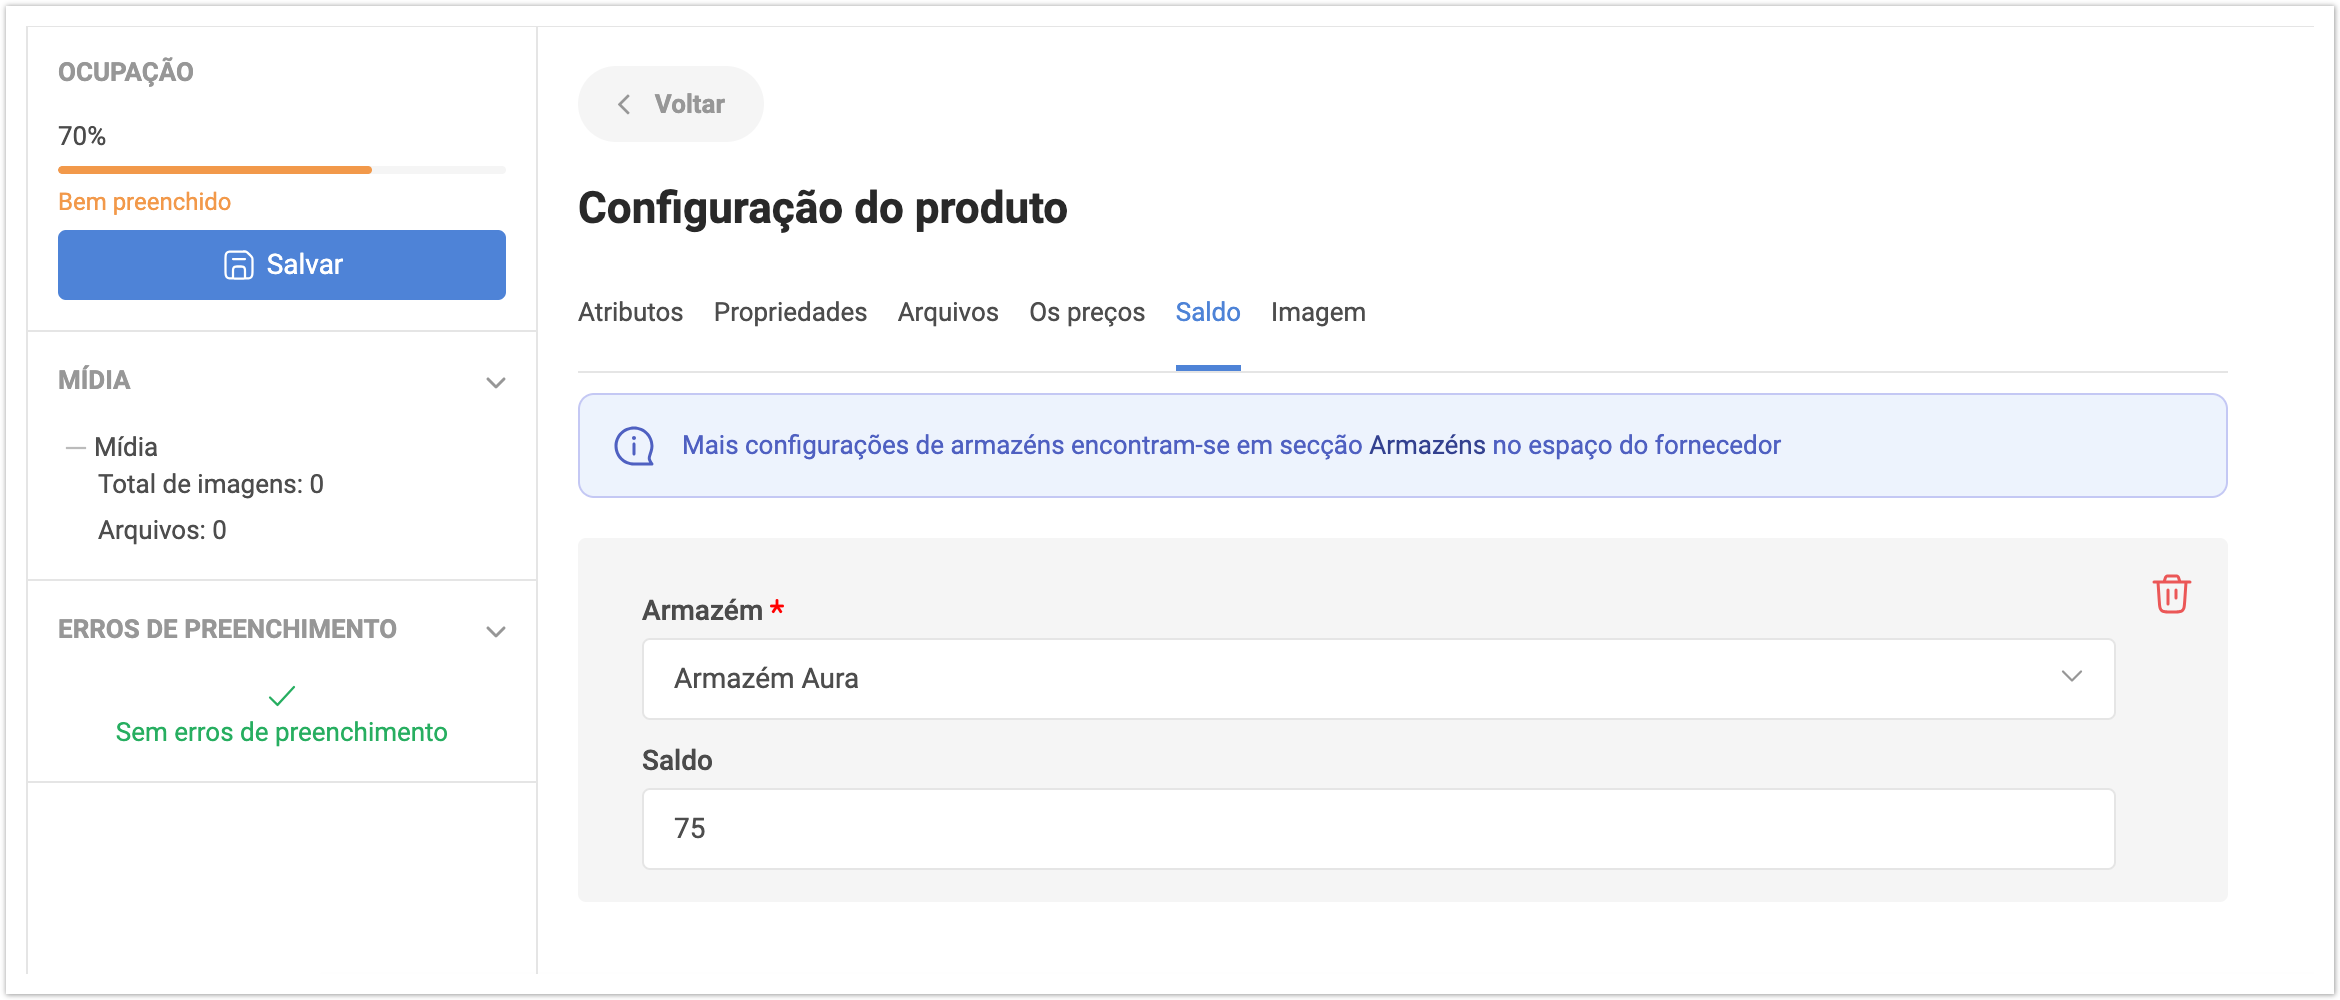
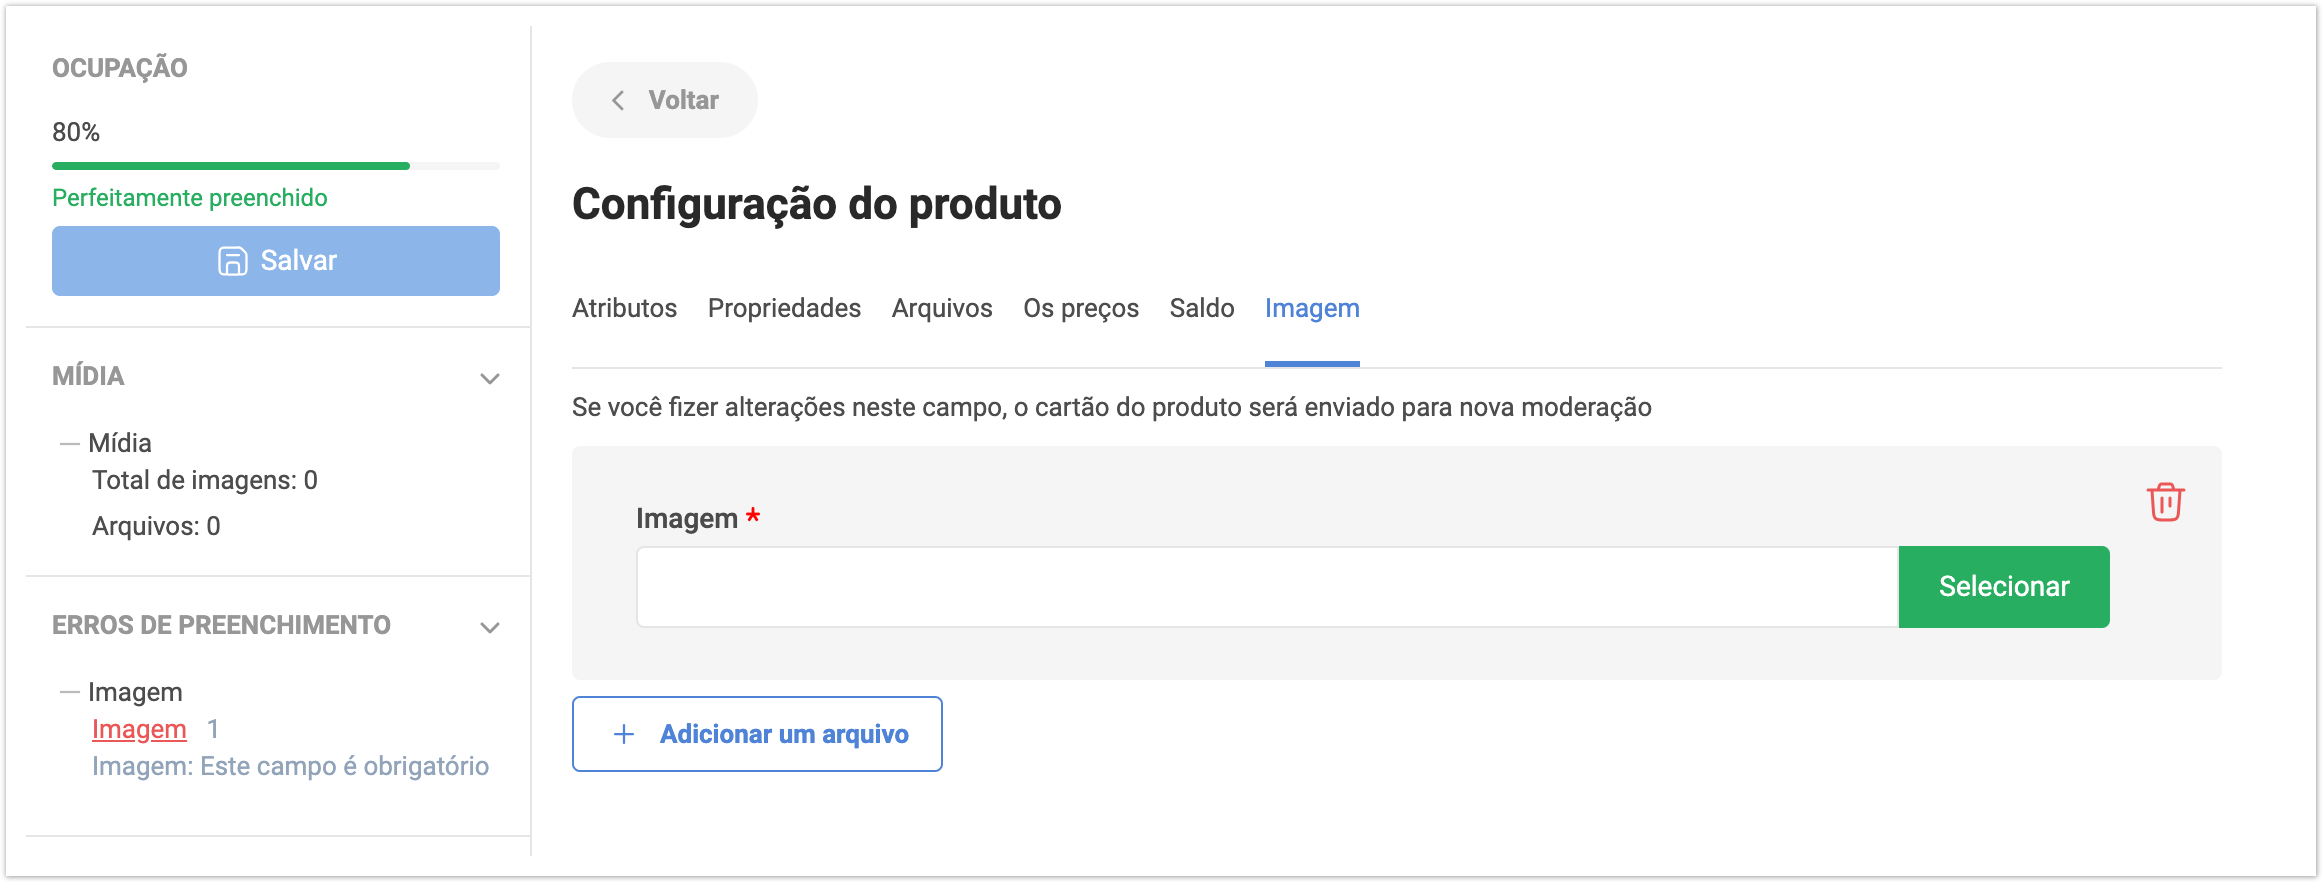
Os dados do produto podem ser encontrados em várias guias: Atributos, Propriedades, Arquivos, Preços, Saldo, Imagem.
A guia Atributos contém os seguintes dados:
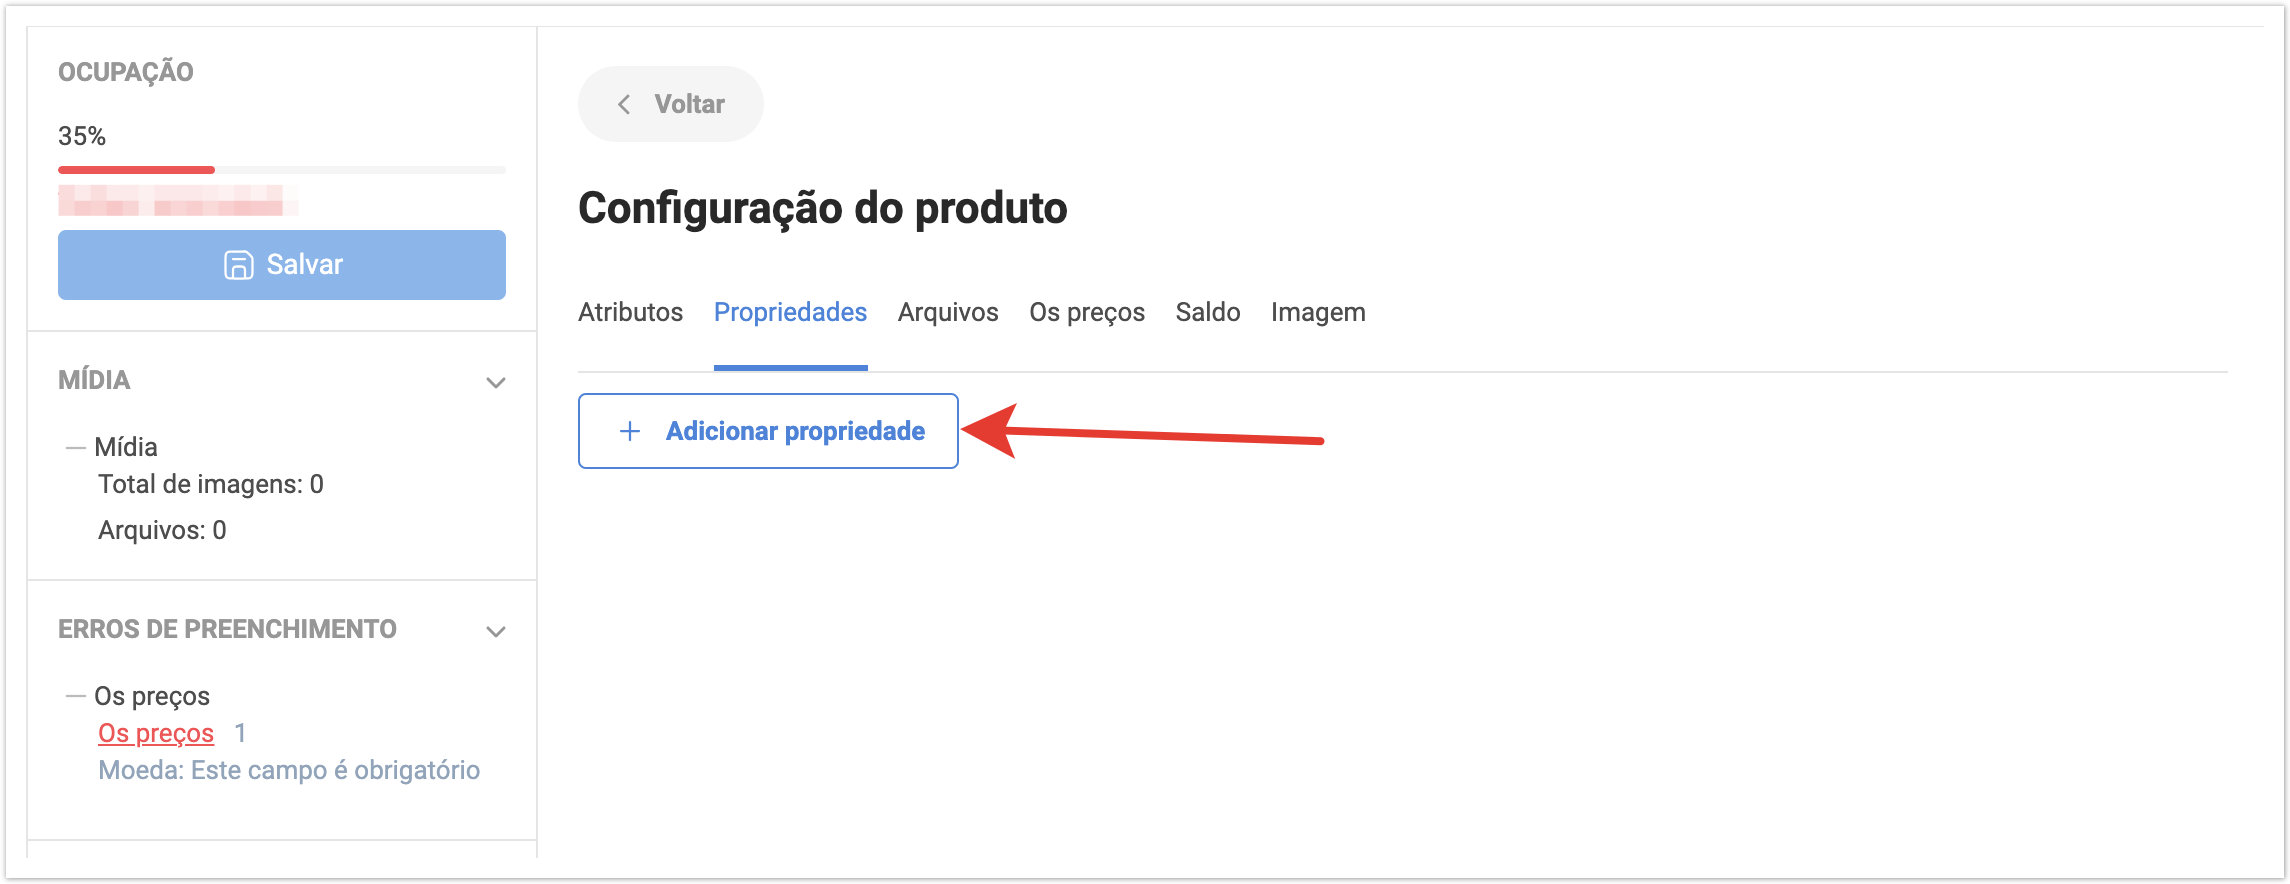
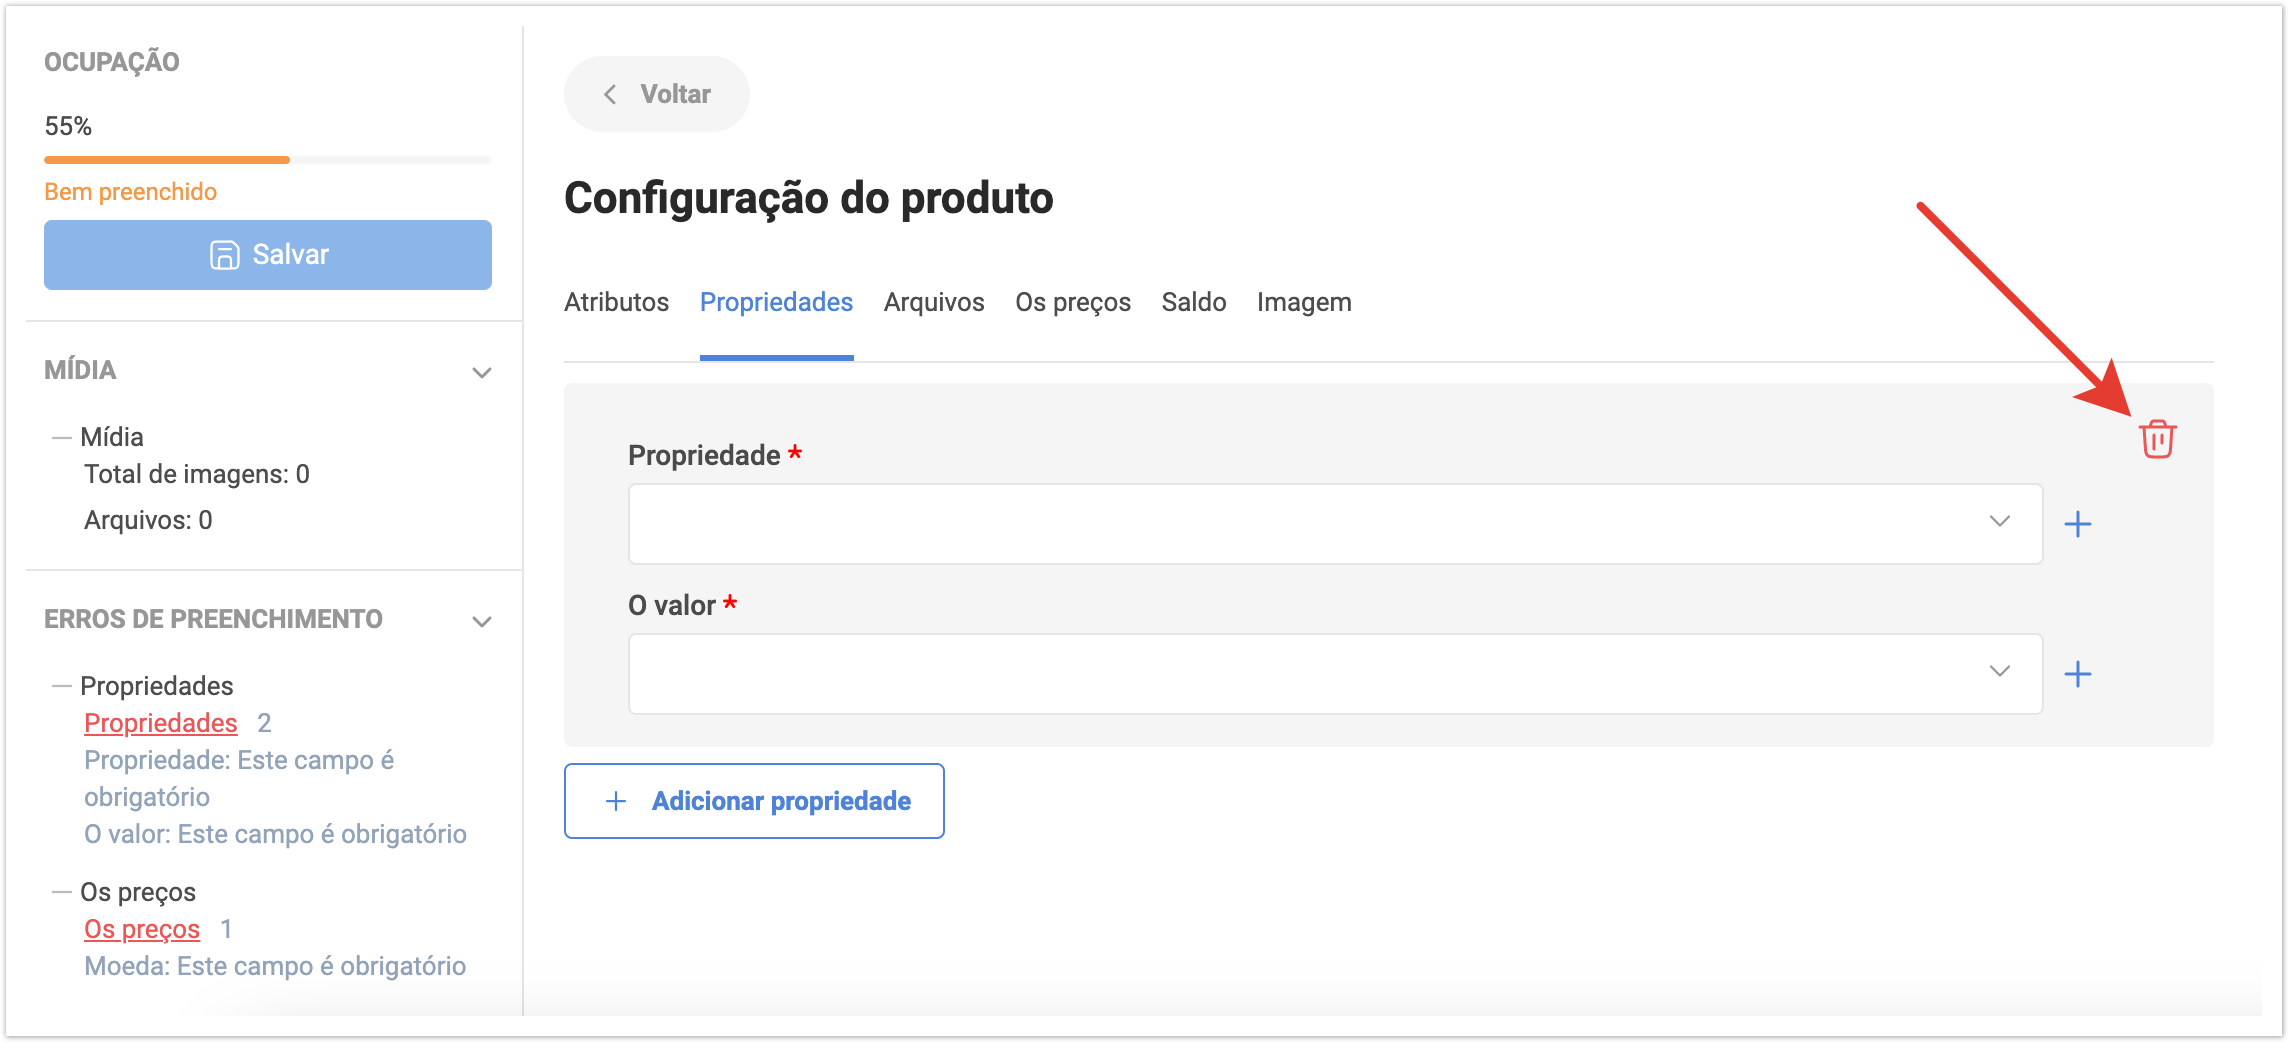
À medida que você preenche os campos obrigatórios, os Erros de preenchimento desaparecerão da lista. Na guia Propriedades, você pode adicionar as propriedades necessárias para o produto. Para fazer isso, clique no botão Adicionar propriedade.
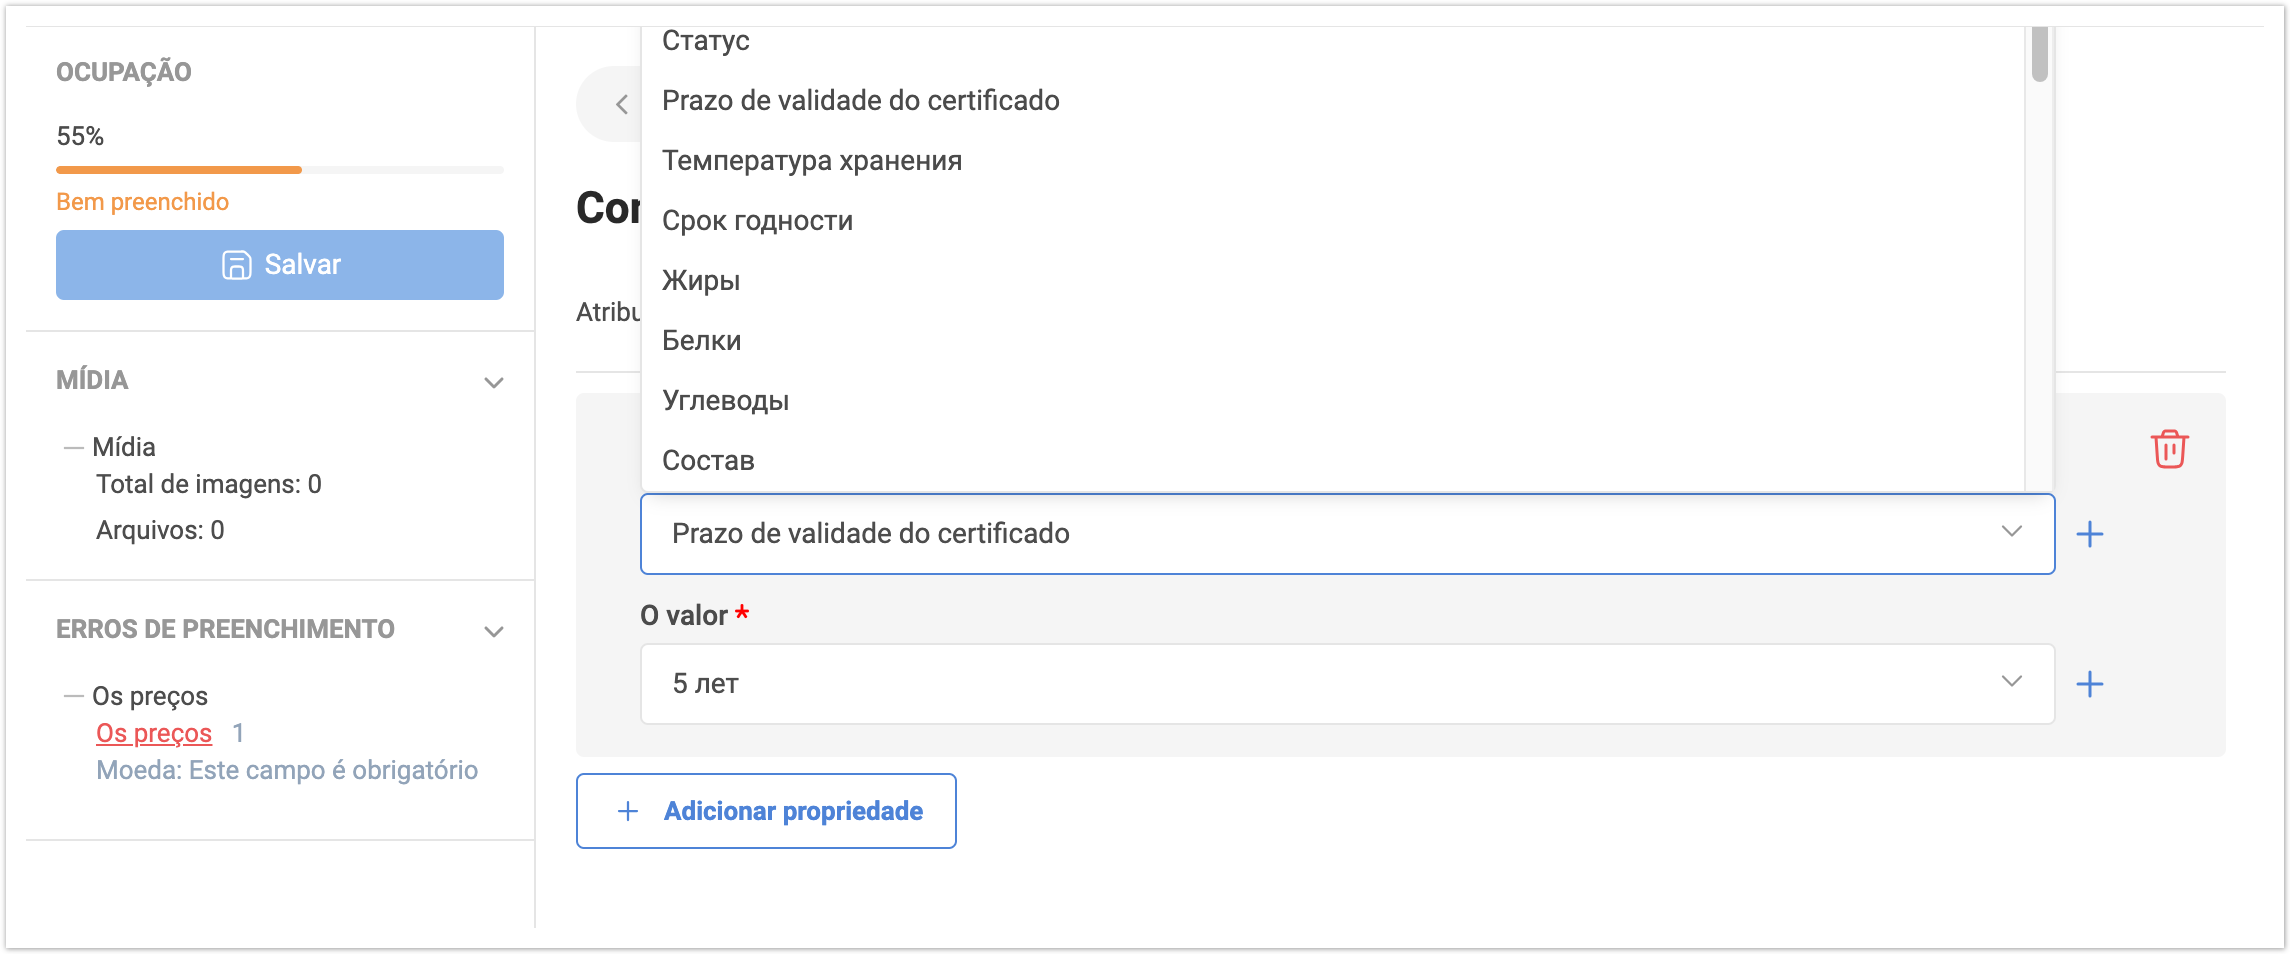
Depois disso, você precisa selecionar o que deseja adicionar na lista de propriedades e, em seguida, selecionar seu valor na lista.
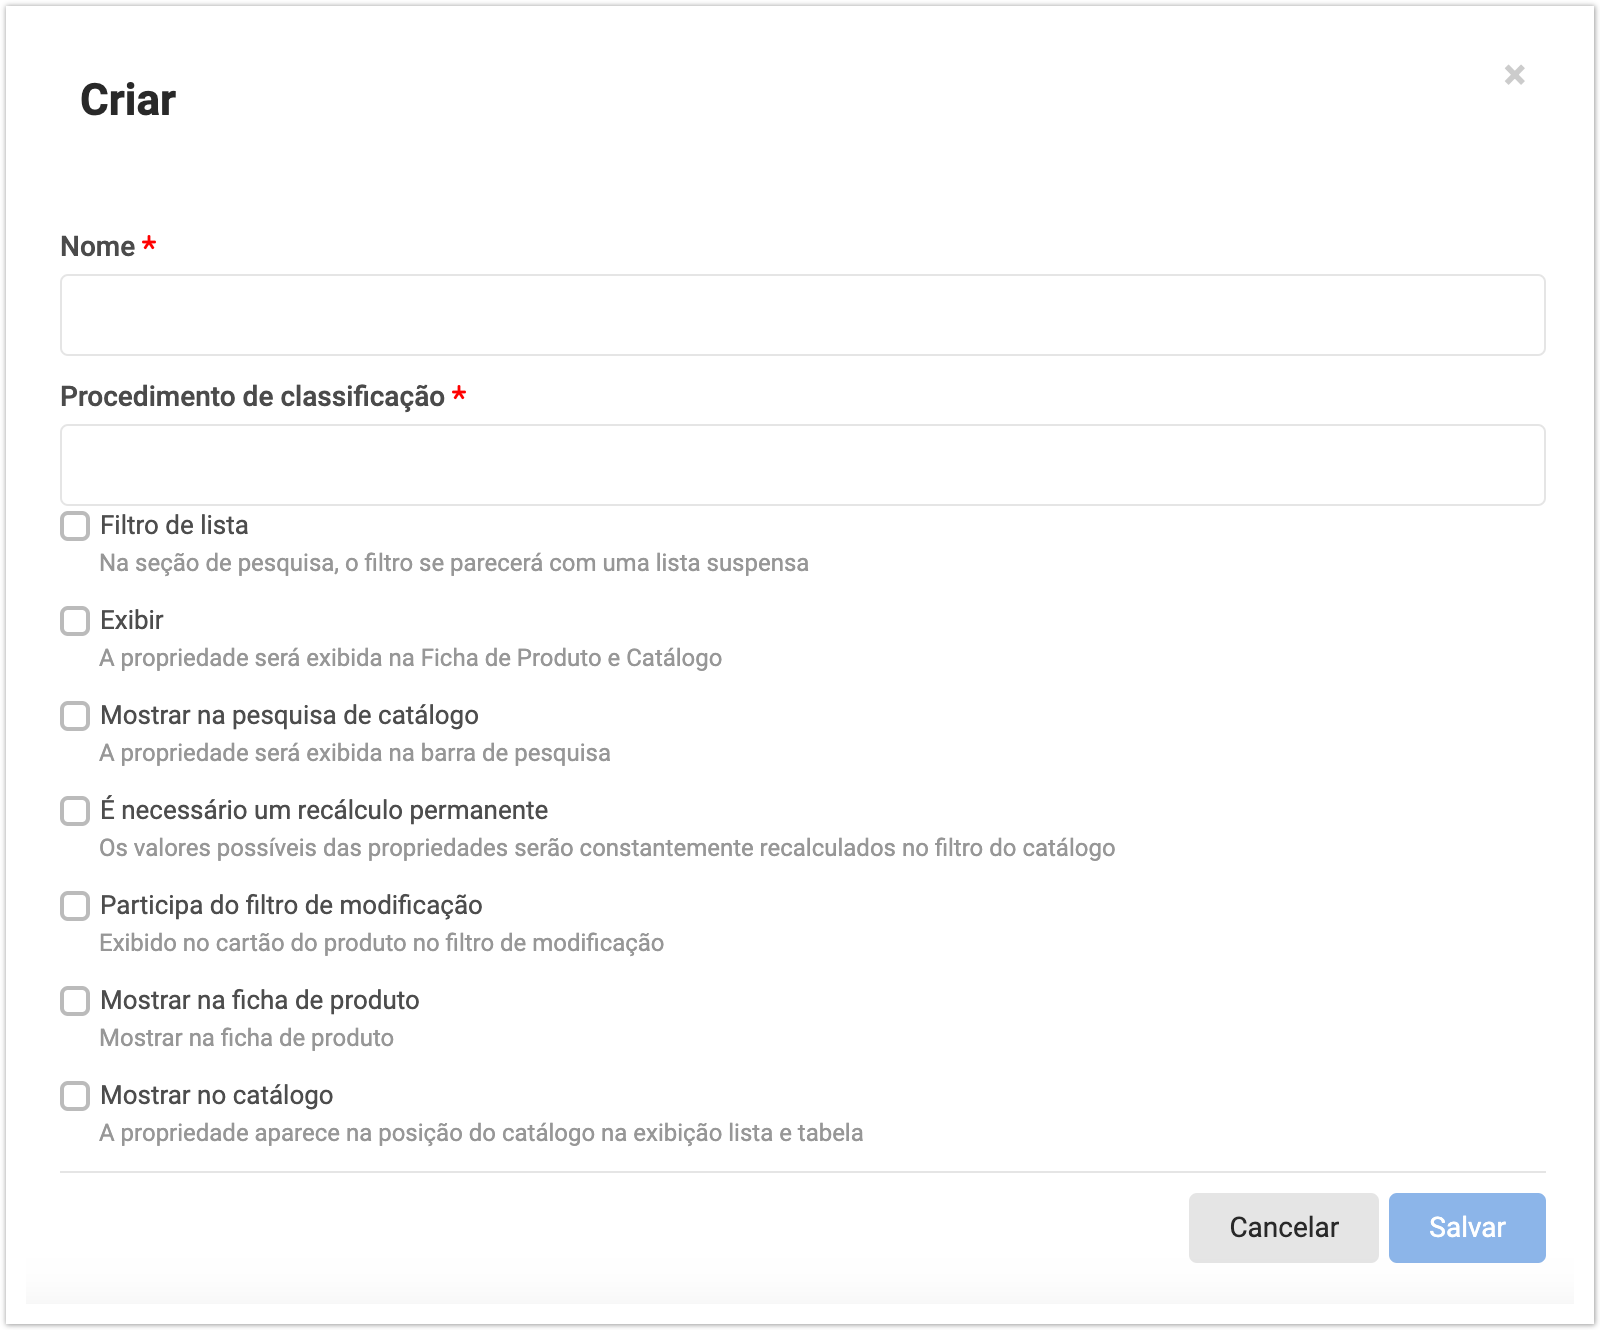
Se você quiser adicionar uma nova propriedade que não foi adicionada antes, então você precisa clicar no botão com o símbolo "+".
Uma janela será aberta para adicionar uma nova propriedade. Aqui você precisará especificar o Nome e a Ordem de Classificação. E, em seguida, na lista de configurações, selecione as necessárias para a propriedade a ser adicionada. Filtro de lista – Na pesquisa avançada, a propriedade será exibida como uma lista suspensa a partir da qual você pode selecionar os valores da propriedade do produto. Se a configuração estiver desabilitada, os valores de propriedade serão exibidos na forma de caixas de seleção onde você precisa marcar as caixas. Exibir — essa configuração é responsável por exibir a propriedade no catálogo e no cartão do produto. Se a propriedade não deve ser exibida, basta remover a caixa de seleção. Mostrar na pesquisa de catálogo - Essa configuração controla a exibição da propriedade na barra de pesquisa. O recálculo constante é necessário - quando a caixa de seleção estiver marcada, os valores da propriedade serão recalculados no filtro de catálogo. Participa do filtro de modificação — quando você marca a caixa de seleção, essa propriedade pode ser selecionada no filtro de modificação no cartão do produto. Mostrar na ficha de produto — a configuração controla se a propriedade será exibida no cartão do produto. Mostrar no catálogo — a configuração controla se a propriedade será exibida no catálogo de produtos (se o catálogo for exibido como uma lista ou tabela).
Após o preenchimento dos campos, você precisa clicar no botão Salvar e a propriedade será adicionada, em seguida, da mesma forma, clicando no botão "+", adicione um valor para esta propriedade.
Se uma propriedade foi adicionada por engano, você pode removê-la clicando no símbolo da lixeira.
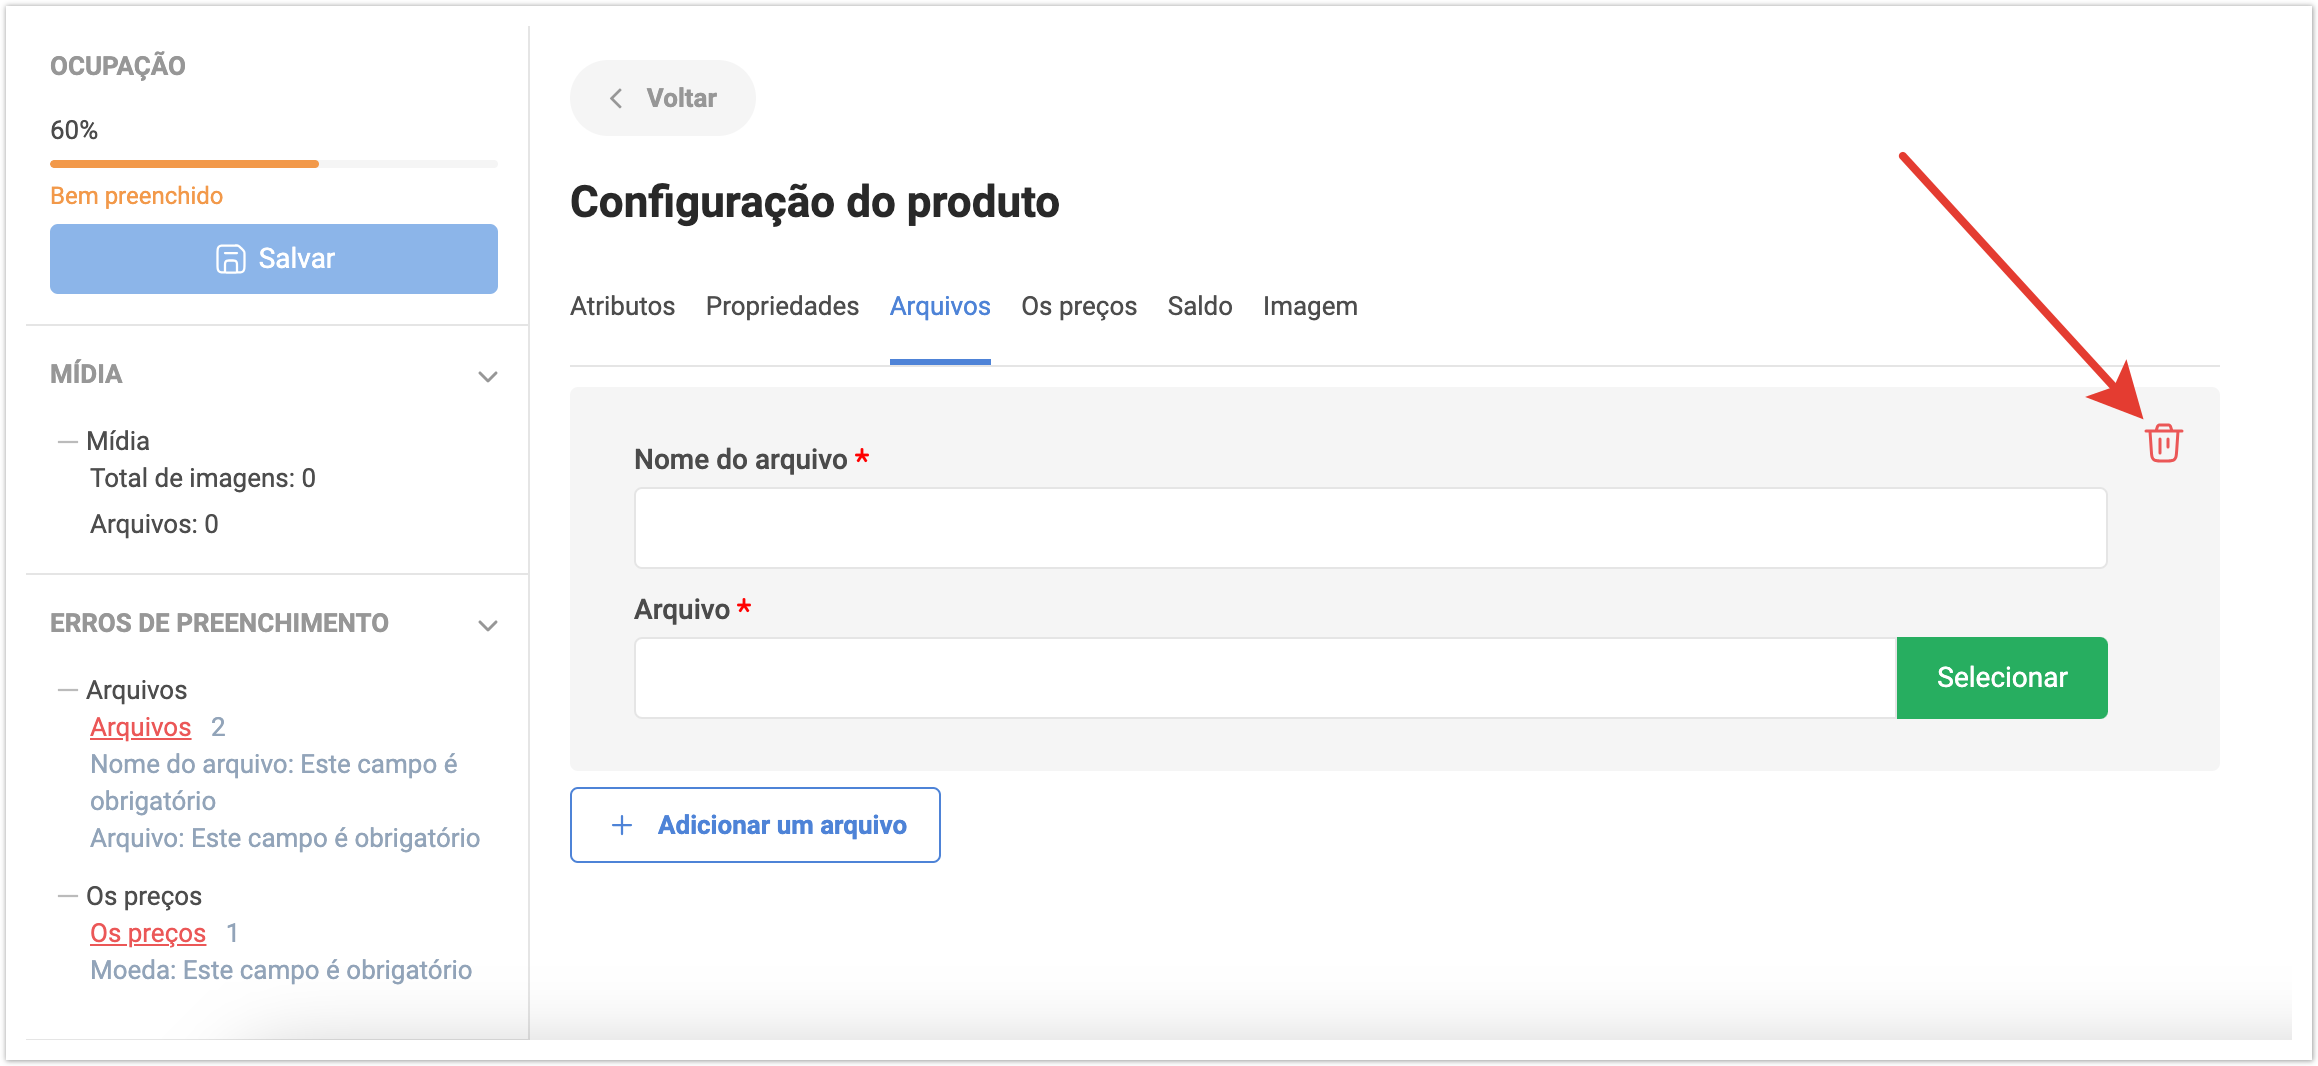
Na guia Arquivos, há uma opção para adicionar arquivos adicionais, como Certificados, Especificações, Instruções e quaisquer outros arquivos que devam ser exibidos ao usuário final no cartão do produto. Para adicionar um arquivo, clique no botão Adicionar um arquivo e selecione-o no computador local.
Você também pode excluir um arquivo baixado anteriormente se ele não for mais relevante.
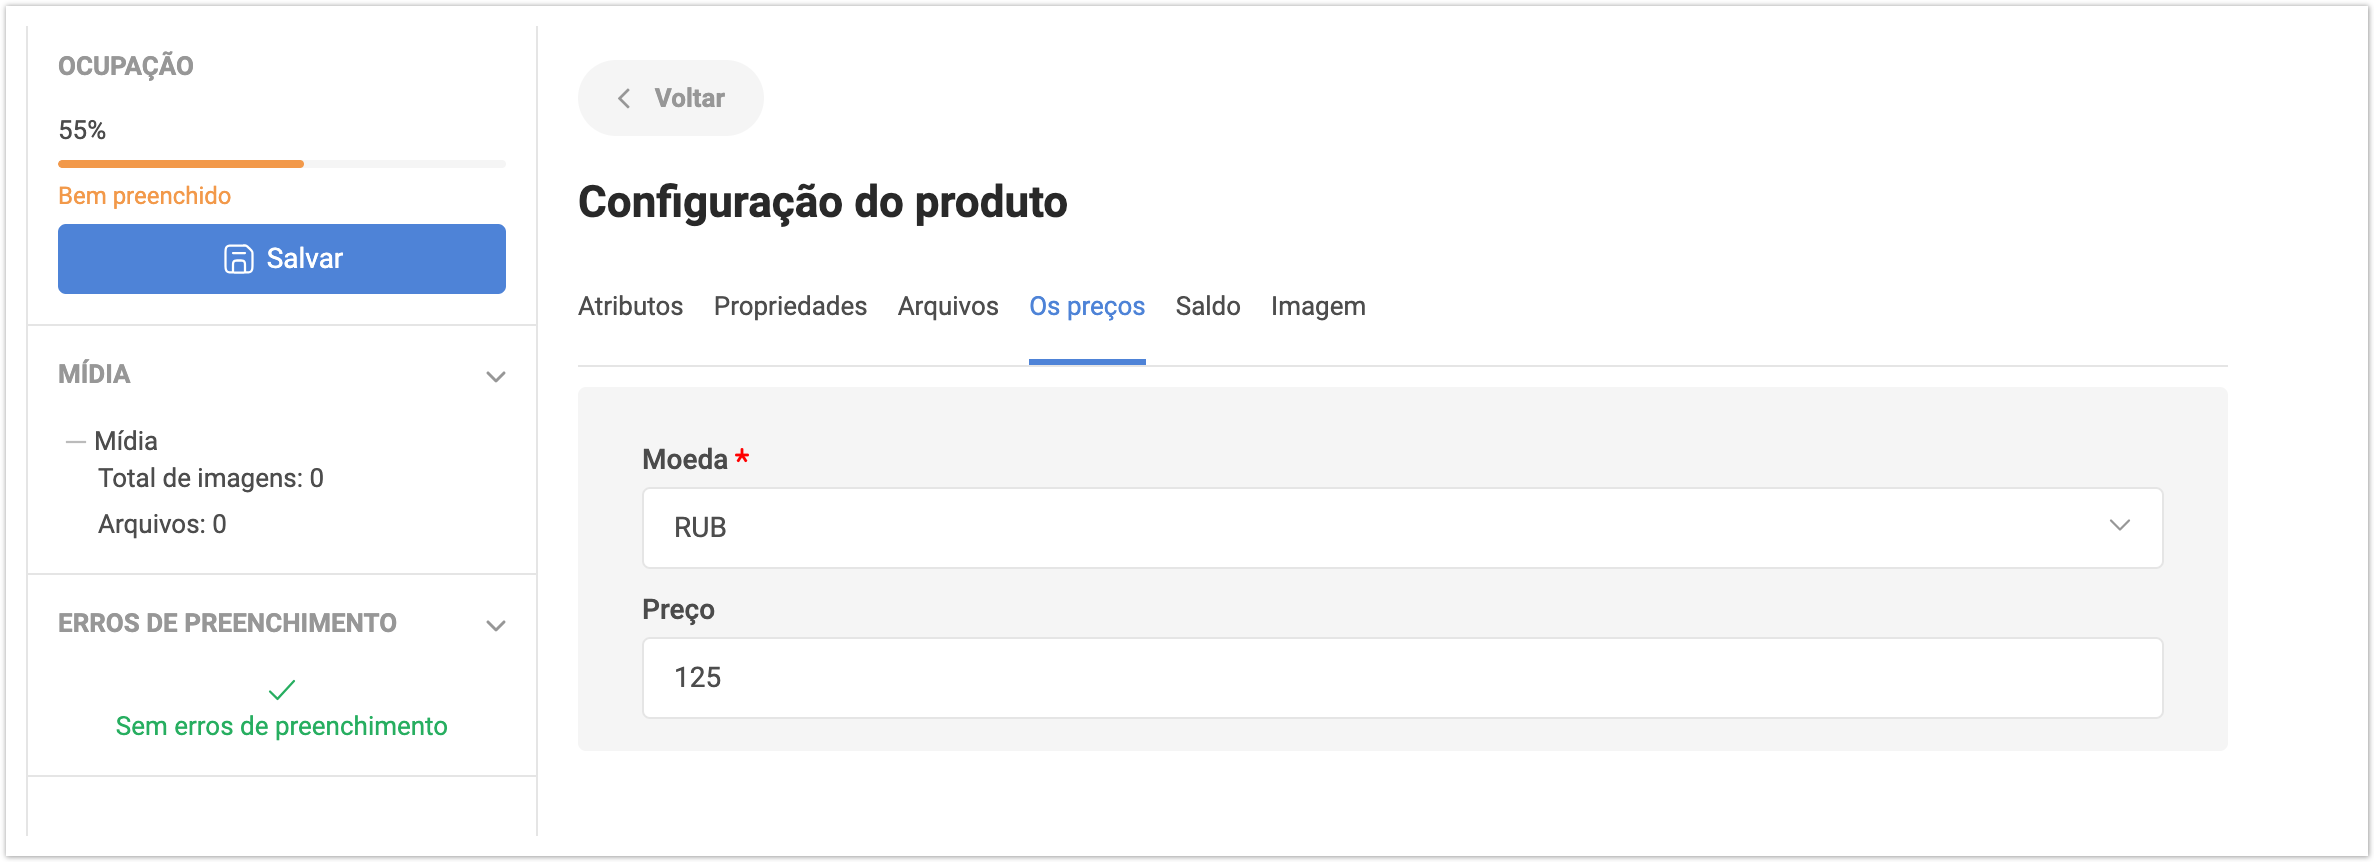
Na guia Preços, você pode adicionar um valor de tipo de preço para um item. Você precisa especificar a moeda - você pode selecioná-la na lista usando a pesquisa. No campo Preço, especifique o valor do preço para o item. No campo Tipo de preço, selecione o tipo de preço que você inseriu anteriormente. Ao clicar no botão Adicionar preço, você pode adicionar vários valores para diferentes tipos de preços para um produto. Assim, dependendo do tipo de preço selecionado, o valor do preço do produto será diferente.
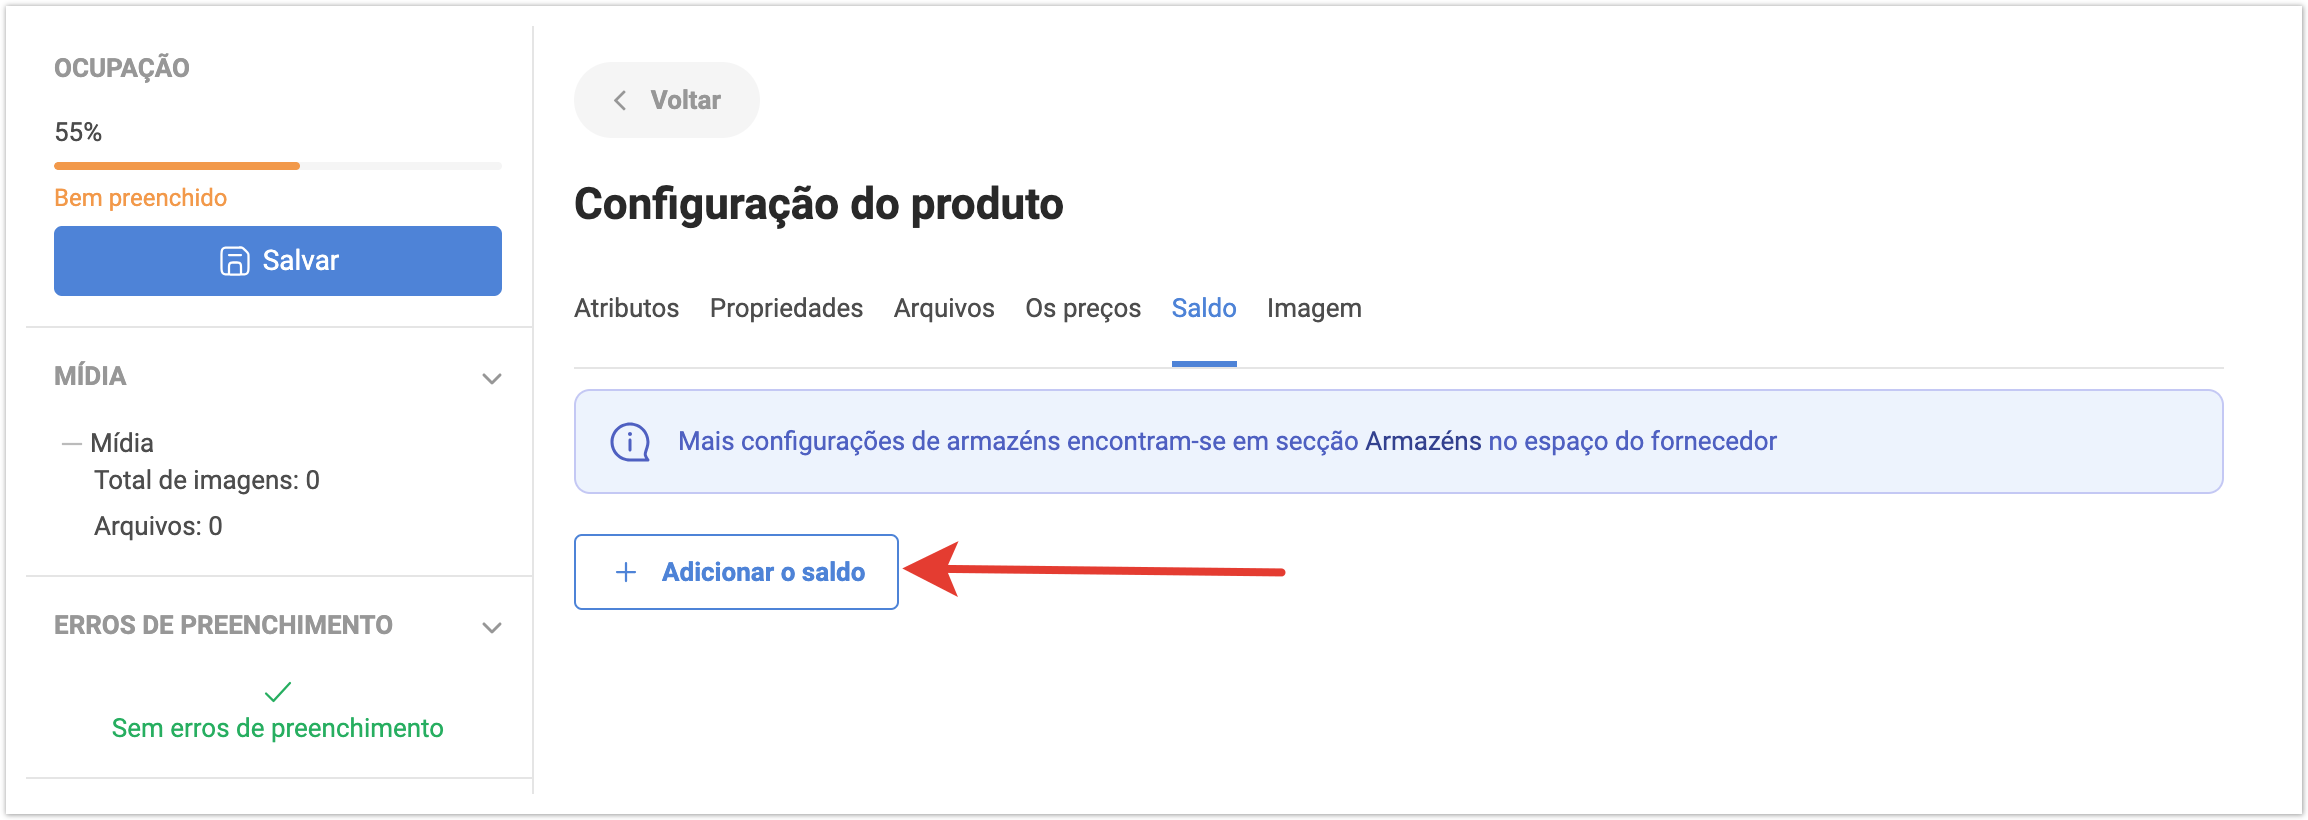
Na guia Estoque, você pode especificar os saldos de estoque para o item em armazéns específicos. Para fazer isso, clique no botão Adicionar o saldo.
Depois disso, selecione um depósito na lista que você criou anteriormente no estágio de configurações de perfil e especifique o saldo nesse depósito. Se o produto estiver listado em vários armazéns, clicando no botão Adicionar o saldo, você poderá especificar os saldos em outros armazéns para este item.
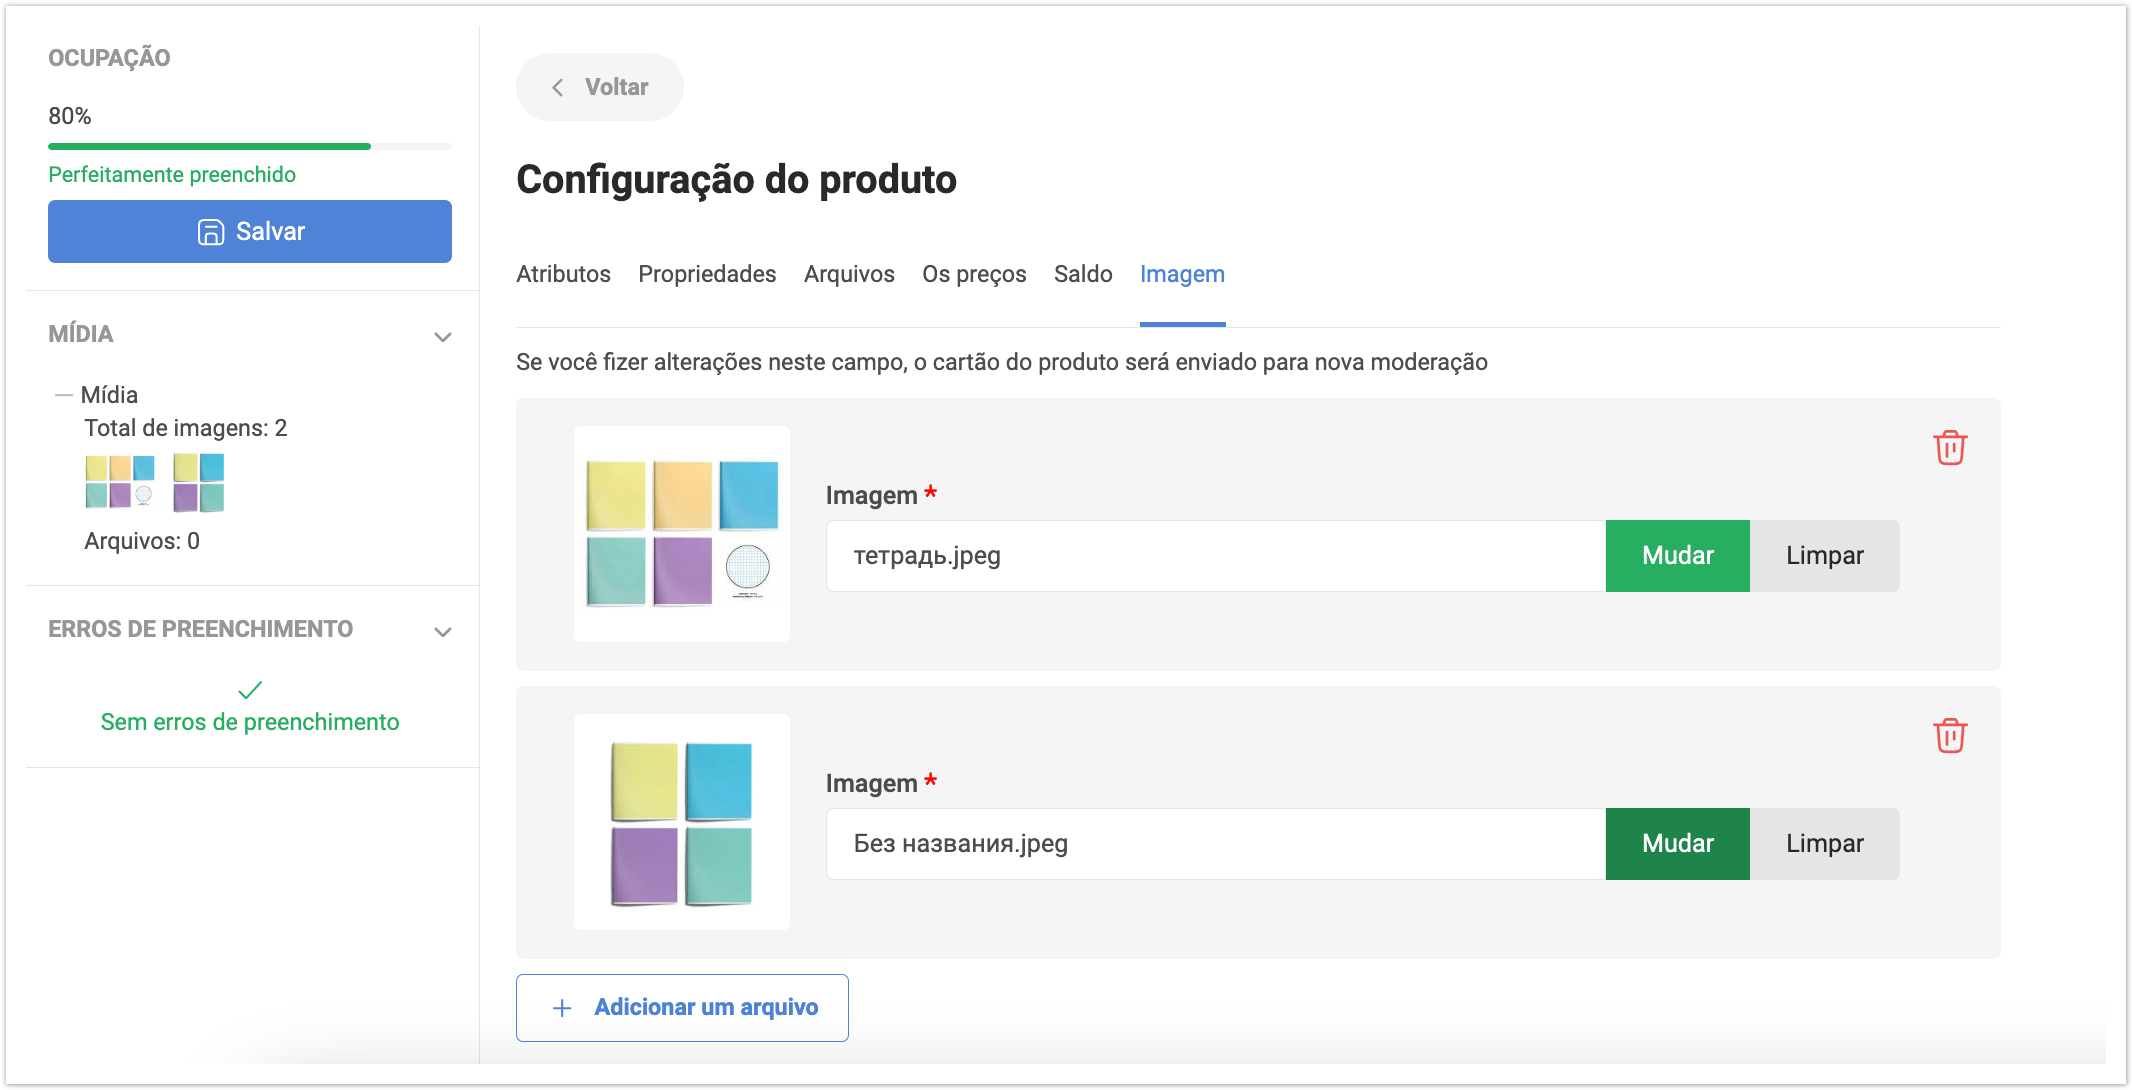
Na guia Imagens, você pode carregar imagens para o produto. Para fazer isso, clique no botão Adicionar um arquivo e, em seguida, clique no botão Selecionar para adicionar arquivo do computador local.
Você pode adicionar várias imagens e também pode editar ou limpar uma imagem carregada anteriormente. Se uma imagem for carregada por engano, você poderá excluí-la.
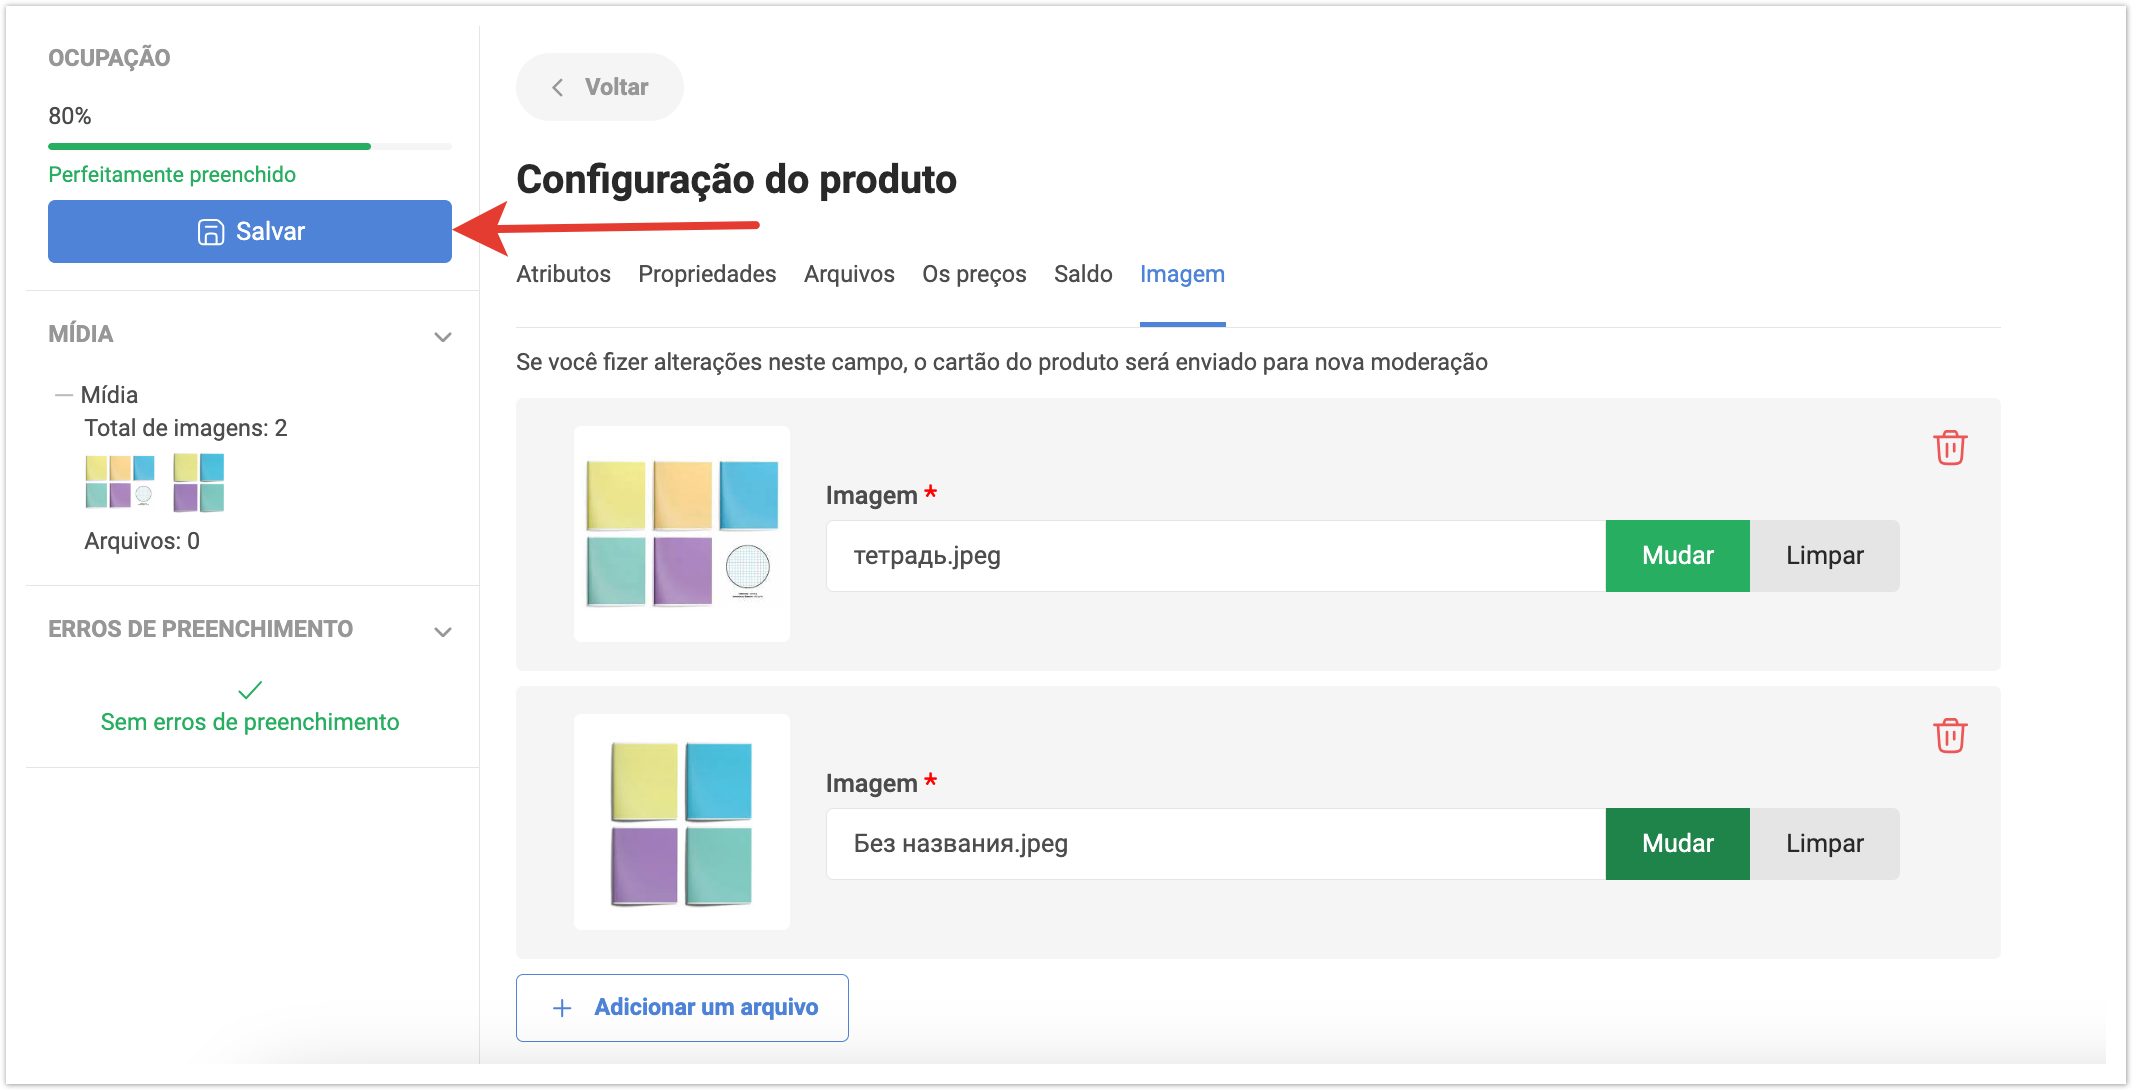
Depois de preencher todos os campos obrigatórios, você precisa clicar no botão Salvar para adicionar o produto ao catálogo.
Posteriormente, você poderá editar manualmente o produto se houver alguma alteração nele. |