
| Sv translation | |||||||||||||||||||||||||
|---|---|---|---|---|---|---|---|---|---|---|---|---|---|---|---|---|---|---|---|---|---|---|---|---|---|
| |||||||||||||||||||||||||
Информация про настройку категорий также рассказана в видео:
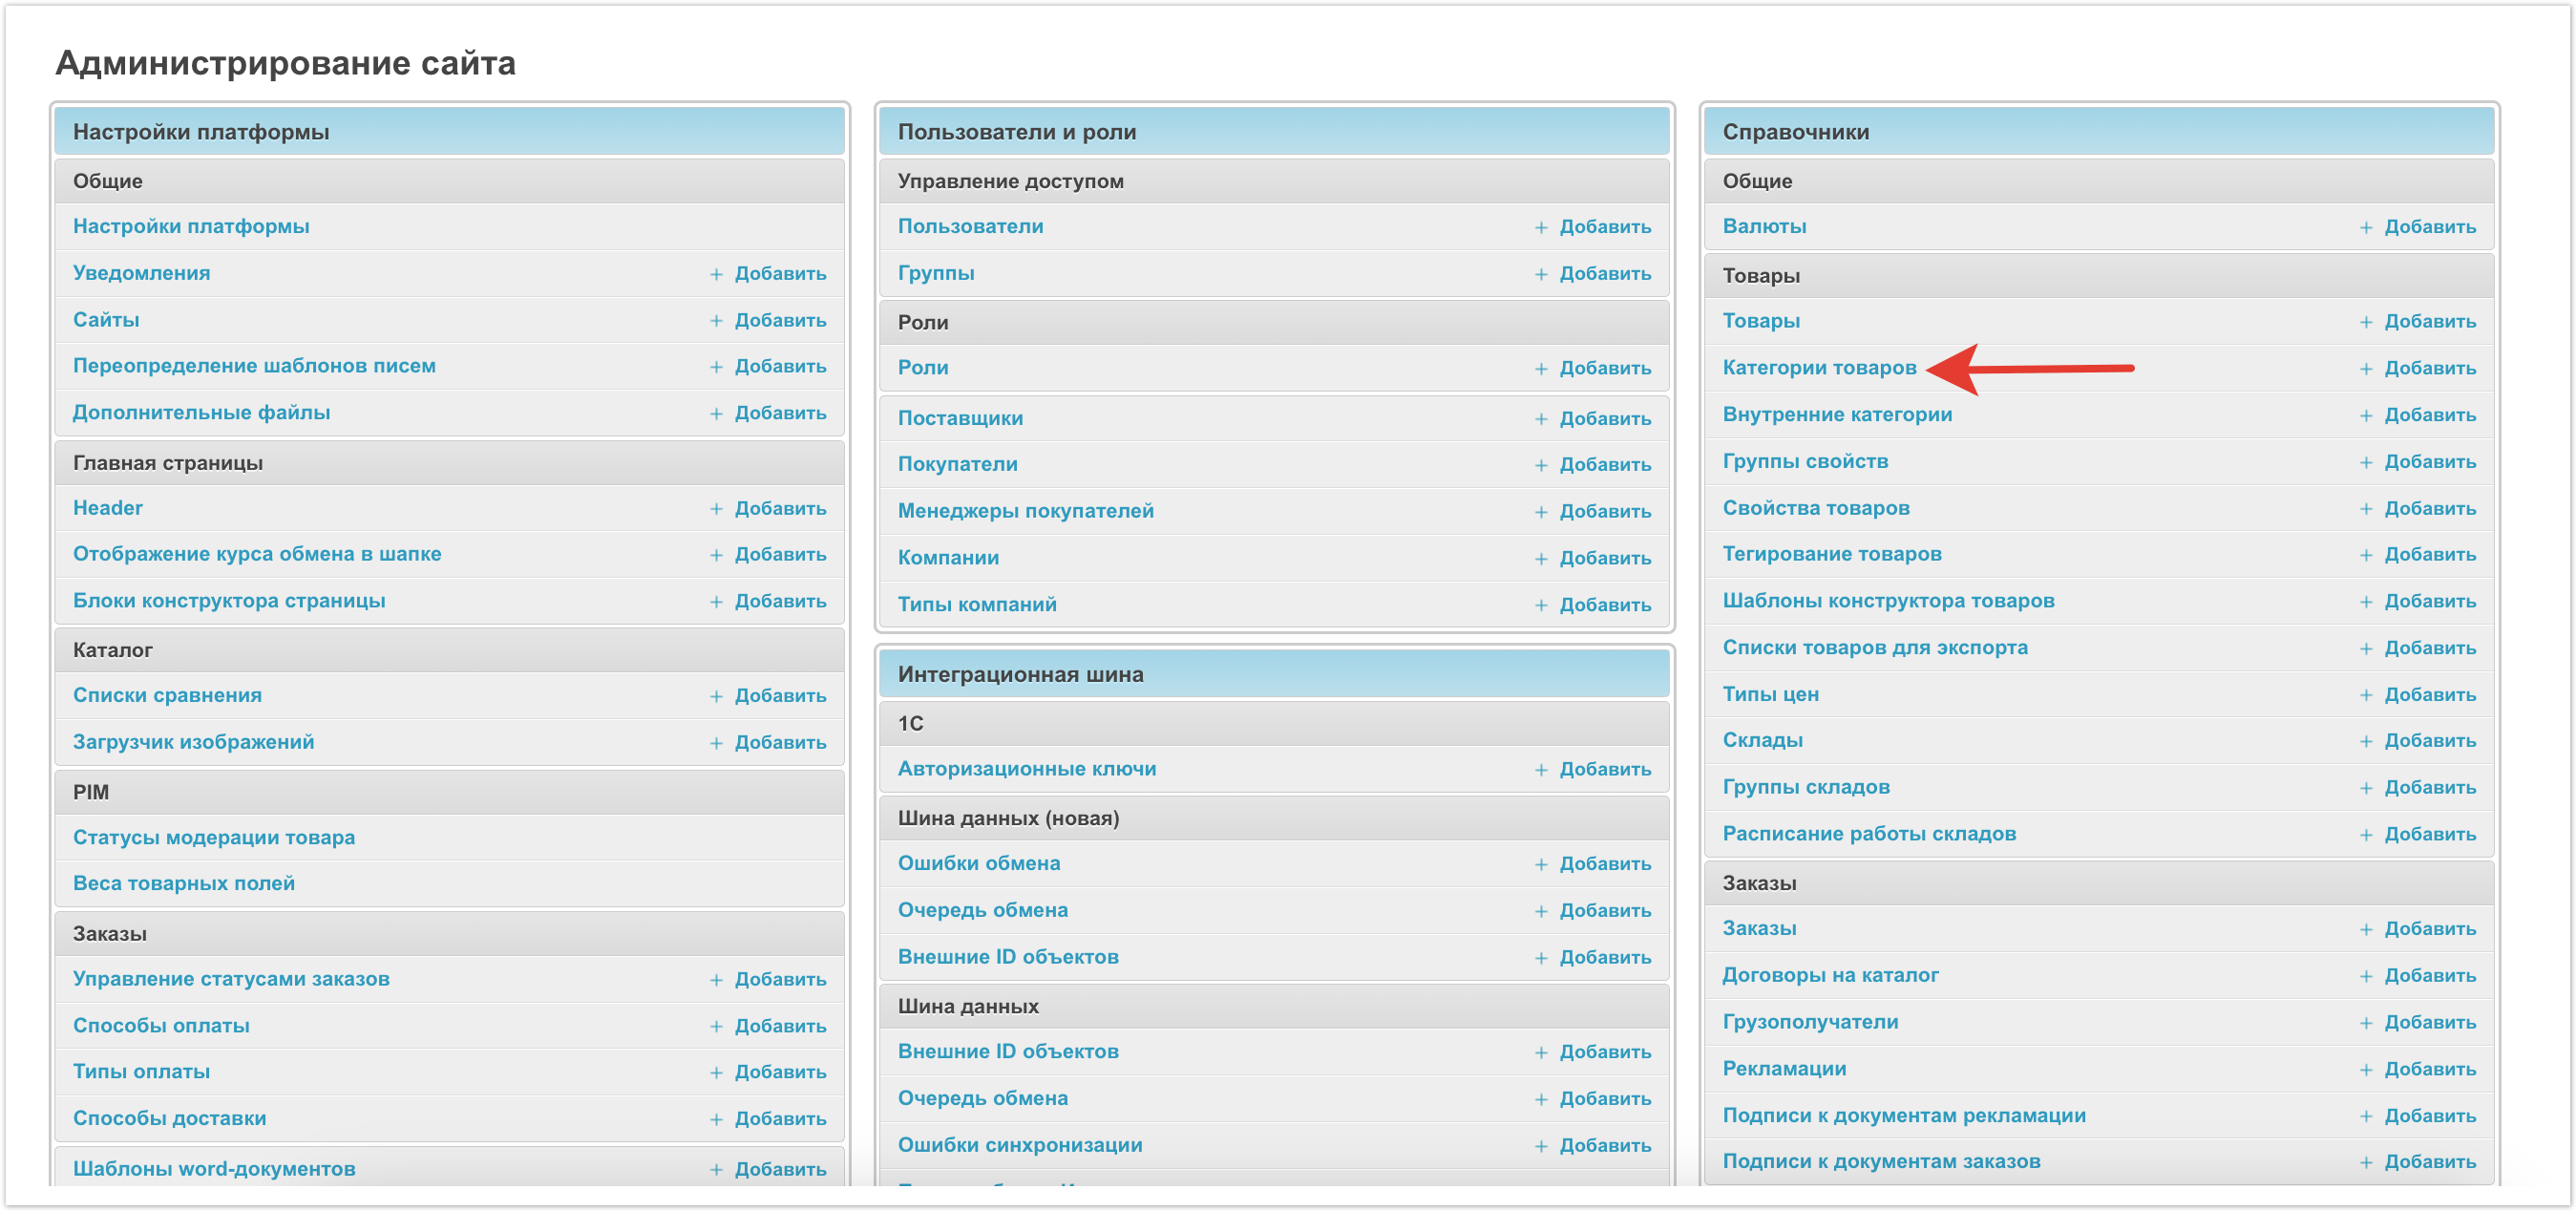
Рассмотрим настройку категорий со стороны панели администратора.
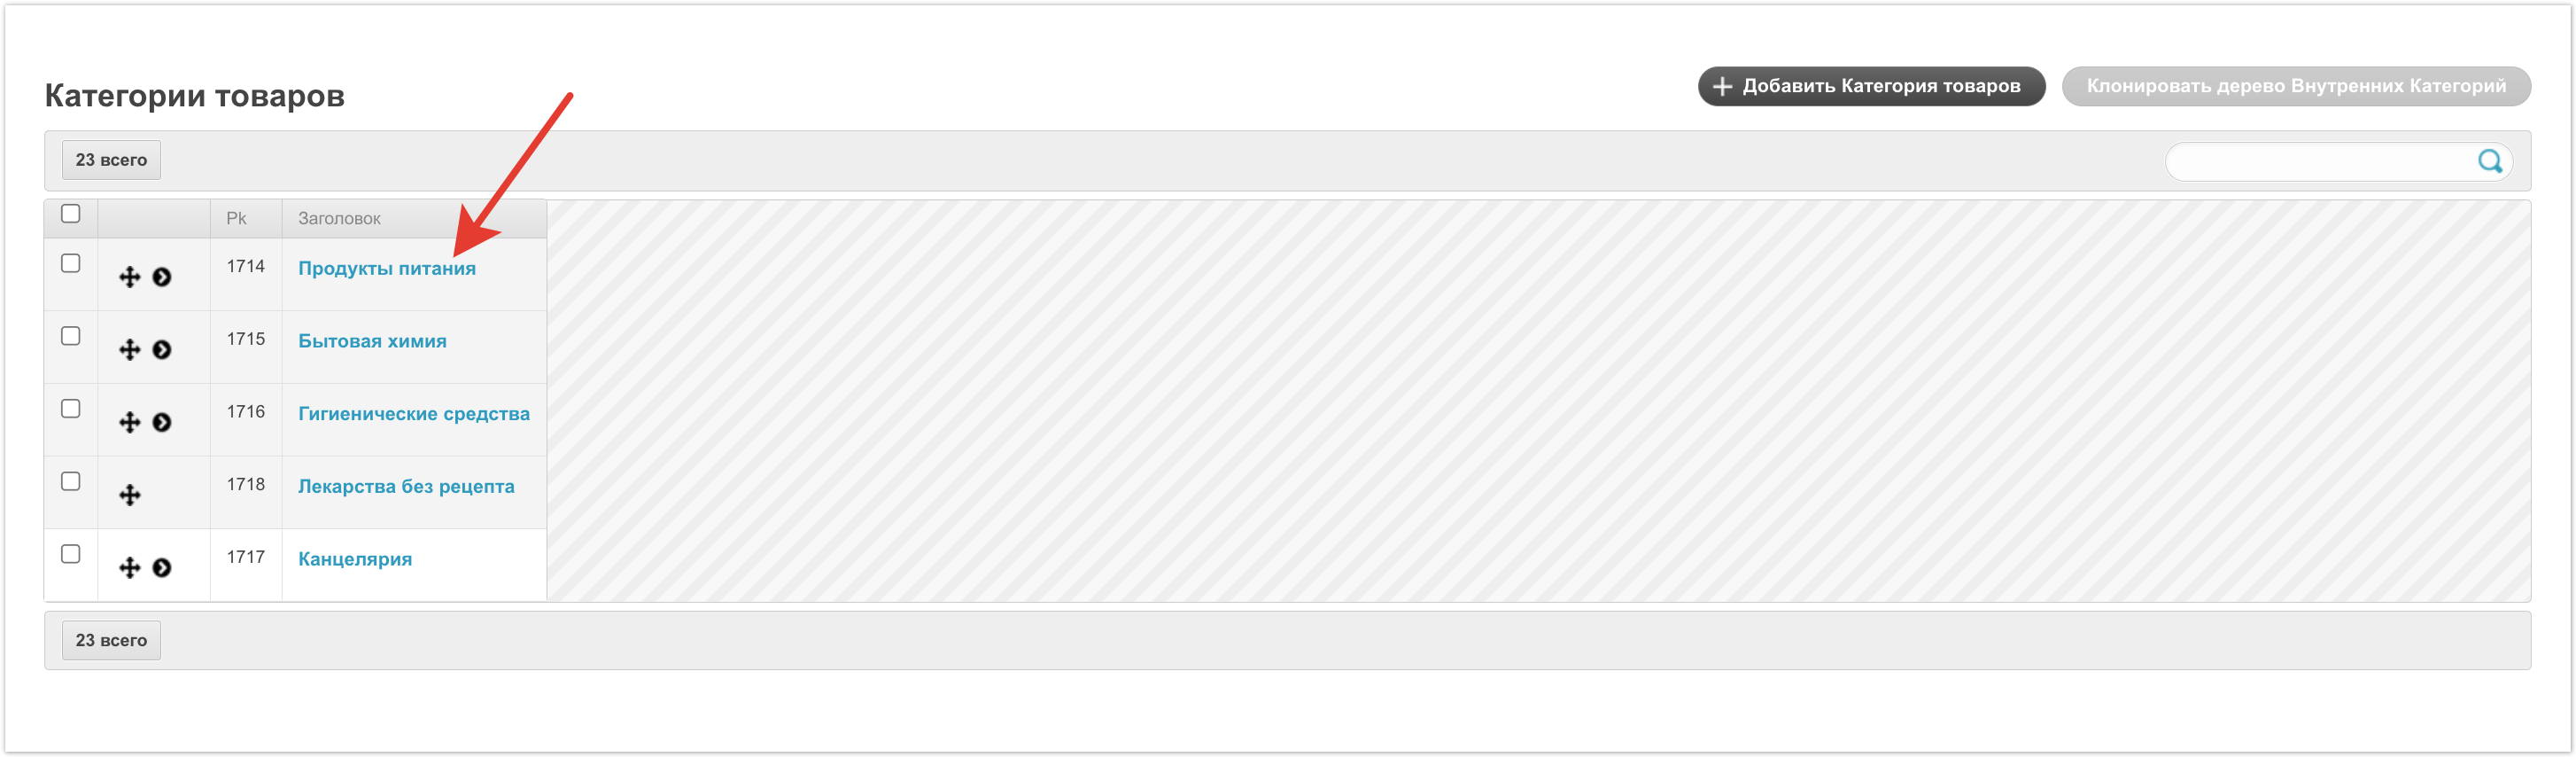
Для того, чтобы выполнить настройку категорий платформы необходимо в панели администратора перейти в раздел Категории товаров.  |


| Якорь | ||||
|---|---|---|---|---|
|

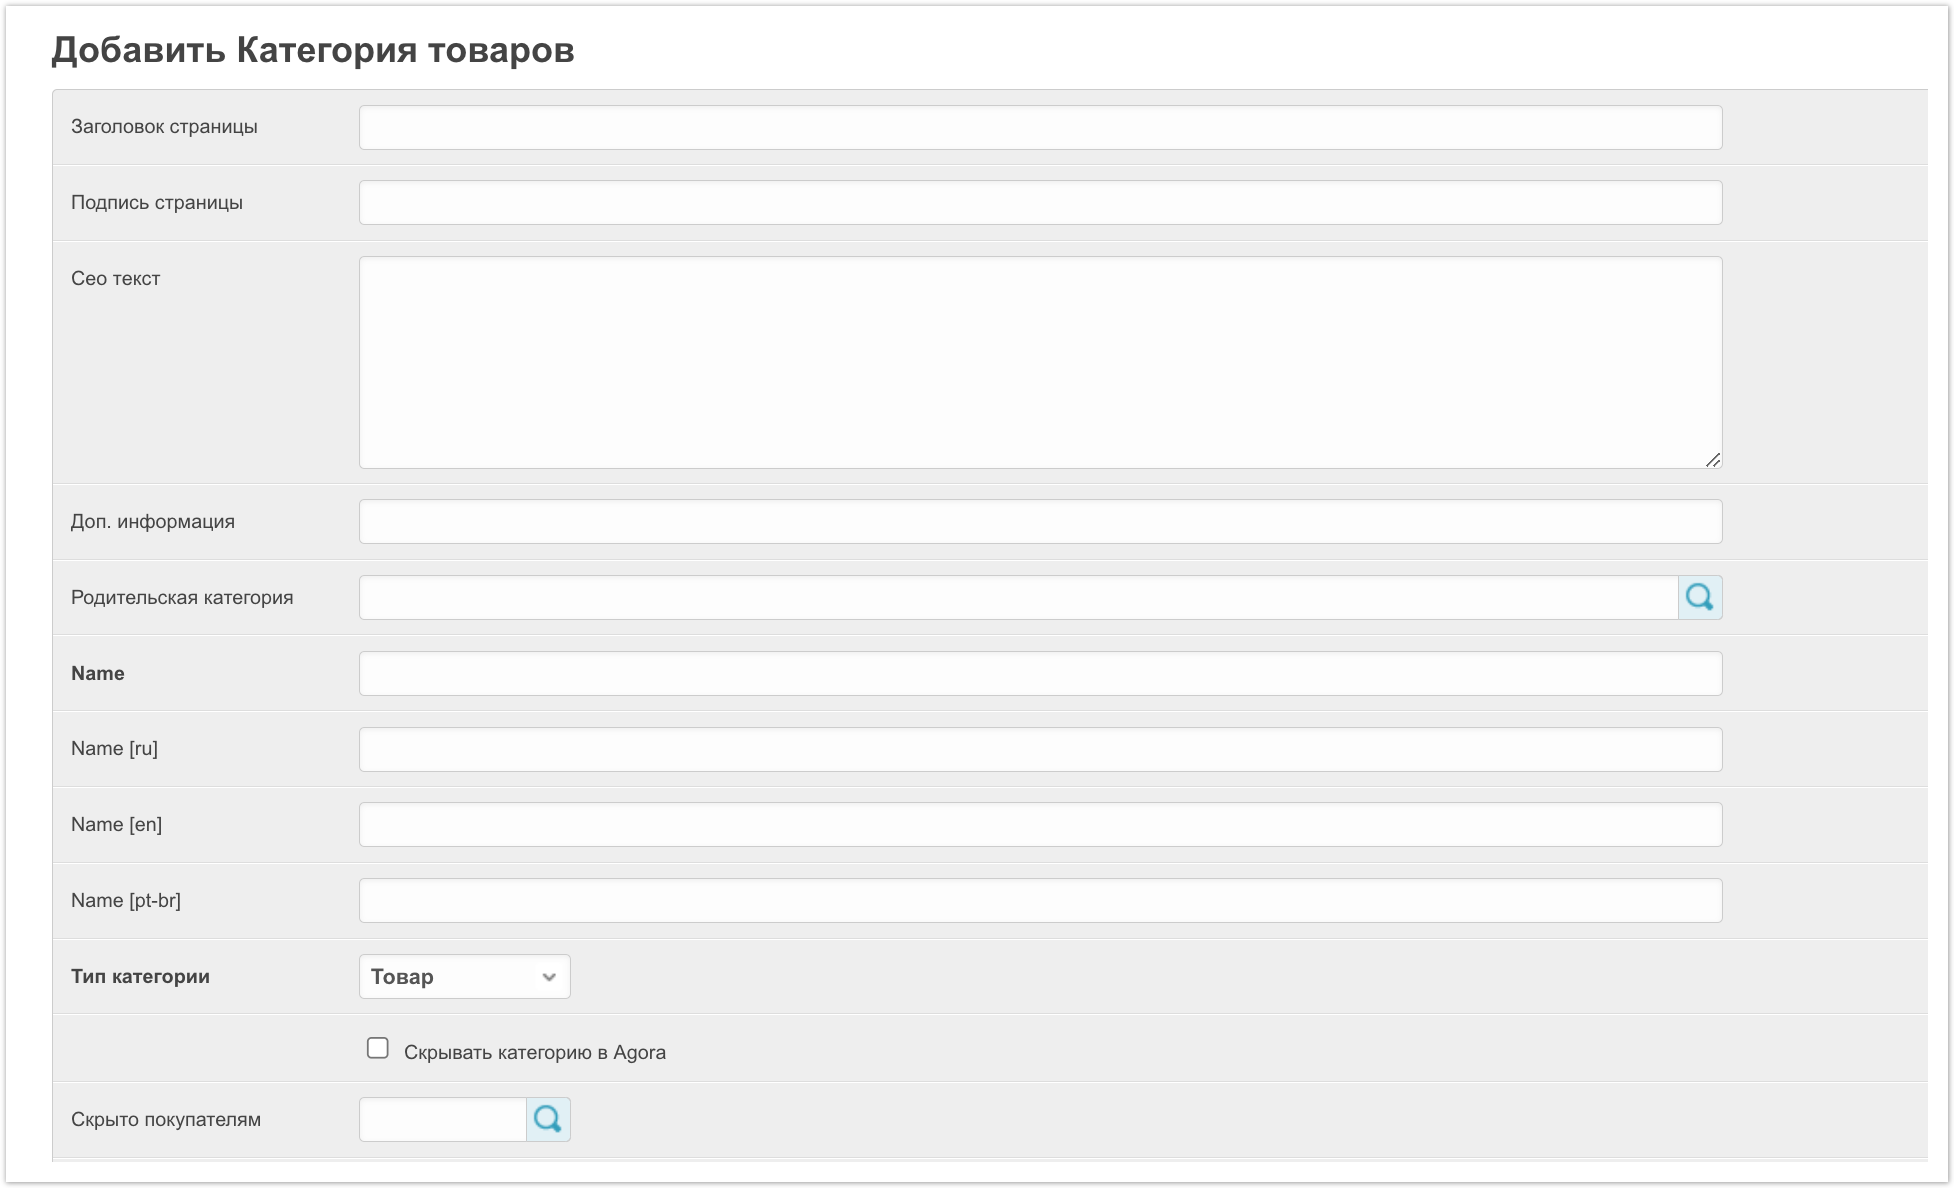
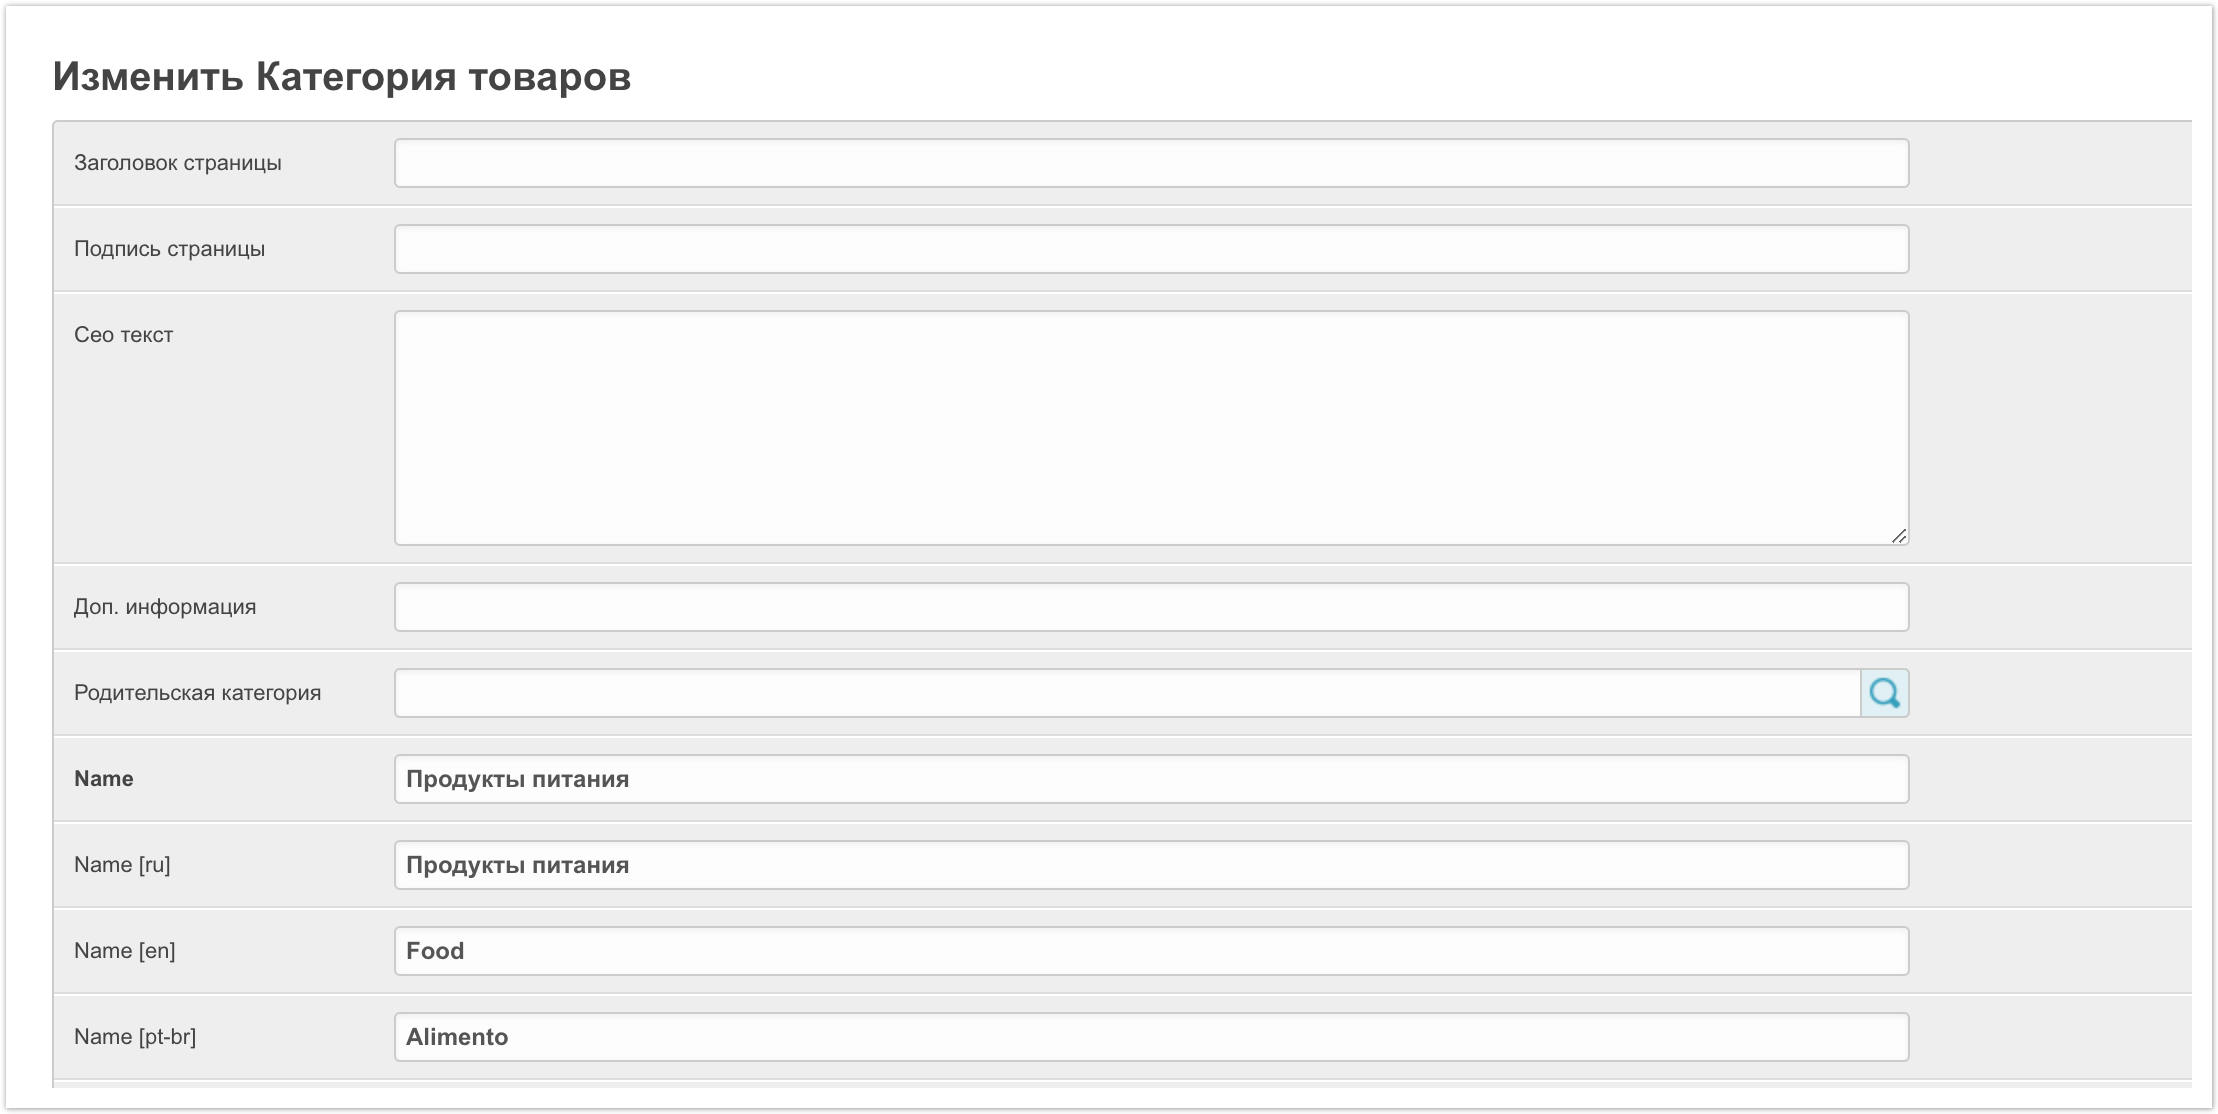
Заголовок страницы, Подпись страницы, Сео текст, Доп. информация - Эти данные можно заполнить для повышения качества поисковой выдачи. Заполненные данные не будут выводится на платформе, но будут использоваться для SEO оптимизации.
Родительская категория - в этом поле можно указать, к какой родительской категории относится заводимая категория. Заполнение этого поля актуально, если создается вложенная категория, у которой есть родитель. Если же создается категория верхнего уровня, то заполнять это поле не требуется.
Name - в этом поле указывается название категории. Его можно указать на разных языках для платформ с использованием мультиязычности. Название категории будет выводится в личных кабинетах пользователей.
Тип категории - в выпадающем списке есть два значения Товар и Услуга. Тип категории определяет, какие объекты она в себя будет включать - товары или услуги.
Скрывать категорию в Agora - эта настройка позволяет скрыть категорию товаров от всех пользователей платформы. Если настройка включена, то сама категория и все товары этой категории будут скрыты от покупателей и поставщиков.
Скрыто покупателям - в этом поле можно выбрать конкретных покупателей, для которых категория будет скрыта. Эта настройка используется в случае, если категория должна быть скрыта не от всех, а только от некоторых покупателей. Более подробно про настройки прав доступа описано в отдельном документе.
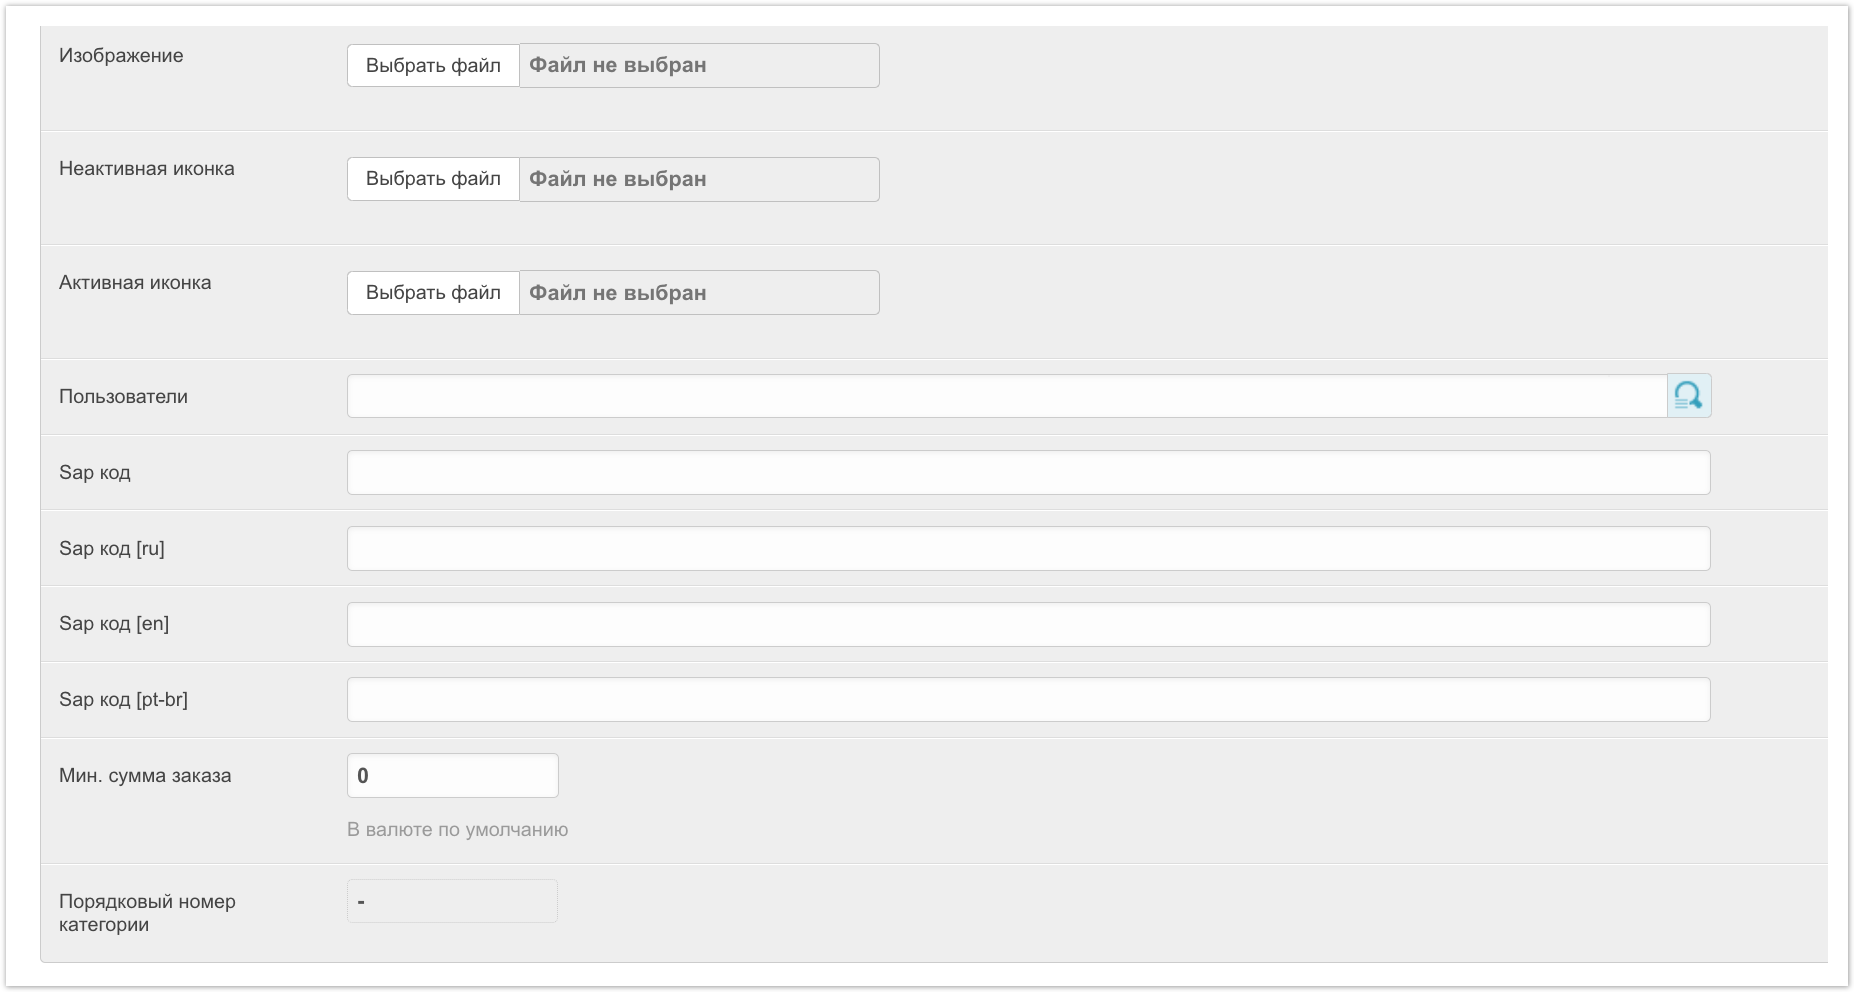
Изображение - в этом поле можно загрузить изображение, которое будет отображаться у категории во вкладке Каталога по центру страницы.

Неактивная иконка - в этом поле можно загрузить изображение для иконки, которая будет выводится в списке категорий слева на странице Каталога.
Активная иконка - в этом поле можно загрузить изображение для иконки, которая будет выводится в списке категорий слева на странице Каталога, при выборе этой категории.
Пользователи - в этом поле можно указать пользователей, для которых категория будет доступна. Эта настройка работает схожим образом, как настройка скрытия категории, но отличие в том, что она позволяет сэкономить время на скрытие, если отображать категорию нужно всего лишь для нескольких пользователей.
 Sap код - код для интеграции с SAP.
Мин. сумма заказа - в этом поле можно указать минимальную сумму для заказа товаров из этой категории. Покупатель не сможет заказать товара из этой категории на сумму меньше, чем указана в поле.
Email для оповещений о заказах Порядковый номер категории - в этом поле можно указать адреса электронной почты, на которые будут отправляться уведомления при заказе товара из этой категории. Если нужно выполнить отправку оповещений на несколько адресов почты, то каждый адрес должен быть указан с новой строки.
Колонка всплывающего сайдбара - эта настройка на данный момент не актуальна и будет удалена в будущих обновлениях.
Порядковый номер категории - в этом поле может быть выведен порядковый номер категории, если она его имеет. Это поле используется при работе функционала по генерации внутренних артикулов.
может быть выведен порядковый номер категории, если она его имеет. Это поле используется при работе функционала по генерации внутренних артикулов.
Далее идет блок Далее идет блок настроек с SEO параметрами.

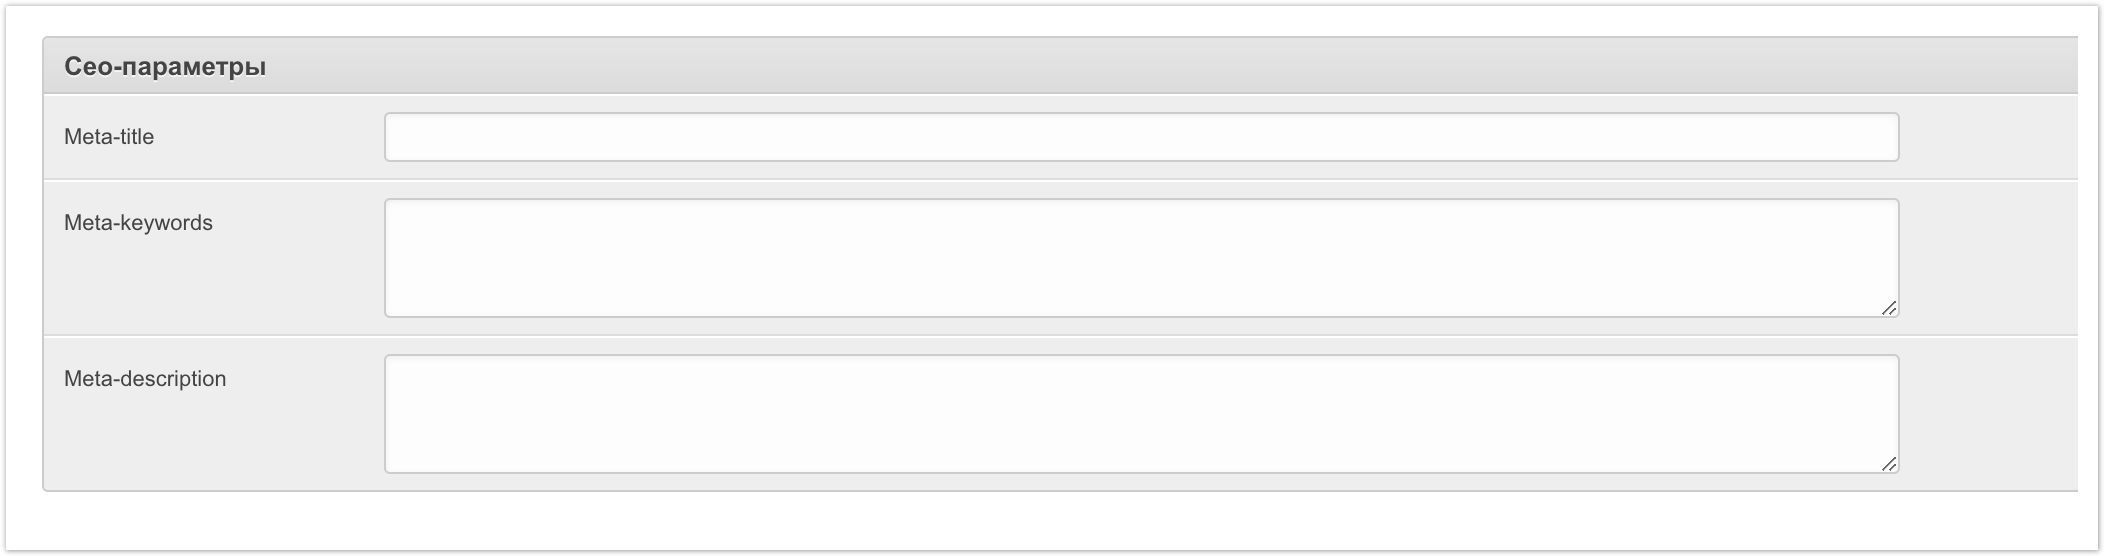
В этом блоке настроек можно указать данные для поисковой оптимизации категории товаров: Meta-title, Meta-keywords, Meta-description, Заголовок страницы, Подпись страницы, Сео текст, Доп. информация. Эти данные можно заполнить для повышения качества поисковой выдачи. Заполненные данные не будут выводится на платформе, но будут использоваться для SEO оптимизации.
После заполнения всех необходимых параметров нужно выполнить сохранение новой категории. Для этого нужно нажать кнопку Сохранить в правом нижнем углу страницы.

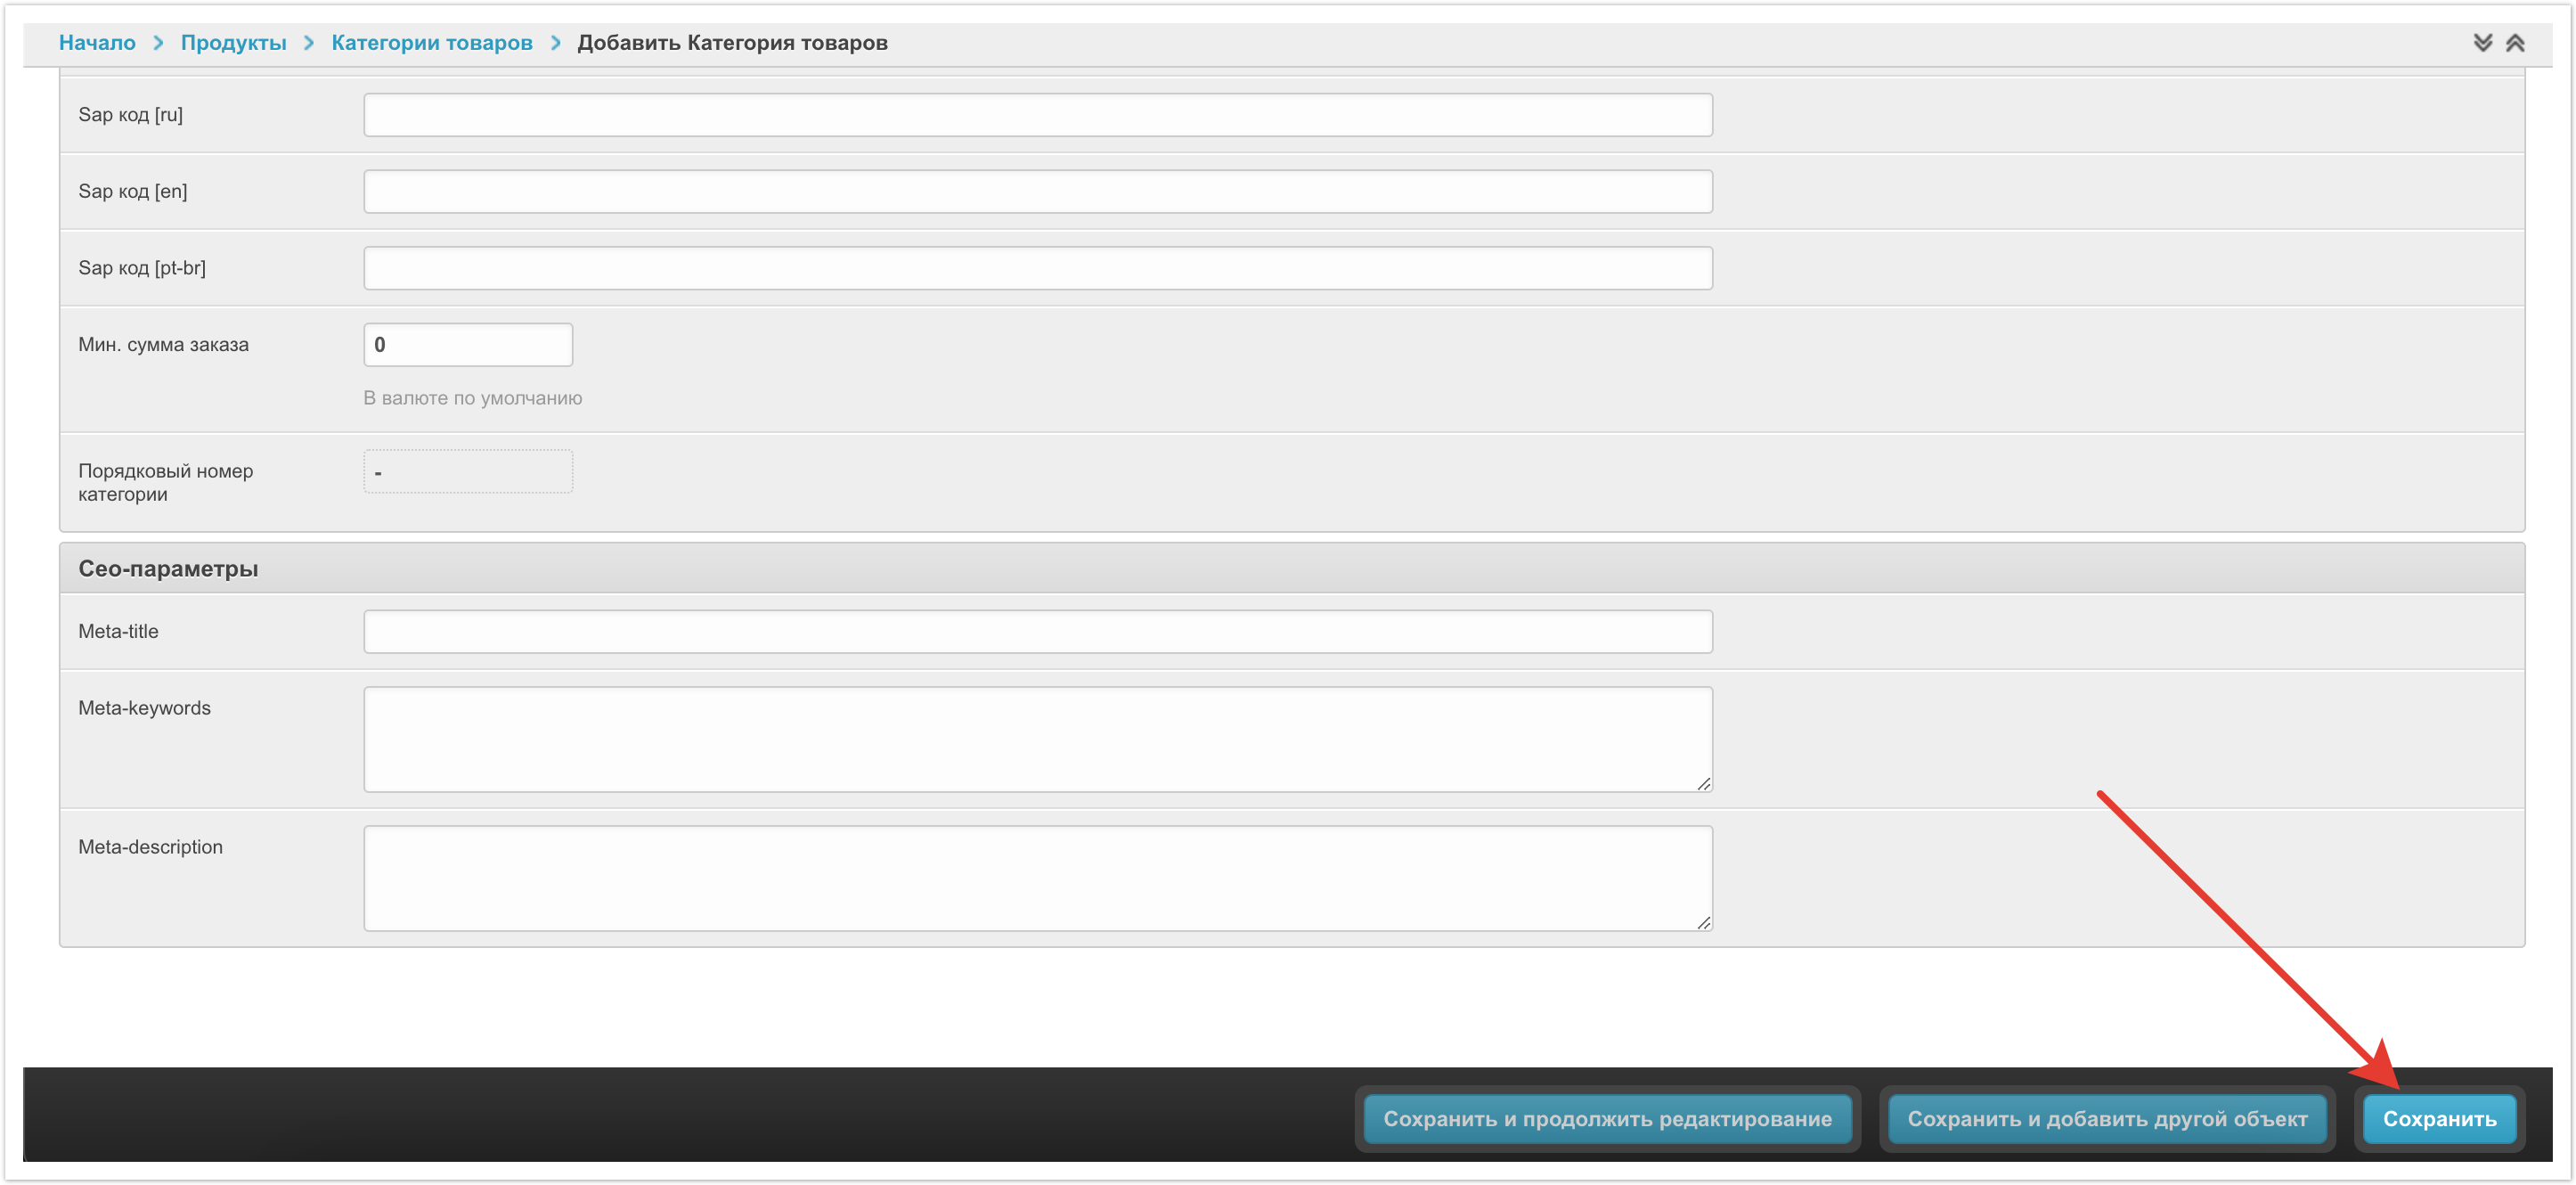
После сохранения новая категория появится в списке.
Изменение категорий
Любую категорию можно изменить, если это необходимо. Для этого необходимо навести на строку с категорией курсор, тогда в правой части строки появится кнопка Изменить, нужно нажать на эту кнопкузаголовок категории.

После этого откроется карточка категории, в которую можно будет внести изменения. Подробнее доступные настройки категории были рассмотрены выше.

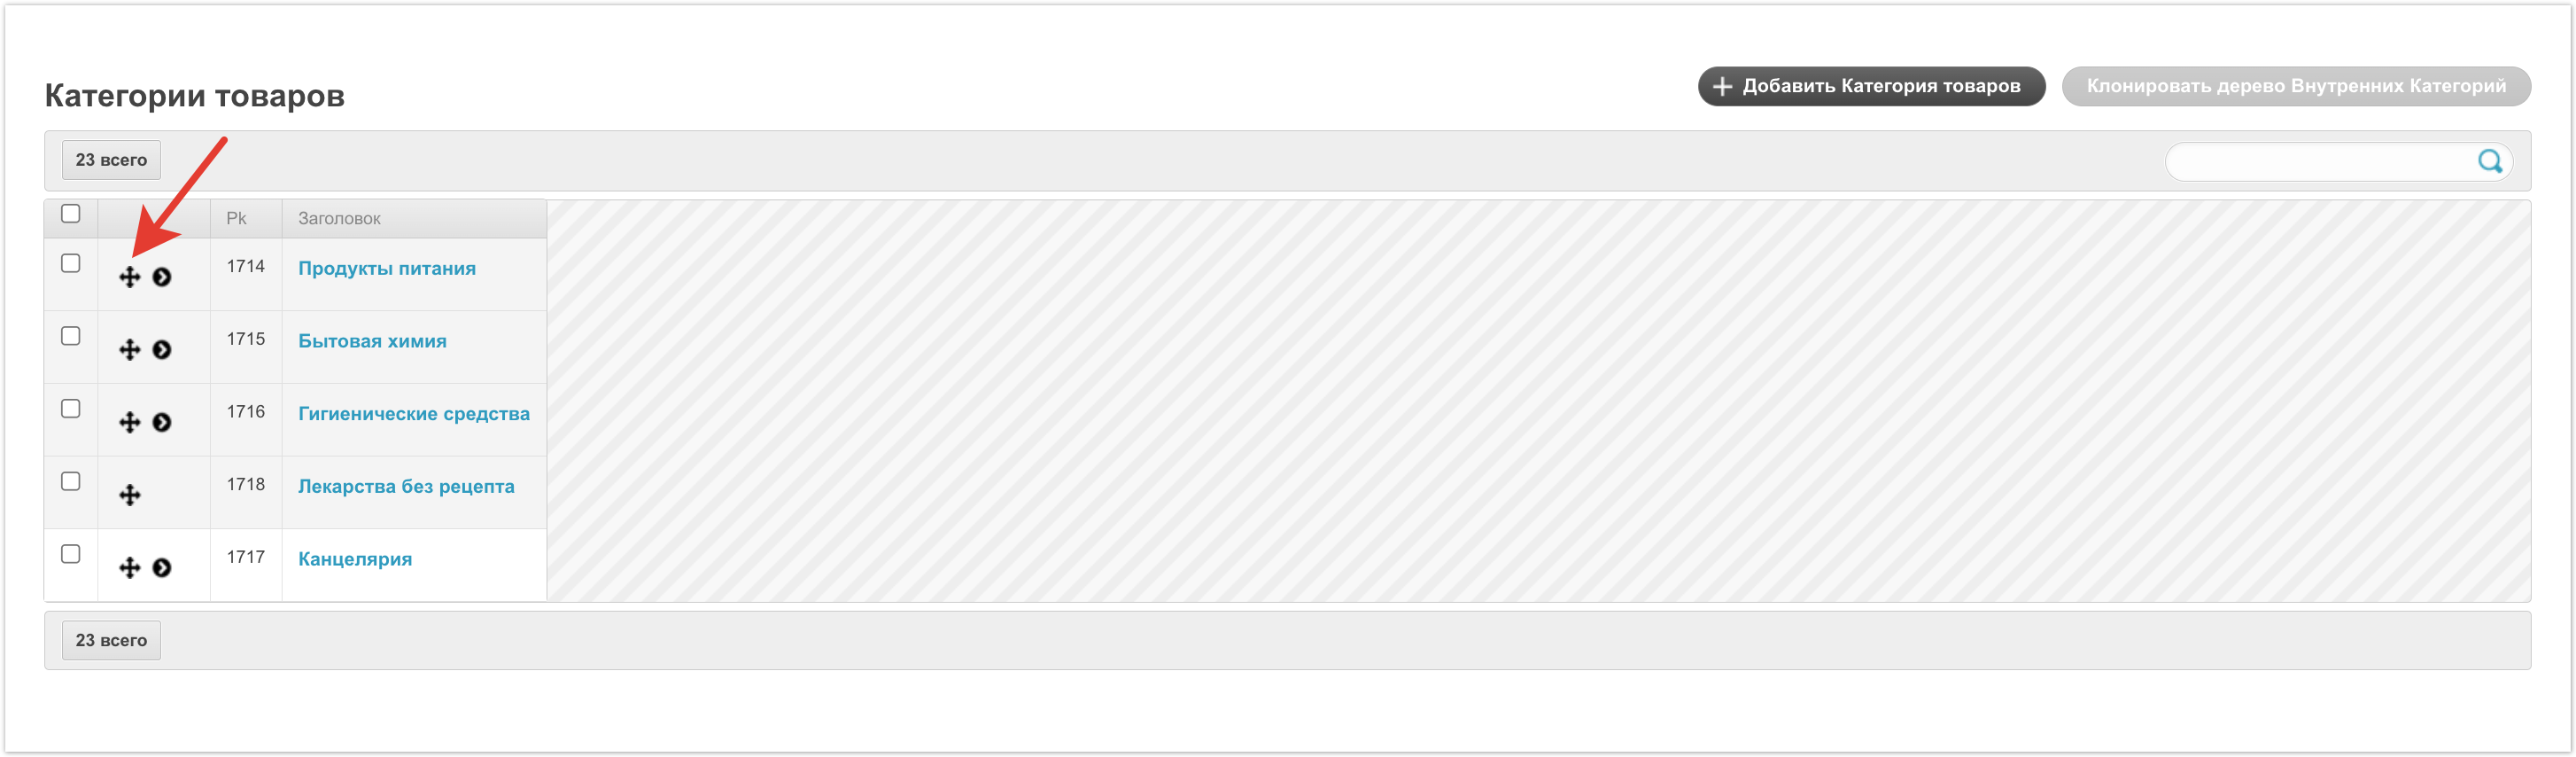
Кроме изменения настроек самой категории можно также менять их порядок с помощью функционала Drag-and-Drop. Для этого нужно навести курсором на строку с категорией. После этого в правой части появится кнопка с тремя горизонтальными полосами, достаточно потянуть за нее символ со стрелками и переместить категорию на новое место.

Удаление категорий
Для того чтобы удалить категорию товаров необходимо выделить ее, а далее в выпадающем списке слева внизу страницы выбрать Удалить выбранные Категории товаров.

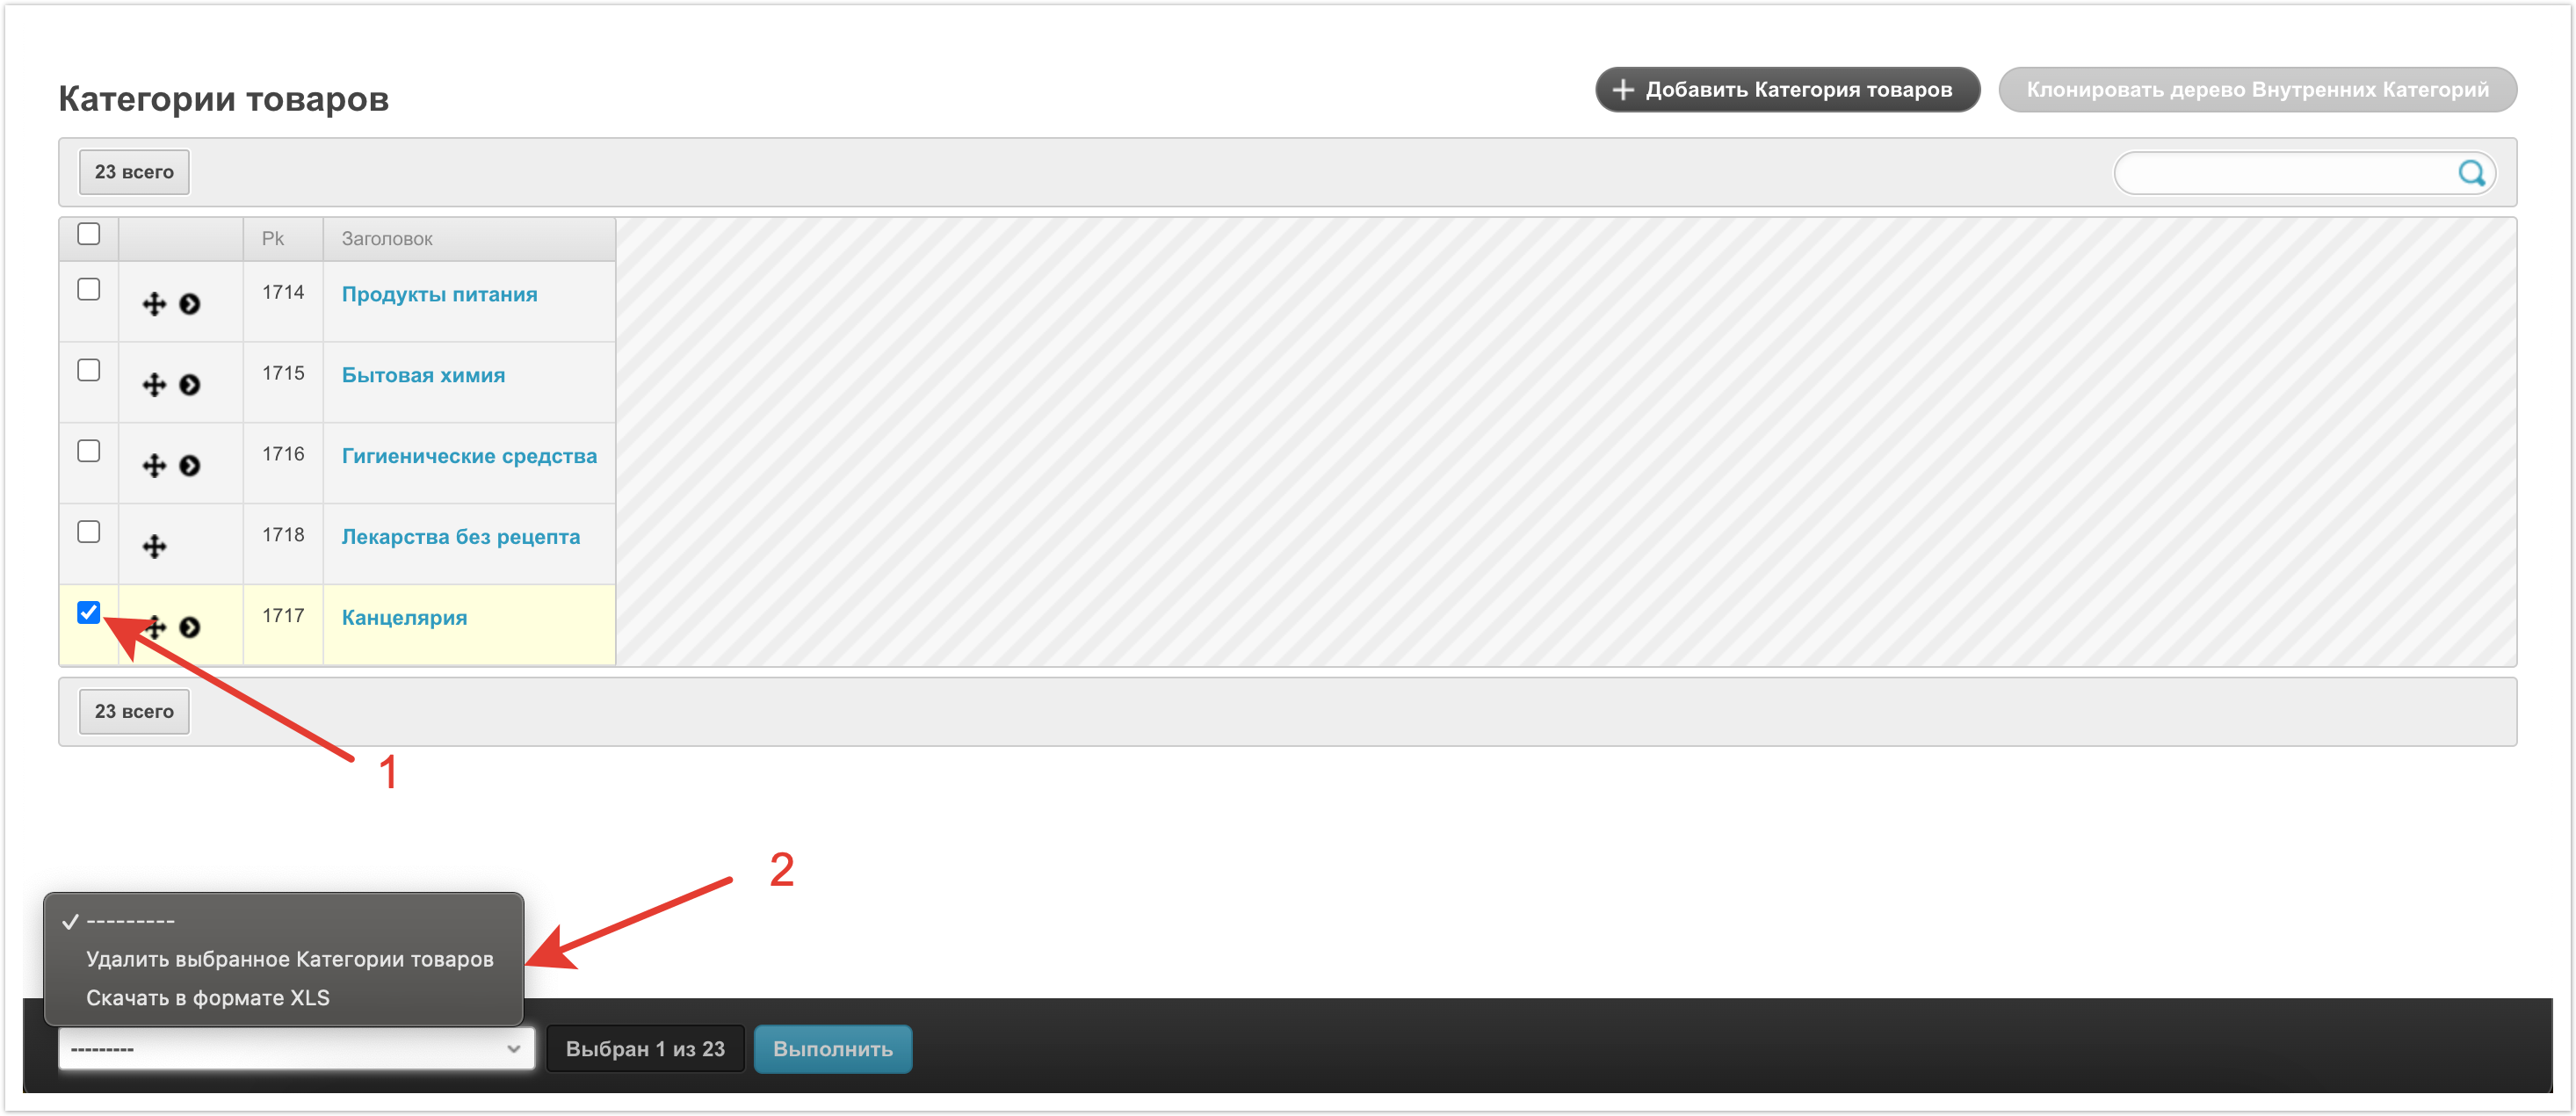
Помимо удаления можно также Скачать в формате XLS. После этого будет сформирован XLS файл с выбранными категориями.
Настройка категорий может выполняться владельцем платформы через панель администратора. Однако, поставщик из своего личного кабинета также может выполнять настройки категорий, например настраивать их соответствие. Подробнее о настройке категорий со стороны поставщика рассказано на отдельной странице.
| Примечание | ||
|---|---|---|
| ||
Если у вас остались вопросы по настройке проекта, обратитесь в техническую поддержку Agora. |
| Sv translation | |||||||||||||||||
|---|---|---|---|---|---|---|---|---|---|---|---|---|---|---|---|---|---|
| |||||||||||||||||
Consider setting up categories from the admin panel.
To set up platform categories, go to the Products Categories section in the admin panel. 
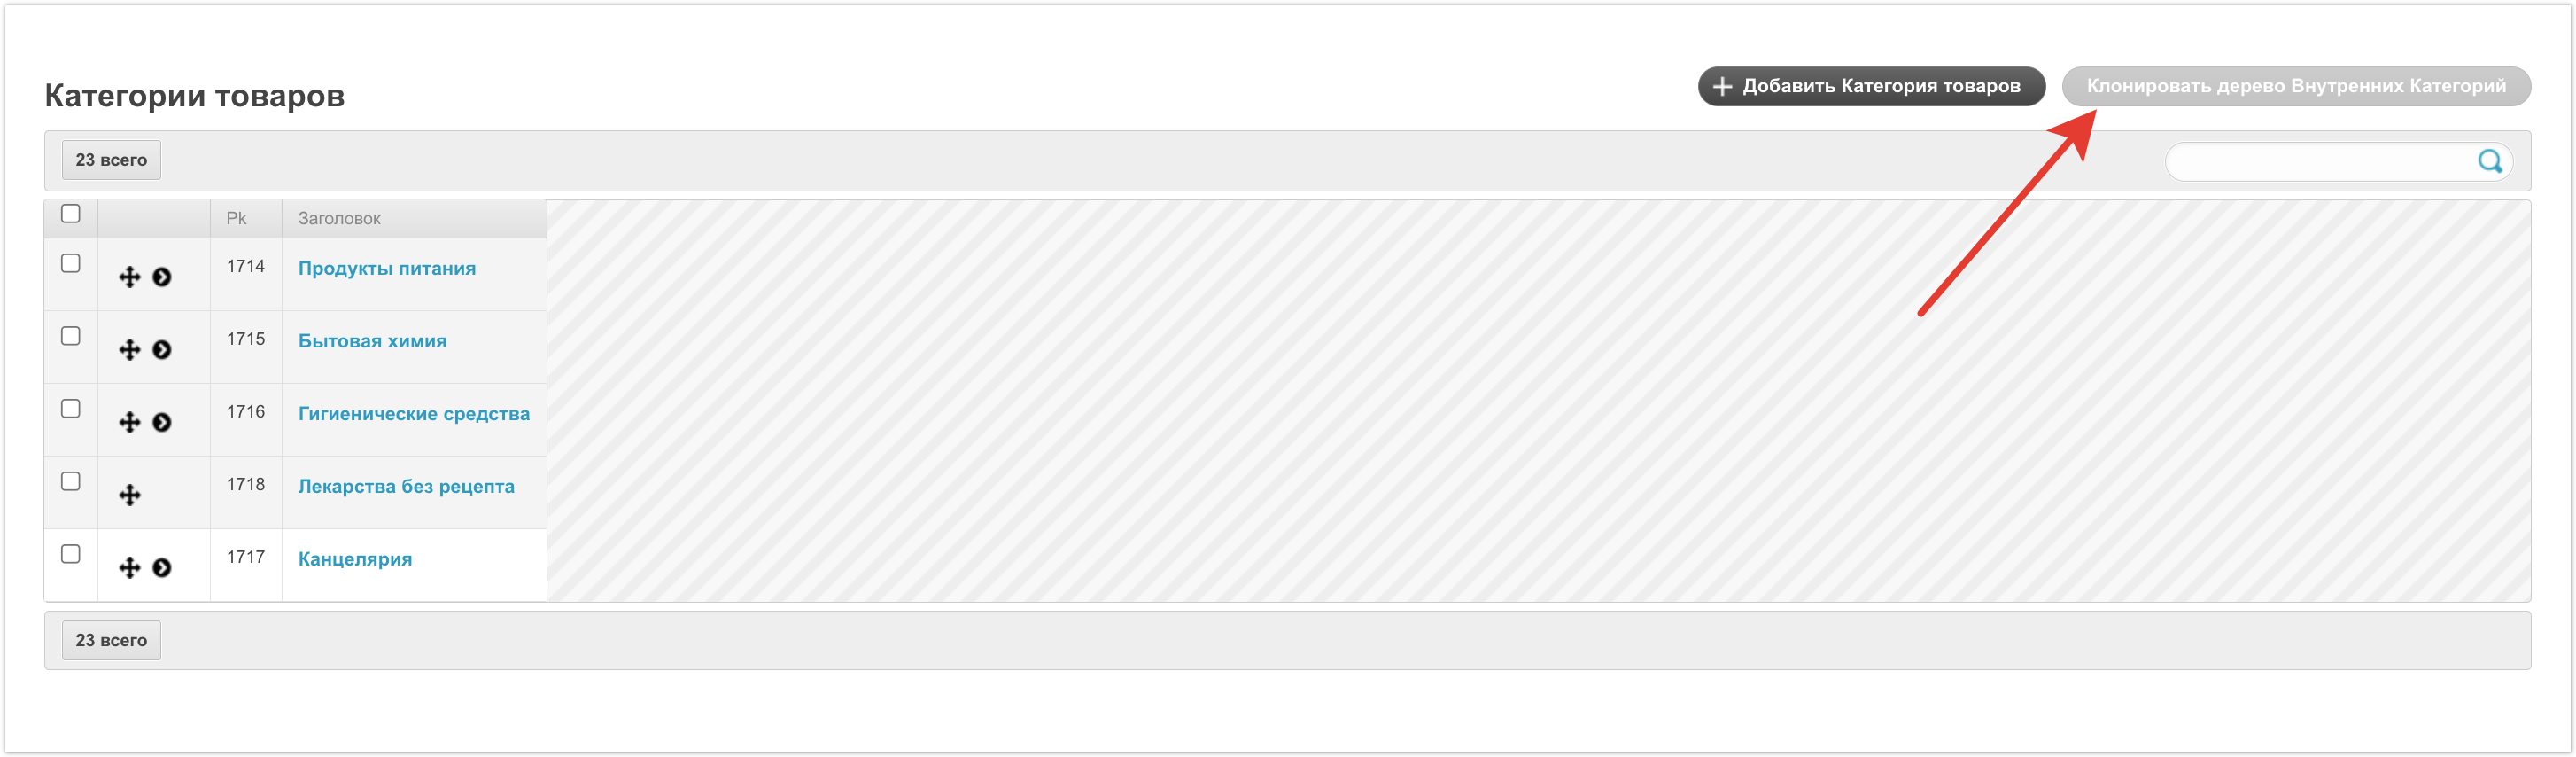
Cloning categoriesIn the Product categories section, you can create the category tree that will be displayed on the platform, or you can clone the tree of internal categories from the ERP system. Cloning the tree of internal categories is relevant mainly for B2B portals. To start the cloning process, you must click the Clone Inner catalog tree button. 
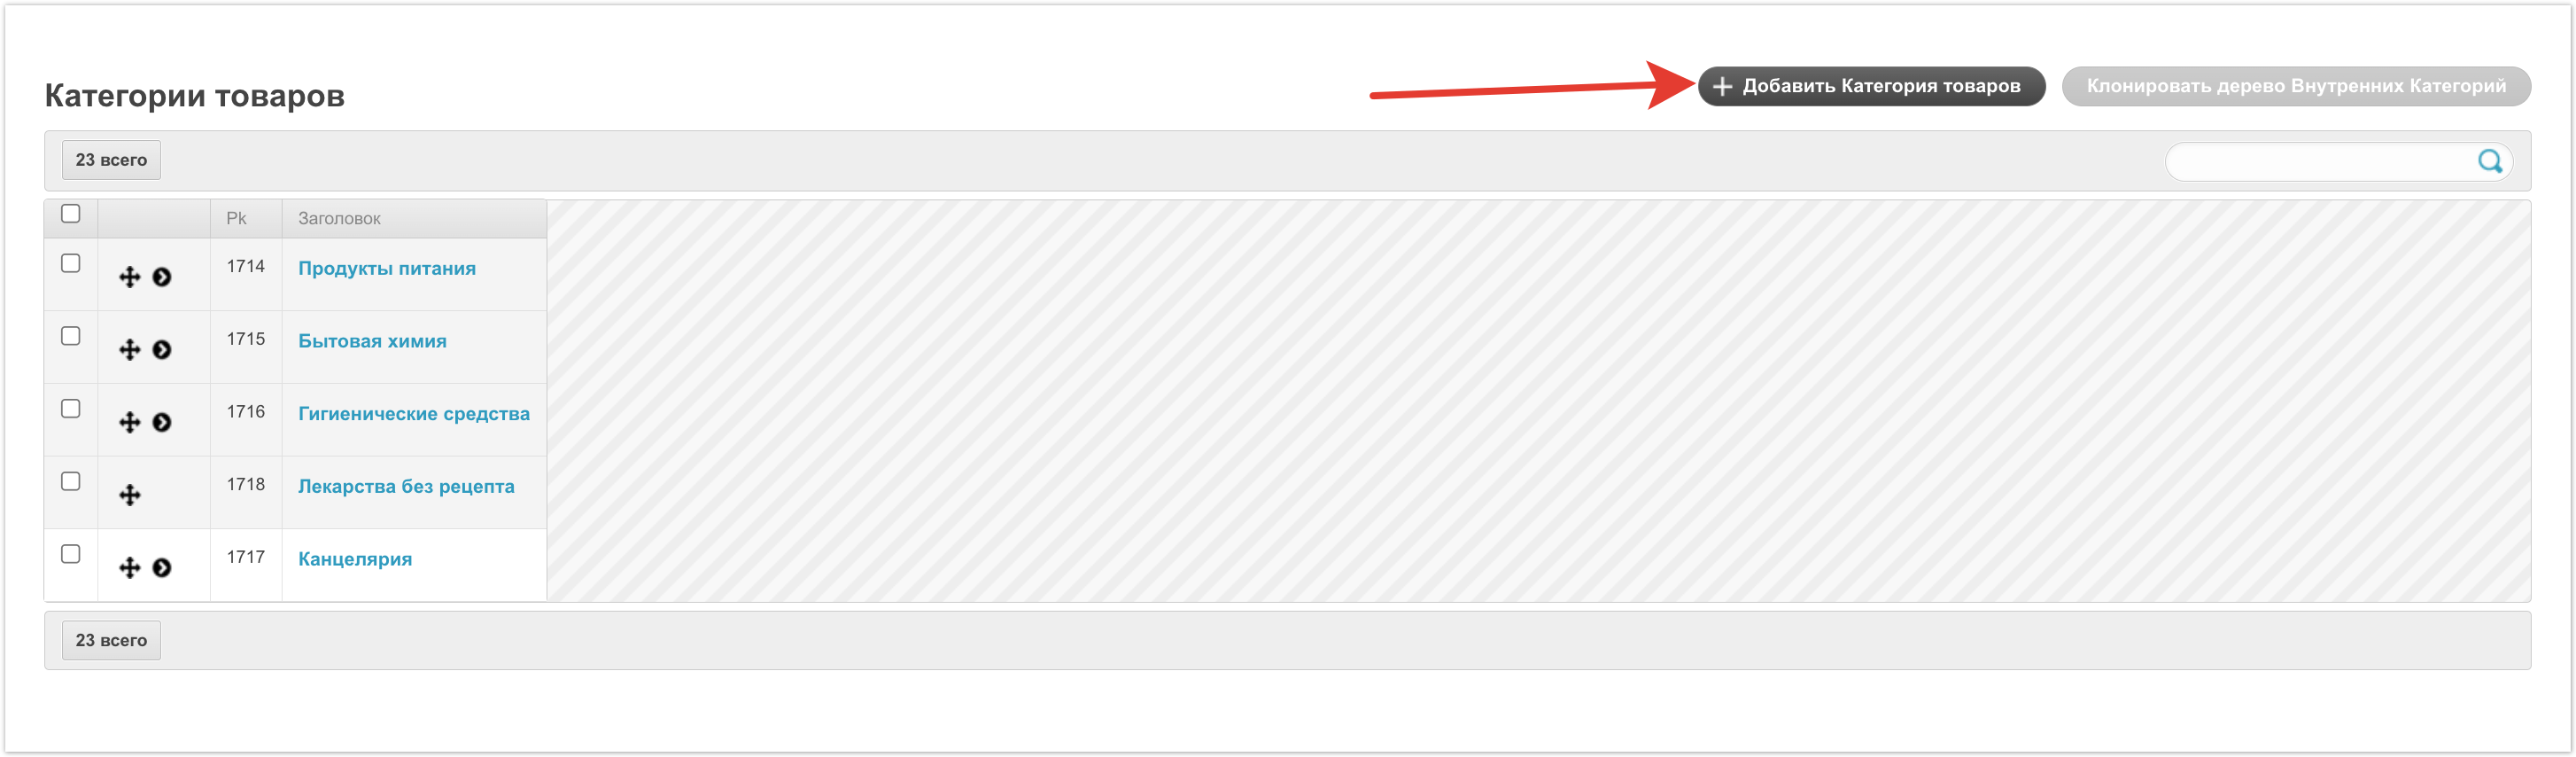
After the cloning process is completed, the same categories will appear in the Products Categories section as in the Inner Categories section. Adding a categoryIf the option of cloning internal categories is not suitable and you need to create a separate tree of categories on the platform, then you can add them manually. To create a category manually, you need to click on the Add Products Category button.
Page title, Signature of page, Seo text, Extras. information - This data can be filled in to improve the quality of search results. The completed data will not be displayed on the platform, but will be used for SEO optimization. Parent category - in this field you can specify which parent category the generated category belongs to. Filling in this field is relevant if a nested category is created that has a parent. If a top-level category is being created, then this field is not required. Name - this field contains the name of the category. It can be specified in different languages for platforms using multilingualism. The name of the category will be displayed in the personal accounts of users. Category type - in the drop-down list there are two values Product and Service. The category type determines what objects it will include - products or services. Hide category in Agora - this setting allows you to hide the product category from all users of the platform. If the setting is enabled, then the category itself and all products in this category will be hidden from buyers and suppliers. Hidden to buyers - in this field you can select specific buyers for whom the category will be hidden. This setting is used if the category should not be hidden from everyone, but only from some customers. More details about access rights settings are described in a separate document.
Image - in this field you can upload an image that will be displayed next to the category in the Catalog tab in the center of the page.
Inactive icon - in this field you can upload an image for an icon that will be displayed in the list of categories on the left side of the Catalog page. Active icon - in this field you can upload an image for the icon that will be displayed in the list of categories on the left side of the Catalog page, when this category is selected.
Users - in this field, you can specify the users for whom the category will be available. This setting works in a similar way to the hide category setting, but the difference is that it saves time on hiding if you only need to display the category for a few users.
Min. order price - in this field you can specify the minimum amount for ordering goods from this category. The buyer will not be able to order goods from this category for an amount less than specified in the field. Sap code - code for integration with SAP. Min. order price Email for order notifications - in this field you can specify the email addresses to which notifications will be sent when ordering a product minimum amount for ordering goods from this category. If you need to send notifications to several email addresses, then each address must be specified on a new line.Column pop-up sidebar - this setting is currently deprecated and will be removed in a future updateThe buyer will not be able to order goods from this category for an amount less than specified in the field. Serial number of the category - this field can display the category serial number, if it has one. This field is used when the functionality for generating internal SKUs works. Next comes the settings block with SEO parameters.
In this settings block, you can specify data for search engine optimization of a product category: Meta-title, Meta-keywords, Meta-description, Page title, Signature of page, Seo text, Extras. information. This data can be filled in to improve the quality of search results. The completed data will not be displayed on the platform, but will be used for SEO optimization. After filling in all the necessary parameters, you need to save the new category. To do this, click the Save button in the lower right corner of the page.
After saving, the new category will appear in the list. Changing categoriesAny category can be changed if necessary. To do this, you need to hover over the line with the category, then the Change button will appear on the right side of the line, you need to click on this button.necessary. To do this, click on the category title.
After that, a category card will open in which you can make changes. The available category settings were discussed above in more detail.
In addition to changing the settings of the category itself, you can also change their order using the Drag-and-Drop functionality. To do this, you need to hover over the line with the category. After that, a button with three horizontal stripes will appear on the right side, just drag it your cursor over the arrow symbol and move the category to a new location.
Removing categoriesTo delete a product category, select it, and then select Delete selected Products Categories from the drop-down list at the bottom left of the page.
In addition to deletion, you can also Download in XLS format. After that, an XLS file with the selected categories will be generated. Categories can be configured by the platform owner through the admin panel. However, the supplier from his personal account can also perform category settings, for example, adjust their correspondence. For more information about setting up categories on the supplier side, see a separate page.
|


| Sv translation | |||||||||||||||||
|---|---|---|---|---|---|---|---|---|---|---|---|---|---|---|---|---|---|
| |||||||||||||||||
Vamos considerar a configuração de categorias no painel de administração.
Para configurar categorias de plataforma, vá para a seção Categorias de produtos no painel de administração. 
Clonagem de categoriaNa seção Categorias de produtos, você pode criar a árvore de categorias que será exibida na plataforma ou clonar a árvore de categorias interna do sistema ERP. A clonagem da árvore de categorias interna é relevante principalmente para portais B2B. Para iniciar o processo de clonagem, você deve clicar no botão Clonar a árvore de Categorias Internas. 
Após a conclusão do processo de clonagem, as mesmas categorias aparecem na seção Categorias de Produtos como na seção Categorias Internas. Adicionar uma categoriaSe a opção de clonar categorias internas não for adequada e você precisar ter uma árvore de categorias separada na plataforma, poderá adicioná-las manualmente. Para iniciar uma categoria manualmente, você precisa clicar no botão Adicionar categoria de produto.
Título da Página, Assinatura da Página, Texto Seo, Informações adicionais - Esses dados podem ser preenchidos para melhorar a qualidade dos resultados da pesquisa. Os dados preenchidos não serão exibidos na plataforma, mas serão usados para otimização de SEO. Selecione a categoria principal - neste campo você pode especificar a qual categoria pai a categoria que você está inserindo pertence. O preenchimento desse campo é relevante se você estiver criando uma categoria aninhada que tenha um pai. Se você criar uma categoria de nível superior, não será necessário preencher esse campo. Name - este campo especifica o nome da categoria. Pode ser especificado em diferentes línguas para plataformas que utilizam o multilinguismo. O nome da categoria será exibido nas contas pessoais dos usuários. Tipo de categoria - na lista suspensa há dois valores Produto e Serviço. O tipo de categoria determina quais objetos ela incluirá - bens ou serviços. Esconda a categoria em Ágora - essa configuração permite ocultar a categoria de produtos de todos os usuários da plataforma. Se a configuração estiver habilitada, a categoria em si e todos os produtos dessa categoria serão ocultados de compradores e fornecedores. Escondido para compradores - neste campo você pode selecionar compradores específicos para os quais a categoria será ocultada. Essa configuração será usada se a categoria não deve ser ocultada de todos, mas apenas de alguns compradores. Mais detalhes sobre as configurações de direitos de acesso são descritos em um documento separado.
Imagem - neste campo você pode carregar uma imagem que será exibida perto da categoria na guia Catálogo no centro da página.
Ícone inativo - neste campo você pode carregar uma imagem para o ícone, que será exibida na lista de categorias no lado esquerdo da página Catálogo. Ícone ativo - neste campo você pode carregar uma imagem para o ícone, que será exibida na lista de categorias no lado esquerdo da página Catálogo, ao selecionar esta categoria.
Usuários - Nesse campo, você pode especificar os usuários para os quais a categoria estará disponível. Essa configuração funciona de maneira semelhante à configuração de ocultação de categoria, mas a diferença é que ela economiza tempo na ocultação se você precisar mostrar apenas uma categoria para alguns usuários.
Quantidade mínima de pedido - neste campo você pode especificar o valor mínimo para encomendar mercadorias desta categoria. O comprador não poderá encomendar mercadorias desta categoria por um valor inferior ao indicado no campo. E-mail para alertas de pedidos - neste campo, você pode especificar os endereços de e-mail para os quais as notificações serão enviadas ao encomendar mercadorias desta categoria. Se você quiser enviar alertas para vários endereços de email, cada endereço deverá ser listado em uma nova linha. Código SAP - o código para integração com o SAP. Quantidade mínima de pedido - neste campo você pode especificar o valor mínimo para encomendar mercadorias desta categoria. O comprador não poderá encomendar mercadorias desta categoria por um valor inferior ao indicado no campoColuna da barra lateral pop-up - essa configuração não é relevante no momento e será removida em atualizações futuras. Número seqüencial de categoria - neste campo pode ser exibido o número de série da categoria, se tiver um. Esse campo é usado quando a funcionalidade para gerar artigos internos funciona. Em seguida, há um bloco de configurações com parâmetros de SEO.
Neste bloco de configurações, você pode especificar dados para otimização de mecanismo de pesquisa da categoria de produto: Meta title, Palavra-chave, Meta descrição, Título da Página, Assinatura da Página, Texto Seo, Informações adicionais. Esses dados podem ser preenchidos para melhorar a qualidade dos resultados da pesquisa. Os dados preenchidos não serão exibidos na plataforma, mas serão usados para otimização de SEO. Depois de preencher todos os parâmetros necessários, você precisa salvar a nova categoria. Para fazer isso, clique no botão Salvar no canto inferior direito da página.
Depois de salvar, a nova categoria aparece na lista. Alterar categoriasQualquer categoria pode ser alterada, se necessário. Para fazer isso, você precisa passar o cursor sobre a linha com a categoria, então o botão Editar aparecerá no lado direito da linha, se necessário. Para fazer isso, você precisa clicar neste botãono título da categoria.
Isso abrirá um cartão de categoria no qual você pode fazer alterações. As configurações de categoria disponíveis foram discutidas em mais detalhes acima.
Além de alterar as configurações da própria categoria, você também pode alterar sua ordem usando a funcionalidade Arrastar e soltar. Para fazer isso, você precisa passar passe o cursor sobre a linha com a categoria. Depois disso, um botão com três barras horizontais aparecerá na parte direita, basta puxá-lo e mover o símbolo de seta e mova a categoria para um novo lugarlocal.
Excluir categoriasPara excluir uma categoria de produto, selecione-a e, na lista suspensa no canto inferior esquerdo da página, selecione Remover categorias de produtos selecionadas.
Além de desinstalar, você também pode Download em formato XLS. Depois disso, um arquivo XLS com as categorias selecionadas será gerado. A categorização pode ser realizada pelo proprietário da plataforma por meio do painel de administração. No entanto, o fornecedor de sua conta pessoal também pode executar configurações de categoria, por exemplo, configurar sua conformidade. Saiba mais sobre como configurar categorias no lado do fornecedor em uma página separada.
|


