
| Sv translation | |||||||||||||||||||||||||
|---|---|---|---|---|---|---|---|---|---|---|---|---|---|---|---|---|---|---|---|---|---|---|---|---|---|
| |||||||||||||||||||||||||
Информация про настройку категорий также рассказана в видео:
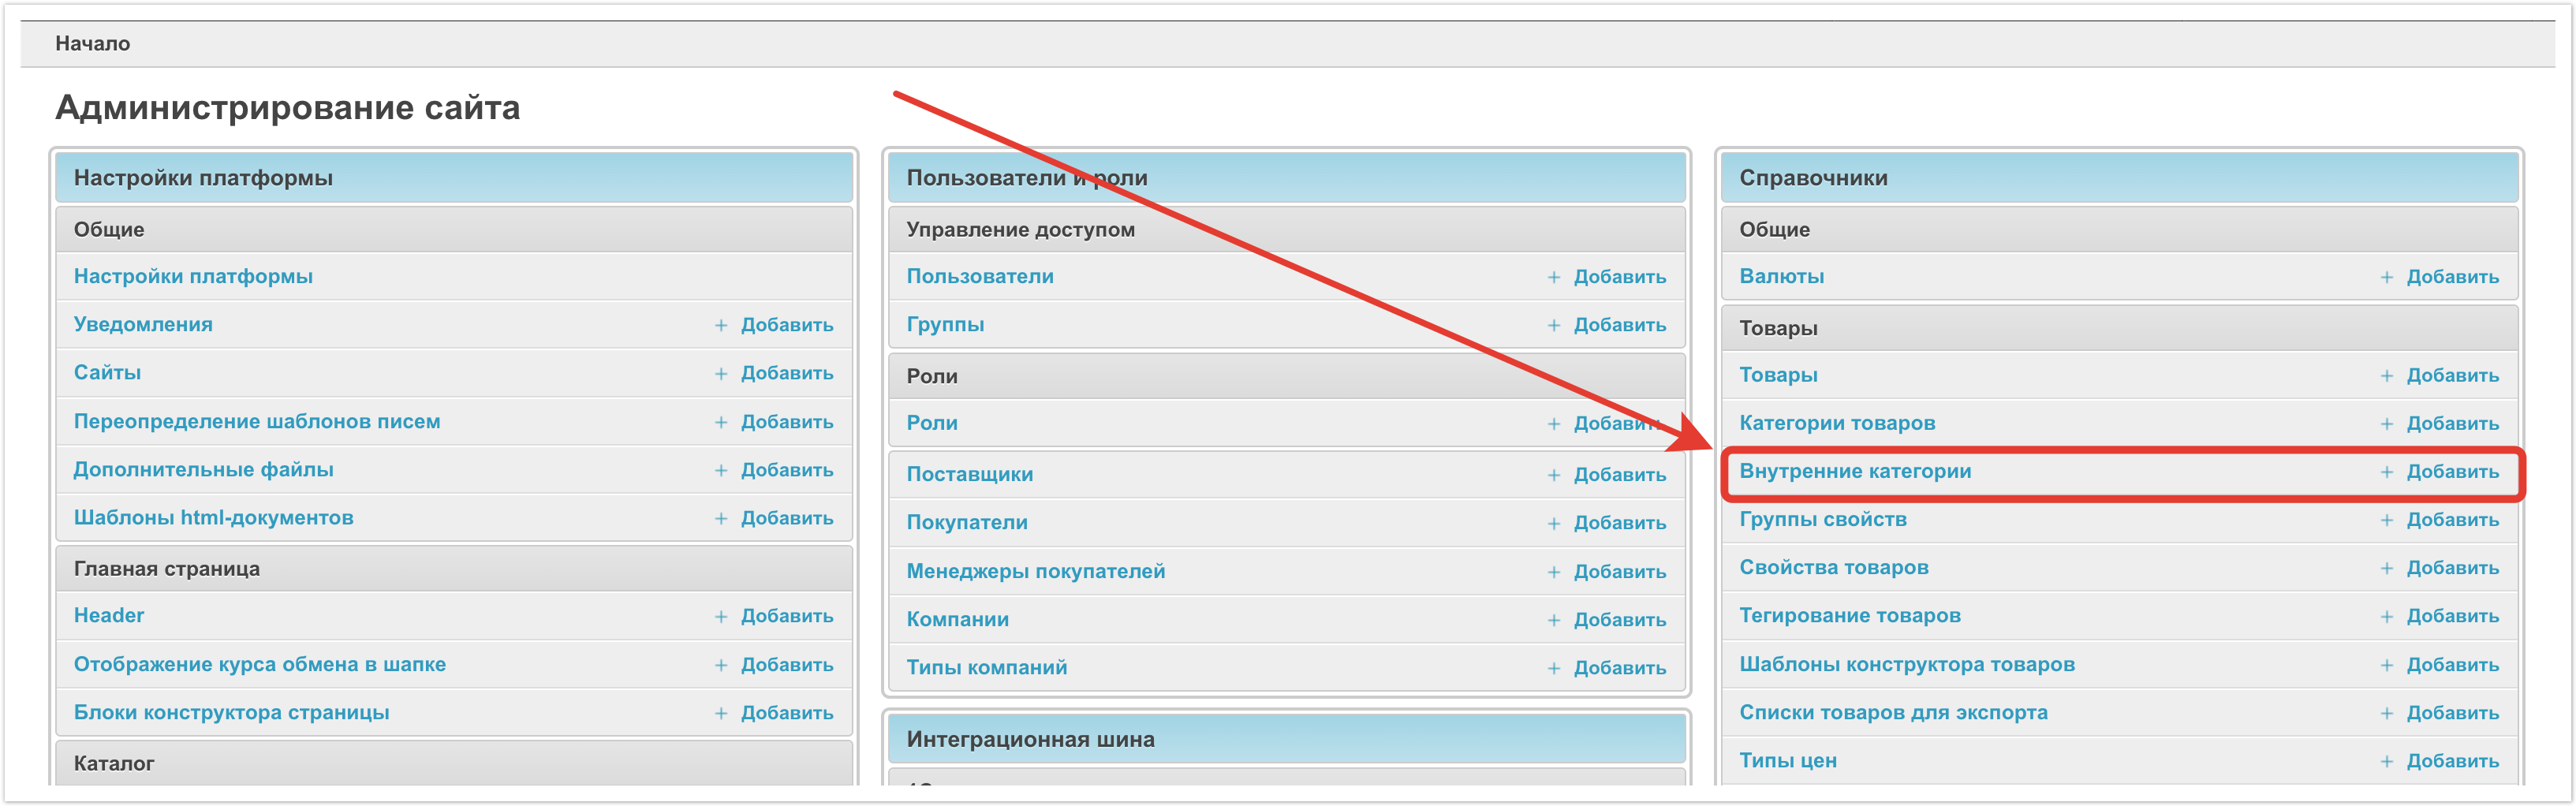
Рассмотрим настройку внутренних категорий со стороны панели администратора.
Для того, чтобы выполнить настройку необходимо в панели администратора перейти в раздел Внутренние категории.
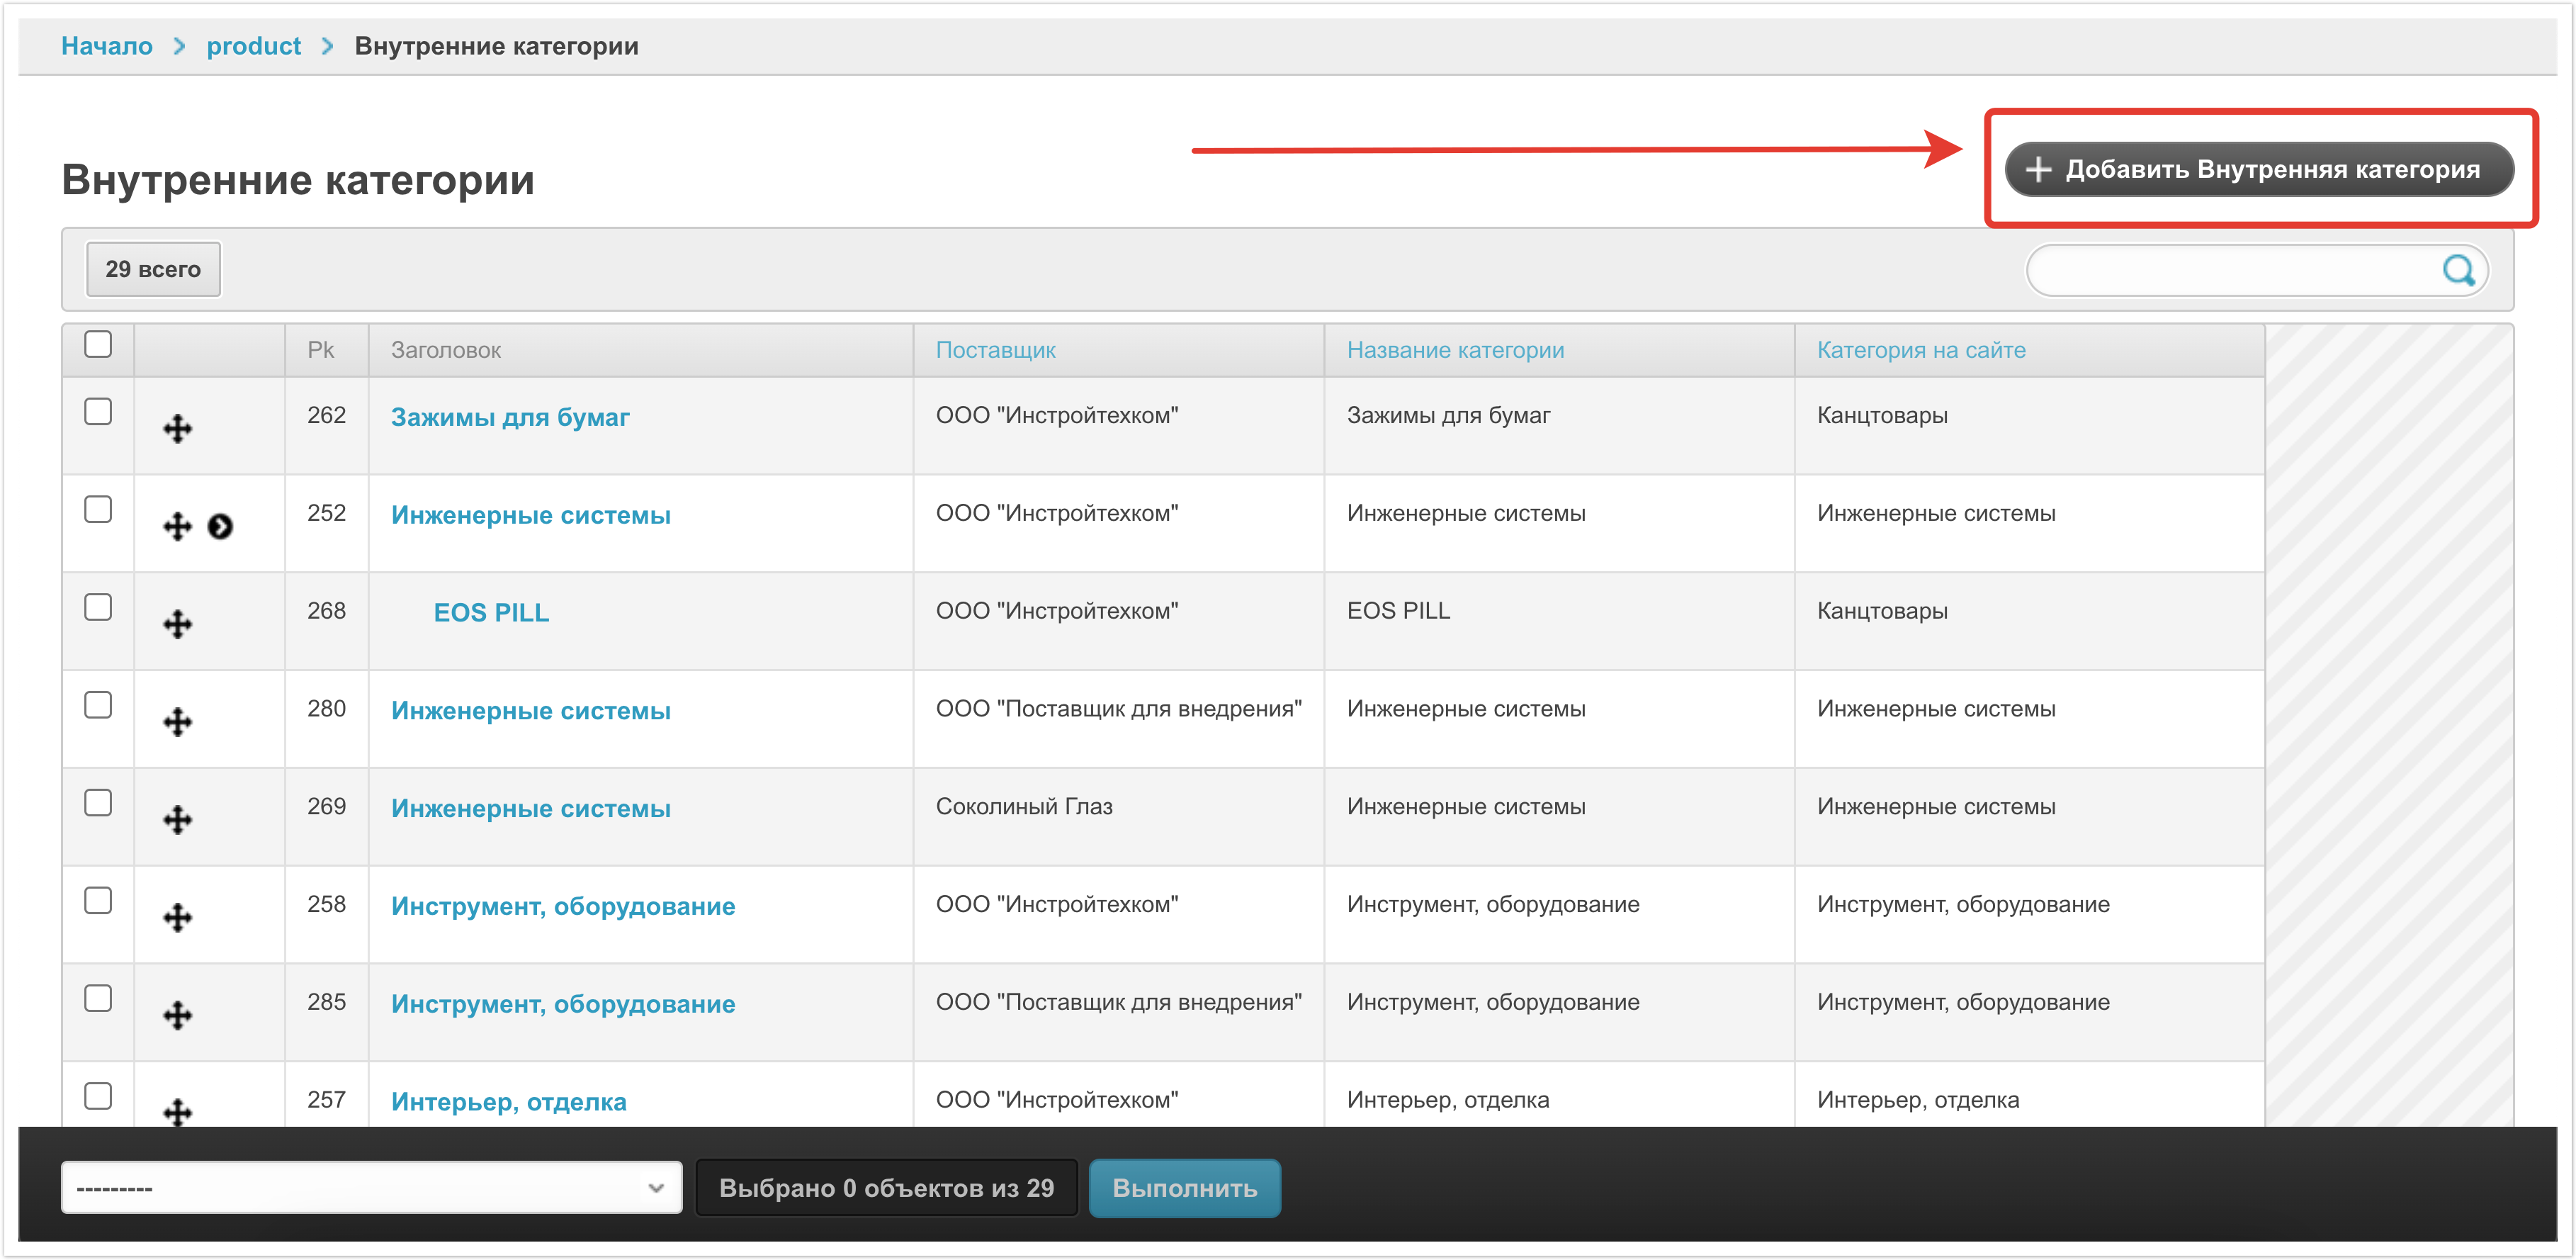
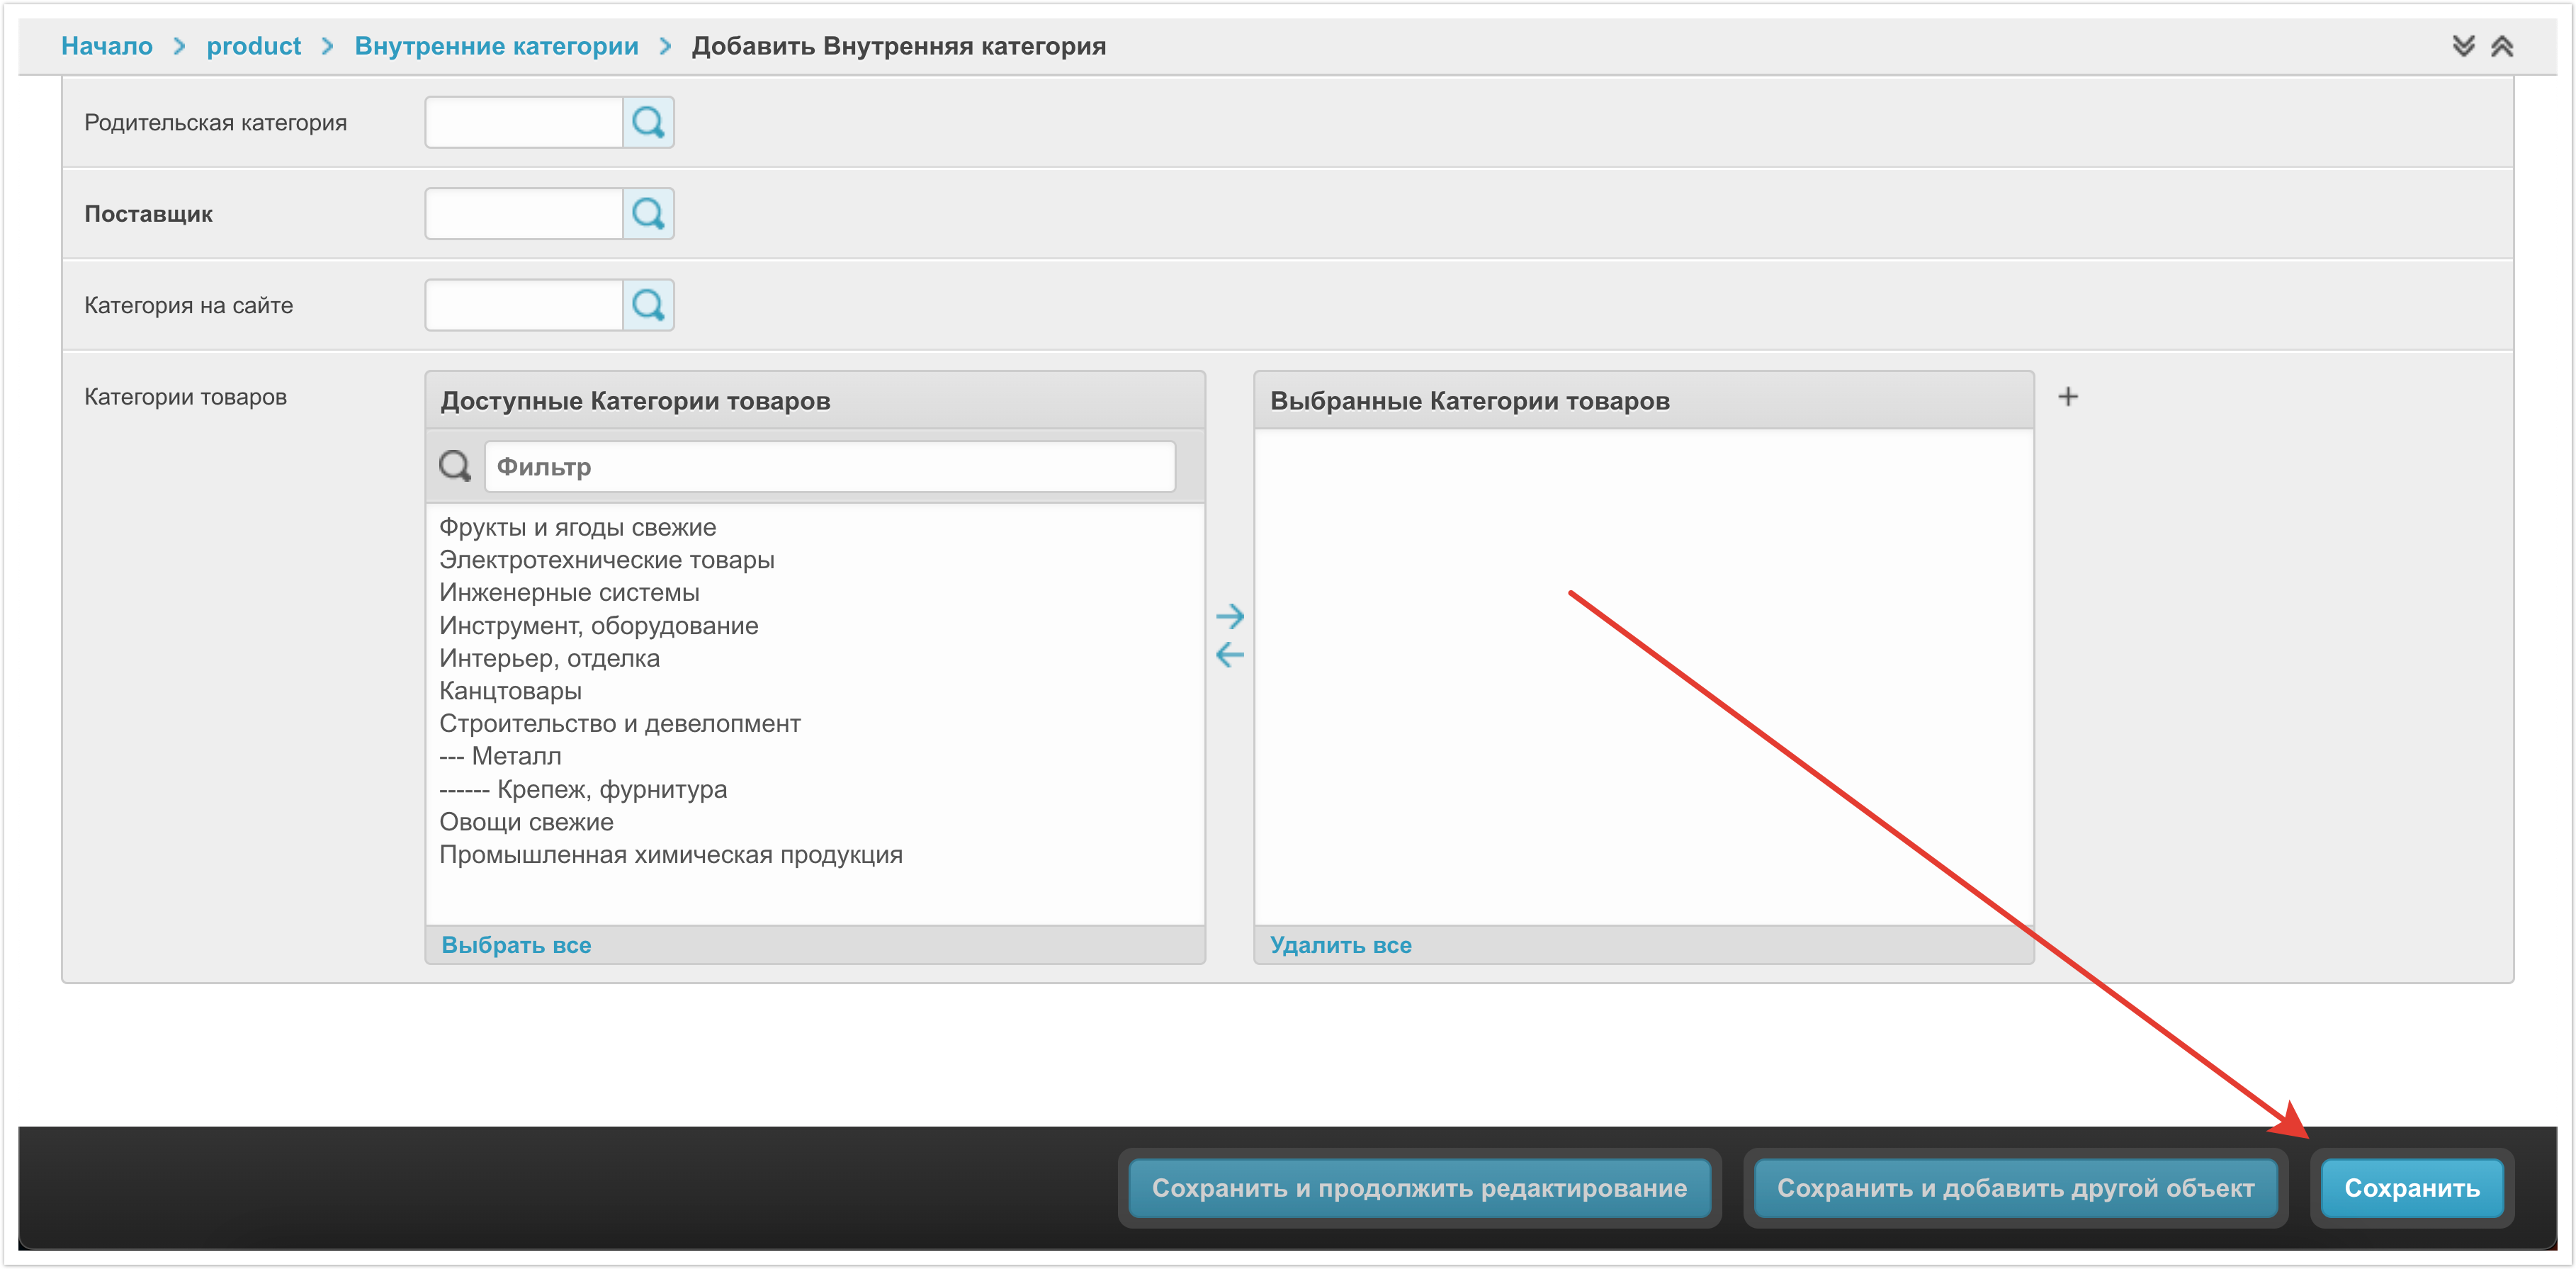
Добавление внутренней категорииВнутренние категории обычно выгружаются из ERP системы, если настроена интеграция. Если интеграция с учетной системой не настроена, то тогда можно добавить внутреннюю категорию вручную. Чтобы завести ее вручную, нужно нажать на кнопку Добавить Внутреннюю категорию.
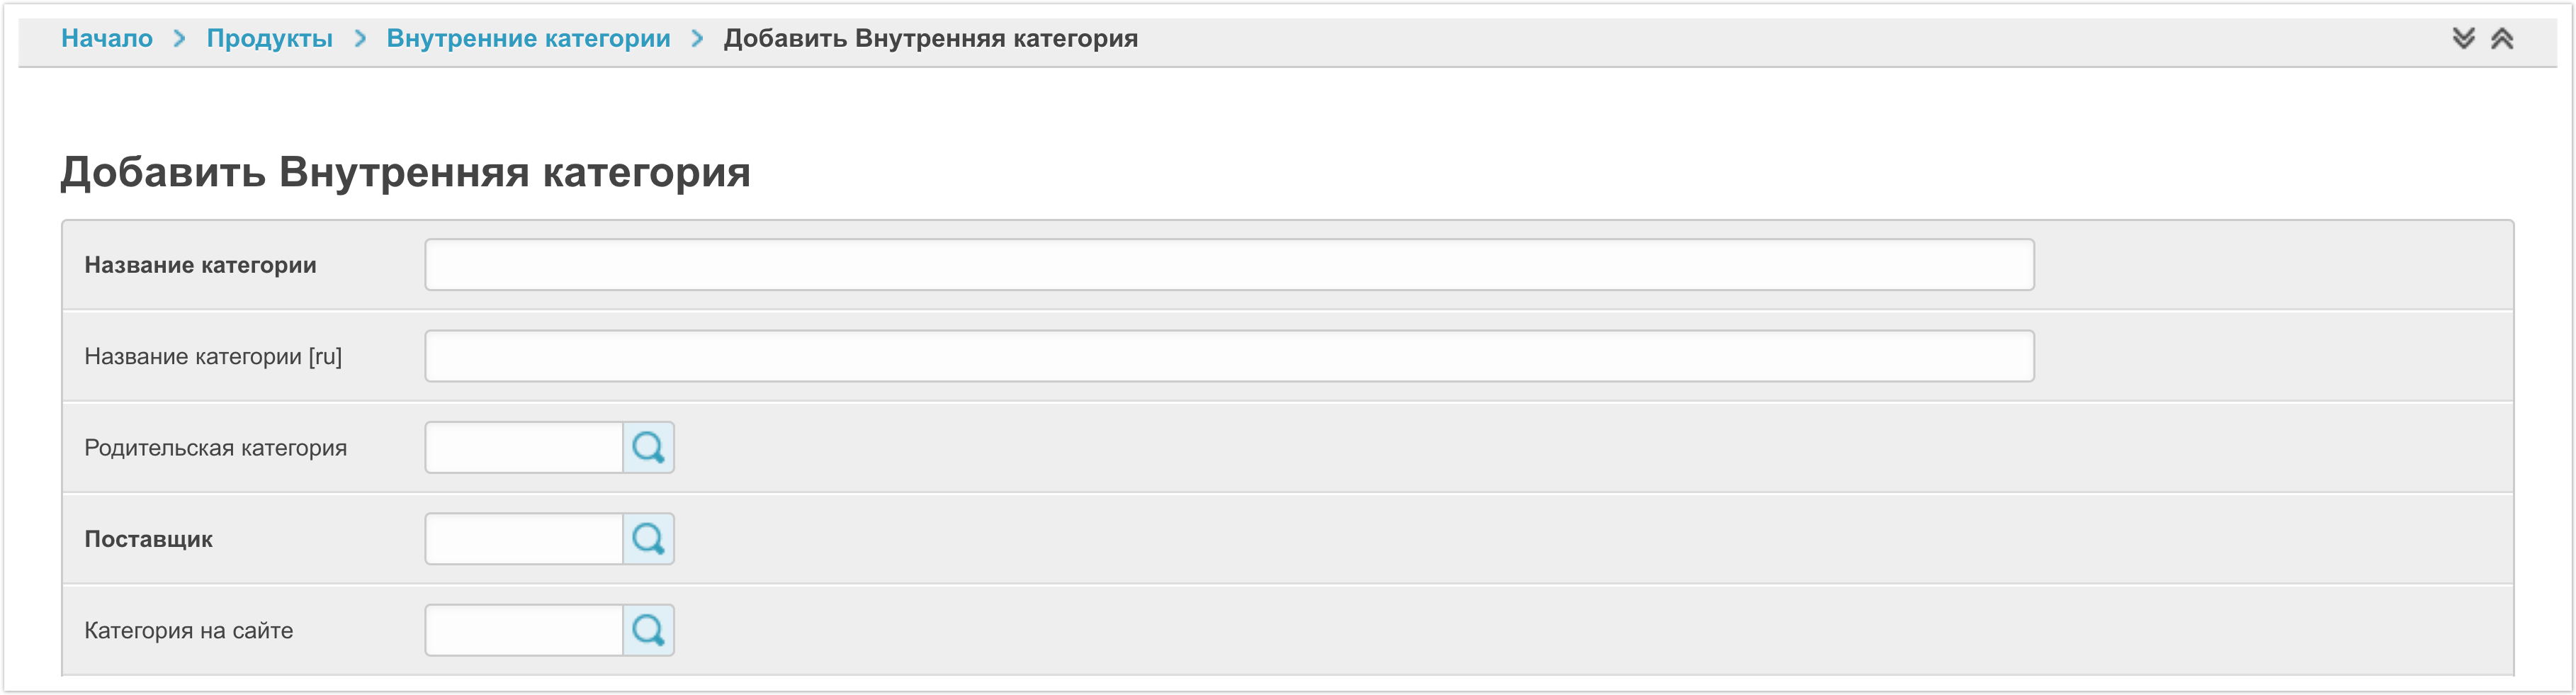
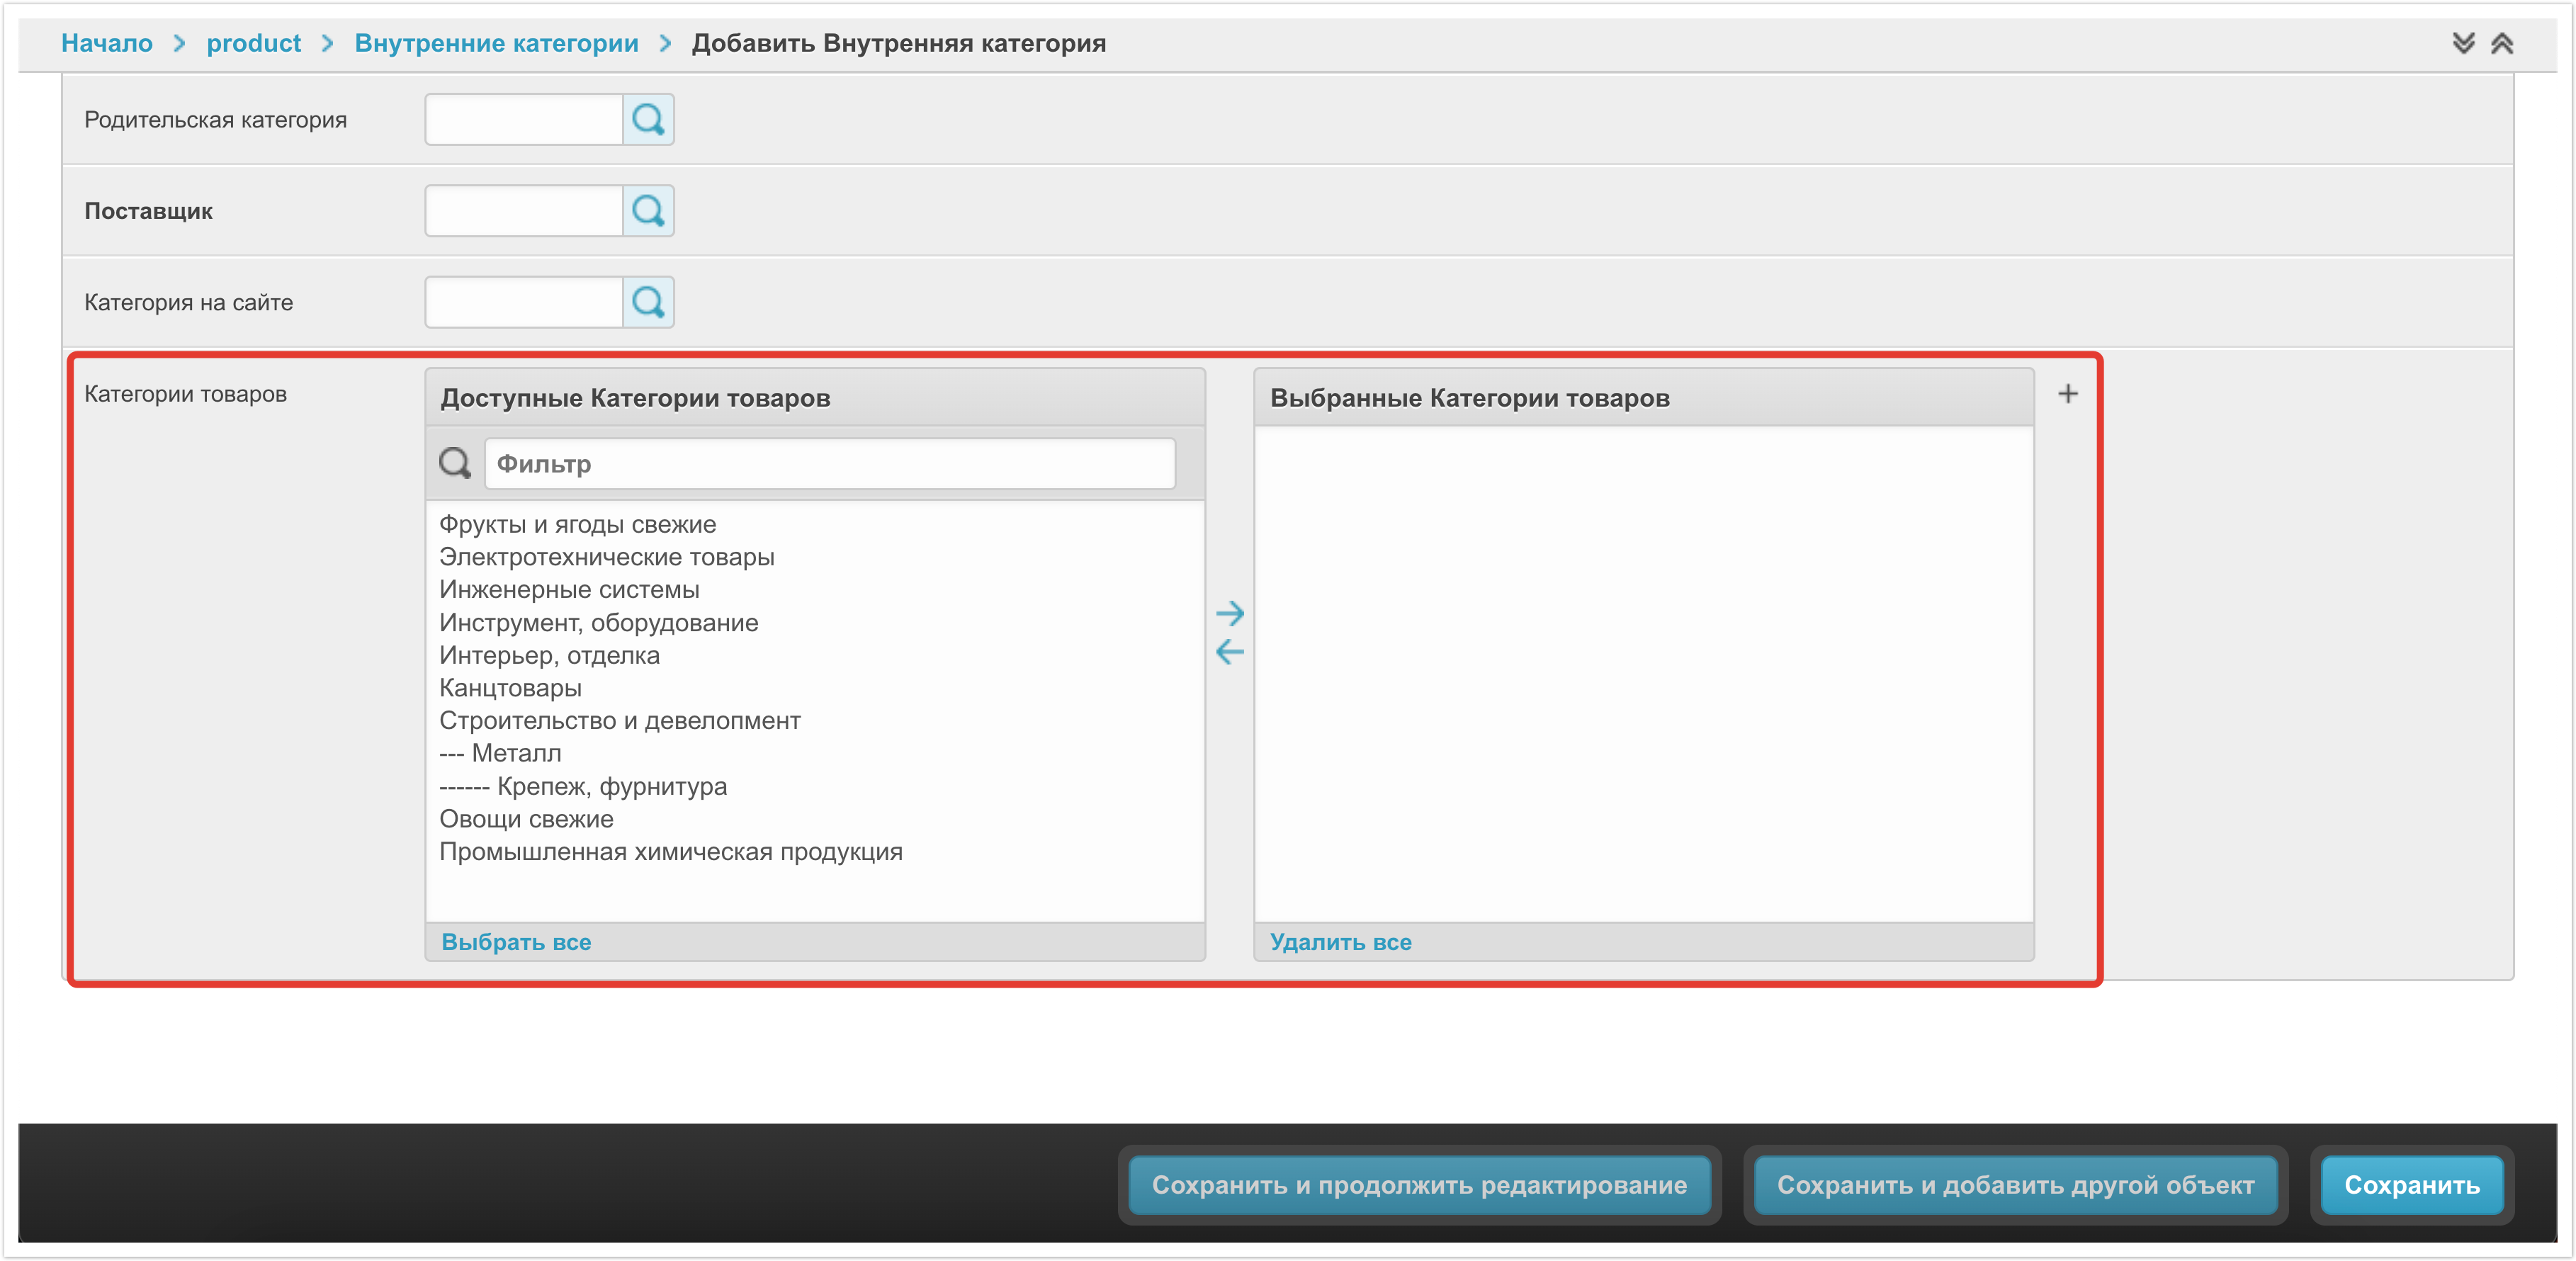
Название категории — в этом поле указывается название внутренней категории. Его можно указать на разных языках для платформ с использованием мультиязычности. Родительская категория — в этом поле можно указать, к какой родительской категории относится заводимая внутренняя категория. Заполнение этого поля актуально, если создается вложенная категория, у которой есть родитель. Если же создается внутренняя категория верхнего уровня, то заполнять это поле не требуется. Поставщик — в этом поле указывается поставщик, к которому относится эта категория. Категория на сайте — в этом поле указывается категория на платформе, с которой должна быть сопоставлена заводимая внутренняя категория. Категории товаров — доступны только при включении кастомной настройки для определенных проектов, не являются обязательными в стандартных настройках и не влияют на функционал.
После заполнения всех необходимых параметров нужно выполнить сохранение новой внутренней категории. Для этого нужно нажать кнопку Сохранить в правом нижнем углу страницы. После сохранения внутренняя категория появится в списке.
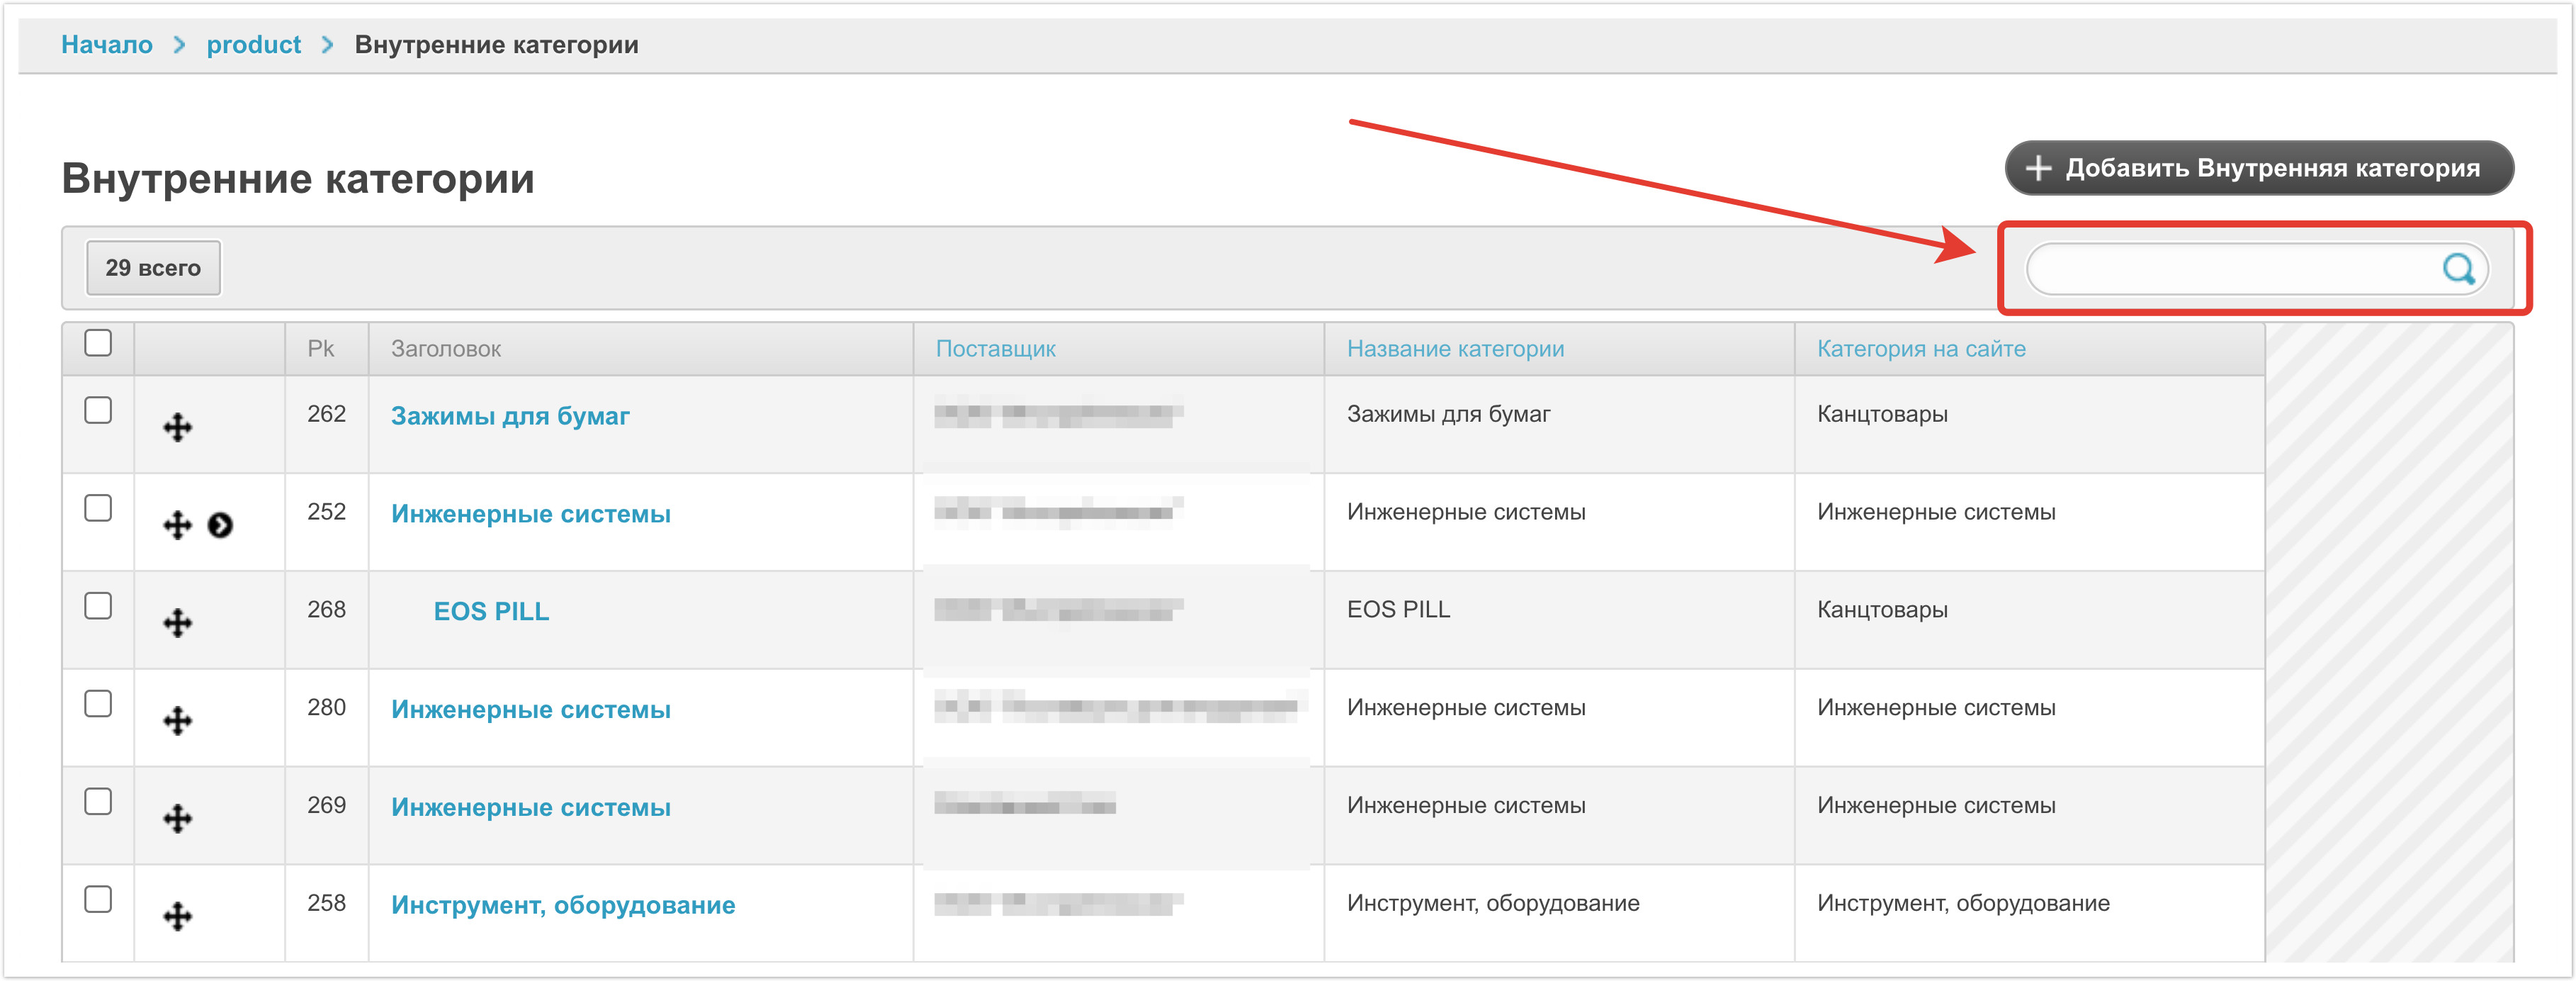
Изменение внутренней категорийЗаведенную ранее внутреннюю категорию можно изменить, если это необходимо. Для того, чтобы найти категорию, которую требуется изменить в списке достаточно воспользоваться строкой поиска по внутренним категориям.
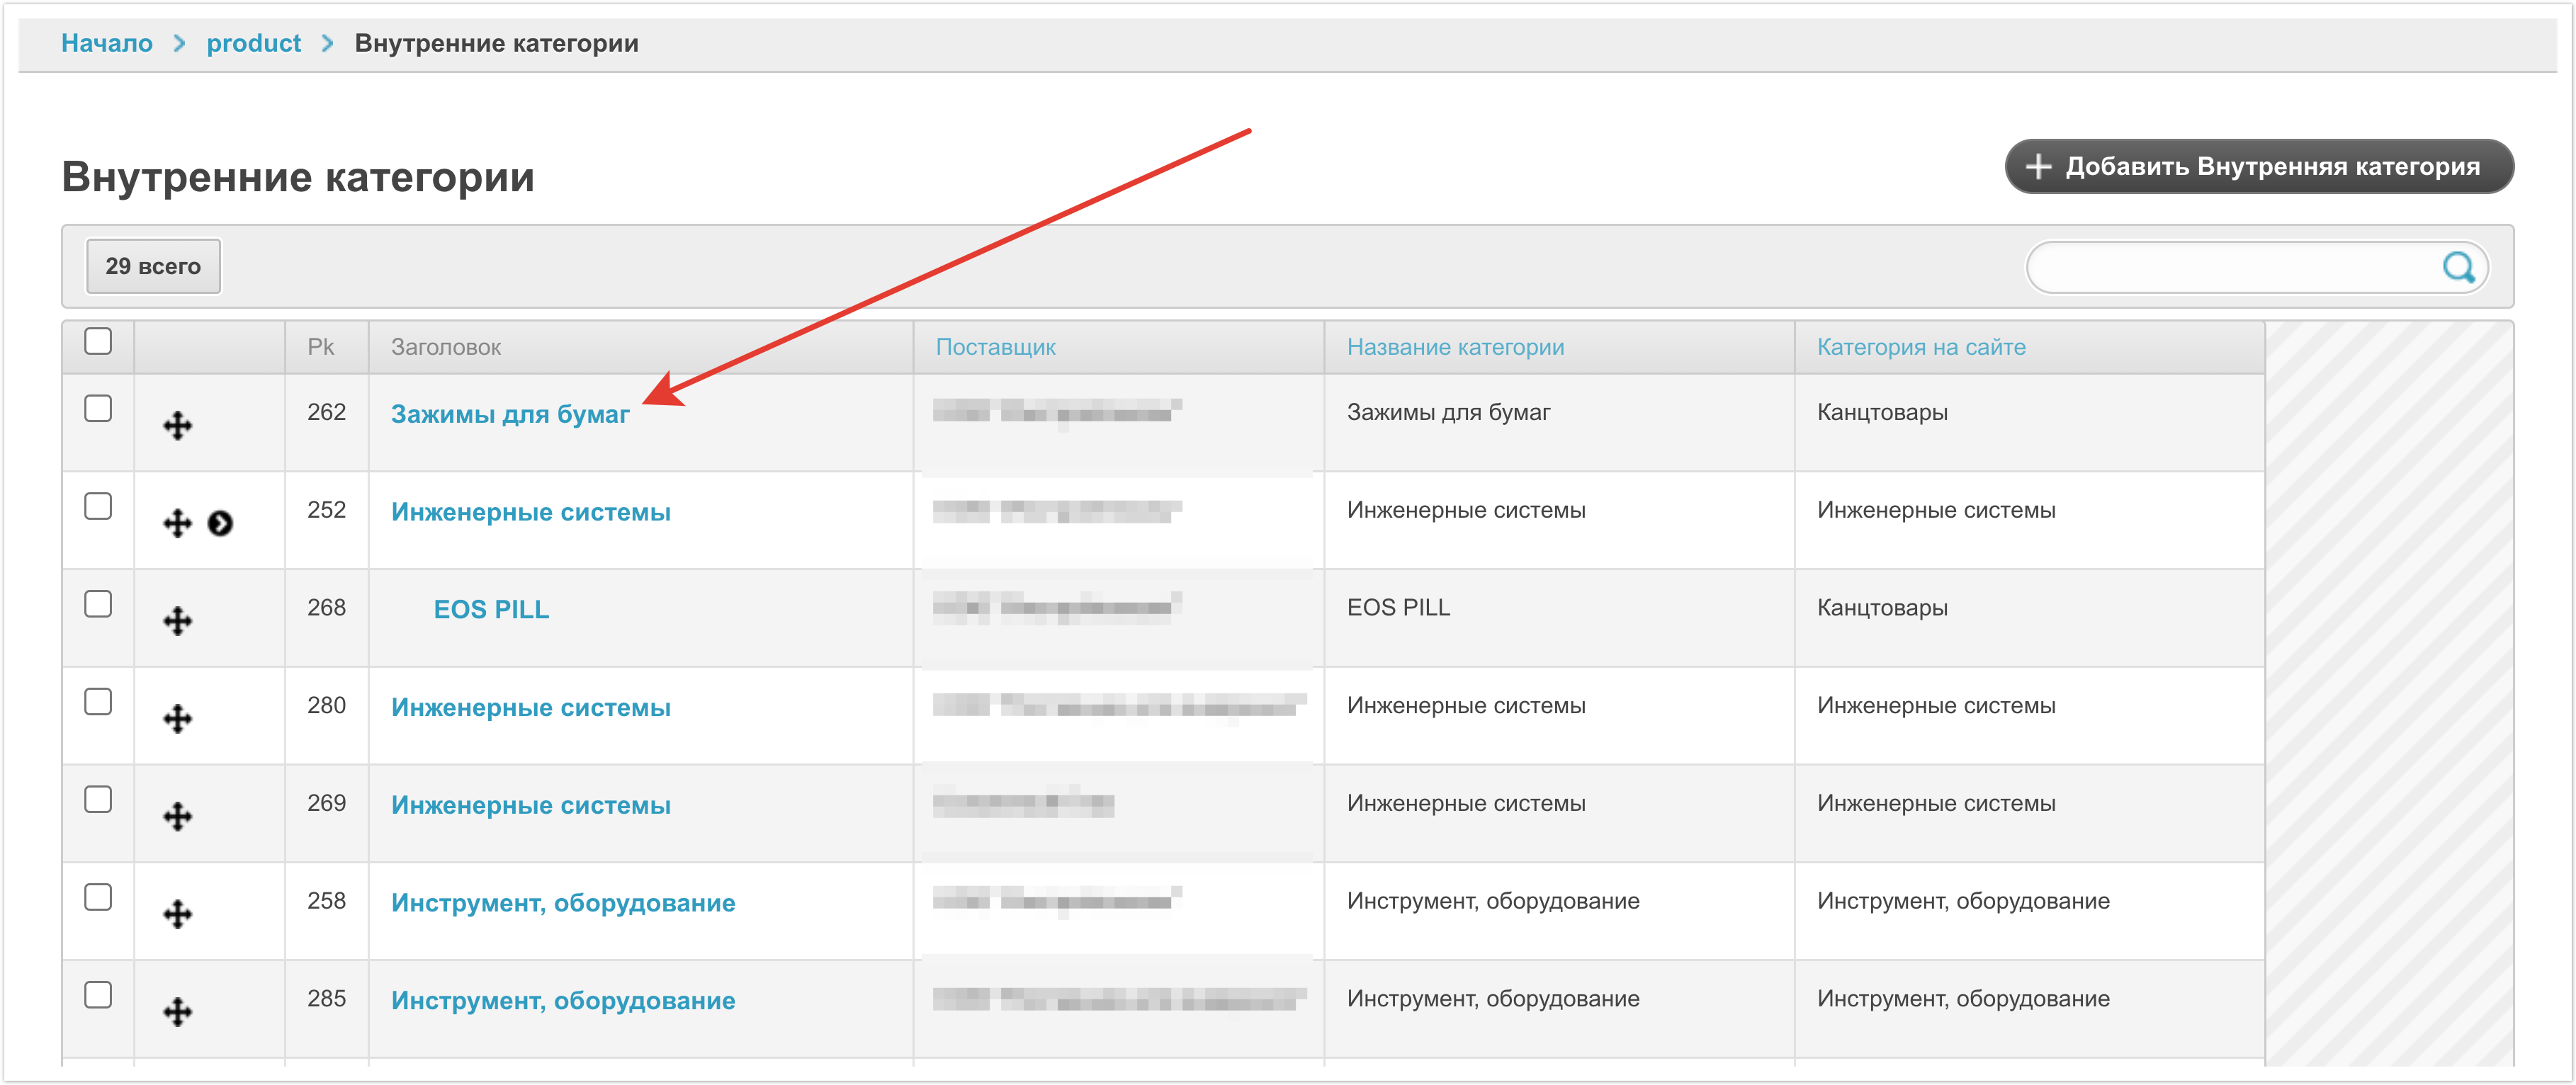
Для изменения внутренней категории необходимо нажать на наименование категории.
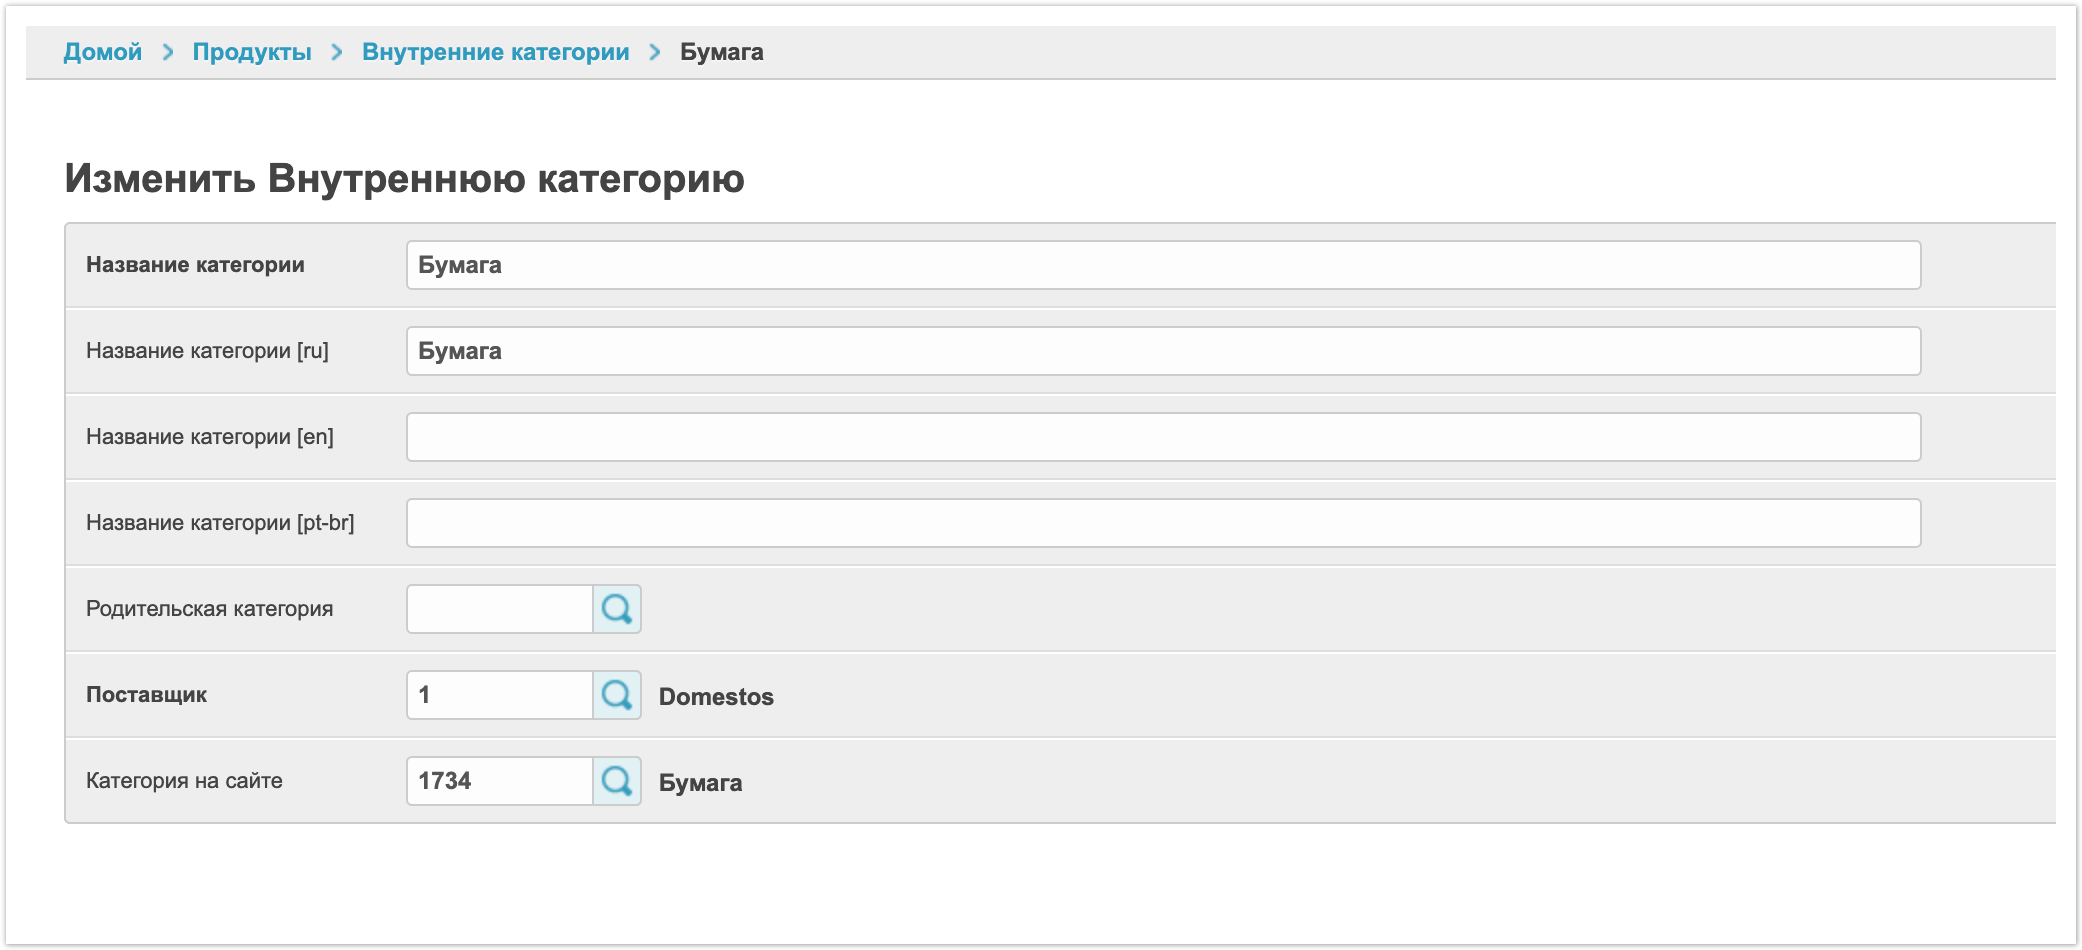
После этого откроется карточка внутренней категории, в которую можно будет внести изменения. Подробнее доступные настройки внутренней категории были рассмотрены выше.
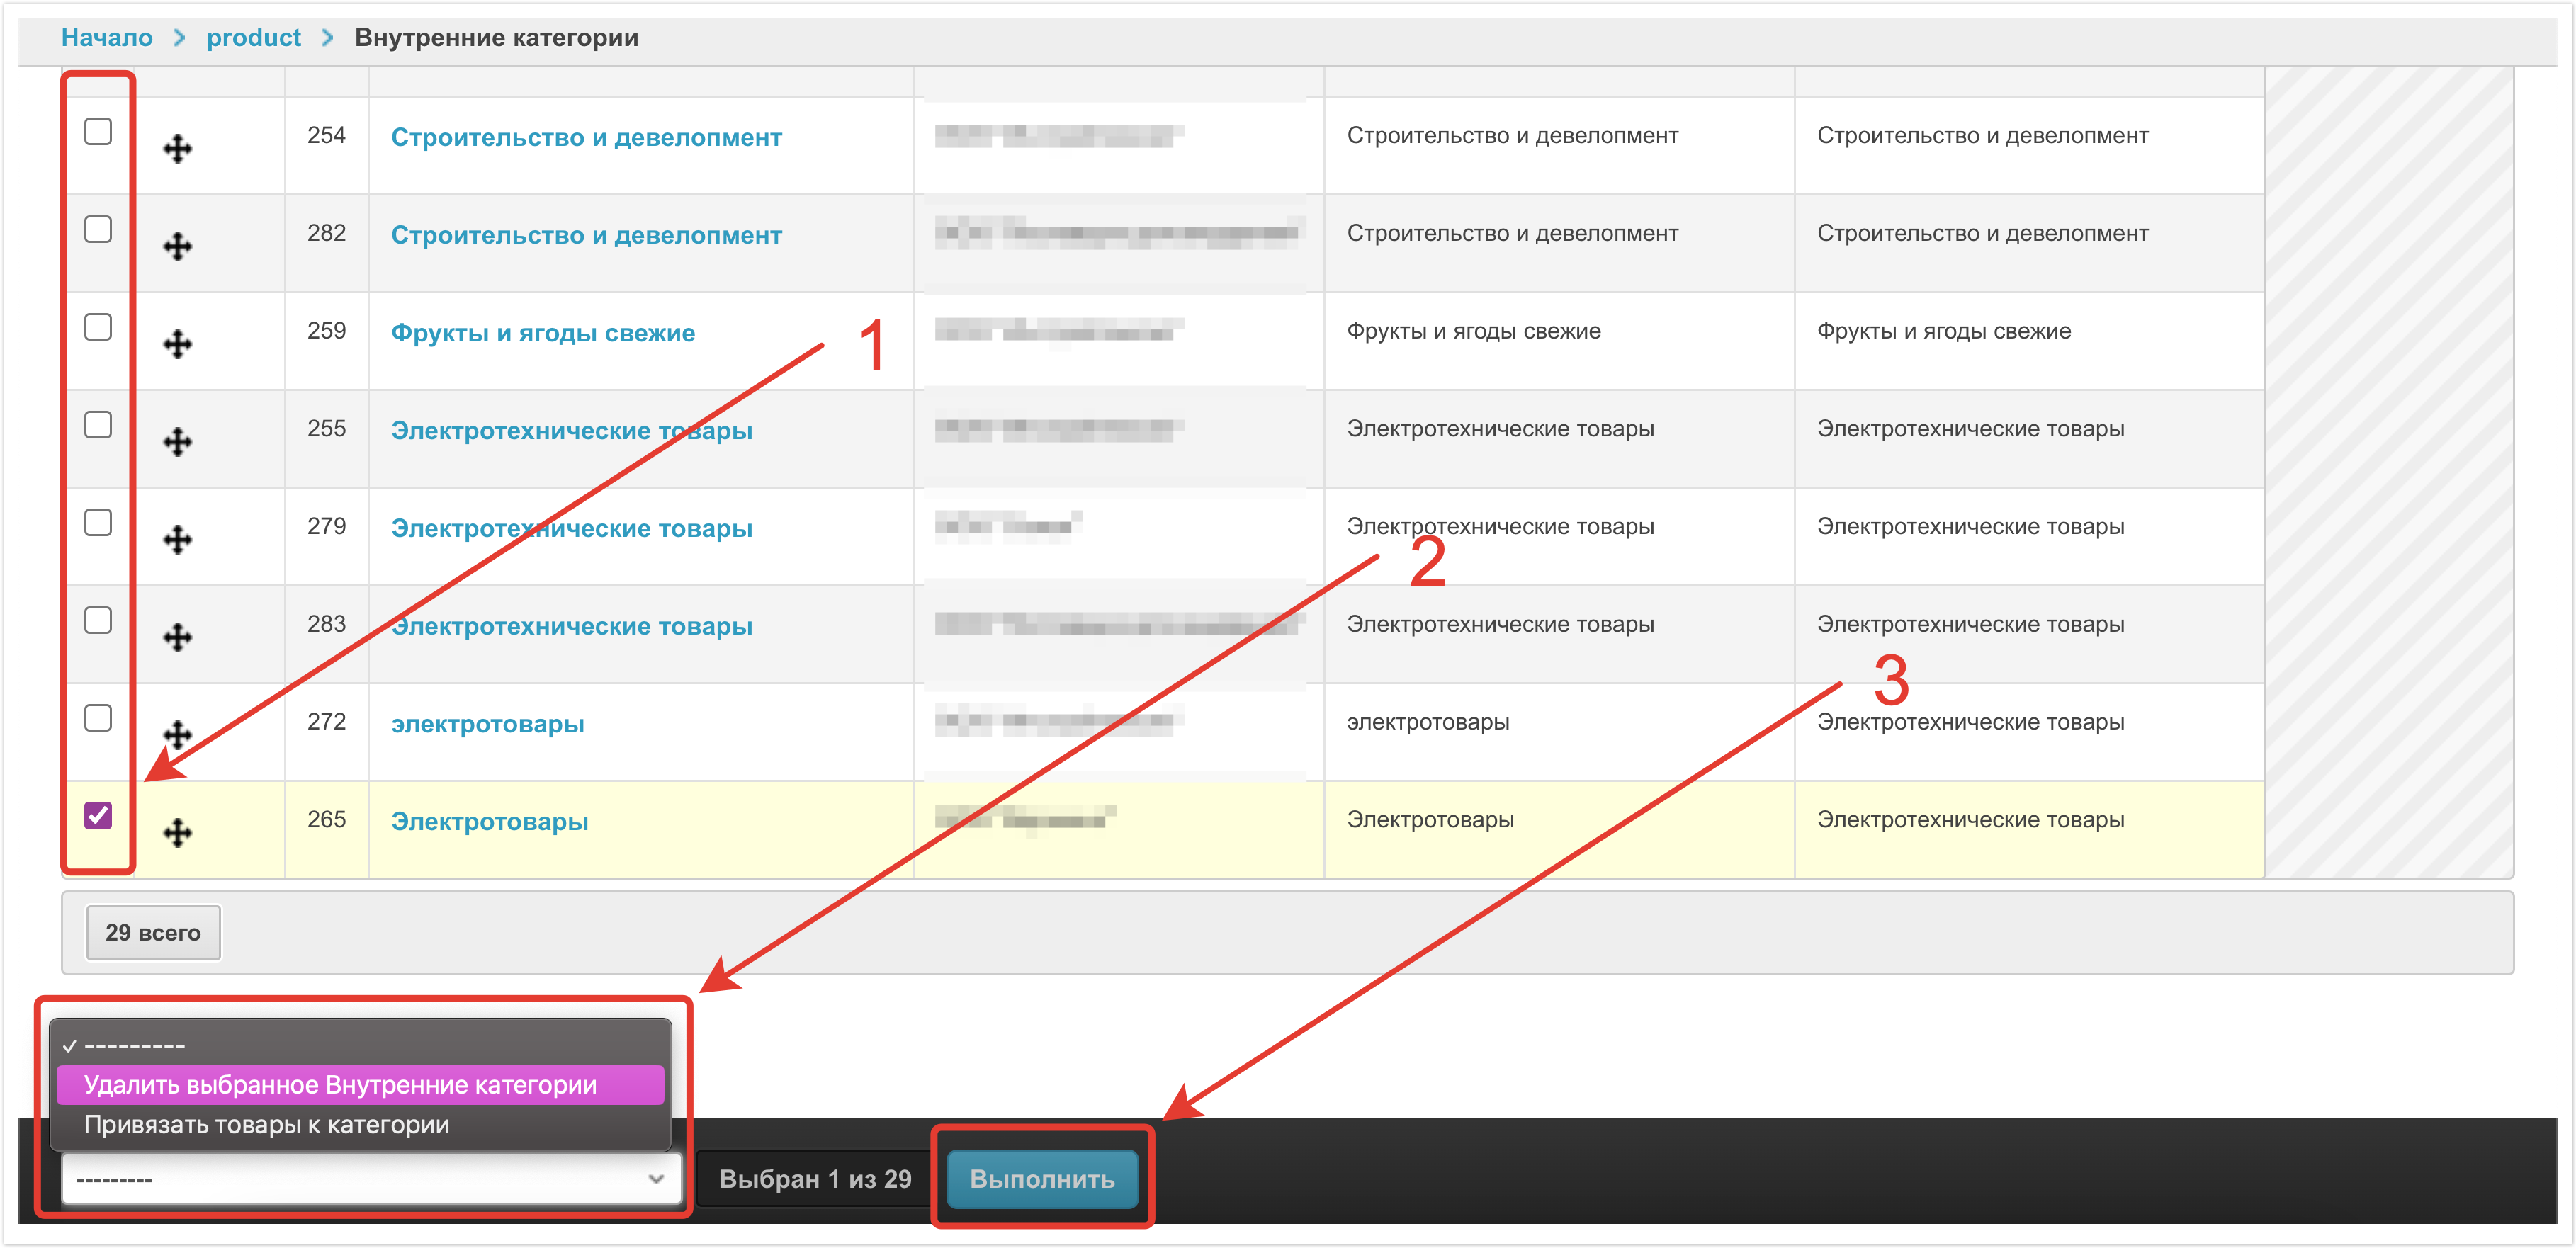
Кроме изменения настроек внутренней категории можно также менять их порядок с помощью функционала Drag-and-Drop. Для этого нужно навести курсором на символ Удаление внутренней категорийДля удаления внутренней категории необходимо выделить ее, а далее в выпадающем списке слева внизу страницы выбрать Удалить выбранное Внутренние категории и затем Выполнить.
Кроме удаления можно также Привязать товары к категории. Эта настройка позволяет массово привязать несколько внутренних категорий к одной категории на платформе. Настройка внутренних категорий может выполняться владельцем платформы через панель администратора. Однако, поставщик из своего личного кабинета также может настроить их соответствие. Подробнее о настройке категорий со стороны поставщика рассказано на отдельной странице.
|
| Sv translation | |||||||||||||||||
|---|---|---|---|---|---|---|---|---|---|---|---|---|---|---|---|---|---|
| |||||||||||||||||
Consider setting up internal categories from the admin panel.
To configure it, go to the Internal categories section in the admin panel.
Adding an internal categoryInternal categories are usually unloaded from the ERP system if integration is configured. If integration with the accounting system is not configured, then you can add an internal category manually. To enter it manually, you need to click on the Add Internal Category button.
Name of category — this field contains the name of the internal category. It can be specified in different languages for platforms using multilingualism. Parent Category — in this field you can specify which parent category the generated internal category belongs to. Filling in this field is relevant if a nested category is created that has a parent. If you are creating an internal top-level category, then this field is not required. Supplier — this field indicates the supplier to which this category belongs. Site category — this field specifies the category on the platform with which the generated internal category should be compared. Product categories — available only when custom settings are enabled for certain projects; they are not required in standard settings and do not affect functionality.
After filling in all the necessary parameters, you need to save the new internal category. To do this, click the Save button in the lower right corner of the page. After saving, the internal category will appear in the list.
Change internal categoriesThe previously entered internal category can be changed if necessary. In order to find the category that you want to change in the list, just use the search bar for internal categories.
To change the internal category, click on the category name.
After that, an internal category card will open, in which you can make changes. The available internal category settings were discussed above in more detail.
In addition to changing the internal category settings, you can also change their order using the Drag-and-Drop functionality. To do this, you need to hover your cursor over the symbol Deleting internal categoriesTo delete an internal category, select it, and then select Delete selected Internal categories from the drop-down list at the bottom left of the page.
In addition to deleting, you can also Snap products to a category. This setting allows you to bulk link multiple internal categories to a single category on the platform. Internal categories can be configured by the platform owner through the admin panel. However, the supplier from his personal account can also configure their compliance. For more information about setting up categories on the supplier side, see a separate page.
|


| Sv translation | |||||||||||||||||
|---|---|---|---|---|---|---|---|---|---|---|---|---|---|---|---|---|---|
| |||||||||||||||||
Vamos considerar a configuração de categorias internas a partir do painel de administração.
Para executar a configuração, vá para a seção Categorias internas no painel de administração.
Adicionar uma categoria internaAs categorias internas geralmente são descarregadas do sistema ERP se a integração estiver configurada. Se a integração com o sistema de contabilidade não estiver configurada, você poderá adicionar uma categoria interna manualmente. Para iniciá-lo manualmente, você precisa clicar no botão Adicionar categoria interna.
Nome da categoria — este campo indica o nome da categoria interna. Pode ser especificado em diferentes línguas para plataformas que utilizam o multilinguismo. Selecione a categoria principal — neste campo você pode especificar a qual categoria pai pertence a categoria interna que você está inserindo. O preenchimento desse campo é relevante se você estiver criando uma categoria aninhada que tenha um pai. Se você criar uma categoria interna de nível superior, não será necessário preencher esse campo. Fornecedor — Este campo especifica o fornecedor ao qual esta categoria pertence. Categoria no site — este campo indica a categoria na plataforma com a qual a categoria interna deve ser comparada. — disponíveis somente quando as configurações personalizadas estão habilitadas para determinados projetos; elas não são obrigatórias nas configurações padrão e não afetam a funcionalidade.
Depois de preencher todos os parâmetros necessários, você precisa salvar a nova categoria interna. Para fazer isso, clique no botão Salvar no canto inferior direito da página. Depois de salvar, a categoria interna aparece na lista.
Alterar categorias internasA categoria interna que você criou anteriormente pode ser alterada, se necessário. Para encontrar a categoria que você deseja alterar na lista, basta usar a barra de pesquisa para categorias internas.
Para alterar a categoria interna, clique no nome da categoria.
Isso abrirá um cartão de categoria interno no qual você poderá fazer alterações. As configurações de categoria interna disponíveis foram discutidas com mais detalhes acima.
Além de alterar as configurações internas das categorias, você também pode alterar sua ordem usando a funcionalidade Arrastar e Soltar Excluir uma categoria interna Para excluir uma categoria interna, selecione-a e, na lista suspensa no canto inferior esquerdo da página, selecione Remover Categorias internas selecionados.
Além da exclusão, você também pode vincular produtos a uma categoria. Essa configuração permite que você vincule massivamente várias categorias internas a uma única categoria na plataforma. A configuração de categorias internas pode ser realizada pelo proprietário da plataforma através do painel de administração. No entanto, o provedor de sua conta pessoal também pode configurar sua conformidade. Saiba mais sobre como configurar categorias no lado do fornecedor em uma página separada.
|


