
| Sv translation | |||||||||||||||||||
|---|---|---|---|---|---|---|---|---|---|---|---|---|---|---|---|---|---|---|---|
| |||||||||||||||||||
Подробнее про логику работы интеграции Agora с Битрикс 24 рассказано в видео:
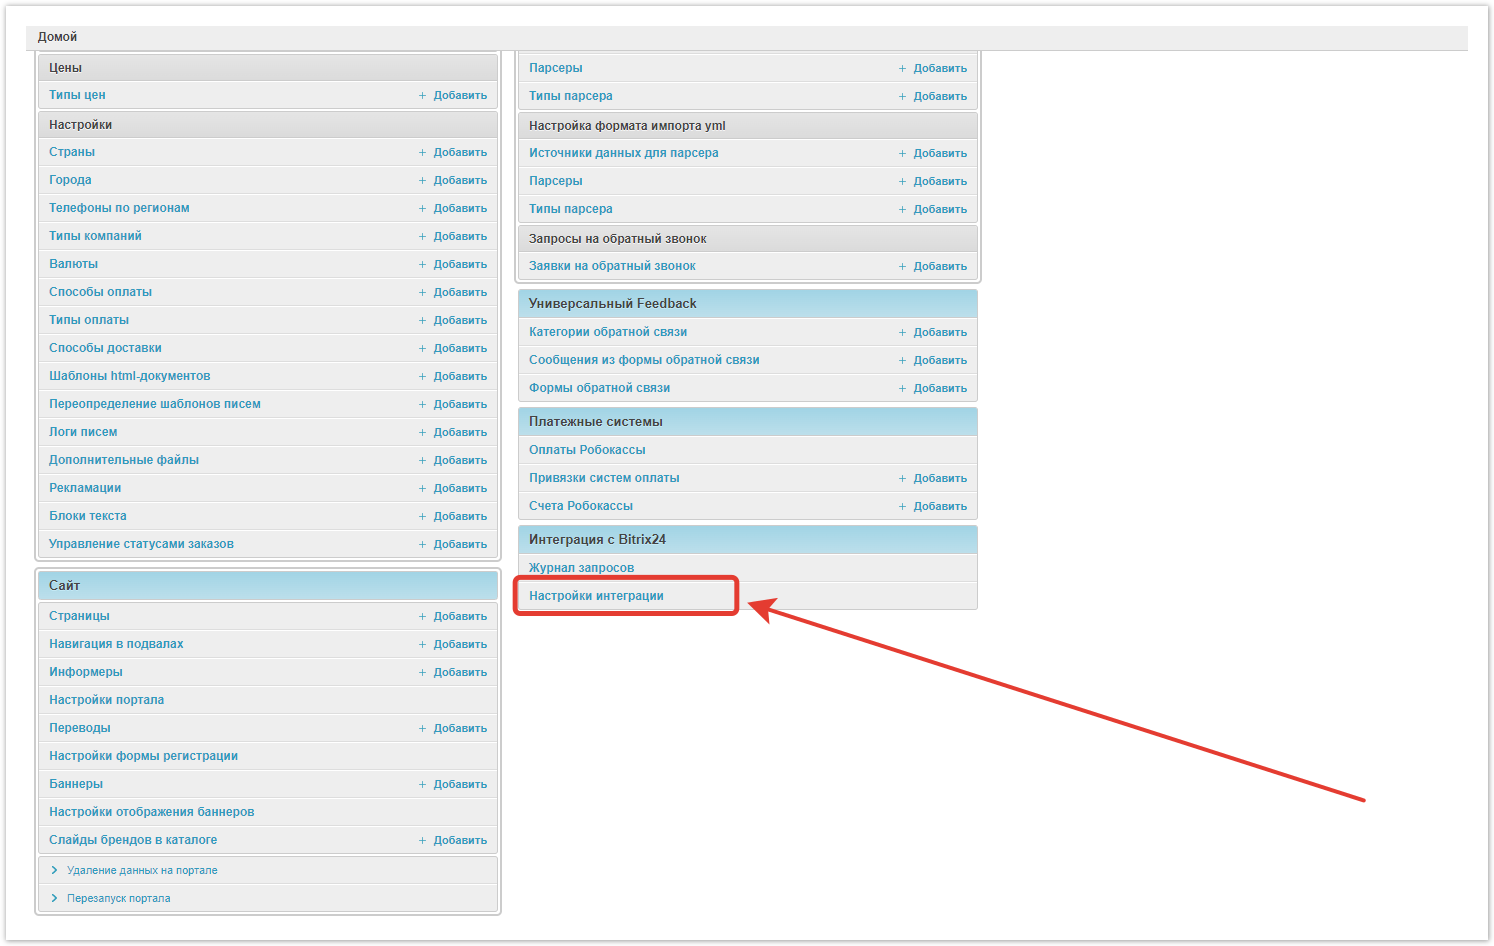
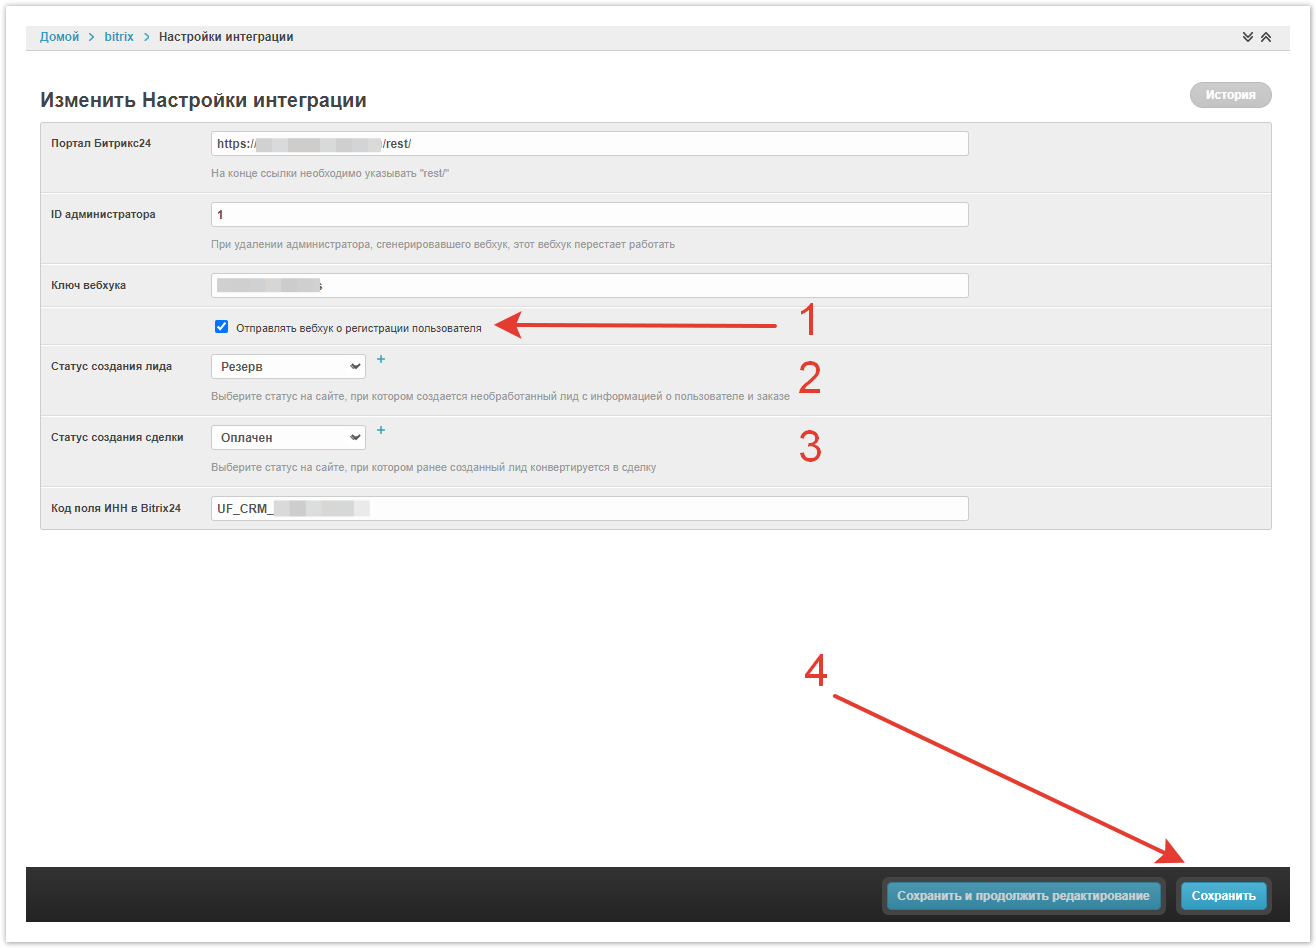
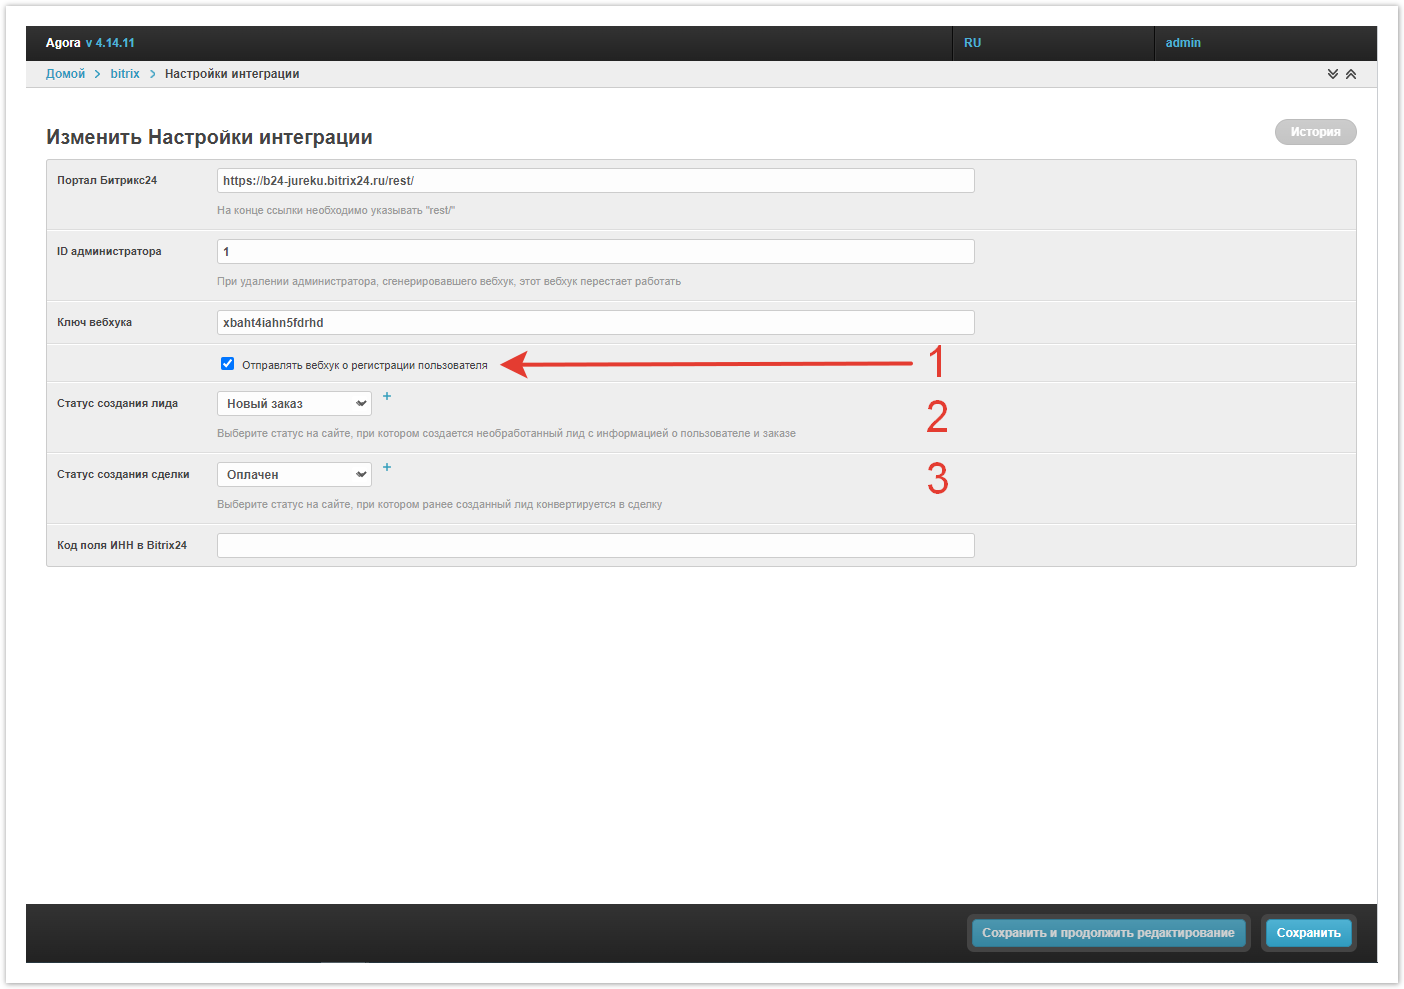
Создание интеграцииДля настройки интеграции перейдите в раздел Интеграция с Bitrix24 → Настройки интеграции административной панели Agora.
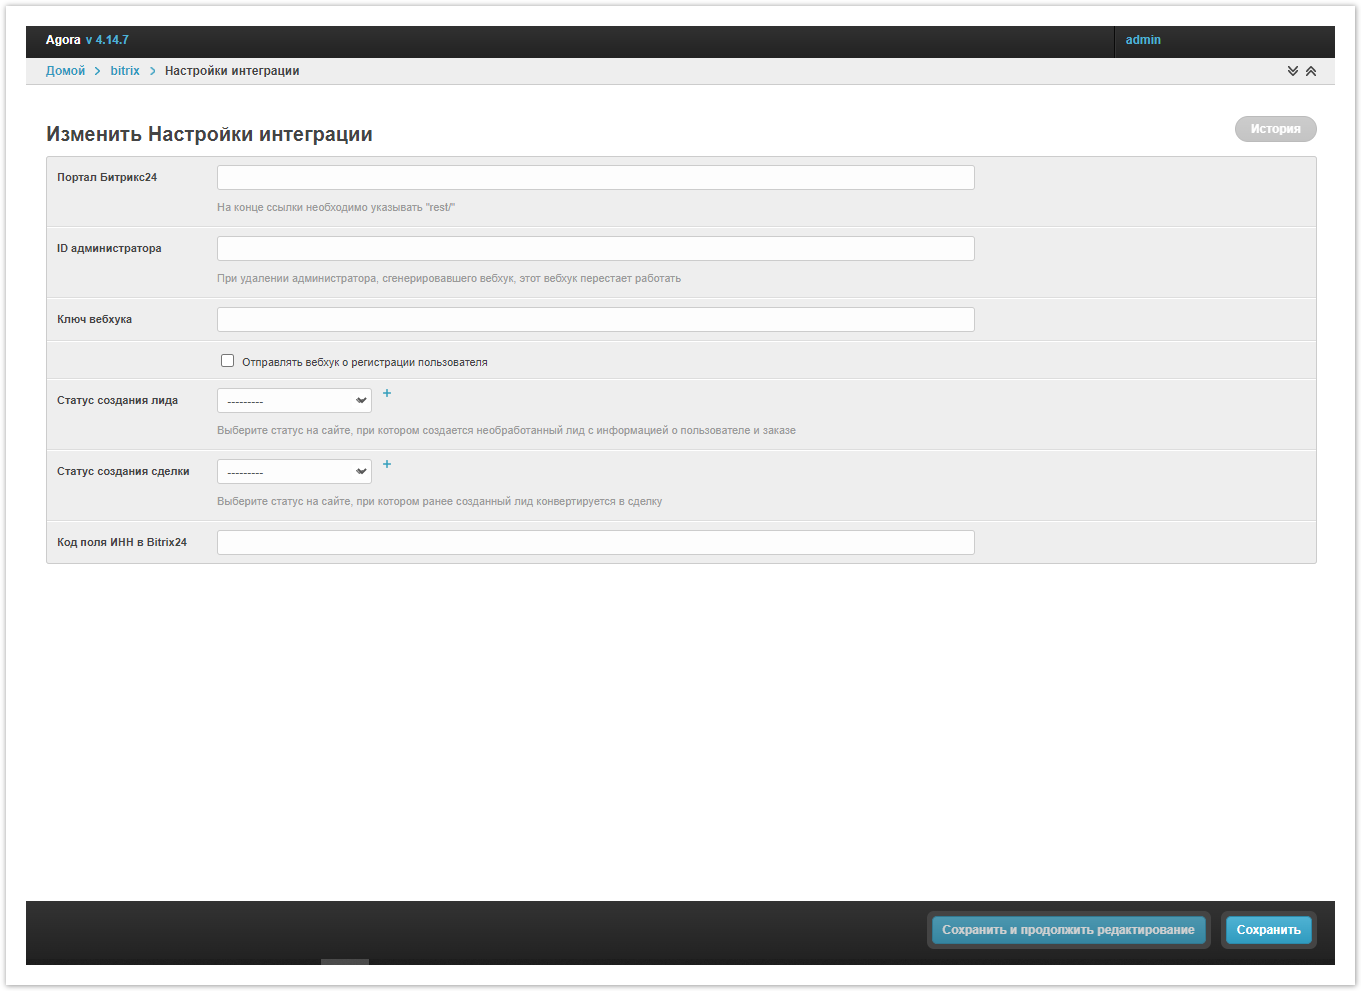
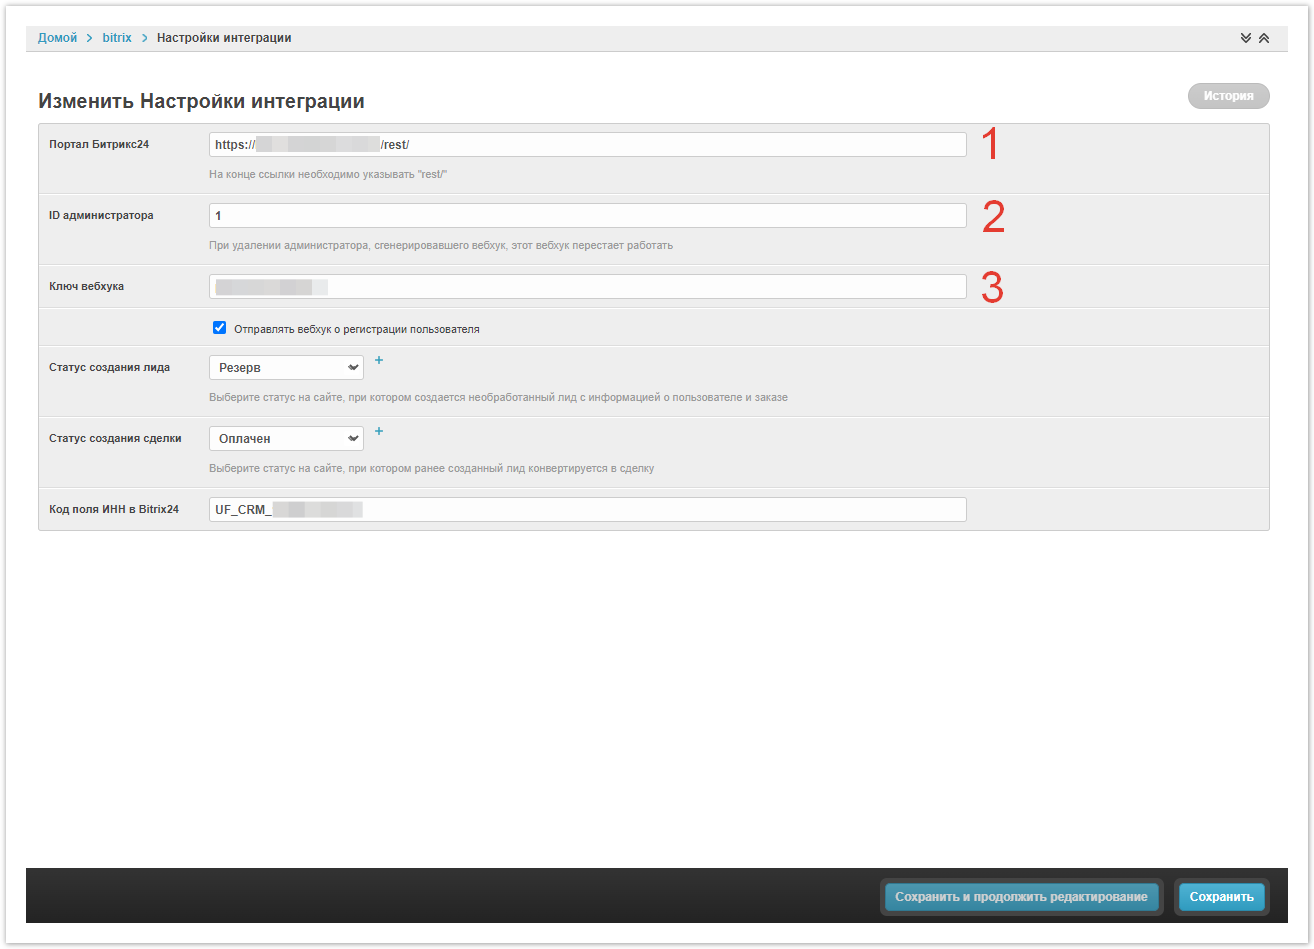
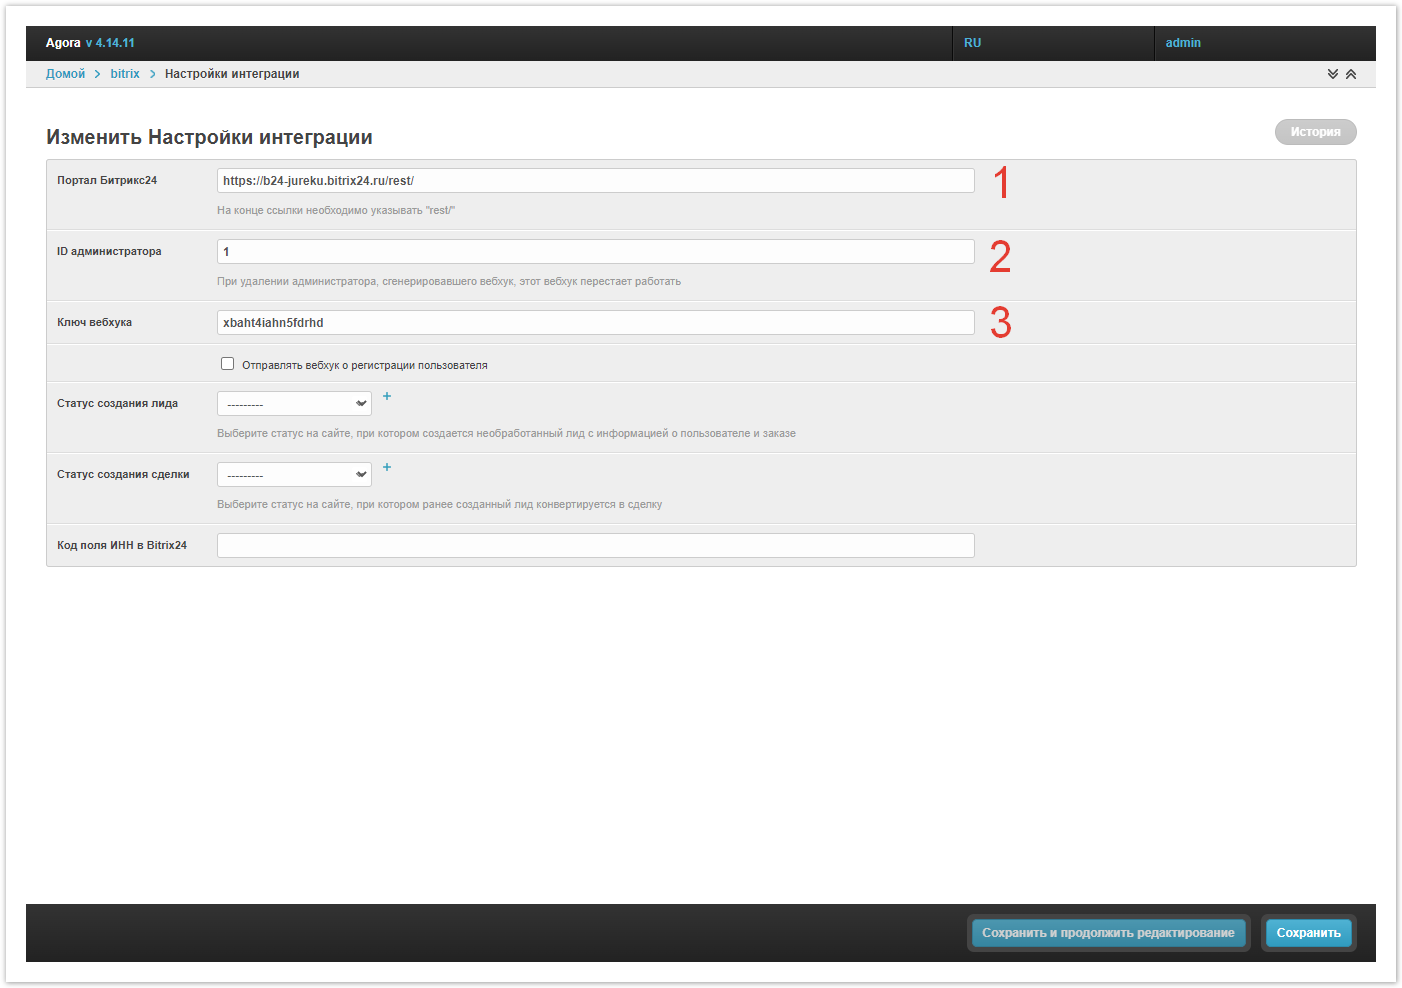
Откроется окно настройки, в которое нужно внести данные.
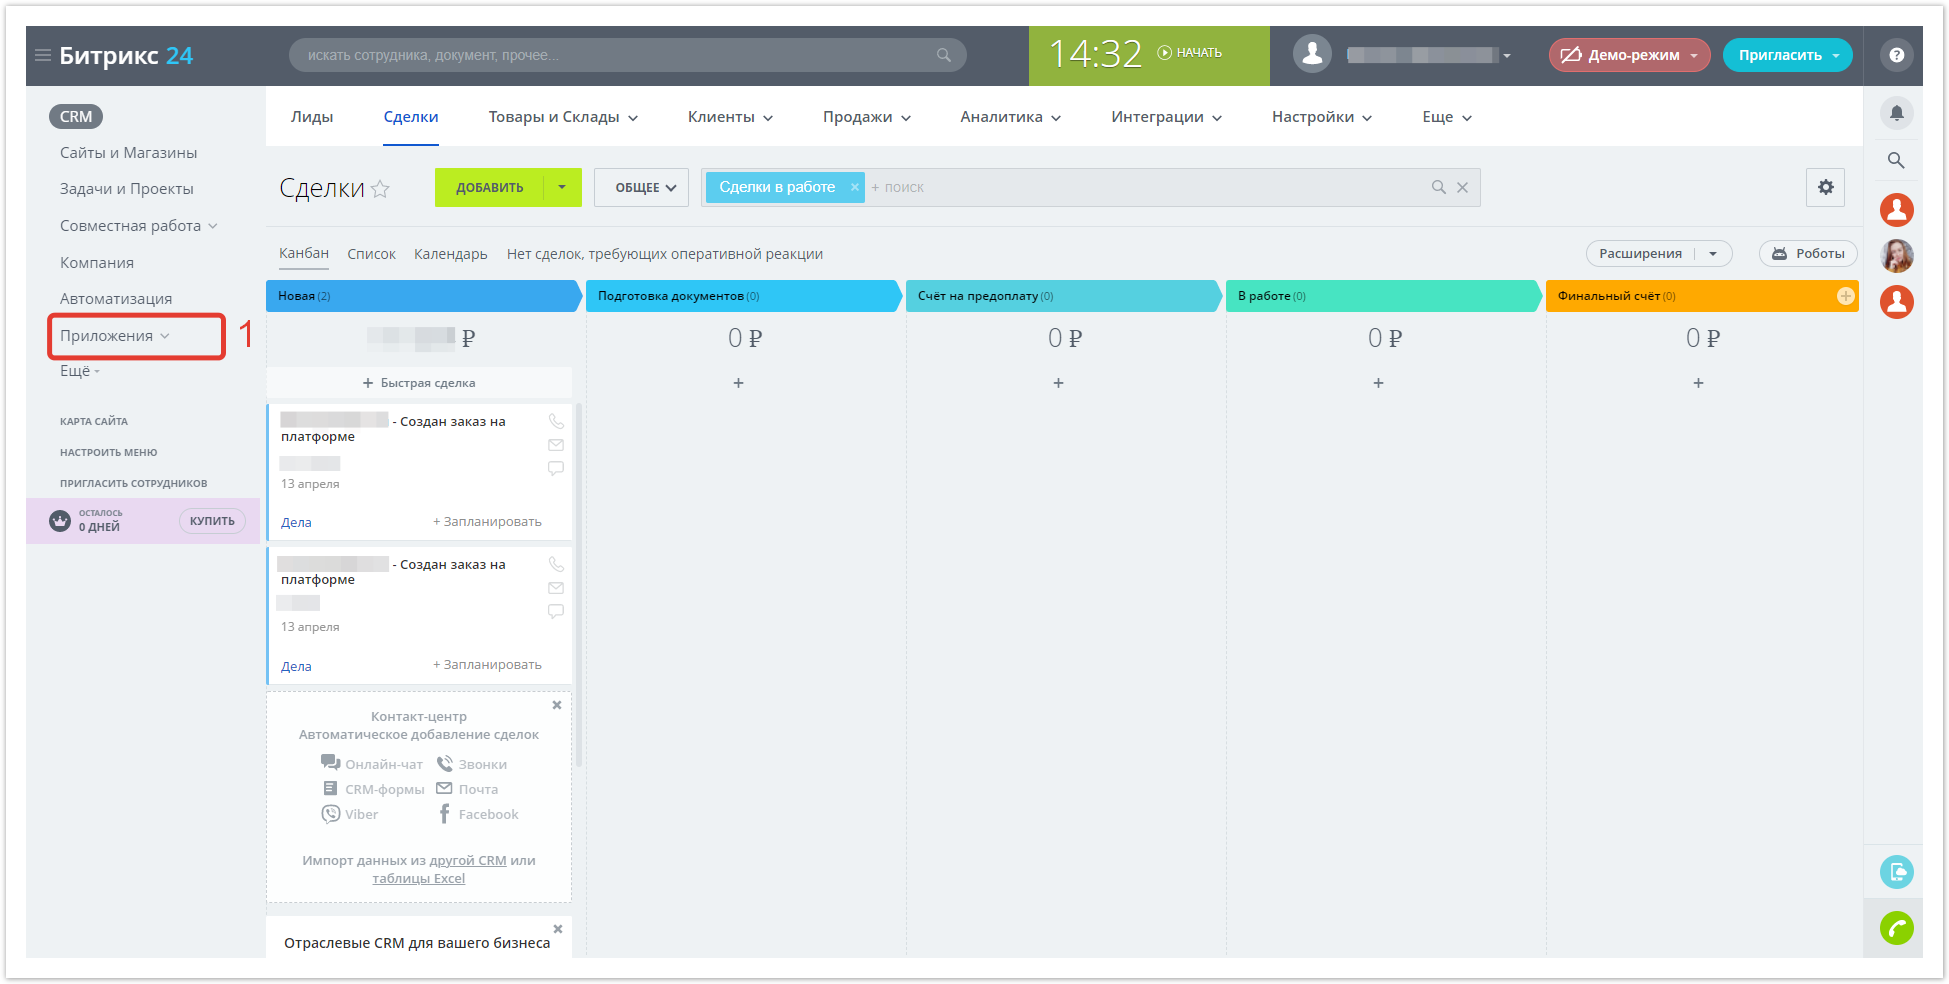
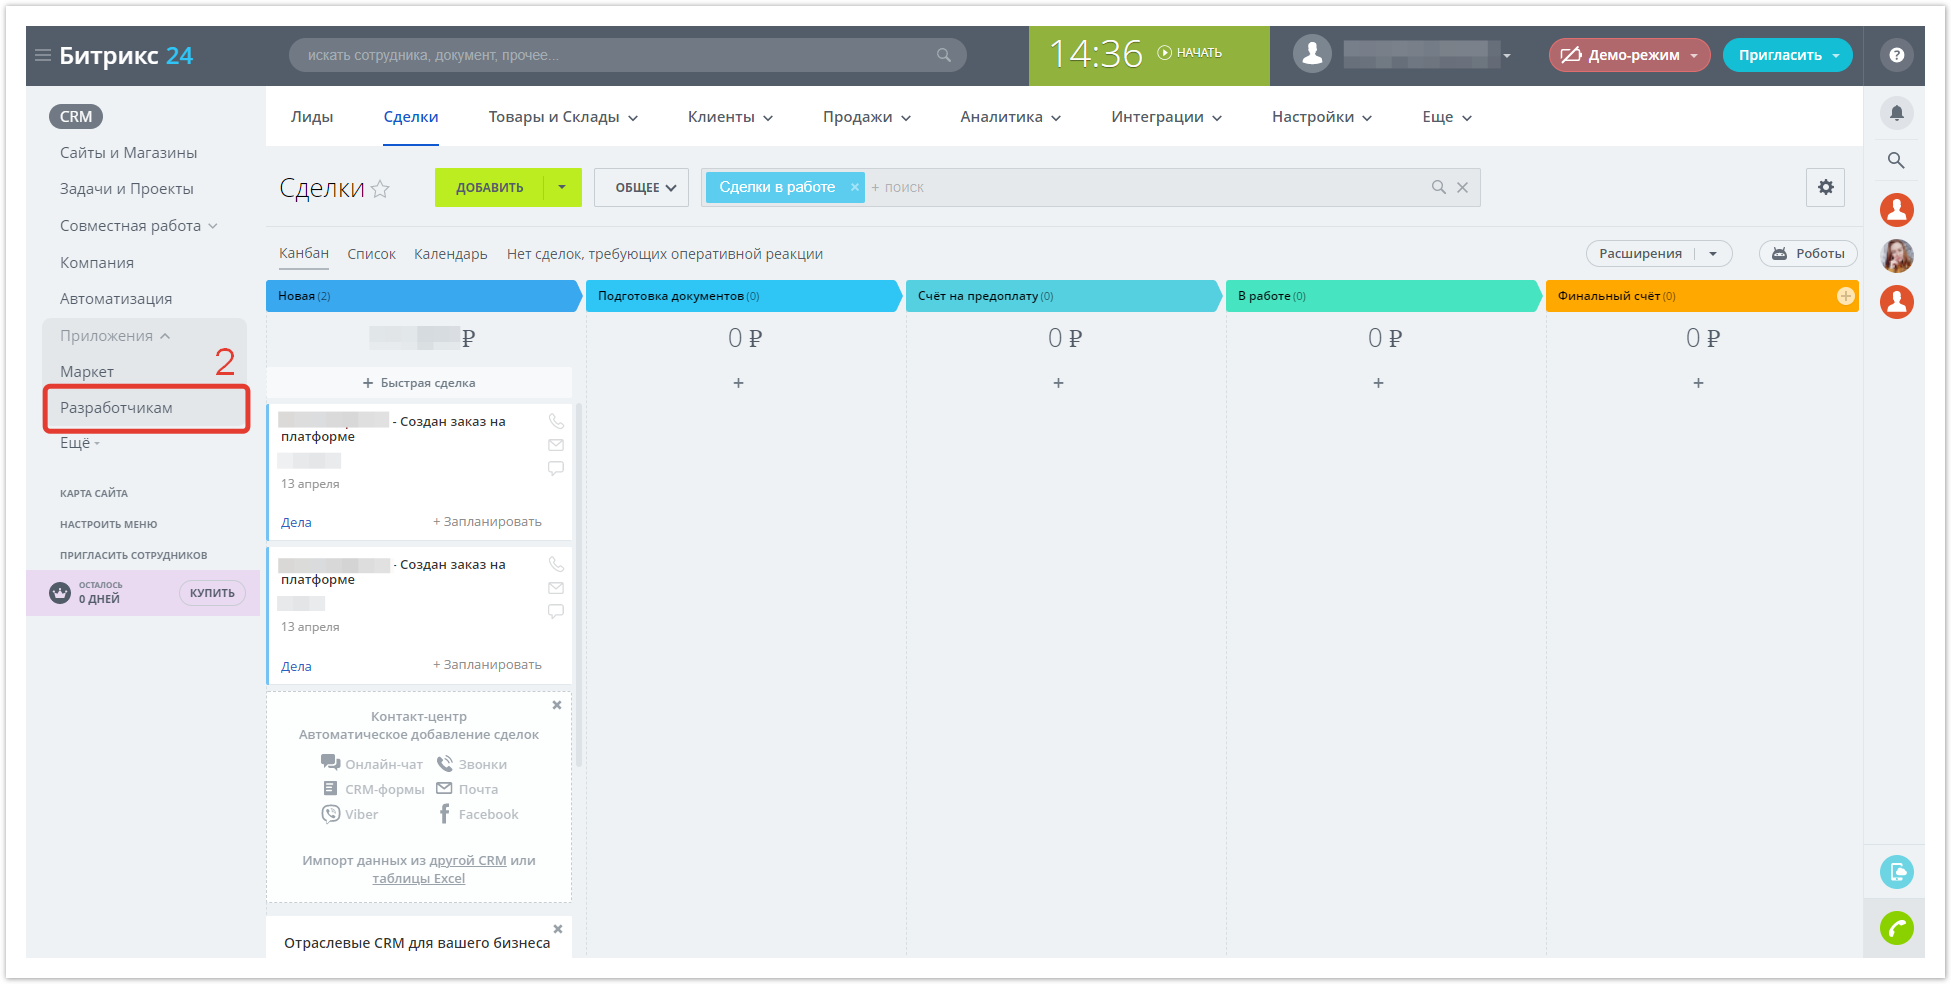
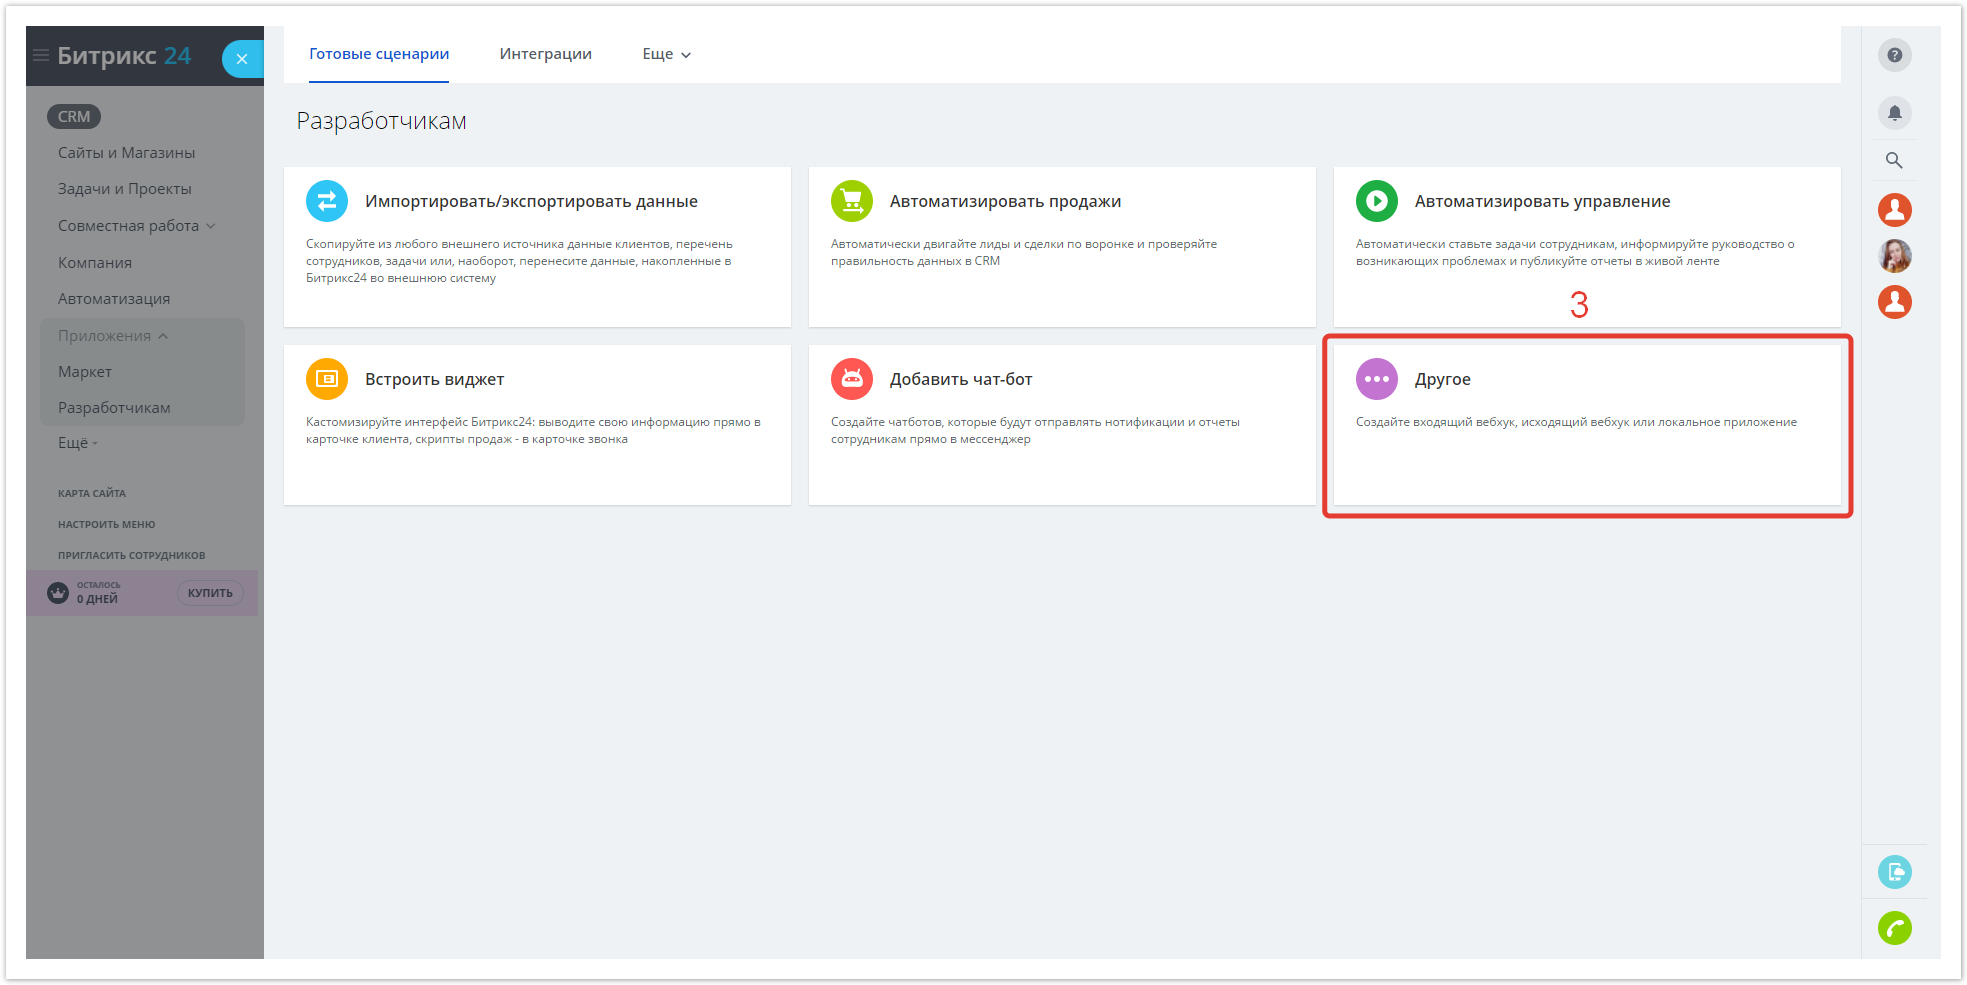
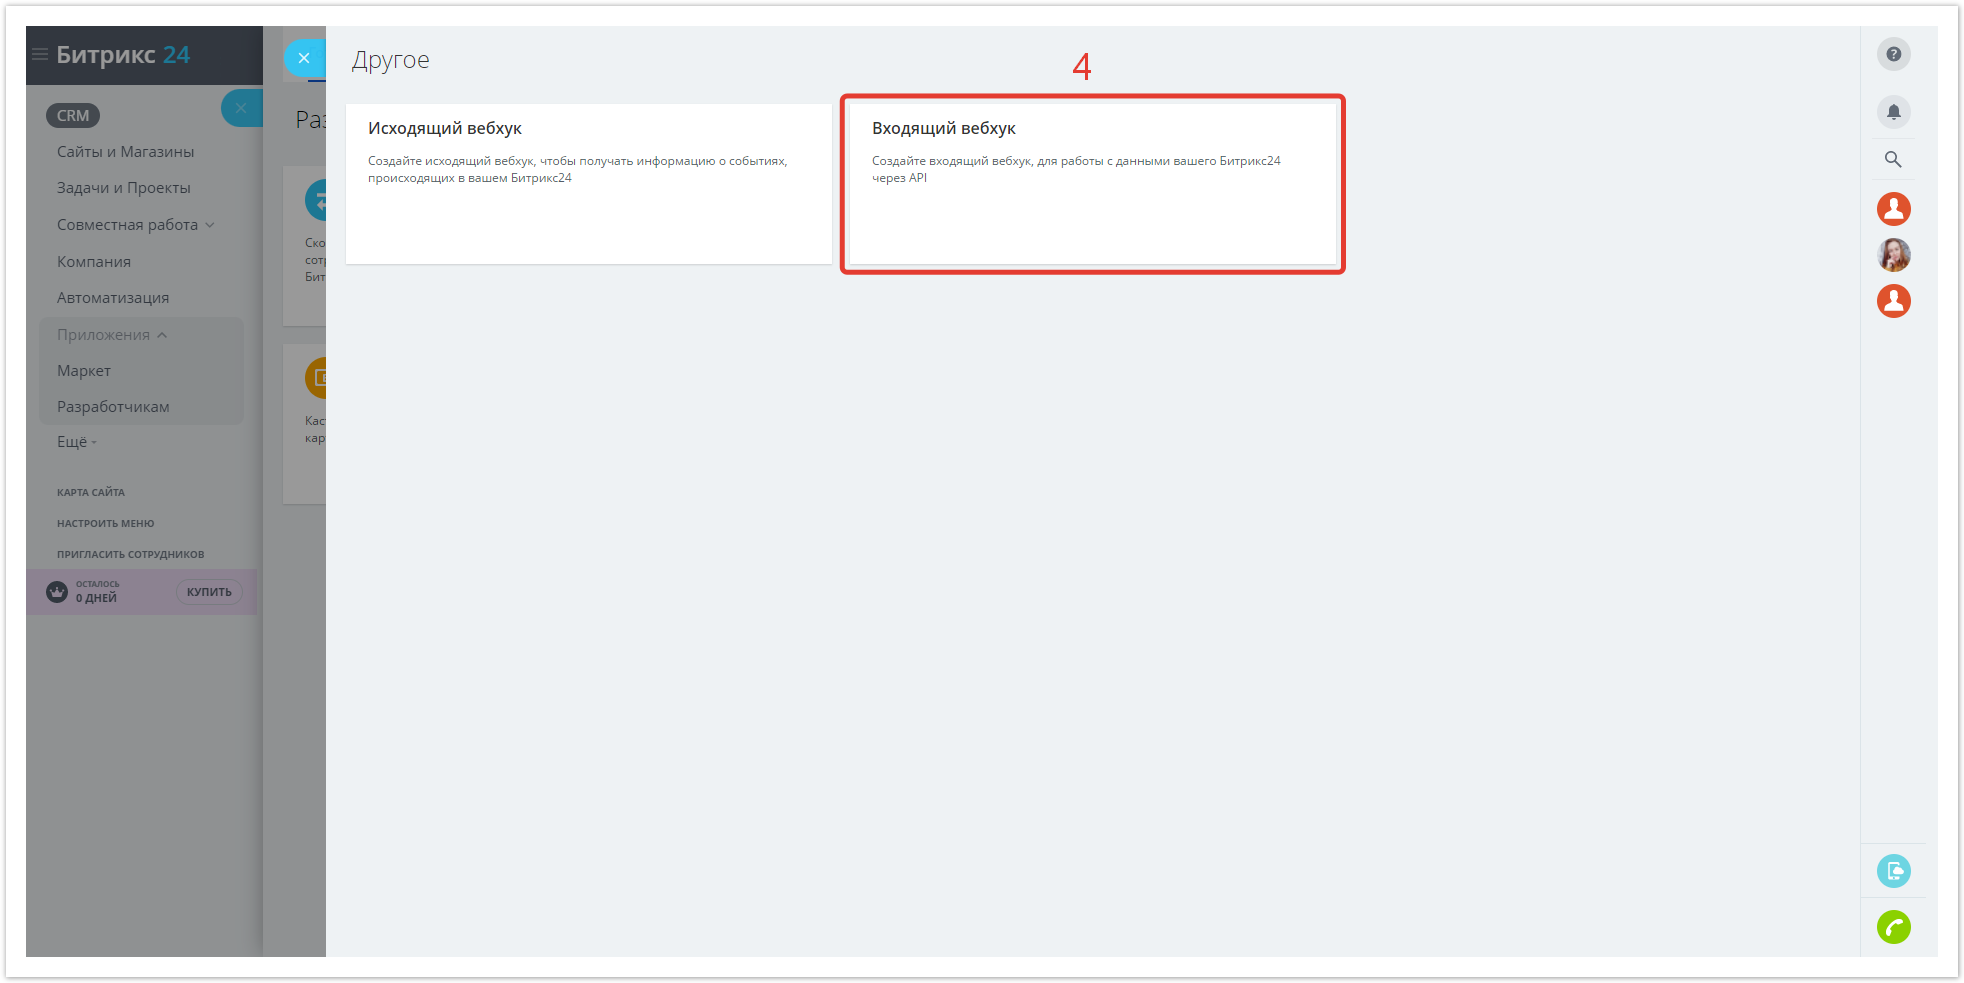
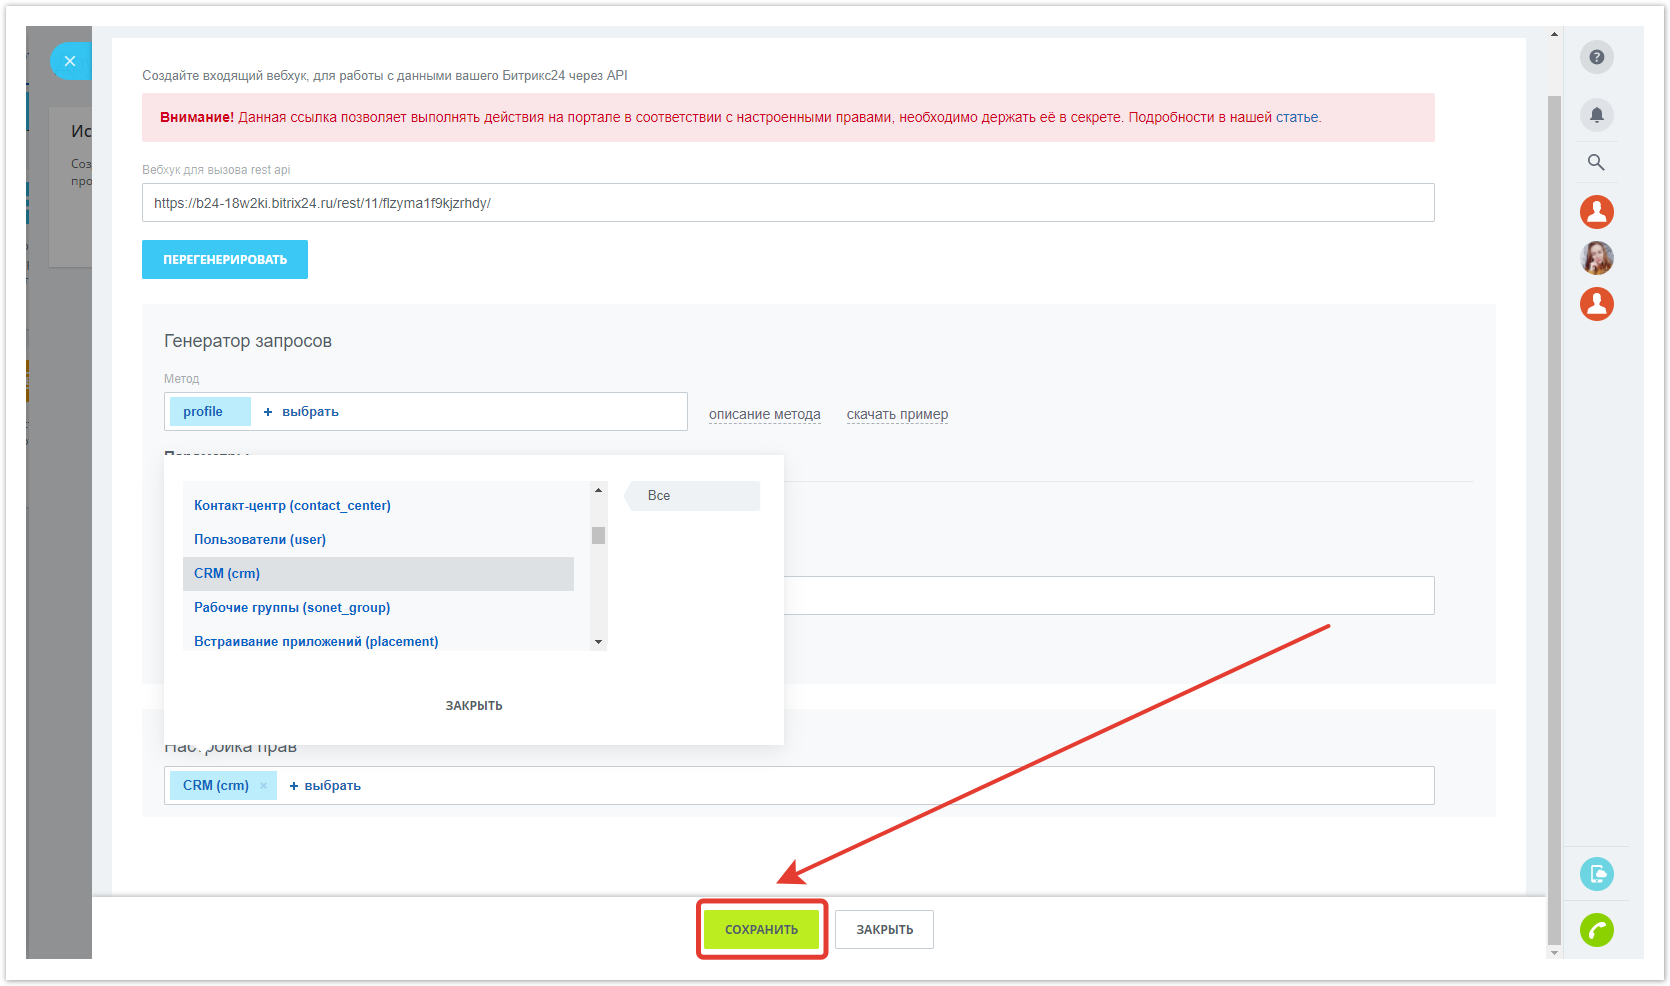
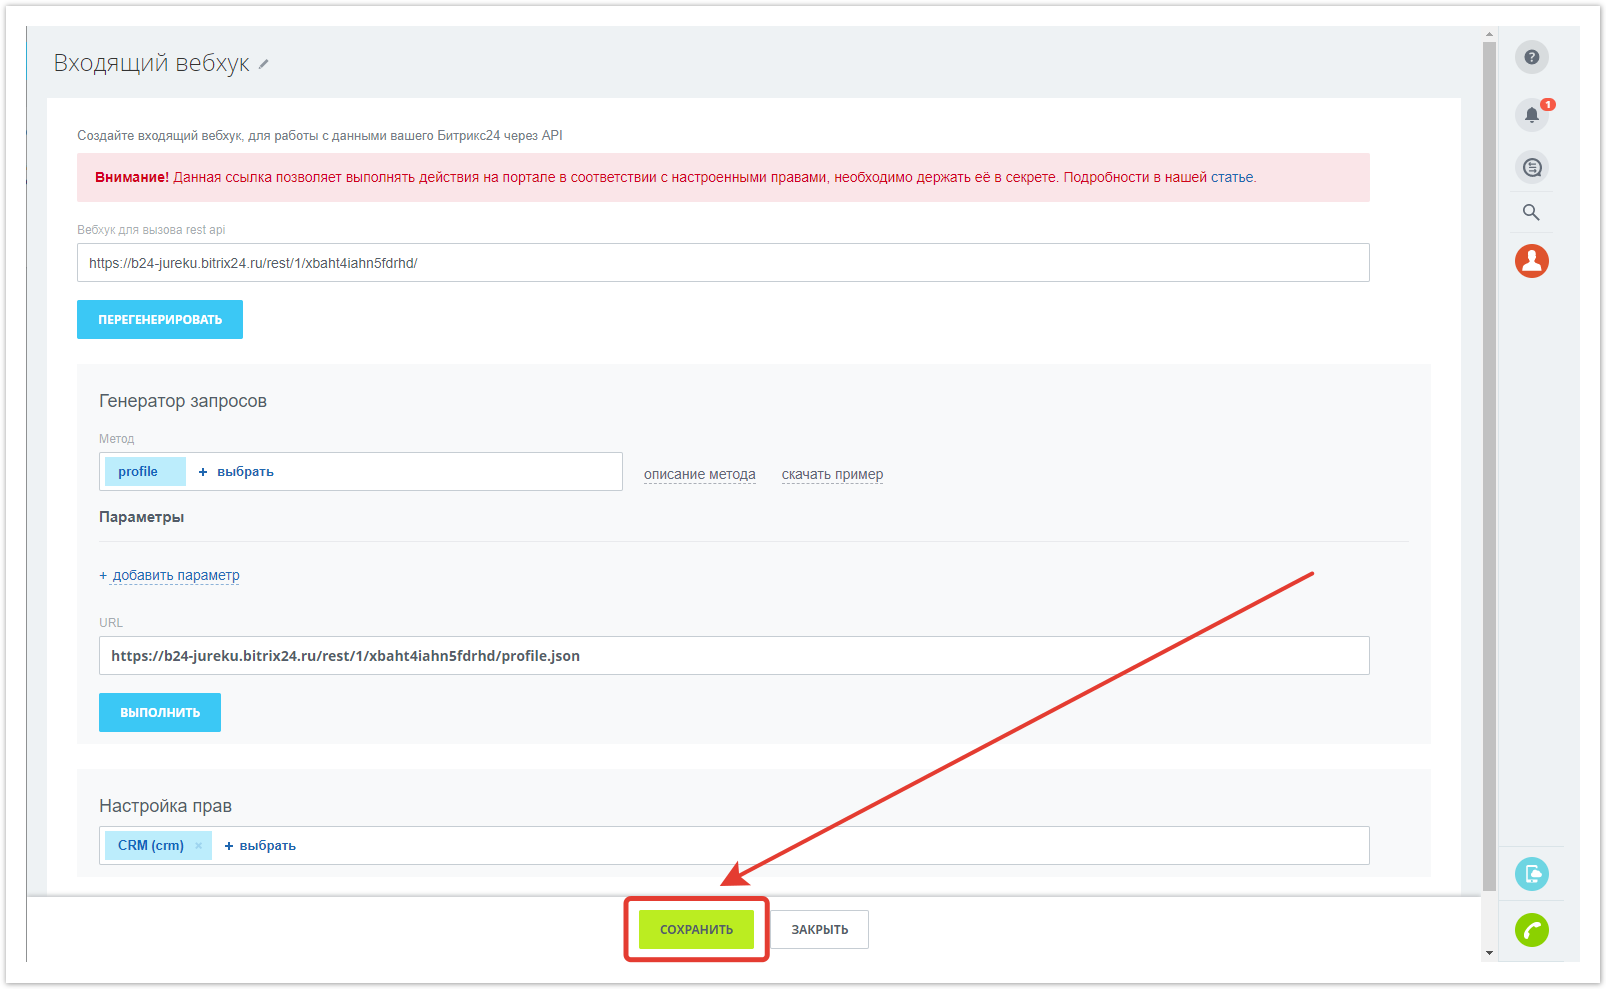
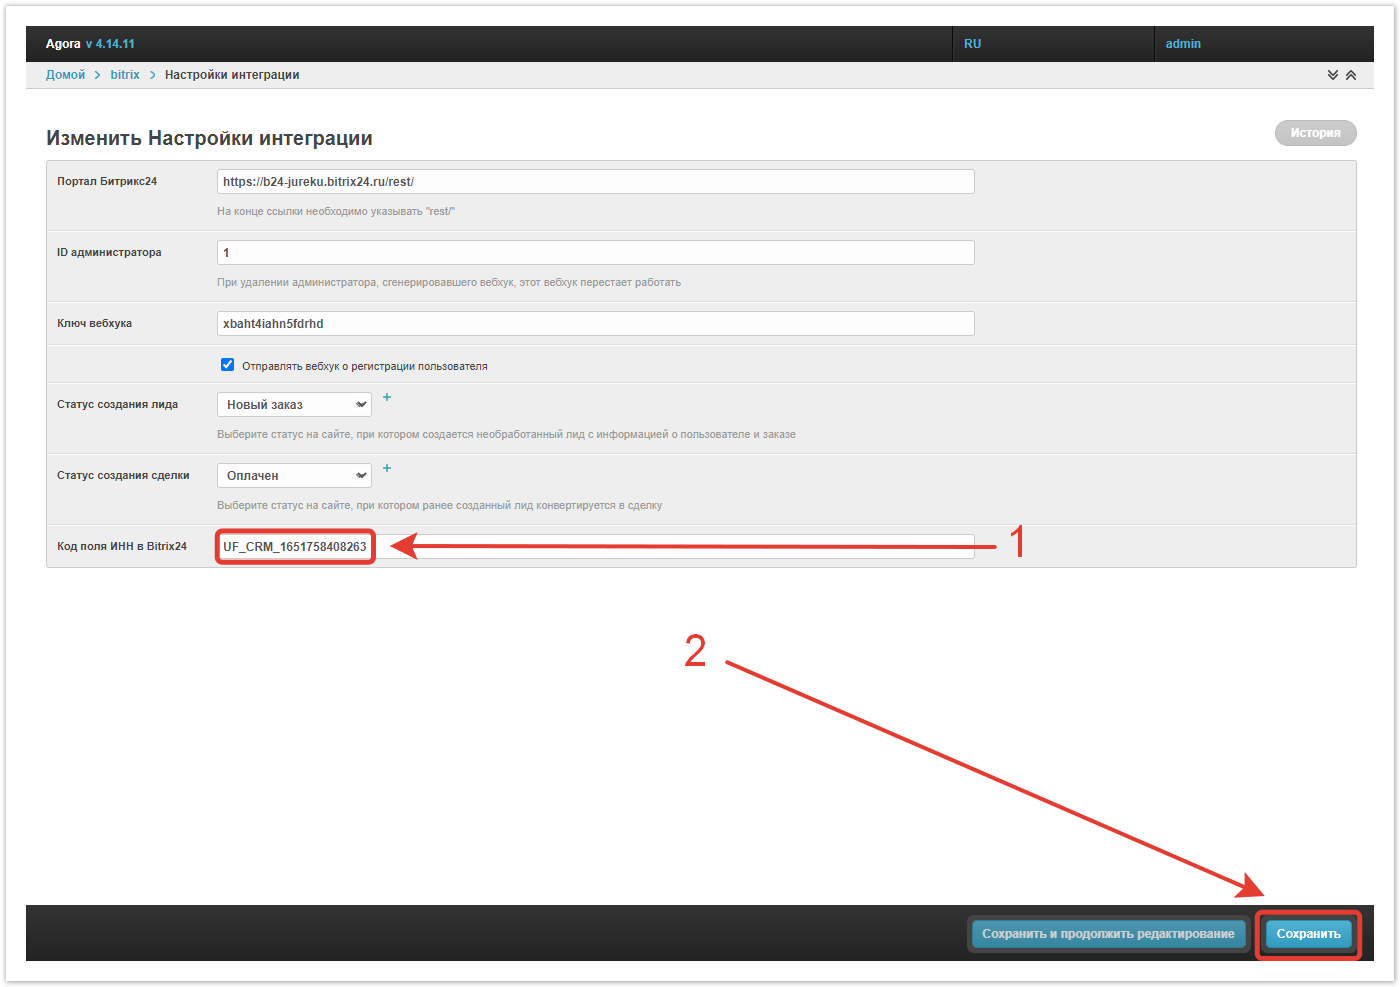
В поля Портал Битрикс24, ID администратора и Ключ вебхука должны быть вставлены части URL-адреса входящего вебхука, созданного в Битрикс24. Чтобы создать новый вебхук в Битрикс24, перейдите в раздел Приложения → Разработчикам → Другое → Входящий вебхук.
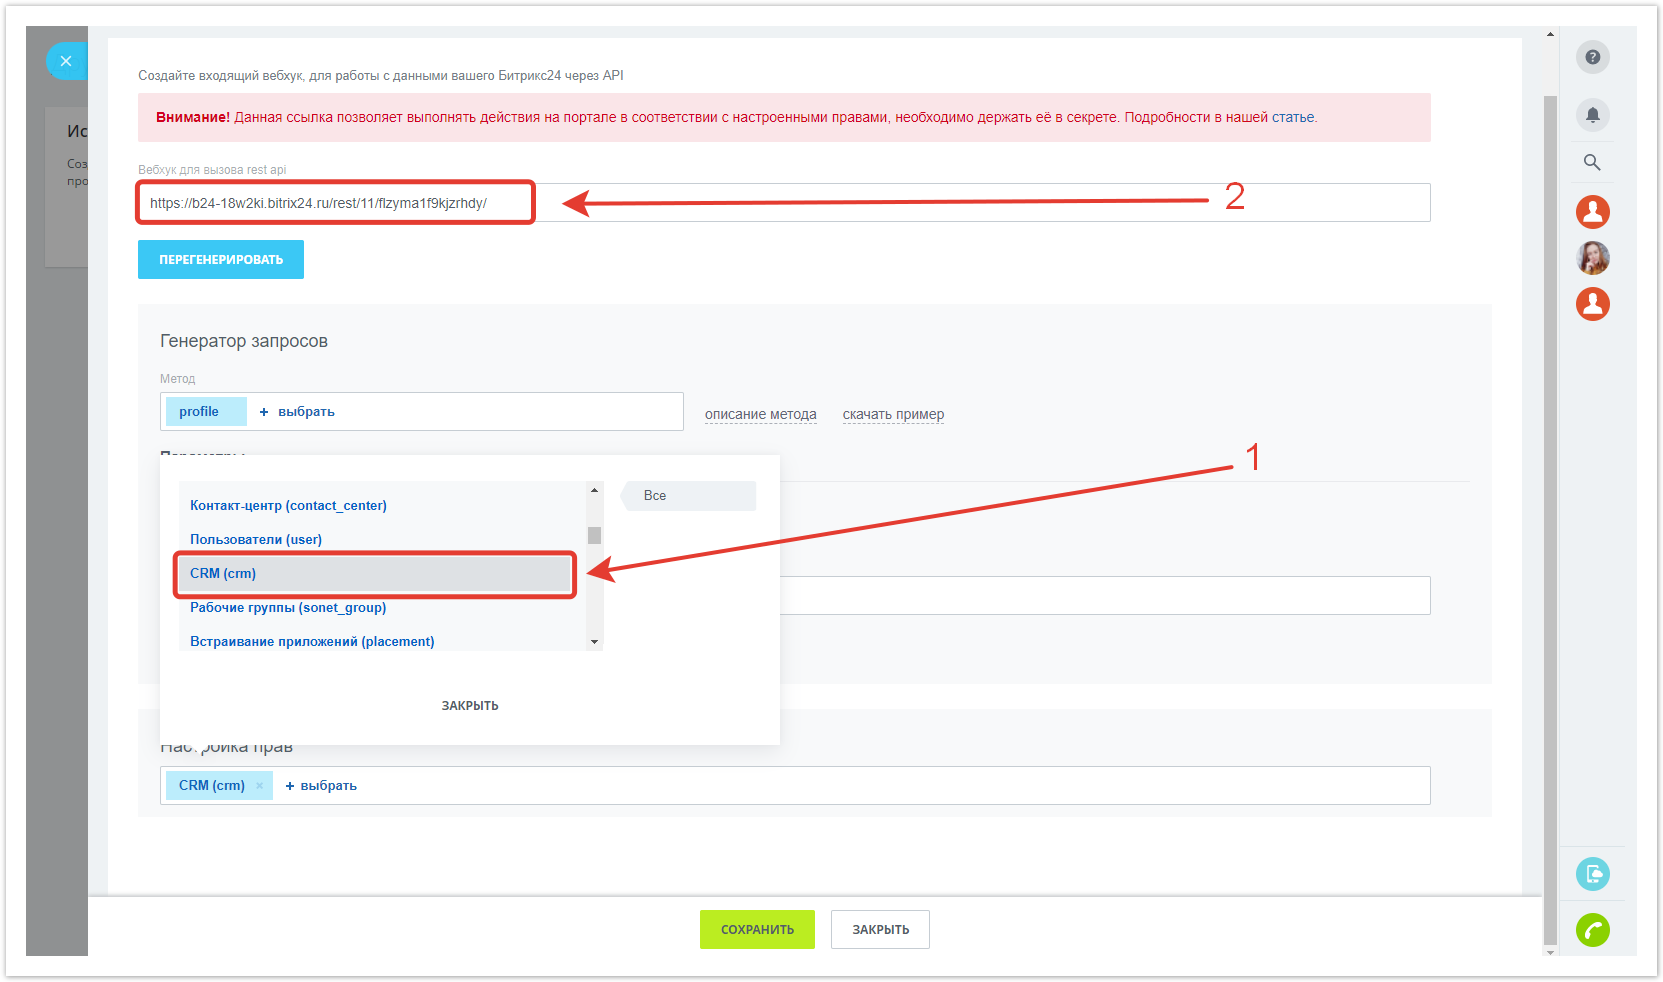
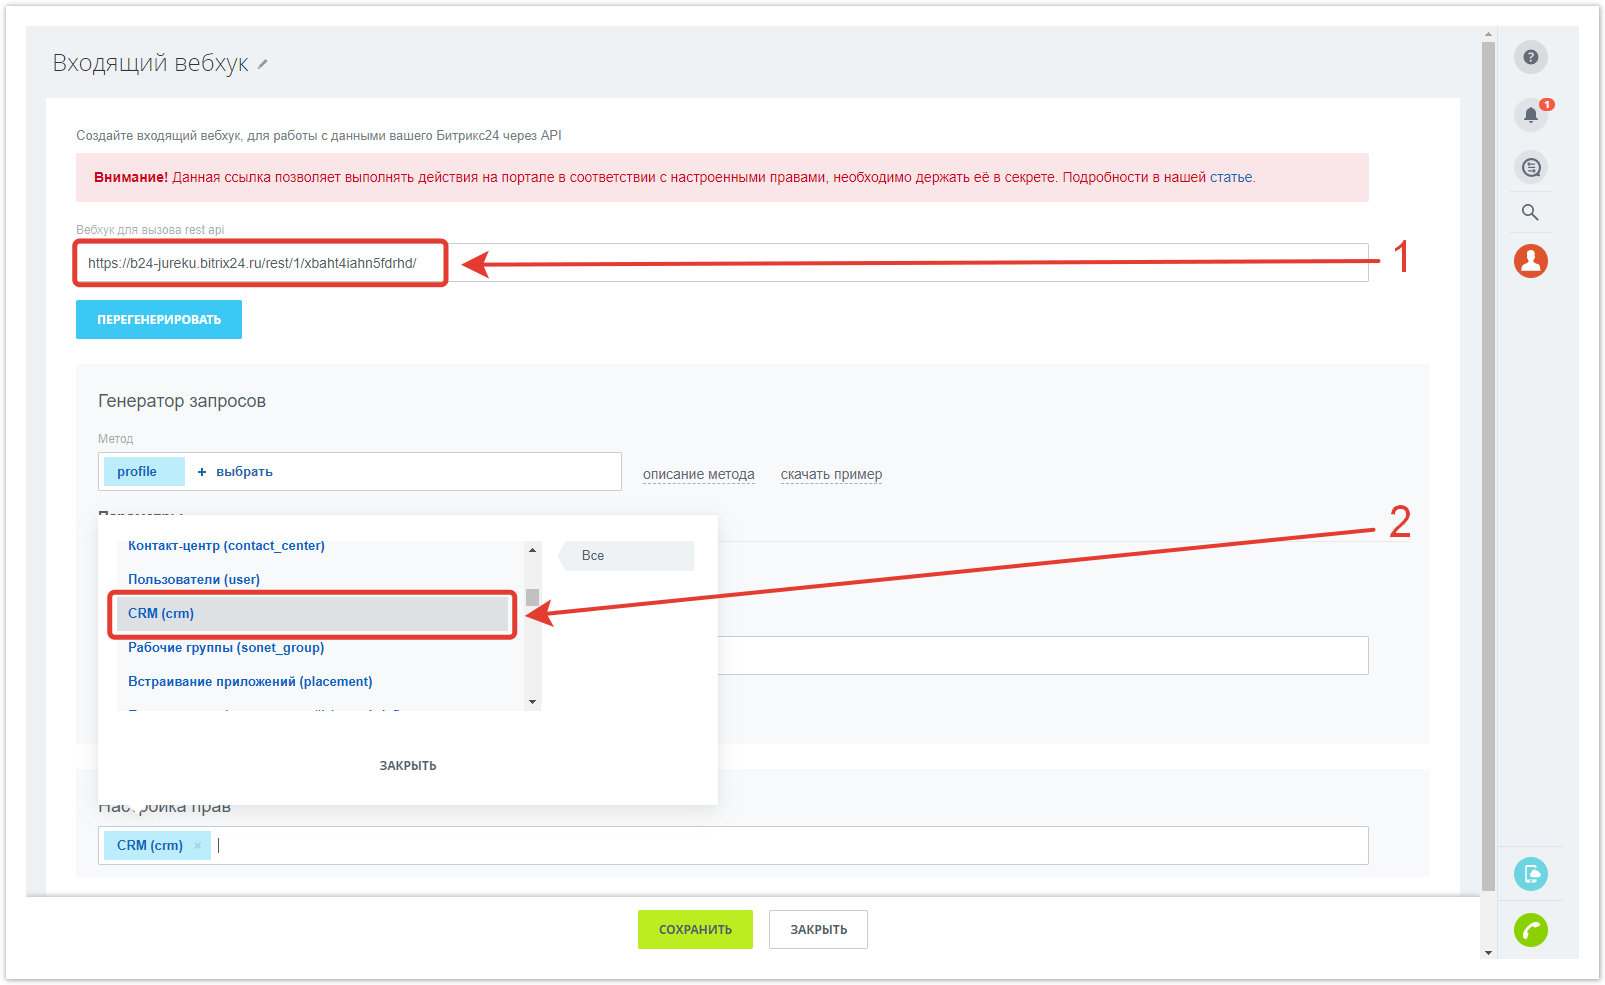
В открывшемся окне выберите права CRM и скопируйте URL-адрес вебхука из поля Вебхук для вызова rest api , (он будет использоваться в дальнейшей настройке интеграции) и выберите права CRM.
По завершении настроек Сохраните изменения.
Затем перейдите Вернитесь в административную панель проекта Agora, в раздел Настройки интеграции. Скопированный ранее URL необходимо разбить на 3 части и вставить в разные поля:
Затем установите или оставьте Останется только установить или оставить пустым чекбокс Отправлять вебхук о регистрации пользователя, выбрать выберите Статус создания лида и Статус создания сделки — при каких статусах заказа в Agora будет создаваться лид и сделка в Битрикс24, а затем Сохранить настройки.
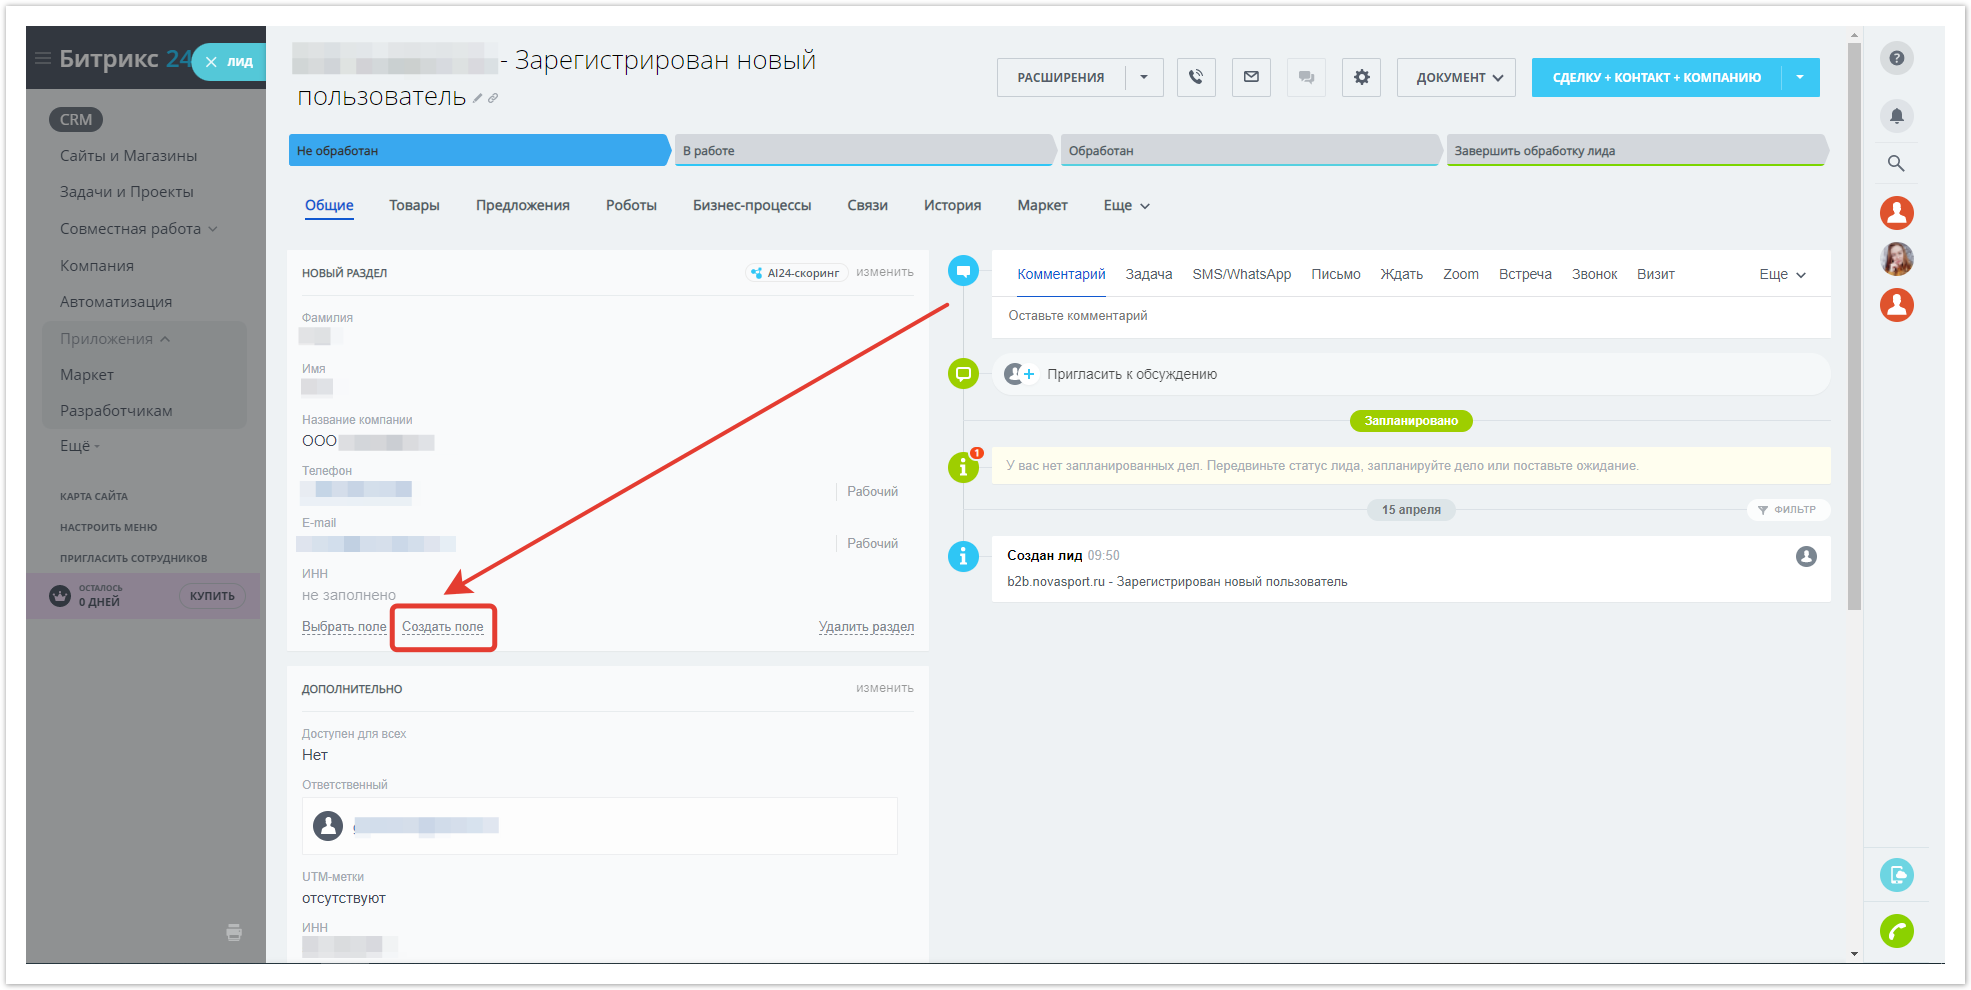
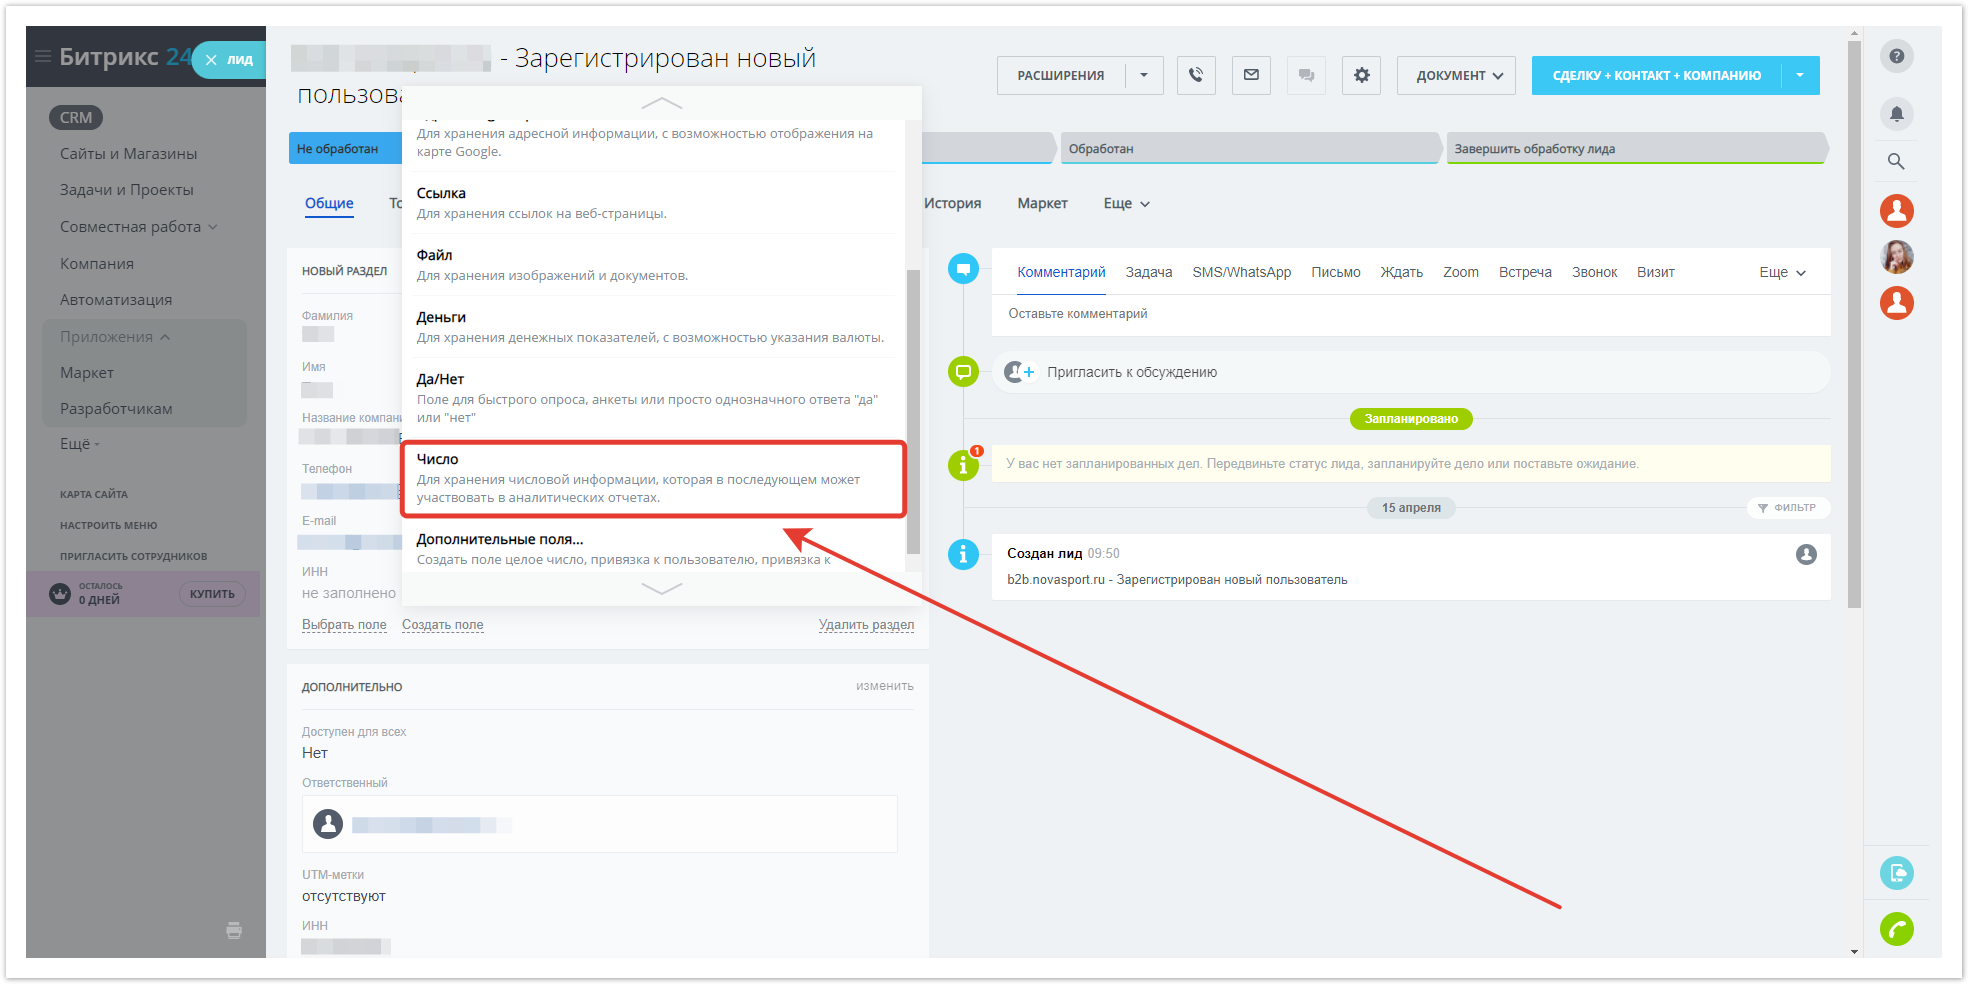
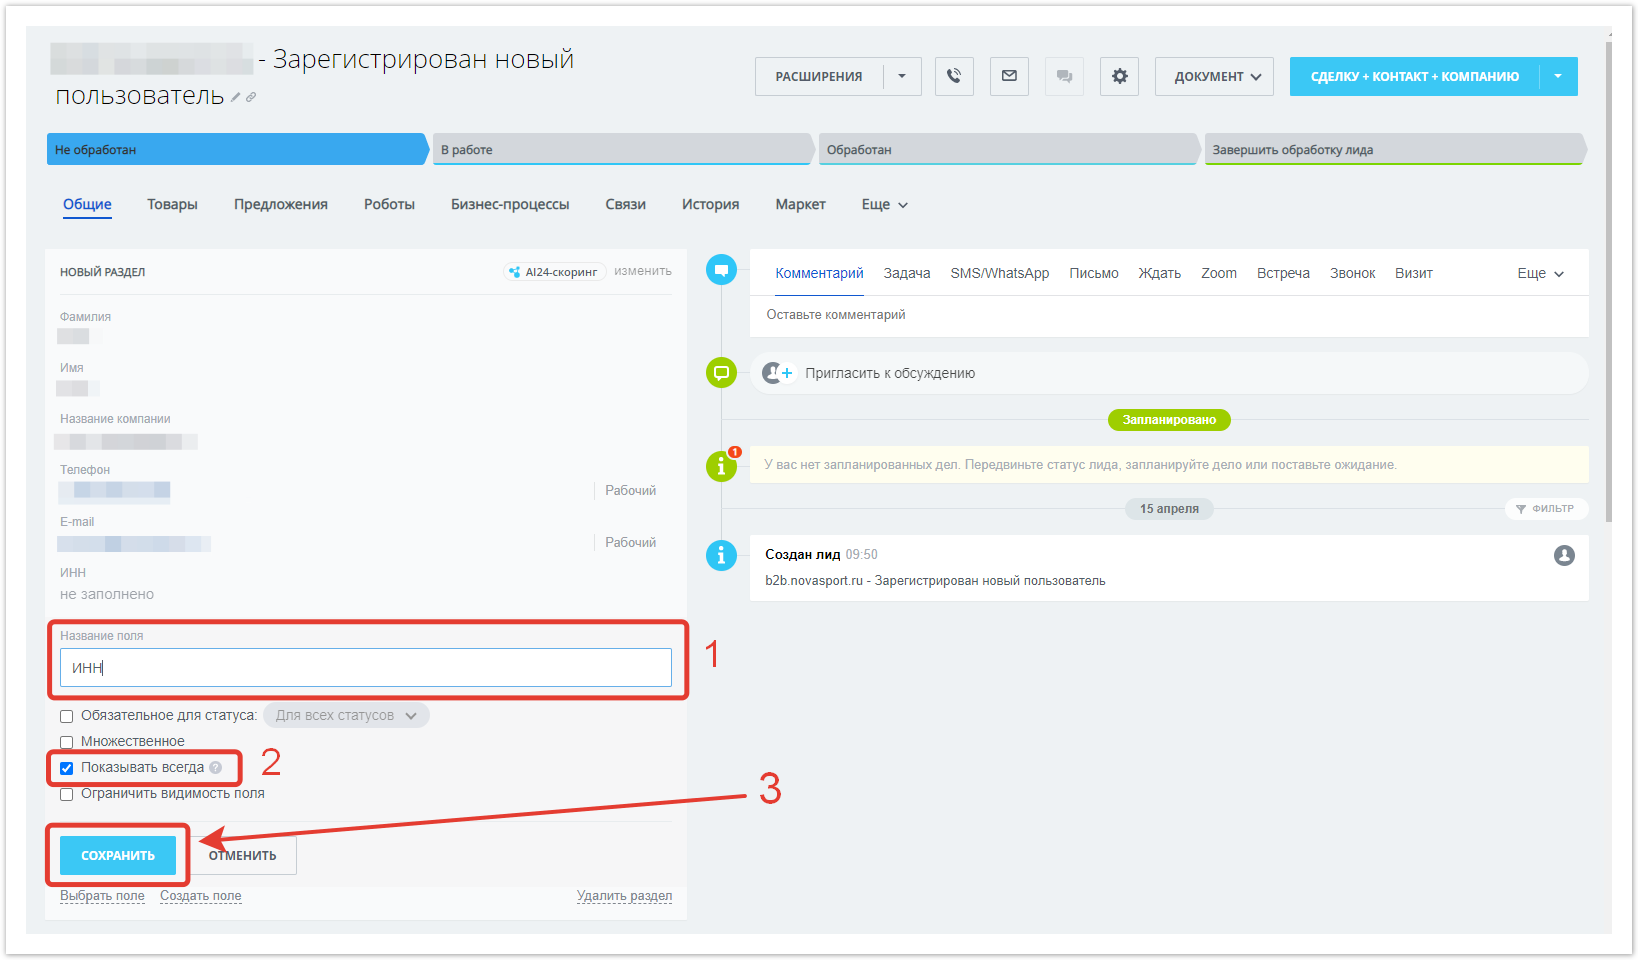
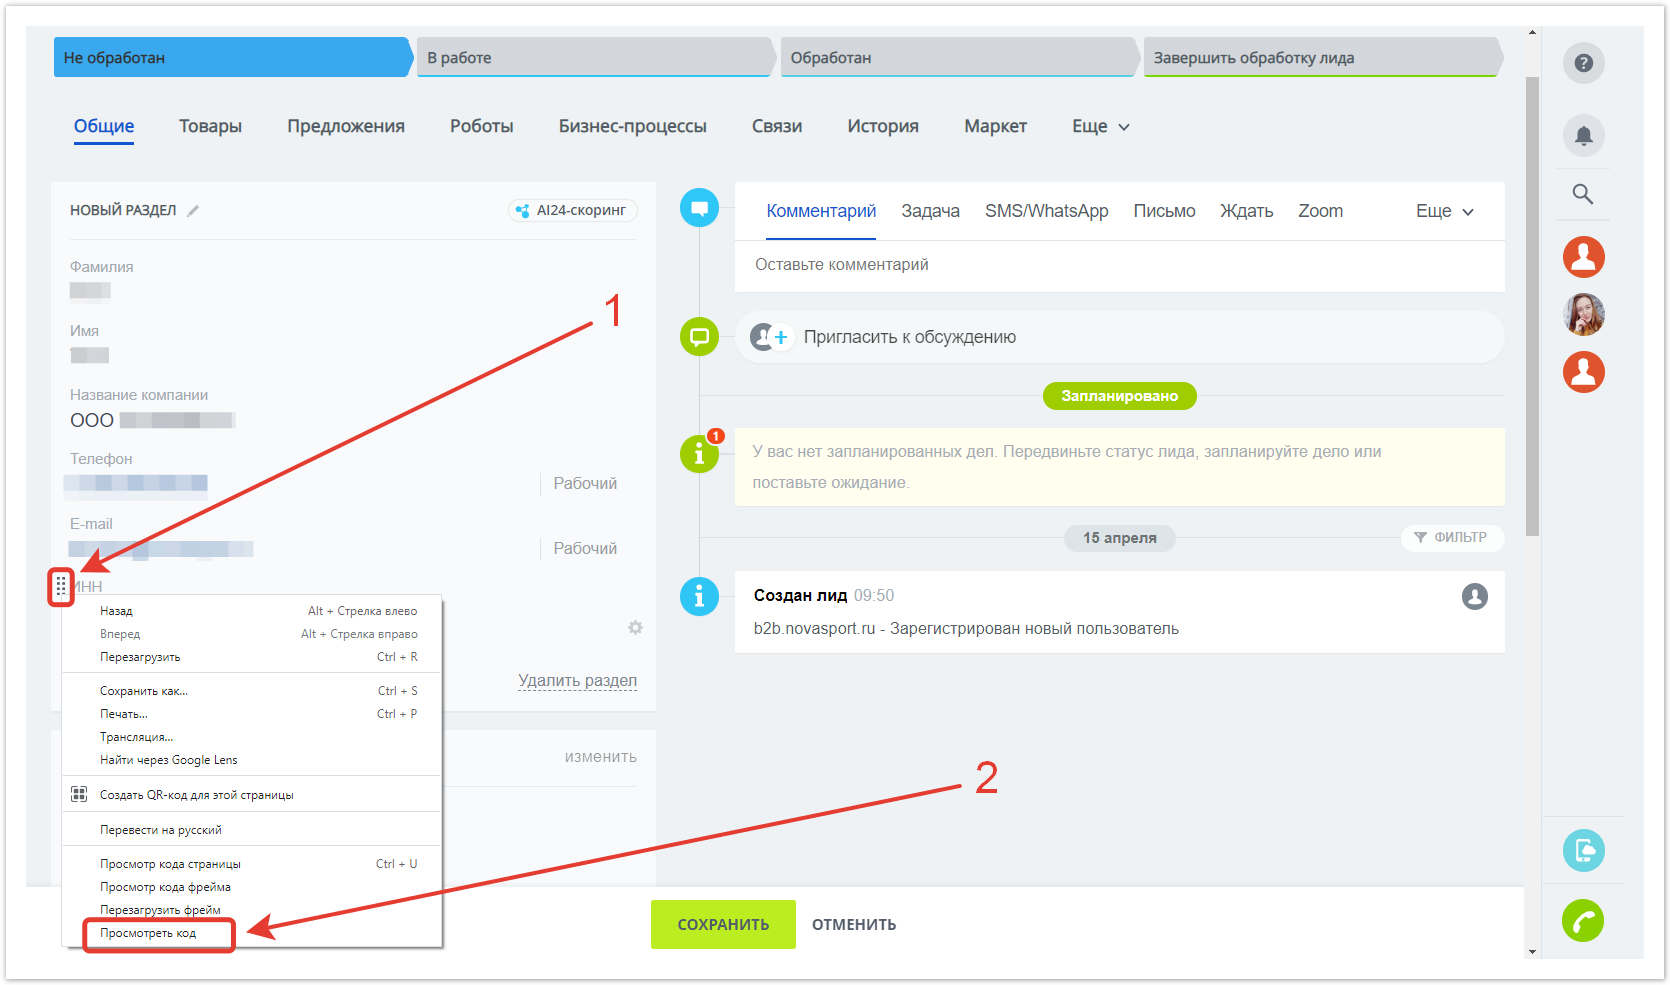
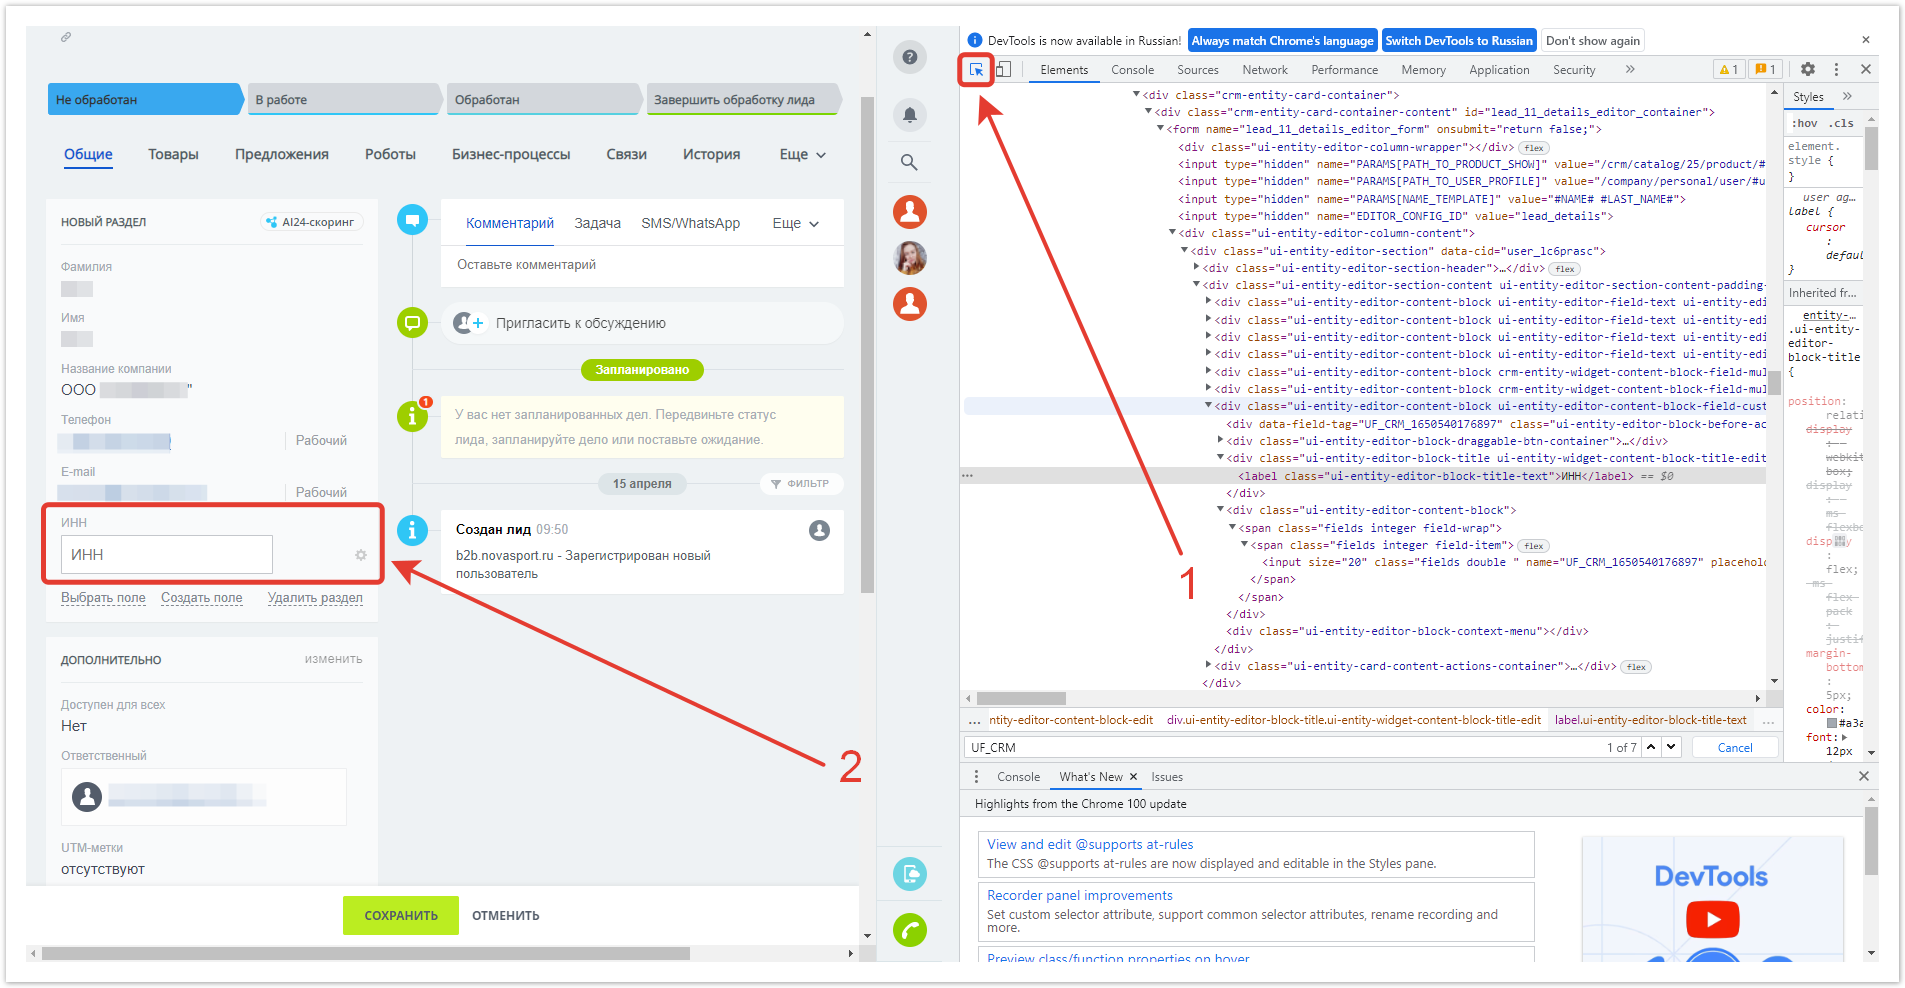
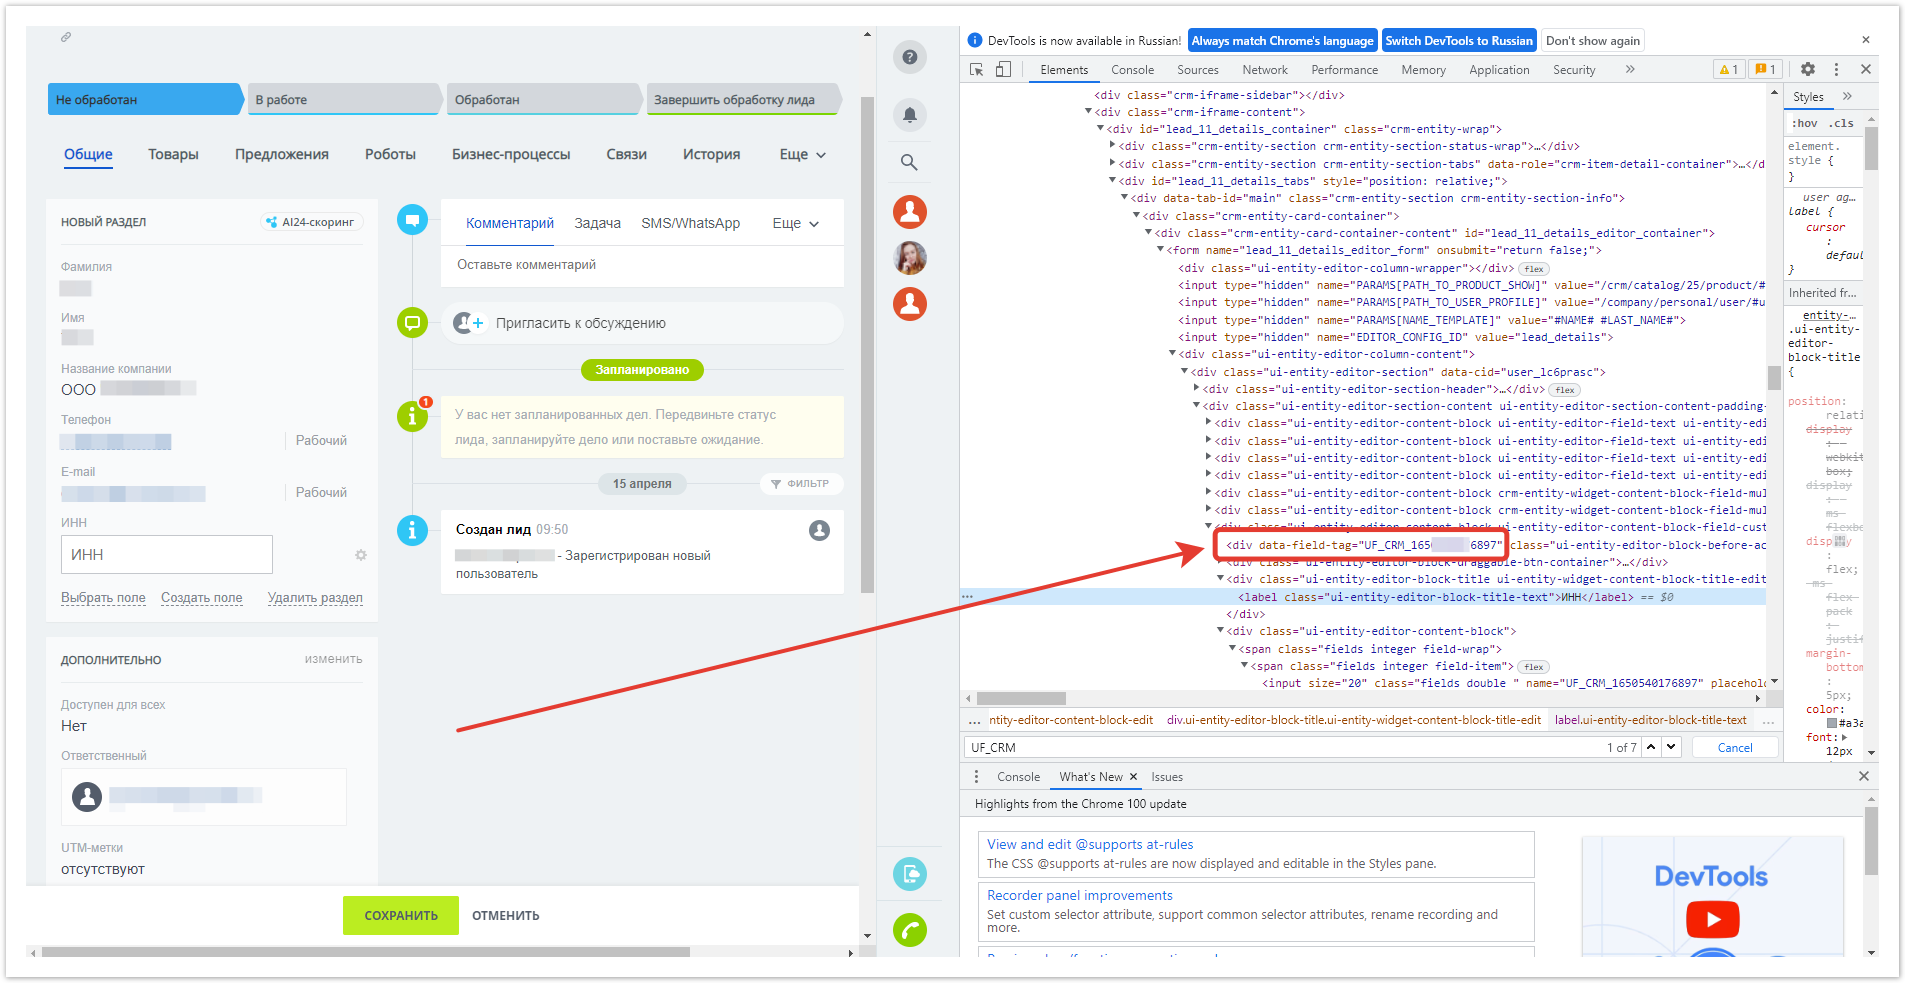
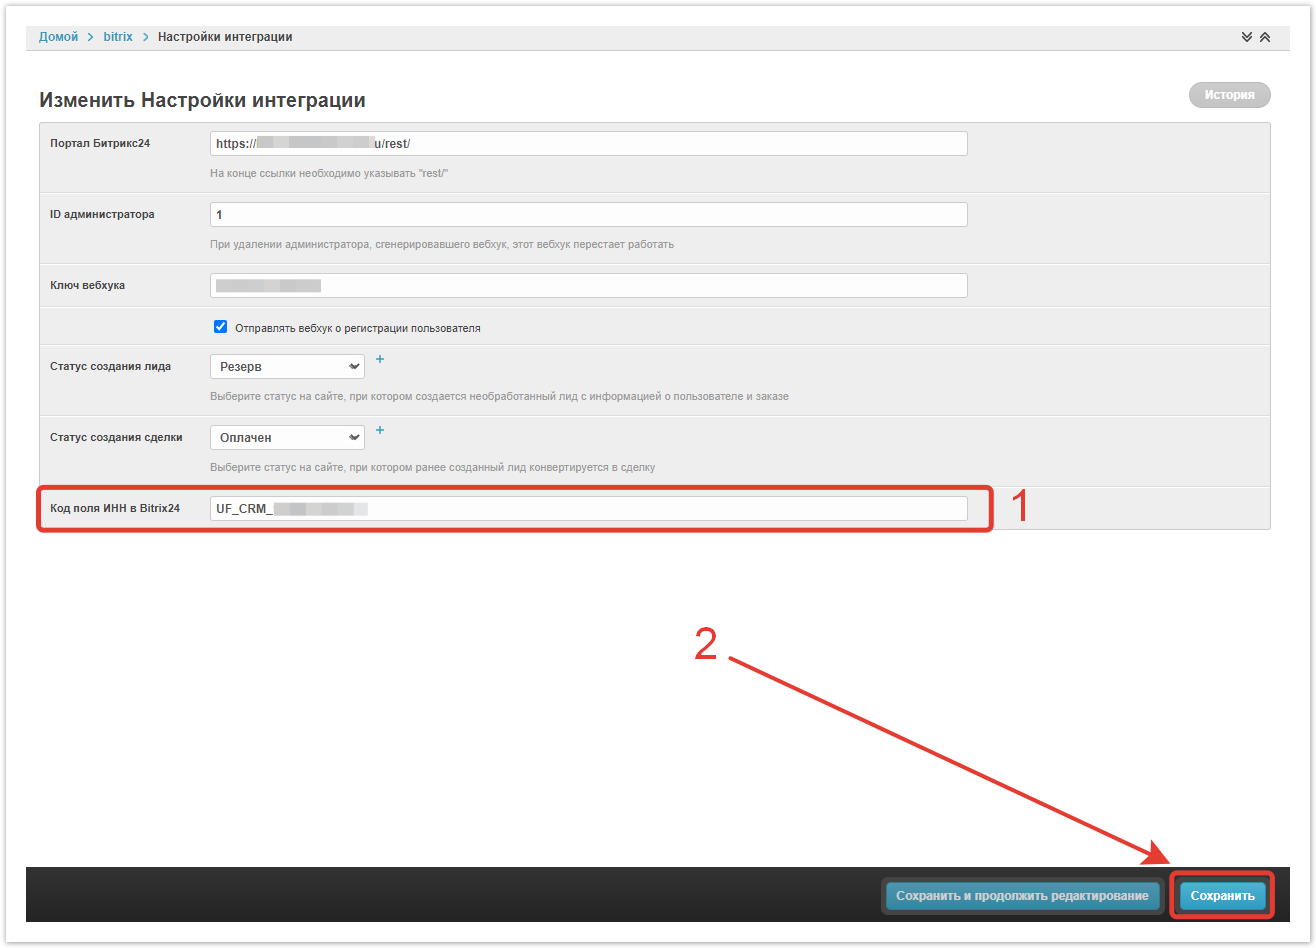
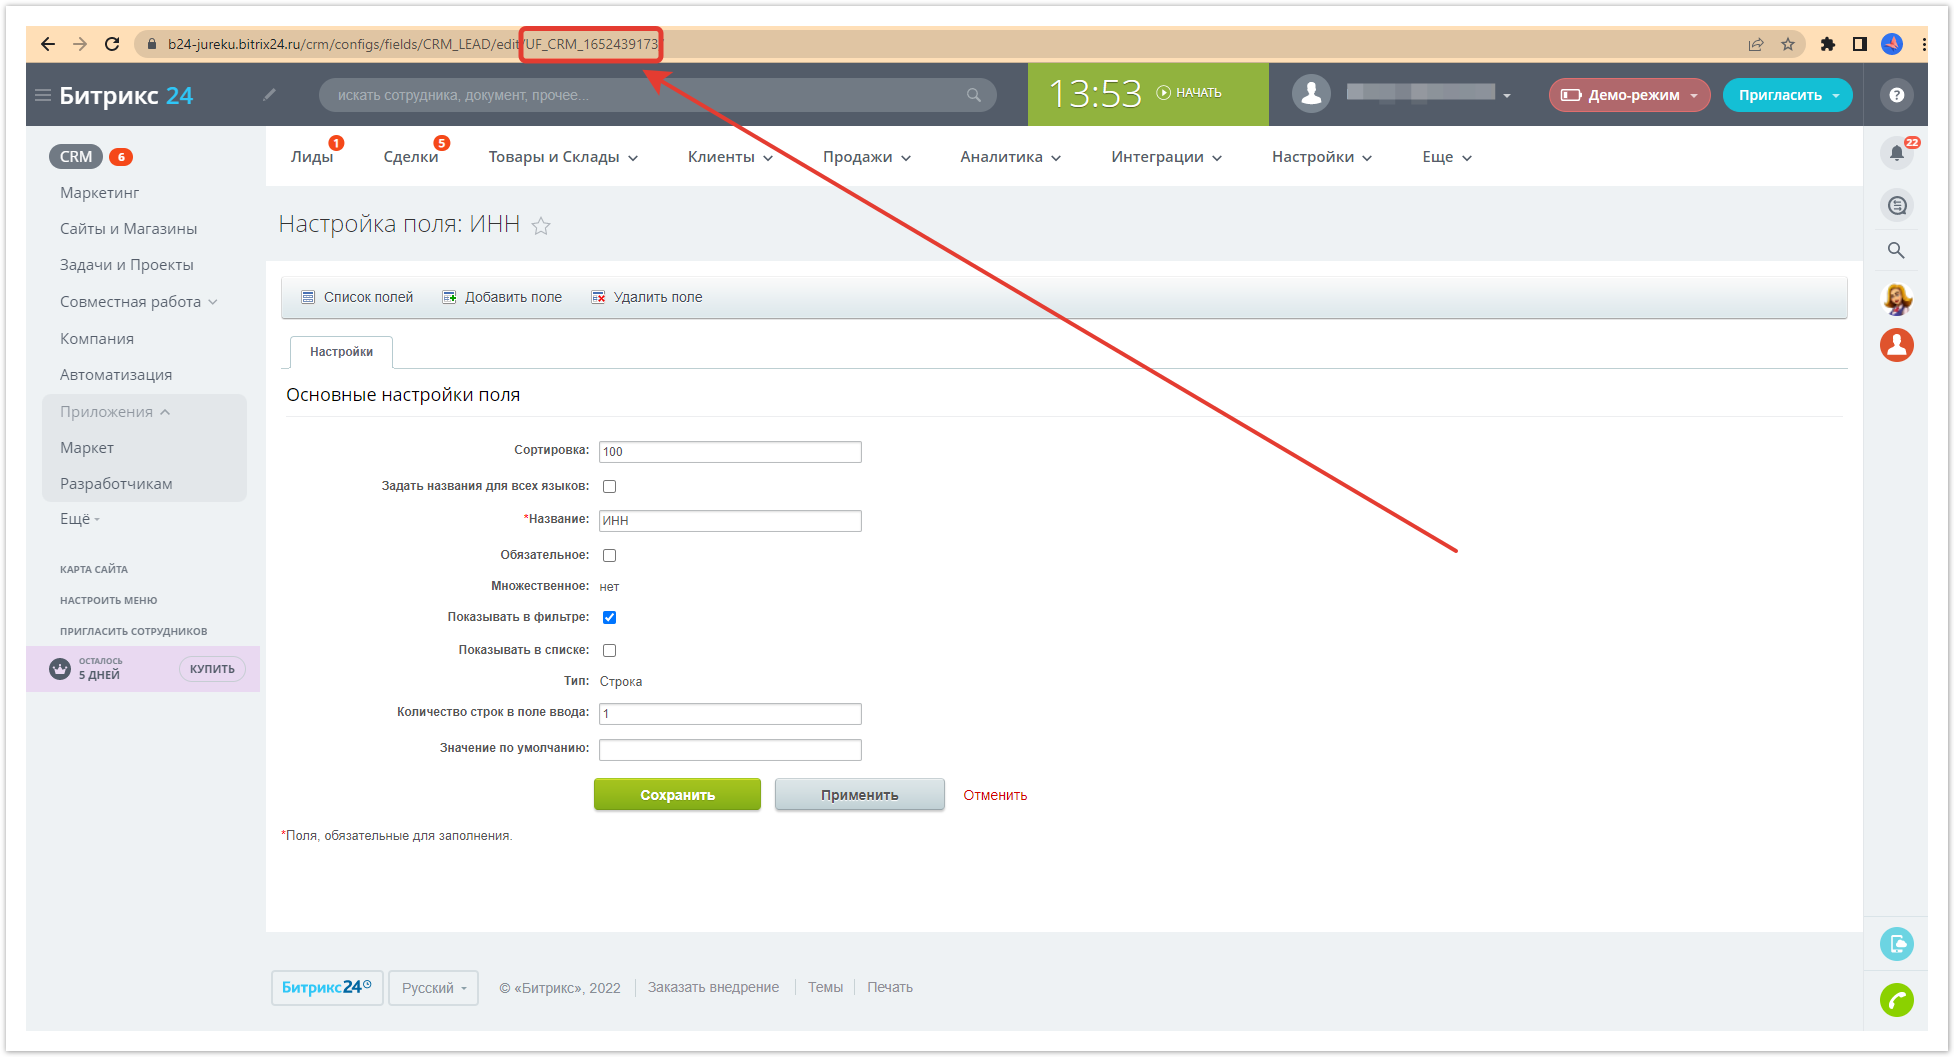
Поле Код поля ИНН Чтобы начать добавление в Bitrix24 является необязательным. Чтобы его заполнить, нужно найти ID поля ИНН , в разделе Лиды нужнов своем Битриксе. Для этого:
Добавление бизнес-процесса для лидов в Битрикс24Далее нужно вернуться в любой лид Битрикс24 и перейти во вкладку Роботы.
В колонке Качественный лид найдите кнопку Редактировать в дизайнере Бизнес-процессов и кликните по ней.
Откроется окно визуализации бизнес-процессов. К уже отображающейся схеме перетащите к стрелке после блока Начало из вкладки Конструкции блок Условие.
Затем перетащите к стрелке после правого блока Условие блок Создание новой сделки из раздела CRM.
Кликните по значку
Нажмите Сохранить.
В правом Условии нужно указать:
Сохраните изменения.
Блок Создание новой сделки должен быть заполнен так:
После этого нужно Сохранить и сам шаблон бизнес-процесса.
Вставьте полученное значение в поле Код поля ИНН в Bitrix24, сохраните изменения.
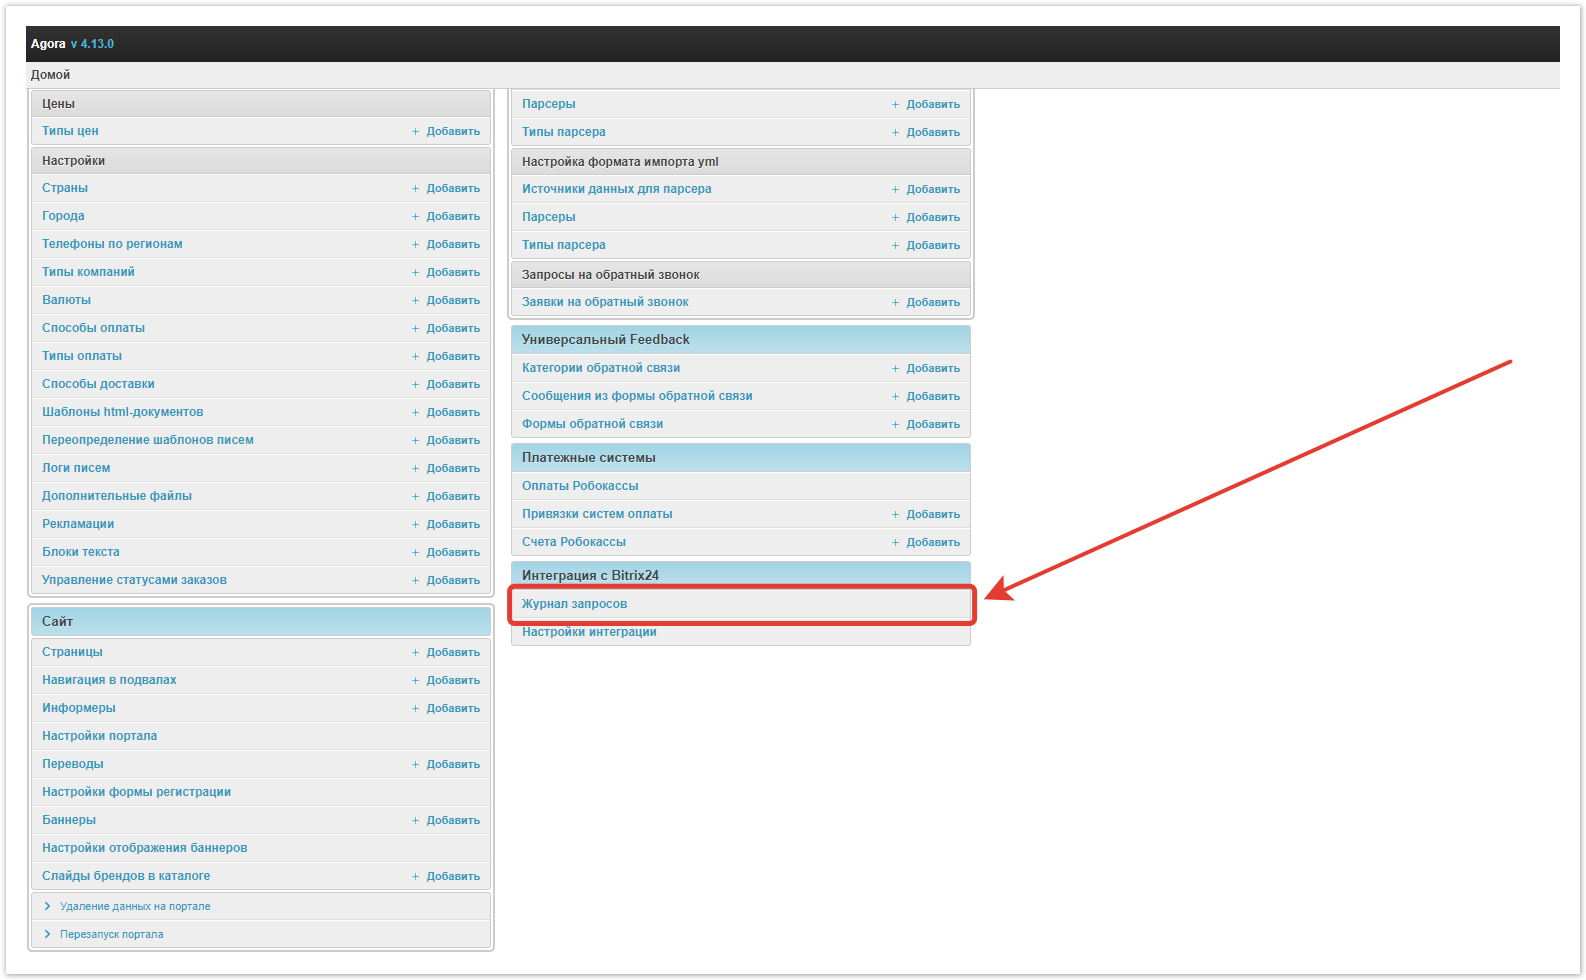
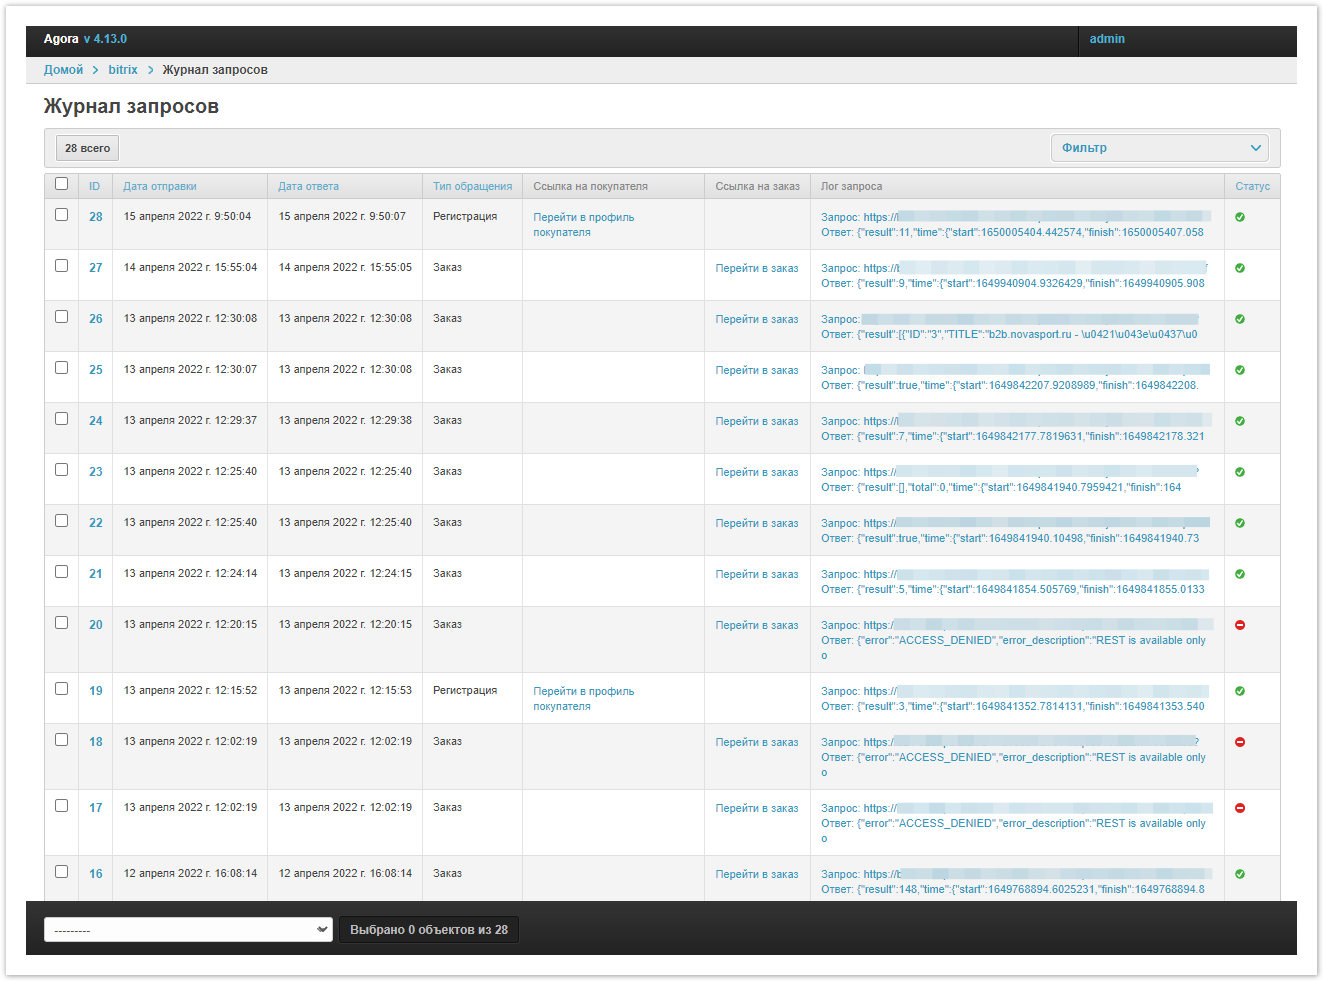
Теперь интеграция Agora с Битрикс24 может считаться завершенной. Вебхук остается доступным до тех пор, пока не будет удален администратор, его создавший. Журнал запросовРаздел отображает историю взаимодействий REST API Битрикса с системой Agora. Чтобы перейти в него, кликните по кнопке Журнал запросов в административной панели Agora.
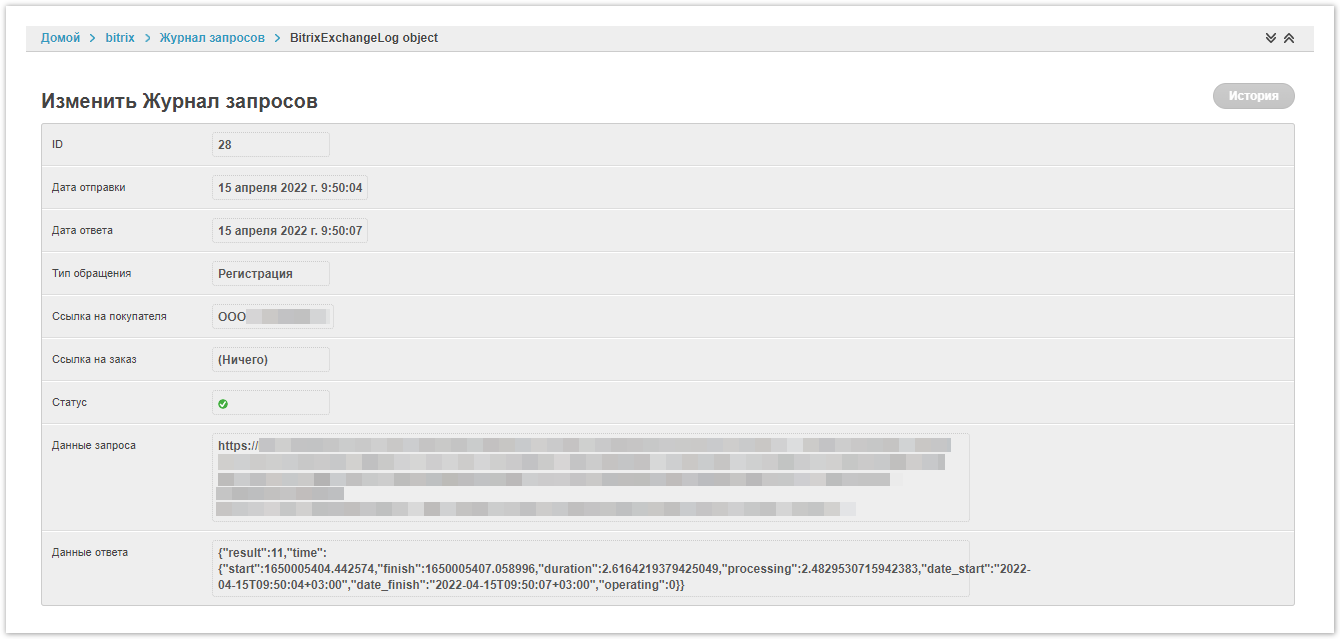
Если кликнуть по ID запроса, вы попадете на страницу с детальной информацией по запросу.
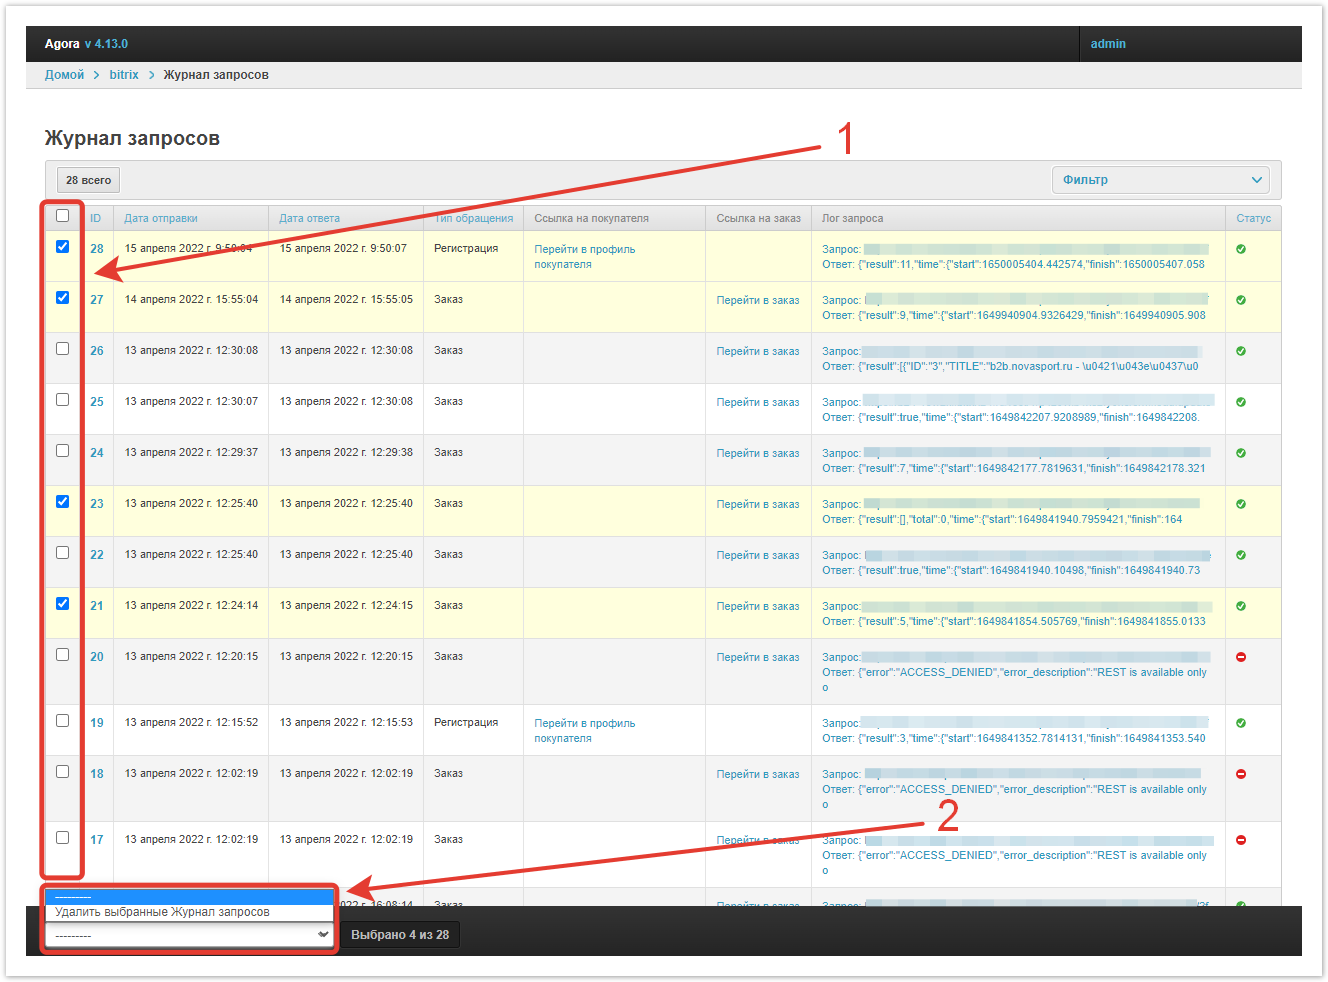
Также в таблице есть возможность выбрать несколько запросов и удалить их.
|


| Sv translation | |||||||||||
|---|---|---|---|---|---|---|---|---|---|---|---|
| |||||||||||
Create aninbound webhookintegrationTo set up the integration, go to the Integration with Bitrix24 → Integration settings section of the Agora administrative panel. A settings window will open in which you need to enter data.
Parts of the incoming webhook URL created in Bitrix24 should be inserted into the Bitrix24 Portal, Administrator ID and Webhook Key fields. To create a new webhook in Bitrix24, go to the section Приложения → Разработчикам → Другое → Входящий вебхук.
Applications → Developer resources→ Other → Inbound webhook.
In the window that opens, select CRM rights and copy the webhook URL from the field Вебхук для вызова field Webhook to call the rest api, (it will be used in further integration settings) and select CRM rights.
After completing the settings, Save the changes.
Then go Return to your Agora the admin panel , to the Настройки интеграцииsectionof the Agora project.
The previously copied URL must be broken into 3 parts and pasted into different fields:
Then check It remains only to set or leave empty the checkbox empty Отправлять вебхук о регистрации пользователя, choose Статус создания лида and Статус создания сделки — under which Send a webhook about user registration checkbox, select Lead creation status and Transaction creation status — at what order statuses in Agora will a the lead and deal will be created in Bitrix24, and then Сохранить.
Adding a TIN fieldTo start adding the The field TIN field , in the Лиды sectioncode in Bitrix24 is optional. To fill it out, you need to find the TIN field ID in your Bitrix. For this:
Adding a business process for leads in Bitrix24Next, you need to return to any Bitrix24 lead and go to the Роботы tab.
In the Качественный лид column, find the button in the Редактировать в дизайнере Бизнес-процессов and click on it.
The business process visualization window will open. To the already displayed scheme, drag to the arrow after the Начало block from the Конструкции tab the Условие block.
Then drag to the arrow after the right block Условие block Создание новой сделки from the CRM section.
Click on the icon
Click Сохранить.
In the right block Условие you need to specify:
Save changes.
The Создание новой сделки block should be filled in as follows:
Form settings must be Saved. After that, you need to Save the business process template itself.
Now the integration of Agora with Bitrix24 can be considered complete. It is ready for full-fledged work: a lead will be created when registering on the site and creating an order on the site, and a deal will be formed after payment. The webhook remains available until the administrator who created it is deleted.
Paste the received value into the field TIN field code in Bitrix24, save the changes.
Now the integration of Agora with Bitrix24 can be considered complete. The webhook remains available until the administrator who created it is deleted. Query LogThe section displays the history of Bitrix REST API interactions with the Agora system. To access it, click on the Query Log button in the Agora administration panel.
In the table that opens, you will see the columns:
Clicking on a request ID will take you to a page with detailed information about the request.
It is also possible to select multiple queries in the table and delete them.
|


| Sv translation | ||||||||||||||||
|---|---|---|---|---|---|---|---|---|---|---|---|---|---|---|---|---|
| ||||||||||||||||
Crie uma integraçãoPara configurar a integração, acesse a seção Integração com Bitrix24 → seção Configurações de Integração do painel administrador do Agora.
Uma janela de configuração será aberta, na qual você precisa inserir os dados.
Nos campos do Portal Bitrix24, ID do administrador e do Webhook Key, partes da URL do webhook de entrada criado no Bitrix24 devem ser inseridas. Para criar um novo webhook no Bitrix24, acesse Aplicativos → Recursos para desenvolvedores → Outros → Webhook de entrada.
Na janela que abre, copie a URL do webhook do campo Webhook para API REST de chamada (ela será usada em configuração de integração adicional) e selecione os direitos de CRM.
Quando as configurações estiverem concluídas, salve as alterações.
Retorne ao painel administrativo do projeto Agora. A URL copiada anteriormente deve ser dividida em 3 partes e colada em diferentes campos:
Em seguida, defina ou deixe em branco o Enviar um webhook sobre o registro do usuário, selecione Status da criação do lead e Status da criação da transação — no qual os status do pedido agora criarão um lead e um acordo no Bitrix24.
O campo TIN em Bitrix24 é opcional. Para preenchê-lo, você precisa encontrar a Código do campo Tin em Bitrix24. Para fazer isso:
Cole o valor resultante no campo de código de campo Código do campo Tin em Bitrix24, salvo as alterações.
A integração da Agora com o Bitrix24 agora pode ser considerada completa. O webhook permanece disponível até que o administrador que o criou seja excluído. Registro de consultaA seção exibe o histórico de interações da API Bitrix REST com o sistema Agora. Para acessá-lo, clique no botão Solicitar log no painel administrativo do Agora.
Na tabela que abre, você verá as seguintes colunas:
Se você clicar no ID de solicitação, você será levado para uma página com informações detalhadas sobre a solicitação.
Também na tabela há a oportunidade de selecionar várias consultas e excluí-las.
|


