...
| Sv translation | |||||||||||||||||||||||||||||||||||||||||||||||||||||||||||||||||||||||||||||||||||||||||||||||||||||||||||||||||||||||
|---|---|---|---|---|---|---|---|---|---|---|---|---|---|---|---|---|---|---|---|---|---|---|---|---|---|---|---|---|---|---|---|---|---|---|---|---|---|---|---|---|---|---|---|---|---|---|---|---|---|---|---|---|---|---|---|---|---|---|---|---|---|---|---|---|---|---|---|---|---|---|---|---|---|---|---|---|---|---|---|---|---|---|---|---|---|---|---|---|---|---|---|---|---|---|---|---|---|---|---|---|---|---|---|---|---|---|---|---|---|---|---|---|---|---|---|---|---|---|---|
| |||||||||||||||||||||||||||||||||||||||||||||||||||||||||||||||||||||||||||||||||||||||||||||||||||||||||||||||||||||||
One of the advantages of P2P procurement is the ability to set up status and role models for approving applications and orders. Using a BPM designer allows you to quickly implement and adapt the client's business logic. This speeds up the approval process, minimizing bureaucratic delays, which helps reduce the procurement cycle time. The system supports complex approval scenarios with control of approval limits, as well as parallel and sequential routes, providing flexibility and accuracy in procurement management. This tool significantly reduces implementation time and allows you to make changes without significant rework, which protects the financial interests of the company and adapts to its needs In addition, thanks to P2P procurement, your company will be able to flexibly manage the acceptance of goods and services. The system allows both full and partial acceptance, which helps adapt to changing needs and optimize supply processes. This means less chaos and more structure in your procurement. Let's consider the available functionality in more detail.
Role model
Globally, all users can be divided into Buyers and Suppliers within the platform. Let's consider what main roles and settings are available for each type of user. BuyersRoles
All new purchasers registered on the platform are assigned the Initiator role by default. A platform user has the ability to delegate their authority to work in the AGORA system to another user for a certain period. The following rights are delegated:
In addition, you can completely reassign Orders, Receipts and Tasks for approval to another user. You can delegate or reassign rights only if the employee's grade is higher than or equal to the grade of the user whose rights are being delegated. The exception is the Financial Controller role, which can delegate rights to an employee with any grade. In addition, any user can create and configure reports in personal settings. This means that you can set a schedule for automatically sending reports at a specified time and date so that all selected recipients receive the necessary information in a timely manner. You can also customize the notifications you receive from the platform depending on the event. You can choose where exactly you want to receive notifications: in the AGORA system, to your email address, or both. This will allow you to stay up to date with important information in the format that is most convenient for you. List of the main purchaser notifications:
SuppliersAfter registration, the supplier user gains access to the platform functions depending on their role. As a rule, suppliers view and approve current orders, check their status, and participate in spot events. The supplier receives the following main notifications:
Roles
Purchase Request - PRTo create an order, the user must first create a request and send it for approval. The items in the request can be either selected from the catalog or written in free form if the required item is not in it.
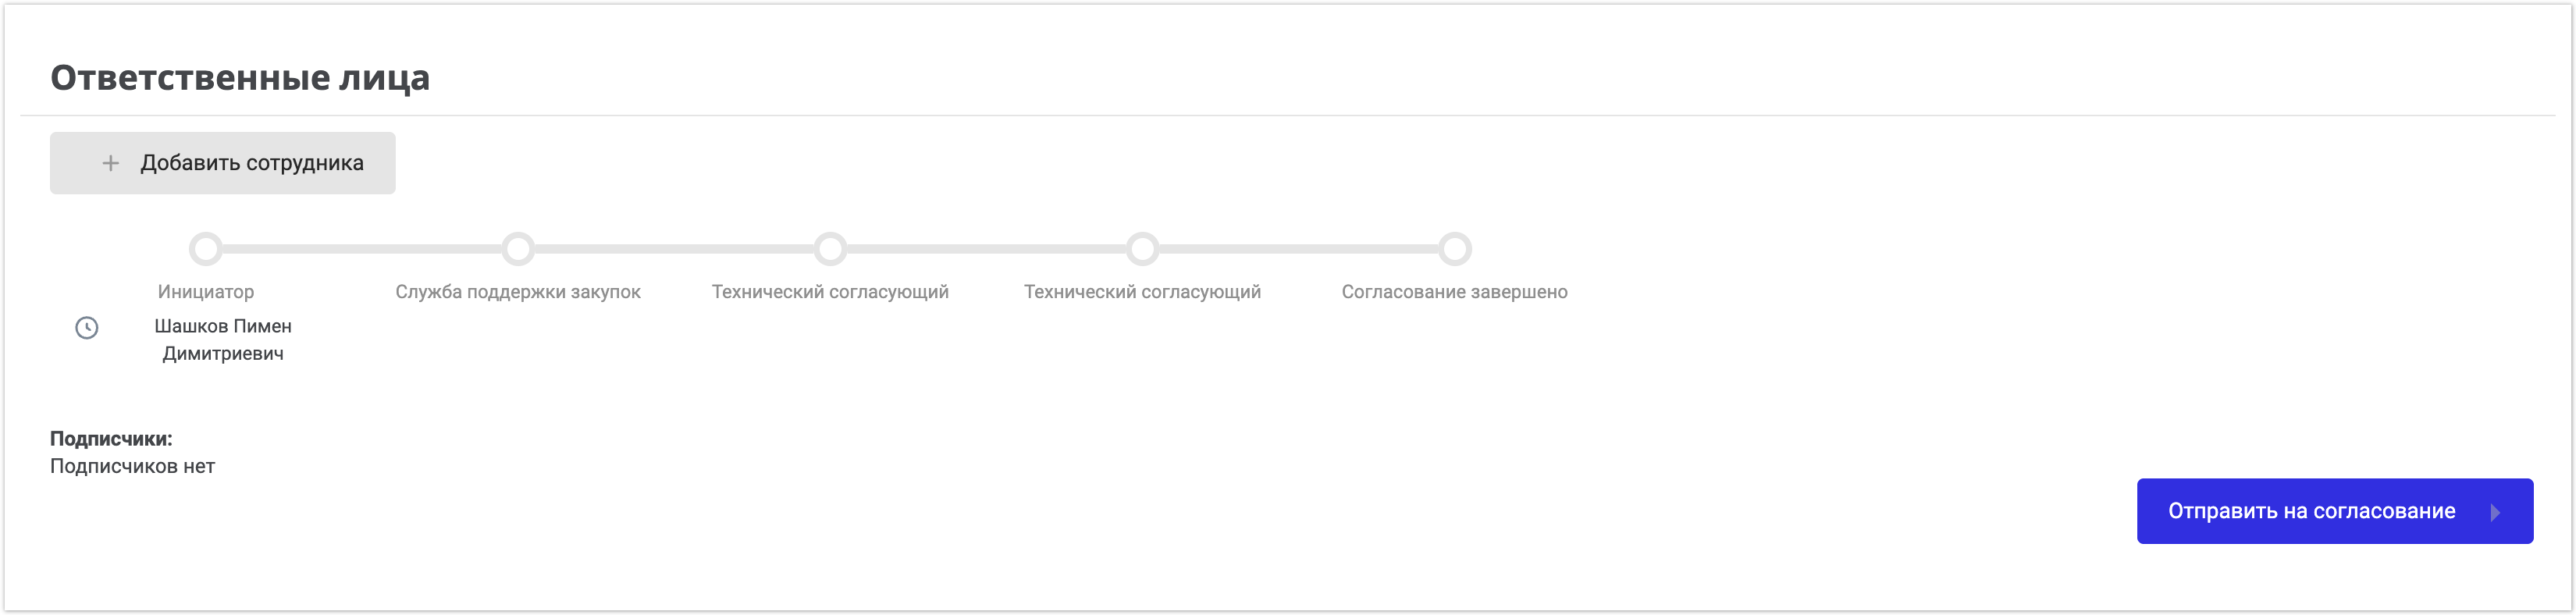
To start creating an application, you need to fill in all the required fields of the form. Once all the required fields are filled in correctly, your application will be ready to be sent for approval. The approval chain is automatically generated as the application is filled in. This means that the system itself determines which steps and who exactly should review your application next. When you are sure that all the information is entered correctly and the application is ready to be sent, simply click the Send for approval button. This will start the process of checking and approving your application by the responsible persons.
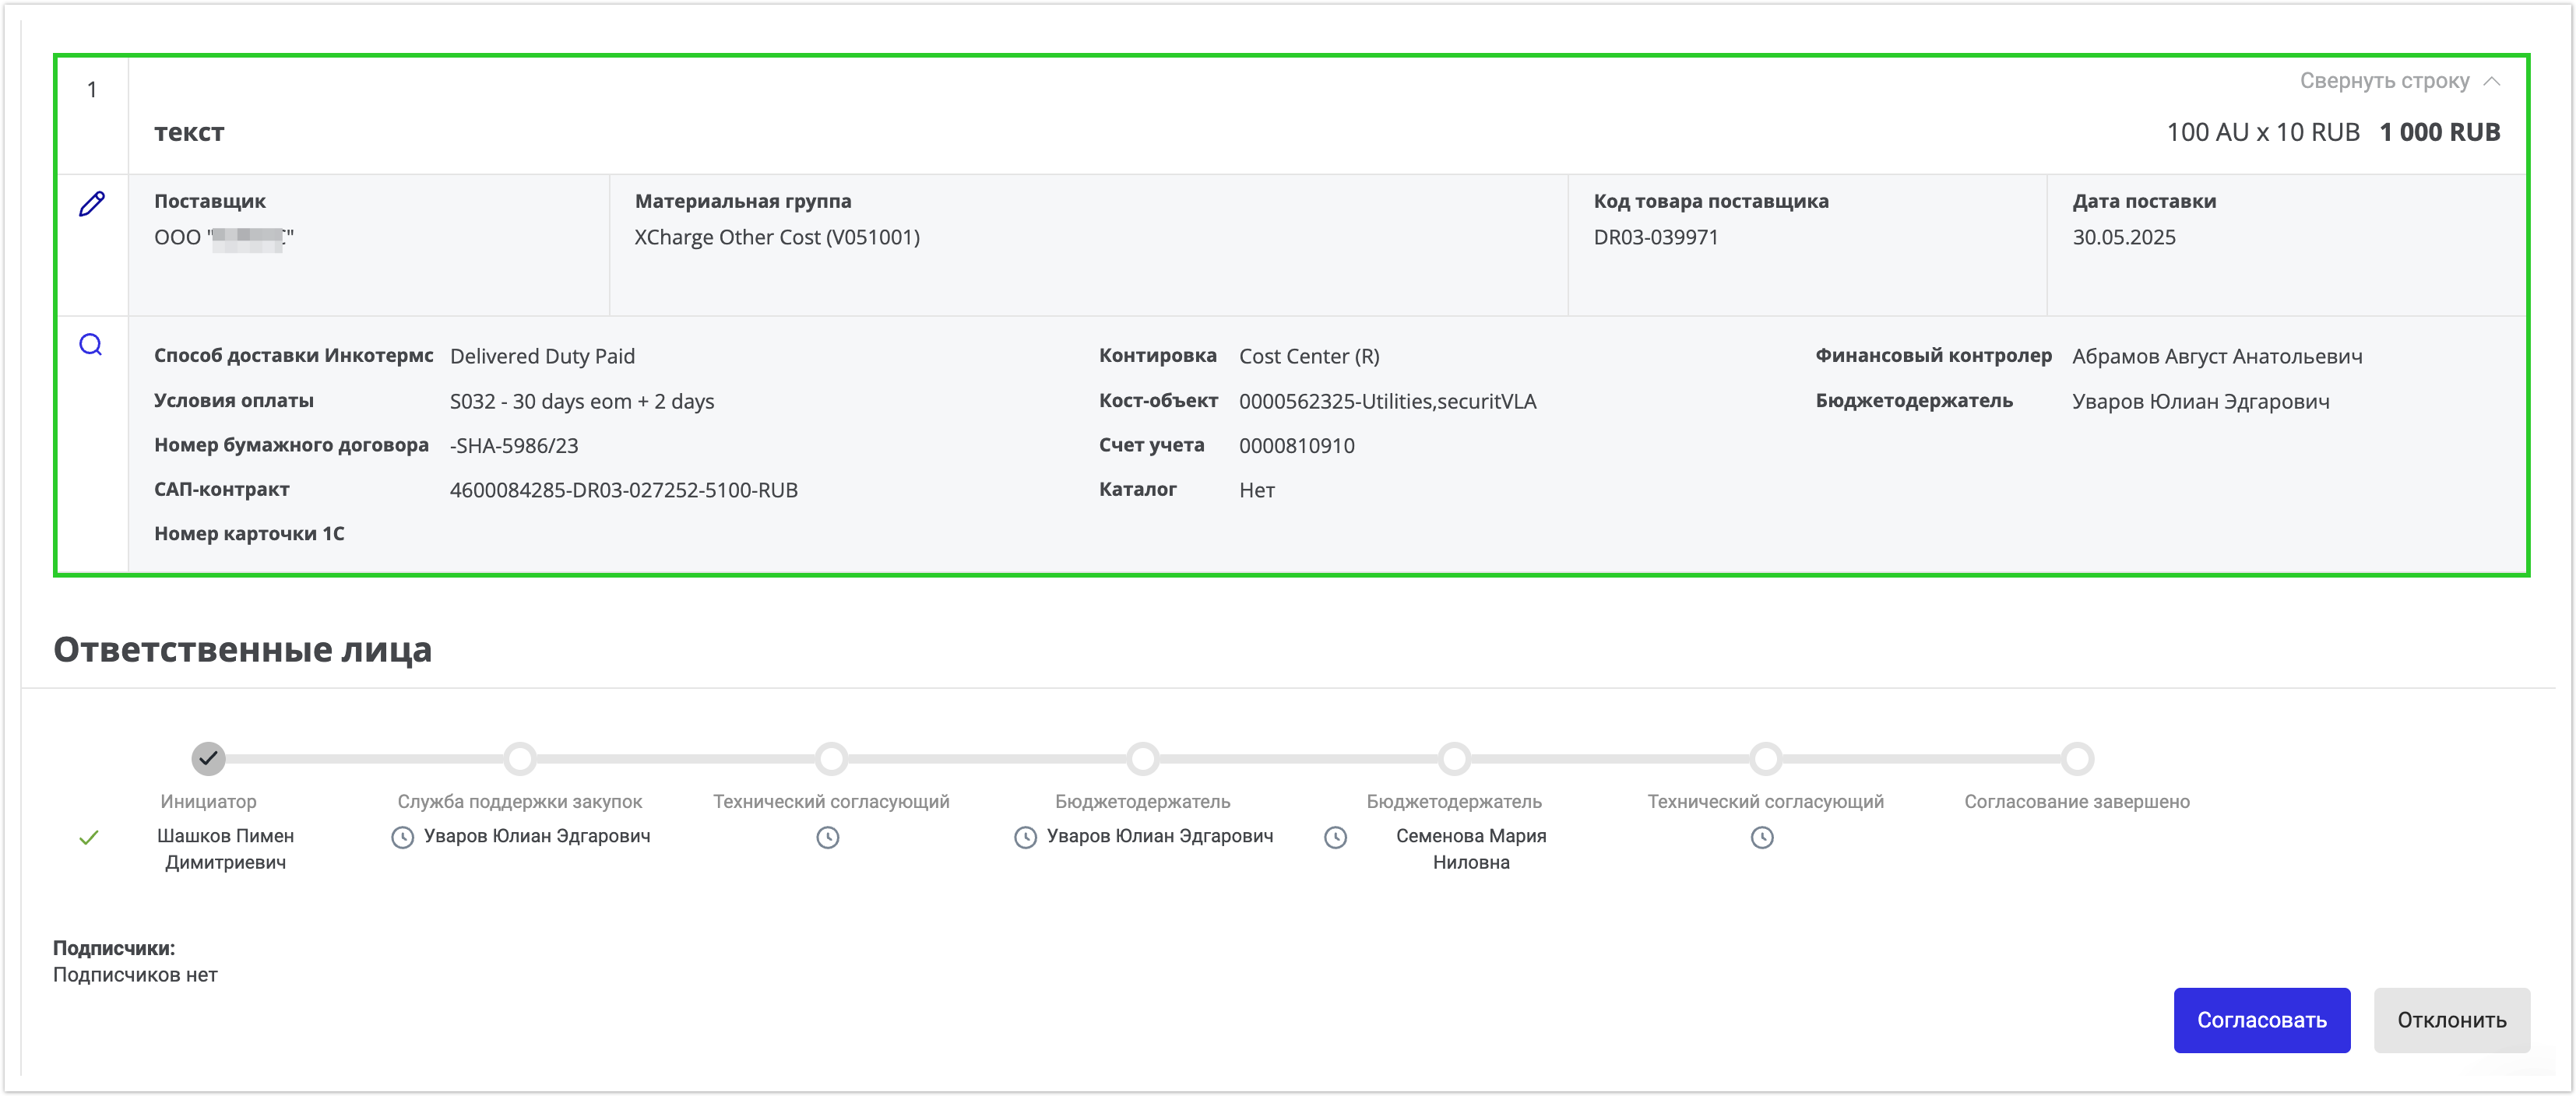
In addition to creating a request from scratch, you can also copy a request from one that has already been created. When copying, a Draft request is created with all the data that was transferred from the copied request. PR approvalThe approval chain is formed automatically based on grades, approval limits, and the use of catalog and non-catalog items in the application.
After successful validation, the application is considered approved, on the basis of which order(s) are created. The number of orders depends on the contracts used when forming the application. To approve the application, the approver must open the application on the platform and click Approve or Reject depending on the desired result.
Purchase Order - POCreating a POTo create an PO, you must first create a PR indicating the required items. The creation of a request was described above. After the request has been successfully approved, orders will be created for it. The number of orders depends on the contracts used in the request. Immediately after the order is created, the system performs the following actions: • Sends the purchase order to the ERP. After the goods or part of them have been received for the Order, a Receipt can be created on this basis. We will consider the creation of receipts below.
Change POChanging an order is available to users with the roles of Initiator and Procurement Support Service: procurement process group. Changing an order is available if all of the following conditions are met:
Changing the Quantity of goods in a completed order, where an investment order is selected in the order line in the payment information (the name of the cost object begins with @) is available to users with the role of Initiator and P2P Procurement Support Service.
After saving the changes, the order will go back to approval. The exception is when, after changing the order, the amount has decreased relative to the agreed amount or increased by no more than 5%. In these circumstances, a new version of the order is created, and the updated order is sent to the supplier in the form of a modified printed form. Cancel POAn order can only be cancelled if no GR has been created for it. This functionality is available to users with the role Purchase Support Service: Purchasing Process Group. This restriction helps ensure order in the purchasing process and eliminates situations where orders are cancelled after goods or services have already begun to arrive. Closing POThis functionality is available to users with the following roles:
Order closure is available for the following statuses:
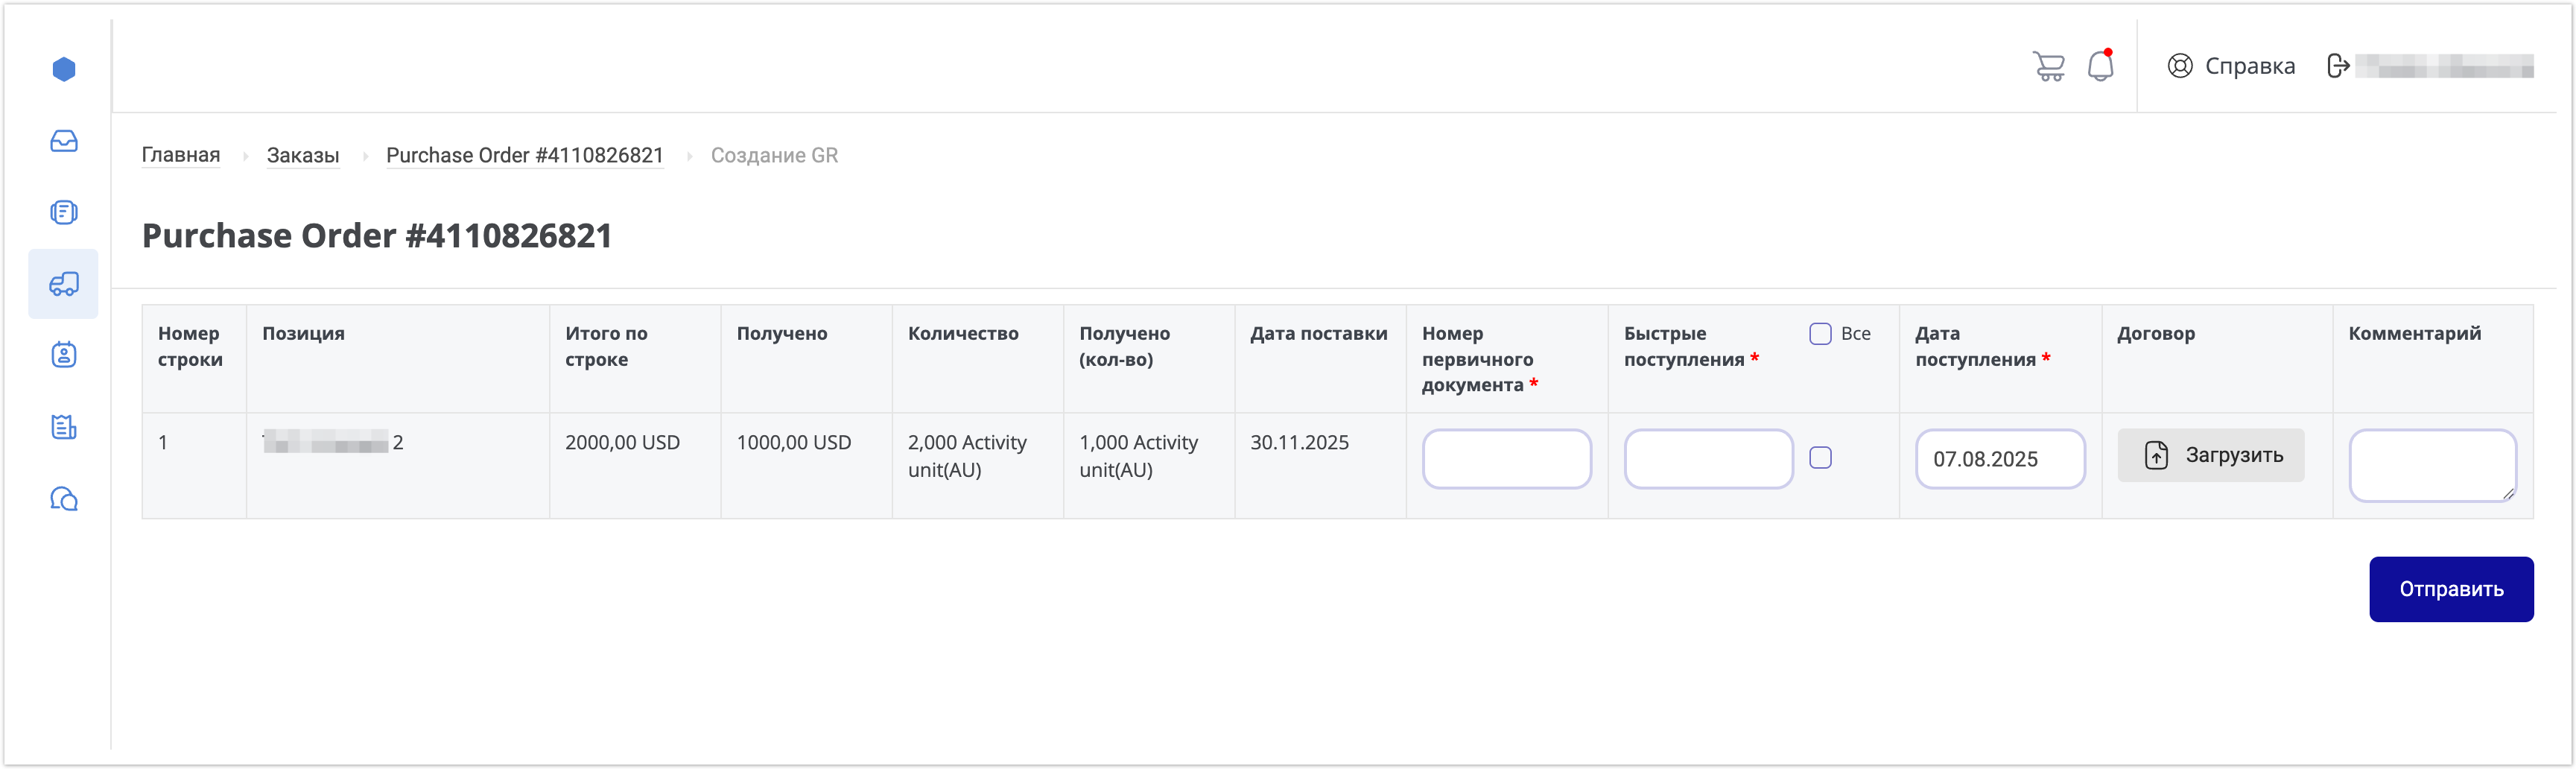
Order closure can be performed either manually or automatically, after a specified time interval from the set delivery date. Goods Receipt -GR
Once the order has been successfully transferred to the ERP and is in the Sent status, a receipt can be created for it.
If an error occurs when creating a receipt, the error is recorded in the ERP integration log and is visible in the history of changes to the GR and PO.
Receipt creation rules:
Cancellation of GROnly a user with the role of Procurement Support Service - Procurement Process Group can cancel a receipt. When you start the process of canceling a receipt, the system will ask you to specify the reason for the cancellation and enter a comment for more detailed information about the reasons for this action. It is important to note that the receipt is cancelled for the full amount, which ensures that the financial obligations associated with this receipt are completely eliminated. After cancellation, the receipt information is transferred to the ERP system to record the changes. In response, the ERP will return a document number to the platform confirming the transaction. This ensures transparency and allows users to easily track all changes that occur. Contract with supplierA supplier contract is a formal agreement between a Buyer and a Supplier that sets the terms of delivery of goods or services. It also specifies such aspects as payment terms, delivery terms, and the overall monetary limit of the contract. An important element of the contract is the possibility of exceeding the established monetary limit, if this is implied by the terms of cooperation. When a PR is approved, its amount is added to the total Amount of all orders under the contract. Then, when a specific item in the Order (PO) is closed, a recalculation takes place. The difference between the amount of this item and the amount of all posted receipts is released, increasing the available funds under the contract. The general formula for calculating Free Funds in a contract: This allows you to understand how much money is still available for use under this contractual obligation. CatalogsIn the Catalogs section, you can view available items from supplier catalogs. These items are directly linked to a specific Supplier and their Agreement, making it easier to find the goods or services you need. You have the following options:
These features make catalog management more efficient and flexible, providing easy access to current offers and terms of cooperation. Creating a catalog itemCreating a catalog item is available to users with the Purchasing Support Service (P2P) role - supplier data master group.
After filling in all required fields and saving, the created product will be displayed in the list of products in the Catalog section. Import directory from fileCatalog import is available to users with the Purchasing Support Service (P2P) role - supplier data master group.
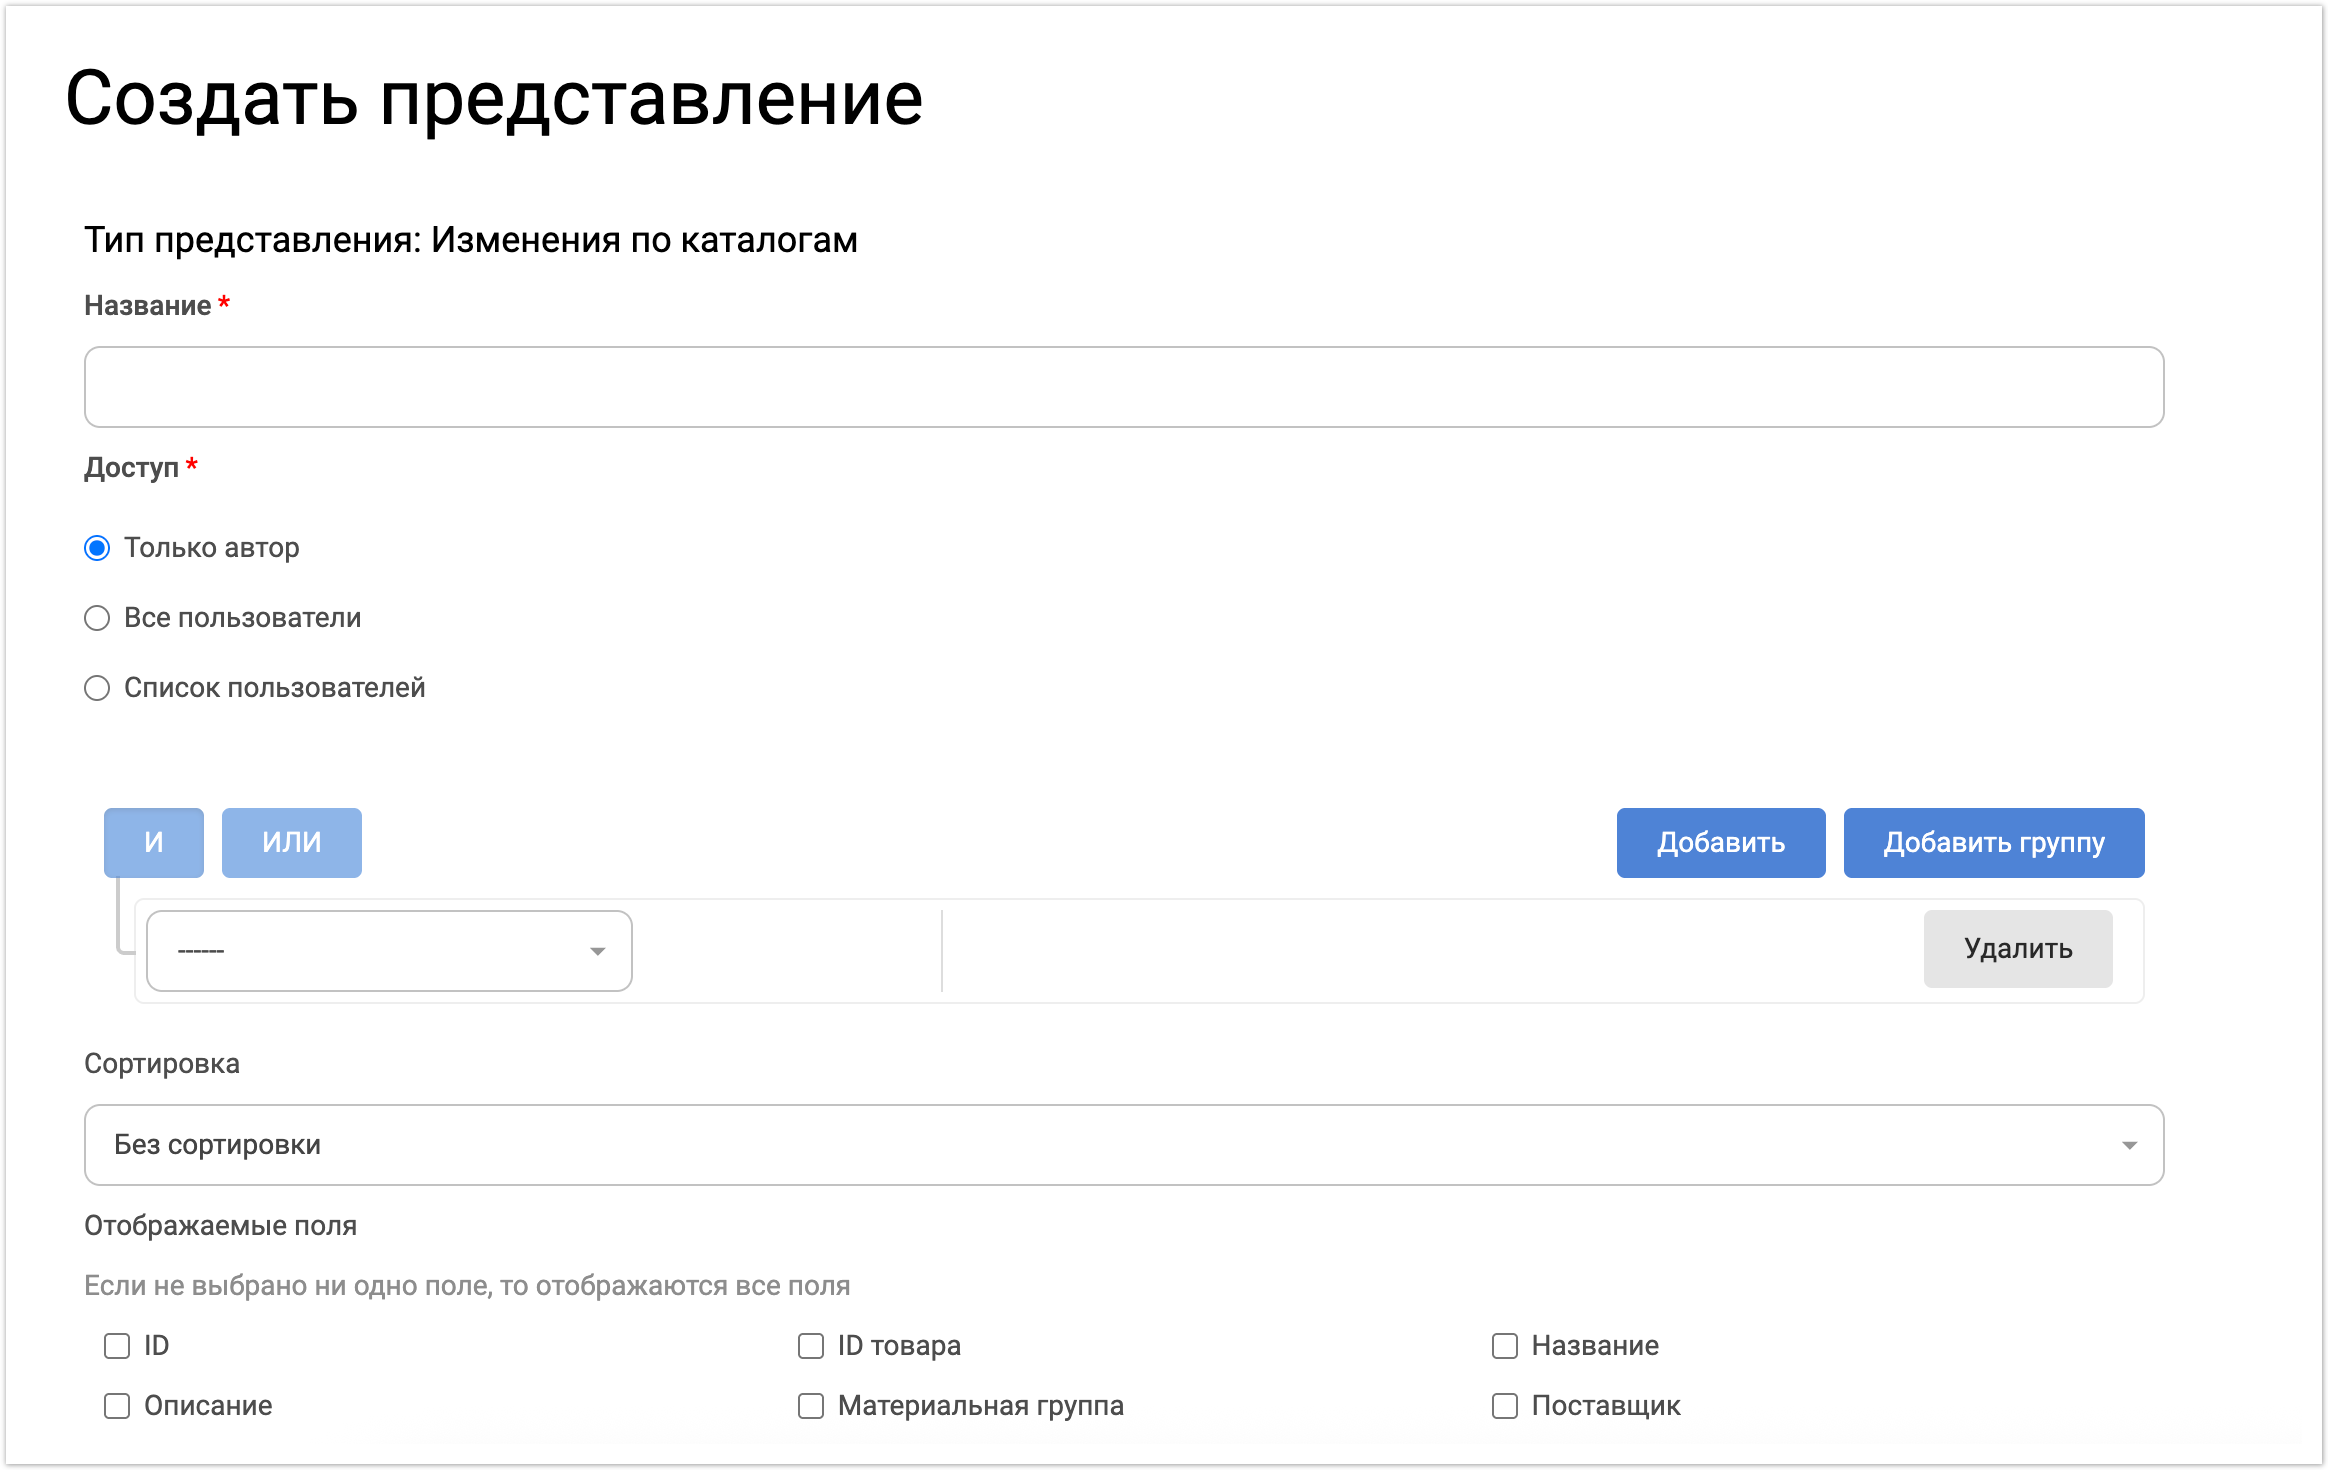
After successful import, the products will be displayed in the product list in the Catalog section. PresentationsViews are a tool specifically designed to simplify searching and filtering data on the platform. They are based on Elasticsearch technology, which allows users to flexibly configure filters depending on your needs and tasks. In other words, you create a view - a ready-made set of filters and save it, and then you can conveniently filter data by this view and not waste time setting manual filters when searching. Views are actively used in the following sections:
This tool allows you to reduce the time it takes to find the information you need and helps you work more productively with data on the platform. Thanks to the capabilities of Elasticsearch, views provide high speed and accuracy of search. Creating a ViewTo create a view, you need to click the New View button and fill in all the required fields for the search query: Using the viewTo apply a view, you must select the desired view from the drop-down list.
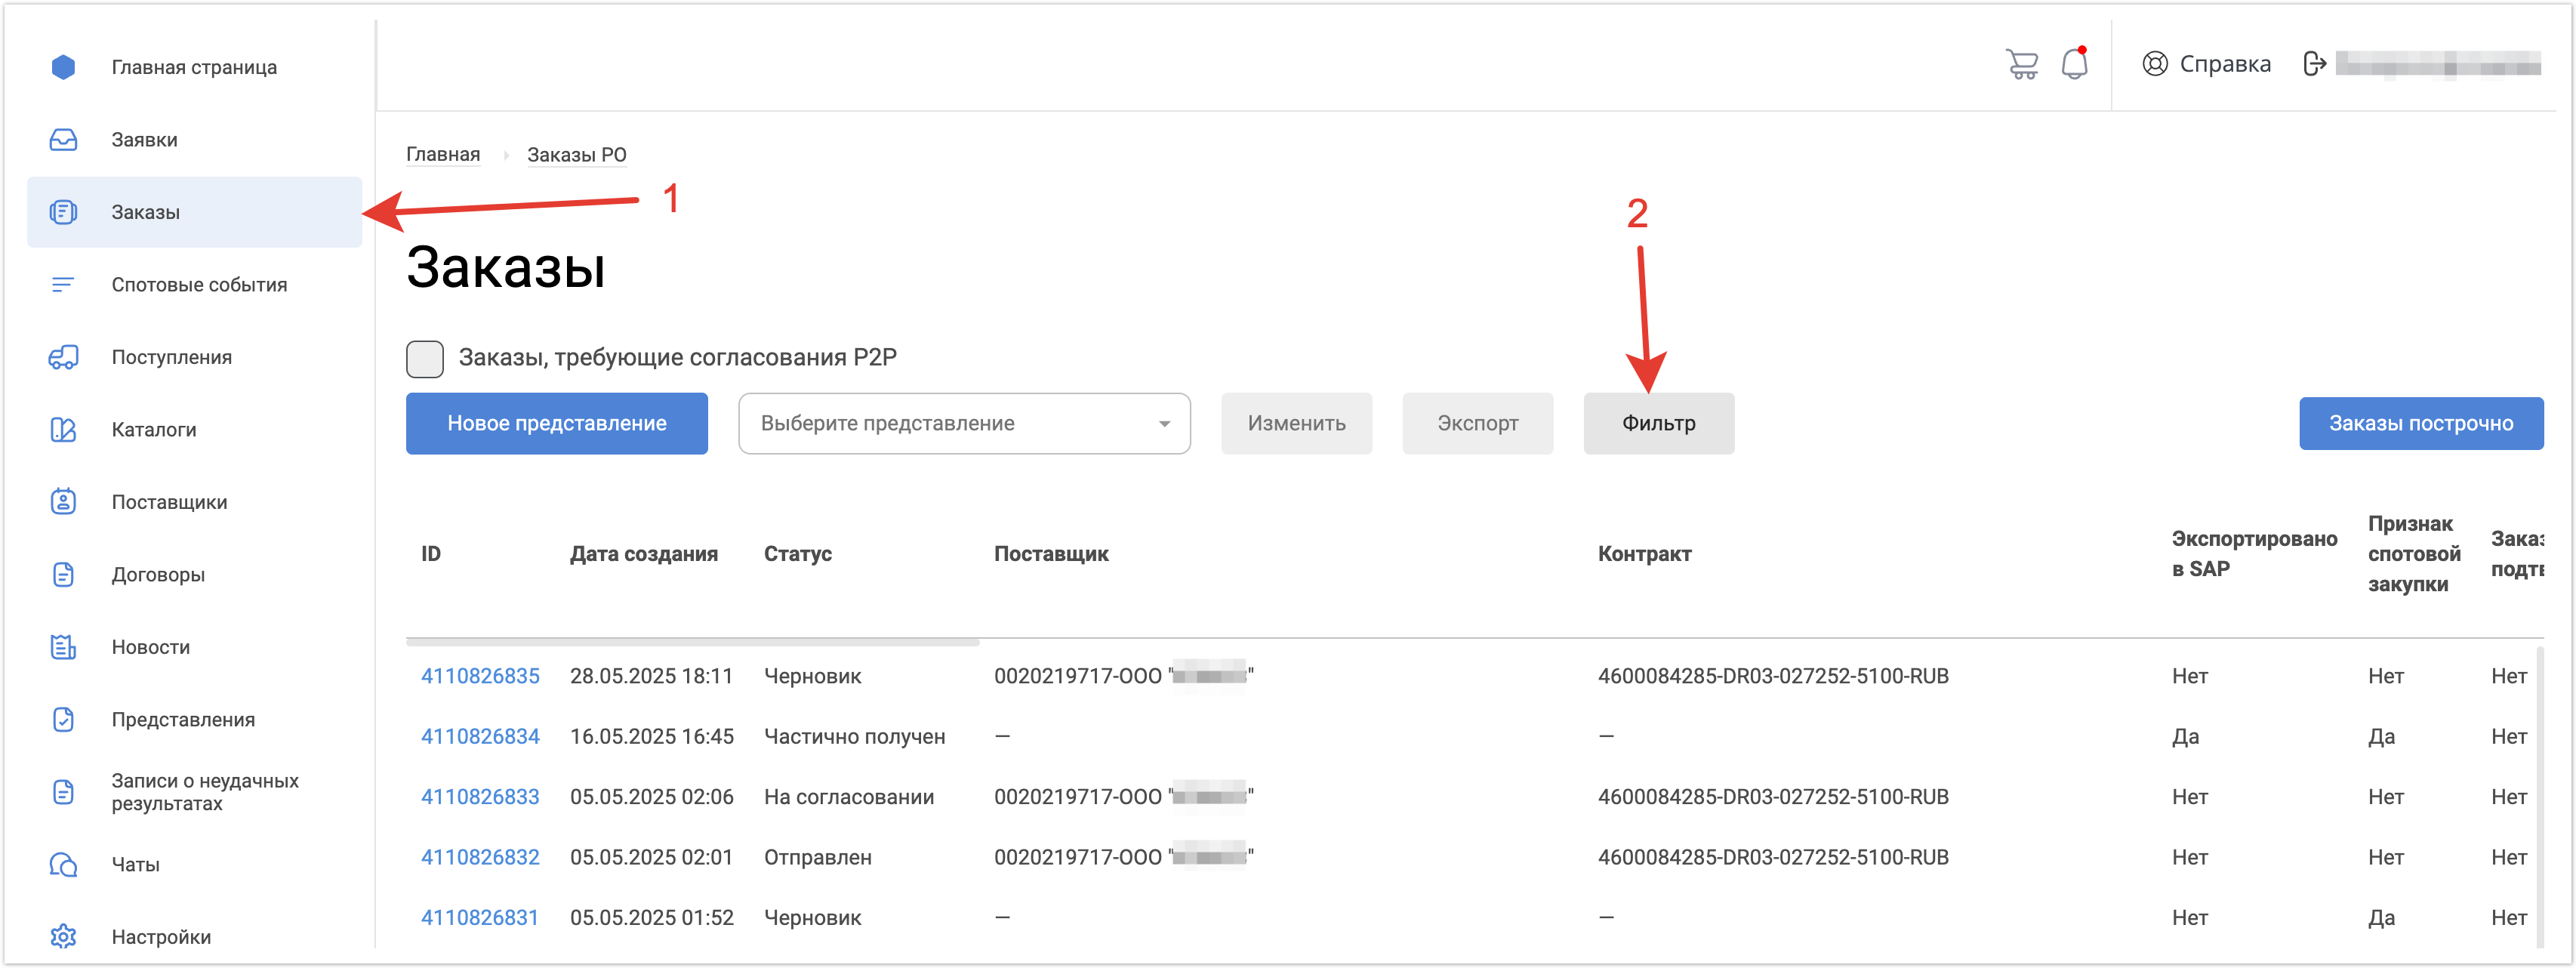
After selecting a view, the list will immediately be filtered according to the specified parameters. Using a filterIf you need to filter data without using views, you can use the Filter function. It can be used both with a selected view to refine the selection, and without it. To specify a Filter, you need to:
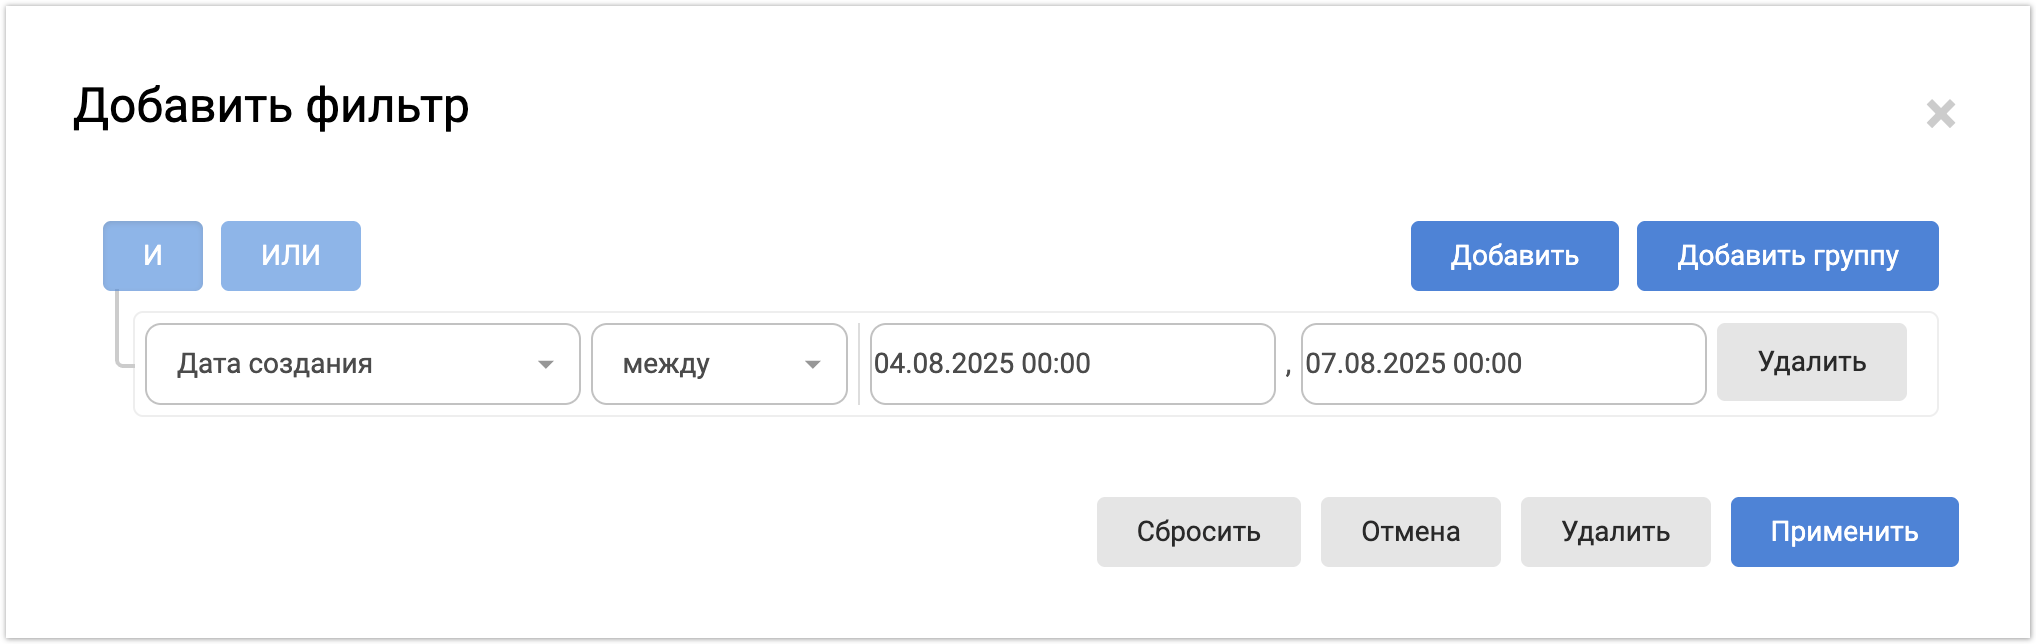
3. In the filter, configure the required selection parameters and click Apply. |